Busha’s Spaetzle


Homemade Spaetzle
Spaetzle are easy to make little dumplings that can serve as the noodles in all sorts of dishes. The dough is a thick batter, dropped into boiling water, and cooked until the spaetzle float to the top and simmer for 5 minutes or so. They come out in all sorts of shapes, which adds to the charm.
Spaetzle can also be served as a side dish. Serve as is, or you can brown them in a little butter first.
I added my spaetzle to Polish mushroom soup. They work great as a “noodle” in soups.
I love to make homemade pasta. Spaetzle really area type of pasta and so much easier to make. No rolling out and cutting. They make a quick and tasty side dish for roasts of all types.
I do have a spaetzle maker, which is a fun little device. It has holes for the batter to fall through and a sliding container for the dough, so it falls into the boiling water in pretty even amounts. I’ve been know to just put the dough in a strainer and press it through, or to use a cheese grater. The things we do when we have to improvise. My Busha just put her dough on a cutting board and used a knife to cut little bits of dough off and push them into the water. I remember watching her do that. She was so fast. My mom made them the same way.
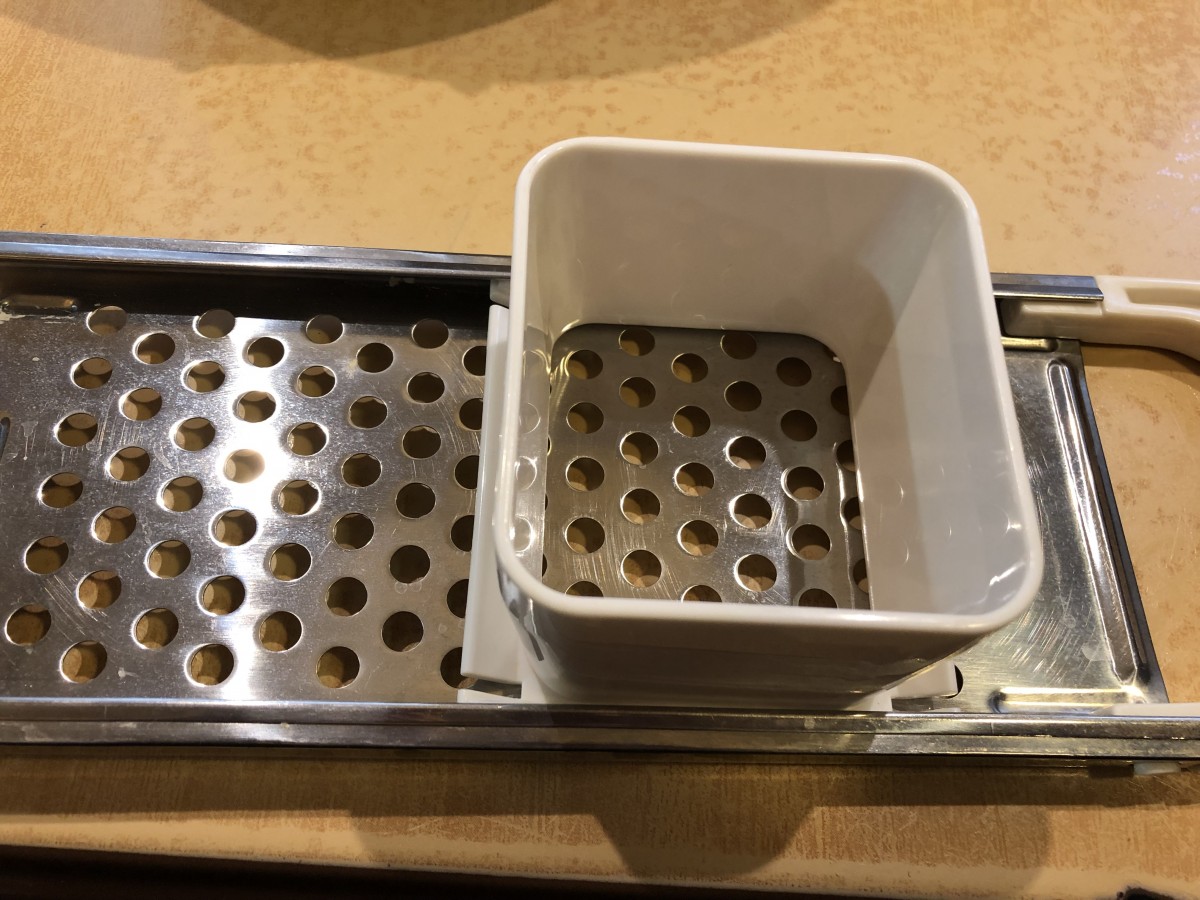
Spaetzle Maker
So here is the recipe I use. Simple, fun and fast.
Homemade Spaetzle
3 eggs
1/2 c. half and half or evaporated milk
1/2 t. salt
1 1/2 c. flour
Combine all ingredients and let rest 30 minutes. Drop by small spoonfuls into boiling water. Cook until they float and puff up, about 5 minutes. Serve with soups, stews sauces. You can toss them with a little butter. I sometimes heat butter in a pan and brown them up a little. You can also add some fresh, chopped herbs to the batter.
Chicken Florentine


Chicken Florentine
I love spinach. I always have, even when I was a kid. My Mom used to make Pork Chops Florentine and it was one of my favorite dishes. She had to add more spinach to her recipe because I loved the spinach so much.
Chicken Florentine is a favorite of mine. It is a simple dish to prepare, too. Great for a weeknight, when you might not have a lot of time to get dinner ready. It is also special enough to serve to company. The most difficult part is getting all that spinach in the skillet.
A pound sounds like too much spinach, but trust me, it is the right amount. The spinach cooks down so much, you need more than you think.
The hardest part of making this dish is just getting all the spinach in the skillet. Don’t try to get it in all at once. As you add the spinach, it will cook down a lot. As the spinach wilts, keep adding more, until it is all in.
I served the Chicken Florentine on its own, but you can serve it over rice, pasta or potatoes. You can also cook it longer to thicken the sauce more, if that is how you prefer it.
I used boneless chicken breasts, because that is what I had. Boneless thighs work great in this dish, too.
So here is the recipe. I hope you give it a try. It is an easy way to get a lot of leafy greens in your diet, for sure.
Chicken Florentine
2 T. oil
1 c. sliced onion
1½ lbs. boneless chicken
Flour
Salt and pepper
1 c. chicken stock
½ c. half and half or milk
¼ c. sherry
1 lb. fresh spinach, washed
In large skillet, oven medium high heat, heat oil. Add onions and sauté until golden. While onions are cooking, season flour with salt and pepper. Dredge chicken pieces in the seasoned flour. Add chicken to the skillet. Cook until chicken is golden on both sides, turning once. Add stock, half and half and sherry to the skillet and bring mixture to a simmer. Add the spinach, a few handfuls at a time, until it wilts and will fit in the skillet. The spinach wilts down a lot. Turn down heat to medium and cook until spinach is cooked down, stirring to get spinach mixed in. Cook a few minutes more so sauce will reduce and thicken a little. Add more salt and pepper to taste, if needed. Serves 4.
Rainbow Vegetable Pasta

Rainbow Pasta
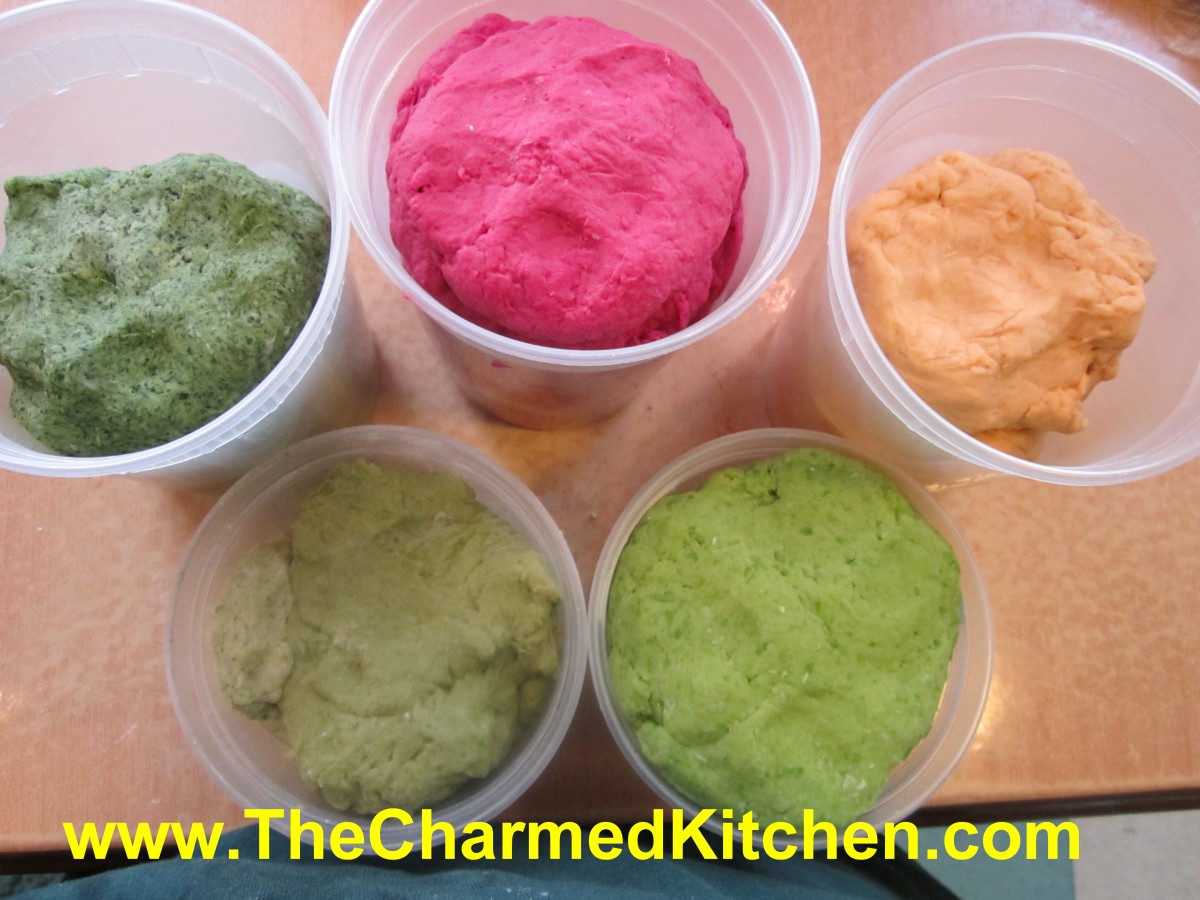
I love the taste of homemade pasta and I particularly like the colors and tastes of veggie pastas. Veggie pastas are sometimes a little softer than egg pasta and benefit from being mixed with some egg based pasta, for strength and ease of rolling. You can also use herbs and spices to flavor and color the dough.
I take pieces of several different doughs and roll them together. As you roll the dough out the colors blend together and create rainbow pasta. You can use sheets of the dough to make rainbow ravioli or just cut into noodles.
I often use a food processor to make pasta dough, especially the vegetable pastas because I am using vegetables that need to be pureed, pretty much. I have a small one which is perfect for small batches, no more than 1 cup of flour. I often use my stand mixer for larger batches and for egg pasta dough. Always best to make pasta dough at least 30 minutes ahead and let it rest before rolling. You can even make it the day before and chill until ready to use.
Basic Homemade Pasta
3 c. flour, more if using electric pasta machine. See note.
1 1/2 t. salt
4 eggs
Water, if needed
Mix flour and salt and stir in eggs, kneading until dough is smooth and elastic. Dough will be very stiff. Add a little water if needed to hold dough together. You may wish to mix the dough in a mixer or food processor. Cover dough and let rest 15-20 minutes before rolling. Under kneading your dough will result in coarse, crumbly pasta. This batch makes about 1 pound. Serves 4-6.
Roll dough out on well floured board or in pasta machine (non-electric) until desired thickness in reached. Add flour as needed to prevent sticking. Cut into strips or whatever shapes are desired. Pasta can be hung to dry or separated and allowed to dry flat on a table. When pasta is not hanging to dry it must be turned occasionally to dry evenly. Although you may hear otherwise, homemade pasta, even when dried, should be frozen for long term storage. Storing at room temperature can lead to spoilage. Fresh pasta can also be stored in the refrigerator for a day or two.
Note: All electric pasta machines vary slightly and you should use their recipes as much as possible. Still, for most models, adding 1/4 c. flour for each cup in a hand rolled recipe works the best. Also recipes that contain seeds and vegetables may clog an electric pasta maker. Follow your manufacturer’s instructions.
These are smaller batches which can be mixed in a processor or by hand. If you want to mix a vegetable based pasta by hand, puree the vegetables first.
Curry Pasta
1 c. flour
1 t. curry powder
1 egg
1-2 T. water, if needed
Carrot Pasta
1 c. flour
1/2 t. dried dill
1/3 c. carrot puree
1-2 T. water, if needed
Beet Pasta
1 c. flour
1/2 t. dill
1/3 c. beet puree
1-2 T. water, if needed
Spinach Pasta
2 c. flour
1 10 oz. package frozen spinach, cooked, drained, reserving some of the liquid
Mix this dough as for other pastas, but don’t be too quick to add reserved liquid. While kneading you’ll get water out of the spinach. May require more kneading and rolling than other pasta doughs. Be patient, it’s worth the work.
Broccoli Pasta
1 c. flour
1/2 c. broccoli puree
Cheese Ravioli Filling
4 oz. cream cheese, softened
2/3 c. shredded mozzarella cheese
2/3 c. ricotta cheese
1/3 c. grated Parmesan or Romano cheese
Combine all ingredients well and chill until needed.
Roll a batch of dough into a rectangle, 18×12 inches and 1/16 inch thick. Arrange well rounded teaspoonfuls of the cheese filling two inches apart on the pasta sheet. Roll out additional dough into an 18×12 inch rectangle. With a pastry brush moisten bottom sheet of pasta around edges with water. Place second sheet of pasta on top, using fingers to seal the dough around the edges of the filling. With a pastry wheel or sharp knife, cut between the ravioli to separate them. You should have 24 ravioli.
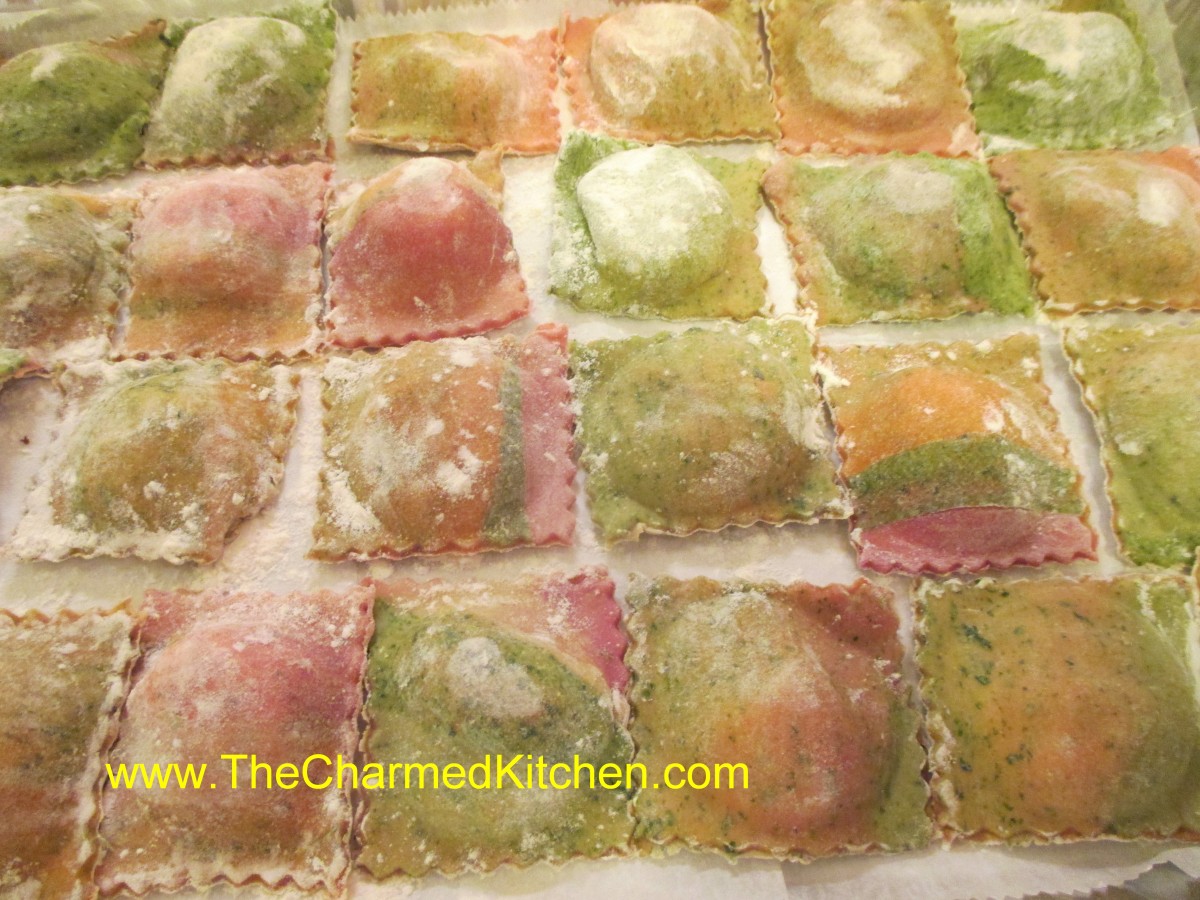
Rainbow Ravioli
Why I Love Parsley

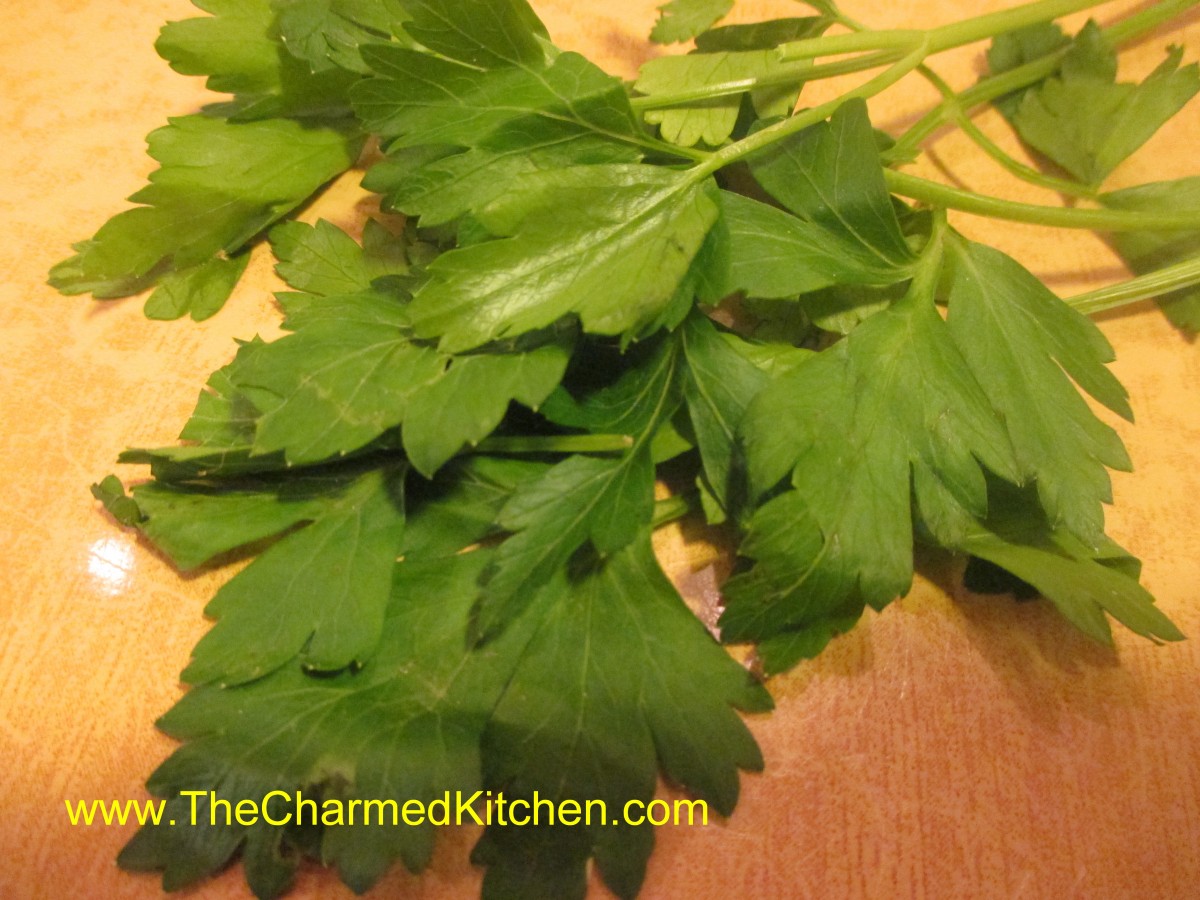
Italian Parsley
Parsley is one of those herbs everyone seems comfortable using- and with good reason. The clean, green flavor goes well with so many foods. Even people who rarely cook with herbs, seem OK using parsley. Because it is used so commonly, I think it often gets overlooked. Parsley is loaded with Vitamin C and chlorophyll for starters. It is also easy to grow.
While thought of as more of a garnish by some, the flavor can often brighten up a dish. Parsley goes well with meats, veggies, pasta, rice and more. I sometimes use it as a base for pesto. It is also essential to add when making soup stocks.
Since the leaves are so tender- you don’t need to cook it to use it. In fact, you should be careful not to overcook it in dishes. Adding chopped parsley right at the end of cooking, most times, is best. It will add a fresh flavor and a burst of green color to your food.
There are three main types of parsley- the flat leaved or Italian parsley. This is the best one for cooking. It has so much flavor. There is also the curly leaved type. This one is cute and often best suited for garnish. Tasty, but not nearly as much flavor as its flat leafed cousin. The third type is root parsley. This one produces a pretty big tap root that is great for using in soup stocks. The plants are dug up and roots are used fresh- or frozen for later use.
Here are some recipes featuring parsley.
Parsley Linguine
Parsley Pasta- Linguine
1 c. flour
2 T. chopped fresh parsley
1 egg
1 T. oil, (optional)
2-4 T. water, if needed
Combine the ingredients in a food processor, then let the dough rest before rolling. Once you are ready to roll out your pasta, the shape is up to you. You can hand roll the pasta, and cut into noodles. I use a pasta maker to roll the dough, and then a cutting attachment for linguine. Fresh pasta cooks fast. Cook in boiling water 1-2 minutes. Drain and toss with butter, oil, or your favorite sauce.
Zucchini Soup with Herbs
2 medium onions, chopped
2 T. oil or butter
2 qts. chicken or vegetable stock
6 cups cubed zucchini
¼ c. raw brown or white rice
2 T. flour
1T. oil
½ c. fresh chopped parsley
2 T. fresh basil, chopped
1 t. oregano
½ t. thyme
salt and pepper to taste
Sauté onion in 2 T. oil or butter until slightly browned. Add stock, zucchini, and rice. Simmer until rice is cooked, about 40 minutes for brown, or 15 – 20 minutes for white rice. In small bowl combine flour with remaining oil and blend until smooth. Add a little hot soup and whisk until smooth. Pour flour mixture into the soup then add herbs and other seasonings. Simmer for 3 – 4 minutes and serve. Serves 6 – 8.
Parsley Potatoes
2 lbs. potatoes, I prefer Yukon Gold or red-skinned
2-3 c. chicken or vegetable stock
4 T. butter or oil
½ c. fresh chopped parsley, or a bit more to taste
Salt and pepper to taste
Prep potatoes: Peel potatoes, if desired. Large potatoes can be cut into quarters, medium potatoes in half. Small potatoes can be left whole. You want them in chunks about 2 inches in size. Place potatoes in a pot with the stock. Over medium heat, bring to a simmer. Cook, uncovered, until the potatoes are tender and most of the liquid is cooked off. Reduce heat so they don’t scorch. Add butter, parsley and seasonings and cook over low heat until the butter has melted. Adjust seasonings and serve. Serves 6.
Grow Your Own
Lets look at growing parsley for a minute. Parsley likes a sunny location, but will tolerate some shade and does very well in pots and hanging baskets. Its fern- like leaves can be planted among flowers and look quite nice.
Parsley is a biennial. That means it produces only leaves the first year. The second year it makes flowers and seeds, then dies. For my part of the world that means I get a harvest of parsley leaves all summer long. Right up until frost I am harvesting. When Spring arrives it sprouts early, with beautiful leaves. Soon after it will produce flowers and seeds. Since I know the plant is going to die anyway I harvest all the leaves that second year – as soon as they start emerging – and freeze and dehydrate them for later use. This gives me a great harvest early in the year.
General Use
Parsley holds most of its flavor when dried and freezes great, too. In milder climates, parsley may defy the odds and produce for a third year, before making seeds.
Don’t discard those stems, either. While the leaves and small stems are chopped up for fresh eating, the stems can be used to flavor stocks. I often freeze them- then add to the pot when making a stock. Too tough for eating, they are still full of flavor and are getting strained out anyway.
The tradition of using a sprig of parsley to garnish a plate was not just to decorate the plate. It was placed there to be nibbled as a way to freshen your breath after dinner.
So don’t dismiss parsley as just a garnish. It really is a great, simple and clean tasting herb that can brighten up most any dish it is added to.
Lemons in the Snow

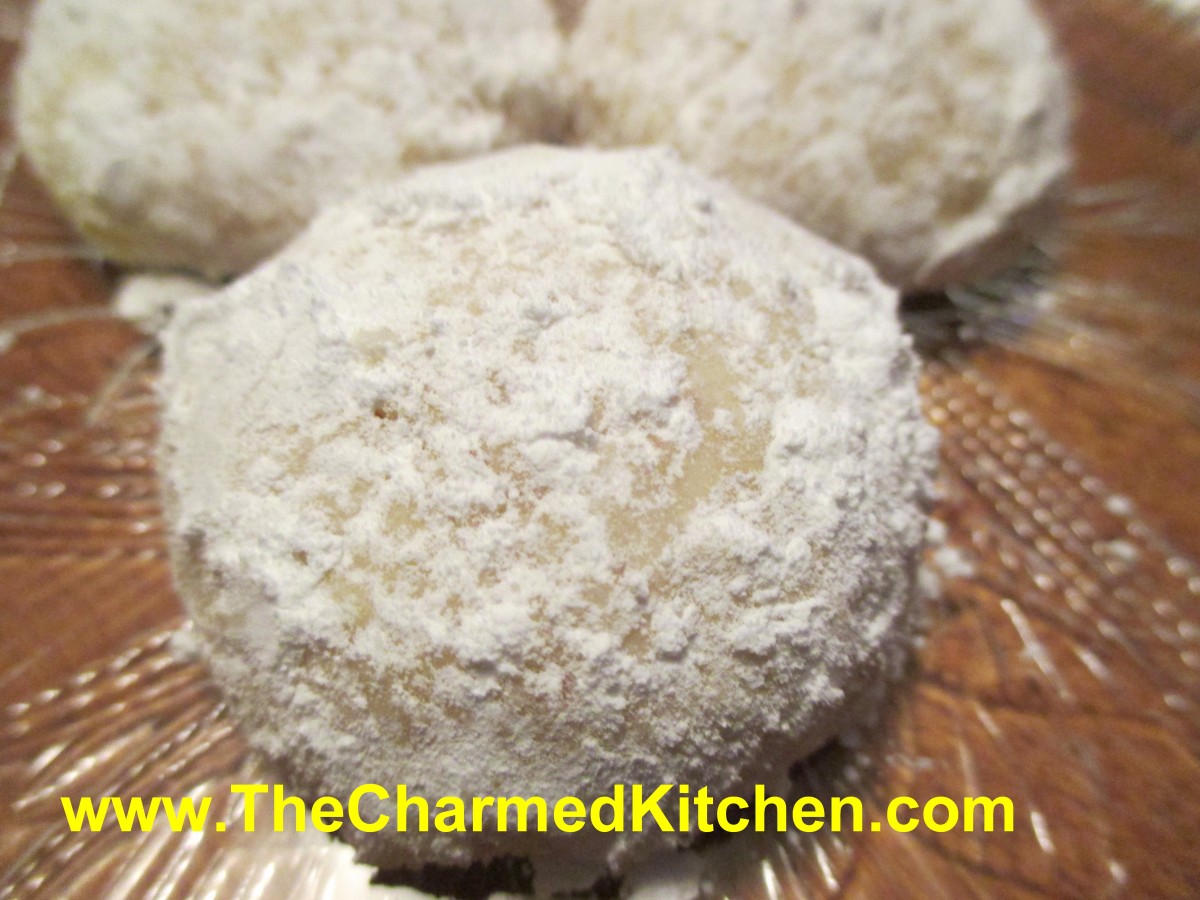
Lemons in the Snow Cookies
The funny name for these cookies is really easy to explain. The cookies are flavored with both lemon juice and lemon zest in the dough. When nearly cooled, the cookies are rolled in powdered sugar. They end up looking like little snowballs.
Yummy, lemon flavored snowballs.
The dough also contains finely ground almonds, for extra texture.
They are a delicate, cake like cookie, with a slightly crisp outside. You could also add a little grated lemon peel to the powdered sugar, before rolling the cookies in it, for a more intense lemon flavor.
Lemons at the market are beautiful this time of year. I love fresh lemon juice in beverages, salads and entrees. These cookies are just one more way to enjoy them.
Lemons in the Snow Cookies
1/2 cup butter (no substitutes), softened
2/3 cup sugar
1 egg
1/4 cup lemon juice
1 tablespoon grated lemon peel -or more if you like
1 3/4 cups all-purpose flour
1/4 teaspoon baking soda
1/4 teaspoon cream of tartar
1/4 teaspoon salt
1/2 cup finely chopped almonds
confectioners’ sugar
In a mixing bowl, cream butter, sugar and egg until well blended. Add lemon juice and peel. Combine flour, baking soda, cream of tartar and salt; stir into creamed mixture. Add almonds. Cover and refrigerate the dough for at least 1 hour or overnight. Roll into 1-in. balls. Place on ungreased baking sheets. Bake at 350 degrees for 10-12 minutes or until bottoms are lightly browned (cookies will not brown on top). Remove immediately to wire racks; cool for 5 minutes, then roll in confectioners’ sugar. Makes 36.
Mom’s Cornbread

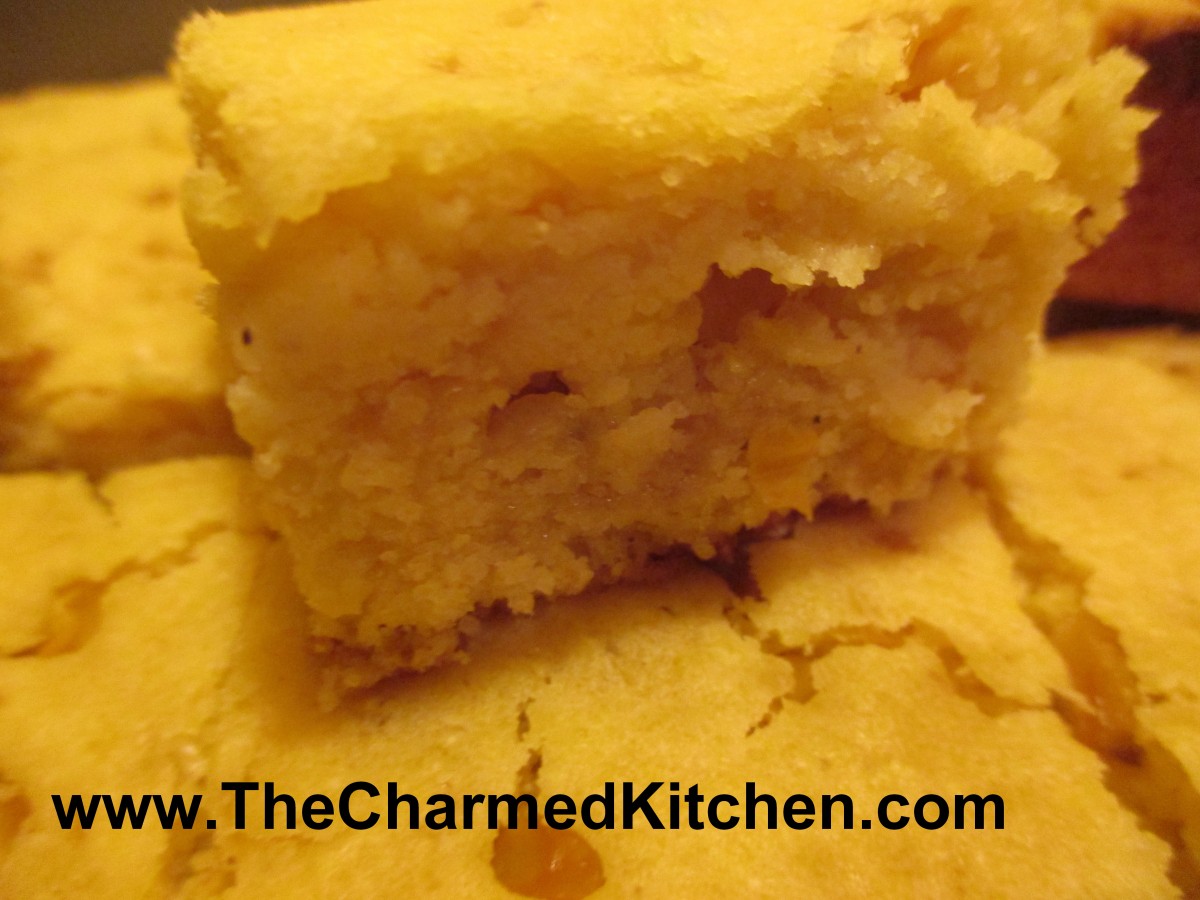
Mom’s Cornbread
I have made a lot of versions in cornbread in my life, but this one might just be my favorite. Perhaps because it is my Mother’s recipe.
Her secret? She put a layer of shredded cheese between layers of batter. She also added cream style corn to some of the batter.
You end up with a cornbread that is full of flavor. It is also very tender and crumbly, but not dry. I baked mine in a cake pan, but there is no reason you could not bake this recipe in cast iron, if you prefer.
I served this cornbread with a chicken-vegetable soup last night. I had a friend in for dinner. My friend loved it.
I was so pleased. I hadn’t made Mom’s version of cornbread in awhile. I will definitely be making it more often from now on.
Mom’s Cornbread
1 c. cornmeal
1 c. flour
2 T. sugar
4 t. baking powder
¾ t. salt
2 eggs
1 c. half and half
¼ c. oil- or melted butter or bacon fat
4 oz. pepper Jack cheese, shredded
1 c. cream style corn
Grease a 9-inch square pan and set aside. Preheat oven to 425 degrees. Combine dry ingredients in medium bowl, and set aside. In small bowl, combine eggs, half and half and oil and beat until smooth. Stir egg mixture into dry ingredients, stirring until combined. Don’t over-mix. Pour half of the batter into prepared pan. Sprinkle shredded cheese over the batter in the pan. Combine remaining batter with the cream style corn. Pour this mixture over the cheese in the pan. Bake 20-25 minutes. Serves 8-9.
Busha’s Beet Soup


Busha’s Beet Soup
This colorful, tasty soup, was first made for me by my Busha, my Polish grandmother. Beets are a big ingredient in Eastern European culture. My Mom cooked with them, too.
I have fond memories of spending time with my Busha. I stayed with her on weekends a few times. One of those weekends, she taught me how to make a wonderful coffee cake. I still have the index card where I wrote down the recipe as she went along making it. Busha didn’t write her recipes down much.
Another time, she made beet soup. I loved it. I think the color is what pulled me in. I was a big fan of pink back then. I still am, especially when it comes to this soup.
I prefer to use fresh, raw beets. You can use cooked beets, or even canned, if you like.
I make homemade spaetzle, but other pasta or cooked, diced potatoes are good, too.
So here is the recipe for the soup and the spaetzle. I always think of Busha when I make it.
Busha’s Beet Soup
1 large onion, sliced thin
oil
5-6 medium beets, about 2 pounds
5-6 cups beef, chicken or vegetable stock
1 c. dairy sour cream
1 t. dill weed
cooked spaetzle, recipe follows
In soup pot, sauté onion in oil until starting to brown. Meanwhile, peel and dice the beets. You should end up with 5-6 cups of cubed beets. Add beets and stock to pot and bring to boil. Cover and turn down to a simmer. Cook until beets are tender, about 20- 25 minutes. Place sour cream in small bowl and ladle in a little of the hot soup, whisking until smooth. Add another ladle of soup and whisk again. Pour this mixture into pot of soup along with the dill weed. Serve with the spaetzle. Serves 4-5.
Note: You can also pre-cook the beets or use canned beets. Trim off leaves of beets, leaving 2 inches of stem. Leave roots intact. Boil beets in water until tender, which can take as little as 20 minutes for tiny beets or 45 minutes for the large ones. Cool in bowl of ice water and then slip off the skins. Dice and add to soup as if the beets were canned. You don’t need the long cook of fresh beets. Just bring soup up to a simmer.
If you prefer, serve the soup with diced boiled potatoes or kluski, rather than the spaetzle.
You can serve the sour cream on the side, rather than incorporating it into the soup, then allow people to add a dollop of sour cream to individual bowls. Polish beet soup usually adds the sour cream and Russian style is to dollop on the top. Both versions taste good.
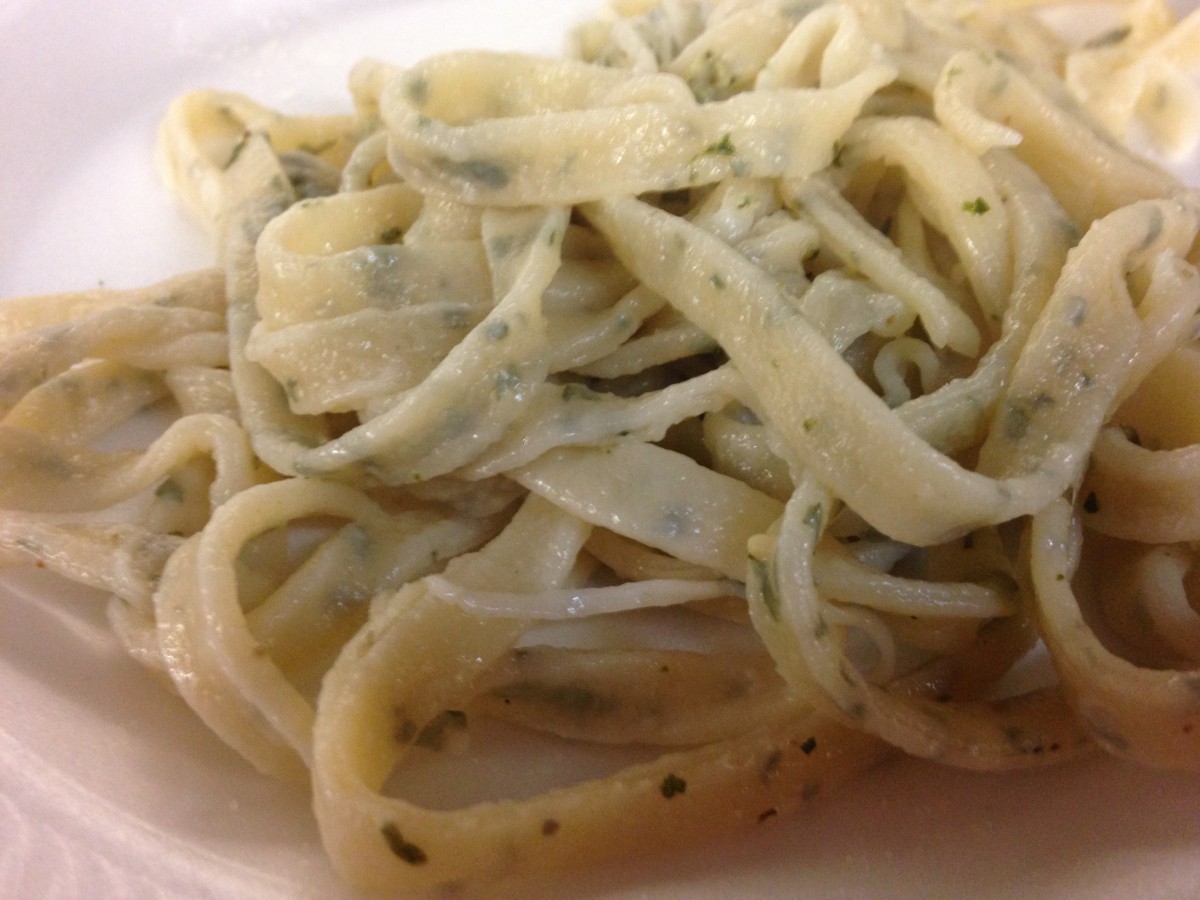
Spaetzle
3 eggs
1/2 c. half and half or evaporated milk
1/2 t. salt
1 1/2 c. flour
Combine all ingredients and let rest 30 minutes. Drop by small spoonfuls into boiling water. Cook until they float and puff up, about 5 minutes. Drain and serve with soups, stews, sauces or buttered.
Orange Tea Bread

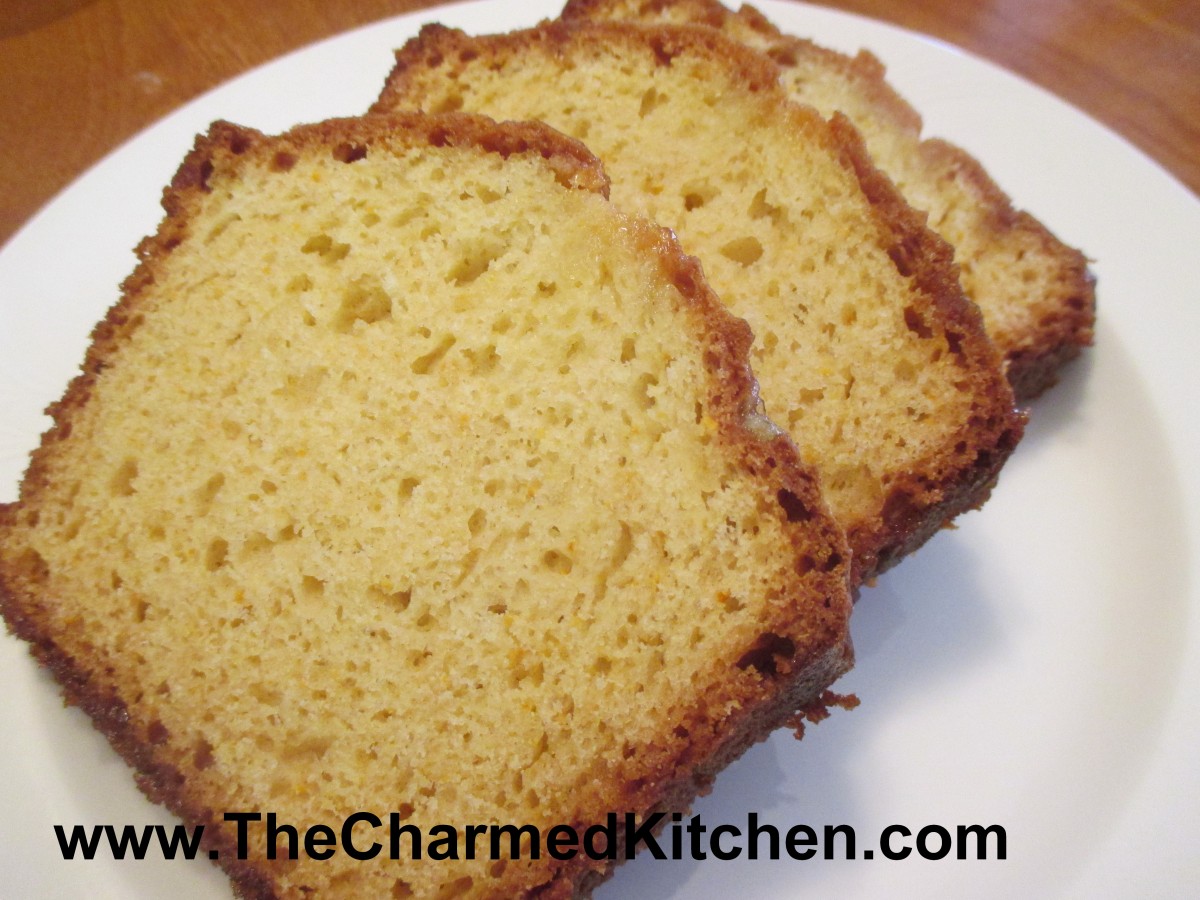
Orange Tea Bread
Winter is citrus season and I have been eating a lot of oranges lately. Besides eating them fresh, I also like to cook with oranges. If you are looking for a new recipe for a quick bread, and like oranges as much as I do, I would recommend trying this one.
The bread is flavored with orange zest in the batter, then a warm orange syrup is drizzled over the bread, right out of the oven. This makes for a bread that is flavorful and moist. It can be breakfast, a brunch dish or even a dessert, when topped with ice cream or whipped cream. The recipe makes one loaf, but I often double the recipe and make two. It seems to disappear around here pretty quickly. The bread freezes well, too.
Orange Tea Bread
2 cups all-purpose flour
1-1/2 teaspoons baking powder
1 teaspoon baking soda
1/2 teaspoon salt
2/3 cup Greek yogurt or sour cream
2/3 cup sugar
2 large eggs
3 tablespoons melted unsalted butter
1 tablespoon grated orange zest
Syrup:
1/2 cup orange juice
1/4 cup sugar
Preheat oven to 350 degrees. Grease an 8-1/2″x4-1/2″x2-5/8″ loaf pan. Line pan with wax paper or parchment and set aside. Sift flour, baking powder, baking soda and salt into a bowl. In a separate bowl, whisk together yogurt, sugar, eggs, butter and orange zest. Add liquid ingredients to dry ingredients, and stir mixture until well combined. Transfer batter to loaf pan, smoothing top, and bake in oven for 45 to 50 minutes, or until skewer inserted in middle comes out clean. While the bread is baking, combine orange juice and sugar in a saucepan. Bring mixture to a boil over moderate heat while stirring, and simmer for 1 minute. Keep syrup warm. Make holes in top of bread with a thin wooden skewer and drizzle with syrup. Let stand in pan until cool. Makes 1 loaf.
My Best Cauliflower Soup Ever!


My Best Cauliflower Soup
My friend Kim and I used to laugh about the covers of all the December issues of women’s magazine. They were lined up by the check-out at the grocery store. They always declared it was “The Best Christmas Issue Ever!!!” It was just something that struck us both funny.
When I made this soup, I knew it was extra good. A friend was over and I gave him a bowl to taste. He looked at me and said, wait for it…”This is the best cauliflower soup you ever made.”
I didn’t have a name for the soup yet, so I decided to call it My Best Ever Cauliflower Soup. I thought it was funny- I hope you do, too. It is also a nod to my sweet friend. Kim would have gotten the joke.
The soup lives up to its name. It has plenty of flavor, even without the toppings. With the toppings, it becomes something very special.
If you are looking for a really good and easy soup recipe- I suggest you give this one a try.
My Best Ever Cauliflower Soup
3 T. oil
1 large onion, chopped
1 small head cauliflower, chopped
1 qt. chicken stock, but you could use beef or vegetable stock instead
1 qt. canned tomatoes, I had home canned, you could use a 28 oz. can of tomatoes
4 ribs celery, chopped
2 potatoes, peeled and diced
2 T. curry powder, I used my homemade curry powder
2 t. turmeric
1 t. cumin
Salt and pepper to taste
Mushroom topping:
2 T. oil
1 onion, diced
1 lb. baby Portobello mushrooms, sliced
3 T. chopped parsley
Salt and pepper to taste
Additional toppings:
Green onions, sliced
Cashews, you could also use peanuts
Sesame oil
Heat oil in soup pot and cook onion until tender. Add cauliflower and cook about 5 minutes longer. Add remaining ingredients and cook, uncovered, until vegetables are very tender, about 30 minutes. While soup is cooking make mushroom topping. Heat oil in small skillet and cook onion until golden. Add mushrooms and cook until mushrooms are almost caramelized, about 10 minutes. Add parsley and cook a few more minutes. Set aside until ready to use. When soup is done, puree until smooth. To serve soup ladle some hot soup into a bowl. Top with some mushroom mixture and add a few green onions, cashews and a drizzle of sesame oil. Serves 6.
Swedish Limpa Bread


Swedish Limpa Bread
There is nothing better than the smell of fresh baked bread. This Swedish rye bread is a favorite of mine. It has a soft texture and makes great sandwiches. It also makes the house smell wonderful as it bakes.
The flavor in enhanced by a combination of caraway seeds and a little orange zest. It even makes wonderful French toast. My brother-in-law says it is just like the bread his Swedish mother made.
It is not like rye breads you might traditionally think of. Limpa is lighter in color and texture. It makes really great French toast, too.
I shape mine in two round loaves, but you can also bake this bread in loaf pans, if you prefer. If you want to use it for sandwiches, the loaf pans are probably a good idea. You can also shape the dough into dinner rolls, if you like. You will get 2-3 dozen rolls out of this recipe, depending on how big you make your rolls.
Swedish Limpa
6 ½ c. flour
2 c. rye flour
¼ c. brown sugar
2 t. salt
2-t. caraway seeds
2 t. grated orange peel
2 pkt. Active dry yeast
2 T. butter, softened
2 2/3 c. hot water (125-130 degrees)
Set aside 1-cup flour. Mix remaining flours and other dry ingredients in a large bowl. Add butter and water to flour mixture and stir to blend. Mix in enough additional flour to make a soft dough. Knead on a floured surface until smooth about 8-10 minutes. Place dough in oiled bowl turning to oil top. Cover and let rest in a draft free area until doubled, about 30 –40 minutes. Punch down. Divide dough in half and form into 2 balls. Place on greased baking sheet and cover until doubled in bulk, about 30 –40 minutes. Bake in a preheated 400-degree oven for 30 minutes or until bread sounds hollow when tapped lightly. Makes 2 loaves.
Note: you can also divide the dough and place in 2 (9×5-inch) greased loaf pans.


