Dressing Versus Stuffing

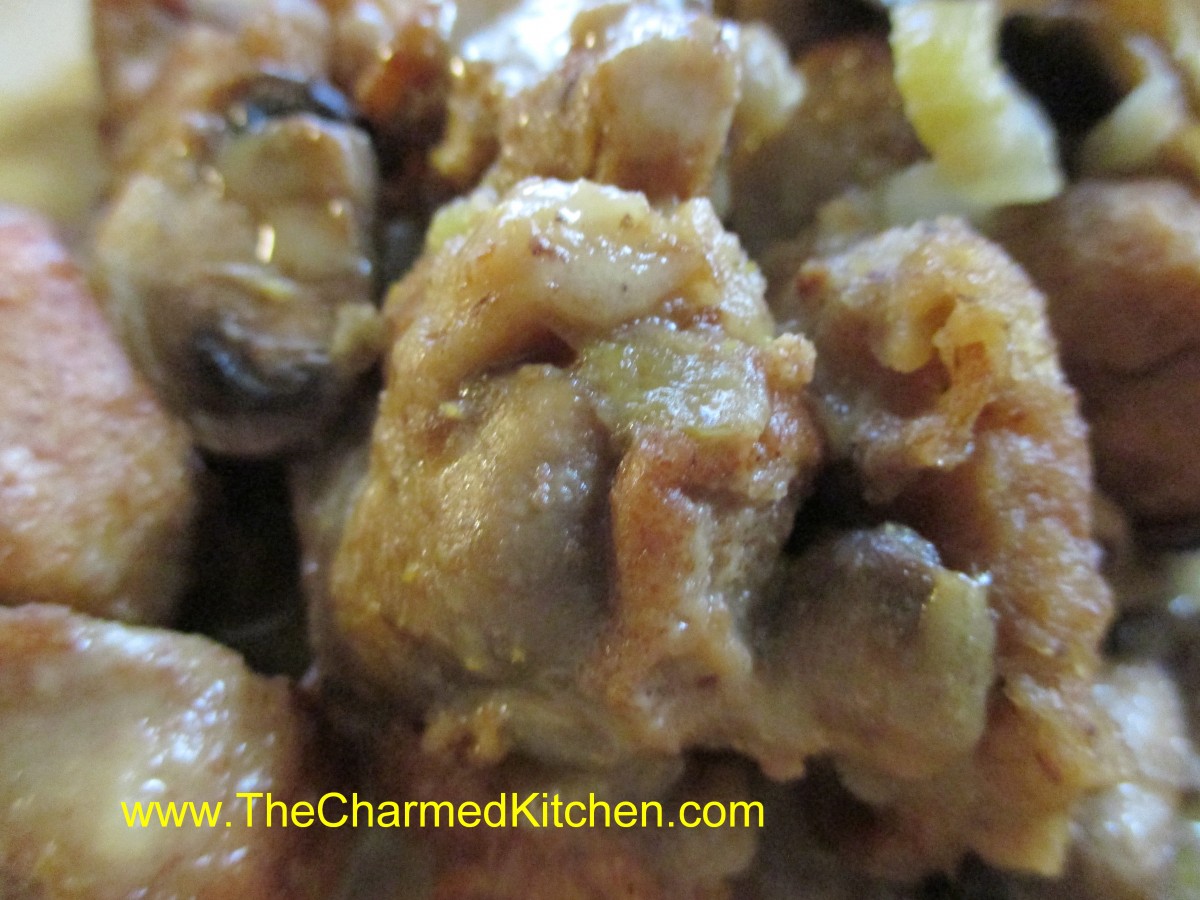
Mushroom Dressing
This time of year, everyone seems to be planning for Thanksgiving. Most of that planning is around the dinner. There are people who make stuffing and those who make dressing. The difference between the two, is where you cook it.
When you stuff the bird, it is stuffing. Cooked outside of the turkey, it is dressing. Over the years I’ve had a lot of variations on both. My Mom always bought Pepperidge Farm stuffing mix as a base. The she added onions, celery, sausage and sometimes mushrooms. She also made a pretty darn good cornbread stuffing. I tend to use a good quality bread, often homemade, that I toast and combine with veggies and stock and then bake as dressing.
I love stuffing, too. The only problem is that by stuffing the bird you must increase the cooking time to be sure the stuffing has reached a safe internal temperature ( 165 degrees). I prefer to stuff smaller birds, like chicken, where the cooking time isn’t as long. We always had stuffing when I was little. Eventually Mom switched over to dressing to make it faster to cook the bird. Keep in mind, my family normally had turkeys that weighed over 25 pounds. The cooking time for a stuffed bird of that size is pretty long.
There are also people who add eggs to their stuffing/dressing. That wasn’t something I’ve done. It is something I need to try at some point. The “eggers” swear by the moistness and texture of their recipe. I will admit to being intrigued.
So how do you make your stuffing/dressing? Eggs, no eggs? In the bird or out? I love to hear what others are doing. I have my recipe, which I will share with you, but I am open to trying something new.
Dressing/Stuffing
Basic Bread Stuffing/ Dressing
1 c. sliced mushrooms
¾ c. diced celery
3 T. minced onions
2 T. chopped parsley
4 T. butter or margarine
4-5 c. bread cubes
salt and pepper to taste
¼ – ½ c. turkey or chicken broth if making dressing
Sauté vegetables in butter until tender. Add bread and seasonings and toss to coat. Stuff into turkey just before cooking or add broth and place in covered casserole, cooking for 45 minutes to an hour at 350 degrees. When making stuffing allow ¾ c. per pound of turkey. You may want to stuff the bird and still make extra dressing for the next day. When making dressing be sure to cover the pan well to keep the dressing from drying out.
Variations:
Oyster dressing: Add 12 ounces of oysters, cooked in their own liquid for 3 minutes and drained to the stuffing. For the dressing you may want to reserve some of the cooking liquid and add it in place of turkey broth.
Cornbread Stuffing: Omit bread cubes and add 4-5 cups of cornbread crumbs.
Fruit Stuffing: Omit parsley and add 1 ½ c. chopped tart apples and ½ c. chopped prunes.
Sausage: Add 1 cup cooked and crumbled sausage
Of course there is always the prepared stuffing mixes on shelves everywhere. I make no judgements. Time is a precious commodity. If you are going to use Pepperidge Farm or any of the other dry mixes watch what liquid you use as the mixes tend to be saltier and adding broth could make them too salty. Also when you use pre-seasoned mixes, add the same vegetables you would have added to homemade for a better taste. My mom always uses the Pepperidge Farm stuffing mix and by the time she adds all of her little touches it tastes great.
Cauliflower Gratin

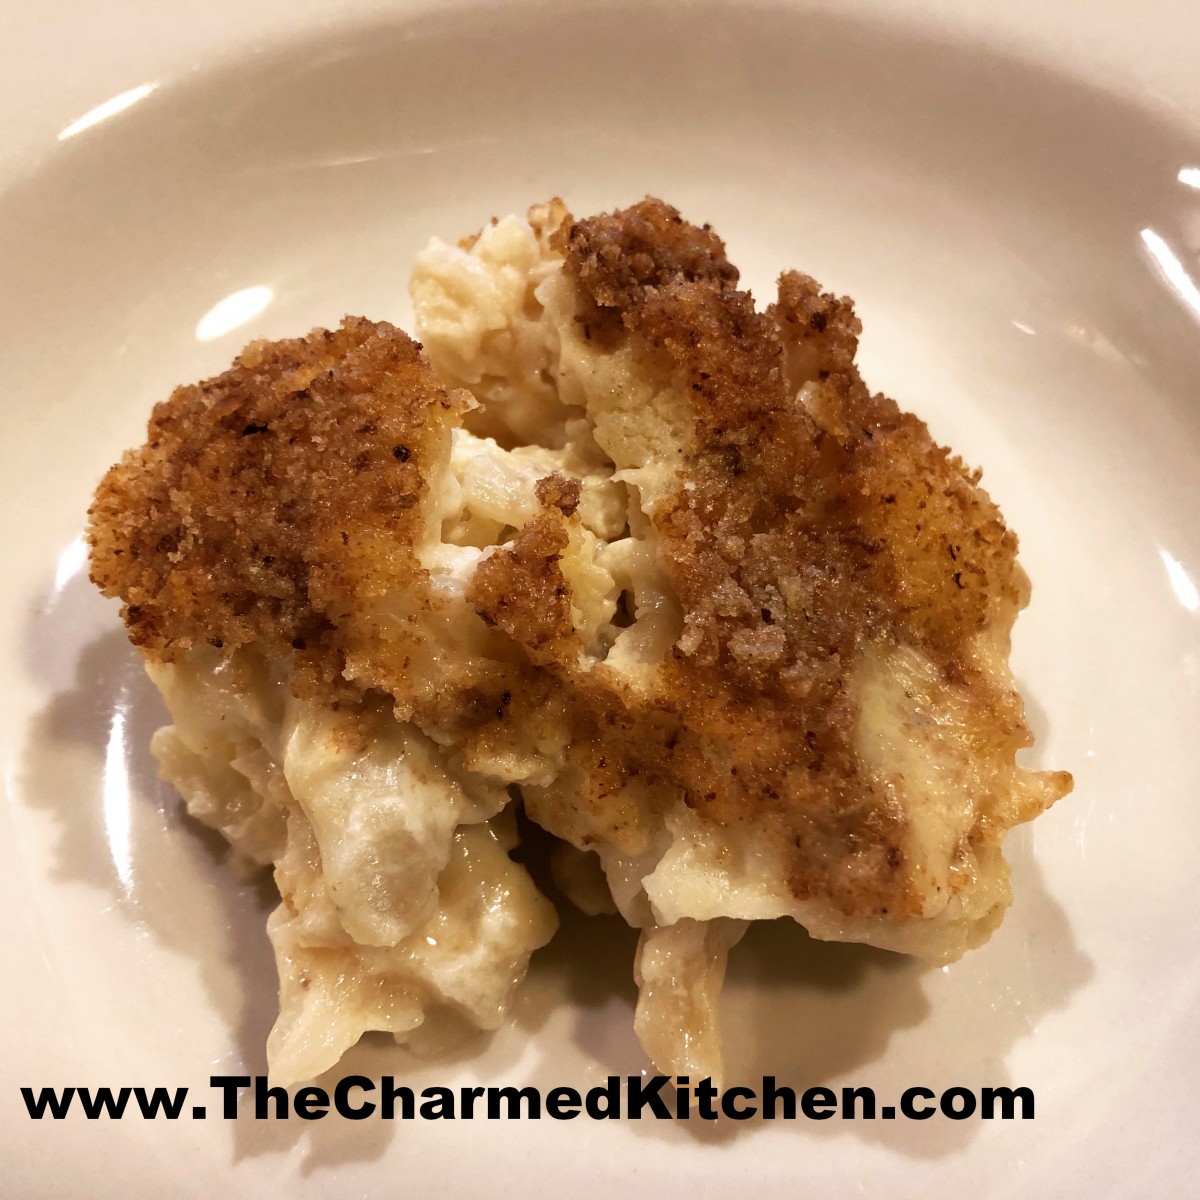
Cauliflower Gratin
Gratin is just another way of saying cheesy cauliflower. I love cauliflower. I also love cheese. Bringing the two of them together is a classic combination.
I decided to make a cauliflower gratin for dinner yesterday. When I started, I remembered one I had made a few weeks ago. It was for a dinner with a couple of my friends. It tasted great, but was a little too watery.
The problem is, I wanted the cauliflower to be cooked, but not cooked to mush. I just steamed it for a few minutes. It was tender, but still pretty firm.When it cooked in the cheese sauce, it cooked a little more and became more tender. This is a good thing. Unfortunately, it gave off water as it cooked and thinned the sauce too much.
I wanted to try again, with a thicker base sauce, to offset the water in the cauliflower. We were so pleased with the final dish. Creamy, cheesy and not watery at all.
I have to admit, I almost chickened out when I saw how thick the base sauce was. But, I figured if it was too thick, it would still taste good.
I forgot to measure the cauliflower before and after steaming. I had to take a good guess at how much chopped up cauliflower there was. A little more or less won’t matter that much. I had a pretty good size head of cauliflower. I guessed at 8 cups raw, but it could have been 10 cups.
So here is the recipe- I hope you give it a try.
Cauliflower Gratin
1 medium head of cauliflower, stems trimmed off and cut into bite sized pieces- you should have about 8 cups
6 T. butter
6 T. flour
1 c. half and half- you could use cream or milk, if you prefer
6-8 oz. cheese- cubed, shredded or sliced- any cheese that melts will work. I used a combination of cheddar and Muenster
Salt and pepper to taste
Hot sauce to taste
½ c. bread crumbs
2 T. butter
Steam the cauliflower until just tender. I steamed mine in the microwave for 6 minutes. It took me two batches to steam it all. Place cauliflower in a mixing bowl and set aside. In pot heat the butter until melted and stir in the flour until smooth. Add the half and half and cook, over medium heat, stirring often, until mixture thickens. It is going to get REALLY thick. Don’t freak out. When the mixture cooks with the cauliflower, the cauliflower will give off more liquid which will thin out the sauce. Once the mixture gets bubbly, cook over very low heat another couple of minutes, stirring constantly. Turn off the heat and add the cheese. Stir occasionally, until the cheese has melted. You can turn the heat on if you need to for a minute or so. Trust me, be patient, the cheese will melt. Spoon the cheese sauce over the cauliflower and mix it together as best you can. Add seasonings, if you like. Place cauliflower mixture in a baking dish. I used a deep dish pie pan- and it fit, but I had to push it down a little. Sprinkle with the bread crumbs and dot with the 2 tablespoons of butter. Bake in a preheated 350 degree oven until it gets all bubbly and starts to brown a little. This takes about 25-30 minutes.
Let it sit a few minutes before you try to eat it. It is really hot.
Sweet Potato Puffs

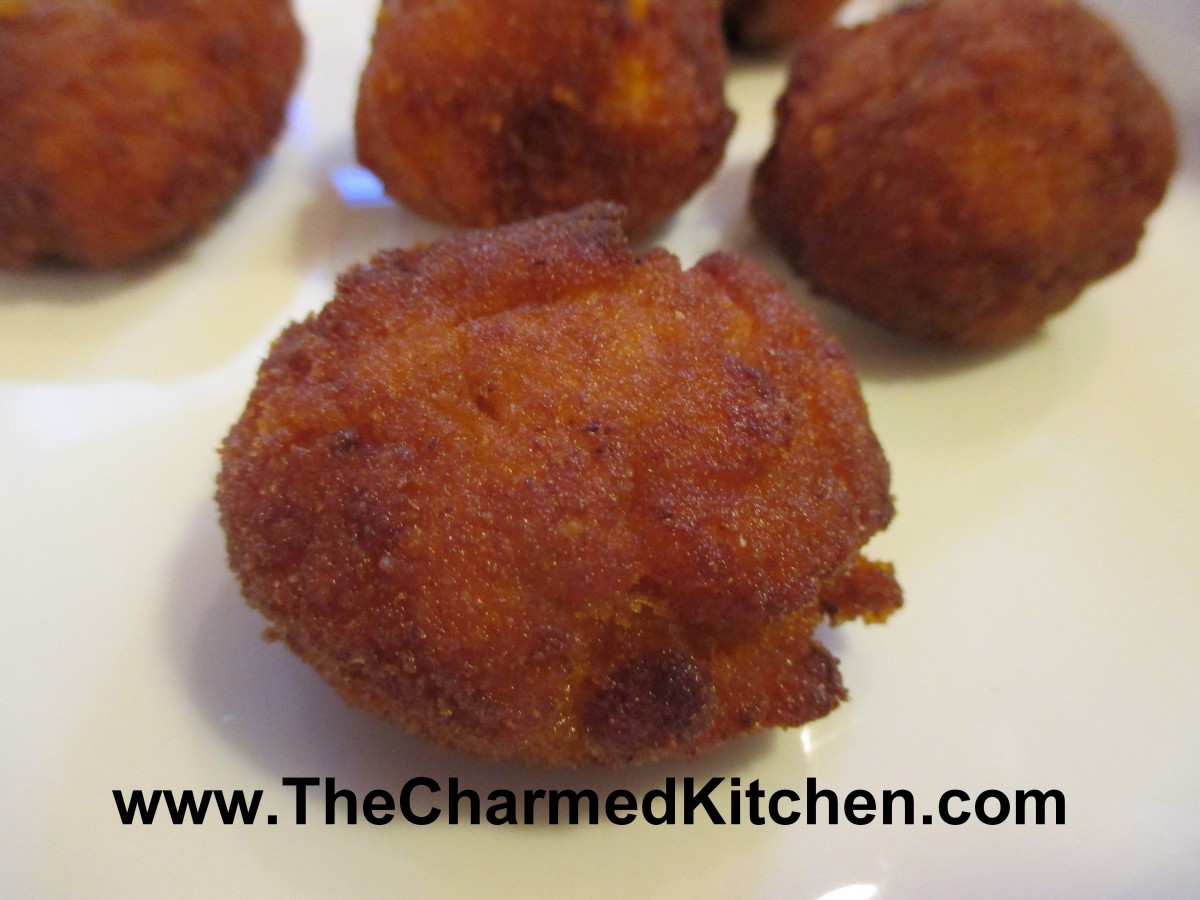
Sweet Potato Puffs
If you are looking for a new way to serve sweet potatoes, you might just want to try this recipe. Sweet potatoes are mashed, mixed with butter, eggs and spices, rolled in bread crumbs and fried. The end result is a delicate morsel that has a crunch on the outside- and creamy mashed sweet potatoes on the inside. They are addictive!!! They make a great side dish, or can be served as an appetizer. While they are good hot, they maintain their crunch even after cooling down.
I first had a version of this recipe many years a go when a coworker made them and brought them to work. I recently found her original recipe, and added more seasonings to it. I love them as much now, as I did then.
The mixture, even after chilling, is soft. I placed spoonfuls of the mix in the breadcrumbs and rolled them gently into balls. The puffs are soft, even after frying, so remove carefully from the oil. You can fry up a batch in a few minutes, and serve right away. You can also cook them ahead of time, then reheat them before serving.
So here is the recipe.
Sweet Potato Puffs
2 c. mashed, cooked sweet potatoes
3 T. softened butter
1 egg
3 T. chopped parsley, or 1 T. dried
½ t. salt
½ t. paprika
½ t. cumin
½ t. nutmeg
Hot sauce to taste
Dash of fresh ground pepper
Bread crumbs for rolling
Oil for frying
Combine sweet potatoes with butter and egg, stirring to mix well. Add seasonings and stir well. Chill mixture at least a couple of hours. Heat oil to 350 degrees. You should have at least a couple of inches of oil in the pan. Shape sweet potato mixture into 1-inch balls. Roll in crumbs and fry until golden brown. Drain on paper towels and serve. You can make a head of time, then just warm in the oven when ready to serve. They can also be fried and frozen for later use. These make a nice side dish or even can be served as an appetizer. They are very soft, even after frying, so remove from hot oil carefully.
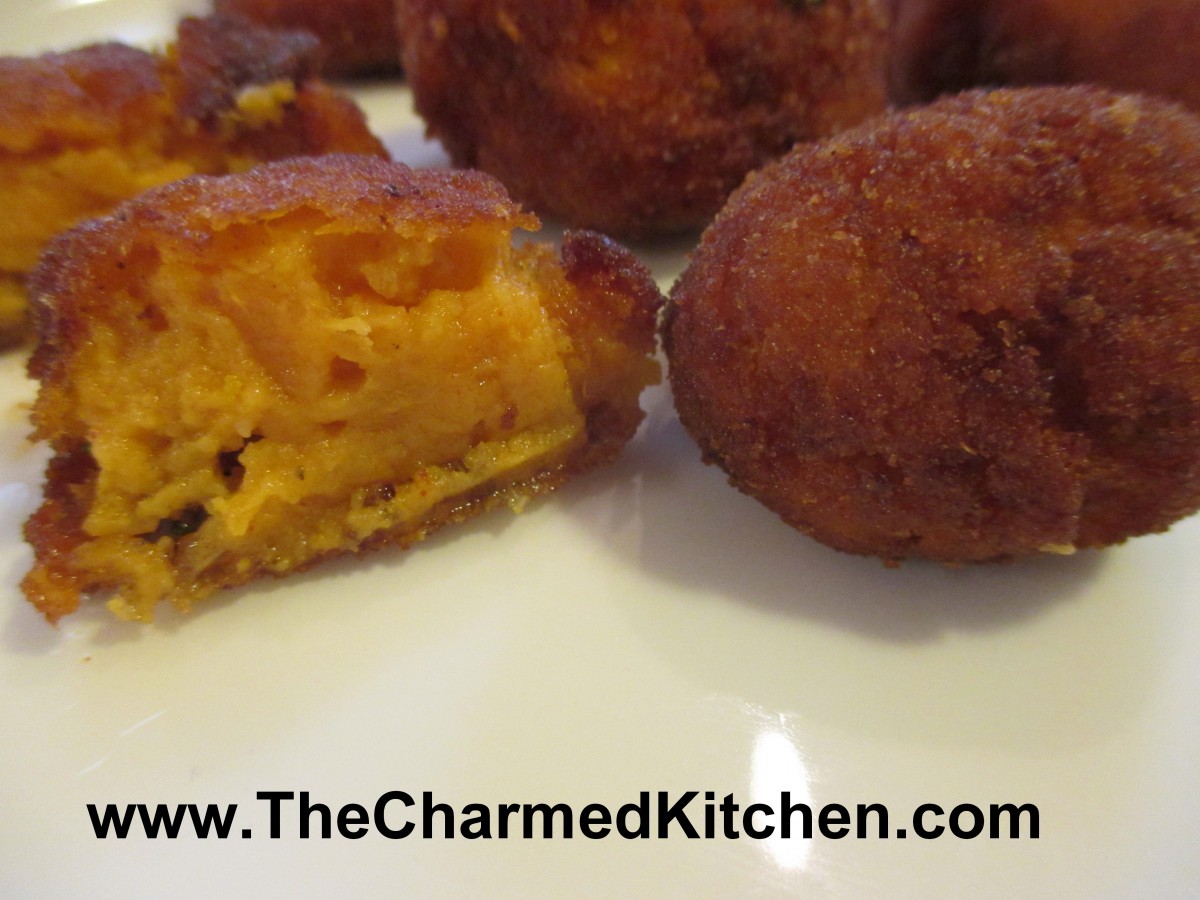
Crunchy outside, soft and creamy inside
Halloween Candy Cheesecakes

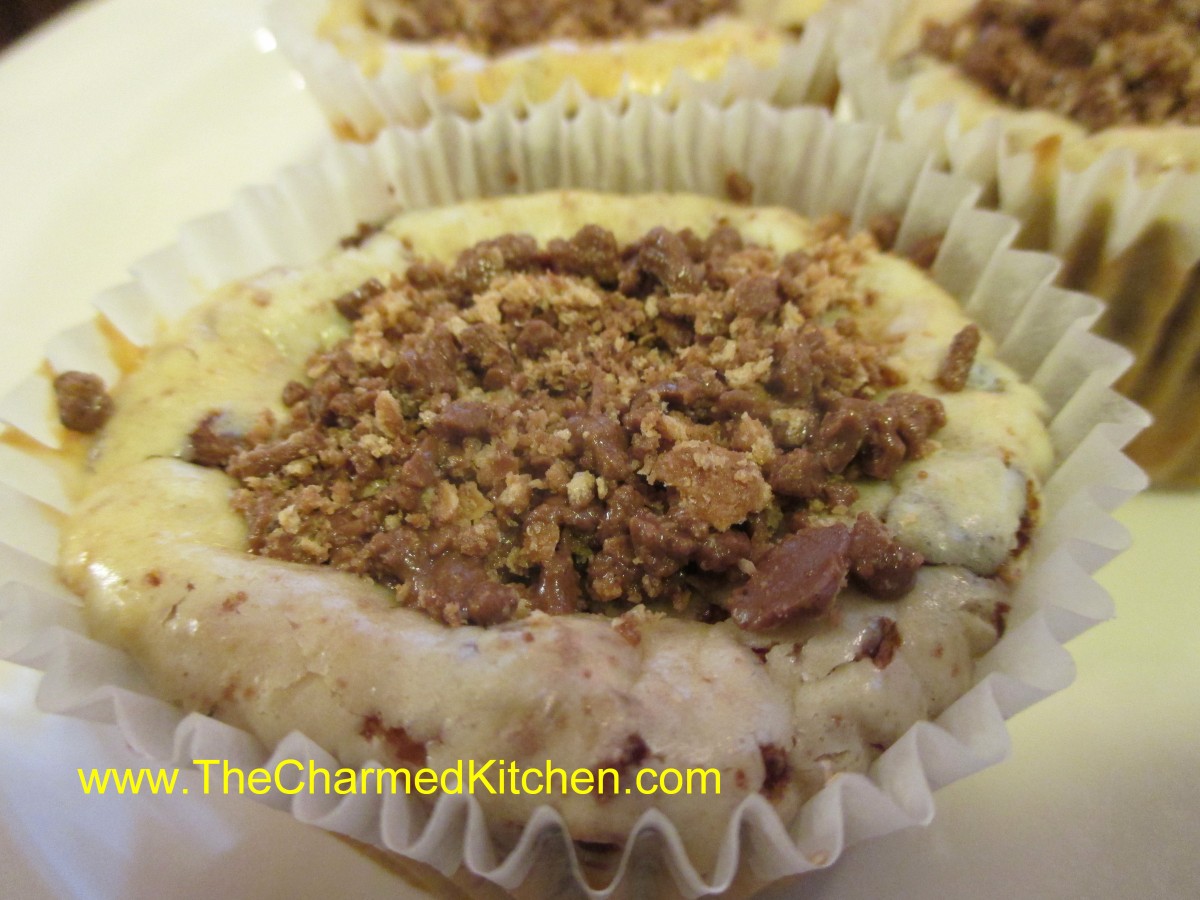
Kit Kat Mini Cheesecake
I am posting this as a public service to those of you with leftover Halloween candy.
Sometimes you end up with leftover Halloween candy. It was cold and rainy here last night, so there were not as many kids out as usual. I am sure some of you have leftover candy, too.
You could just eat the candy- or you can transform it into a dessert.
The idea I came up with was mini cheesecakes. I’ve made them before, so I used my recipe, and just folded in crushed candy bars. Once the cheesecakes cool they deflate a little, so I also added some crushed candy bars to the top to make them look nice.
Only change from the original recipe was a slight decrease in sugar to compensate for the extra sweetness of the candy. I used what I had, but I am sure a lot of different candy bars would work. I used a small food processor to really crush up the candy bars. I made 2 batches, one with cookies and cream candy bars and the other with Kit Kat bars.
Since the candy will keep, you could use them in a Thanksgiving dessert. Of course, the candy might not last until Thanksgiving.
Halloween Candy Mini Cheesecakes
12 vanilla wafers
2 (8 oz.) cream cheese, softened
1/3 c. sugar
2 t. vanilla
2 eggs
2/3 c. crushed candy bars plus 1/4 c. crushed candy bar, for topping
Line 12 muffin tins with paper liners. Place 1 wafer in each. Beat together remaining ingredients (except candy) for 1 minute with electric mixer. Fold in candy. Divide this mixture in the muffin tins, filling each 3/4 full. Bake 25 minutes at 325 degrees. Cool and decorate with extra crushed candy. Makes 12. These can be frozen.

Leftovers
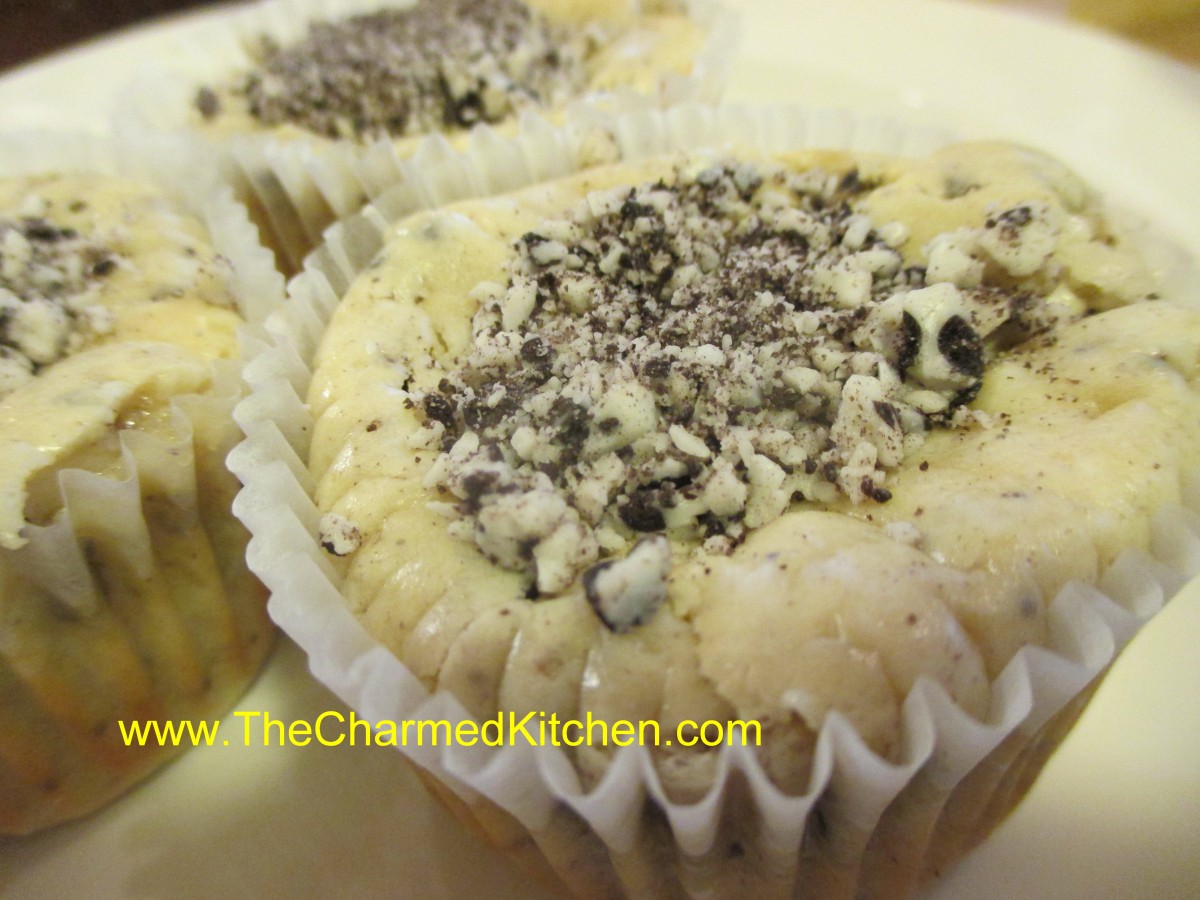
Cookies and Creme Mini Cheesecakes
Sweet Potatoes or Yams?

Sweet Potatoes
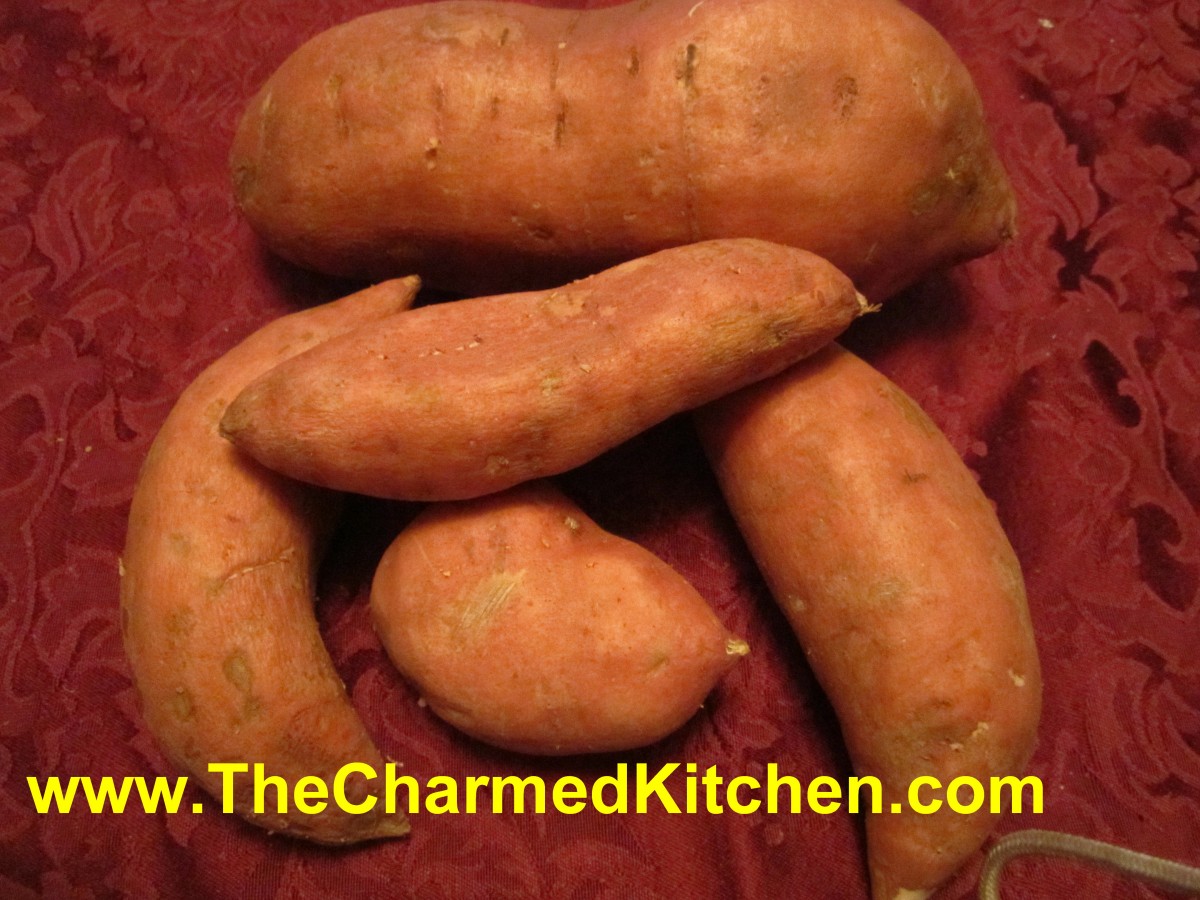
I just wanted to clear something up. With all the sweet potato and “yam” recipes circulating, it seemed like a good time for this post. Are you eating sweet potatoes or yams?
Well, if you live in North America, you are eating sweet potatoes. No matter what the produce department labels them, everything in the store is, botanically speaking, a sweet potato. Red, orange and yellow, big and small – all are sweet potatoes.
So where did the yam thing start? Well, many years ago the state of Louisiana had an abundant crop of sweet potatoes. They wanted to sell them in a competitive marketplace, so they decided to call them yams. Just a name change in an effort to give their product an edge over the competition. You’ll often still see them sold as Louisiana Yams. They aren’t yams, though. Louisiana Yams are, in fact, just sweet potatoes with a name change.
There are real yams- they are larger than sweet potatoes and quite starchy. They might be found at South American restaurants, or in specialty markets in the States, but they are NOT in your local grocery store.
A sweet potato by other name will taste as sweet.
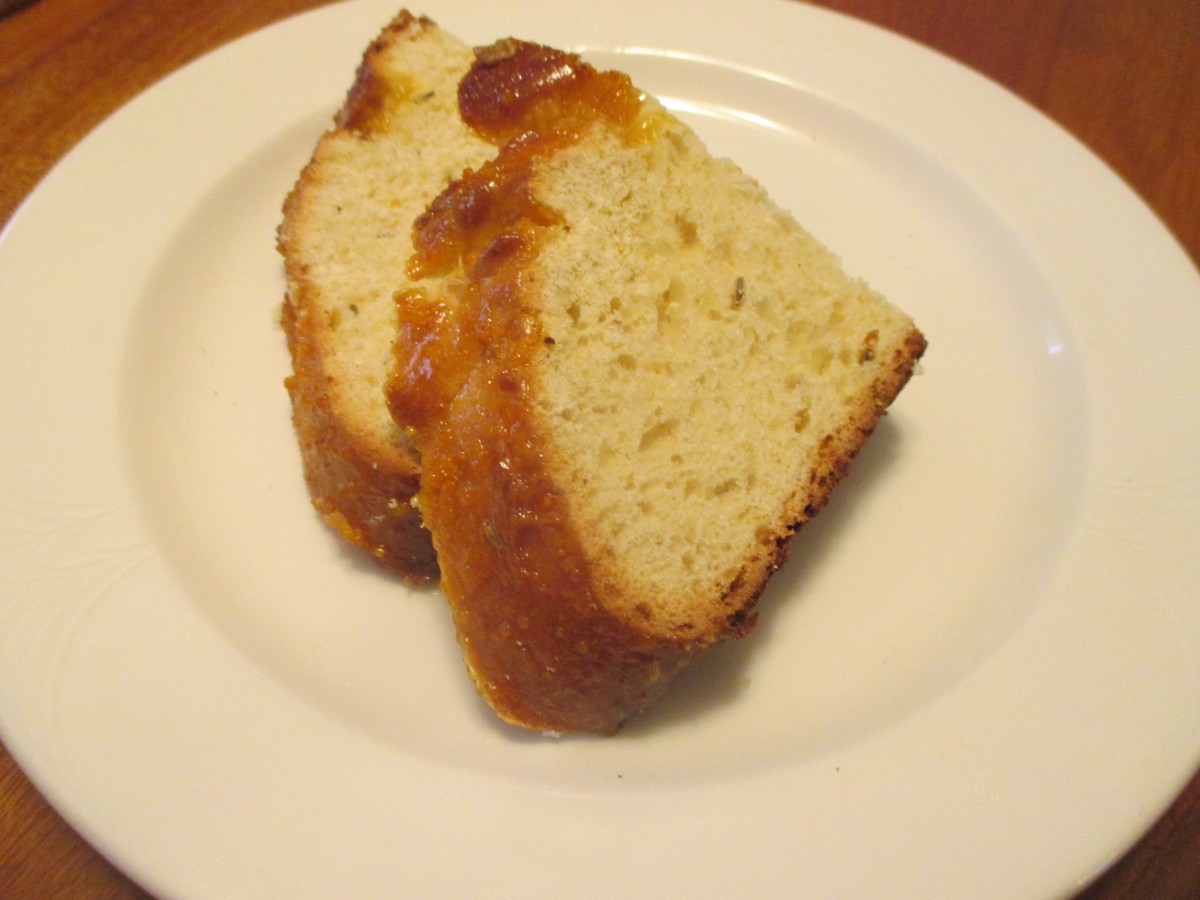
Pan de Muertos (Bread of the Dead)

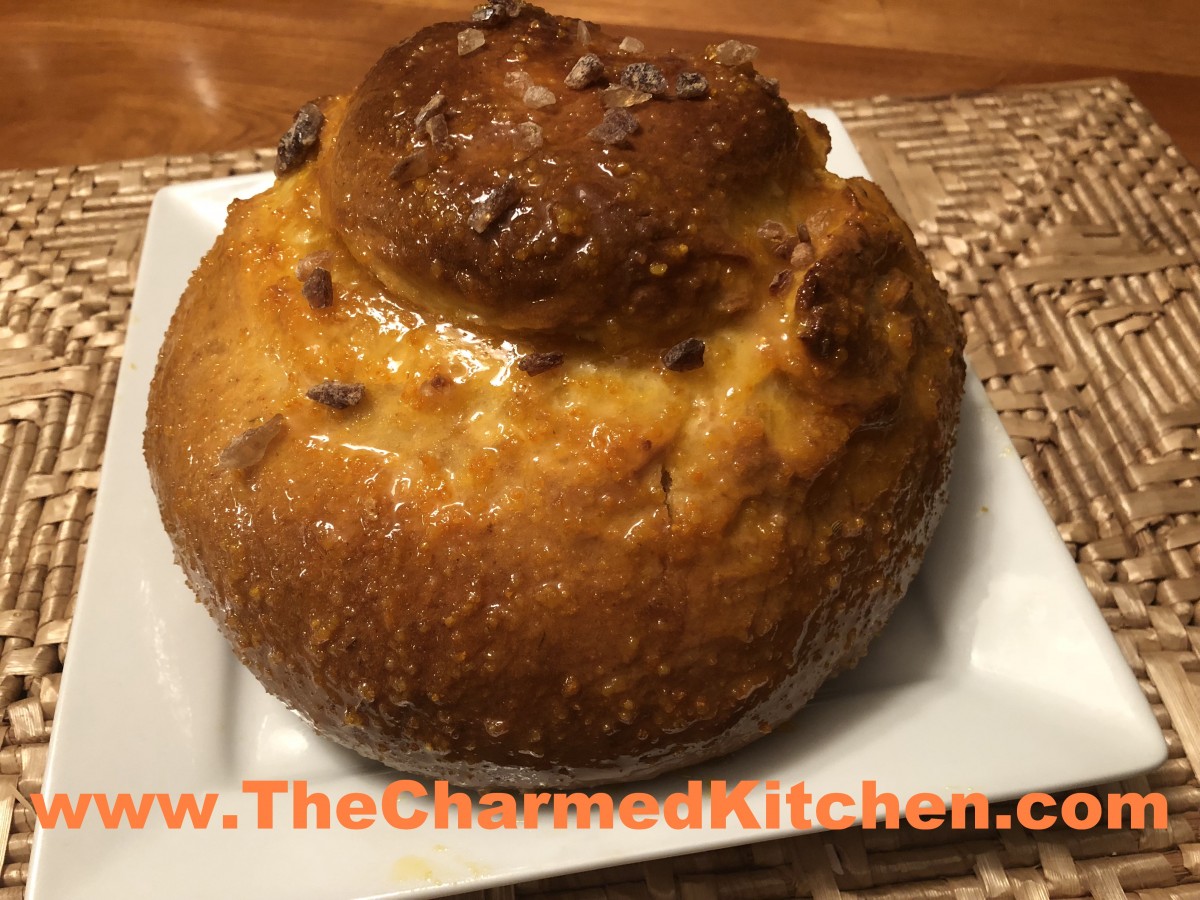
Pan de Muertos
Halloween isn’t the only holiday this week. Many people will be celebrating Dia de los Muertos (Day of the Dead). It is a holiday to remember and honor loved ones who have passed. It traditionally runs from October 31 to November 2.
Pan de Muertos is a traditional bread made for this holiday. This is a version of that bread that is flavored with anise (or fennel) and orange. It is glazed, after baking, with an orange sauce, then sprinkled with a little extra sugar. I like to use rock sugar, which, as the name implies, is a large sugar that looks like small rocks.
I shaped the dough into a round shape, with a knob of dough on the top. You can also mold the bread into different shapes like angels or animals.
The bread itself is so tasty. It is a rich dough with a lovely fragrance and texture.
My father was a baker, so I baked this bread to remember him. I think he would approve.
Here is the recipe.
Pan de Muertos (Mexican Bread of the Dead)
1/4 c. each butter, milk and water
3 c. all-purpose flour
1 1/2 t. active dry yeast (half a packet)
1/2 t. salt
2 t. anise seed or fennel seed
1/3 c. sugar
2 eggs, beaten
2 t. orange zest
Glaze:
1/4 c. each sugar and orange juice
1 T. orange zest
Topping:
2 T. sugar, I used rock sugar
Heat together butter, water and milk until the butter melts. Cool to warm. In a large bowl combine 1cup of the flour, yeast, salt, anise seed and 1/3 c. sugar. Beat in the milk mixture then add the eggs and orange zest and beat until well combined. Stir in 1/2 cup of flour and continue adding more flour until the dough is soft. Turn the dough out onto a lightly floured surface and knead until smooth and elastic. Place the dough into a lightly greased bowl cover with plastic wrap and let rise in a warm place until doubled in size, about 1- 2 hours. Punch the dough down and shape it into a large round loaf with a round knob on top. Place dough onto a baking sheet, loosely cover with plastic wrap and let rise in a warm place for about 1 hour or until just about doubled in size. Bake in a preheated 350-degree oven for about 35 to 45 minutes. Cool on rack 5 minutes then brush with glaze. To make glaze: In a small saucepan combine the 1/4 cup sugar, orange juice and orange zest. Bring to a boil over medium heat and boil for 2 minutes. Brush over top of bread while still warm. Sprinkle glazed bread with 2 T. sugar.

Ready to bake
Eat plain, or lightly toasted with butter
Carrot Pasta Sauce

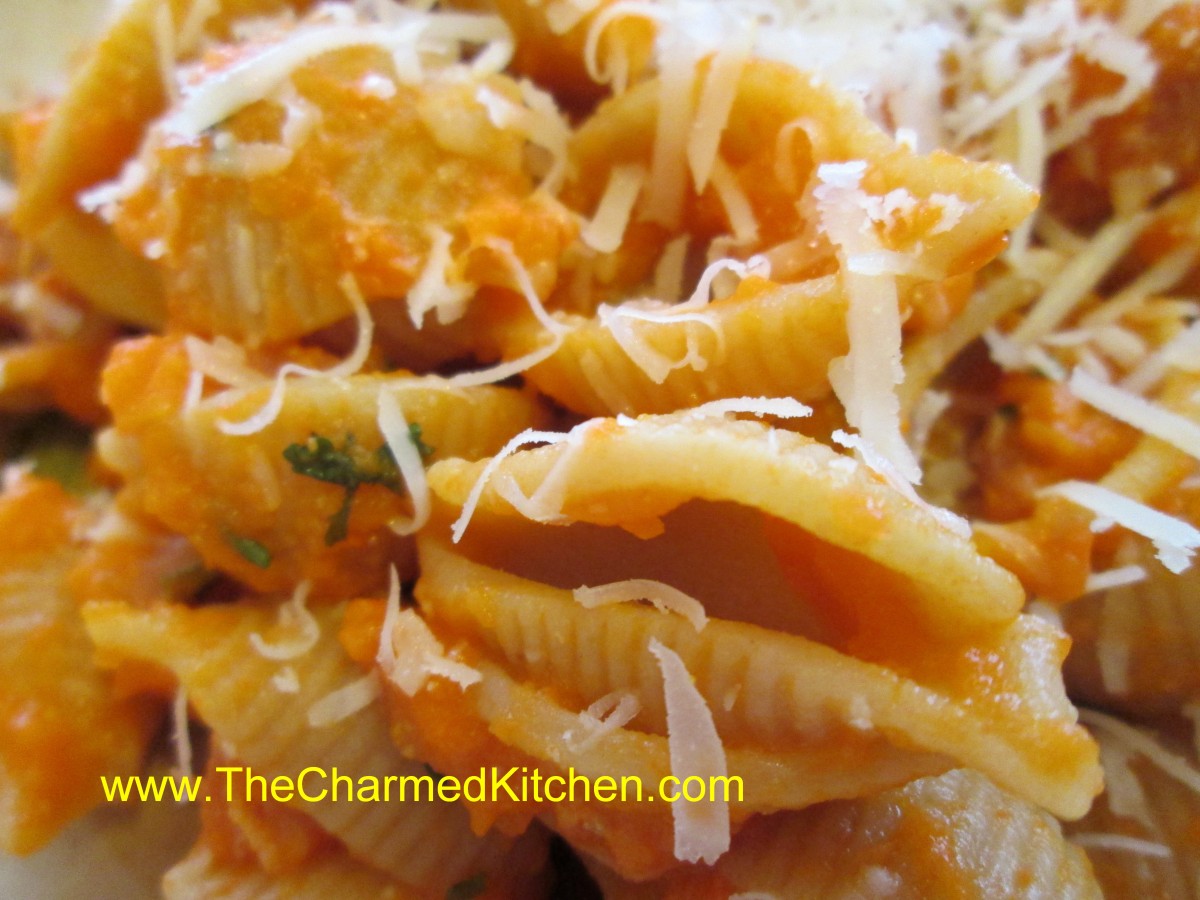
Carrot Pasta Sauce
This pasta sauce is one of my favorites. Most people don’t think of carrots when they think of pasta sauce, but maybe they should. It tastes wonderful and looks pretty, too.
It’s a simple sauce that packs a lot of flavor.
The process is easy. Just cook carrots, with sauteed onions and garlic in stock, until the carrots are really tender. Most of the liquid cooks off. Puree, adding cream or half and half and some dill. Adjust seasonings and you are done!
I used chicken stock, but you could use a vegetable stock for a vegetarian version of this dish.
Toss the sauce with pasta, rice, or even with veggies or meats.
You might get kids to eat carrots, this way.
Here is the recipe. I hope you try it.
Carrot Pasta Sauce
1 T. oil
1 onion, chopped
1 garlic clove, minced
1 lb. carrots, peeled and sliced
2 c. chicken or vegetable stock
Salt and pepper to taste
1/2 c. cream, half and half or evaporated milk
1T. fresh dill or 1 t. dried
Hot cooked pasta
Sauté onion in oil until tender. Add garlic, carrots and stock and cook until carrots are very tender. Much of the liquid should have evaporated by then. Place mixture in blender and add cream or milk, mixing until smooth. Add dill and adjust seasonings, tossing over hot pasta to serve. I sometimes top with some shredded Parmesan cheese, too.
Variations: Use sweet potatoes, pumpkin, winter squash or even peas for different tastes.
Oat Bran Carrot Muffins

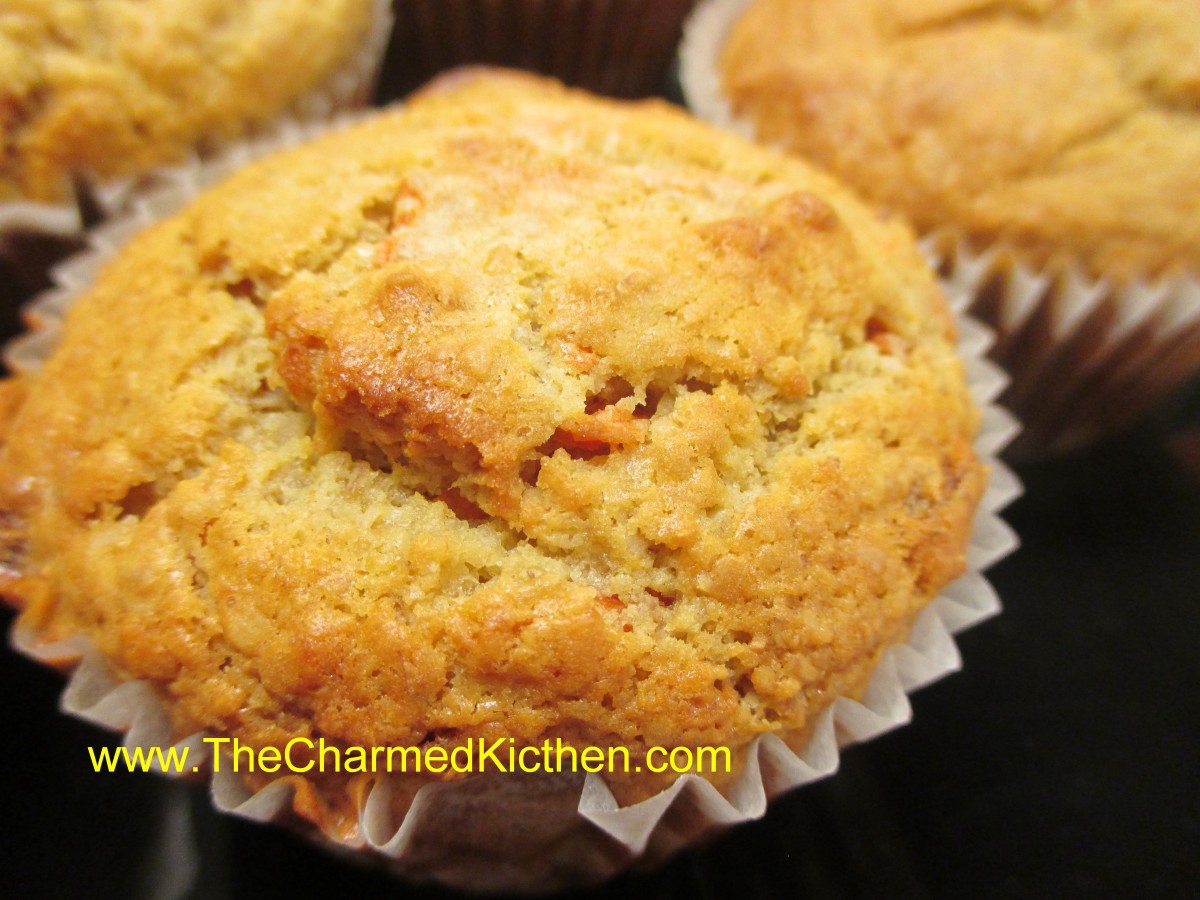
Oat Bran Carrot Muffins
These muffins are really good for you, but they taste like a treat. With the addition of carrots and raisins, these muffins are moist, light and slightly sweet. They remind me of a cross between a muffin and carrot cake.
I prefer the taste of oat bran over wheat bran. I find it has a natural sweetness. I was never a big fan of bran muffins made with wheat bran. I didn’t like the flavor. But I love the way these muffins taste.
Vanilla and orange zest makes them fragrant and tasty, too. With plenty of oat bran, they also provide healthy dietary fiber.
I make these often, then freeze some for later. They make a great breakfast and an easy snack to take with you.
Oat Bran Carrot Muffins
1 c. milk or buttermilk
1 c. oat bran
1 egg
1/3 c. oil
3 T. brown sugar
1 t. vanilla
1 t. orange peel
1 c. shredded carrots
1 c. flour (all purpose or whole wheat pastry flour)
1 t. baking powder
1 t. baking soda
½ t. salt
½ c. raisins
In mixing bowl combine oat bran and milk. Add egg, oil, sugar, vanilla, peel and carrots. Beat well. Combine remaining ingredients in small bowl and mix well. Gently fold into bran mixture. Divide batter in 12 muffin cups that are either greased or lined with paper cups. Bake in a preheated 375-degree oven for 20-25 minutes. Makes 12.
Chocolate Beet Cake – Gluten Free

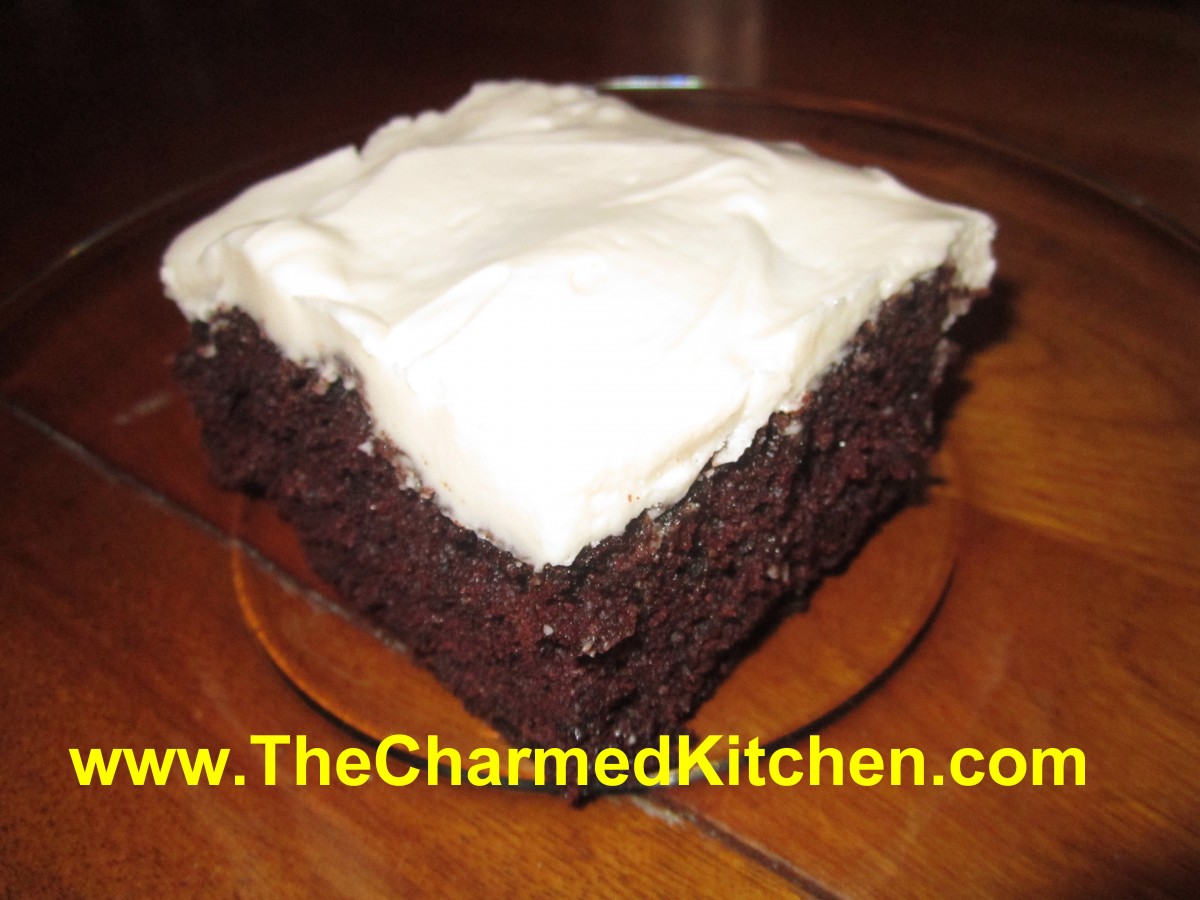
Gluten Free Chocolate Beet Cake
I made this cake for a family dinner I will be attending later today. One of my relatives has Celiac, so I made it gluten free. It wasn’t hard to do. I have made this cake gluten- free before. I just swapped out gluten free flour for the regular flour in the recipe, then reduced the baking temperature by 25 degrees.
The original recipe is baked at 350, this one at 325. Baking time is the same.
When I say beet cake, a lot of people give me a funny look. First, there are the beet haters, and you know who you are. The people who just don’t like the taste of beets. I get that, beets are an acquired taste.
Then there are the people who like beets, but could never picture them in a cake. I bake cakes with carrots in them, zucchini and even parsnips. Adding beets to a cake is not so far off. The beets add a subtle red color to the cake, but they also add moistness. The end result is a cake that is full of flavor and has a wonderful, moist texture.
Truth is, I don’t really taste the beets in the cake much at all. I taste the chocolate. So here is the chocolate beet cake recipe. I hope you enjoy it.
Gluten-Free Chocolate Beet Cake
2 cups gluten free flour
1½ teaspoons soda
1/2 teaspoon salt
1 1/2 cups sugar
1/2 cup cocoa powder
3 large eggs, beaten
1 cup plus 2 tablespoons oil
1½ cups grated cooked beets
2 teaspoons vanilla
Powdered sugar, optional, or cream cheese frosting- recipe below
Preheat oven to 325°. Combine flour, soda, salt, sugar and cocoa in a bowl; set aside. In a mixing bowl, combine the eggs and oil. Beat in vanilla and continue beating until well blended. Slowly beat in dry ingredients until well mixed; stir in beets. Pour into a greased and floured 9×13-inch baking pan. Bake at 325° for 25 to 35 minutes, or until cake bounces back when touched lightly with finger. Cool in pan on a rack. Frost cooled cake, or dust with powdered sugar.
Frosting recipe:
8 oz. Cream cheese, softened
3/4 c. powdered sugar- or more to taste
1 stick butter, room temperature
Beat all together until fluffy. Frost cake and refrigerate until ready to eat.
Sweet Potato Biscuits with Herbs

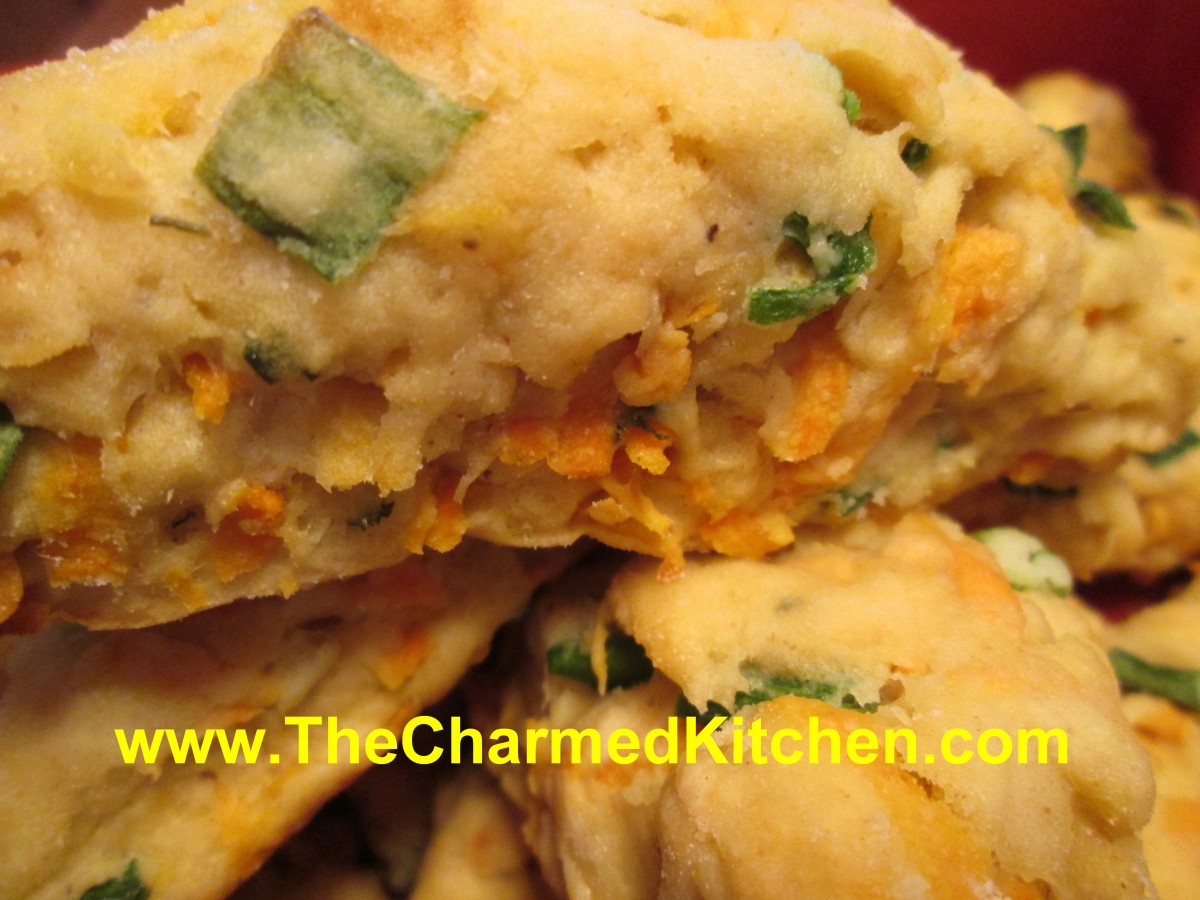
Sweet Potato and Herb Biscuits
These biscuits are a favorite of mine. They go great with a bowl of chili.
I like sweet potatoes cooked any number of ways. Steamed, roasted, mashed. In this biscuit recipe, raw sweet potatoes are grated and added to the dough, along with some herbs. The biscuits come out tender, with great flavor and texture.
I enjoy them with a bit of butter, warm from the oven.
When you mix the dough, don’t be worried if it seems too dry. It takes a little bit of kneading to get the moisture out of the potatoes. The extra effort is worth it.
I cut them into triangles, but you can also just form the dough into a log shape. Then, slice the dough for round biscuits. They taste wonderful, no matter the shape.
Sweet Potato and Herb Biscuits
2 1/4 c. flour
1 T. baking powder
1/2 t. grated lemon peel
1/4 t. each baking soda, dried basil and dried thyme
1 egg, beaten
1 1/2 c. shredded sweet potato, about 1 large
1/2 c. fine chopped green onions
1/2 c. sour cream
2T. butter, melted or olive oil
Stir together dry ingredients in large bowl and set aside. Combine remaining ingredients and add to flour mixture mixing until just blended. Turn onto lightly floured surface and knead a few times until dough just stays together. Dough will look too dry- but it will come together after you knead it. Press into an 8-inch square and cut into four squares.* Cross cut each square into four triangles. Place on greased baking sheet and bake in a preheated 425 degree oven for 20 minutes. Makes 16.
* I press the dough into a lightly floured 8×8-inch baking pan and then flip it out onto the work surface, before cutting. That way you’ll get nice, even edges.


