Scotch Broth

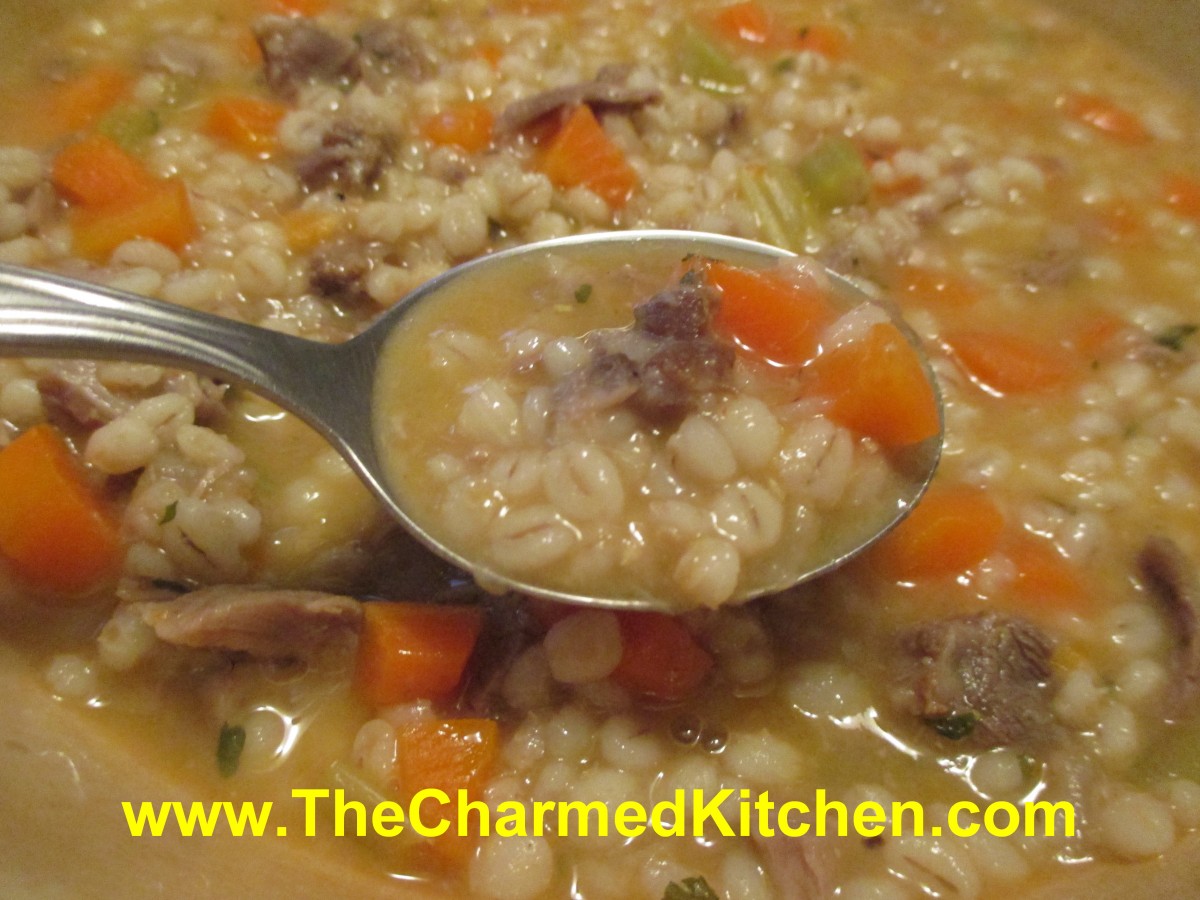
Scotch Broth
After picking up some lamb neck bones the other day, I knew I was going to make stock from them. It was unseasonably cold, and snow was in the forecast. Not that I need snow to be in the mood to make soup or stock. I make soup all the time. Still, with a couple of chilly days ahead, I knew I was really going to be craving some home made soup. I used the lamb bones to make the stock and then used the stock to make Scotch Broth the next day. The house smelled so good.
There are a number of variations for Scotch Broth. Traditionally it is made with lamb stock. Barley is often added as well. I used what I had on hand and what I liked. I was very happy with the dish, in the end.
Scotch Broth
2 T. oil or butter- I used fat from the stock
1 red onion, diced fine
2-3 shallots, diced fine
1 c. pearl barley
2 qts. Lamb stock*
2-3 carrots, peeled and diced
2 ribs celery, diced
2 c. diced lamb meat
Parsley
Salt and pepper to taste
Hot sauce to taste
In soup pot, heat the fat up and sauté the onion and shallots until just turning golden. Add the barley and cook a few minutes longer. Add the lamb stock and bring to a simmer. Cover and cook until barley is pretty tender, about 45 minutes. Add the remaining veggies and lamb and cook until veggies are tender. Add seasonings to taste, simmer a few minutes longer and serve.
* To make the stock I started with a couple of packages of lamb neck bones. I browned the bones in a stockpot. Then I added a couple of chopped onions and browned them, too. I also added additional vegetables including some carrots, celery, a few cabbage leaves and garlic. I covered all of it with water and simmered it for several hours. I added salt, pepper, parsley, thyme and savory as well. I let the mixture cool down a little before straining it. I had almost 8 cups of stock. I also let the lamb cool down and removed the meat from the bones. I diced it up and set it aside to add to the soup later. I made this the day before I made the Scotch Broth, so it was easy to just remove the fat from the stock, before using it. I actually used a little of the fat I removed, to sauté the onions for the broth.
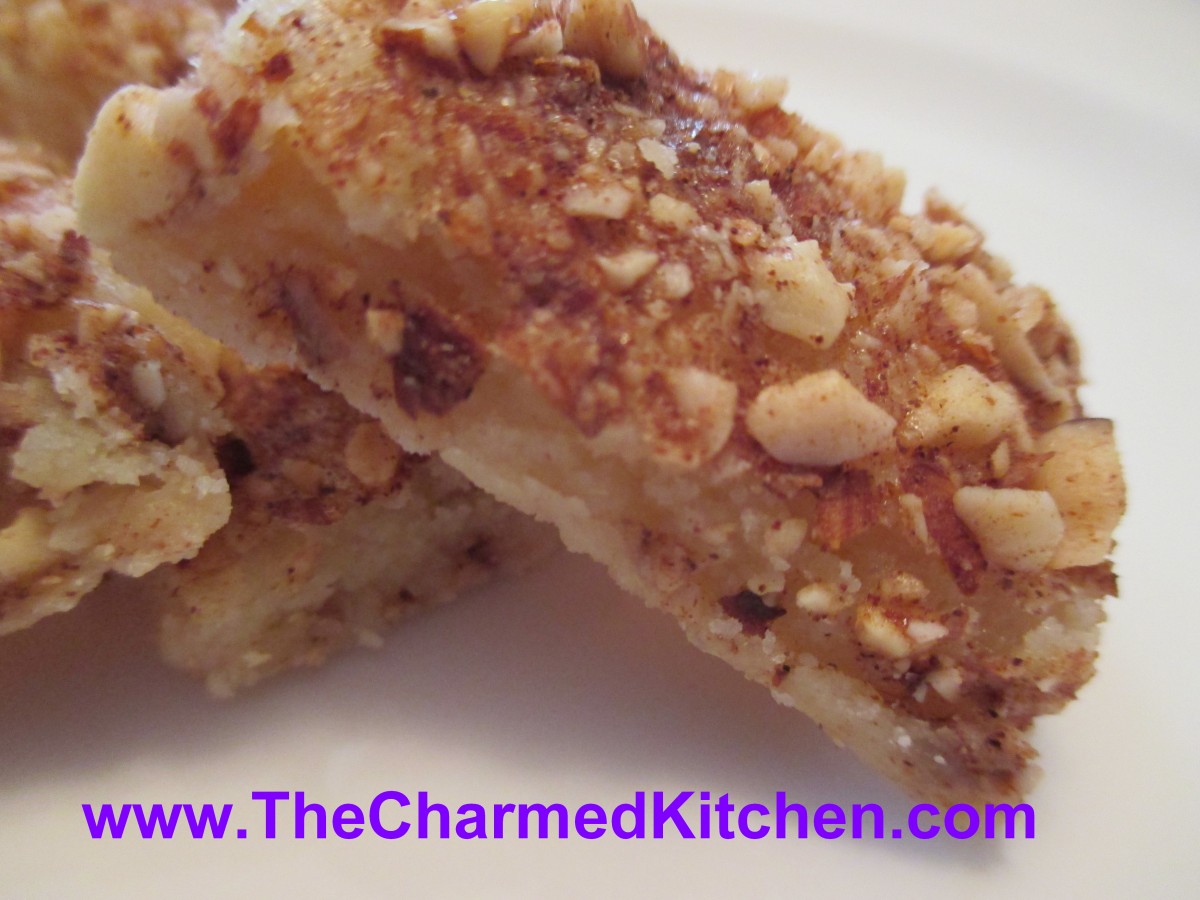
Stuffed French Toast

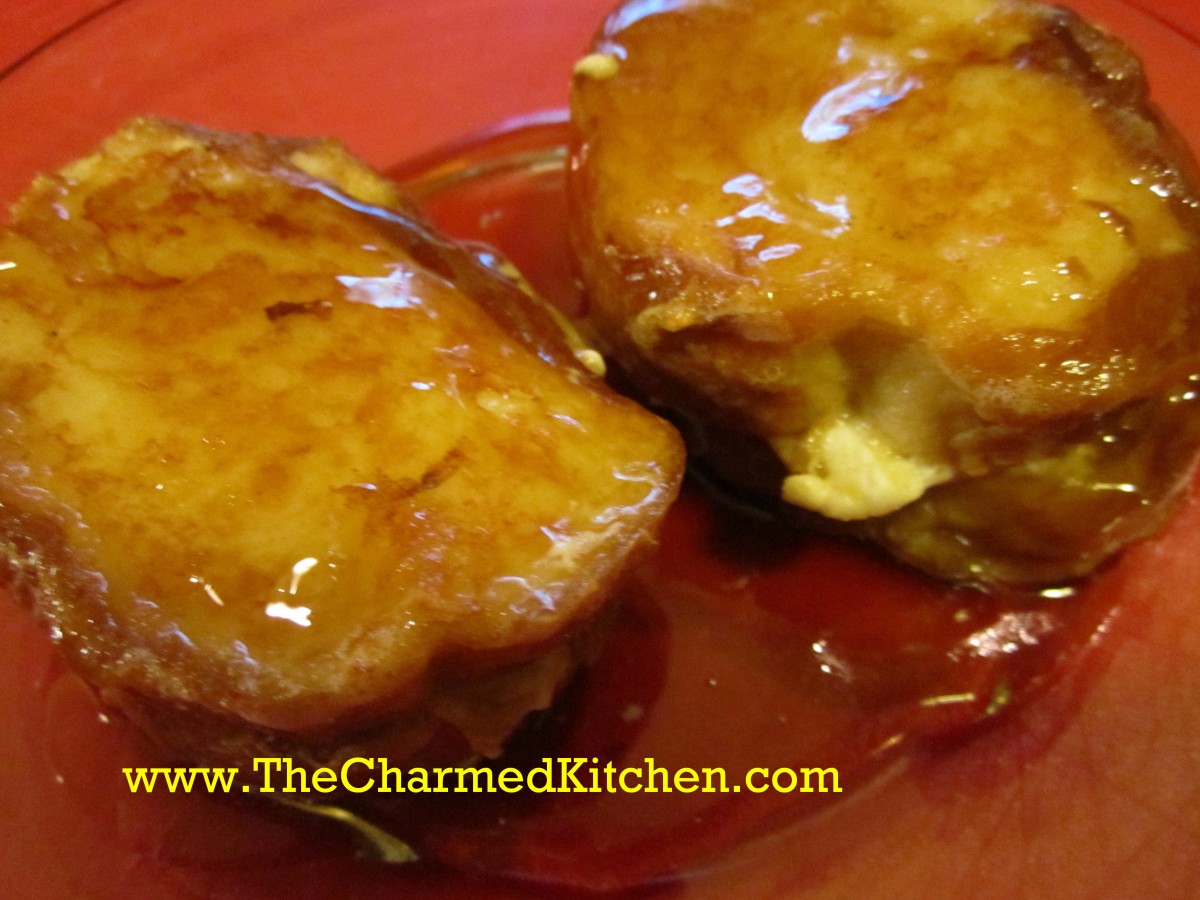
Stuffed French Toast
Whenever I make this dish, I remember a Winter brunch in the park with friends. It was February and cabin fever led to the idea to meet up in the park for brunch. We cooked everything over the grill or on a camp stove. It was pretty cold. We still had a great time. I made this French toast and it was a big hit. It’s even more fun when you are cooking inside. You can stuff the bread the night before and keep it in the fridge until ready to cook which will save you time in the morning. Great for brunch- inside or out.
Stuffed French Toast
1 (8 oz.) package cream cheese, softened
1 t. vanilla
1/2 c. chopped nuts
1 16-oz. loaf French bread
4 eggs
1 c. whipping cream or half and half
1 t. vanilla
1/2 t. ground nutmeg
Mix together cream cheese, vanilla and nuts. Set aside. Cut bread into 10-12 1 1/2 inch slices. Cut pocket in each slice and fill with 1 1/2 T. filling. Combine eggs and whipping cream with remaining vanilla and nutmeg. Use tongs to dip the bread, taking care not to squeeze out the filling. Cook toast on lightly greased griddle until browned on both sides. Keep toast warm in oven until ready to serve. Serve with maple syrup, warmed preserves or powdered sugar. Makes 10-12 slices.
Blueberry Sweet Rolls

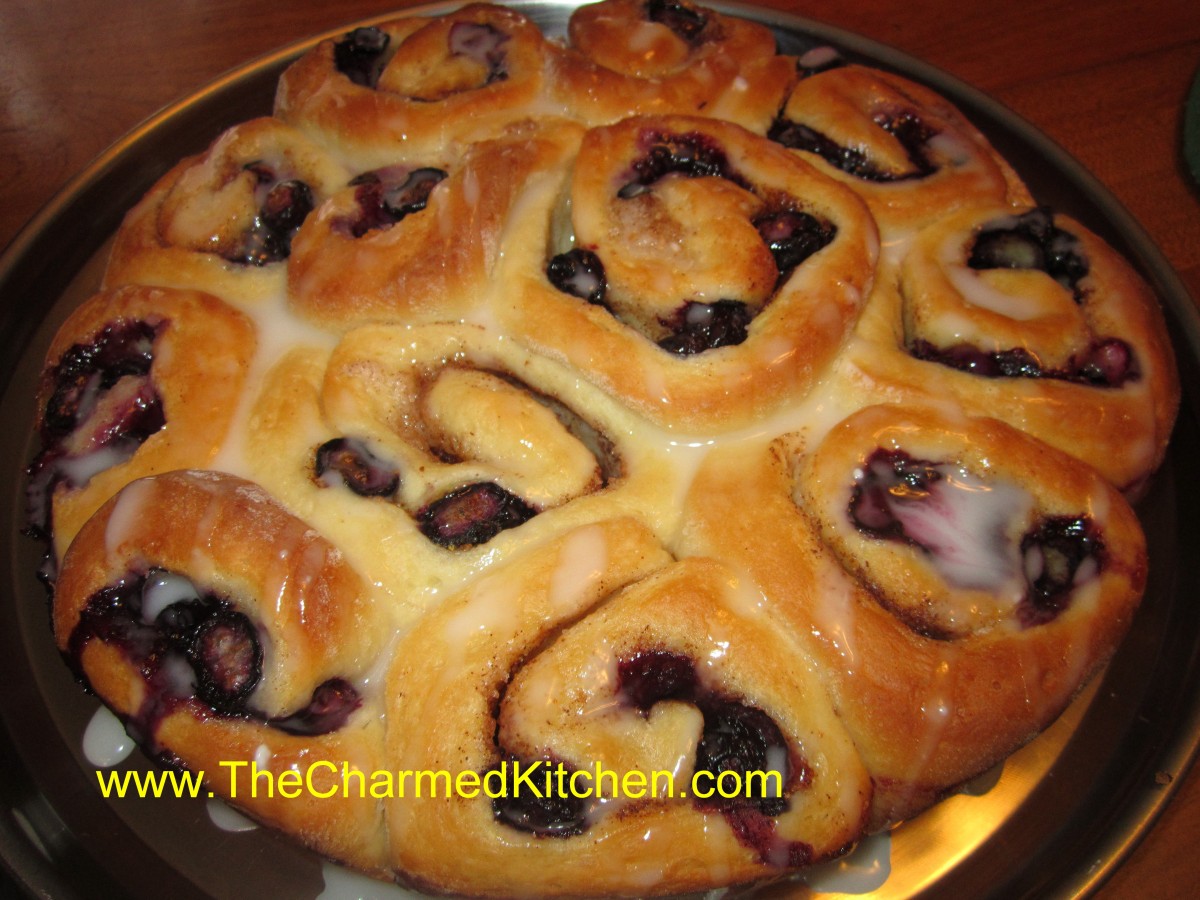
Blueberry Sweet Rolls
With snow in the forecast for this weekend- I needed something to remind me of a warm summer day. I used some of the blueberries I froze last summer to make these sweet rolls. They are great for breakfast, but I think they make a pretty good dessert. Sweet, but not too sweet. Studded with plenty of berries, too. Invited a neighbor over this morning for a cup of coffee- and surprised her with these. These rolls were just what we both needed. I sent her home with the rest.
Blueberry Sweet Rolls
3-3 1/2 c. bread flour
1 package active dry yeast
1 1/3 c. evaporated milk
6 T. butter
1/4 c. sugar
1 t. salt
1 egg
6 T. butter, melted
1/2 c. sugar
2 t. cinnamon
1 t. grated lemon or orange peel
2 c. fresh or frozen blueberries
In bowl combine 1 1/2 c. of the flour with the yeast, sugar and salt. Heat together the milk and 2T. of the butter until warm and add to the flour mixture, beating 2 minutes. Add egg and beat 2 minutes longer. By hand stir in enough of the remaining flour to make a soft dough. Turn dough onto a lightly floured surface and knead, adding flour as needed until dough becomes moderately stiff. Place in greased bowl, turning once to coat and cover. Allow to double in bulk, about 1 1/2 hours. Punch dough down, cover, and let rest 10 minutes. Divide dough in half. Roll each half into a 14×8 inch rectangle. Brush dough with the melted butter. Combine the remaining sugar, peel and cinnamon and sprinkle over the dough. Top with the blueberries and press the berries into the dough. Starting at the long side roll up dough jelly roll fashion and seal edge by pinching. Repeat with second roll. Cut each roll into 12 slices and place 12 rolls in greased 9 inch round pans. Cover pans and allow to rise until doubled, about 30 minutes. Bake in a 375 degree oven for 20-25 minutes. While rolls are warm, you can top with a powder sugar glaze, if desired. Makes 24.
Spicy Beet and Tomato Soup

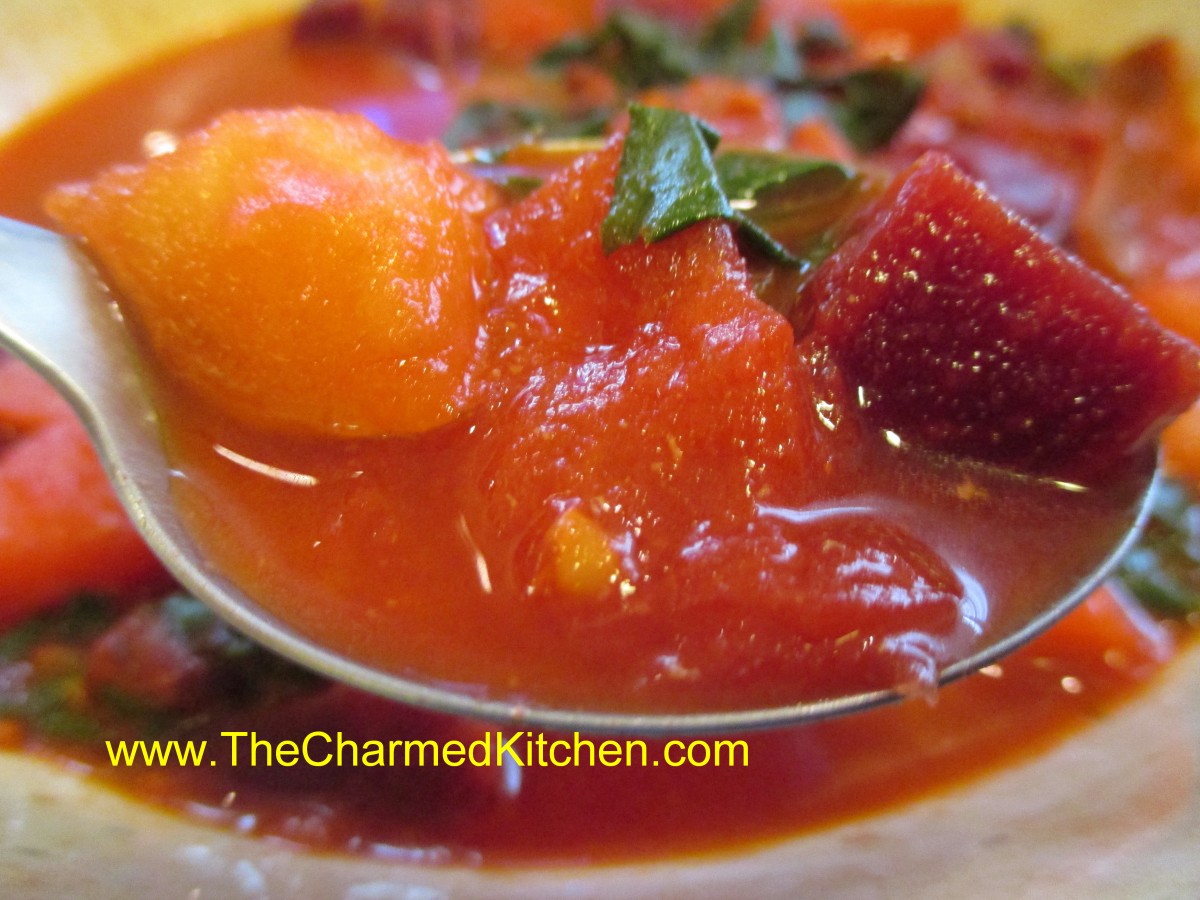
Spicy Beet and Tomato Soup
I had a bunch of fresh beets in my fridge and since it’s a little cool today I thought I’d make soup with them. I took inspiration from what I had on hand including onions, potatoes and home canned tomatoes. Adding the tomatoes was a last minute decision that worked out really well. The tomatoes added just the right amount of tart/sweet flavor. The color was really pretty, too.
I must say this about working with beets. I love them. I love how they taste. I love the color, and how everything I cook with beets turns out the most gorgeous color. I don’t, however, like the way my kitchen looks whenever I cook with beets. It’s like something out of a crime scene. Not blaming the beets. Just wondering how it is I can clean up everything, then walk in the kitchen the next day and find flecks of red all over?
Here is the recipe. It was a small bunch of beets, so I just made a small batch of soup, but it could easily be doubled.
Spicy Beet and Tomato Soup
1 bunch beets, about 1 lb.
oil
1 onion, chopped
1 t. cumin seeds
1 t. fennel seeds
3-4 c. stock- I used chicken
1 potato, cubed
1 pint canned tomatoes – or 2 c. diced tomatoes – or 14 oz. can of diced tomatoes
1t. dill
1/4 t. cayenne, or to taste
salt and pepper to taste
Wash beets and trim leaving about 1 inch of the stem attached. Reserve greens. Place beets in a saucepan of boiling water and simmer for about 20 minutes. Remove beets and cool in cold water until you can handle them. While beets are cooling, cook onion in oil until tender. Add seeds and cook until they are toasted and onions are golden. Peel and cube the beets. Add to the onions along with the stock, potatoes and tomatoes and cook until potatoes are tender, about 15 minutes. Rinse and chop up about 1 cup of the beet greens and add them to the soup along with the seasonings. Cook until greens are tender, about 5 minutes. Adjust seasonings and serve. Serves 3-4.
Raspberry Crumb Cake

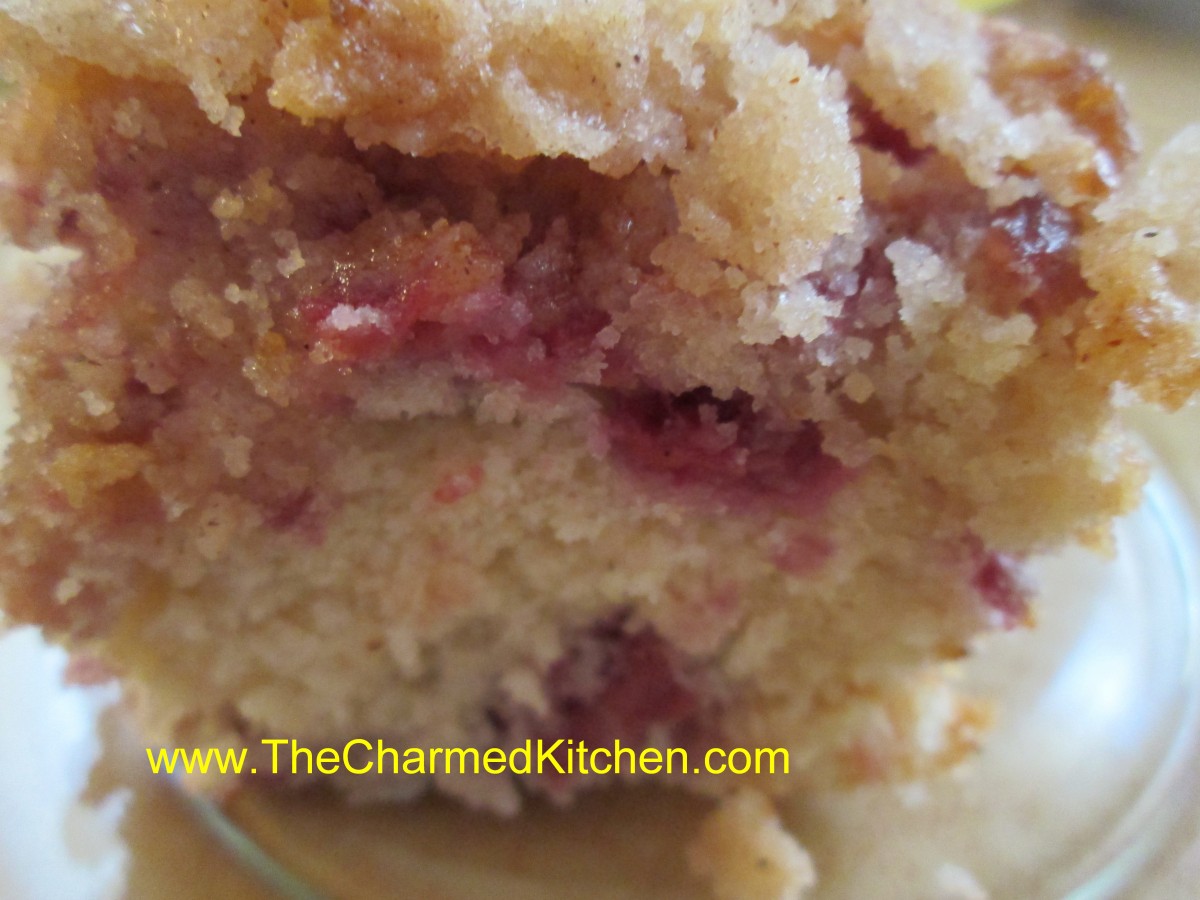
Raspberry Crumb Cake
I have been trying to clean out my freezer. I came across some raspberries I froze last summer and decided to make a cake with them. I have made this cake with fresh berries, too. Either works, but I give the cake a few extra minutes to bake when I use frozen berries. The cake is delicate and not too sweet. The crumb topping really makes it special. It stands on its own, but is also good served with a drizzle of melted chocolate, some extra berries or a scoop of ice cream. This cake always makes me think of summer, even on a chilly day.
When I was a kid we had a patch of raspberries in the back of the yard. It was always a special treat to go out on a summer day and harvest the raspberries, warm from the sun. We did lose berries to birds and squirrels and it became my Father’s mission to save as many berries as he could. When we got a new dog, my Dad was sure berry theft would go down. But we seemed to be getting even fewer berries. One day, my Mom caught the dog eating raspberries right off the plants. Mystery solved.
Raspberry Crumb Cake
For cake batter:
2 c. flour
2 t. baking powder
½ t. salt
½ stick (¼ cup) butter, softened
¾ c. sugar
1 egg
½ c. sour cream
2 t. vanilla
2 cups raspberries – I like fresh but frozen work
For topping:
½ c. sugar
¼ c. flour
½ t. cinnamon
½ stick (¼ c. butter, chilled and cut into bits)
Combine dry ingredients and set aside. In mixing bowl with electric mixer, beat butter and sugar until light and fluffy. Beat in egg, sour cream and vanilla. Add flour mixture gradually until just mixed in. Fold in raspberries. Grease and flour an 8 or 9-inch pan and add prepared batter. Combine topping ingredients until they resemble coarse crumbs. Sprinkle over batter in pan and bake in a preheated 375-degree oven and bake for 35-45 minutes. Use toothpick to test.
Naan Bread


Naan Bread
If you have ever eaten at an Indian restaurant, you probably had naan bread. The bread has a soft, yet chewy texture, and is often topped with seeds. I was invited to an Indian dinner with friends, and I offered to make the naan. I bake bread all the time, but somehow I had never made naan. I was excited to give it a try. I knew there would be some challenges.
The thin rounds of dough are traditionally baked against the wall of a tandoori oven. The clay of the oven walls gets really hot, and cooks the bread quickly. Since I don’t have a tandoori oven, I baked my naan bread under the broiler. I was nervous that it would get burnt before it finished baking, but they turned out great. Soft, puffy bread pillows that I brushed with ghee right after baking. They came out even better than I had hoped. This is a bread I will be making again.
Naan Bread
1 t. sugar
1 pkt. Yeast
2/3 c. warm water
1½ c. flour
1 T. ghee*
1 t. salt
Oil for baking pans
Extra ghee for brushing breads
Sesame, fennel or poppy seeds, if you like
In medium bowl, combine sugar with yeast and warm water. Stir and allow to sit until mixture gets bubbly, about 10 minutes. In mixing bowl place the flour, ghee and salt and mix to combine. Add the yeast mixture and stir until a soft dough forms. You might have to add a little more water. Knead dough on a floured surface until smooth and elastic, about 5 minutes. Return dough to mixing bowl, cover and allow to rise in a warm place until doubled in size, about 1½ hours. Turn dough onto floured surface and knead a couple more minutes. Unless you have a tandoori oven, you will need to cook the naan under a very hot broiler. Turn the broiler on. Line a baking sheet with foil and coat with some oil. Set aside while you prepare the dough for baking. Cut dough into 6-8 pieces. Roll each piece into a circle about 5 inches across and ½ inch thick. Place dough on the prepared baking sheet and place under the broiler. I set mine about 4 inches from the heat. Turn breads a couple of times. They will take about 7 minutes to bake. Remove from broiler, brush with extra ghee or melted butter and sprinkle with seeds, if you like. Makes 6-8. Best served soon after baking.
*Ghee is essentially clarified butter, or butter where all the solids have been removed. To make ghee, gently melt butter in a saucepan over medium-low heat. After melting, the butter will separate into three layers. This should only take a few minutes. Foam will appear on the top layer, the milk solids will migrate to the bottom of the pan, and clarified butter will float between the two. Let the butter come to a simmer and hold it here until the middle layer becomes fragrant, more golden than when you started, and clear – push the solids on top out of the way to have a peek. The milk solids at the bottom will begin to brown. At this point it is a matter of preference, you can let the solids lightly brown, or let things progress a bit further. When the ghee is finished, skim absolutely all of the top layer of foam into a bowl with a spoon or strainer, turn off the heat, and allow things to settle for a minute or so. Next, carefully pour the golden central layer through a strainer, into a clean glass jar, leaving the milk solids at the bottom of the pan. It can be used as a cooking oil, for flavoring all sorts of foods, and is amazing on popcorn.
Very Berry Scones

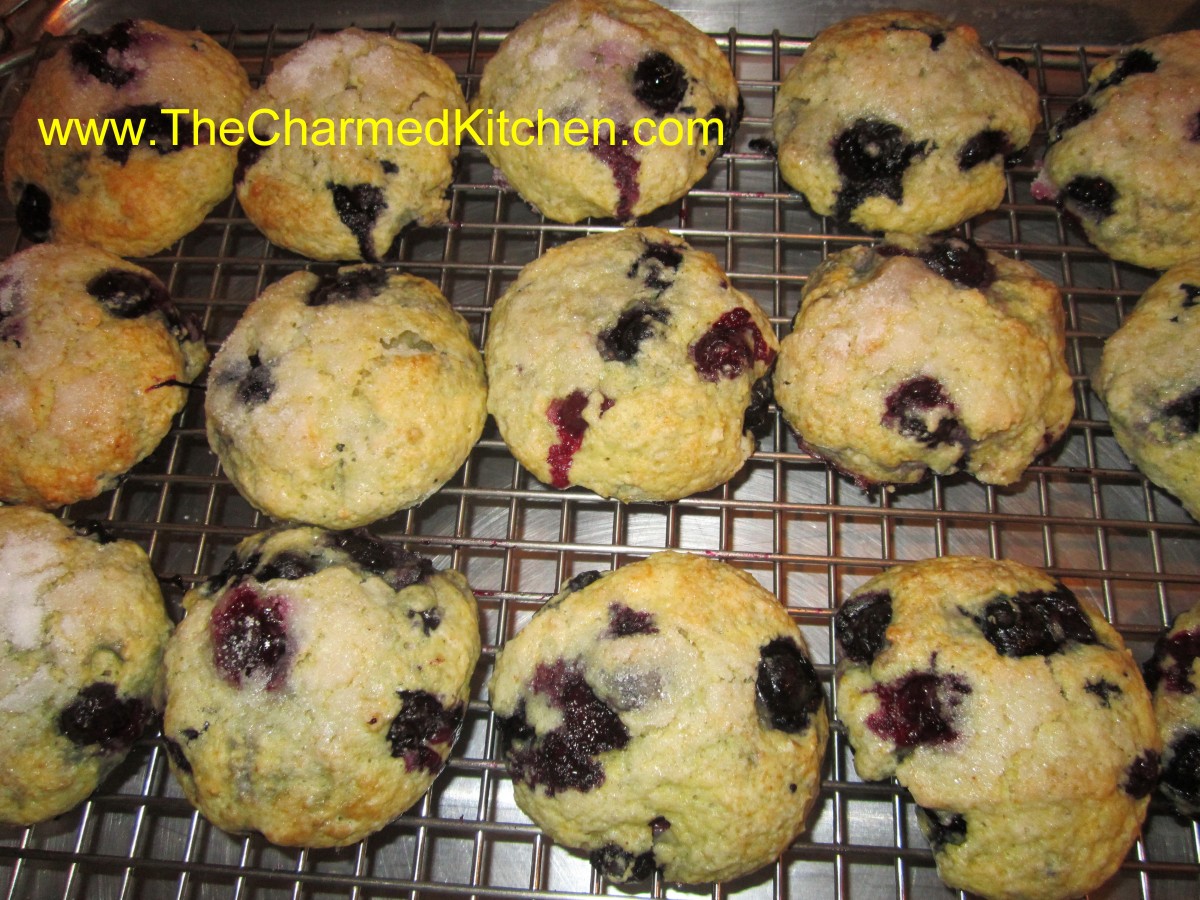
Very Berry Scones
I had been cleaning out the freezer and found some frozen berries from last Summer. I decided to use some of them to make these scones. Even when the weather is chilly- fresh berry scones make me feel warmer. I used a combination of blueberries and blackberries, but raspberries would work nicely, too. I had one with a cup of coffee for breakfast. They could also be used as a dessert in a berry shortcake. The secret to a tender scone is to be gentle with the dough. Do not mix too much. As soon as the dough holds together, you are good to go.
Very Berry Scones
2 c. flour
1/4 c. sugar
1 T. baking powder
¾ t. salt
6 T. chilled butter
1 ½ c. berries, fresh or frozen- do not thaw berries – I used blackberries and blueberries
1 t. lemon or orange zest
2 large eggs
1/3 c. heavy cream
Mix dry ingredients together in bowl and cut in butter to resemble coarse crumbs. Toss in blueberries and zest. Beat together eggs and cream and stir into flour mixture. Mix very gently to avoid bruising berries. Use a small ice cream scoop to scoop out batter and place on baking sheet. Place scoops about an inch apart. Press down slightly. Brush with a little cream and sprinkle with a little extra sugar. Bake in a preheated 400-degree oven for 20-22 minutes. Makes 15-18.
Giant Peanut Butter Cup

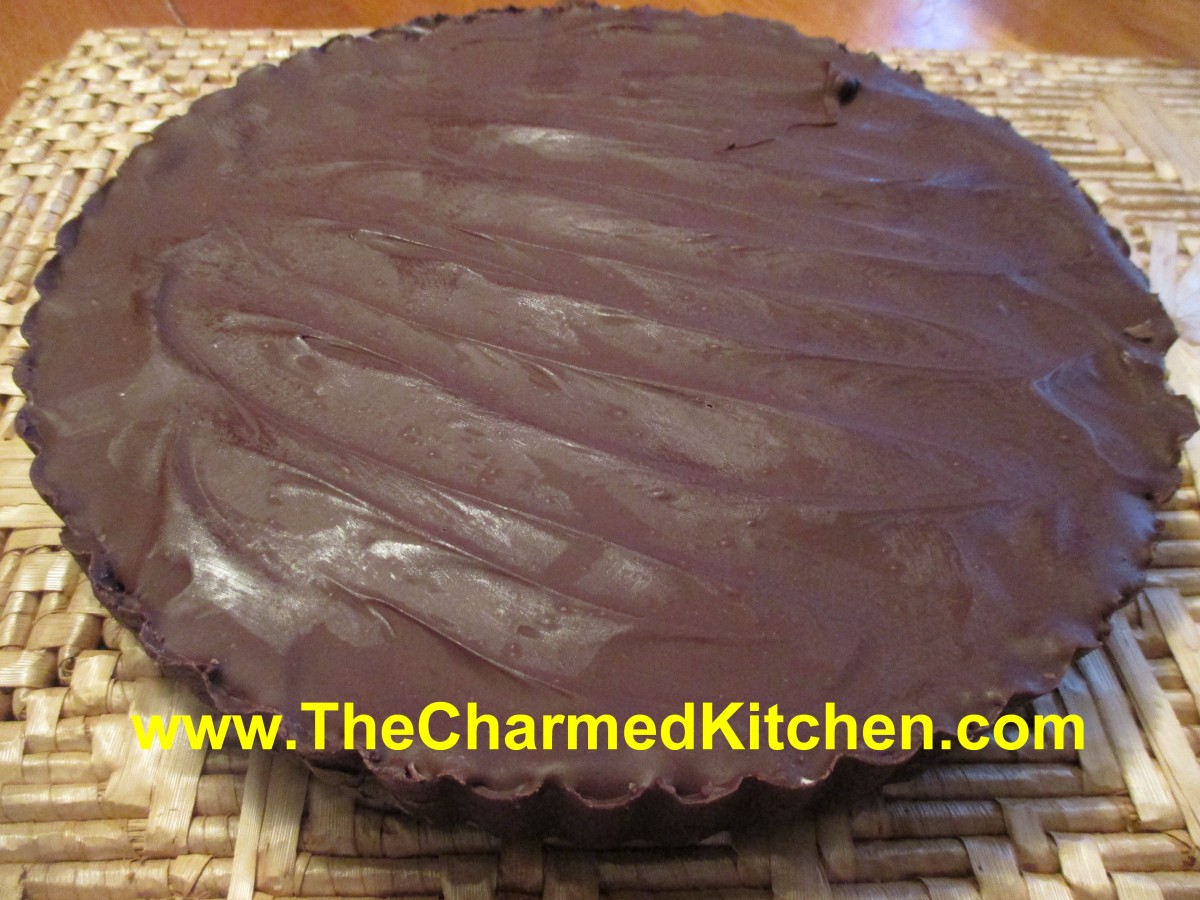
Giant Peanut Butter Cup
I wanted a food gift, for a friend. I wanted to make her something special. I decided to try my hand at making a giant peanut butter cup. I’ve made small ones in the past, so I knew the basic structure. Using a 10-inch tart pan offered different challenges, but I went ahead and gave it a try. I wasn’t worried about the components. I had good quality dark chocolate and peanut butter. I knew it would taste good. I wasn’t sure it would stay in one piece. After using more than a pound of chocolate, I didn’t want to bring her a pile of broken pieces. It worked, and here is the result. Since I haven’t given it to her yet, I don’t have any pictures of it sliced. I used a pretty good amount of chocolate. You could probably use less, but I wanted the chocolate thick enough on the bottom the make it sturdy. I also used a slightly altered version of the filling I use when I make buckeyes. I am pleased with how it came out. Who am I kidding? I am just happy it came out in one piece.
Here is how I did it.
Susie’s Giant Peanut Butter Cup
1- 1½ lbs. chocolate – I used a nice quality dark chocolate
1½ c. peanut butter
1 stick (½ cup ) butter, softened
2 ½ c. powdered sugar
2 t. vanilla
You will need a tart pan with a removable bottom. I used a 10-inch pan, but a 9- inch pan would work, too. Cover the removable bottom of the tart pan with wax paper. It will make it easier to get the thing out in one piece later. I cut out a square and just folded the extra wax paper under the pan and taped it down. Melt the chocolate and pour enough of it into the bottom of the tart pan that you can cover the bottom generously. Use a small spoon to push chocolate up the sides of the pan.
Now at this point you could just keep tipping the pan to get the chocolate evenly coated inside. I know my limitations. I just pictured myself dropping the pan of melted chocolate, so I used the spoon method instead. The important thing is that the entire inside get a coating of chocolate. Place pan in fridge to cool and chocolate to set up. Meanwhile, in medium bowl mix peanut butter and butter together until well mixed. Stir in sugar and vanilla and mix until smooth. Spread this mixture over the chocolate shell. Don’t press too hard. You don’t want to break the shell. I will confess that before I added the peanut butter, I played around with loosening the chocolate shell. I was worried it would not come out later. After I added the peanut butter mixture, I put it back in the fridge to firm up. Once the peanut butter mixture was chilled, I melted the rest of the chocolate and poured it over the top.
I used a lot of chocolate in the base and needed to melt more chocolate than I originally planned on. I do think the thicker shell helped when it came time to get it out of the tart pan.
To remove the peanut butter cup- make sure it is completely hardened. I gently pulled at the sides all around the edges of the tart pan, to loosen it. Then I pushed up on the removable bottom of the pan. After a few gentle pushes, it came out. I had to trim a little chocolate off the bottom when removing the wax paper, but it helped in getting the peanut butter cup out in one piece.
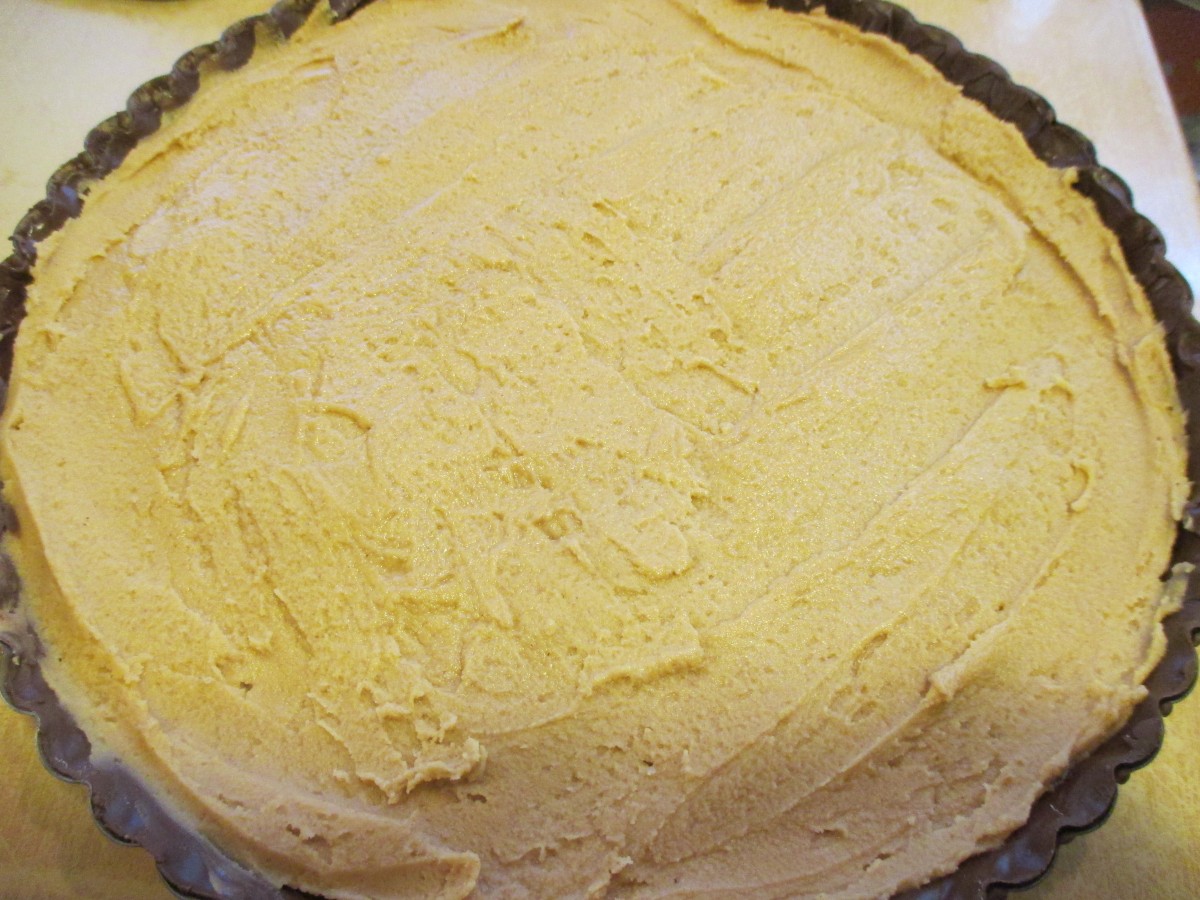
Spread peanut butter mixture over chocolate shell
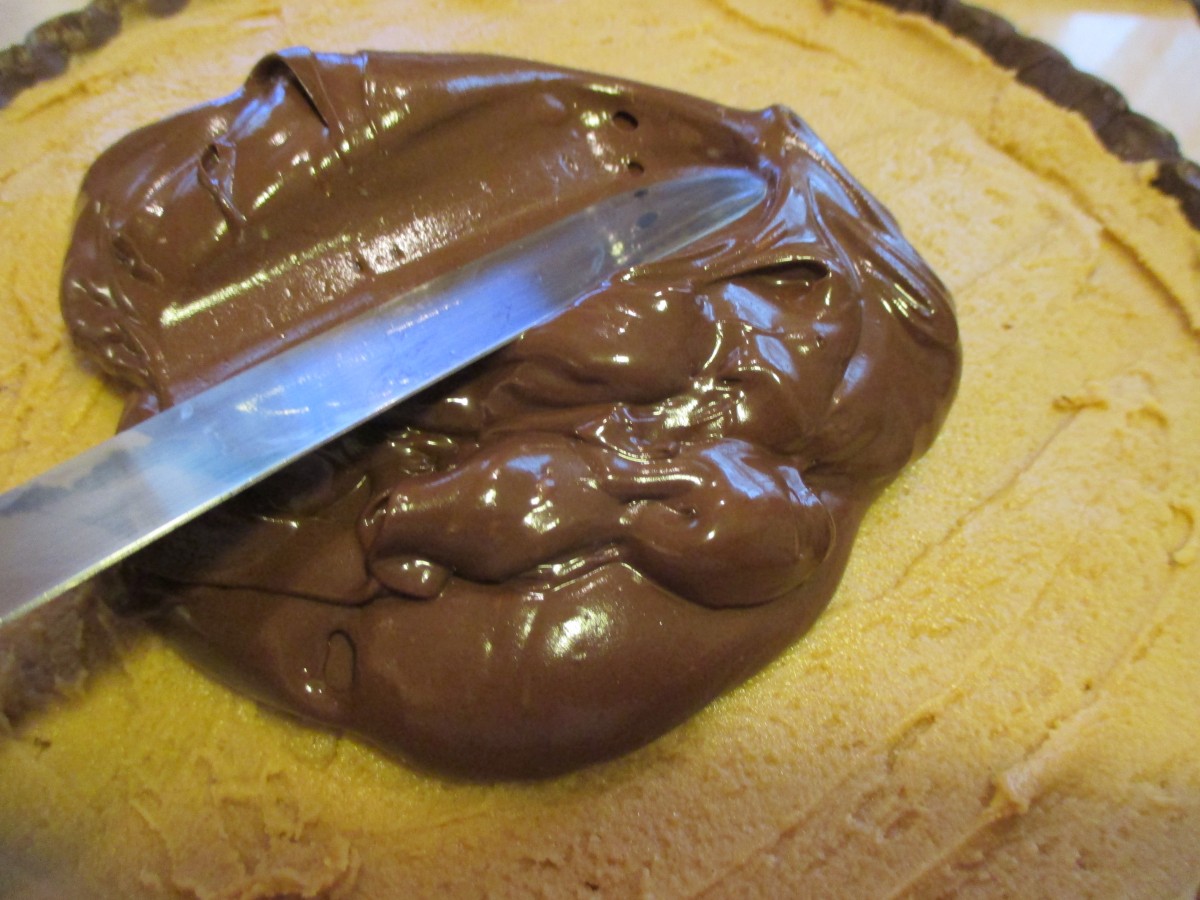
Spread melted chocolate over peanut butter filling
Chicken with Rhubarb Glaze


Chicken with Rhubarb Glaze
Like a lot of people, when I think of rhubarb, I first think of desserts like pie or cobbler. I had some rhubarb and could not decide what to do with it. I chopped it up, and cooked it in a little water until tender. I ended up with 2 cups of cooked rhubarb. I used this as the base for the glaze. I added the other ingredients, cooked it down until it was thick, and ended up with about 2 cups of glaze. It had a nice balance of sweet, tart and heat. I used some of it as a glaze for chicken I was cooking. I froze the rest. It would also be good on other meats or even on grilled veggies.
Rhubarb Glazed Chicken
8 chicken thighs or 1 whole chicken, cut up
1 cup rhubarb glaze ( recipe follows
salt and pepper to taste
Place chicken pieces in roasting pan, season to taste and bake in a preheated 375 degree oven for 30 minutes. Remove from oven and drain any fat out of the pan. Pour over the rhubarb glaze and return chicken to oven for an additional 35 minutes. Baste the chicken with some of the glaze in the pan and return to oven for 15 minutes more. Serves 4.
Rhubarb Glaze
2 c. cooked rhubarb
1 c. apple cider vinegar
1/4 c. brown sugar
2 T. honey
2 T. dried minced onion
1 T. hot sauce
1 T. paprika
2 t. minced garlic
1 t. Worcestershire sauce
1 t. cumin
1 t. cinnamon
salt to taste
Place all ingredients in a saucepan and cook over medium heat until thickened. Stir more often as mixture thickens. Cook until sauce has reduced to about 2 cups. Use as a glaze on meats and vegetables. It was great on chicken but would also go well on pork or duck. Note: I liked the tang of it but you could make it a little sweeter to suit your own taste. Makes 2 cups. Will keep a few weeks in the fridge or can be frozen.
Cinnamon Pecan Shortbread Cookies

Cinnamon Pecan Shortbread
It seems I am always making variations on shortbread cookies. I love shortbread. I am not alone- so many friends have told me the same thing. There is something about the crumbly texture of shortbread that makes them a favorite for a lot of people. This recipe is a classic shortbread, topped with cinnamon and pecans. They are really good. You just make a batch of dough, top with a cinnamon – pecan mixture, and bake. Could not be simpler. As soon as they come out of the oven cut them into little strips. I got nearly 100 out of one batch. It depends on the size you cut them. If you are looking for a simple, yet wonderful cookie, you might want to try these.
Cinnamon Pecan Shortbread Cookies
1 c. butter
1 c. sugar
1 egg, separated
2 c. flour
1 T. water
½ c. finely chopped pecans 2 t. cinnamon
Lightly grease jellyroll pan (10×15). Mix butter, sugar and egg yolk then stir in flour. Pat into pan. Beat egg white with water until frothy and spread over dough. Combine pecans and cinnamon. Sprinkle on nut mixture and bake in a 350-degree oven for 20-25 minutes or until lightly browned. Cut immediately into tiny strips, makes 50- 100 .


