Dukkah

Dukkah
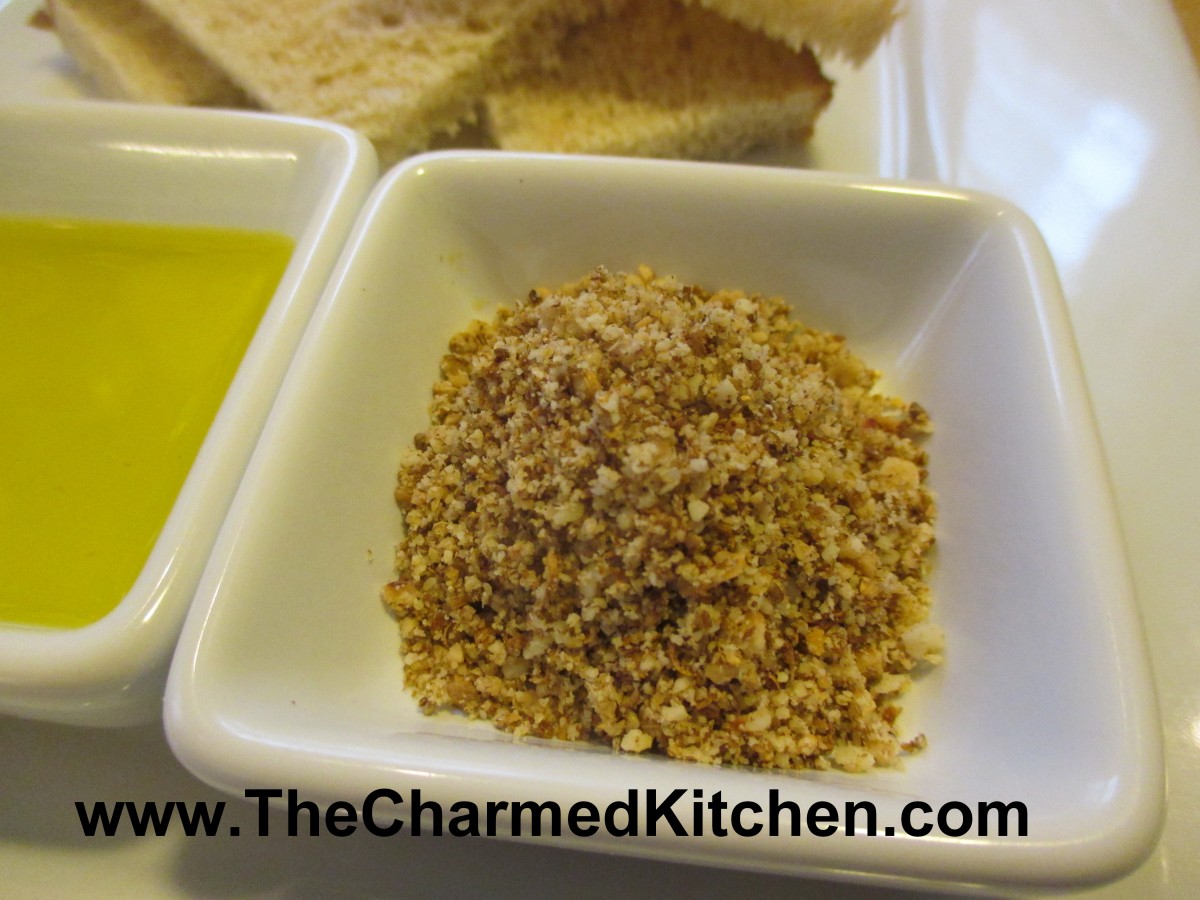
Dukkah is an Egyptian dish that is a mix of toasted nuts and spices. It has a wonderful fragrance and crunchy texture. A lot of the flavor comes from toasting the nuts and spices before grinding them up. Toasting really brings out the flavor of both the nuts and the other ingredients. It is traditionally served with olive oil and bread. You put some Dukkah in a little bowl, and put olive oil in another little bowl. Dip your bread in the oil and then in the Dukkah. I like to sprinkle it on fish or chicken before baking. Dukkah is also good tossed with cooked veggies, or sprinkled on an omelet. So simple and so tasty.
Dukkah
¾ c. each whole, blanched almonds and hazelnuts
½ c.(scant) coriander seeds
¼ c. cumin seeds
6 T. sesame seeds
In 300-degree oven toast nuts for about 20 minutes or until golden. Bake cumin and coriander seeds, stirring occasionally, for about 10 minutes or until you can smell them. Toast sesame seeds about 5 minutes. Cool all ingredients. If you prefer, you can toast the seeds in a skillet, over medium heat. Just place the coriander and cumin seeds in a skillet and heat, stirring often until they become fragrant, about 5 minutes. Add the sesame seeds and continue toasting until sesame seeds are golden brown, about 5 minutes longer. Be careful not to burn them. Grind sesame seeds and spices into a coarse powder. In processor chop nuts fine and combine with spices. To serve dukkah: pour olive oil in a small bowl. Place crusty bread and dukkah on a plate. Dip bread in oil then in the dukkah. I also use dukkah sprinkled on chicken and fish. Store in fridge or freezer for extended freshness.
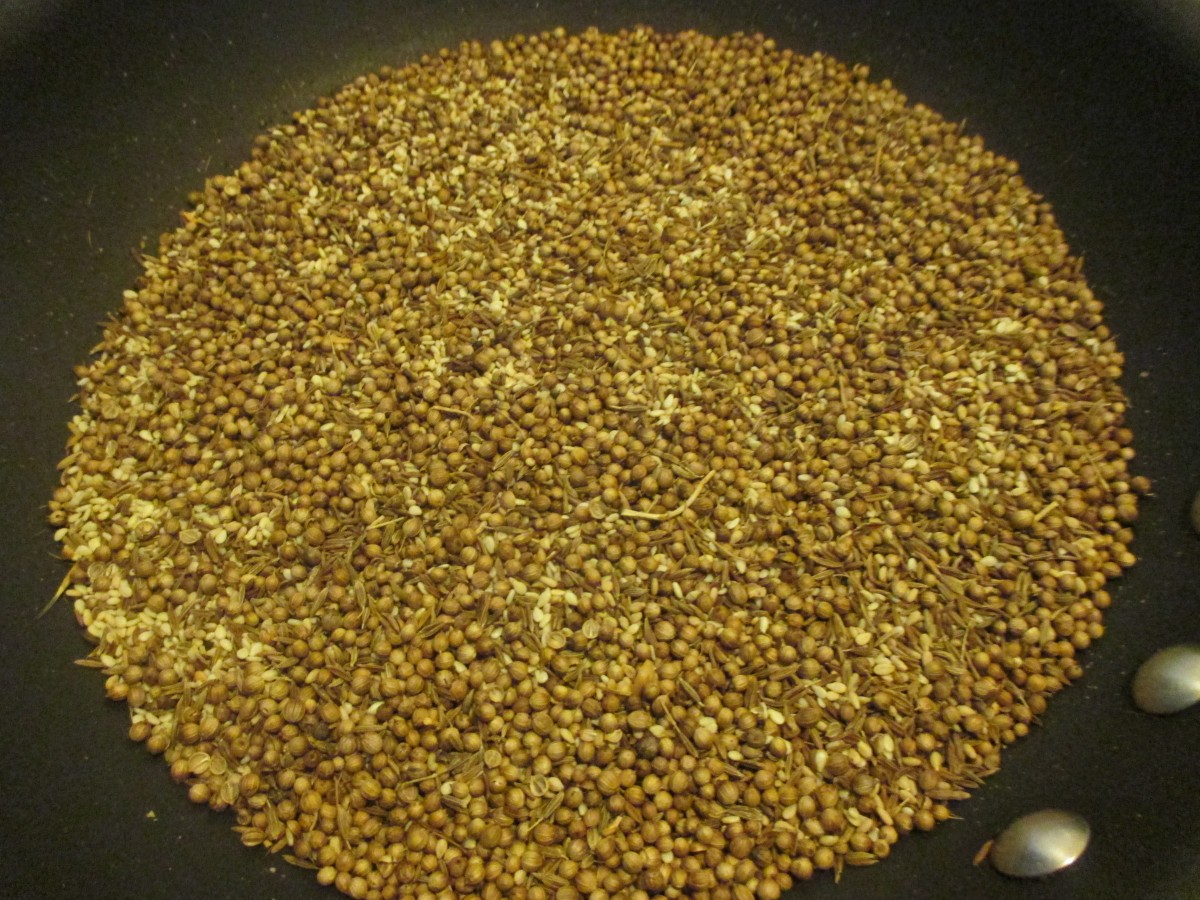
Toasting the spices
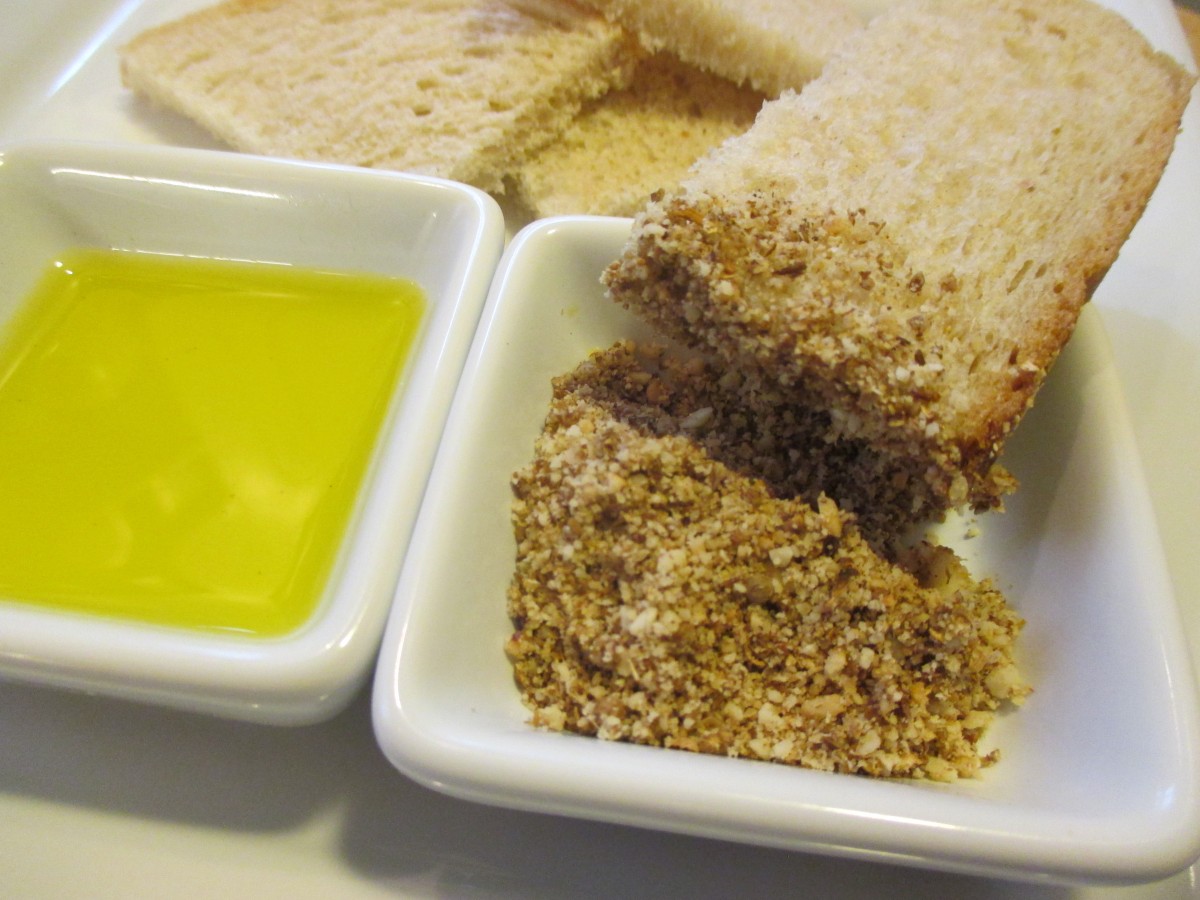
Serving Dukkah with olive oil and bread
Really Easy Blueberry Crumb Cake

Blueberry Crumb Cake
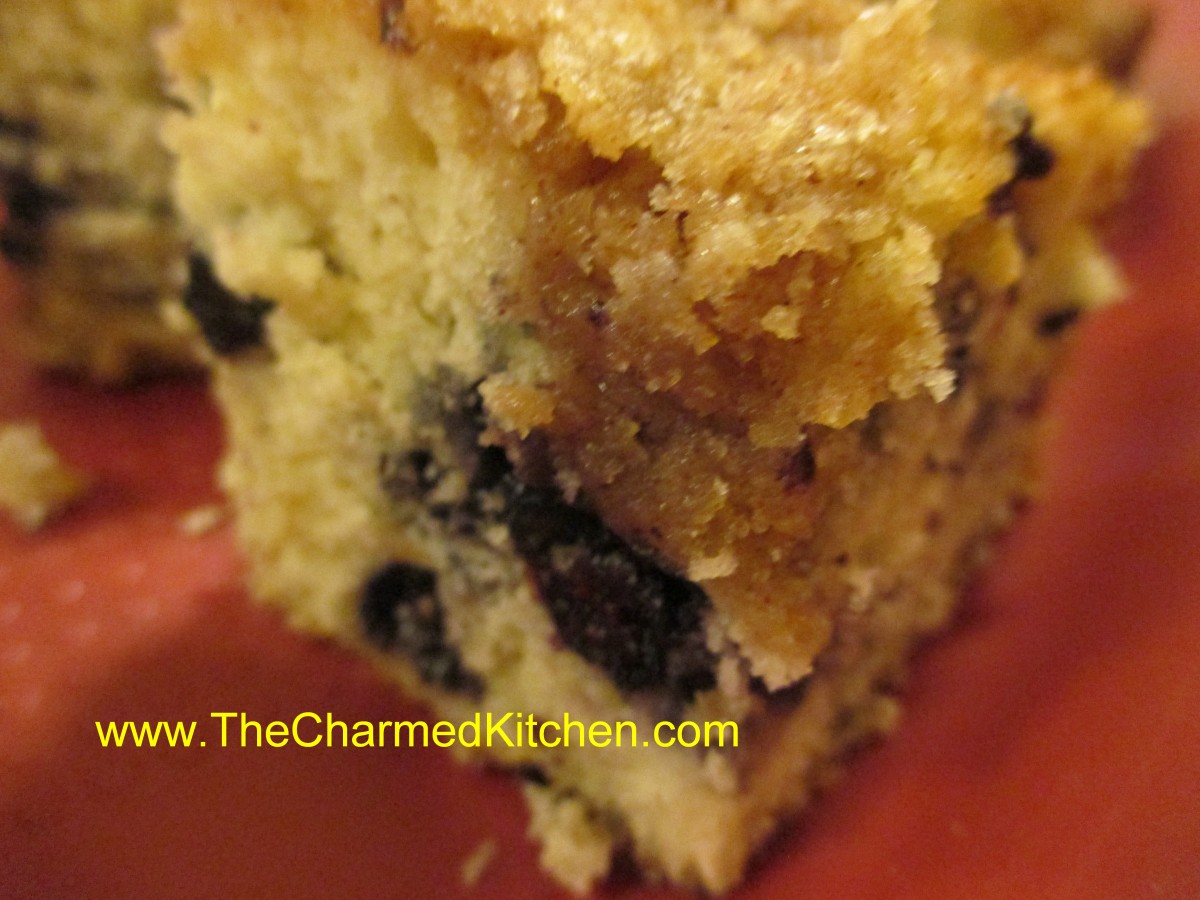
When local berries are in season I freeze plenty so I can enjoy them all year round. In a recent cleaning out of the freezer, I pulled out a package of blueberries and decided to make something with them. I love blueberries in pretty much anything. I cook with them all the time. This is one of my favorite blueberry recipes- and that is saying a lot. It is a classic and always a favorite when I make it for friends and family. The cake is moist, tender and delicate but the magic is that crumb topping. The cake isn’t too sweet, so you can enjoy it for dessert, or even for breakfast or brunch. I like it plain, but friends have been known to serve it with ice cream. There is something extra nice about a blueberry cake on a snowy day.
Blueberry Crumb Cake
For cake batter:
2 c. flour
2 t. baking powder
½ t. salt
½ stick (¼ cup) butter, softened
¾ c. sugar
1 egg
½ c. milk
1 pint blueberries, fresh or frozen
For topping:
½ c. sugar
¼ c. flour
½ t. cinnamon
½ stick (¼ c. butter, chilled and cut into bits)
Combine dry ingredients and set aside. In mixing bowl with electric mixer, beat butter and sugar until light and fluffy. Beat in egg and milk. Add flour mixture gradually until just mixed in. Fold in blueberries. Grease and flour an 8 or 9-inch square baking pan and add prepared batter. Combine topping ingredients until they resemble coarse crumbs. Sprinkle over batter in pan and bake in a preheated 375-degree oven and bake for 35-45 minutes. Use toothpick to test.
Note: I have used a 9-inch round pan and it worked fine.
English Toffee Crunch

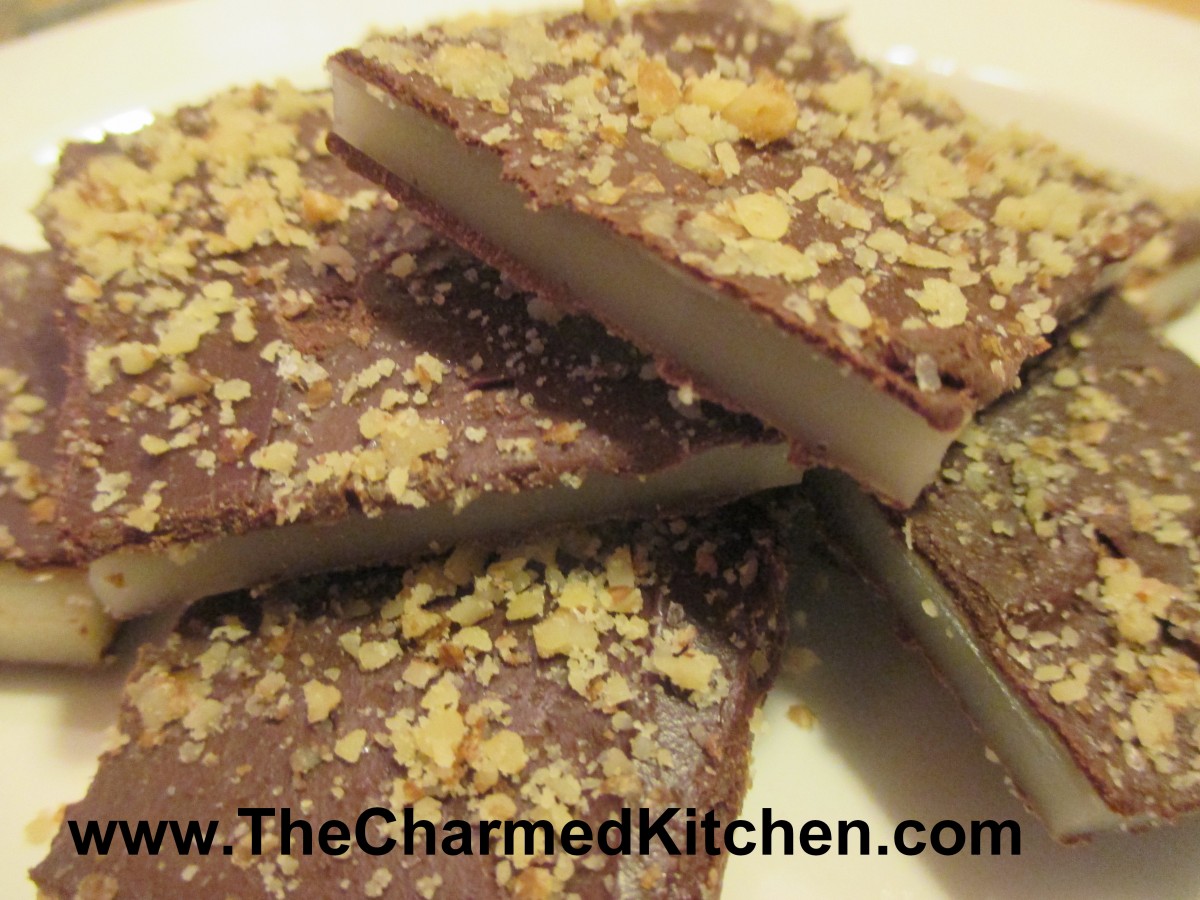
English Toffee Crunch
If you are looking to make a special sweet treat for someone, English Toffee Crunch is always a good choice. The crunchy, sweet toffee is coated with chocolate on the top and bottom along with a sprinkling of fine chopped nuts. A classic, for sure. I know people are sometimes a little scared about making candy, but this is pretty easy to make, and well worth the effort. The only special piece of equipment you will need is a candy thermometer. Just be careful when handling the hot ingredients. The end result is a special treat for a special someone.
English Toffee Crunch
1 1/2 c. sugar
2 sticks butter (not margarine)
3 T. water
1 T. light corn syrup – recipe follows for homemade
3/4 lb. milk or dark chocolate, or chocolate chips
1/2 c. very finely chopped walnuts
Over low heat, stirring constantly, cook sugar, butter, water and corn syrup until mixture reaches hard crack stage (300-310 degrees). Pour onto ungreased jellyroll pan tilting quickly in all directions to get toffee as thin as possible. It hardens up unbelievably quickly so work fast. I like to warm the cookie sheet a little in the oven so it buys me a few extra seconds to thin out the toffee. Harden in fridge about five minutes or let stand at room temperature until cooled down. Melt chocolate in double boiler and spread half of it over toffee, spreading to edges. Sprinkle with half the nuts and return to fridge it harden chocolate. Turn toffee carefully onto another sheet and coat the bottom with the remaining chocolate and nuts. Chill until chocolate hardens then break up into bite sized pieces. Note: you can use even more chocolate if you like a thicker coating. Store in a cool, dry place in an airtight container. Makes 1 1/2 lbs.
Homemade Corn Syrup Substitute
2 cups granulated sugar
3/4 cup Water
1/4 tsp. Cream of Tartar
dash of salt
Combine all in a large, heavy stainless steel pot. Stir and bring to a boil. Reduce heat to a simmer and cover with lid for 3 to 4 minutes to get the sugar crystals off the sides of the pan. Uncover and cook to softball stage, 238 to 240 degree’s F. or when a small amount is dropped into cold water and does not hold its shape; stir constantly. Cook for another minute. Cool and store in covered jar at room temperature, will keep well for 2 months at room temperature.
For dark corn syrup add 1/4 cup molasses
Homemade Eclairs


Homemade Eclairs
If you want to surprise someone with a very special sweet treat this weekend, you could make eclairs. These are a bit or work, but the end result is so wonderful. I think they are worth the effort, especially for special occasions.
You start by make a pate a chou, or cream puff pastry. This is the same dough used to make cream puffs. It is a combination of water, butter, milk and flour- cooked on top of the stove, then enriched with the addition of eggs. The dough is piped onto baking sheets and baked until puffed, golden and crisp. Once cooled, they are filled with sweetened whipped cream or, more traditionally, a custard filling, then topped with chocolate ganache.
Homemade Eclairs
1 recipe Cream Puff Pastry (Pate a Chou)- recipe follows
Egg custard- for filling, or sweetened whipped cream- recipe follows
Chocolate Ganache- for topping- recipe follows
Start by making the dough. This recipe will make 12-18 medium eclairs.
Cream Puff Pastry
¾ c. water
¼ c. milk
¼ t. salt
½ c. (1 stick) unsalted butter
1¼ c. flour – unbleached or bread flour preferred
4 large eggs
Extra milk for brushing
In saucepan, heat together water, milk butter and salt into a full boil. Butter has to be melted. While stirring, dump flour into saucepan, stirring constantly. Mixture will form into a ball. Reduce heat to medium and continue cooking dough, while stirring, for another minute or two. Place dough in an electric mixer and allow it to cool down a little before adding the eggs. Mixture has to be at 140 degrees F, or below, before you start adding the eggs. I use the paddle attachment and beat the dough before adding the eggs. This cools the dough down faster. Beat in eggs, one at a time, until each is fully incorporated. Beat until dough is shiny. A spoon, lifted out of the batter, should leave a peak that does not fall down.
Preheat oven to 425. Line a baking sheet with foil or parchment. I used a silicone liner and was happy with the result. Don’t grease the pan. Using a piping bag, squeeze the dough into 5-inch strips on the baking sheet- leaving a little room in between. Strips should be about ¾ -inch in diameter. Using a little milk on your finger, smooth down any peaks on the puffs. They should resemble little hot dog buns. Bake at 425 for 15 minutes, then turn oven down to 375. Bake eclairs 10 more minutes, or until golden brown. Tap the shells. They should sound hollow. Turn off the heat and leave oven door open a crack, allowing them to dry completely. Cool before filling. Makes 12-18.
Custard Filling
2 cups milk
2 tablespoons cornstarch
1⁄3 cup sugar
2 eggs, lightly beaten
1 teaspoon vanilla
Using a whisk, combine milk, sugar and cornstarch in a medium saucepan over medium heat on stove top. Allow milk to scald (heat to the point when tiny bubbles form around edges of pan). Whisk occasionally to prevent cornstarch from clumping on bottom edges of pan. Remove milk mixture from heat, preferably to a burner that’s turned off.
Mix about 2 tablespoons of scalded milk mixture into eggs using whisk, then introduce eggs into milk mixture in a slow stream, whisking milk mixture constantly. Immediately return pan to heat and whisk gently until custard thickens, another two or three minutes. Do not allow to boil. (If you find that you have egg white strands in custard, feel free to pass it through a fine-mesh sieve into a different bowl now.) Remove pan from heat and stir in vanilla. Cool before using. Makes 3 cups.
To fill the eclairs, using a small piping tip with a pastry bag, filled with the custard. Squeeze filling in on one end, on through the bottom, squeezing until it seems full.
Once eclairs are filled, top with a chocolate ganache. I just dip the tops of the eclairs in the warm ganache and chill until chocolate sets. Filled eclairs should be stored i8n fridge until ready to serve. They can be frozen.
Chocolate Ganache
4- 6 oz. dark chocolate, chopped- or 1 cup chocolate chips
2 oz. heavy whipping cream
In saucepan, heat chocolate and cream together until just heated through. Remove from heat and stir until smooth. You can also do this in a microwave safe bowl, in the microwave for about a minute. Remove and stir until smooth. Makes 1 cup.
Homemade Vegetable Soup Base


Vegetable Soup Base Ingredients
I make a lot of homemade soup and soup stock. I will admit to sometimes using a paste-type soup base to stretch my homemade stock or to boost the flavor. They are so much better than bullion cubes, and can help you out in a pinch. They are also very convenient. I have made a lot of stuff from scratch- could I make my own soup base? I could- and I did. I made a vegetable soup base that is a mixture of vegetables, both fresh and dried, herbs, mushrooms, nutritional yeast, spices and salt. There is pretty good amount of salt, but I wanted to be able to store it in the fridge and be safe. Figured out that every teaspoonful of the finished base has less than 1/4 teaspoon of salt. Not great, but a lot less than bullion cubes. If you want to make yours with less salt or no salt- you’ll have to freeze the mixture in ice cube trays and take it out of the freezer as needed. Sort of like your own bullion cubes. The nice part is I can now make a vegetable soup easily and I know exactly what is in it. It can also be added to chicken or other meat-based stocks, in place of the salt, to add extra flavor.
Homemade Vegetable Soup Base
4 carrots, peeled and cubed
3 celery ribs, washed and cubed
1 large sweet onion, peeled and cubed
3 green onions, washed and cut up
1 c. sun- dried tomatoes, soaked in water 30 minutes, and drained
1 c. dried mushrooms, soaked in water 10 minutes and drained
1 c. chopped cabbage
1 c. parsley, chopped
1/2 c. chopped sweet pepper
1/4 c. nutritional yeast, optional
2 T. turmeric
8 oz. salt- I used sea salt and used a scale to weigh it. It’s around a cup but will differ if you are using a coarse salt
Combine all ingredients, except the salt, in a food processor and blend until smooth. I have a decent size Cuisinart and still had to do this in batches. Combine in a bowl with the salt and stir well to blend. Store in a clean jar in the fridge until ready to use. I ended up with about 5 cups of soup base. To use, add about 1 teaspoonful to a cup of hot water for vegetable broth. Use less or more according to your taste. Use in place of salt in other soups, stews and sauces.

Finished Soup Base

Vegetable broth made from the base
Kat’s Ricotta Fritters


Kat’s Ricotta Fritters
I have made these ricotta fritters before and they are always a big hit. However, no one seems to like them as much at my friend, Kat. She loves them. Really loves them. So I have decided to add her name to the recipe from now on.
Ricotta cheese is the ingredient that makes these fritters so special. They are delicate and tender on the inside, with a light crunch on the outside. If you are looking for a fast and easy addition to a dessert tray or brunch menu you can’t do much better than home made fritters. You just heat up oil, mix up the batter ingredients, and start frying. In less than 30 minutes you can have a plate of warm fritters. You can also make the batter up a day or two ahead of time- and chill until ready to use. When finished, you can eat them plain, roll them in cinnamon sugar or powdered sugar, or drizzle with a powdered sugar glaze.
Kat’s Ricotta Fritters
3/4 c. flour
2 t. baking powder
1 t. salt
1 T. cinnamon
1 c. ricotta cheese
2 eggs, beaten
3 T. sugar
2 t. vanilla
Powdered sugar for dusting
oil for deep frying
Heat oil to 370 degrees in heavy saucepan. While oil is heating combine dry ingredients with cinnamon and set aside. Beat together cheese, eggs, sugar and vanilla until smooth. Stir in dry ingredients. Working in batches spoon batter by level tablespoonfuls into hot oil, turning occasionally until golden brown, about 3 minutes in all. Transfer with slotted spoon to paper towels to drain. Dust with cinnamon sugar or powdered sugar and serve. Makes about 3 dozen.
Note: You can make the batter up a day ahead of time and chill until ready to use.
Candied Bacon


Candied Bacon
I had a conversation with a friend the other night about candied bacon. She had never heard of it. I explained that the mix of salty, smoky and sweet flavors really worked together. This recipe is only 3 ingredients- bacon- maple syrup (no fake stuff, please) and nuts. The end result is amazing. The candied bacon is easy to make. The hard part is letting it cool completely before eating. Once cool, it gets quite crisp. Really yummy. Try some and let me know what you think.
Candied Bacon
1 lb. bacon
3/4 c. – 1 c. maple syrup
3/4 c. – 1 c. crushed pecans, or any nuts you like.
Preheat oven to 350. Put bacon in baking pan and bake about halfway through (about 5-7 minutes or so). Drain most of the grease and allow to cool slightly. Coat each piece in syrup, roll in nuts and put back on pan. You may need more nuts as you go along, though it’s up to you how much to cover them. Bake another 7-9 minutes, until desired crispness. If you do like crisper bacon, just be sure to move the cooked bacon quickly off the baking sheet onto parchment paper, since the syrup will harden. Allow longer cooking times with thicker bacon.
Fish Chowder


Fish Chowder
When I think of seafood chowder, I usually think about a creamy mix of some sort of shellfish with assorted veggies. This chowder is a little different. It is a mix of fish and veggies, but there is no dairy or shellfish. The seafood can be any mild fish you happen to like. It is both hearty and light at the same time, if that makes sense. I have used salmon, catfish, cod and flounder in the past, and liked the way all of them tasted in the chowder. The recipe calls for Roma tomatoes, but any tomatoes would work. I used a pint of my home canned tomatoes, since I don’t have fresh this time of year. Here is the recipe.
Fresh Fish Chowder
1 medium carrot, sliced
2 ribs celery, diced
2 medium potatoes, peeled and sliced
1 large leek, white part only, cleaned and chopped
5 c. chicken, vegetable or fish stock
2 c. plum tomatoes, chopped
Salt and pepper to taste
1 1/2 lb. firm white fish cut into 1/2 inch cubes – I used flounder
1/4 c. flour
1/2 t. paprika
2 T. oil
In broth cook the carrot, celery and leeks 10 minutes. Add tomatoes and potatoes and simmer, covered, for 15 minutes longer. Season to taste. Meanwhile mix the flour and paprika together and dredge the fish in it. Heat oil in a skillet over medium high heat and cook the fish until lightly browned on both sides. Drain on paper towels. Before serving add fish pieces to the soup and simmer 5 minutes. Serve with crusty bread. Serves 6.
Reuben Bread


Reuben Bread
This would make a great bread to serve for your Super Bowl party. I taught a bread baking class last week and we made one in class. If you are looking for a twist on a Reuben sandwich try baking all the traditional ingredients into a loaf of bread. By using quick rising yeast, this bread can be ready to eat in right around an hour. It tastes amazing, and looks pretty impressive, too. Easier than you think, it will look like you spent all day making it. Plus, you can switch out the ingredients in all sorts of fun combinations.
Rueben Bread
3 ¼ c. all purpose or bread flour, you can use a little rye flour, too
1 T. sugar
1 t. salt
1 package quick-rising yeast
1 c. hot water
1 T. oil
¼ c. thousand island dressing*
6-8 oz. thin sliced corned beef
4 oz. sliced Swiss cheese
1 c. sauerkraut, rinsed and squeezed dry
1 egg white, beaten
Caraway seeds
Set aside 1 cup of the flour. Combine remaining flour with the other dry ingredients in a medium bowl. Stir in water and oil and gradually stir in enough flour to make a soft dough. Turn onto lightly floured surface and knead until dough is smooth and elastic, about 5 minutes. Roll dough into a rectangle about 16 x 8. Spread dressing down center middle of dough. Top with meat slices, cheese and sauerkraut. Cut one-inch wide strips of dough from filling to edge on both sides. It will sort of look like fringe. Alternating sides, fold strips up and over the filling at an angle. Carefully lift loaf onto greased baking sheet and place at an angle. Cover with a towel and place sheet on top of a roasting pan half-filled with simmering water for 15 minutes. Brush with egg white and top with seeds. Bake in a preheated 400-degree for 20-25 minutes or until golden brown. Cool slightly before slicing. Serve warm and refrigerate leftovers.
* You can make your own Thousand Island Dressing by combining equal parts of ketchup, mayo and sweet pickle relish.
Note: The variations for this bread are almost endless. Some favorite combinations are ham and Swiss with mustard, roast beef and cheddar, chicken, broccoli and cheese, Spinach with ricotta or feta and onions, pizza, assorted fillings. You get the idea. Use your imagination and have fun. Just be careful not to overfill, or the bread will be hard to move, use fillings that aren’t too runny and always use cold fillings.
If you want to use regular yeast use warm, rather than hot water. Also, don’t let dough rise over boiling water. After kneading cover dough and let rise 45 minutes. Punch down and assemble as in original recipe. Cover with a towel and let rise until dough looks puffy, about 40 minutes. Bake as directed above. These breads can also be frozen.
Red Lentil Soup with Curry


Red Lentil Soup with Curry
It was chilly and I had a taste for soup. I needed something quick, so I decided to use red lentils. The name is a little misleading. Red lentils are more a salmon color than red, and they cook to a pale yellow. Tasty, no matter the color. They are smaller than the more common brown lentils and they cook quickly. They are tender in as little as 10 minutes. For this soup, since I wanted to puree them, I let them cook until really tender, about 20 minutes. The soup came out quite nice. I topped it with a little sesame oil and basil, for added flavor. The cashews added some crunch.
You can also use red lentils to thicken a soup without flour. Just add a few and let them coo 20 minutes or longer. They will begin to fall apart and thicken the soup.
Red Lentil Soup with Curry
2 t. oil
1 large onion, chopped
2 cloves garlic, minced
6 c. stock- I used chicken, but veggie stock would work
2 c. red lentils
1-2 T. curry powder – add according to your taste
2 t. turmeric
Salt and pepper to taste
Sesame oil
Basil, cut into thin strips
Cashews
Heat oil in stockpot and cook onions until golden brown. Add the garlic and cook another couple of minutes. Add stock and heat to a boil. Rinse lentils and add to the pan. Cook at a simmer, covered, until lentils are soft- about 20 minutes. Add seasonings and adjust to your taste. Puree soup until smooth. Thin soup with additional stock or even water, if needed. Ladle soup into bowls and top each with a drizzle of sesame oil, some basil and a few cashews. Serves 4-6.


