New Day Cleveland – Homemade Liqueurs

I had a great time on New Day Cleveland the other day. Thanks to David Moss and the rest of the crew for making me feel so welcome. Here is the clip from my appearance.
Christmas Tree Coffee Cake

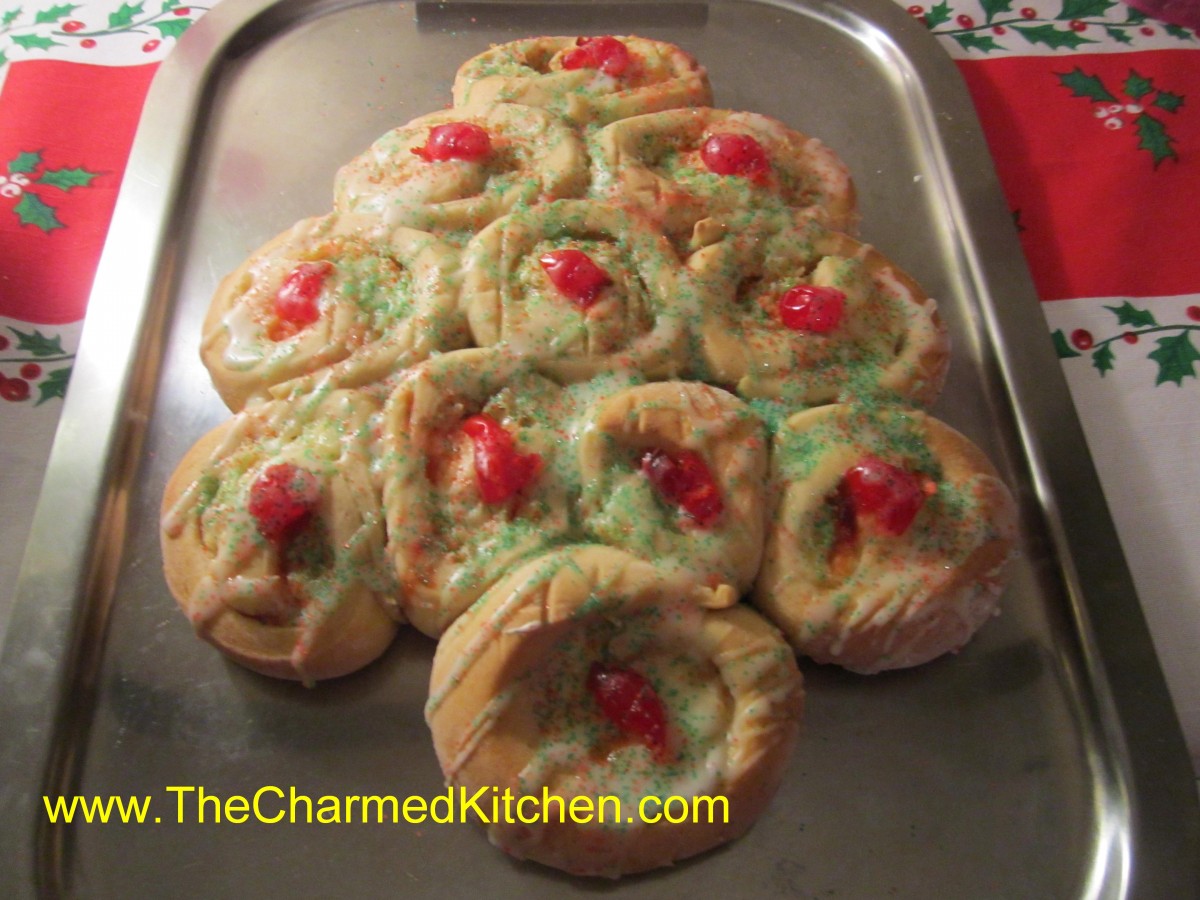
Christmas Tree Coffee Cake
This Christmas “tree” has become a tradition around here. I make one as a gift for a dear friend every year. If you are looking for something to serve for Christmas morning, or even as a dessert option, I suggest you make this coffee cake. The dough is made, then chilled before rolling. You can do that a day, or even two, ahead of time. The rolls are filled with pineapple and cream cheese and are very tasty. They are arranged in a tree pattern before baking. Then the “tree” is topped with a light glaze and gently sprinkled with red and green sugars. So pretty and not that hard to make. As an added bonus the recipe makes two, so you can keep one for home and perhaps gift one to a friend. Who are we kidding? You will keep them both for yourself- just invite more people over. Here is the recipe.
Christmas Tree Coffee Cake
Dough:
4-4 1/2 c. bread flour
1/2 c. sugar
1 1/2 t. salt
2 packages active dry yeast
3/4 c. milk
1/2 c. water
1/2 c. butter
1 egg
Filling:
1 lb. Cream cheese, softened
1/2 c. sugar
1/4 t. nutmeg
dash salt
1/4 t. vanilla
1 (20 oz.) can pineapple in its own juice drained and squeezed dry
Topping:
11 red candied cherries, halved
2 c. powdered sugar
3 T. milk
red and green sugars
For dough in large mixing bowl combine 2 cups of the flour with the sugar, salt and yeast. Heat together the milk, water and butter until very warm. Add to flour mixture and beat 2 minutes. Add egg and 1 more cup of flour and beat 2 more minutes. Stir in enough of the remaining dough to make a stiff batter, about 1 cup. Cover bowl tightly with foil or plastic wrap and refrigerate for at least 2 hours or up to 3 days before using. For filling combine all ingredients for the filling except the pineapple and beat until smooth. Stir in pineapple and set aside until ready to use. Remove dough from fridge cut in half. Roll out one piece on lightly floured surface into a 10×11- inch rectangle. Spread with half the filling, leaving an inch at the end of 11-inch side. Roll up from eleven- inch side. Use thread or dental floss to cut through dough in 1-inch pieces by placing thread under roll and crossing ends. Pull outward and thread should cut through dough. If you aren’t having any luck you can always use a knife, but they tend to flatten the rolls. On a greased baking sheet arrange the slices (you should have 11) into a tree shape. Start with one on the top and then a row of 2 below then 3 and then 4. The last roll will serve as the trunk. Cover dough with plastic wrap and set in a warm place to rise. Repeat with the remaining dough and filling. When dough is risen, about 1-2 hours bake in a 375- degree oven for 15 minutes then cover edges with foil to prevent over browning and return to oven for 10 minutes more. Cool on wire rack. Place half a cherry in the middle of each roll. Make a glaze with powdered sugar and milk and drizzle over. Sprinkle with the sugars. Makes 2 trees, 11 rolls each. Can be frozen up to a month ahead . defrost in a 350 -degree oven for 10 minutes and apply toppings.
Cookie “Candies”

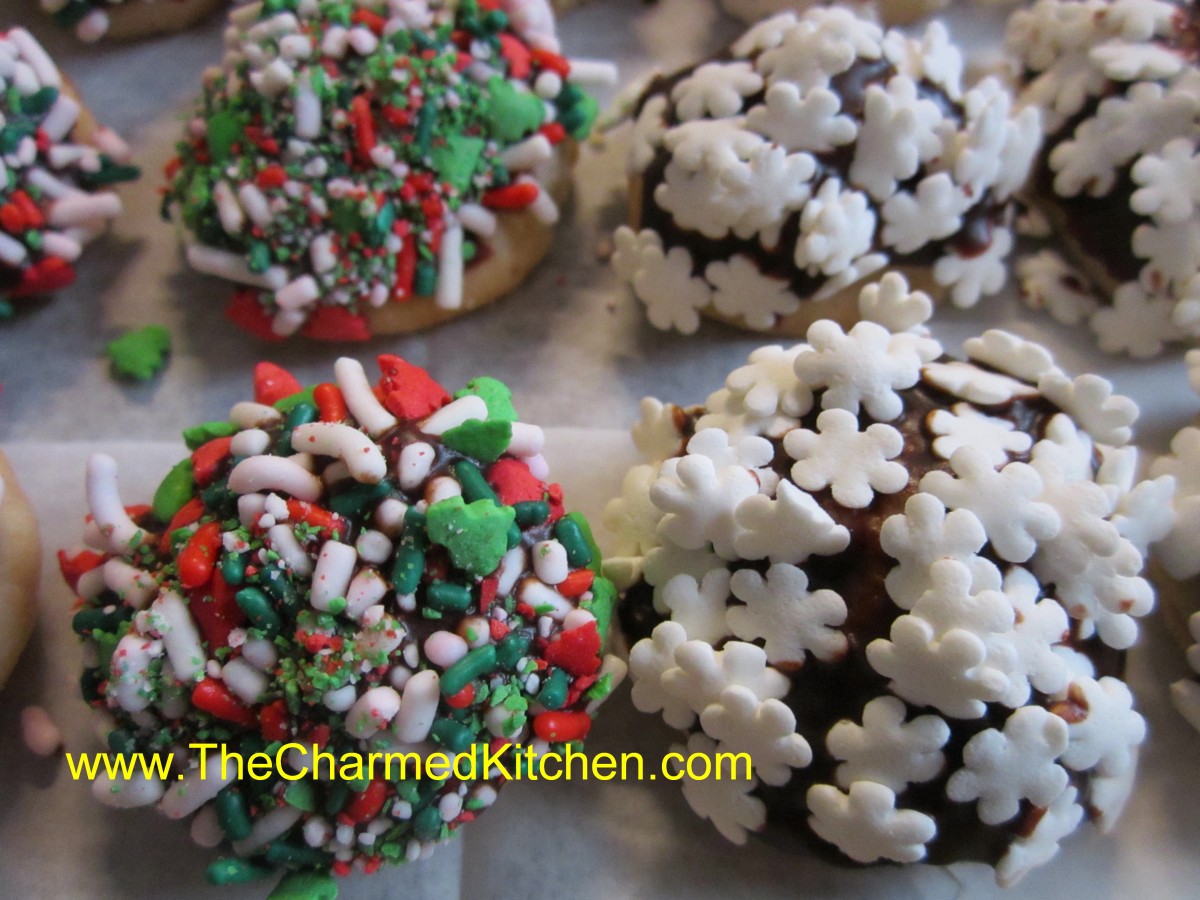
Cookie “Candies”
These oatmeal shortbread cookies are one of my must-do cookies every holiday season. The dough is molded into little shapes then baked. They keep their shape pretty well. Once cooled, the cookie are dipped in melted chocolate and then dipped in assorted toppings like sprinkles, coconut or sprinkles. They end up looking like little candies. A great cookie and fun for kids to help decorate.
Cookie-Candies
1 c. butter
¾ c. powdered sugar
1 T. vanilla
2 c. flour
½ c. rolled oats
½ c. chocolate chips
¼ c. milk
finely chopped nuts
assorted sprinkles
shredded coconut
Cream together butter, sugar and vanilla. Stir in flour and oats. Shape teaspoonfuls of the dough into different shapes like rounds, ovals, cones cubes etc. Try to make them look like little candies. They will hold their shape very well while baking. Bake in a 325- degree oven for 20-25 minutes on an ungreased baking sheet. Cool. In microwave safe dish combine chocolate and milk and melt. Dip tops of cookies in chocolate mixture and then in one of the toppings you have. Chocolate topping will harden up after a while. Makes about 4 dozen.
Vanilla Shortbread with Coffee/Cinnamon Filling

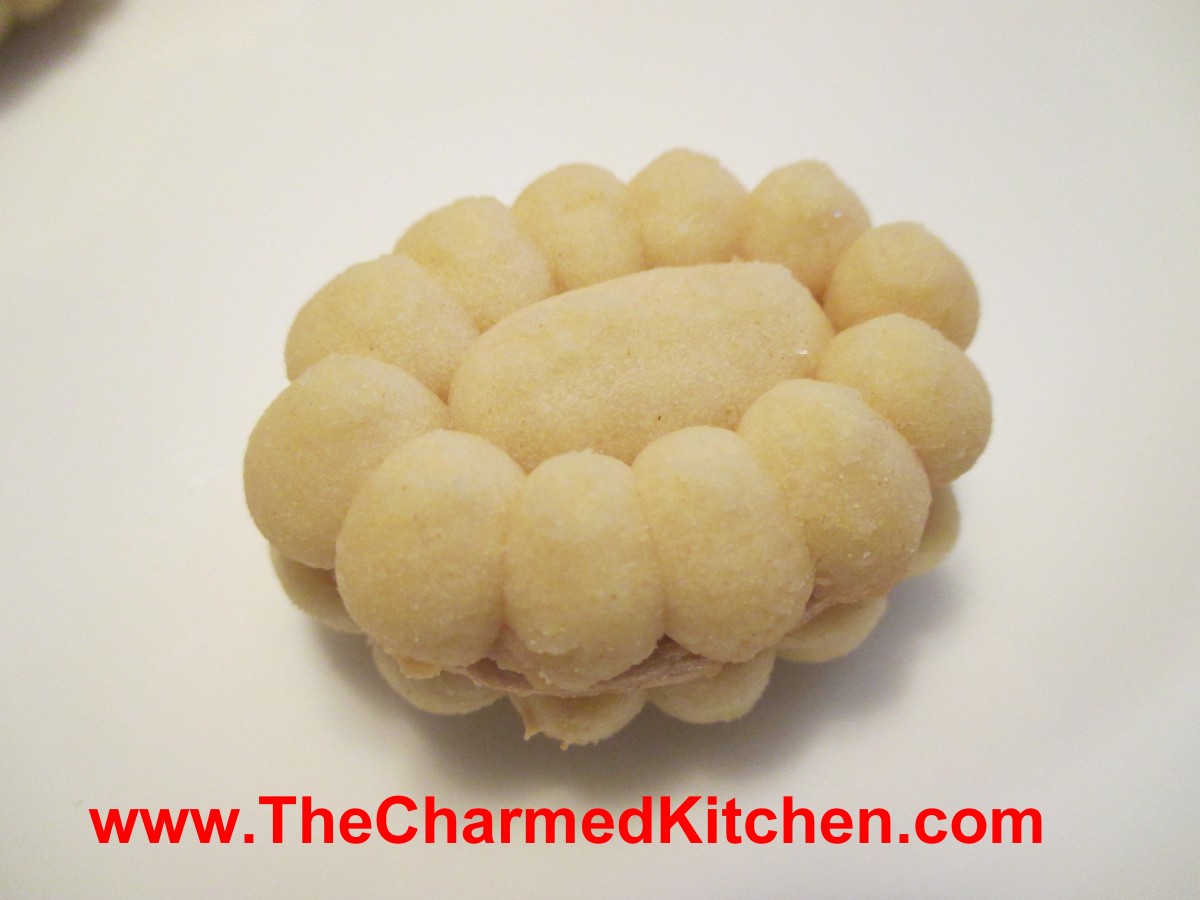
Vanilla Shortbread with Coffee/Cinnamon Filling
Certain cookies bring back special memories for me. More so around the holidays. Most memories are of making cookies with my mom. This cookie though, is one I used to make with my friend, Kim. She really loved coffee and the coffee-cinnamon filling made these one of her favorites. The cookies are tender, and not too sweet. The filling, which sandwiches them together, is what makes them special. Use a cookie press to make any shape you like for these cookies. Once baked, two halves are put together in little sandwich cookies. These are a big hit, whenever I make them.
Vanilla Shortbread with Coffee/Cinnamon Filling
1 c. butter
½ c. powdered sugar
½ t. vanilla
2 c. flour
¼ t. baking powder
Heat oven to 375-degrees. Cream together butter, sugar and vanilla. Blend in flour and baking powder. Using flower design of cookie press to make 1- inch cookies on ungreased baking sheet. Bake about 7 minutes, or until very lightly browned. Cool and then put two cookies together with coffee filling.
Note: You can make these cookies in almost any cookie press design that is symmetrical. I have made strips, trees and stars among others. Makes about 2 dozen double cookies.
Coffee/Cinnamon Filling
2/3 c. powdered sugar
2 T. butter, softened
1 t. instant coffee dissolved in 1 t. boiling water
1 t. cinnamon
Beat all ingredients together until smooth. Add a few drops of water if too dry.
Chocolate “Brownie” Cookies

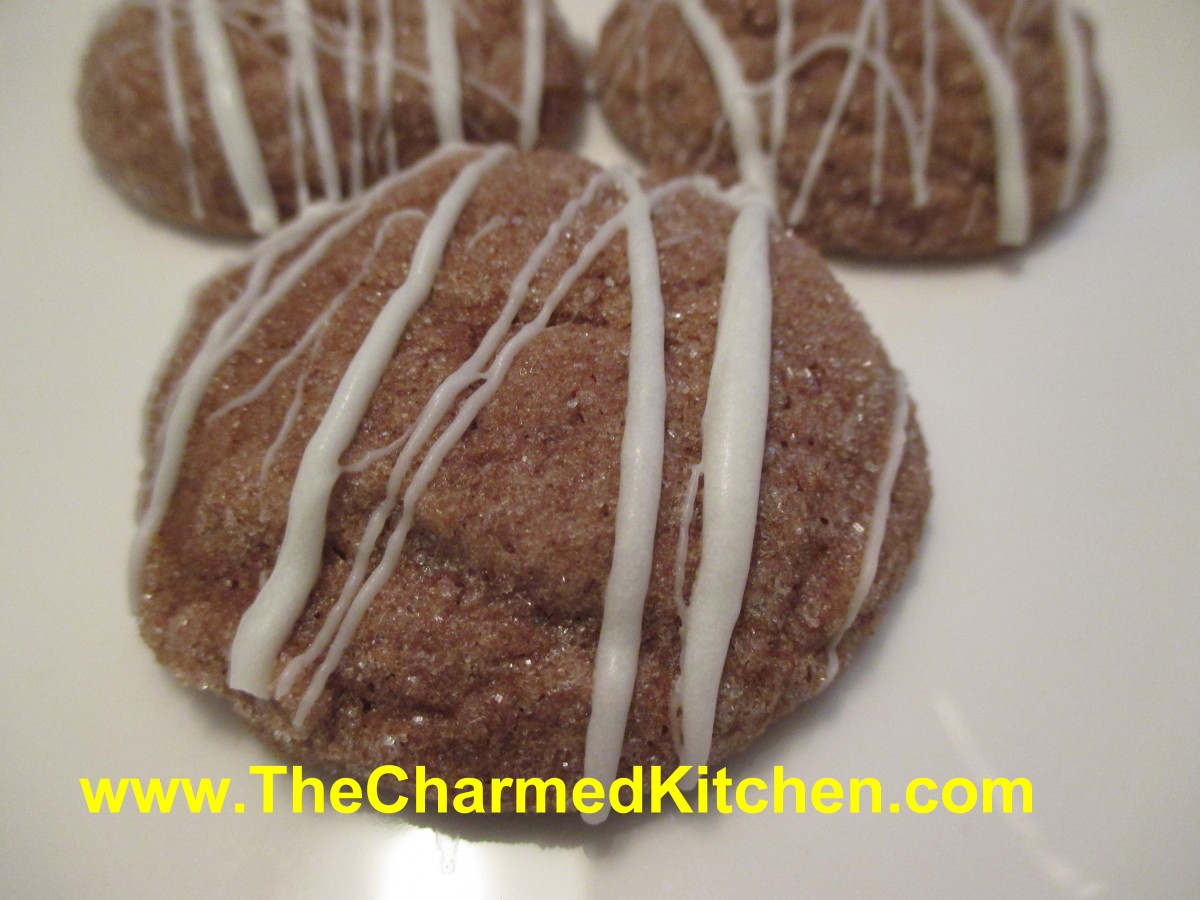
Chocolate “Brownie” Cookies
These delightful cookies are soft and cake-like. The texture reminds me of a brownie. They are soft, with just a little crunch on the outside. I like to finish them with a drizzle of white or dark chocolate. Simple to make, I always make a double batch, as they go quickly.
Chocolate “Brownie” Cookies
1 c. butter, softened
1 ¼ c. sugar
2 eggs
2 oz. unsweetened chocolate, melted
½ t. vanilla
2 2/3 c. flour
2 t. cream of tartar
1 t. baking soda
½ t. salt
¼ c. sugar
Chocolate for drizzling, optional
Cream together butter and sugar. Beat in eggs, chocolate and vanilla. Stir in next four ingredients. Chill dough. Shape dough into 1” balls and roll in ¼ cup sugar. Place about 2 inches apart on ungreased baking sheet. Bake in a preheated 375- degree oven for 8-10 minutes. Once cooled, drizzle with melted chocolate, if you like. Makes 5-6 dozen.
Holiday Chocolate Fan Cookies


Holiday Chocolate Fan Cookies
If you want a cookie that is really going to impress you might want to make these Holiday Chocolate Fans. They are crisp, not too sweet and tipped with chocolate and fine chopped nuts. While they look difficult to make, they are actually quite easy. For starters you don’t have to make dough. These are made with phyllo dough. Phyllo is found in the freezer section at the grocery store. Phyllo dough (also spelled filo) can be a little fussy. Be sure to keep extra dough covered with a damp towel so it won’t dry out and get brittle. It is best to work quickly when making these. We made these dipped in finely chopped toasted almonds. Other nuts could be used. You could also use white chocolate, if you prefer. I have even added a few sprinkles to the nuts for a pop of color.
Holiday Chocolate Fans
1 lb. phyllo dough, thawed*
1 c. butter, melted
12-oz. chocolate chips
2 T. shortening- you can use coconut oil instead
1 c. finely chopped nuts or coconut, pistachios are extra nice
Remove phyllo from box, still rolled up and cut crosswise into 5-6 equal pieces. Keep unused dough covered in a damp towel to prevent drying out. Take one piece of dough and open it up, cutting it in half crosswise. Take 1 sheet and brush with butter. Place another sheet on top and brush again with butter. Place third piece of dough on top and butter again. Starting at short end begin to fold the dough in ¾ inch folds, accordion style. Pinch together at one end and fan out the dough at the other. It should look like a little fan. Place on ungreased baking sheet and repeat with remaining dough. Bake at 375 degrees for 5 minutes. Cool. Melt chocolate and shortening together in microwave or on top of double boiler. Stir to smooth. Dip tip of wide end of fans in melted chocolate and then in the nuts or coconut. Place on a rack to cool and harden. Makes about 65 fans. Can be frozen.
*I buy frozen phyllo dough but be sure to get the right one. Around here there are 2 different sizes. You’ll need the long box- where the dough is 15 inches long.
Chocolate Lovers Shortbread

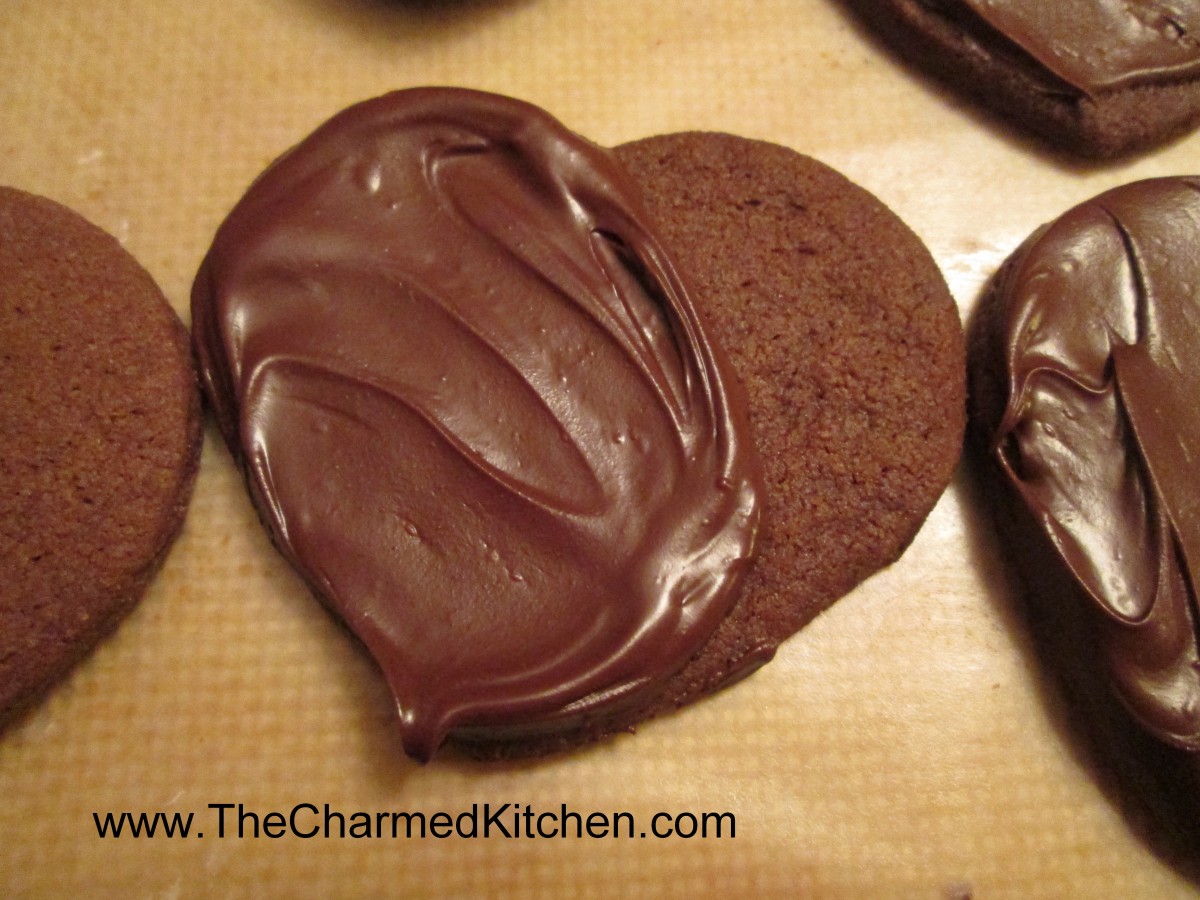
Chocolate Shortbread Cookies
I never met a shortbread cookie I didn’t like. These are no exception. With the addition of cocoa you end up with a cookie that has the traditional delicate texture of shortbread, with the added bonus of a rich chocolate flavor. They are great just plain, dusted with powdered sugar or, my favorite way, brushed with a little melted bittersweet chocolate. Simple, tasty and a nice treat for the chocolate lovers you love.
Chocolate Shortbread
1 c. butter, room temperature
3/4 c. sugar
2 c. flour
1/3 c. cocoa
1/4 t. salt
8 oz. semi-sweet chocolate
Beat together butter and sugar until well blended. Mix together dry ingredients and slowly beat into butter mixture, stirring it in at the end. Roll out dough about 1/4 inch thick and cut out with cookie cutters. Re-roll scraps and cut out the remaining dough. Place on an un-greased baking sheet and bake at 325 degrees until cookies are firm around the edges, about 20 minutes. Cool on baking sheet 5 minutes before transferring to a rack to cool. Melt chocolate and dip cookies in it or use chocolate to hold 2 cookies together. Makes 2-3 dozen, depending on the size.
Russian Teacakes

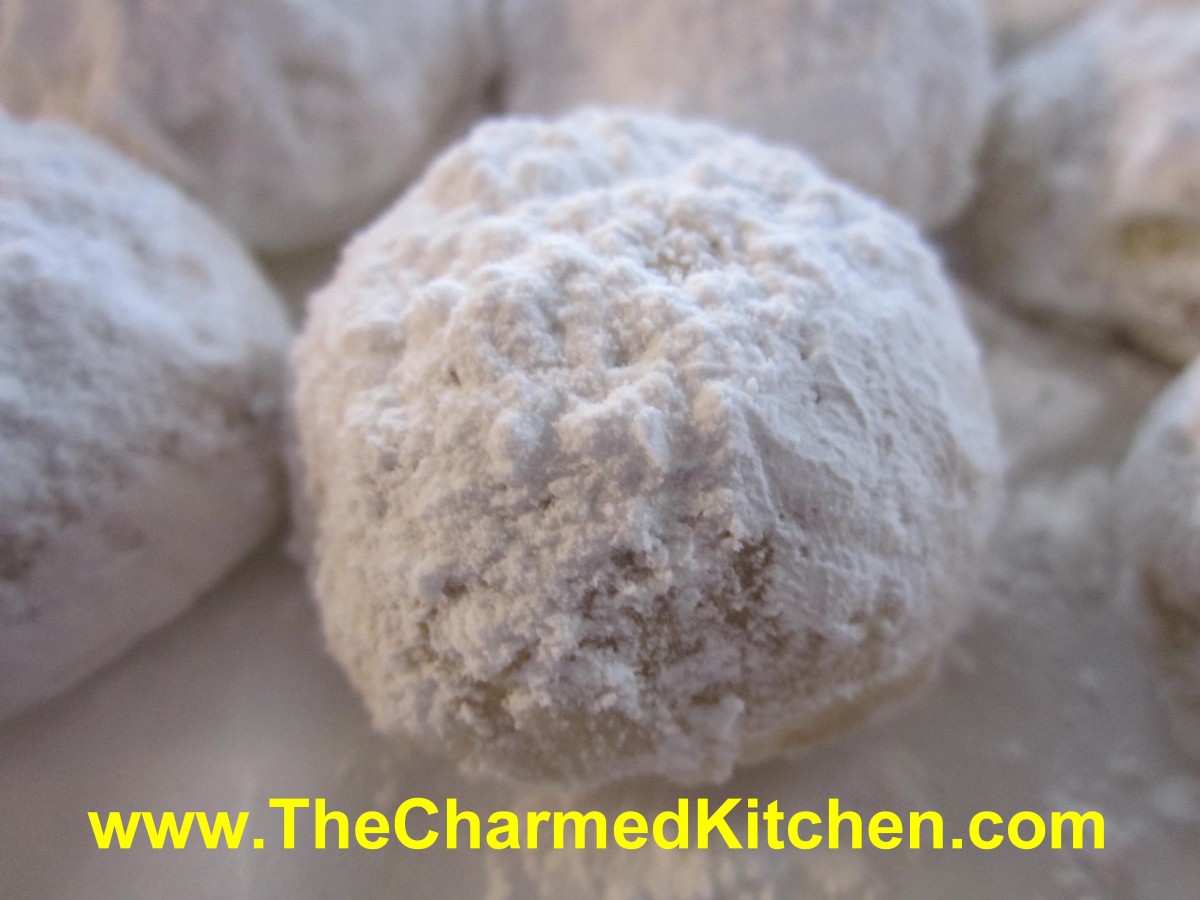
Russian Teacakes
I had a conversation with a childhood friend recently about these cookies. She remembered that my Mom used to make them, and she wondered if I still did. I still do make them. Wouldn’t seem like Christmas without them. Russian Teacakes, also known as Mexican Wedding Cakes are a delicate nut filled shortbread cookie coated in powdered sugar. The magic is created when the cookies, hot from the oven, are rolled in powdered sugar. Once cooled they are dusted with more powdered sugar. Whether you call them Russian Teacakes, Mexican Wedding Cakes, or as another friend always refers to them, butter balls, these cookies are a must for your holiday cookie baking.
Russian Teacakes
1 c. butter
½ c. powdered sugar, plus extra for coating
1 t. vanilla
2 ¼ c. flour
¼ t. salt
¾ c. finely chopped nuts, nearly ground
Mix butter, ½ cup sugar and vanilla well. Stir flour and salt together and then add to butter mixture. Mix well and stir in nuts. Wrap dough and chill. Heat oven to 375 degrees. Roll dough into 1-inch balls and place 1 inch apart on ungreased baking sheet. Bake 10-12 minutes. Cookies should be lightly browned on the bottom. While still warm, roll cookies in powdered sugar. Dust again with sugar once cooled. Makes about 4 dozen.
Snow People Cookies

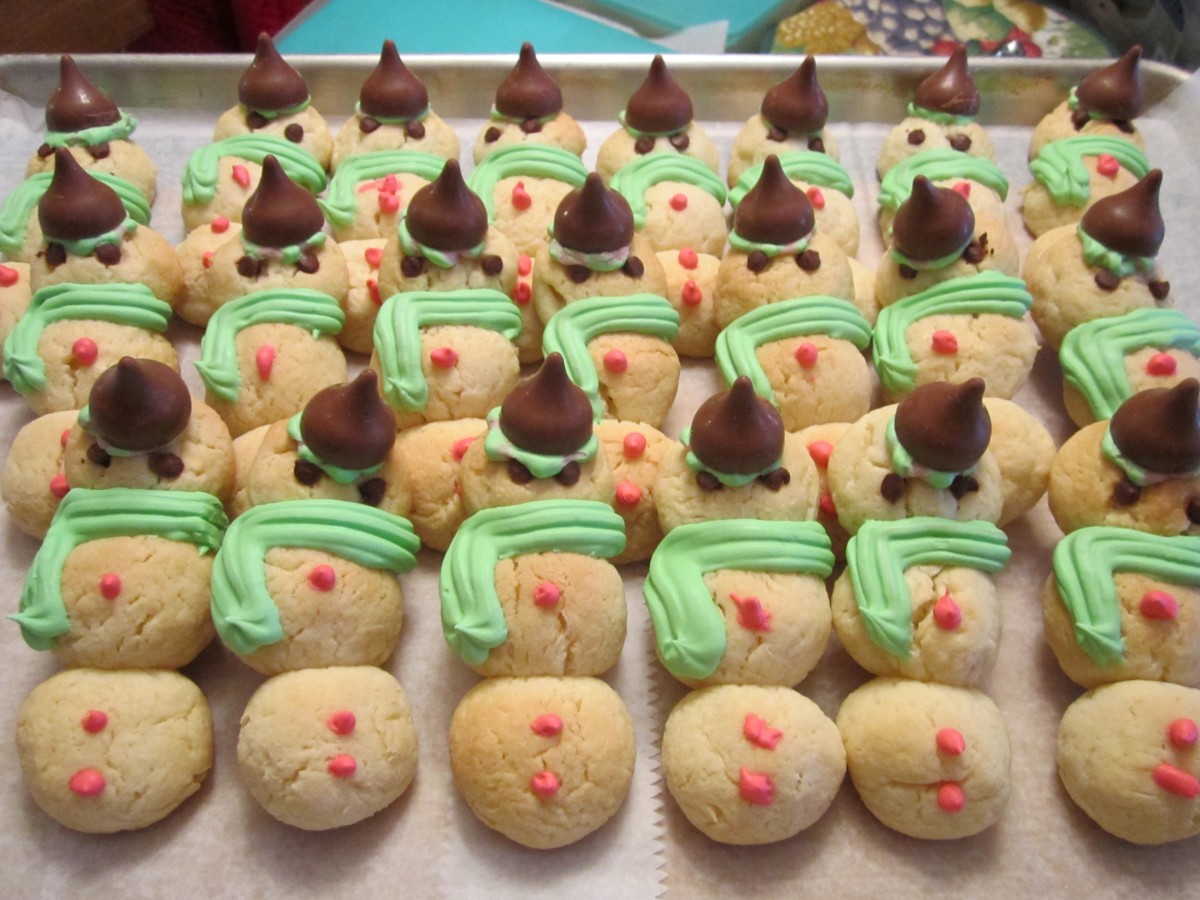
Snow People
These cookies are always requested by family and friends. I make them every year for Christmas. They are also a fun cookie for kids to make. The cookies are made from a rich, cream cheese dough. They stay soft in the middle, with a little crunch on the outside. They are even cuter if you use the candy striped kisses available this time of year.
Snow People
Dough:
4 c. flour
1 t. baking powder
1 c. butter, softened
1 (8oz.) package cream cheese, softened
2 c. sugar
1 egg
1 t. vanilla
¼ t. almond extract
Decorations:
Mini chocolate chips or mini M&Ms
Kisses, whole, or mini peanut butter cups, halved
Frosting:
2 c. powdered sugar
Few drops green food coloring
Milk
Extra powdered sugar for sprinkling
Mix dry ingredients and set aside. Cream together butter and cream cheese until smooth. Beat in sugar until light and fluffy. Beat in egg and flavorings then stir in dry ingredients. Chill dough overnight. For each snow person rolls out 3 balls of dough, 1-inch, ¾-inch and ½-inch in diameter. Place balls in descending order on ungreased baking sheet. Press together lightly. Use 2 mini chocolate chips for eyes in smallest ball and use either chips or mini M&Ms for buttons (2 on largest ball and 1 in medium). You can also add a tiny dot of frosting once they are cooled for the buttons, too. Bake in a preheated 325-degree oven for about 18 minutes or until edges are firm and bottoms are lightly browned. Cool on baking sheet 1 minute then remove to rack to finish cooling. Combine powdered sugar with green food coloring and just enough milk to make a frosting that can be piped. Use a little dab of frosting to attach either a chocolate kiss (unwrapped) or half of a peanut butter cup as a hat. Pipe a small amount of frosting to form a scarf. Dust cookies with a little extra powdered sugar for snow when finished decorating. Makes about 48 cookies.
Homemade Cashew Brittle

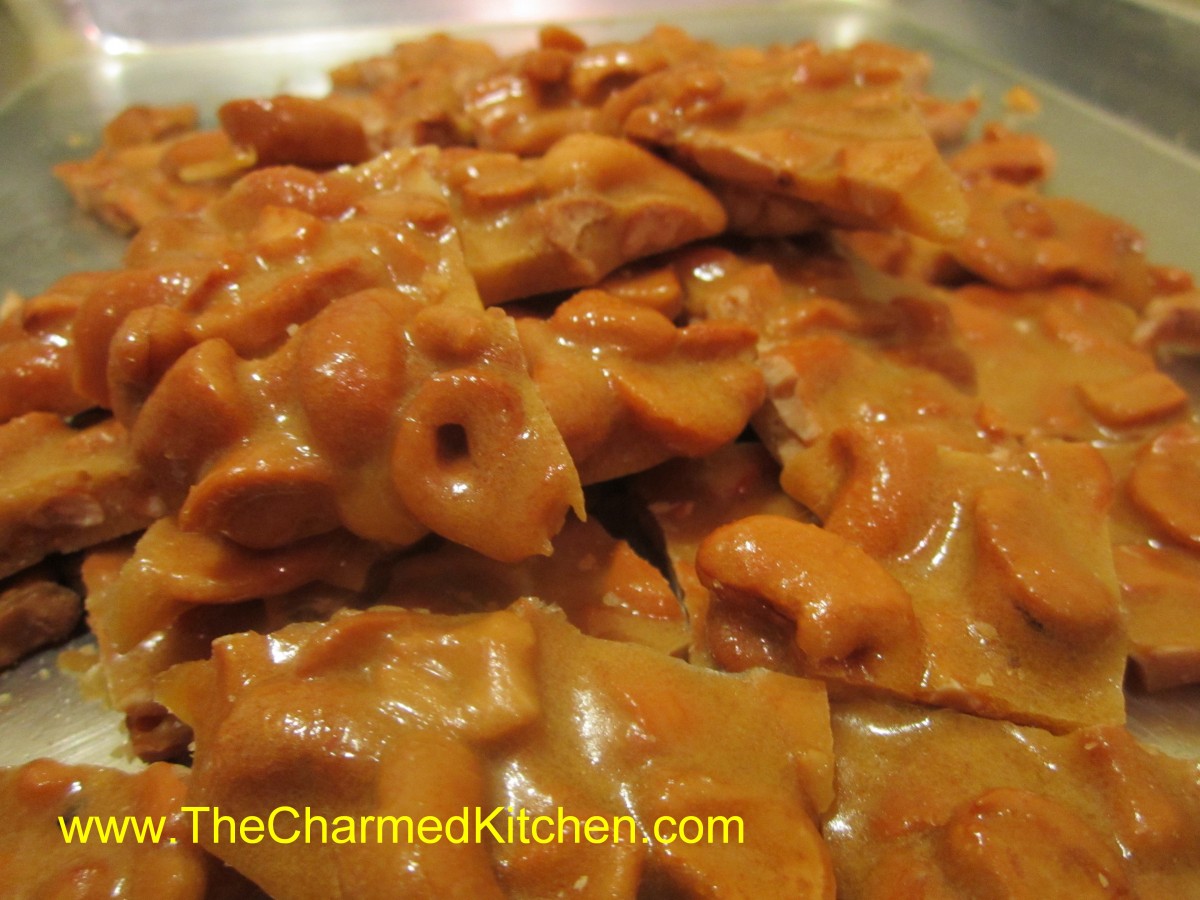
Homemade Cashew Brittle
If you need a great food gift- perhaps something to bring to a holiday party- this brittle might just be the answer. I was given this recipe at a craft show a few years ago. The brittle is cooked in the microwave. No special thermometers or equipment required. Just a glass bowl and a few minutes of your time. It could not be simpler. It is really good, too. You can use other nuts, if you prefer, or peanuts. You can also dress it up with a drizzle of chocolate, once cooled. Stored in a covered container, in a cool dry place, the brittle will stay crunchy for weeks.
Homemade Cashew Brittle
2 c. cashews*
1 c. sugar
1/2 c. corn syrup
1/8 t. salt
1 t. butter
1 t. vanilla
1 t. baking soda
Butter or oil a large baking sheet and set aside. In a 3-4 quart glass bowl combine the nuts, sugar, corn syrup and salt. Microwave on high for 3 minutes. Remove from microwave, stir well and return to microwave. Cook 3 more minutes in microwave. Remove and stir in butter and vanilla, stirring until butter has melted. Return to microwave and cook for 2 more minutes. Remove from microwave and stir in baking soda. Stir until well blended and pour mixture onto prepared baking sheet. Spread out quickly, then allow to cool. Once cool, break into pieces. Store in a cool, dry place. I normally store it in a tin or plastic container with a tight-fitting lid.
* I used salted cashews but feel free to experiment with other nuts
Note: Use high power setting on microwave.


