Picnic Quiches

These tiny quiches pack a lot of flavor. They are also a great take along for picnics and cook outs. Since you can eat them hot or cold, they make a nice food for road trips, too.
The quiche recipe is made up of three parts- the crust, the filling and the custard. They are baked in muffins tins and each recipe makes a dozen. I have two crust recipes- including a gluten free crust that is made from rice and zucchini. There are three filling choices, but you can get creative and make a number of different variations. The custard is pretty straightforward- half and half, eggs and seasonings. I make a couple of batches at a time and then freeze some for later.
Picnic Quiches
Crust Options:
Rice Zucchini Crust (Gluten free)
1½ c. shredded zucchini
1¼ c. cooked rice (white or brown)
1 egg
¼ c. Parmesan cheese
Crouton Crust
3½ c. garlic-cheese croutons, about 5 oz., ground
1/3 c. melted butter
Fillings:
Mushroom and Onion
1 medium onion, chopped
Oil
8 oz. mushrooms, cleaned and chopped
3-4 oz. cheddar cheese, shredded or cubed fine
In skillet cook onion in oil until lightly browned. Add mushroom and cook until mushrooms are golden. Cool and combine with cheese before using.
Spinach and Bacon
12 oz. bacon, cooked and crumbled
10 oz. package of frozen spinach, thawed and squeezed dry
4 oz. Swiss cheese, shredded
Combine all ingredients. Set aside until ready to use.
Confetti
1 ear corn, cooked and kernel cut off the cob- about ½ cup
½ c. mined fresh sweet pepper
¼ c. chopped green onion
4 oz. shredded cheese- I like a sharp cheddar in this filling
Custard:
1c. half and half
3 eggs
½ t. each basil and salt
1/8 t. each garlic powder, pepper and paprika
Directions
Grease 12 muffin cups (3 inch). Prepare crust of your choice by mixing crust ingredients together. Pat 2 tablespoons of the crust mixture into each muffin cup. Bake in a 350 degree oven for 10-12 minutes. Cool before filling. While baking and cooling crusts, prepare filling of your choice and make the custard.
Spoon 2 tablespoons of filling over each cooled crust. Spoon about 3-4 tablespoons of the custard over the filling. Bake in a 375 degree oven for 15-20 minutes. Cool on wire racks, chill completely before packing for your picnic.
Broccoli and Cauliflower Salad

I make broccoli salad pretty often, but sometimes like to switch it up a little by adding cauliflower. The result is a salad that has a great mixed of flavors, colors and textures. The addition of bacon also adds a wonderful smoky flavor. Certainly, feel free to omit the bacon for a vegetarian salad. With or without the bacon, this is a great salad for the warmer days ahead.
Broccoli and Cauliflower Salad
4 c. cauliflower, broken into bite- sized pieces
2 broccoli crowns, cut into bite- sized pieces
1 can water chestnuts, drained and sliced
1 sweet pepper, seeded and chopped
1 c. shredded cheese, optional
8- 10 slices of bacon, cooked and chopped
1/2- 3/4 cup of mayo, adjust to your preference
salt and pepper to taste
Steam the cauliflower and broccoli until just tender/crisp. About 5 minutes in a microwave steamer, 6 minutes in a conventional steamer. Place in a bowl to cool down then combine with remaining ingredients and stir to combine well. Adjust seasonings, if needed. Serves 6-8.
Elmwood Coconut Crackers

I was getting together with friends and wanted to bring one of my favorite snacks along. It was a special occasion.
Throughout the pandemic, my friend Tara, has been having fire pit gatherings in her backyard. They have been a great way to see friends in a safe way. Because Tara is moving, this was the last fire pit at this house.
The magical thing about the location is that her property abuts Elmwood Park. As we sat around the fire we were able to enjoy the beauty of the park. I wanted to name the recipe in honor of our last Elmwood fire.
The base is saltine crackers topped with butter, brown sugar, coconut and cinnamon. They are ready in just a few minutes. Perfect when you are craving something sweet, but don’t have a lot of time. Not too sweet and just a little salty, too. You could use chopped nuts in place of the coconut if you prefer. They are super crunchy, too. Like a brittle, but with a cracker base. Great served alone, or with ice cream.
Store in a cool, dry place to keep them crunchy.
Elmwood Coconut Crackers
36 saltine crackers
1/3 c. butter
1/3 c. brown sugar
1 c. coconut
1 t. cinnamon
Cover a baking sheet with foil. Place the crackers, touching, side by side in a single layer. Melt butter in microwave, then add sugar and heat together 1 minute on high. Stir butter and sugar mixture together until smooth and drizzle this over the crackers. Combine coconut and cinnamon and then sprinkle the coconut over the crackers. Bake in a 350 degree oven for 8-10 minutes, or until coconut is toasted. Cool on baking sheet on a cooling rack. Crackers will easily break apart from each other. Makes 36.
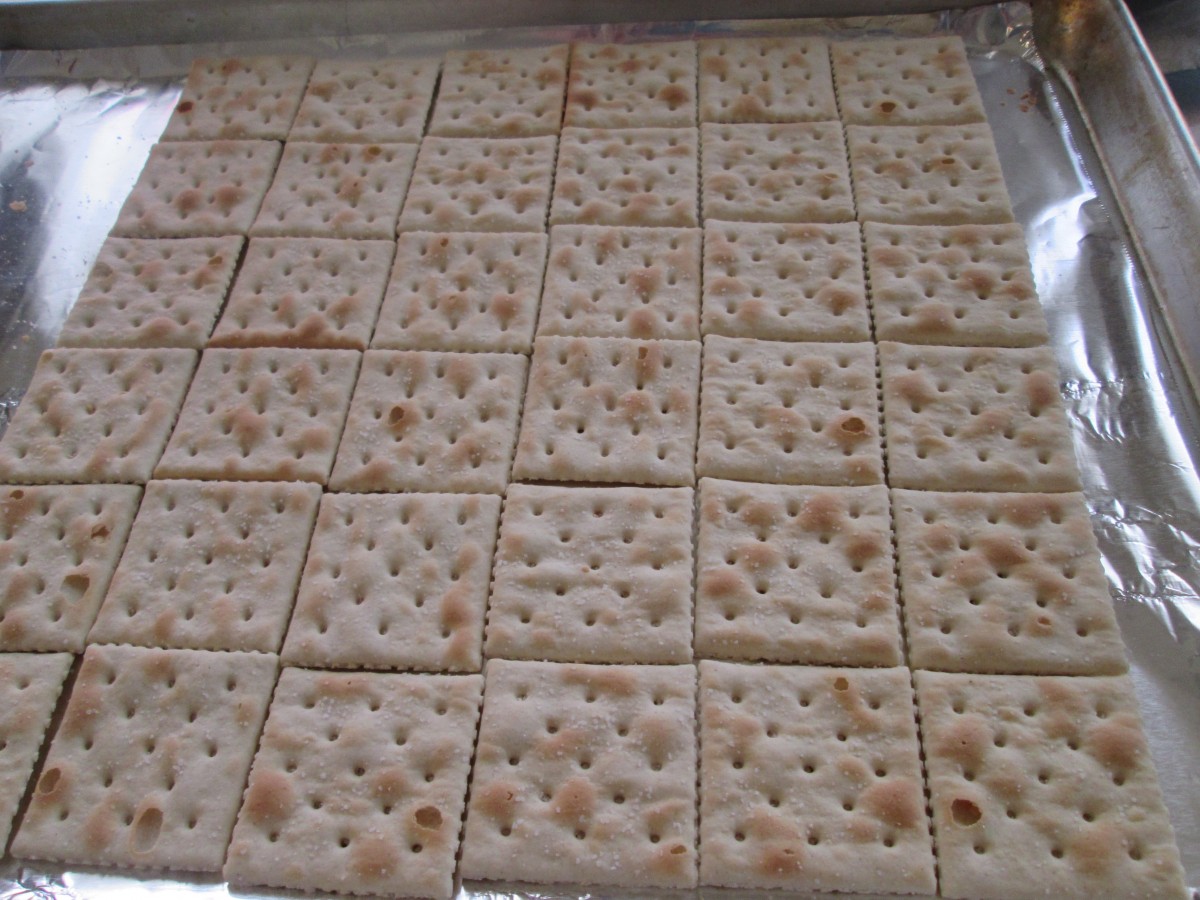
Arrange crackers on a baking sheet
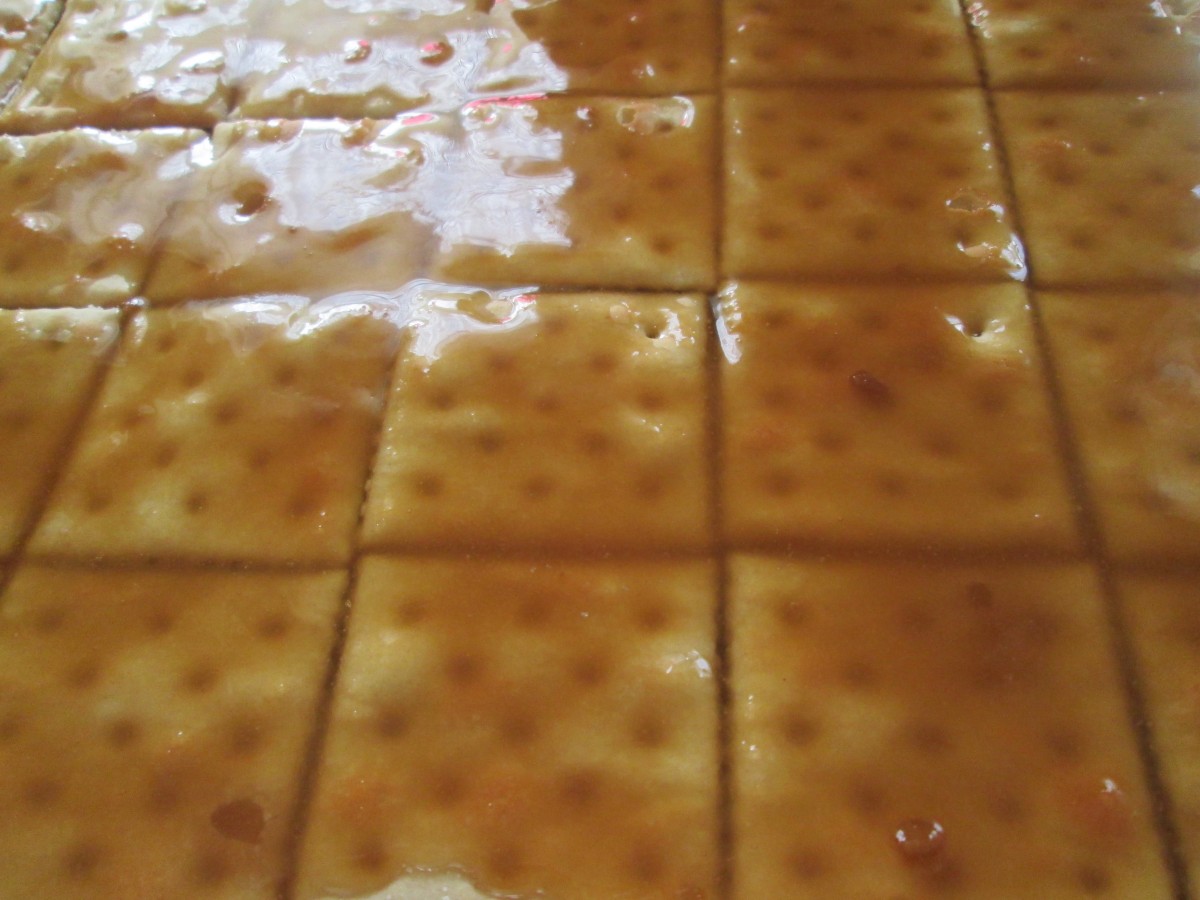
Drizzle crackers with the butter/brown sugar mixture
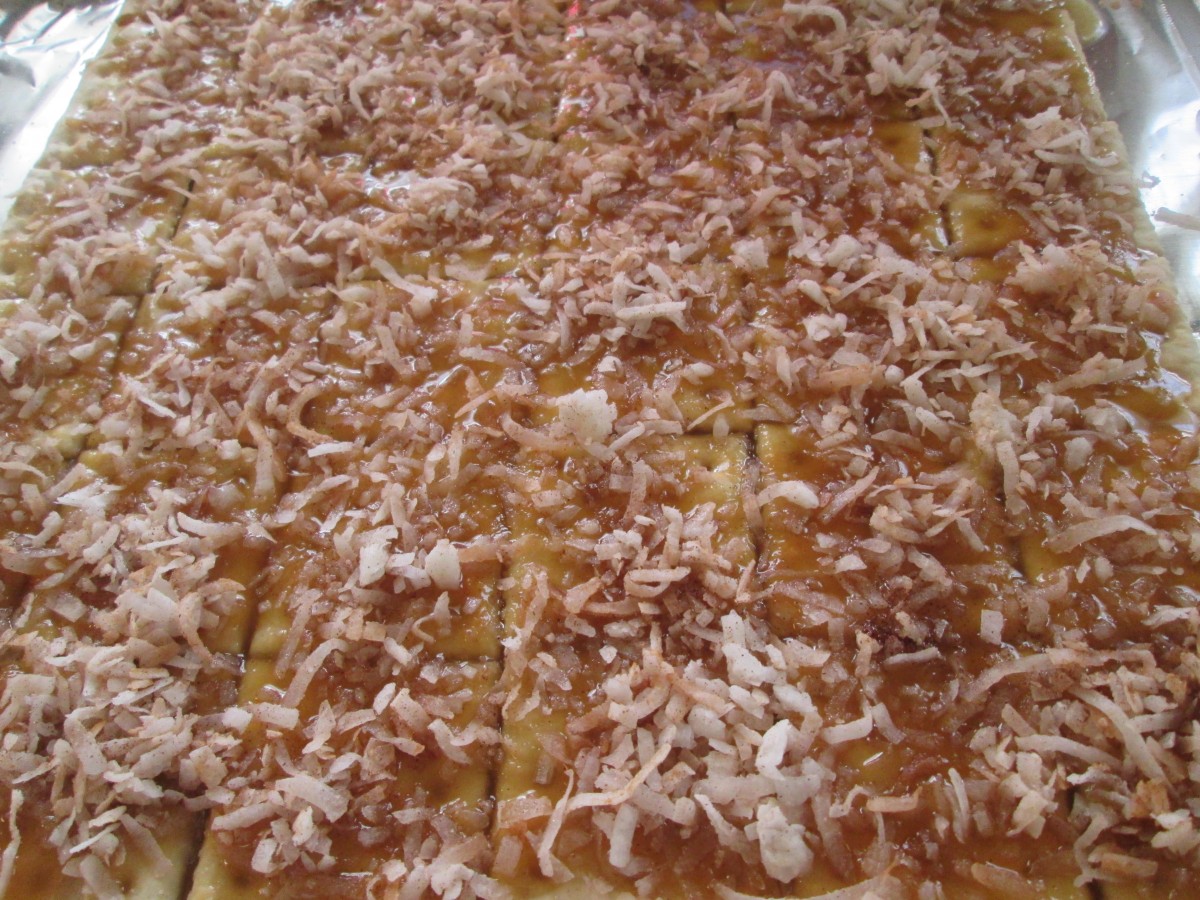
Sprinkle on the coconut and bake until coconut is toasted
Coleslaw Chef’s Salad
I love coleslaw and enjoy it as a side with all sorts of foods. This is especially true when the weather warms up. It seems I go from cabbage soup and cabbage and noodles to coleslaw and cabbage salads as the seasons change.
I wasn’t looking for my coleslaw to be a side dish this time, though. I was thinking of ways to make it more of a main dish. I had gotten busy with a project this morning and wanted something simple and quick. I came up with a twist on a chef’s salad.
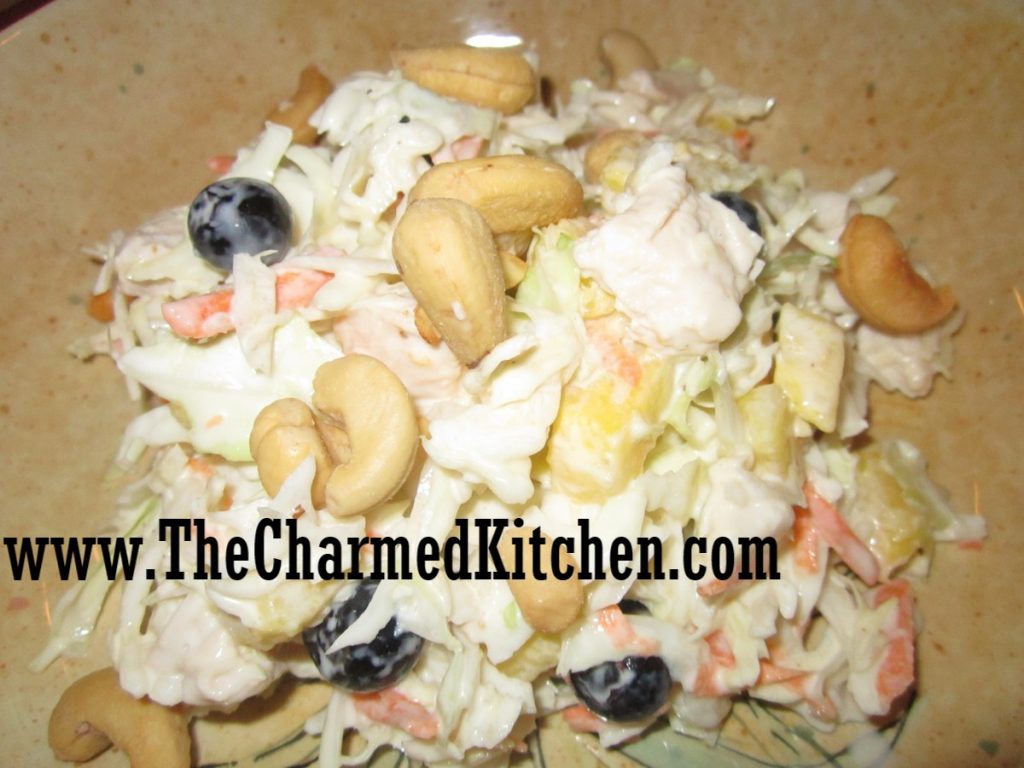
I took shredded cabbage and added meat, fruits and dressing, then topped it with some cashews. Quick to make, and a great choice when you don’t have a lot of time or it is too hot to cook.
You can use your own imagination and add other fruits or proteins. This is a great way to use up leftovers, too. I think I might add peaches and raspberries next time.
So here is the recipe- taking coleslaw from side dish- to main dish.
Coleslaw Chef’s Salad
5-6 c. shredded cabbage- cole slaw mix is fine
2 c. cubed cooked meat- I used chicken but use what you like- or use a combination
2 c. fresh fruit- I used blueberries and fresh pineapple but use what you like
1 c. cubed cheese., optional
Dressing:
2/3 c. mayo
3 T. cider vinegar
1 T. sugar
1 t. fresh grated ginger
salt and fresh ground pepper to taste
Topping:
1/2 c. cashews, optional
Combine cabbage with fruits, meats and cheeses (if using) in a mixing bowl. In smaller bowl combine the dressing and stir until smooth. Pour dressing over the cabbage mixture and toss to coat. Chill at least 30 minutes before serving. Sprinkle cashews on top just before serving. Serves 4.
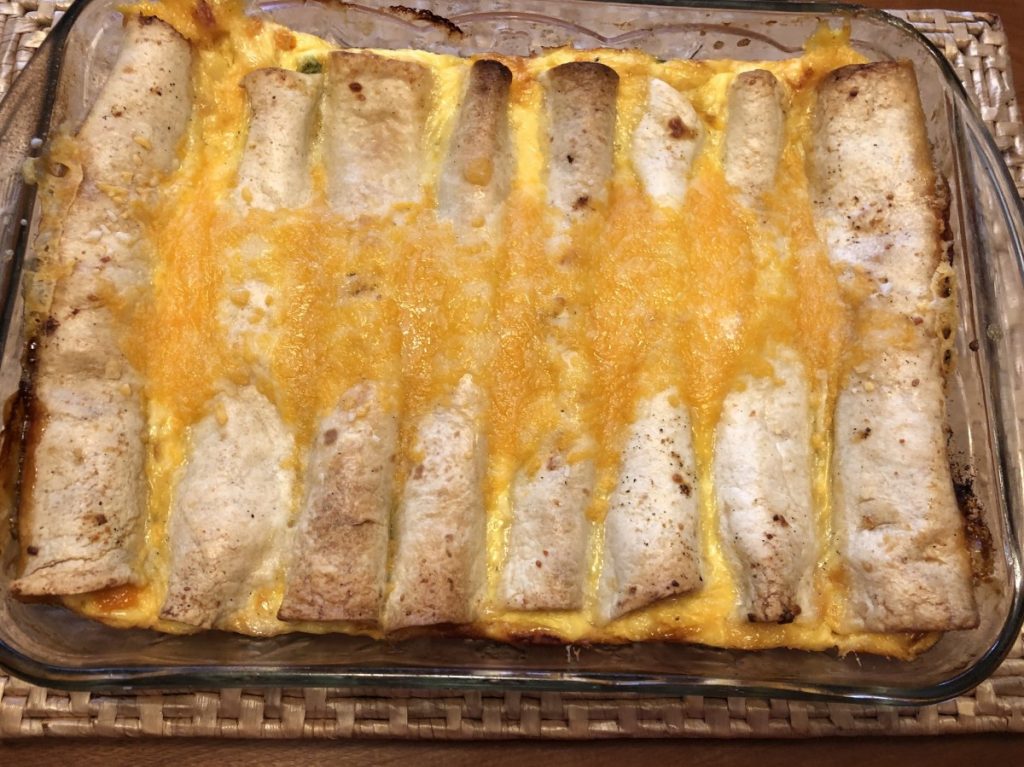
Tara’s Brunch Enchiladas

These are not traditional enchiladas, and I am OK with that. Made with a ham and cheese filling, then topped with an egg-based custard, they are a wonderful addition to any brunch menu. They would be fine served for breakfast or lunch, too. The prep in all done the day before, so you just have to pop them in the oven when ready to bake and serve.
The recipe can be easily tweaked, to work with other ingredients. Maybe a corned beef and Swiss cheese version or chicken with broccoli. You could also go vegetarian with a combination of beans and veggies. You can cut the recipe in half, or freeze leftovers. I love a versatile recipe.
I started calling them Tara’s Enchiladas for my friend Tara, who needed a recipe for a Mother’s day brunch last year.
We made these in class the other night. It was a class on Sunday Brunch. Everyone enjoyed them.
So here is the recipe. Hope you give it a try.
Brunch Enchiladas
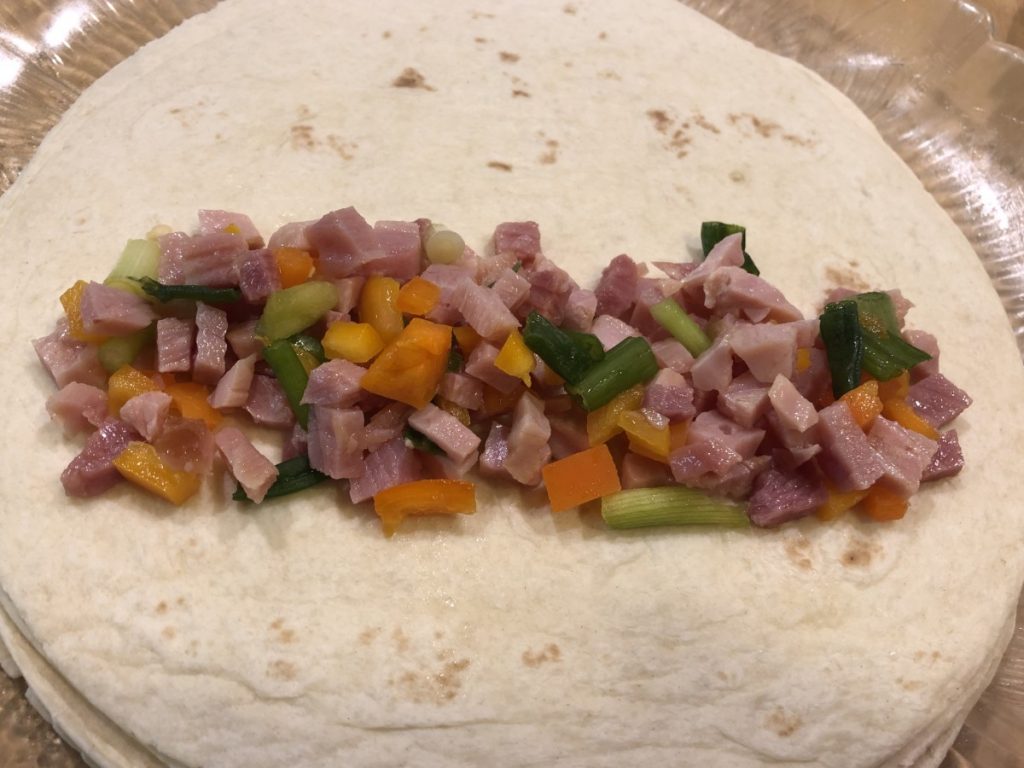
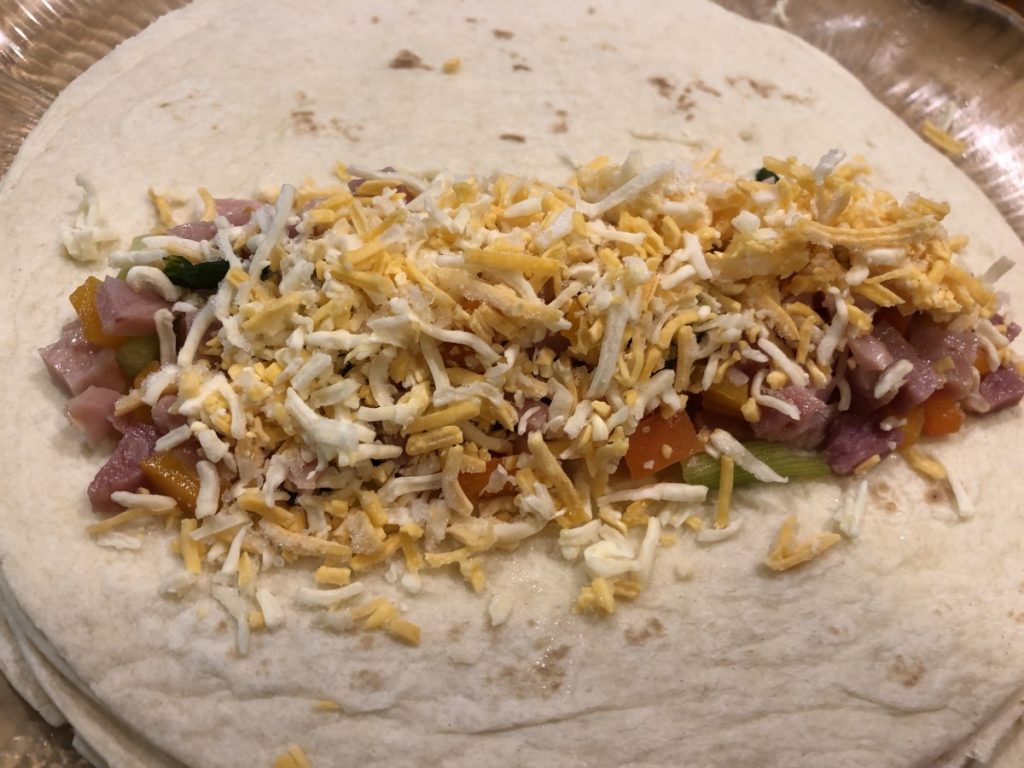
12 oz. fully cooked ham, chopped fine or ground
½ c. sliced green onions
½ c. chopped sweet pepper
2½ c. shredded cheddar cheese
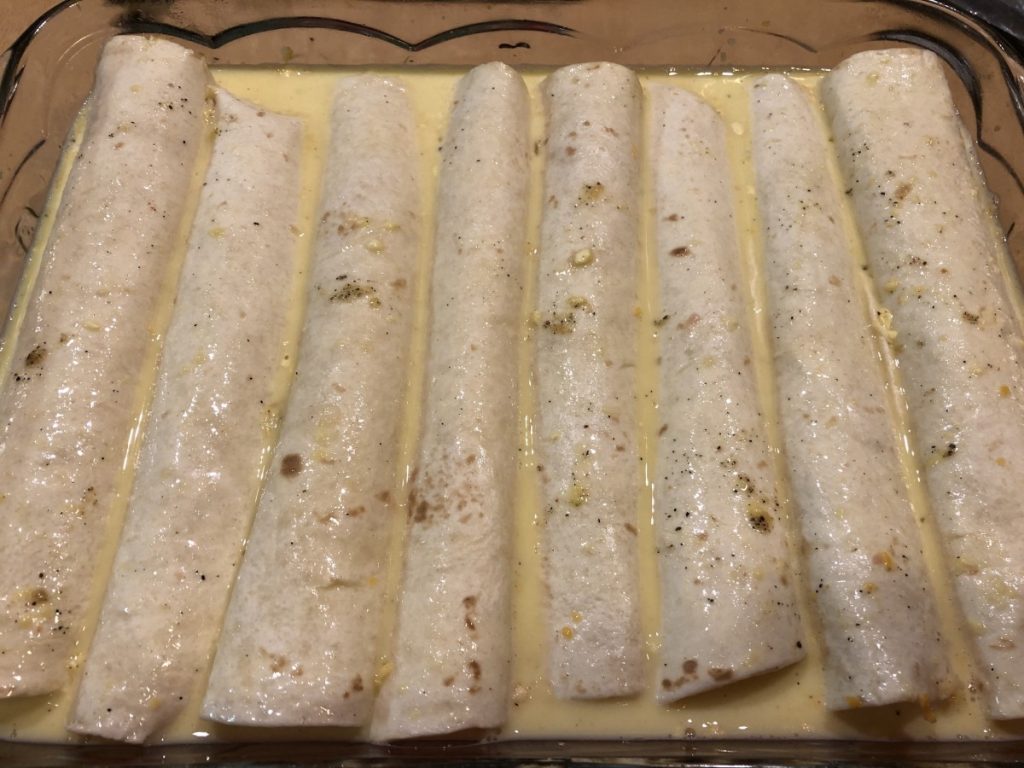
8 (8-inch) flour tortillas
4 beaten eggs
2 c. half and half or milk
1 T. flour
salt, pepper, and garlic powder to taste- ham is salty- so go light on salt
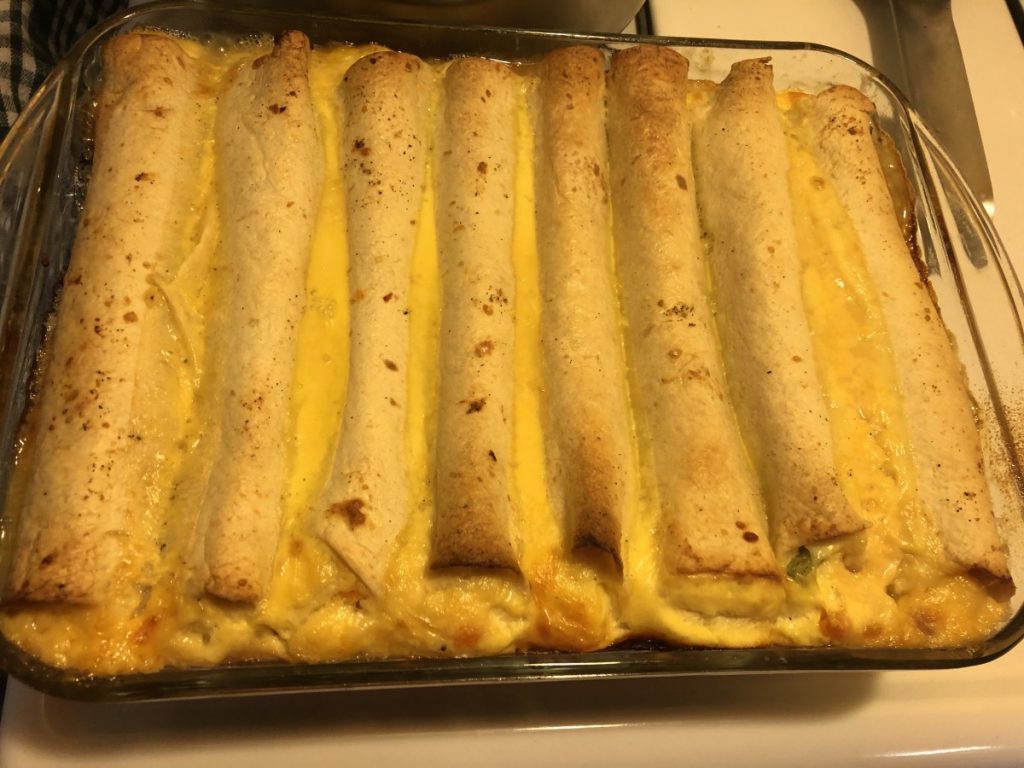
In bowl, combine ham with vegetables. Place 1/3 c. of ham mixture and 3 tablespoons of cheese in each tortilla and roll up. Place tortillas, seam side down, in greased 9×13-inch pan. Combine remaining ingredients and mix well. Pour over tortillas. Refrigerate several hours or overnight. Uncover and bake in a 350-degree oven for 45-50 minutes or until set. To check for doneness, insert a knife off center. Knife should come out clean. Sprinkle with remaining cheese and return to oven for 3-5 minutes to melt cheese. Serves 8.
Note: Let enchiladas sit a few minutes before serving to make cutting easier. I cut them down the middle, then into squares to serve.
Praline Biscuits

When you are craving a sticky bun, but don’t want to wait hours for a yeast dough to rise, these Praline Biscuits might be just what you are looking for. They share a lot of the ingredients of sticky buns: pecans, brown sugar, butter, cinnamon. The flavors are a lot alike. The difference is that these tasty biscuits can be ready in 30 minutes or less.
These biscuits use biscuit mix, like Bisquick or Jiffy Mix for the dough. I actually like to make my own baking mix- recipe follows- but store bought is fine, too.
The texture will be different from a traditional sticky bun. Like the name implies, these are biscuits. I don’t think you will mind at all. We made them in class last night and everybody loved them. They would make a great addition to any brunch or breakfast menu.
So here is the recipe, simple and sweet. Enjoy!!
Praline Biscuits
1/2 c. butter
1/2 c. brown sugar
36 pecan or walnut halves
cinnamon
2-c. biscuit mix
1/3 c. applesauce
1/3 c. milk
Preheat oven to 450 degrees. In each of 12 muffins cups place 2 t. butter, 2 t. sugar and 3 nut halves. Sprinkle cinnamon in each. Heat in oven until melted. Combine remaining ingredients and spoon over nut mixture. Bake 10 minutes, invert on heatproof serving platter. Makes 12.
Biscuit Mix
8 c. flour
1 c. powdered milk
1 c. powdered buttermilk
¼ c. baking powder
1 T. salt
1½ c. shortening- I like to use coconut oil- you can also use butter, but mixture needs to be kept in the fridge if you use butter
In large bowl combine dry ingredients and mix well. Cut in shortening until mixture resembles coarse crumbs. Store in a tightly closed container and use in 1-2 months. Makes 10 cups.
Coconut Ginger Soup

This recipe is inspired by a favorite dish at a local Thai restaurant. The recipe is pretty simple. Coconut milk and chicken stock are the base. The soup has a few veggies added and a healthy dash of lime juice and ginger. Then it is just a matter of adding some additional seasoning and the cooked chicken.
If you are starting with raw chicken, you could add it with the initial ingredients and just simmer long enough to cook the chicken. Small slices of chicken would cook in a few minutes. Since I had cooked chicken, I added it at the end. It was in the soup just long enough to warm it up. That way the chicken wouldn’t get tough from over-cooking.
The soup is meant to have a nice, citrus flavor from the lime juice. Adding the juice from three or four limes should be plenty, but all limes are not the same. If your limes are smallish, or not really juicy, feel free to add a little more.
For a soup thrown together so quickly, it really has a wonderful flavor. It is one of my favorite quick meals. So here is the recipe. Enjoy.
Coconut Ginger Soup
1 can, (13.5 oz.), coconut milk
2 c. chicken stock
1 can sliced water chestnuts, drained
1 jar bamboo shoots, drained
2 T. fresh grated ginger
Juice of 3-4 limes
Hot sauce to taste
3 T. fresh chopped cilantro- or parsley
3 T. chopped green onions
salt to taste
8 oz. cooked chicken, sliced in bite-sized pieces
Heat first 7 ingredients in a saucepan until heated through. Simmer about 5 minutes. Add cilantro and green onions and season to taste. My limes were pretty juicy. Feel free to add a little more lime juice, if you like. Add the chicken and simmer a few minutes longer. Serves 2-3.
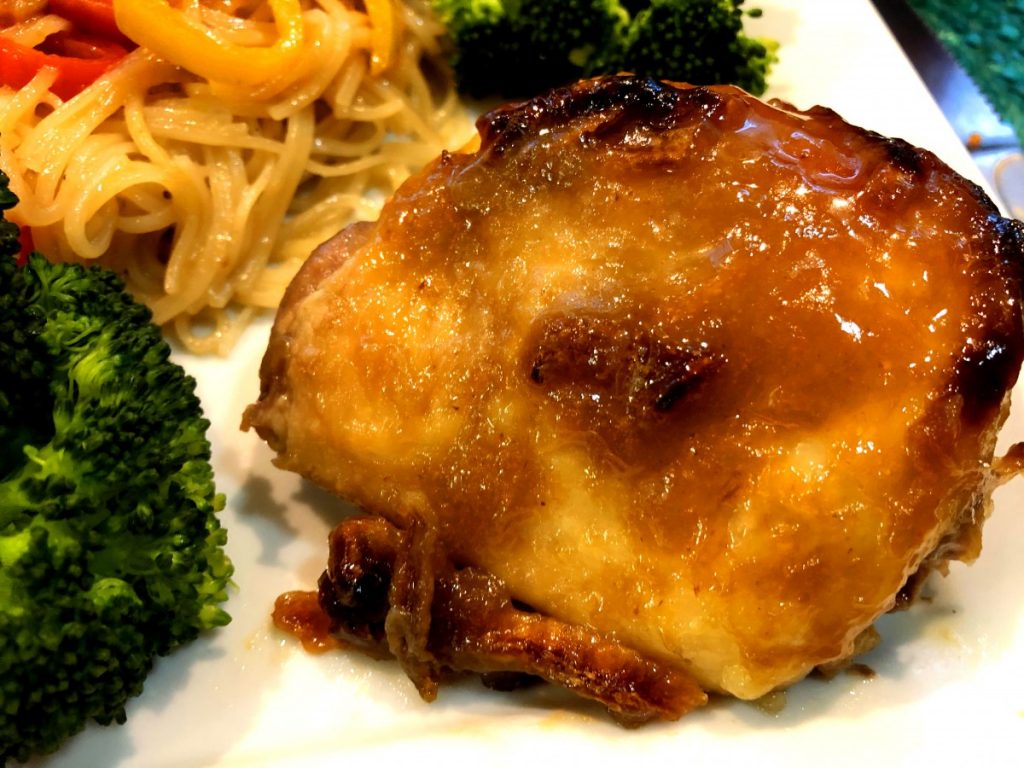
Rhubarb Sauce
It is rhubarb season around here. Rhubarb is turning up at local farm markets and even in some grocery stores.
Like a lot of people, when I think of rhubarb, I first think of dessert, like pie or cobbler. But rhubarb’s tangy, tart flavor, lends itself to lots of savory uses.
I had some rhubarb and could not decide what to do with it. I chopped it up, and cooked it in a little water until tender. I ended up with 2 cups of cooked rhubarb.
I used this as the base for the sauce. I added the other ingredients, cooked it down until it was thick, and ended up with about 2 cups of sauce. It had a nice balance of sweet, tart and heat.
I used some of it as a glaze for chicken I was cooking. I froze the rest. The sauce would be good on other meats or even on grilled veggies.
Rhubarb Glazed Chicken
8 chicken thighs or 1 whole chicken, cut up
1 cup rhubarb sauce (recipe follows)
salt and pepper to taste
Place chicken pieces in roasting pan, season to taste and bake in a preheated 375 degree oven for 30 minutes. Remove from oven and drain any fat out of the pan. Pour over the rhubarb sauce and return chicken to oven for an additional 35 minutes. Baste the chicken with some of the sauce in the pan and return to oven for 15 minutes more. Serves 4.
Rhubarb Sauce
2 c. cooked rhubarb
1 c. apple cider vinegar
1/4 c. brown sugar
2 T. honey
2 T. dried minced onion
1 T. hot sauce
1 T. paprika
2 t. minced garlic
1 t. Worcestershire sauce
1 t. cumin
1 t. cinnamon
salt to taste
Place all ingredients in a saucepan and cook over medium heat until thickened. Stir more often as mixture thickens. Cook until sauce has reduced to about 2 cups. Use as a glaze on meats and vegetables. It was great on chicken but would also go well on pork or duck. I could also imagine it on portobello mushrooms. It would make a nice dipping sauce, too. Note: I liked the tang of it but you could make it a little sweeter to suit your own taste. Makes 2 cups. Will keep a few weeks in the fridge or can be frozen.
Asparagus Irene
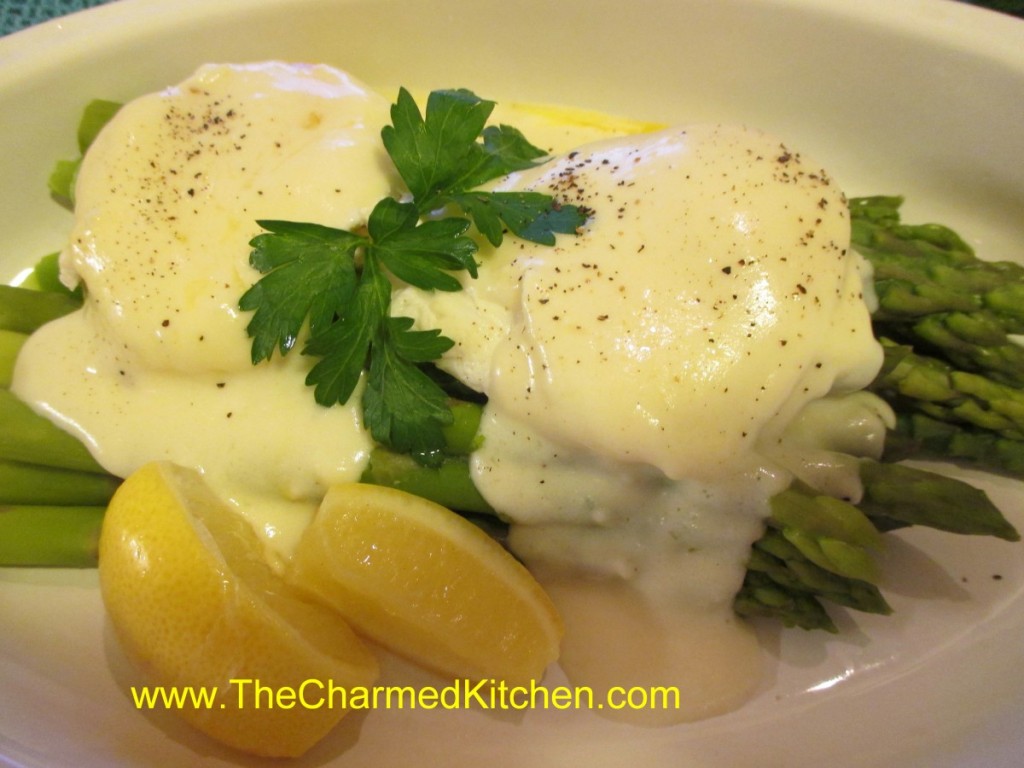
Asparagus will always be one of my favorite vegetables. I just love it. As I started writing out the recipe for this dish, I was thinking about my Mom and how much she loved asparagus. She always wanted the bigger asparagus spears- she said they had more flavor.
I remember her showing me how to break the bottom of the stalks off and how she would cook them until they were just done- but not mushy. She wouldn’t consider eating canned asparagus- only fresh- so the season was short. It was something to be savored while it lasted.
Most times she just placed the cooked asparagus on a plate, topped with a pat of butter and a sprinkle of salt. One time, though, she made a white sauce and poured it over the asparagus. It was bliss. For this version I used a white sauce, and topped the asparagus with 2 poached eggs, too. It is a lovely breakfast or brunch dish. Makes a great dinner, too. I named the dish after her.
Here is the recipe.
Asparagus Irene
1 lb. fresh asparagus, washed and stems trimmed
white sauce- recipe follows
fresh lemon, cut in wedges
2 eggs
vinegar- for the poaching water
salt and pepper to taste
Put the asparagus in a steamer and cook for about 5 minutes- or until almost done. Set aside. Make white sauce, but add some lemon juice to it. I just kept squeezing lemon wedges in until it tasted right to me. Set sauce aside. Boil some water in a shallow pan and add a tablespoon of vinegar to the water. Drop the two eggs in and simmer, covered until the whites are opaque and the yolks are still runny. While the eggs are cooking return the asparagus to the heat and cook until just tender. Place asparagus on a serving dish. Sprinkle with a little salt. Gently place the eggs on top of the asparagus. Spoon some of the white sauce over the eggs. You will have more sauce than you need. Save it for another use. Garnish with lemon wedges and parsley, if you like. Finish with some salt and fresh ground pepper. Serves 2.
Basic White Sauce (Bechamel)
The start of many a classic dish.
2 T. butter or oil
2 T. flour
1 1/4 c. warmed milk
salt and pepper to taste
In saucepan melt butter or heat oil and add flour, stirring until smooth. Slowly whisk in milk, stirring constantly until thickened and bubbly. Turn heat down and continue to cook, stirring constantly for a couple minutes longer. Season to taste. If you are going to store the sauce for later use place a layer of wax paper on top, store in a container with a lid or pour a little milk over the top to prevent a skin from forming. Makes about 1 c.
Lemon: Add zest of a lemon, 2 T. lemon juice and 2 T. butter just before serving.
English Toffee Crunch
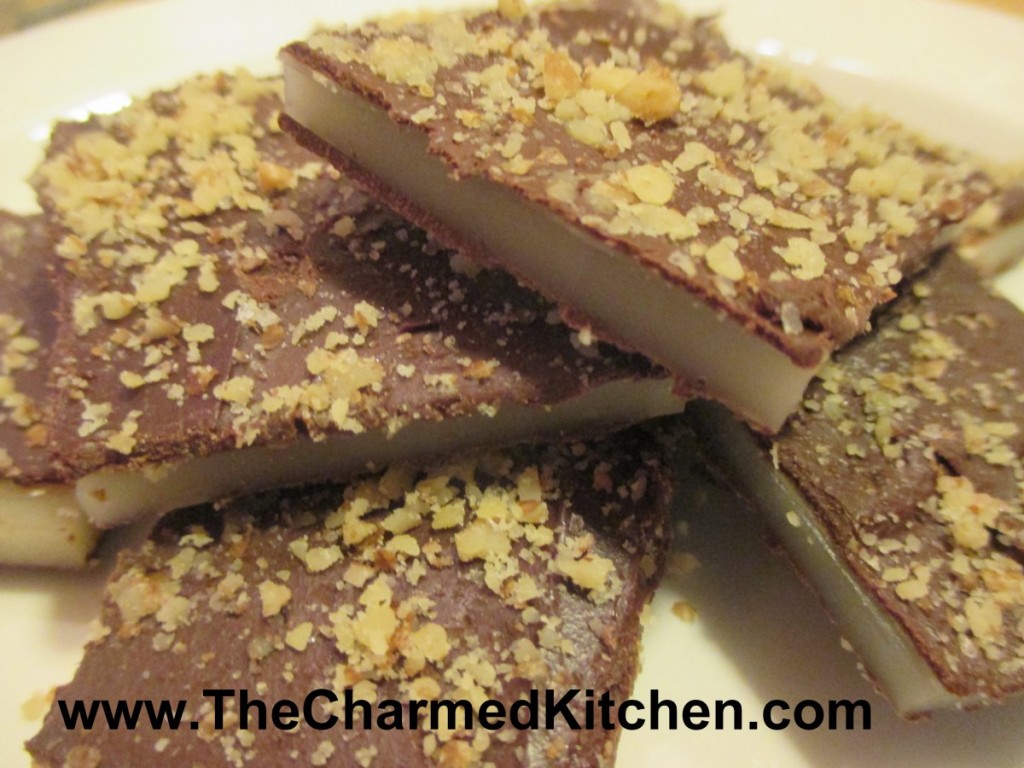
If you are looking to make a special sweet treat, English Toffee Crunch is always a good choice. The crunchy, sweet toffee is coated with chocolate on the top and bottom, along with a sprinkling of fine chopped nuts. A classic, for sure.
I know people are sometimes a little scared about making candy, but this is pretty easy to make, and well worth the effort. The only special piece of equipment you will need is a candy thermometer. Just be careful when handling the hot ingredients. The end result is a special treat.
English Toffee Crunch
1 1/2 c. sugar
2 sticks butter (not margarine)
3 T. water
1 T. light corn syrup – recipe follows for a substitute
3/4 lb. milk or dark chocolate, or chocolate chips
1/2 c. very finely chopped walnuts
Over low heat, stirring constantly, cook sugar, butter, water and corn syrup until mixture reaches hard crack stage (300-310 degrees). Pour onto ungreased jellyroll pan tilting quickly in all directions to get toffee as thin as possible. It hardens up unbelievably quickly so work fast. I like to warm the cookie sheet a little in the oven so it buys me a few extra seconds to thin out the toffee. Harden in fridge about five minutes or let stand at room temperature until cooled down. Melt chocolate in double boiler and spread half of it over toffee, spreading to edges. Sprinkle with half the nuts and return to fridge it harden chocolate. Turn toffee carefully onto another sheet and coat the bottom with the remaining chocolate and nuts. Chill until chocolate hardens then break up into bite sized pieces. Note: you can use even more chocolate if you like a thicker coating. Store in a cool, dry place in an airtight container. Makes 1 1/2 lbs.
Homemade Corn Syrup Substitute
2 cups granulated sugar
3/4 cup Water
1/4 tsp. Cream of Tartar
dash of salt
Combine all in a large, heavy stainless steel pot. Stir and bring to a boil. Reduce heat to a simmer and cover with lid for 3 to 4 minutes to get the sugar crystals off the sides of the pan. Uncover and cook to softball stage, 238 to 240 degree’s F. or when a small amount is dropped into cold water and does not hold its shape; stir constantly. Cook for another minute. Cool and store in covered jar at room temperature, will keep well for 2 months at room temperature.
For dark corn syrup add 1/4 cup molasses


