Holiday Sugar Cookies
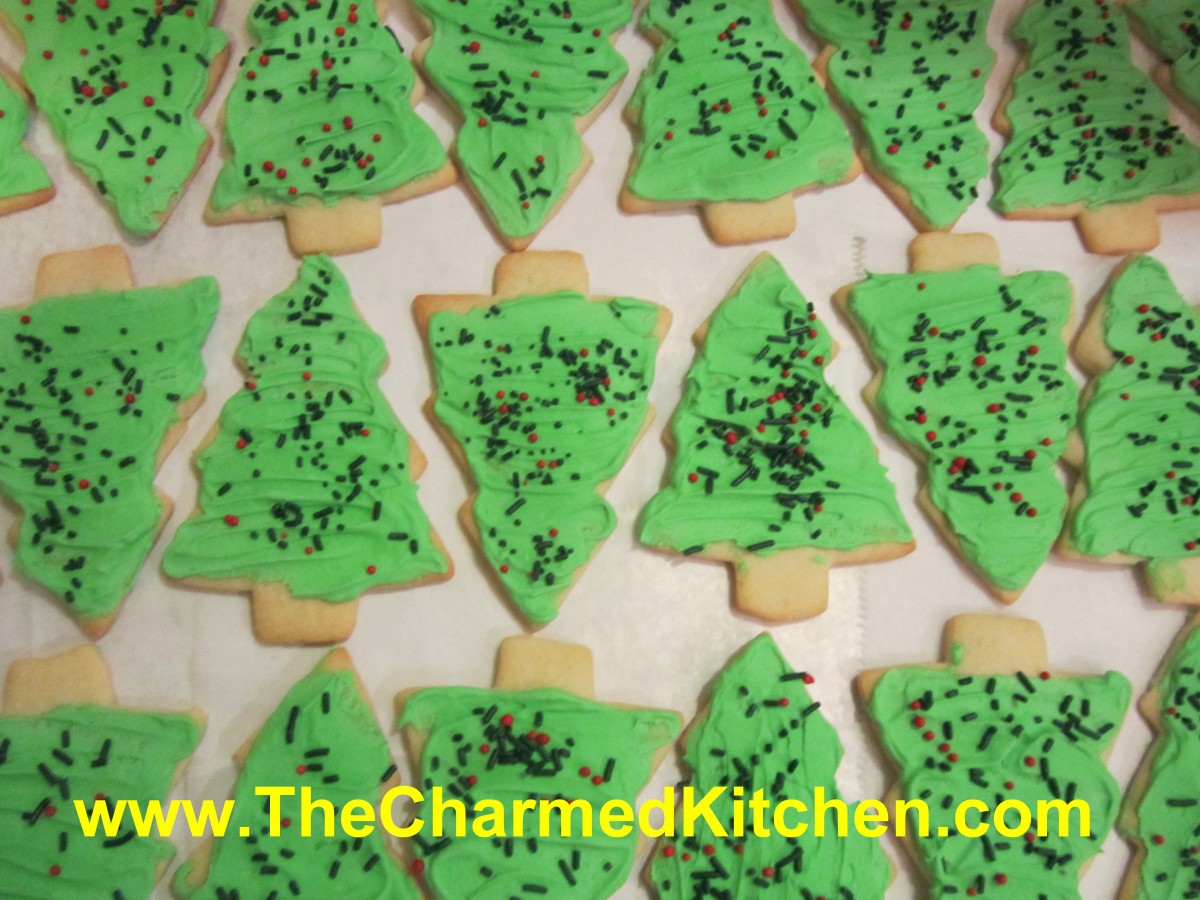
Sugar Cookie Trees
These cut-out cookies are a classic, and always part of my holiday cookie baking. I will confess to having an enormous assortment of cookie cutters, so there is almost no end to the shapes I might use. This time of year I am making trees, stars, snowmen and more.
These cookies are crisp and sturdy enough to stand up to frosting, without being too hard. They also hold their shape well when baking.
I use royal icing to frost them, and an assortment of sprinkles and other candies. Royal icing is made with egg whites or powdered egg whites. The advantage over a butter cream, is that royal icing hardens, making the cookies easy to pack and stack. You don’t need much- just a thin layer. Tinting the frosting different colors is a big part of the fun. Depending on how much time you have, you can get really creative with decorating.
Old-Fashioned Sugar Cookies
1 c. butter
1 c. sugar
1 egg
1 t. vanilla
3 c. flour
2 t. baking powder
3 T. milk
Extra sugar for sprinkling, if desired
Beat butter and sugar until fluffy. Beat in egg and vanilla. Combine dry ingredients and add to butter mixture. Beat in milk. Heat oven to 375-degrees. Roll dough on lightly floured surface to about 1/3- inch thickness. Cut out with lightly floured cutters and sprinkle with sugar or colored sugar if you like and if you are not going to frost them. Bake on an ungreased baking sheet for 10-12 minutes. Cool on baking sheet 3 minutes before placing on wire rack to cool completely. Frost when cooled. Makes about 4 dozen.
Decorating your cookies:
You can use a buttercream frosting, if you like, however the topping I prefer is royal icing. Because royal icing contains egg whites it gets hard. Cookies have a smooth appearance and can be stacked. When making royal icing, use pasteurized egg whites or powdered egg whites. Raw egg whites pose a risk of salmonella.
You can also use colored sugar and sprinkles and mini chocolate chips for eyes.
Royal Icing
1 lb. powdered sugar
½ t. cream of tartar
5¼ t. egg white powder
6 T. water
½ t. vanilla, optional
Assorted food coloring
In large mixing bowl combine dry ingredients and mix well. Add water and vanilla and beat until light and fluffy, about 10 minutes. Divide into small bowls and tint each batch as needed. Keep bowl covered with a damp towel while waiting to use so frosting will not dry out.
Old Fashioned Spritz Cookies
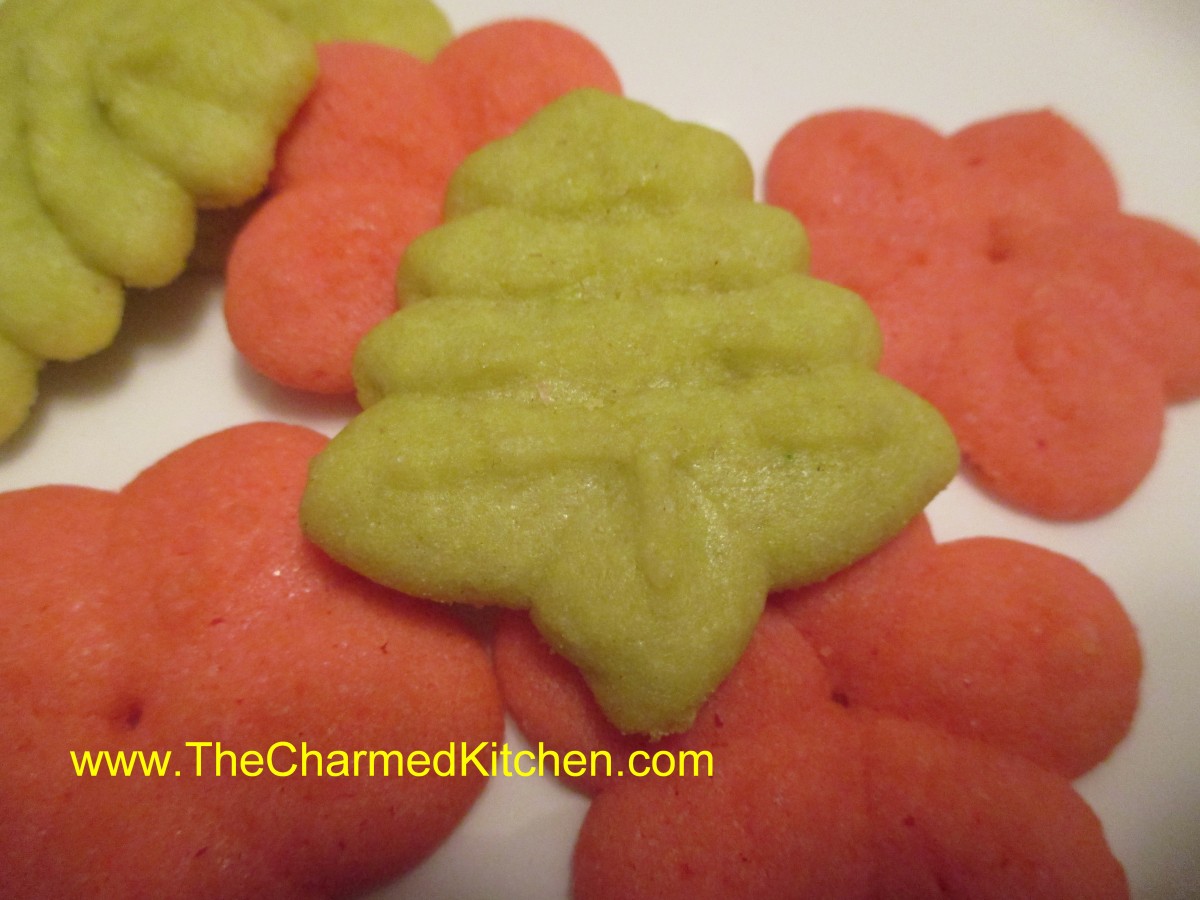
Spritz Cookies
Some cookies are really about the memories for me. I remember making pressed cookies when I was a kid. I loved using the machine to press out dough in all sorts of magical shapes.
My mother was so kind- she let me make whatever I wanted. One Christmas, we had a whole plateful of camels.
The machine we had required turning a handle- watching carefully, and turning the handle backwards to stop the flow of the dough. There are much easier versions of cookie presses today. Mine has a ratchet which pushes out the right amount of dough with one click. I decided to make some little green trees and red flowers this year. These cookies are light and very crisp. Great for having with coffee. They are also fast to make, once you get used to the cookie press.
The fun thing about using a cookie press is that you can crank out a high volume of pretty cookies in no time flat. They taste good, too. I used vanilla extract in the little trees. In the flowers, I added some sweet cherry flavor, which paired well with the vanilla.
Spritz Cookies
1 c. butter
1 c. sugar
1 egg
1 T. vanilla*
½ t. salt
2½ c. flour
In mixing bowl beat together butter and sugar until fluffy. Beat in egg. Stir in vanilla and salt. Tint dough, is desired. Add flour and stir until smooth. Using a cookie press with desired shape press cookies on to ungreased baking sheet. Leave about 1-inch between cookies. Bake in a preheated 375-degree oven for about 10 minutes- cookies should be a light golden color around the edges. Cool on a wire rack. Makes about 3 dozen.
Soft Butter Cookies

Soft Butter Cookies
If you are looking for a truly tender cookie, this may be it. These cookies are so delicate, they just melt in your mouth!! The secret ingredient might surprise you. It is oil. Yes, I know I said butter cookies – they also contain butter. But the combination of oil and butter makes them soft and delicate, even days after baking.
They also contain both granulated and powdered sugar. Not your typical cookie recipe, for sure. This just may be my “go to” butter cookie recipe from now on.
I found a sheet of paper with the ingredients written on it. No directions, just ingredients listed and a notation about cooking time and oven temperature. I wish I knew where I got the recipe. I would certainly give the source credit. I did increase the amount of vanilla a little. You don’t have to chill the dough and they roll very easily, without sticking to your fingers. You could chill the dough, but let it warm up a little before rolling. The dough can also be made ahead and frozen- I tested it.
I dipped the tops of the raw cookies in sprinkles, but you could leave them plain and then roll in powder sugar, once baked and cooled, or drizzle with melted chocolate.
Soft Butter Cookies
1 c. butter
1 c. oil, I used avocado oil
1 c. sugar
1 c. powdered sugar
2 eggs
1 T. vanilla
1 t. baking soda
1 t. cream of tartar
½ t. salt
4 ½ c. flour
In mixing bowl, beat together butter, oil, sugars and vanilla. Once well blended, beat in eggs. Stir in the baking soda, cream of tartar and salt, then add the flour, mixing until well combined. Heat oven to 350 degrees. Roll dough into one inch balls and press tops of cookies in sprinkles or colored sugar, if desired. Place one inch apart on ungreased baking sheets. Bake for 12 minutes, or until light golden on bottom. Leave cookies on baking sheets 3 minutes before placing on cooling rack. Makes about 6 dozen cookies.
Vanilla Shortbread with Coffee/Cinnamon Filling
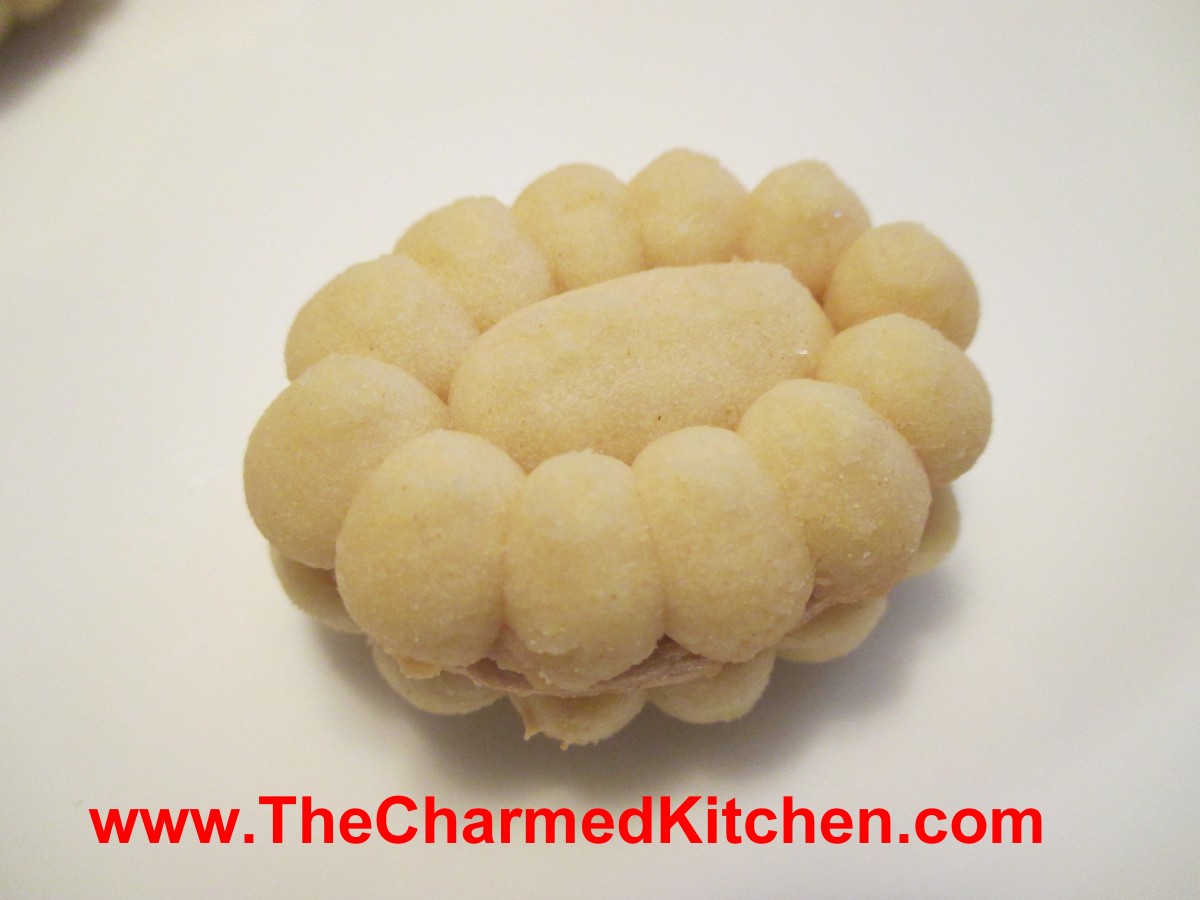
Vanilla Shortbread Cookies with Coffee/Cinnamon Filling
Certain cookies bring back special memories for me. More so around the holidays. Most memories are of making cookies with my mom. This cookie though, is one I used to make with my friend, Kim. She really loved coffee and the coffee-cinnamon filling made these one of her favorites. The cookies are tender, and not too sweet. The filling, which sandwiches them together, is what makes them special. It is a buttery mix of cinnamon and coffee flavors. They pair so well together.
Use a cookie press to make any shape you like for these cookies. Once baked, two halves are put together in little sandwich cookies. These are a big hit, whenever I make them.
Vanilla Shortbread with Coffee/Cinnamon Filling
1 c. butter
½ c. powdered sugar
½ t. vanilla
2 c. flour
¼ t. baking powder
Heat oven to 375-degrees. Cream together butter, sugar and vanilla. Blend in flour and baking powder. Using flower design of cookie press to make 1- inch cookies on ungreased baking sheet. Bake about 7 minutes, or until very lightly browned. Cool and then put two cookies together with coffee filling.
Note: You can make these cookies in almost any cookie press design that is symmetrical. I have made strips, trees and stars among others. Makes about 2 dozen double cookies.
Coffee/Cinnamon Filling
2/3 c. powdered sugar
2 T. butter, softened
1 t. instant coffee dissolved in 1 t. boiling water
1 t. cinnamon
Beat all ingredients together until smooth. Add a few drops of water if too dry.
Date Cookies
Date Pinwheel Cookies
Since it that time of year, I thought I would start sharing some of my favorite cookie recipes.
I love the sweetness of dates, and really enjoy using that natural sweetness in baking. I always seem to make several dishes with dates around the holidays. These date filled cookies are one of my favorites. Moist and cake-like, with the wonderful flavor of the dates, nuts and citrus zest, these cookies taste even better than they look. The cookie dough, made with brown sugar, has an almost caramel-like flavor. The combination is a winner for sure.
Date Pinwheel Cookies
Date Filling
12 oz. pitted dates, chopped
1/3 c. brown sugar
¼ c. water
Juice of 1 lemon
Zest of 1 lemon
Zest of 1 orange
½ c. finely chopped nuts
Combine dates with all ingredients (except the nuts) in a small saucepan. Cook, stirring constantly, until thickened, about 5-10 minutes. Stir in nuts. Cool.
Dough
½ c. butter, softened
1 c. brown sugar
1 egg
1 t. vanilla
1¾ c. flour
½ t. baking soda
½ t. salt
In bowl combine butter and sugar and beat until fluffy. Add egg and vanilla and beat well. Combine dry ingredients and stir into butter mixture. Divide dough in half. Roll or pat one half of the dough into a rectangle about 7×11- inches in size. Spread with half of the cooled date filling. Starting at long end, roll dough up . Repeat with remaining dough and filling. Wrap rolls in wax paper or plastic wrap and chill in fridge several hours. This dough/roll is pretty soft. I sometimes put the rolls in the freezer for an hour or two before baking to make them easier to slice.
To make the cookies: Preheat oven to 375 degrees. Slice the rolls into ¼ -inch slices and place an inch apart on a lightly greased baking sheet. Bake about 12 minutes- or until cookies are a light golden color. Cool on wire rack. Makes about 5 dozen.
Homemade Marshmallows
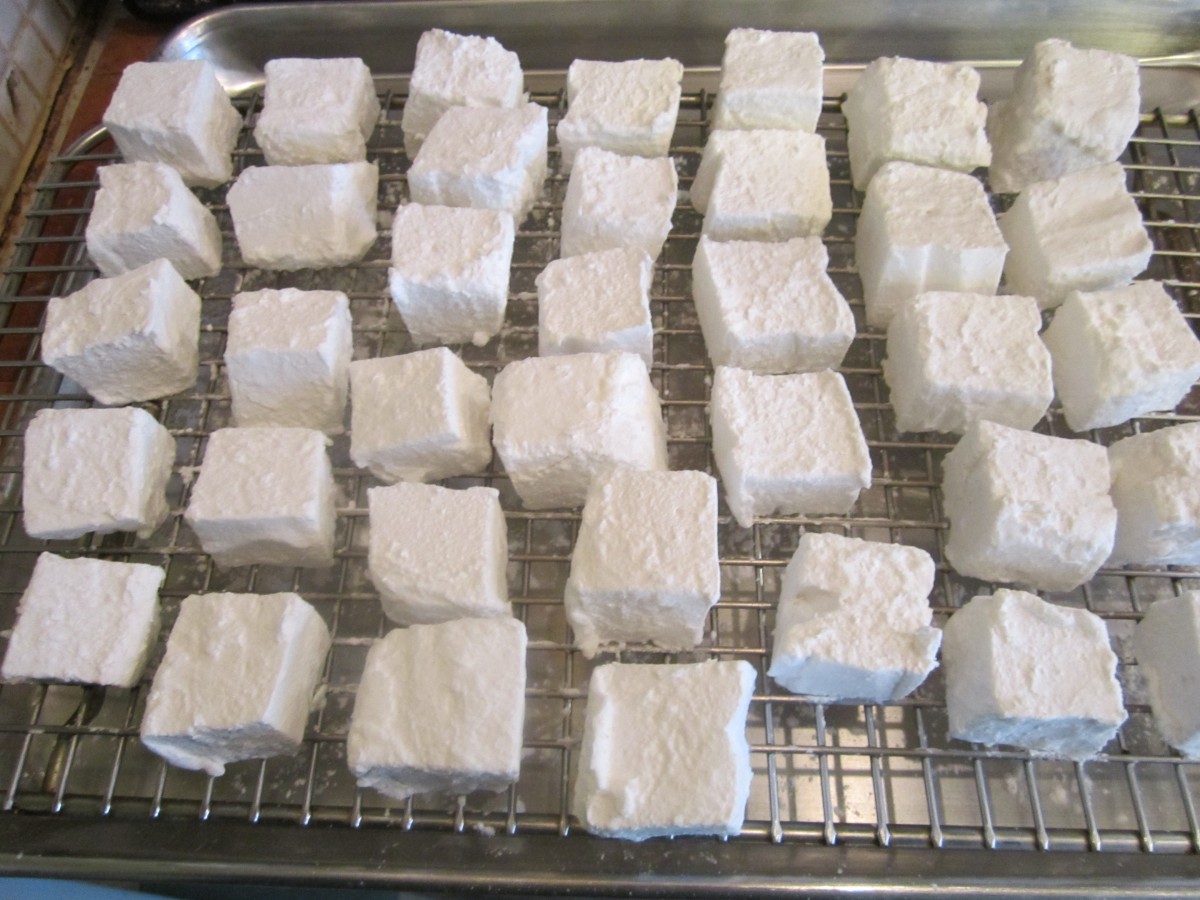
Freshly rolled marshmallows
Since I shared a recipe for homemade hot cocoa yesterday, I thought I would share my recipe for homemade marshmallows today. They are very easy to make, and so much better than store bought.
The recipe is for classic vanilla marshmallows, but you can add different flavors and even colors, if you like. How fun to enjoy a mug of hot cocoa topped with homemade marshmallows. Maybe even make a mint version for your cocoa.
I’ve used this recipe for ages. I like that it is super easy, and still gives you quality marshmallows. I’ve seen more complicated versions- but why make life harder than it already is?
Marshmallows
1/2 c. cornstarch
1/2 c. powdered sugar
small amount of butter
2 envelopes unflavored gelatin, or 6 sheets of gelatin*
1/2 c. granulated sugar
1/3 c. water
2/3 c. corn syrup
1/2 t. vanilla
Combine cornstarch and powdered sugar in a small bowl. Butter an 8x8x2 inch-baking pan. Sprinkle with some of the cornstarch mixture. Reserve the rest of the mixture for use later on. Combine the gelatin, granulated sugar and water in a small saucepan and cook over low heat, stirring constantly until gelatin is dissolved.** Pour gelatin mixture into a large bowl, adding the corn syrup and vanilla. Beat with an electric mixer on high speed for 15 minutes. Be precise on the timing. The mixture will be thick and fluffy, marshmallow cream, actually. Pour mixture into the prepared pan, spread evenly and refrigerate overnight. The next day, sift some of the reserved cornstarch mixture over the marshmallows. Sprinkle some more of the coating mixture on a work surface and turn the marshmallow out onto the prepared surface. Cut the marshmallows into 1-inch squares, coating as you go. The marshmallows are very sticky until completely coated. Allow to dry on a rack. Store in an airtight container for up to 3 weeks. Makes about 4 dozen candies.
You can swap out flavorings- using maybe mint or lemon in place of the vanilla. You can also add a few drops of food coloring, if you like. Oh, and when you are at the rolling the pieces around in the cornstarch and powdered sugar stage of the process- don’t wear black. You’ll thank me later for that.
* Note: 3 sheets of sheet gelatin= one packet (1 tablespoon) of powdered gelatin.
** Note: If you are using sheet gelatin place it in the pan with COLD water and stir until dissolved. Then add the sugar and just cook, over medium-low heat until just warm, stirring often. Don’t let the mixture get too hot or the gelatin will not work.
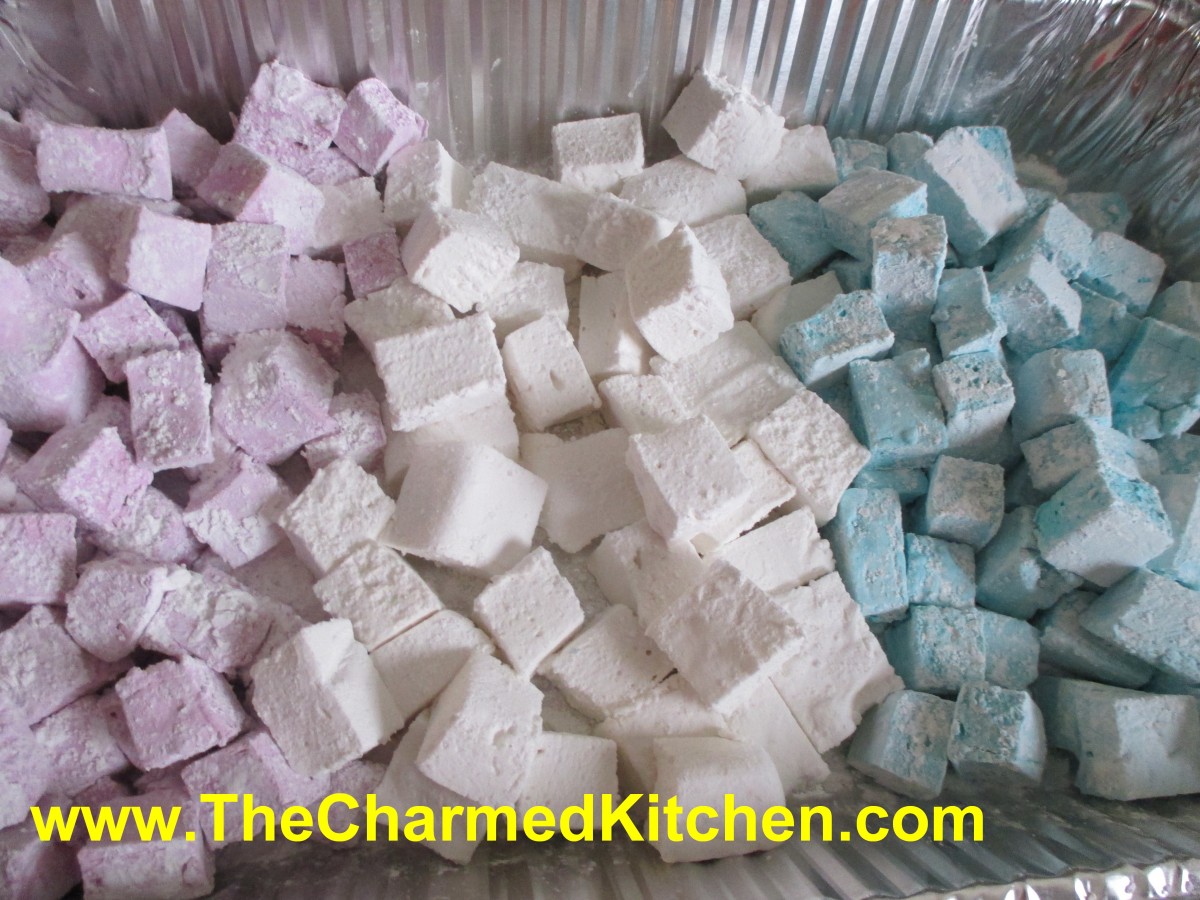
Rainbow Marshmallows
Homemade Hot Cocoa Mix
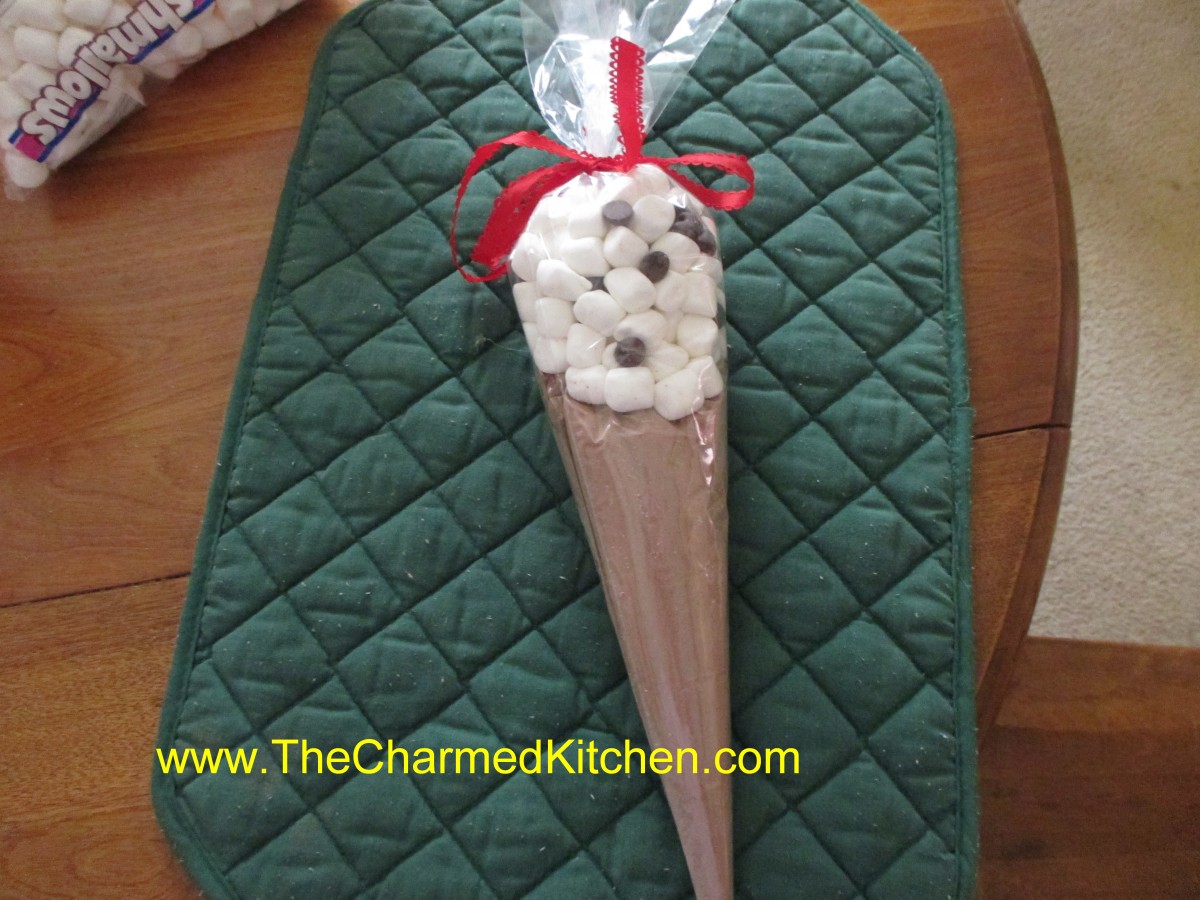
Hot Cocoa Ice Cream Cone
I am always looking for homemade gift ideas for the holidays. I really like gifts that both adults and kids can make. This one is just a simple way to package homemade hot cocoa mix to make it special. We made these in a holiday gift class the other night. People really enjoyed making them.
You start with hot cocoa mix- recipe follows. Then you get these cone shaped bags. I use a 12-inch size and a 17-inch size. I buy my online but they are available in some craft and candy making stores. Just put about 1 cup of the hot cocoa mix in the smaller cone shaped bag. Fold the top down and tape it shut. Now place the smaller bag inside the larger bag. Add about a cup of mini marshmallows mixed with some chocolate chips. The chips are optional. Tie shut with a ribbon. It ends up looking (sort of) like an ice cream cone. I add a label that says “Hot Cocoa for Two” with directions that say, “Divide hot cocoa mix between two large mugs. Fill with a cup of boiling water in each. Stir and top with the marshmallows”. You can make whatever label you like. A quick and simple gift. You could also include mugs with the gift. This is a great idea for kids to make for grandparents, teachers, etc.
Here is the recipe for the hot cocoa mix.
Hot Cocoa Mix
3 c. nonfat dry milk
1 c. cocoa
1 c. sugar
1/4 t. salt
1 c. mini marshmallows (optional)
In large bowl, mix all ingredients well. I like to sift the ingredients in because it powders the milk even finer than the way it comes. Store in an airtight jar and use within 6 months. To use add 5 tablespoonfuls to 8 ounces boiling water. Variation, flavor with cinnamon, instant coffee, cayenne pepper or even dried orange peel.
Cinnamon Ornaments
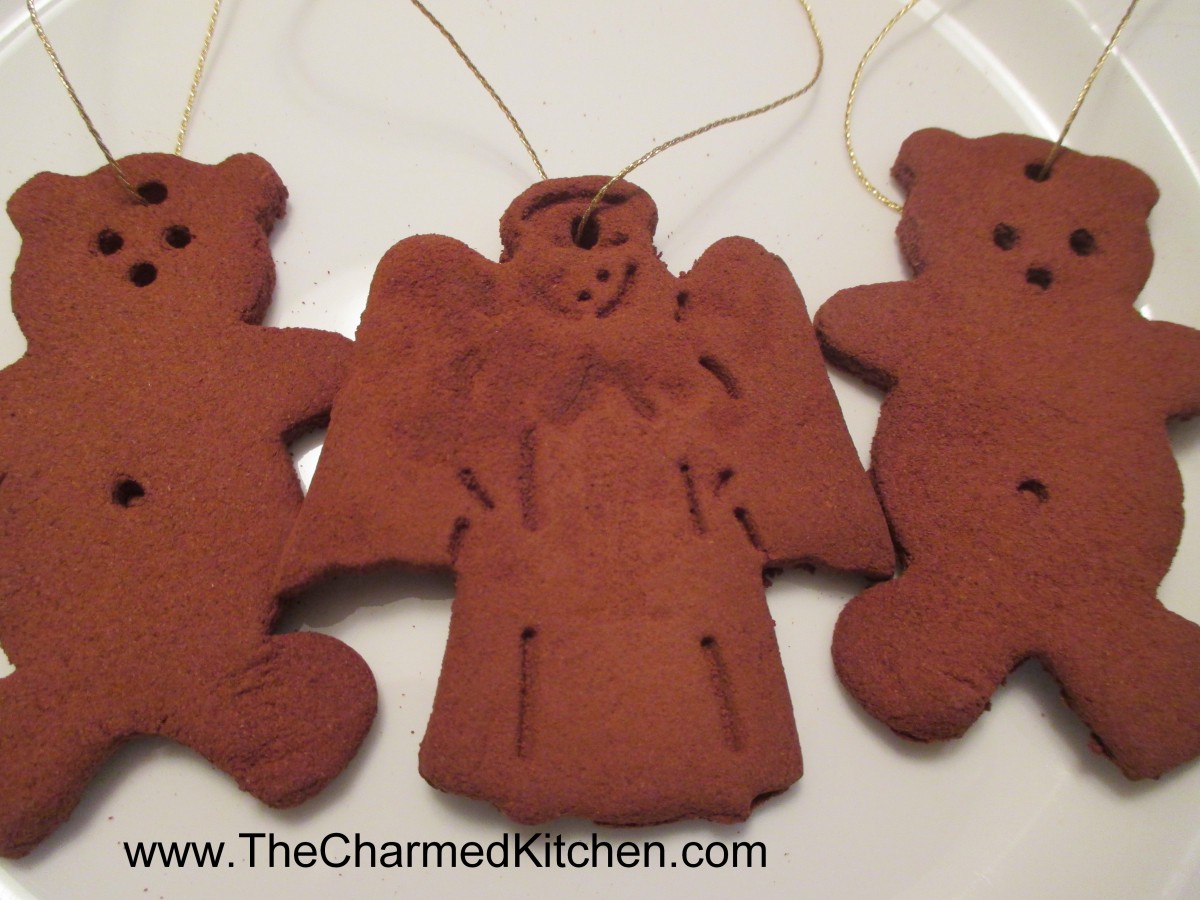
Cinnamon Ornaments
If you want a simple gift/craft for the holidays, it does not get much easier than cinnamon ornaments. All you need are cinnamon, applesauce, a rolling pin and cookie cutters. There is no cooking involved, or special equipment.
You combine the cinnamon and applesauce to make a sort of dough. You roll out the dough and cut it into shapes. Then, you just need to let the ornaments dry and harden. Allow a few days for drying. If you put them in a dehydrator, they are dry in a few hours. The house smells really good while they are drying. Even after they are dried, they continue to have that wonderful cinnamon fragrance. They can be used as ornaments on a tree or simply hung to freshen a room. This is a fun gift for kids to make, too. Here are the directions.
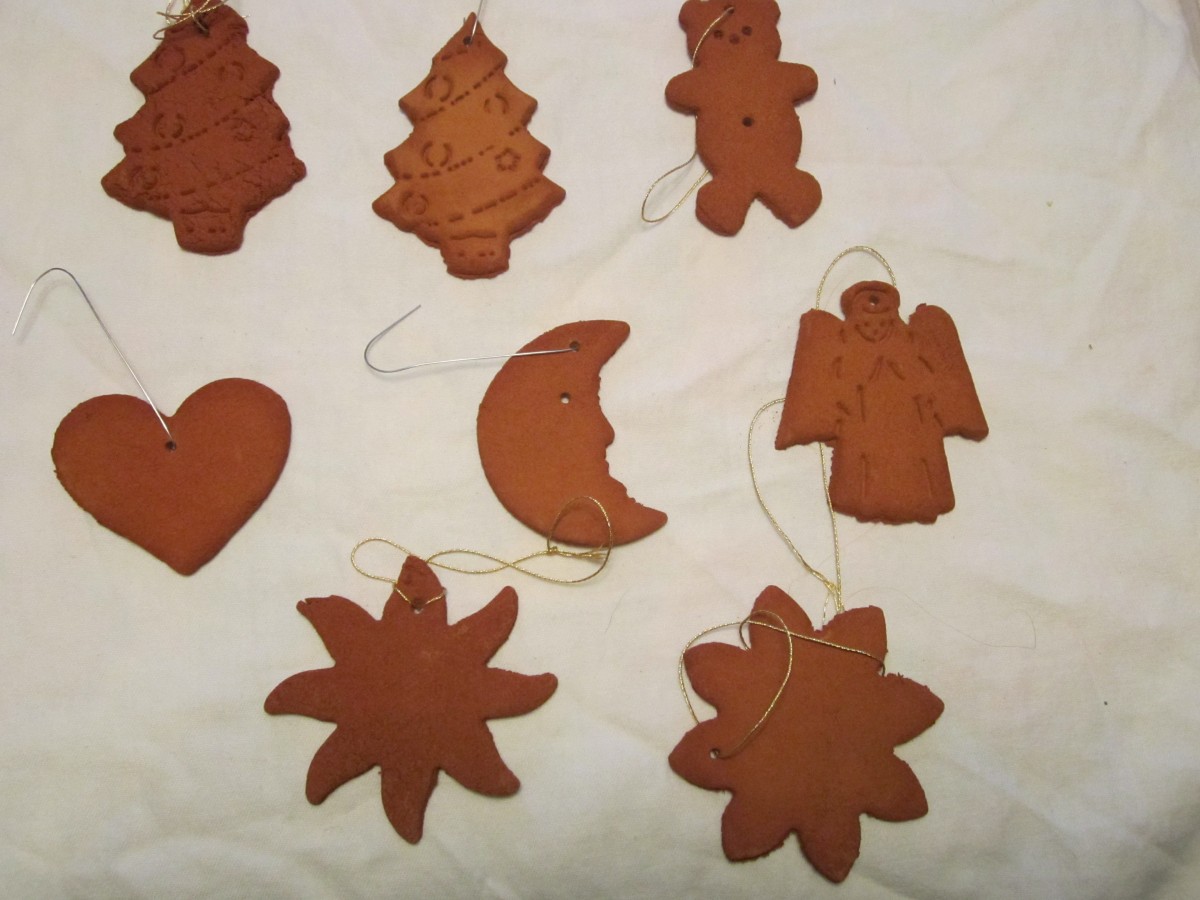
Ornament assortment
Cinnamon Ornaments
These are for decorating, not for eating!
3/4 c. applesauce
1 bottle (4.12 oz.) cinnamon
Mix applesauce and cinnamon and knead to form a stiff dough. Roll out to 1/4-inch thickness and cut out with cookie cutters. Make hole in top of ornament with skewer or straw and carefully transfer to rack to dry. Let dry a couple of days, turning occasionally. Hang dried ornaments with decorative thread or ribbon. Makes about 12-15.
Two Trees and a Roll of Duct Tape
 I have some really fun childhood holiday memories. Perhaps the most fun was getting our own Christmas tree. What really made the trip fun was going with Uncle Frank.
Uncle Frank was my dad’s baby brother. He was always so much fun. He had a great sense of humor, too.
The one thing Uncle Frank never seemed to have- at least at tree cutting time- was a car with a working heater. I am not sure if he and my dad thought it was more of an adventure that way. I mean, we could have gone in my family’s car- but we never did.
One year in particular, will always stand out for me. There were 7 of us in a Volkswagen beetle. Two adults, my Dad and Uncle Frank, three of my cousins, my brother and me. Of course, no heater in the car. It was also a very snowy December, so the car was cold.
We were all bundled up as we headed out to get a couple of Christmas trees. There is a small space behind the back seat in an old Beetle. That is where my cousin Laurie and I sat. My brother and two cousins shared the back seat. Dad and Uncle Frank sat in front.
When we got to the tree farm, the dads pretty much left us kids on our own. There was a lot of snow on the ground and I remember sliding down a snowy hill, over and over. When we were called back to the car- we were all pretty cold- and our boots were full of snow.
I don’t want you to think that my Dad and Uncle Frank were not good parents or reckless. They were the best- and so much fun. They insisted we all take off out wet boots when we got in the car. Everyone tossed them in the area in back were Laurie and I had been sitting. We joined the others in the back seat. My cousin Gary sat on my Dad’s lap. Well, that was after my Dad and Uncle Frank got in the car.
See, there was this problem with the trees. For some reason they didn’t have enough rope- or any rope. I don’t really remember that part.
I just know, that at some point, with the kids shivering in the car- we were now wet and had removed our boots- My Uncle Frank and my father started taping two pine trees to a VW Bug. I remember them passing the tape over and under the car, making sure the trees were not going anywhere.
I feel the need to point out, that the rounded top of the beetle was not an easy place to secure a tree- or two. So the trees ended up more on the sides of the car, taped securely into place. I learned at a very early age, the value of duct tape. The guys had to come in through open windows, since the trees were pretty much blocking the doors.
When my Uncle started up the car- the windows were all frosted up. The heater did not work, so no defroster for the windows. He used his thumbnail to scratch off an area of ice about the size of a silver dollar. He closed one eye, put the open eye up to the little circle he had cleared on the windshield and declared – it was fine- he could see just fine.
We all laughed. He was laughing, so was my Dad. We took our cues from the adults and joined in the merriment. It was a cold, but laughter- filled ride home. When we got back, my uncle crawled out the window and un-taped the trees so we could all get out of the car.
My Mom and Aunt quickly got us into dry clothes and I am guessing they were not as amused by our condition as we were. The point is, no one got hurt and it probably toughened us up a little.
I am glad there are car seats and seat belts and air bags in cars today. I think kids and adults should be safely secured in all moving vehicles. But way back when- we didn’t have those safety features. It isn’t like they decided not to strap us in- they couldn’t.
While my Uncle Frank was laughing and joking around that day, he was also a police officer. I am sure he knew how to drive in snowy conditions. Maybe he was nervous. Maybe my dad was, too. But if they were, they didn’t show it.
I know there was a lot of love and laughter in the Beetle that day. I can only imagine the looks we got from other drivers on our way home. I couldn’t actually see other cars, however, as the view was blocked by the tree branches and frosty windows.
If there is any lesson- perhaps it is to be brave enough to be silly sometimes. While I don’t want anyone to put a child in harm’s way- don’t be so careful that your kid’s miss out on adventures, too.
Be the person that gives a kid a really good memory this holiday season. Perhaps, using duct tape and a couple of trees.
Homemade Bath Salts
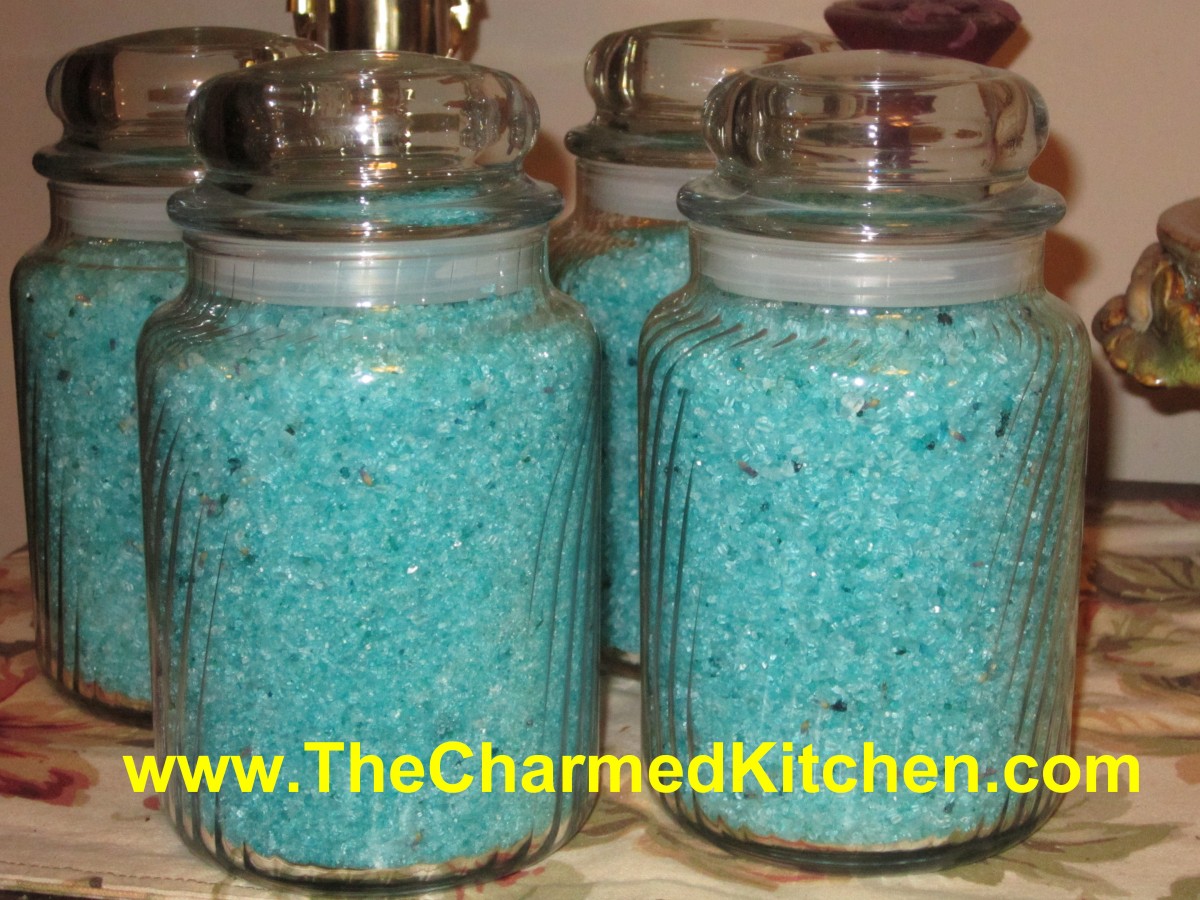
Homemade Bath Salts
One of my favorite gifts to make is bath salts. Everyone seems to like them. I actually get requests for more!!
The ingredients are fairly easy to find. Epsom salts can be found at any drug store.
Essential oils can be found at most craft stores. Food coloring- grocery stores. Try to find pretty jars to put them and finish with a pretty label.
This is a fun craft for kids to make for Mom, teachers etc. I like using essential oils, but you can use perfume, too.
Sometimes I add small amount of dried flower petals. If you do that- just small amounts and crumbled pretty fine, so there won’t be issues with clogging drains. Here are the directions.
Homemade Bath Salts
Epsom Salts
Fragrant oils
Food coloring- optional
Flower petals
Place 2 cups Epsom salts in a non-reactive bowl and add a few drops of scented oils and a few drops of food coloring, if desired. Toss to distribute, or place in a jar with a tight fitting lid or even in a plastic bag and shake mixture well. Take a whiff. If you can’t smell them, add more. You can add more coloring, too if needed. Add a few petals, broken up, for additional fragrance and for color. Place salts in a glass jar with a lid or in a plastic bag and let stand 1 week. Smell again and adjust fragrance as needed. Fragrances mature and you may find them too weak or strong. Add more oil or cologne to heighten aroma or add more salts to cut down on intensity. Keep in mind that the bath salts will be diluted a lot in a bath, so a little strong is good.
The oils are available at many craft stores and by mail. See the section on mail order in the back of the book. Choosing the fragrance you want to use can be a little trickier. Most of the florals are a safe bet, but you may want to get more creative. Citrus, herb, spice and woody fragrant oils can add a dimension to your bath salts that make them really outstanding.
To present them as a gift salts can be put in a wide-mouth jar, with a lid. Decorate with ribbon and attach a small scoop, if you like. Discount and dollar stores are a good place to find attractive jars at a reasonable price as well as garage sales and resale shops. You can also package them for individual use in lollipop bags with a card board header, like the herb packets. I like to make different fragrances and label them (relaxing bath, earthly delights, sweet dreams, etc. I then package them in the bags and add a few to a gift basket.


