Five Fast Food Gifts
Buckeyes
If you are looking for some last minute food gift ideas, these might help. All of them can be put together in no time and require little, or no cooking.
I find my friends and family really appreciate homemade gifts. I start making some items well in advance. Other things really need to be made last minute.
I have made a lot of cookies for gifts, but sometimes I just want to make something different. Here are some of my most popular gifts, based on how many people ask for them again. My friends and family are not shy!!!
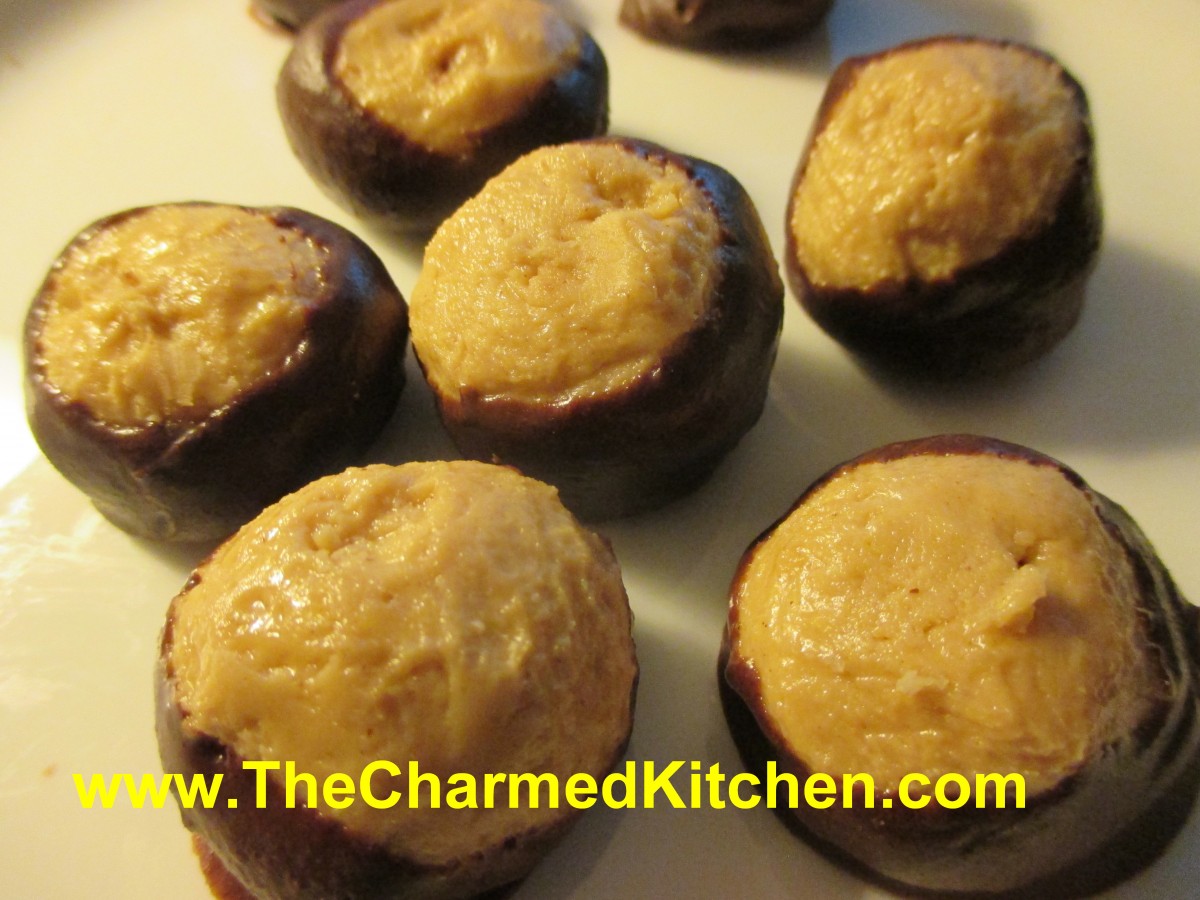
Buckeyes
Buckeyes are a favorite treat here in Ohio, but everybody loves them. They are made with peanut butter, powdered sugar, butter and a chocolate mixture for dipping. Easy and very tasty. This is a treat kids can help make, too.
1 ½ lb. powdered sugar
1 ½ c. peanut butter
2 sticks softened butter
12 oz. chocolate chips
2 T. coconut oil or shortening
Mix together sugar, peanut butter and butter. Chill. Roll into balls, about 1-inch big. Flatten slightly. Melt chocolate and coconut oil. Dip in melted chocolate to cover about ¾ of the surface. Using a toothpick or fondue fork makes this job a lot easier. Allow to harden on wax paper. Store in a cool place. Can be frozen. Makes about 80.
Susie’s Giant Peanut Butter Cup
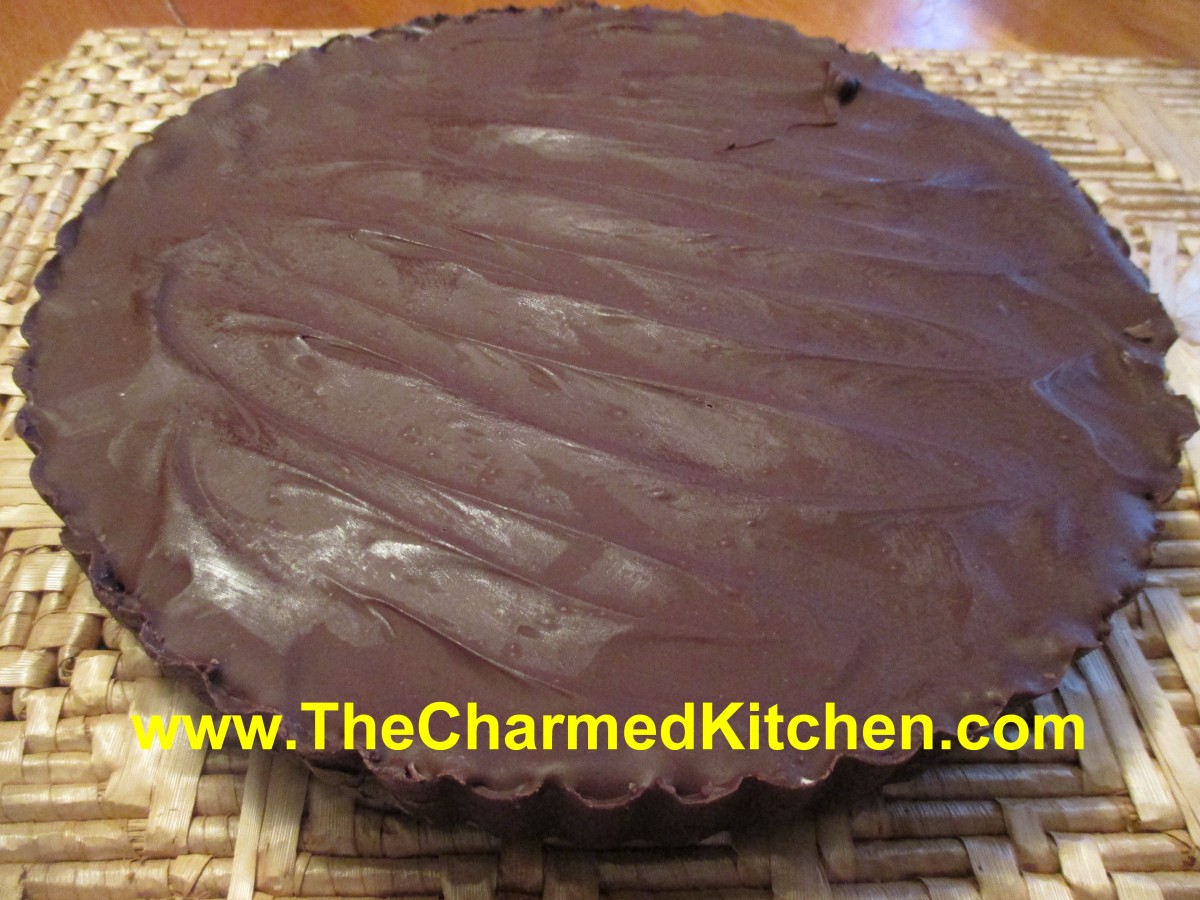
Giant Peanut Butter Cup
I wanted a food gift, for a friend. I wanted to make her something special. I decided to try my hand at making a giant peanut butter cup. I’ve made small ones in the past, so I knew the basic structure. Using a 10-inch tart pan offered different challenges, but I went ahead and gave it a try. I wasn’t worried about the components. I had good quality dark chocolate and peanut butter. I knew it would taste good. I wasn’t sure it would stay in one piece. After using more than a pound of chocolate, I didn’t want to bring her a pile of broken pieces. It worked, and here is the result. Since I haven’t given it to her yet, I don’t have any pictures of it sliced. I used a pretty good amount of chocolate. You could probably use less, but I wanted the chocolate thick enough on the bottom the make it sturdy. I also used a slightly altered version of the filling I use when I make buckeyes. I am pleased with how it came out. Who am I kidding? I am just happy it came out in one piece.
Here is how I did it.
1- 1½ lbs. chocolate – I used a nice quality dark chocolate
1½ c. peanut butter
1 stick (½ cup ) butter, softened
2 ½ c. powdered sugar
2 t. vanilla
You will need a tart pan with a removable bottom. I used a 10-inch pan, but a 9- inch pan would work, too. Cover the removable bottom of the tart pan with wax paper. It will make it easier to get the thing out in one piece later. I cut out a square and just folded the extra wax paper under the pan and taped it down. Melt the chocolate and pour enough of it into the bottom of the tart pan that you can cover the bottom generously. Use a small spoon to push chocolate up the sides of the pan.
Now at this point you could just keep tipping the pan to get the chocolate evenly coated inside. I know my limitations. I just pictured myself dropping the pan of melted chocolate, so I used the spoon method instead. The important thing is that the entire inside get a coating of chocolate. Place pan in fridge to cool and chocolate to set up. Meanwhile, in medium bowl mix peanut butter and butter together until well mixed. Stir in sugar and vanilla and mix until smooth. Spread this mixture over the chocolate shell. Don’t press too hard. You don’t want to break the shell. I will confess that before I added the peanut butter, I played around with loosening the chocolate shell. I was worried it would not come out later. After I added the peanut butter mixture, I put it back in the fridge to firm up. Once the peanut butter mixture was chilled, I melted the rest of the chocolate and poured it over the top.
I used a lot of chocolate in the base and needed to melt more chocolate than I originally planned on. I do think the thicker shell helped when it came time to get it out of the tart pan.
To remove the peanut butter cup- make sure it is completely hardened. I gently pulled at the sides all around the edges of the tart pan, to loosen it. Then I pushed up on the removable bottom of the pan. After a few gentle pushes, it came out. I had to trim a little chocolate off the bottom when removing the wax paper, but it helped in getting the peanut butter cup out in one piece.
Homemade Cashew Brittle
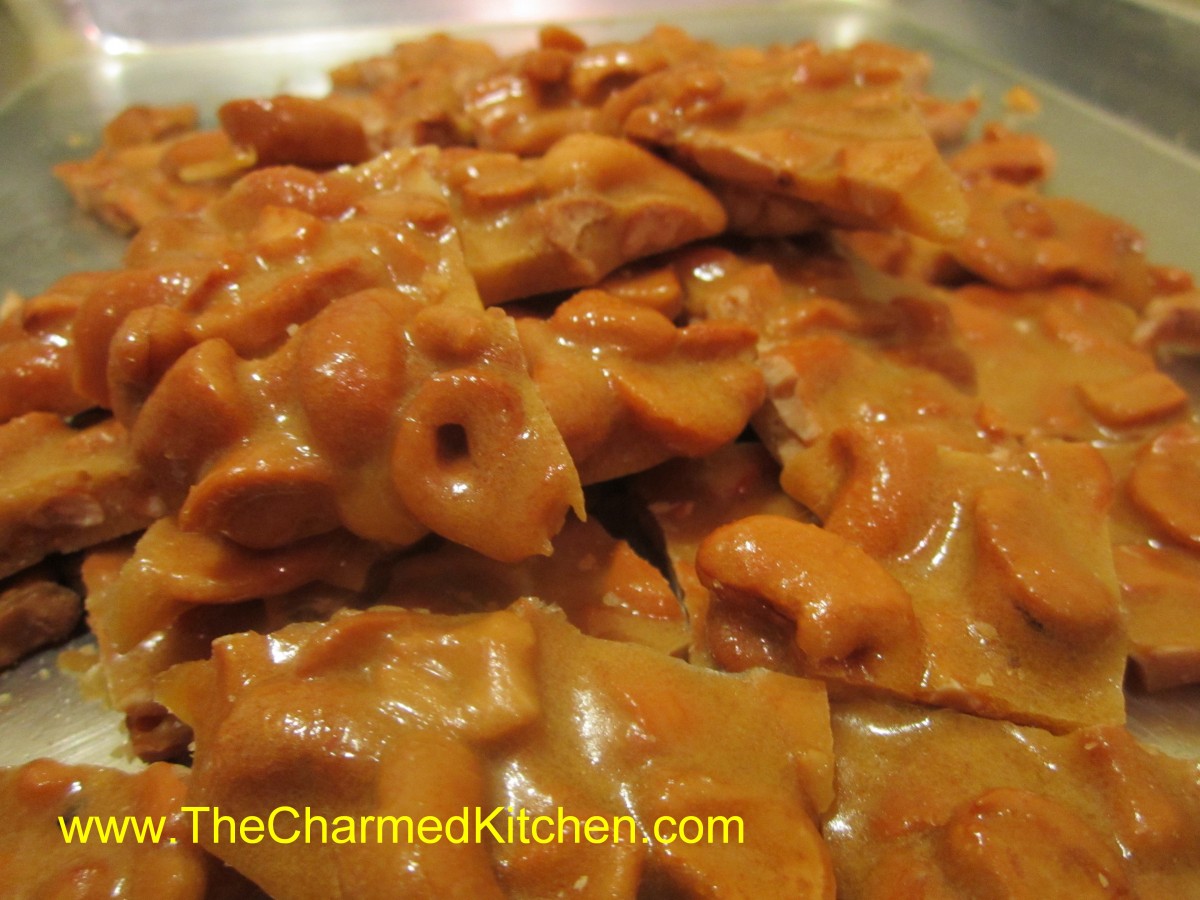
Homemade Cashew Brittle
If you need a great food gift- perhaps something to bring to a holiday party- this brittle might just be the answer. I was given this recipe at a craft show a few years ago. The brittle is cooked in the microwave. No special thermometers or equipment required. Just a glass bowl and a few minutes of your time. It could not be simpler. It is really good, too. You can use other nuts, if you prefer, or peanuts. You can also dress it up with a drizzle of chocolate, once cooled. Stored in a covered container, in a cool dry place, the brittle will stay crunchy for weeks.
2 c. cashews*
1 c. sugar
1/2 c. corn syrup
1/8 t. salt
1 t. butter
1 t. vanilla
1 t. baking soda
Butter or oil a large baking sheet and set aside. In a 3-4 quart glass bowl combine the nuts, sugar, corn syrup and salt. Microwave on high for 3 minutes. Remove from microwave, stir well and return to microwave. Cook 3 more minutes in microwave. Remove and stir in butter and vanilla, stirring until butter has melted. Return to microwave and cook for 2 more minutes. Remove from microwave and stir in baking soda. Stir until well blended and pour mixture onto prepared baking sheet. Spread out quickly, then allow to cool. Once cool, break into pieces. Store in a cool, dry place. I normally store it in a tin or plastic container with a tight-fitting lid.
* I used salted cashews but feel free to experiment with other nuts
Note: Use high power setting on microwave.
Homemade Liqueurs -Using Extracts

Homemade Almond Liqueur
I enjoy making liqueurs with seasonal fruits, but when fruit is in short supply, you can also use extracts. Pure extracts will give your liqueur a nice, true flavor, but no color. I have made almond, hazelnut, walnut and peppermint. You can use whatever flavors you think you might like. One advantage is that liqueurs made from extracts are ready to drink in less than a week. Fruit based liqueurs often take weeks and weeks to fully develop. So if you like a little almond flavor in your coffee- you can make your own liqueur with almost no effort. Another advantage is that you can adjust the sweetness to your own taste as well. I have included the recipes for almond and peppermint, but the recipe is the same for any extract flavor you might want to make.
Almond Liqueur
1 t. pure almond extract
3 c. vodka
1 c. simple syrup
Combine all ingredients and let mature several days. Makes 4 cups.
Peppermint Liqueur
1 t. pure peppermint extract
3 c. vodka
1 c. simple syrup
Combine all ingredients and let mature several days. Makes 4 cups.
Sweetening- Simple syrup is made from 1 cup of sugar and ½ cup of water. Bring to a boil, then cool. You will have 1 cup of syrup. You can sweeten your liqueur with honey, if you prefer. Watch when you substitute honey for sugar, as it is sweeter and stronger flavored. Better to use orange or clover honey. Add to suit your taste.
Homemade Hot Cocoa Mix
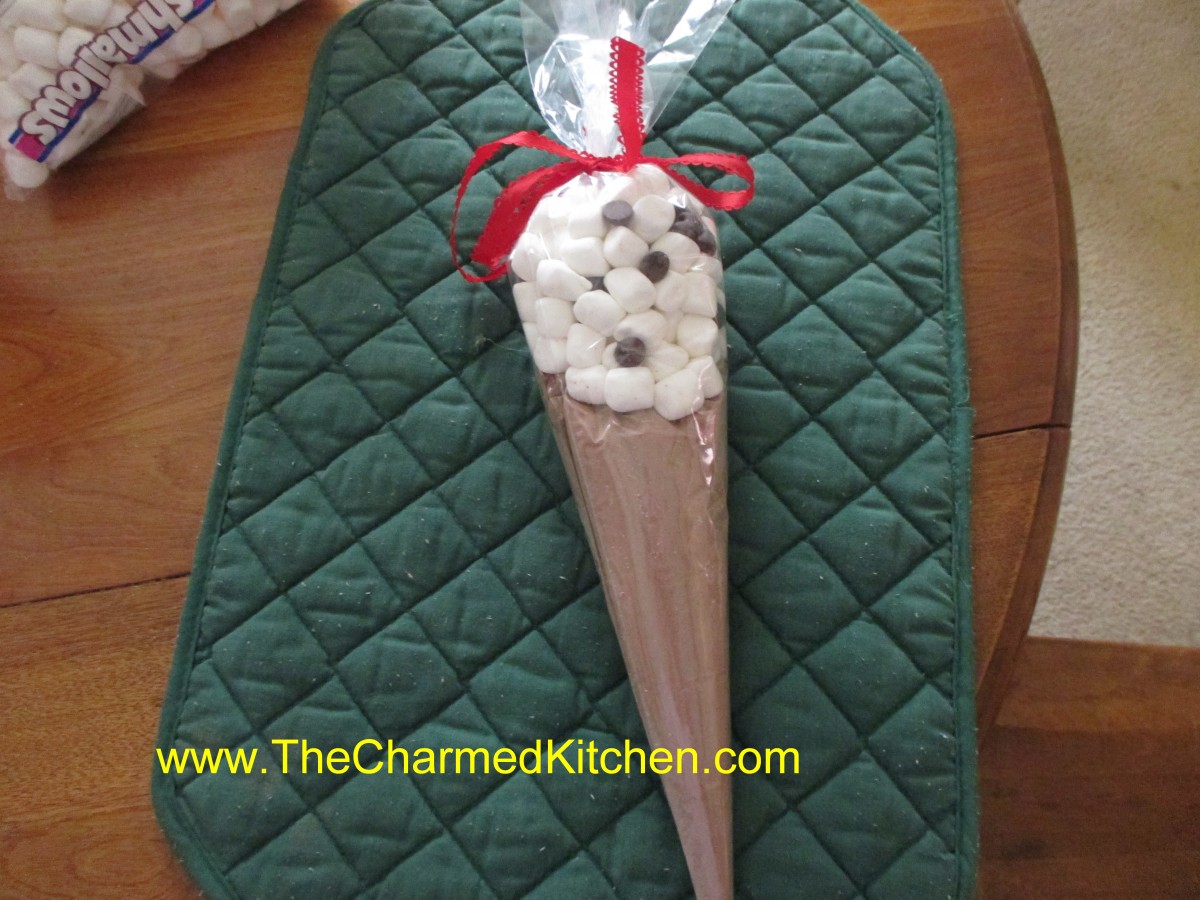
Hot Cocoa Ice Cream Cone
I am always looking for homemade gift ideas for the holidays. I really like gifts that both adults and kids can make. This one is just a simple way to package homemade hot cocoa mix to make it special. We made these in a holiday gift class the other night. People really enjoyed making them.
You start with hot cocoa mix- recipe follows. Then you get these cone shaped bags. I use a 12-inch size and a 17-inch size. I buy my online but they are available in some craft and candy making stores. Just put about 1 cup of the hot cocoa mix in the smaller cone shaped bag. Fold the top down and tape it shut. Now place the smaller bag inside the larger bag. Add about a cup of mini marshmallows mixed with some chocolate chips. The chips are optional. Tie shut with a ribbon. It ends up looking (sort of) like an ice cream cone. I add a label that says “Hot Cocoa for Two” with directions that say, “Divide hot cocoa mix between two large mugs. Fill with a cup of boiling water in each. Stir and top with the marshmallows”. You can make whatever label you like. A quick and simple gift. You could also include mugs with the gift. This is a great idea for kids to make for grandparents, teachers, etc.
Here is the recipe for the hot cocoa mix.
Hot Cocoa Mix
3 c. nonfat dry milk
1 c. cocoa
1 c. sugar
1/4 t. salt
1 c. mini marshmallows (optional)
In large bowl, mix all ingredients well. I like to sift the ingredients in because it powders the milk even finer than the way it comes. Store in an airtight jar and use within 6 months. To use add 5 tablespoonfuls to 8 ounces boiling water. Variation, flavor with cinnamon, instant coffee, cayenne pepper or even dried orange peel.
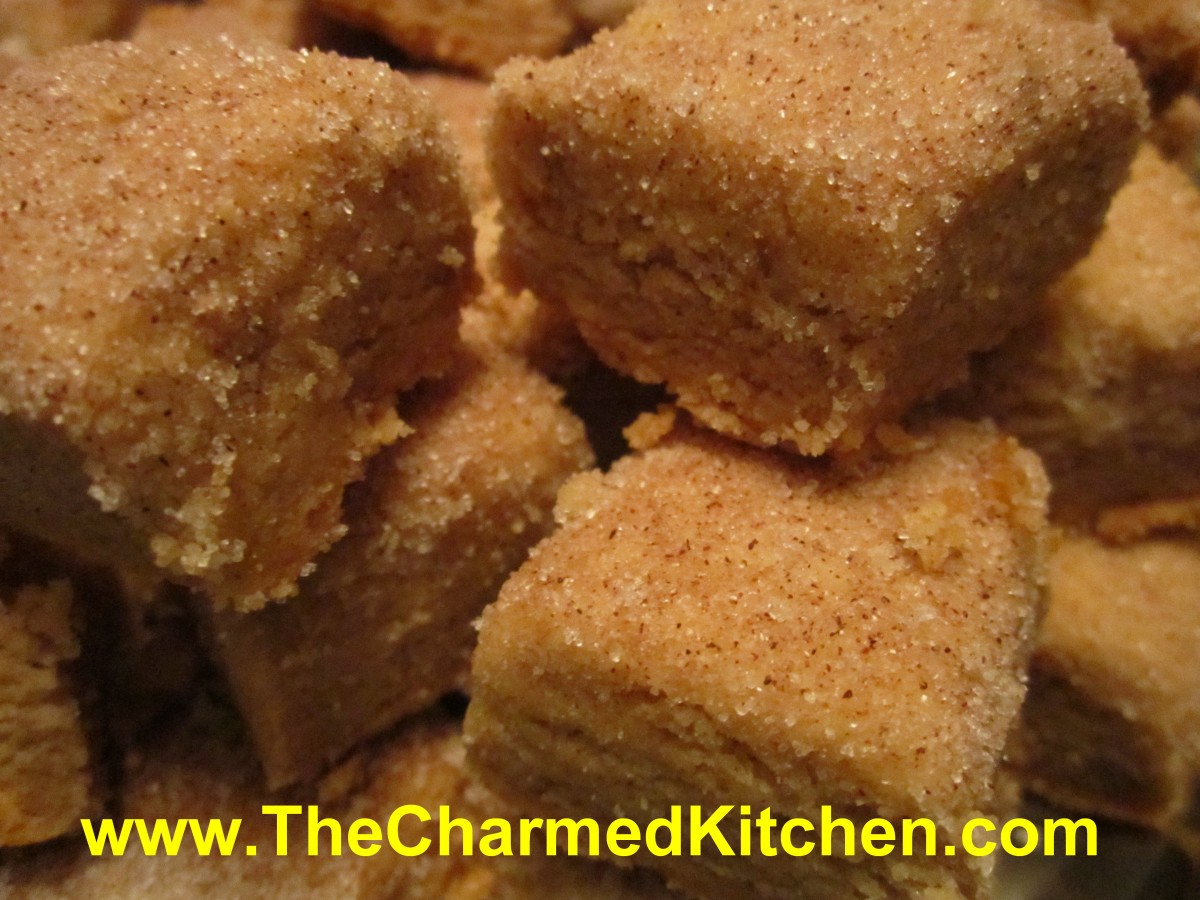
Cinnamon Pecan Shortbread Cookies
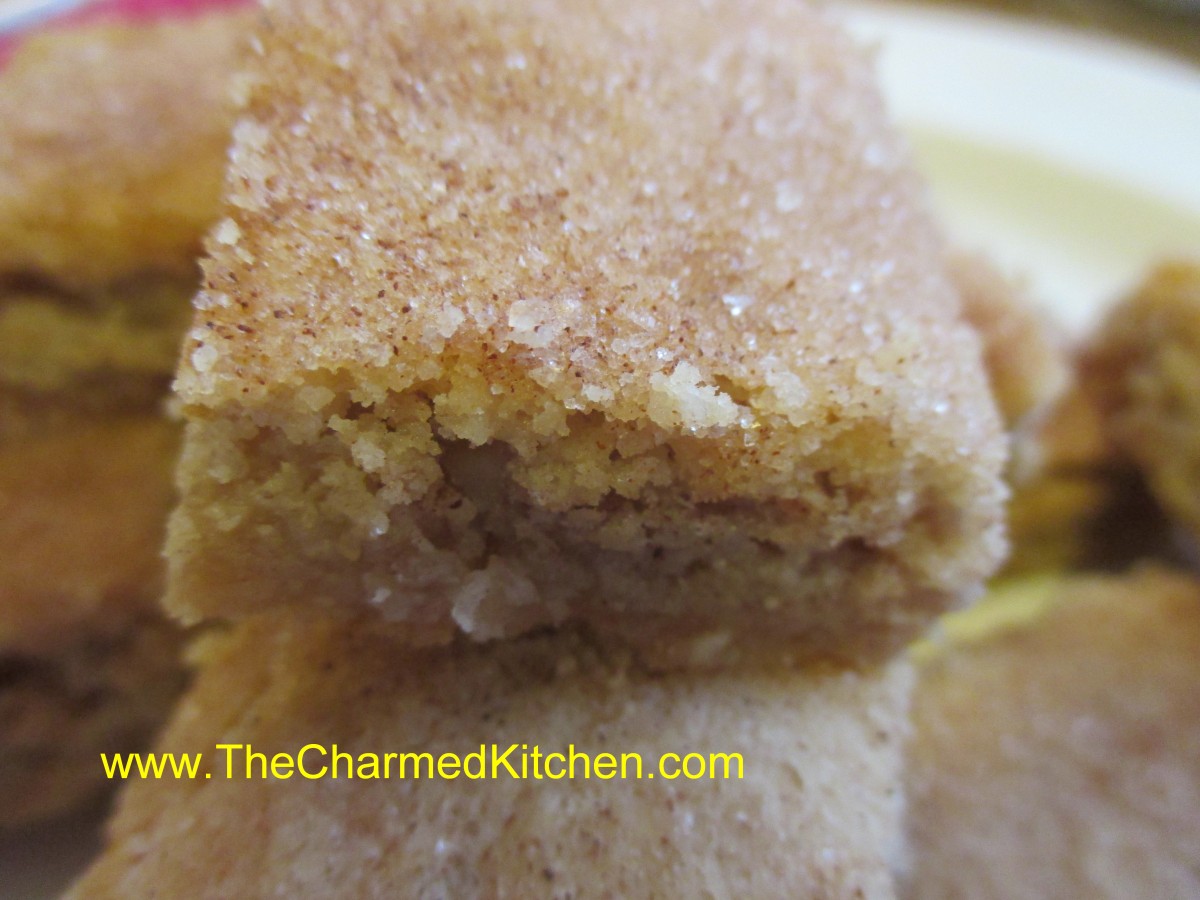
Cinnamon Pecan Shortbread
I am a big fan of shortbread cookies. I have a classic recipe, that I have made for years. But I like to switch it up sometimes. At a time of year when I am doing a lot of cookie baking, I also appreciate a bar cookie. Very little effort, for a big reward. For these cookies, I started with my regular shortbread cookie recipe, then added ground pecans and cinnamon. I also sprinkled them with cinnamon sugar. They came out great. The flavor reminds me of Pecan Sandies, but so much better. Here is the recipe.
Cinnamon Pecan Shortbread
1 c. sugar
2 c. butter
4 c. flour
¾ c. finely ground pecans
2 t. cinnamon
½ c. cinnamon sugar
Cream together sugar and butter. Stir in flour, nuts and cinnamon and press into 10×15-inch jelly roll pan. Sprinkle with cinnamon sugar and cut into squares. Bake in a 300 degree oven for 45 minutes or until light brown around edges. Re-cut while warm. Makes 4 dozen or more, depending on the size you cut them.
Stuffed French Toast
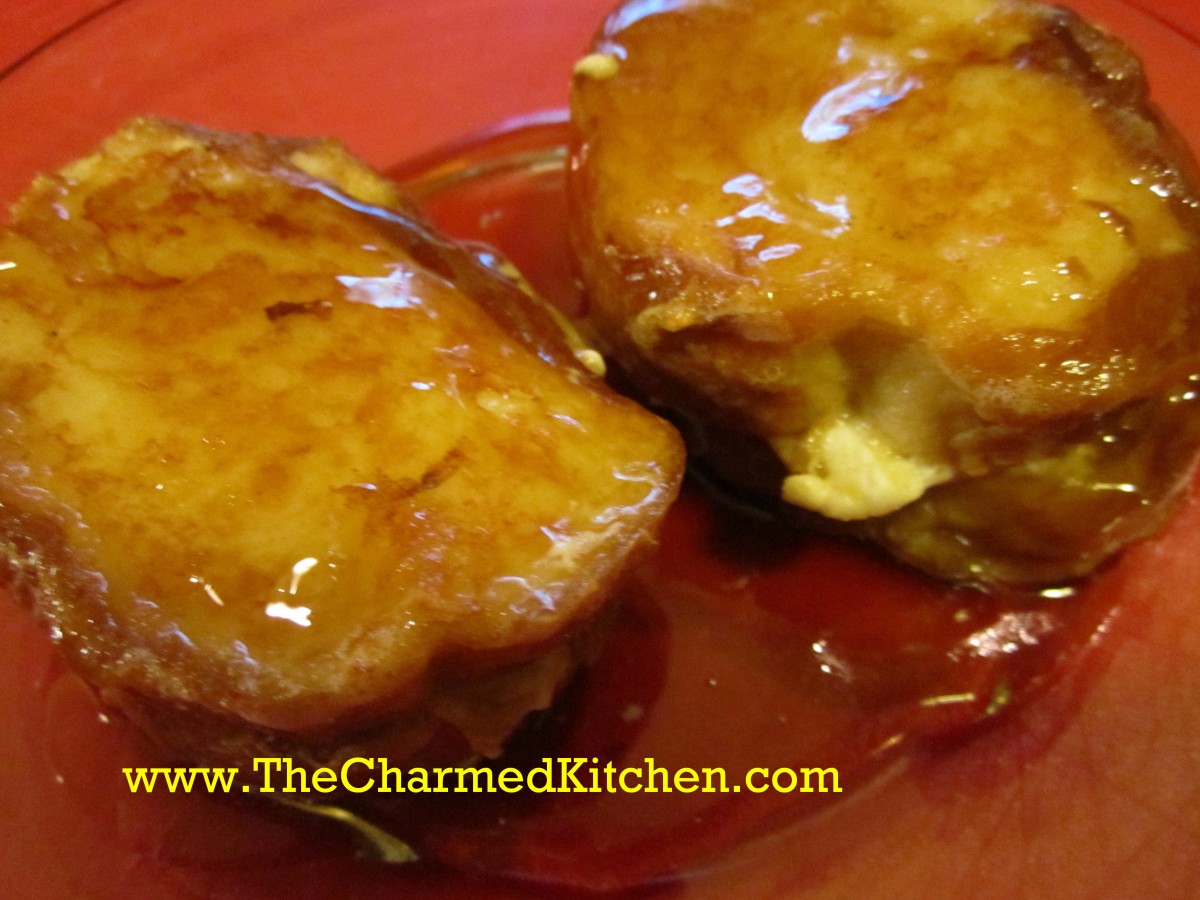
Stuffed French Toast
If you are looking for a special dish for a holiday brunch or breakfast, this recipe is always a hit. Whenever I make this stuffed French toast, I remember a Winter brunch in the park with friends. It was February, and cabin fever led to the idea to meet up in the park for brunch. We cooked everything over the grill or on a camp stove. It was pretty cold. We still had a great time.
I made this French toast and it was a big hit. It’s even more fun when you are cooking inside. You can stuff the bread the night before and keep it in the fridge until ready to cook which will save you time in the morning. Great for brunch- inside or out.
Stuffed French Toast
1 (8 oz.) package cream cheese, softened
1 t. vanilla
1/2 c. chopped nuts
1 16-oz. loaf French bread
4 eggs
1 c. whipping cream or half and half
1 t. vanilla
1/2 t. ground nutmeg
Mix together cream cheese, vanilla and nuts. Set aside. Cut bread into 10-12 1 1/2 inch slices. Cut pocket in each slice and fill with 1 1/2 T. filling. Combine eggs and whipping cream with remaining vanilla and nutmeg. Use tongs to dip the bread, taking care not to squeeze out the filling. Cook toast on lightly greased griddle until browned on both sides. Keep toast warm in oven until ready to serve. Serve with maple syrup, warmed preserves or powdered sugar. Makes 10-12 slices.
Spritz Cookies
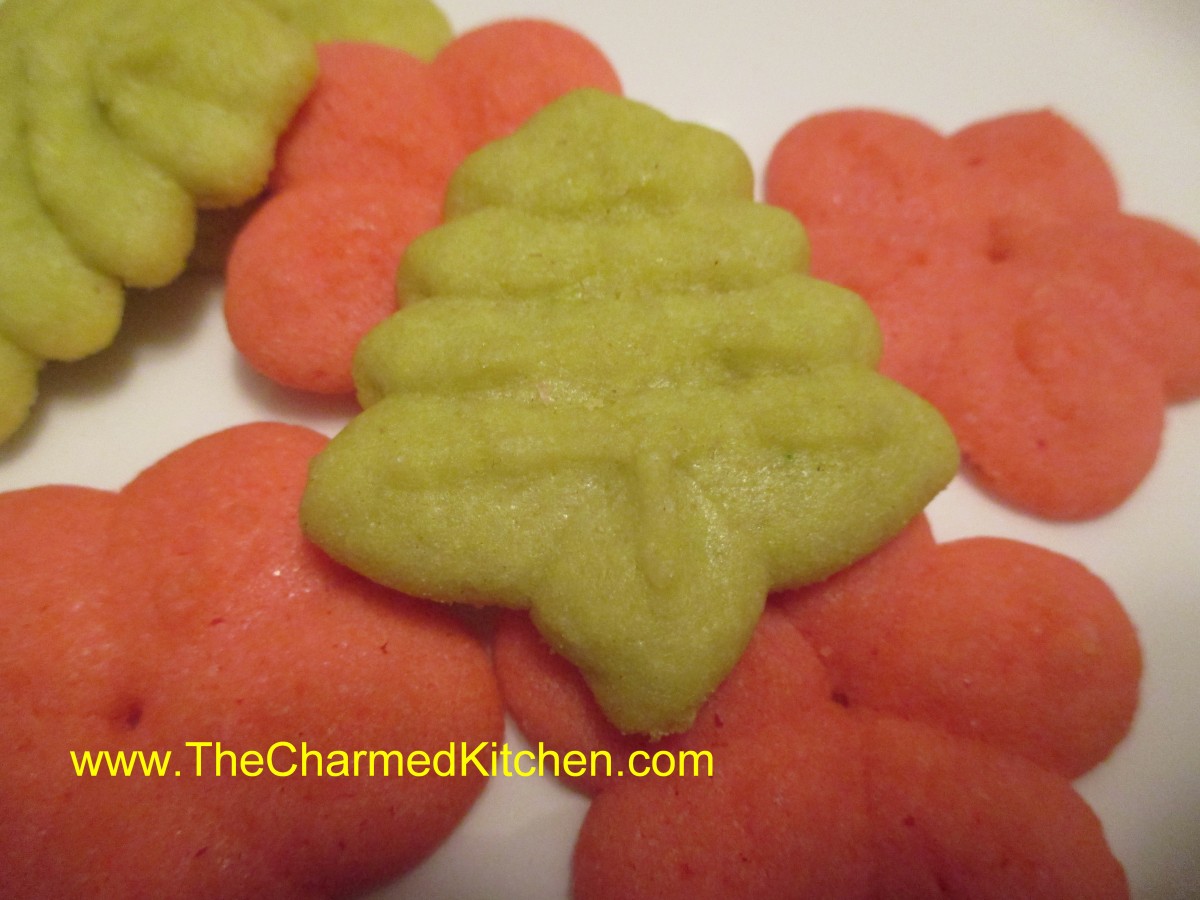
Spritz Cookies
Some cookies are really about the memories for me. I remember making pressed cookies when I was a kid. I loved using the machine to press out dough in all sorts of magical shapes. My mother was so kind- she let me make whatever I wanted. We had one Christmas with a whole plateful of camels. The machine we had required turning a handle- watching carefully, and turning the handle backwards to stop the flow of the dough. There are much easier versions of cookie presses today. Mine has a ratchet which pushes out the right amount of dough with one click. I decided to make some little green trees and red flowers this year. These cookies are light and very crisp. Great for having with coffee. They are also fast to make, once you get used to the cookie press. The fun thing about using a cookie press is that you can crank out a high volume of pretty cookies in no time flat. They taste good, too. I used vanilla extract in the little trees. In the flowers, I added some sweet cherry flavor, which paired well with the vanilla.
Spritz Cookies
1 c. butter
1 c. sugar
1 egg
1 T. vanilla*
½ t. salt
2½ c. flour
In mixing bowl beat together butter and sugar until fluffy. Beat in egg. Stir in vanilla and salt. Tint dough, is desired. Add flour and stir until smooth. Using a cookie press with desired shape press cookies on to ungreased baking sheet. Leave about 1-inch between cookies. Bake in a preheated 375-degree oven for about 10 minutes- cookies should be a light golden color around the edges. Cool on a wire rack. Makes about 3 dozen.
Coconut-Almond Shortbread- Vegan
Coconut Almond Shortbread
I absolutely love these cookies. Shortbread cookies are a favorite of mine. I have baked a lot of variations of shortbread cookies, and these are one of the best.
This recipe came about because I needed a cookie for someone who doesn’t eat dairy or eggs. I decided to make a shortbread type cookie, since they normally don’t have eggs in them. I just needed a good substitute for the butter. Rather than using butter, I used a combination of almond butter and coconut oil.
They came out just right, with the crumbly, dry texture of a traditional shortbread and the added flavor of the almond butter, coconut and cinnamon. I could see adding some finely chopped almonds the next time I make them.
Coconut Almond Shortbread
1 c. sugar, plus 1/4 cup extra for sprinkling
1 c. almond butter
1 c. coconut oil
4 c. flour
2 t. cinnamon
Cream together sugar, almond butter and coconut oil. Stir in flour and press into 9×13-inch baking dish. Combine extra sugar with cinnamon. Sprinkle over the cookies dough and cut into squares. Bake in a 300 degree oven for an hour or until light brown around edges. Re-cut while warm. Makes 4 dozen.
Cream Wafer Cookies
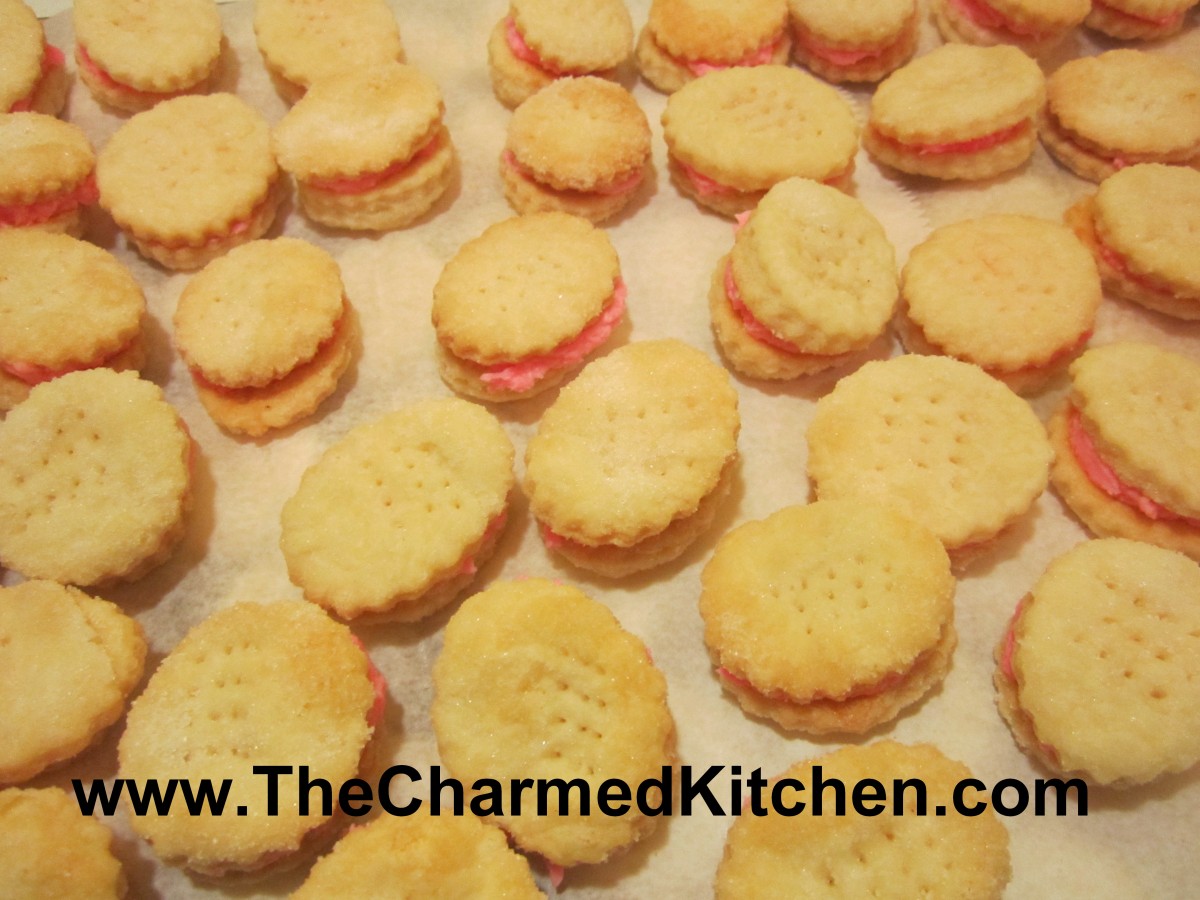
Cream Wafer Cookies
Cream Wafers are a little more work than most cookies, but they are worth it. They are the most requested cookies of all the ones I make. The secret is the dough, which contains no sugar. It is made from only three ingredients- flour, butter and heavy whipping cream.
When baked, they turn into flaky layers that melt in your mouth. Seriously, if you want to really impress this holiday season, show up at a party with these cookies.
Cream wafers are coated in sugar before baking. You can use tinted sugar, if you like. Once baked and cooled, they are made into little sandwich cookies, using a buttercream frosting. You can also tint the frosting if you like.
Because they puff when baking and become thicker, and you are using two of them to make the sandwich cookie, be sure to roll them out pretty thin.
Here is the recipe. Hope you enjoy!!
Cream Wafers
1 c. butter
1/3 c. heavy whipping cream
2 c. flour
extra fine or granulated sugar
Frosting:
¼ c. butter, softened
¾ c. powdered sugar
1 T. milk
1 t. vanilla
food coloring, if desired
Mix butter, cream and flour well. Wrap and chill at least an hour. Roll chilled dough 1/8 inch thick on lightly floured board. Cut out into 1½ inch rounds or even little hearts or stars. Transfer cookies to a sheet of wax paper heavily coated with extra fine or granulated sugar and coat both sides. Place on an ungreased baking sheet and prick each cookie 4 times with a fork. Bake at 375-degrees 7-9 minutes until lightly browned and puffy. Cool on rack. Mix frosting ingredients. Put 2 cookies together with frosting to make “sandwiches”.
Classic Sugar Cookies
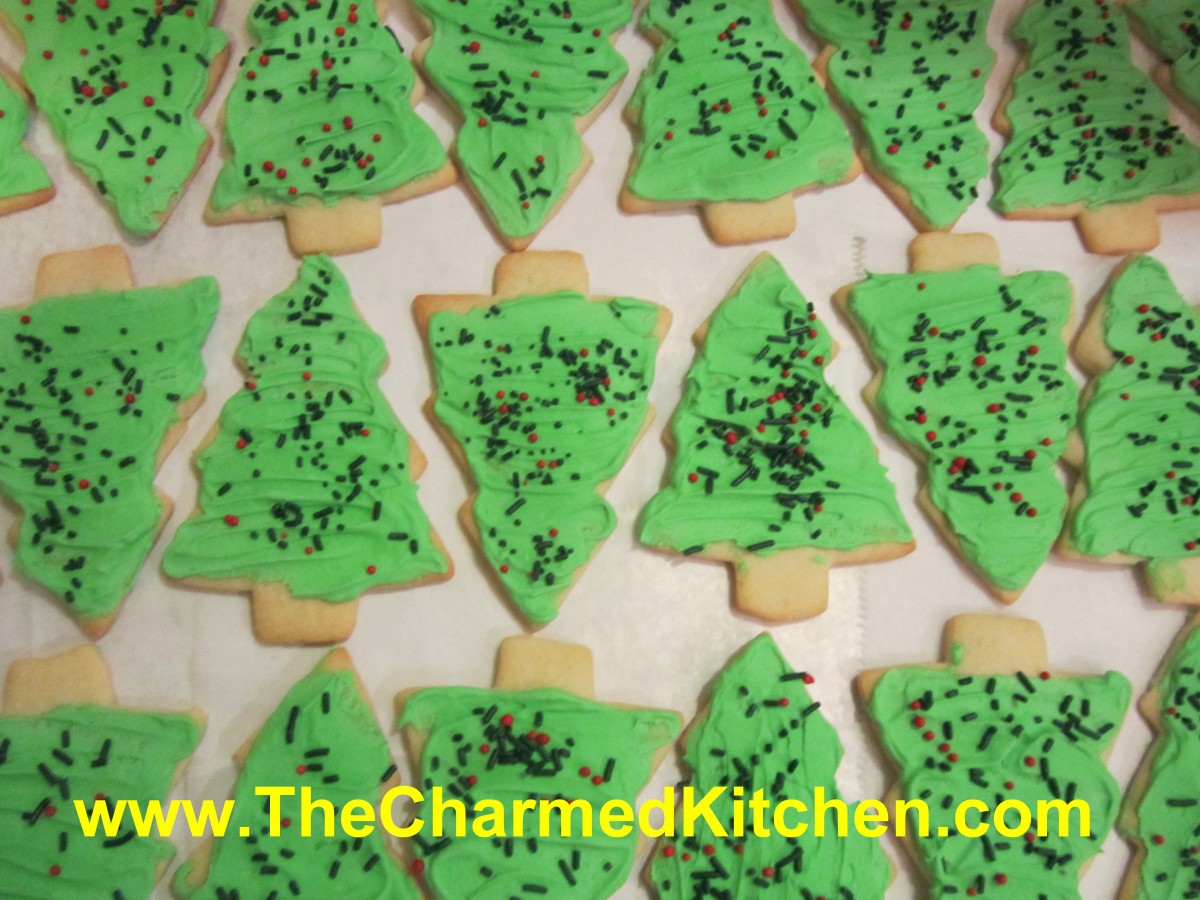
Sugar Cookie Trees
These cut-out cookies are a classic, and always part of my holiday cookie baking. I will confess to having an enormous assortment of cookie cutters, so there is almost no end to the shapes I might use. This time of year I am making trees, stars, snowmen and more.
These cookies are crisp and sturdy enough to stand up to frosting, without being too hard. They also hold their shape well when baking.
I use royal icing to frost them, and an assortment of sprinkles and other candies. Royal icing is made with egg whites or powdered egg whites. The advantage over a butter cream, is that royal icing hardens, making the cookies easy to pack and stack. You don’t need much- just a thin layer. Tinting the frosting different colors is a big part of the fun. Depending on how much time you have, you can get really creative with decorating.
Old-Fashioned Sugar Cookies
1 c. butter
1 c. sugar
1 egg
1 t. vanilla
3 c. flour
2 t. baking powder
3 T. milk
Extra sugar for sprinkling, if desired
Beat butter and sugar until fluffy. Beat in egg and vanilla. Combine dry ingredients and add to butter mixture. Beat in milk. Heat oven to 375-degrees. Roll dough on lightly floured surface to about 1/3- inch thickness. Cut out with lightly floured cutters and sprinkle with sugar or colored sugar if you like and if you are not going to frost them. Bake on an ungreased baking sheet for 10-12 minutes. Cool on baking sheet 3 minutes before placing on wire rack to cool completely. Frost when cooled. Makes about 4 dozen.
Decorating your cookies:
You can use a buttercream frosting, if you like, however the topping I prefer is royal icing. Because royal icing contains egg whites it gets hard. Cookies have a smooth appearance and can be stacked. When making royal icing, use pasteurized egg whites or powdered egg whites. Raw egg whites pose a risk of salmonella.
You can also use colored sugar and sprinkles and mini chocolate chips for eyes.
Royal Icing
1 lb. powdered sugar
½ t. cream of tartar
5¼ t. egg white powder
6 T. water
½ t. vanilla, optional
Assorted food coloring
In large mixing bowl combine dry ingredients and mix well. Add water and vanilla and beat until light and fluffy, about 10 minutes. Divide into small bowls and tint each batch as needed. Keep bowl covered with a damp towel while waiting to use so frosting will not dry out.
Russian Teacake Cookies
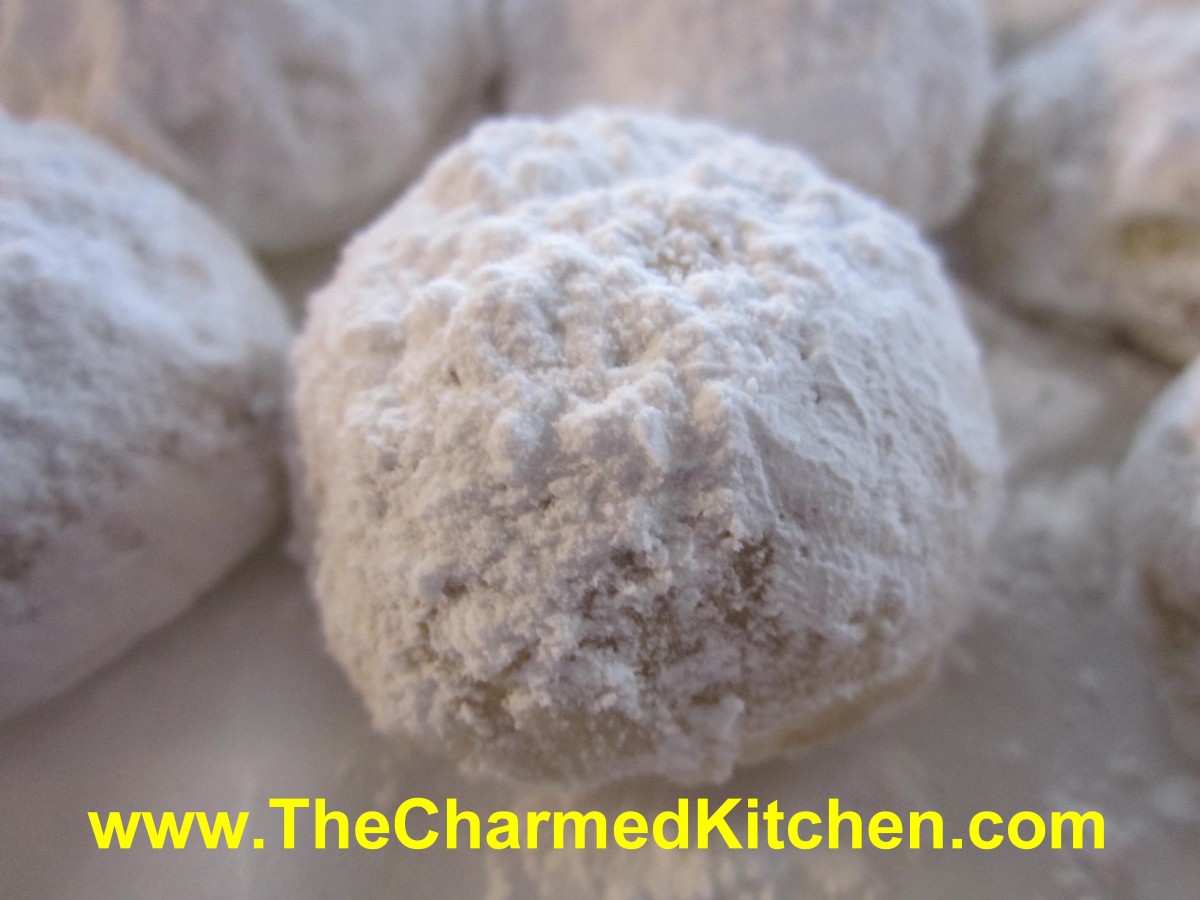
Russian Teacakes
I had a conversation with a childhood friend recently about these cookies. She remembered that my Mom used to make them, and she wondered if I still did. I still do make them. Wouldn’t seem like Christmas without them. Russian Teacakes, also known as Mexican Wedding Cakes, are a delicate, nut filled shortbread cookie coated in powdered sugar. The magic is created when the cookies, hot from the oven, are rolled in powdered sugar. Once cooled they are dusted with more powdered sugar. Whether you call them Russian Teacakes, Mexican Wedding Cakes, or as another friend always refers to them, butter balls, these cookies are a must for my holiday cookie baking.
Russian Teacakes
1 c. butter
½ c. powdered sugar, plus extra for coating
1 t. vanilla
2 ¼ c. flour
¼ t. salt
¾ c. finely chopped nuts, nearly ground
Mix butter, ½ cup sugar and vanilla well. Stir flour and salt together and then add to butter mixture. Mix well and stir in nuts. Wrap dough and chill. Heat oven to 375 degrees. Roll dough into 1-inch balls and place 1 inch apart on ungreased baking sheet. Bake 10-12 minutes. Cookies should be lightly browned on the bottom. While still warm, roll cookies in powdered sugar. Dust again with sugar once cooled. Makes about 4 dozen.
Date Pinwheel Cookies
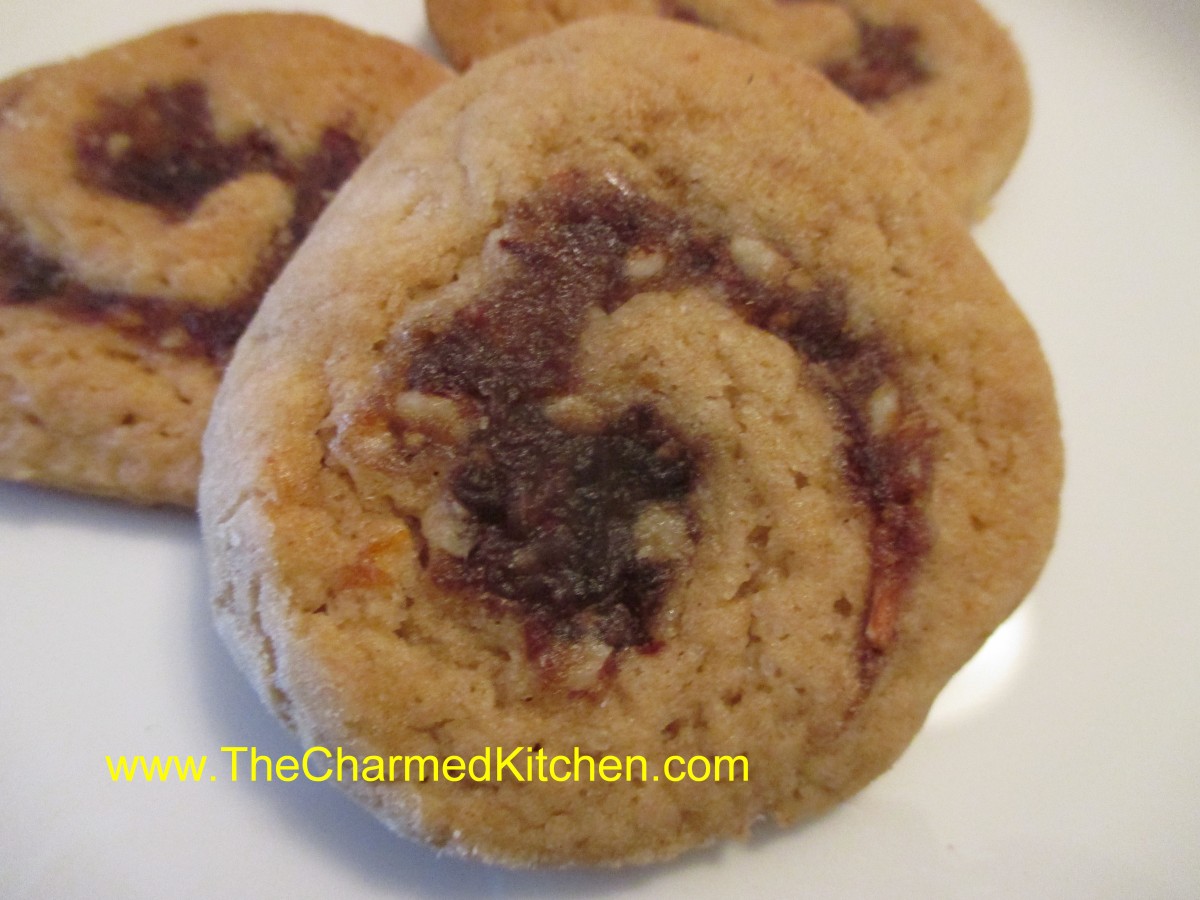
Date Pinwheel Cookies
I love the sweetness of dates, and really enjoy using that natural sweetness in baking. I always seem to make several dishes with dates around the holidays. These date filled cookies are one of my favorites. Moist and cake-like, with the wonderful flavor of the dates, nuts and citrus zest, these cookies taste even better than they look. The cookie dough, made with brown sugar, has an almost caramel-like flavor. The combination is a winner for sure.
Date Pinwheel Cookies
Date Filling
12 oz. pitted dates, chopped
1/3 c. brown sugar
¼ c. water
Juice of 1 lemon
Zest of 1 lemon
Zest of 1 orange
½ c. finely chopped nuts
Combine dates with all ingredients (except the nuts) in a small saucepan. Cook, stirring constantly, until thickened, about 5-10 minutes. Stir in nuts. Cool.
Dough
½ c. butter, softened
1 c. brown sugar
1 egg
1 t. vanilla
1¾ c. flour
½ t. baking soda
½ t. salt
In bowl combine butter and sugar and beat until fluffy. Add egg and vanilla and beat well. Combine dry ingredients and stir into butter mixture. Divide dough in half. Roll or pat one half of the dough into a rectangle about 7×11- inches in size. Spread with half of the cooled date filling. Starting at long end, roll dough up . Repeat with remaining dough and filling. Wrap rolls in wax paper or plastic wrap and chill in fridge several hours. This dough/roll is pretty soft. I sometimes put the rolls in the freezer for an hour or two before baking to make them easier to slice.
To make the cookies: Preheat oven to 375 degrees. Slice the rolls into ¼ -inch slices and place an inch apart on a lightly greased baking sheet. Bake about 12 minutes- or until cookies are a light golden color. Cool on wire rack. Makes about 5 dozen.
Baking Cookies on New Day Cleveland

Holiday Chocolate Fan Cookies
I was so happy to be a guest on New Day Cleveland today. Baking cookies has always been a tradition in my family for Christmas. I shared one of my Mom’s favorite cookies, a fan made from phyllo, then dipped in chocolate and nuts. As always, everyone at Fox 8 was warm and welcoming. Of course, that might have just been because I brought the cookies.
http://fox8.com/2016/12/13/stand-out-at-your-cookie-exchange/


