Chocolate Butter Cookie

Chocolate Butter Cookies
These delicate little cookies are crispy on the outside and tender in the middle. They have a nice chocolate flavor and are not overly sweet. As an added bonus, they are also easy to make. This recipe was an experiment. I was so happy with how the cookies turned out, I wanted to share the recipe with you. I rolled the cookies in demerara sugar when they were raw and then baked them. Demerara is a less refined sugar and looks like coarse brown sugar. It gave the cookies a nice sparkly appearance. You can roll the dough in granulated sugar, if you like. You could also bake them plain and decorate with a drizzle of chocolate when cooled.
Chocolate Butter Cookies
1 c. sugar
1½ c. butter, room temp.
1 egg
2 t. vanilla
3 c. flour
¾ c. cocoa
Combine all ingredients, except flour and cocoa, and beat until light and fluffy, about 3 minutes. Stir in flour and cocoa and blend well. Shape rounded teaspoonfuls of dough into balls. Place 1-inch apart on ungreased baking sheet and bake in a preheated 375-degree oven for 7-9 minutes or until set. Cool. Makes about 5 dozen.
Decorate with drizzles of melted chocolate or frosting, powdered sugar, sprinkles (apply before baking) or whatever you have on hand. You can also bake the cookies in rounds with an indent in the middle and add a cherry later. I rolled the raw cookies in demerara sugar. It’s a less refined sugar at looks little coarse brown sugar. Gave the cookies a pretty sparkle.
Alfajores Cookies
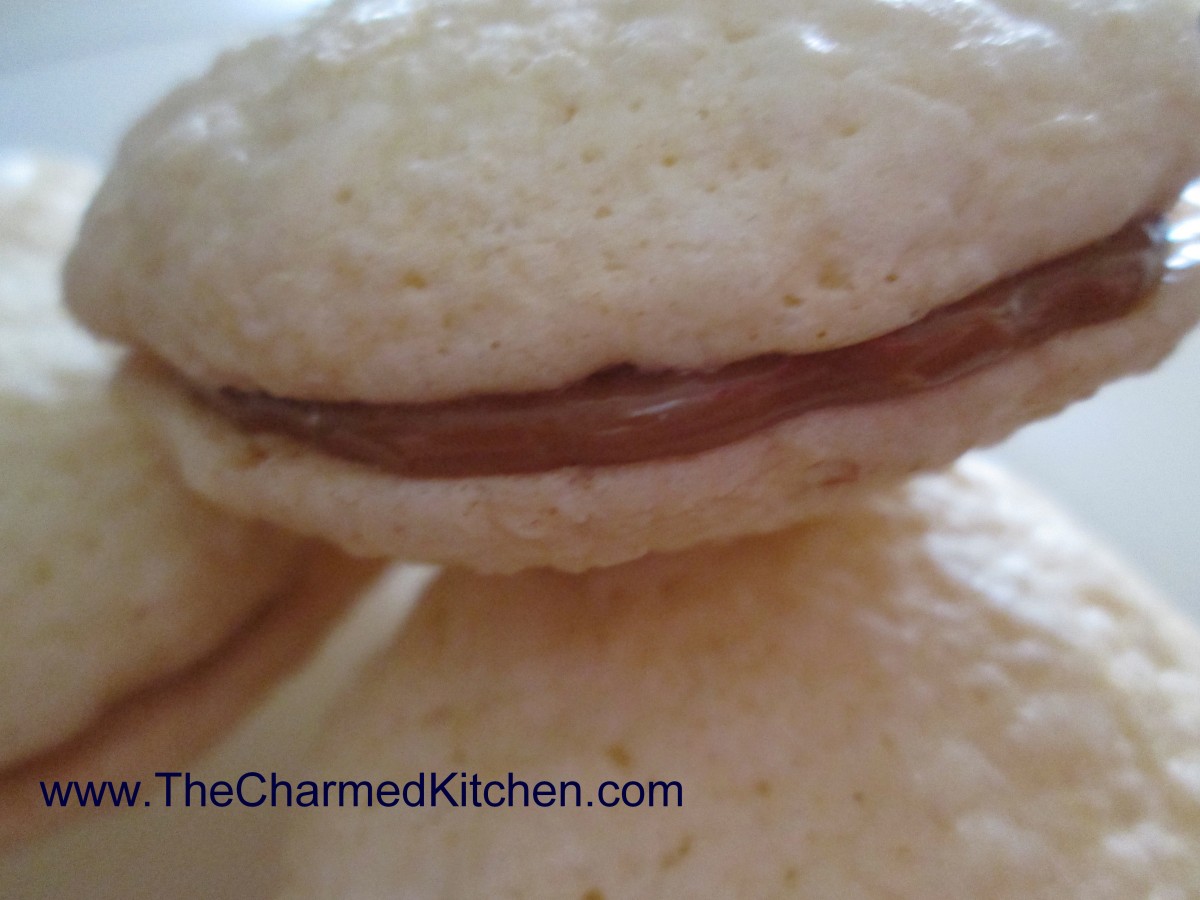
Alfajores Cookies
It is the time of year when many of us are baking cookies. I have certain cookies I make every year, but I always look for new recipes, too. If you are looking for a new cookie recipe, you might want to try these. Made with cornstarch as a primary ingredient, they are very crispy and light. Sandwiched together with dulce de leche they make a wonderful dessert. These cookies are popular in a number of South American countries and in Spain although the origin is probably from the Middle East.
Alfajores Cookies
1/2 cup butter
1 cup sugar
1 egg
2 egg yolks
1 tsp. vanilla
2 tsp. lemon rind, grated
1 1/2 cup cornstarch
1/2 cup flour
1 tsp. baking powder
1/4 tsp. salt
Cream butter; add sugar and beat until fluffy. Add egg and egg yolks, one at a time, beating well. Beat in vanilla and lemon rind. Sift together cornstarch, flour, baking powder and salt. Add to mixture and mix well. Drop batter by small spoonfuls onto well-buttered baking sheet. Bake at 350 degrees for 15 minutes. Remove immediately. Sandwich the cookies together with (dulce de leche) sweet milk dessert. Makes 40 cookies.
Dulce de Leche (Milk Jam)
This is the easiest way to make Dulce de Leche…the taste is pretty authentic and the work is almost completely eliminated!
1 can sweetened condensed milk
Place the can inside the pot on top of a wire rack. I use a round rack used for cooling cakes. If you don’t have a rack place a towel on the bottom of the pot. Add water to completely cover can, plus 1-2 more inches. Simmer for 4 hours, making sure the can is always completely covered with water…if not…there is an explosion!! Leave the can to cool several hours and only then open it and serve. Serve the golden-brown confection over flan, as a filling for crepes, cakes or just plain. For breakfast you can spread it on croissants, rolls or toast.
Sugared Nuts
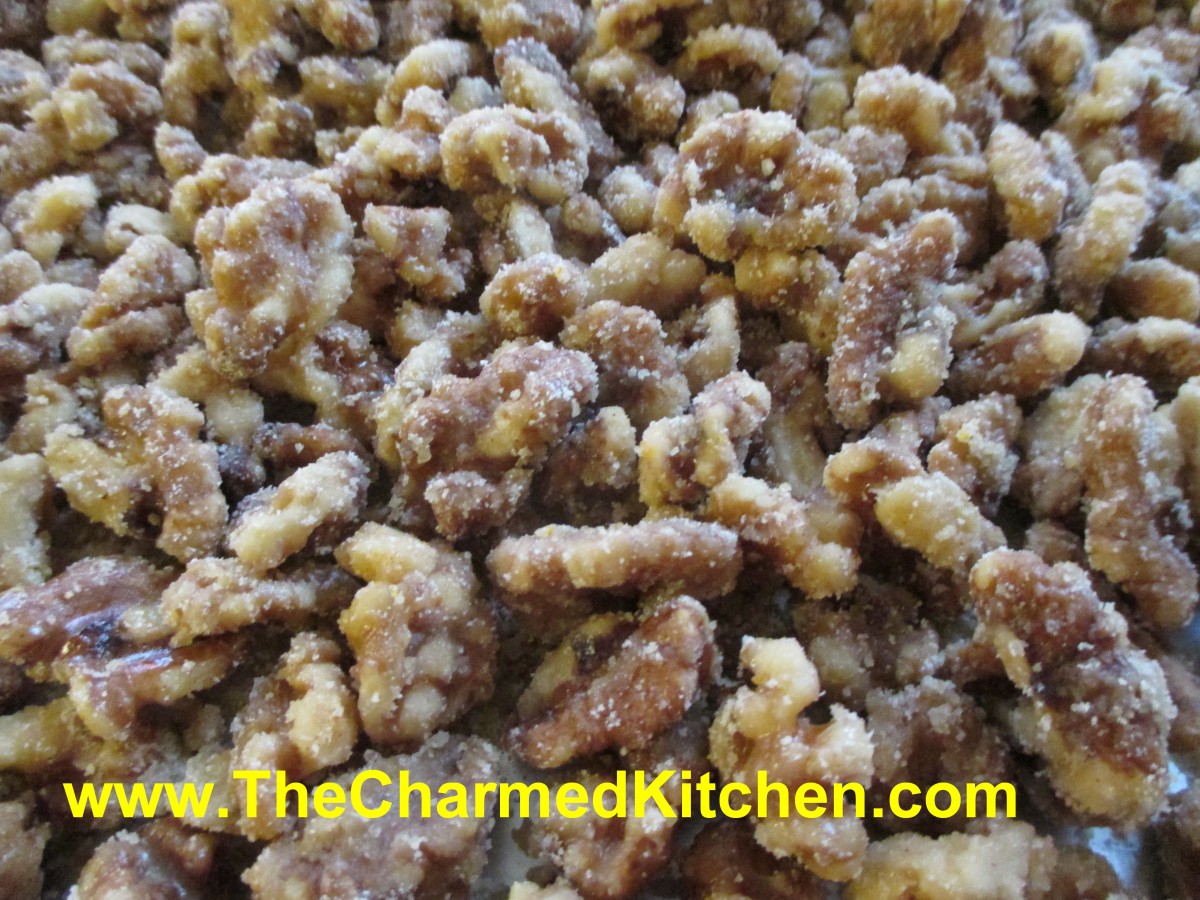
Sugared Nuts
Many years ago, my sister Cindy gave me the recipe for making these nuts. I make at least a few batches every year, and they are always a big hit. I will admit to tweaking the recipe a little over time, but the basics are still the same. Nuts are placed in a heavy skillet with sugar, water and seasonings. The mixture is then brought to a boil and cooked until most of the liquid cooks off. This takes about 10 minutes, give or take. You dump the nuts onto a cookie sheet, and start stirring immediately. If you don’t stir them, they will stick together. This is where the magic happens. The nuts look wet when you pour them out and start stirring, but in a few minutes, they cool and dry, and the sugar crystallizes on the nuts. Once cooled, the nuts are crunchy and sweet and very tasty. You can use them as a snack, or in all sorts of recipes. This is a really fast confection to make, and is a nice gift, too.
Sugared Nuts
4-5 c. nuts, I like walnuts or pecans
2 c. sugar
1 c. water
1 t. cinnamon
1 t. orange peel
1 t. salt, optional
Place all ingredients in heavy skillet and cook over medium heat, stirring often, until all the water disappears. Whatever liquid in the pan will be clinging to the nuts and syrupy. Dump nuts onto a large cookie sheet and break apart with a wooden spoon to prevent clumping. As nuts cool, stir once or twice to remove any remaining clumps, and to cool faster. Nuts will lose their glossy appearance and attain a sugary crust. If it looks like nut soup, you didn’t cook them long enough, and you must return all to the skillet and cook longer. As the nuts start to get drier during cooking, you can turn down the heat a little to prevent burning. Once you’ve made a few batches, though, you will get good at judging when to stop cooking. You can also make a spicy version by adding a teaspoon of cayenne pepper along with the other ingredients. Store in cool, dry place to keep nuts fresh longer.
Lemons in the Snow
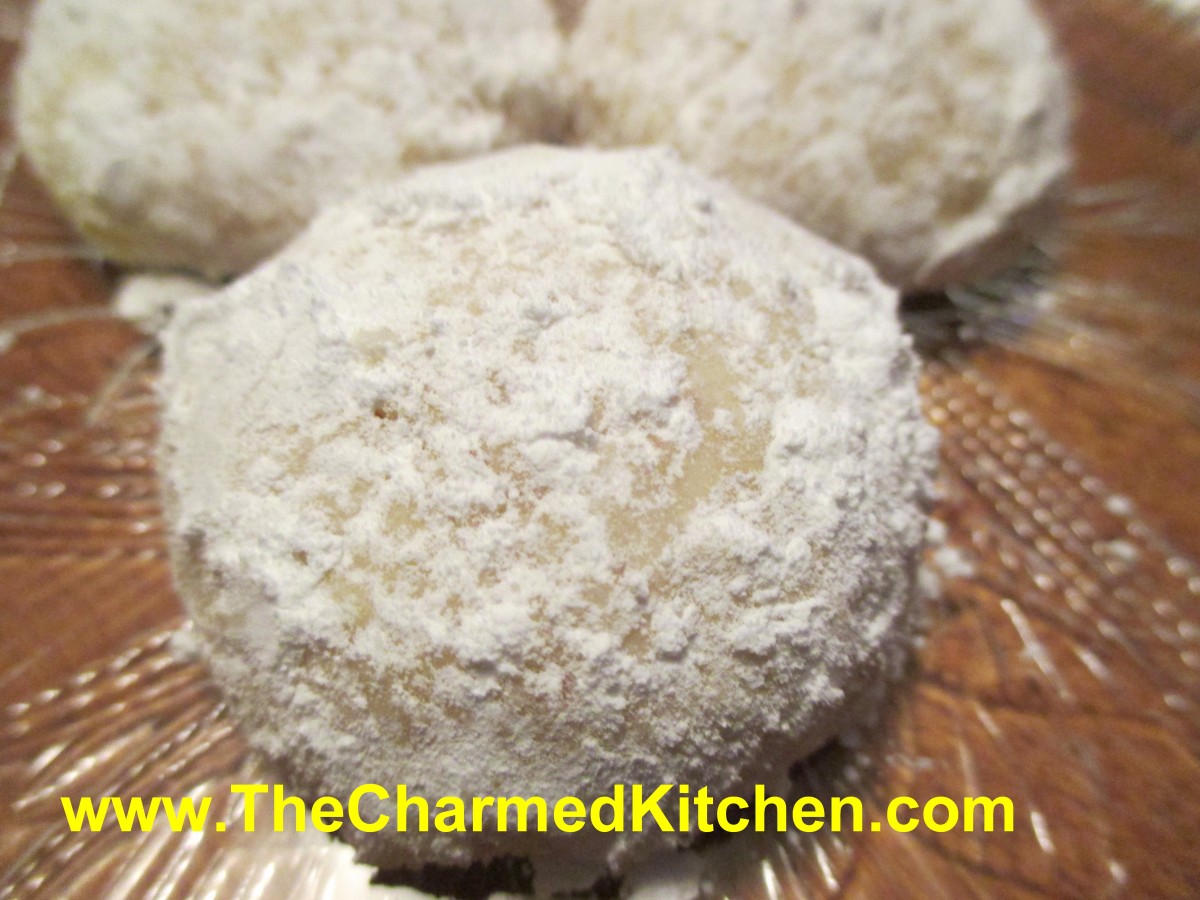
Lemons in the Snow Cookies
The funny name for these cookies is really easy to explain. The cookies are flavored with both lemon juice and lemon zest in the dough. When nearly cooled, they are rolled in powdered sugar. They end up looking like little snowballs. Yummy, lemon flavored snowballs. The dough also contains finely ground almonds, for extra texture. They are a delicate, cake like cookie, with a slightly crisp outside. You could also add a little grated lemon peel to the powdered sugar, before rolling the cookies in it, for a more intense lemon flavor.
Lemons in the Snow Cookies
1/2 cup butter (no substitutes), softened
2/3 cup sugar
1 egg
1/4 cup lemon juice
1 tablespoon grated lemon peel -or more if you like
1 3/4 cups all-purpose flour
1/4 teaspoon baking soda
1/4 teaspoon cream of tartar
1/4 teaspoon salt
1/2 cup finely chopped almonds
confectioners’ sugar
In a mixing bowl, cream butter, sugar and egg until well blended. Add lemon juice and peel. Combine flour, baking soda, cream of tartar and salt; stir into creamed mixture. Add almonds. Cover and refrigerate the dough for at least 1 hour or overnight. Roll into 1-in. balls. Place on ungreased baking sheets. Bake at 350 degrees for 10-12 minutes or until bottoms are lightly browned (cookies will not brown on top). Remove immediately to wire racks; cool for 5 minutes, then roll in confectioners’ sugar. Makes 36.
Homemade Cinnamon Ornaments
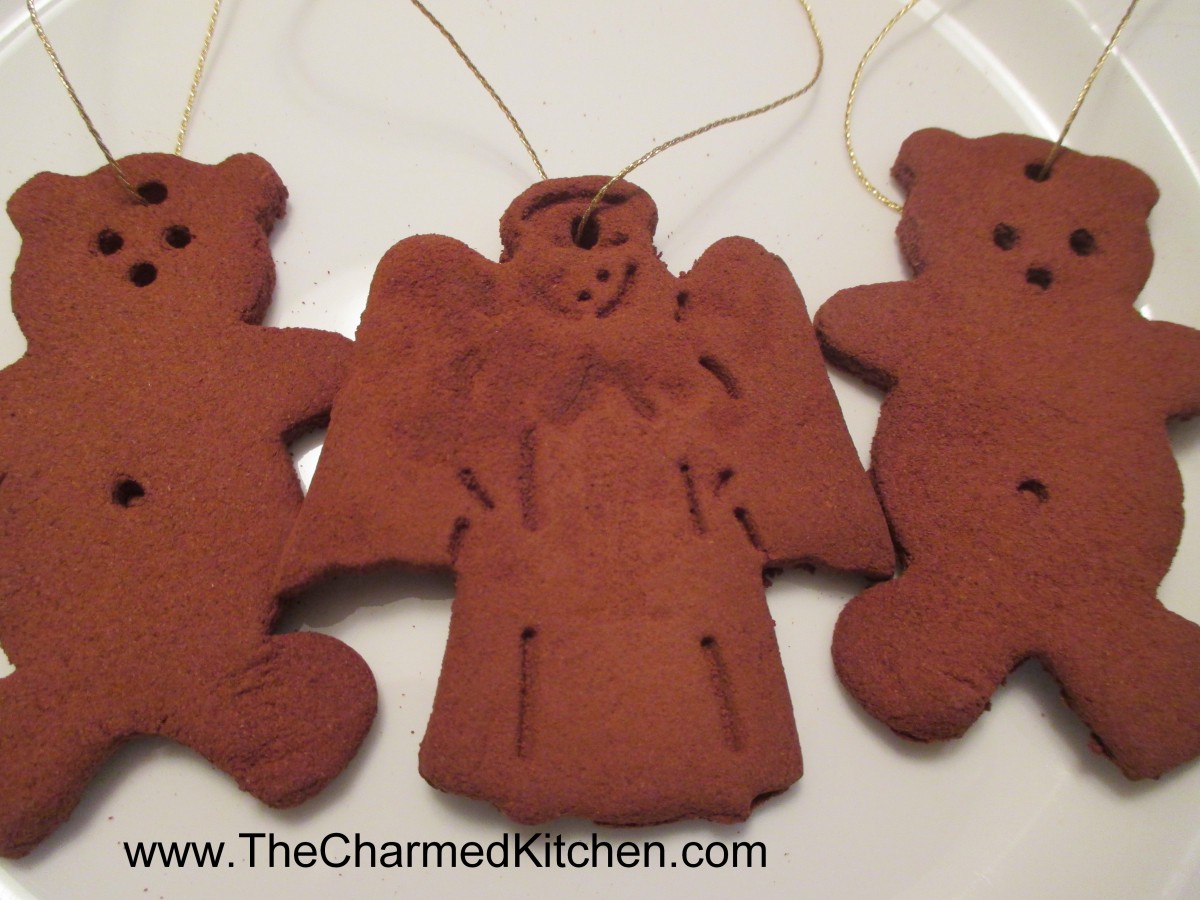
Cinnamon Ornaments
If you want a simple craft for the holidays, it does not get much easier than cinnamon ornaments. All you need are cinnamon, applesauce, a rolling pin and cookie cutters. There is no cooking involved, or special equipment. You just combine the cinnamon and applesauce to make a sort of dough. You roll out the dough and cut it into shapes. Then, you just need to let the ornaments dry and harden. Allow a few days for drying. If you put them in a dehydrator, they are dry in a few hours. The house smells really good while they are drying. Even after they are dried, they continue to have that wonderful cinnamon fragrance. They can be used as ornaments on a tree or simply hung to freshen a room. This is a fun gift for kids to make, too. Here are the directions.
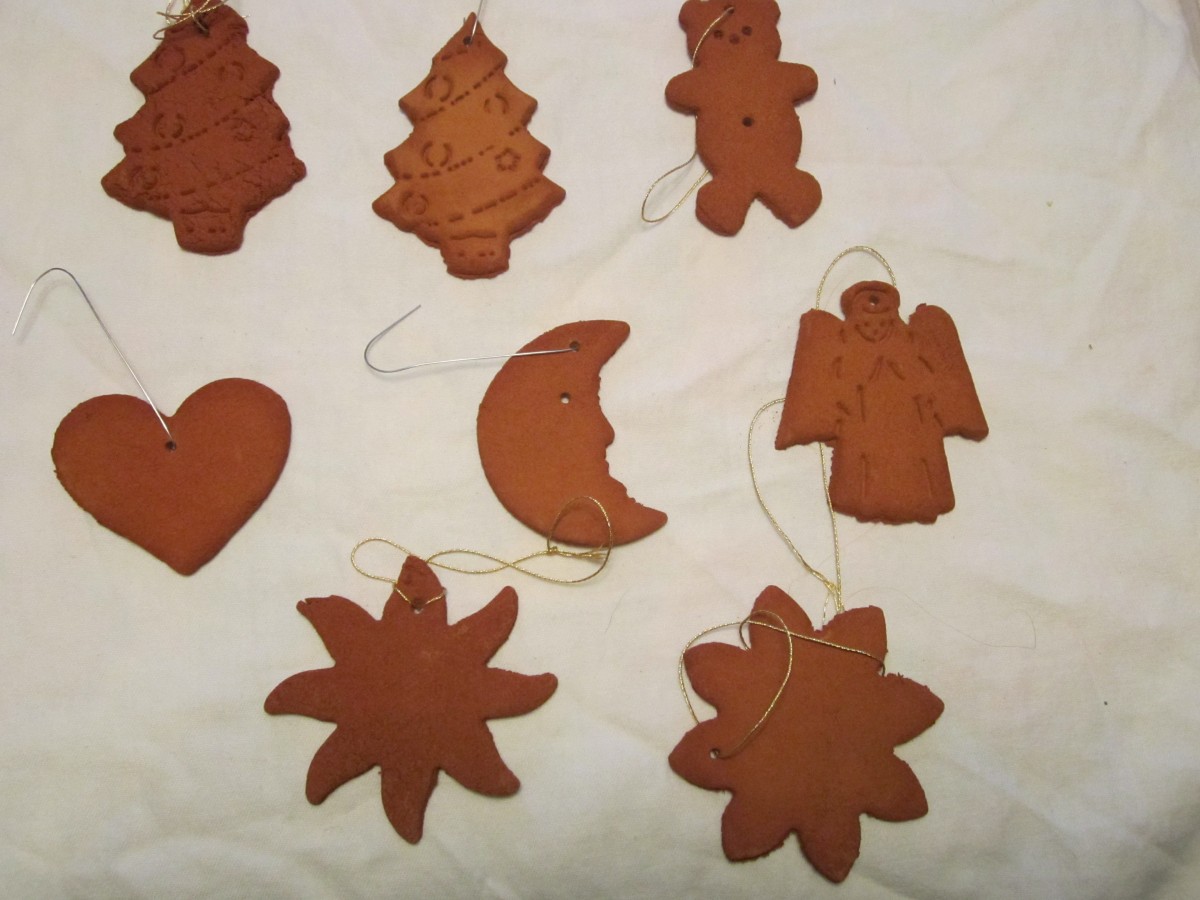
Ornament assortment
Cinnamon Ornaments
These are for decorating, not for eating!
3/4 c. applesauce
1 bottle (4.12 oz.) cinnamon
Mix applesauce and cinnamon and knead to form a stiff dough. Roll out to 1/4-inch thickness and cut out with cookie cutters. Make hole in top of ornament with skewer or straw and carefully transfer to rack to dry. Let dry a couple of days, turning occasionally. Hang dried ornaments with decorative thread or ribbon. Makes about 12-15.
Hot Cocoa Ice Cream Cones
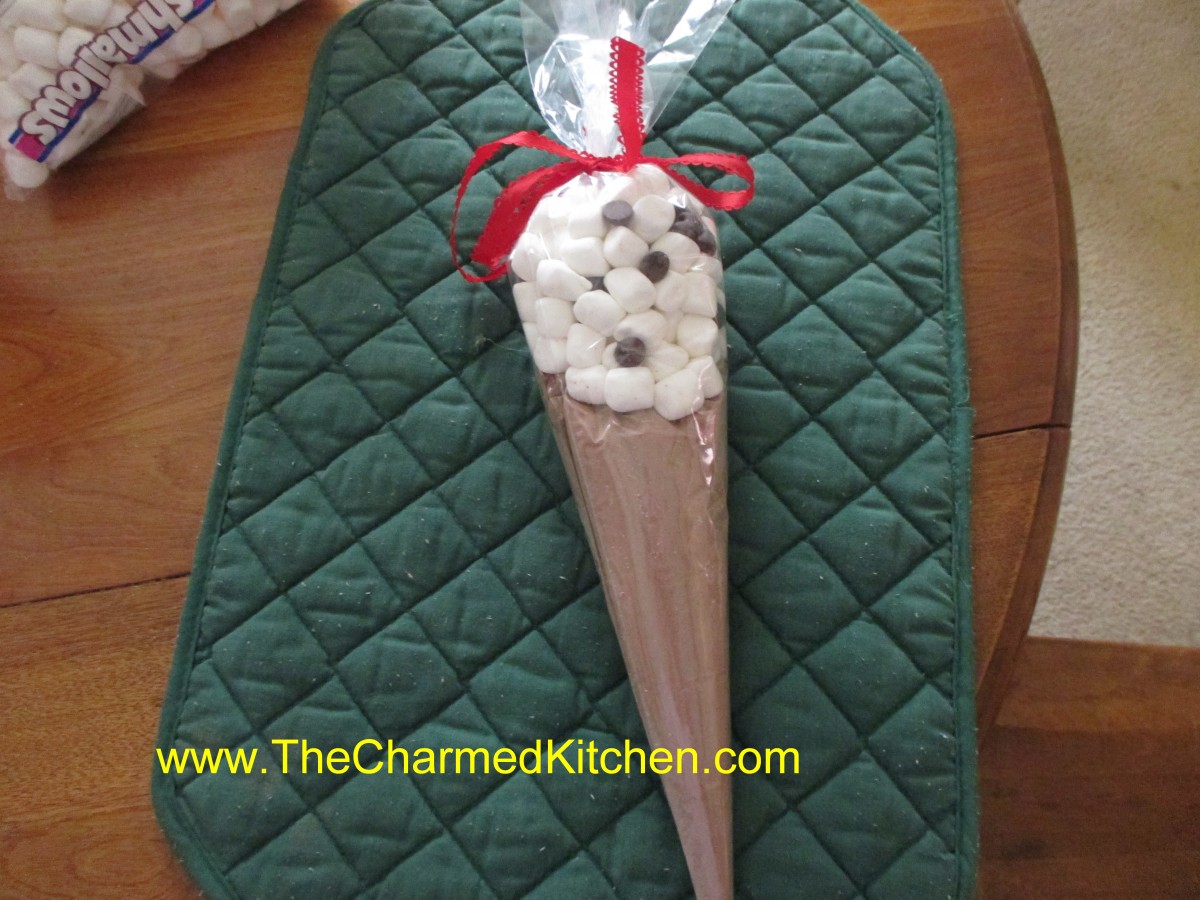
Hot Cocoa Ice Cream Cone
I am always looking for homemade gift ideas for the holidays. I really like gifts that both adults and kids can make. This one is just a simple way to package homemade hot cocoa mix to make it special. We made these in a holiday gift class the other night. People really enjoyed making them.
You start with hot cocoa mix- recipe follows. Then you get these cone shaped bags. I use a 12-inch size and a 17-inch size. I buy my online but they are available in some craft and candy making stores. Just put about 1 cup of the hot cocoa mix in the smaller cone shaped bag. Fold the top down and tape it shut. Now place the smaller bag inside the larger bag. Add about a cup of mini marshmallows mixed with some chocolate chips. The chips are optional. Tie shut with a ribbon. It ends up looking (sort of) like an ice cream cone. I add a label that says “Hot Cocoa for Two” with directions that say, “Divide hot cocoa mix between two large mugs. Fill with a cup of boiling water in each. Stir and top with the marshmallows”. You can make whatever label you like. A quick and simple gift. You could also include mugs with the gift. This is a great idea for kids to make for grandparents, teachers, etc.
Here is the recipe for the hot cocoa mix.
Hot Cocoa Mix
3 c. nonfat dry milk
1 c. cocoa
1 c. sugar
1/4 t. salt
1 c. mini marshmallows (optional)
In large bowl, mix all ingredients well. I like to sift the ingredients in because it powders the milk even finer than the way it comes. Store in an airtight jar and use within 6 months. To use add 5 tablespoonfuls to 8 ounces boiling water. Variation, flavor with cinnamon, instant coffee, cayenne pepper or even dried orange peel.
Soft Butter Cookies

Soft Butter Cookies
If you are looking for a truly tender cookie, this is it. These cookies are so delicate, they just melt in your mouth!! The secret ingredient might surprise you. It is oil. Yes, I know I said butter cookies – they also contain butter. But the combination of oil and butter makes them soft and delicate, even days after baking. They also contain both granulated and powdered sugar. Not your typical cookie recipe, for sure. This just may be my “go to” butter cookie recipe from now on.
I found a sheet of paper with the ingredients written on it. No directions, just ingredients listed and a notation about cooking time and oven temperature. I wish I knew where I got the recipe. I would certainly give the source credit. I did increase the amount of vanilla a little. You don’t have to chill the dough and they roll very easily, without sticking to your fingers. You could chill the dough, but let it warm up a little before rolling. The dough can also be made ahead and frozen- I tested it.
I dipped the tops of the raw cookies in sprinkles, but you could leave them plain and then roll in powder sugar, once baked and cooled, or drizzle with melted chocolate.
Soft Butter Cookies
1 c. butter
1 c. oil
1 c. sugar
1 c. powdered sugar
2 eggs
1 T. vanilla
1 t. baking soda
1 t. cream of tartar
½ t. salt
4 ½ c. flour
In mixing bowl, beat together butter, oil, sugars and vanilla. Once well blended, beat in eggs. Stir in the baking soda, cream of tartar and salt, then add the flour, mixing until well combined. Heat oven to 350 degrees. Roll dough into one inch balls and press tops of cookies in sprinkles or colored sugar, if desired. Place one inch apart on ungreased baking sheets. Bake for 12 minutes, or until light golden on bottom. Leave cookies on baking sheets 3 minutes before placing on cooling rack. Makes about 6 dozen cookies.
Cooking with Coffee on New Day Cleveland
My latest appearance on New Day Cleveland was on cooking with coffee. Here it is!!! Special thanks to my friend, Amy, for letting us use her kitchen.
Easy Homemade Cashew Brittle
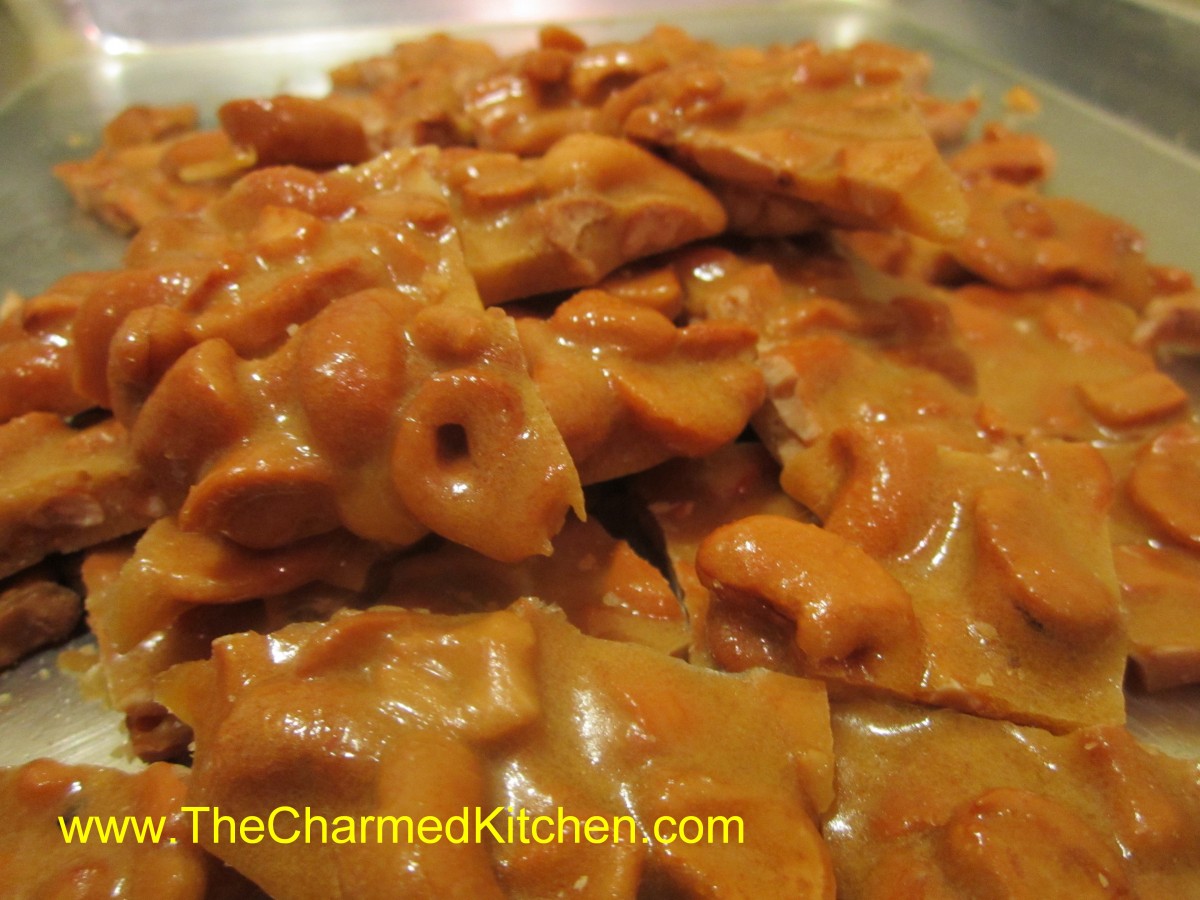
Homemade Cashew Brittle
If you need a great food gift- perhaps something to bring to a holiday party- this brittle might just be the answer. I was given this recipe at a craft show a few years ago. The brittle is cooked in the microwave. No special thermometers or equipment required. Just a glass bowl and a few minutes of your time. It could not be simpler. It is really good, too. You can use other nuts, if you prefer, or peanuts. You can also dress it up with a drizzle of chocolate, once cooled. Stored in a covered container, in a cool dry place, the brittle will stay crunchy for weeks.
Homemade Cashew Brittle
2 c. cashews*
1 c. sugar
1/2 c. corn syrup
1/8 t. salt
1 t. butter
1 t. vanilla
1 t. baking soda
Butter or oil a large baking sheet and set aside. In a 3-4 quart glass bowl combine the nuts, sugar, corn syrup and salt. Microwave on high for 3 minutes. Remove from microwave, stir well and return to microwave. Cook 3 more minutes in microwave. Remove and stir in butter and vanilla, stirring until butter has melted. Return to microwave and cook for 2 more minutes. Remove from microwave and stir in baking soda. Stir until well blended and pour mixture onto prepared baking sheet. Spread out quickly, then allow to cool. Once cool, break into pieces. Store in a cool, dry place. I normally store it in a tin or plastic container with a tight-fitting lid.
* I used salted cashews but feel free to experiment with other nuts
Note: Use high power setting on microwave.
Spinach and Feta Bread
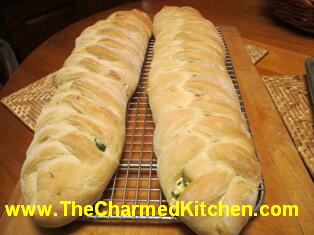
Spinach and Feta Bread
My family always gets together the night before Thanksgiving for a pre-Thanksgiving meal. Since we live in different cities, it is the first night we get to catch up before the big day. We try to keep it simple. My niece makes my Busha’s Polish Mushroom Soup and I make an assortment of filled breads.
I have made these breads with plenty of different fillings, and I have posted many of those recipes. This year I made the Reuben, which was requested by my nephew. I also made one filled with spinach, mozzarella and feta cheese, which I knew my niece would like. Several people have requested the recipe for this spinach bread, so here it is.
Spinach and Feta Bread
3¼ c. all purpose or bread flour
1 T. sugar
1 t. salt
1 package quick-rising yeast
1 c. hot water
1 T. oil
Filling:
1 (10 oz.) package frozen spinach, thawed and squeezed dry
1½ c. shredded mozzarella cheese
1 c. crumbled feta cheese
2 T. chopped parsley
1 T. lemon juice
2 t. hot sauce, or to suit your taste
1 t. dill weed
Grease a large jelly roll pan and set aside. Place a shallow roasting pan on the stove and fill halfway with water. Start heating the water up. You’ll need it later.
Prepare filling: Take spinach and place in a medium bowl. Combine it with cheeses and remaining filling ingredients. Use your hands and squeeze the ingredients together, partly to mix them up well, but also to get them to stick together a little. Set aside and prepare the dough.
Set aside 1 cup of the flour. Combine remaining flour with the other dry ingredients in a medium bowl. Stir in water and oil and gradually stir in enough flour to make a soft dough. Turn onto lightly floured surface and knead until dough is smooth and elastic, about 5 minutes. Roll dough into a rectangle about 16 x 8 inches in size. Spread spinach mixture down center of dough. Squeeze it a little, sort of in a tube shape. You need to fold the dough over this mixture, so pressing it together helps with the next step. Cut one-inch wide strips of dough from filling to edge on both sides. It will sort of look like fringe. Alternating sides, fold strips up and over the filling at an angle. Pinch the ends. Carefully lift loaf onto greased jelly roll pan and place at an angle, so it will fit. Cover with a towel, and place the jelly roll pan on top of a roasting pan, half-filled with simmering water for 15 minutes. Because quick-rising yeast is more heat tolerant, the simmering water helps the dough to rise faster. After 15 minutes, remove towel and place jelly roll pan in oven. Bake in a preheated 375-degree for 20-25 minutes, or until golden brown. Cool slightly before slicing. Serve warm and refrigerate leftovers.
Bread can be baked ahead of time and reheated, too. Wrap in foil and place in a preheated 350 degree oven for about 25 minutes. Loosen the foil after 10 minutes so the bread does not get soggy.
Note: The variations for this bread are almost endless. Some favorite combinations are ham and Swiss with mustard, roast beef and cheddar, chicken, broccoli and cheese,, pizza, assorted fillings. You get the idea. Use your imagination and have fun. Just be careful not to overfill, or the bread will be hard to move, use fillings that aren’t too runny and always use cold fillings.
If you want to use regular yeast, in place of quick rising yeast, use warm, rather than hot water. Also, don’t let dough rise over boiling water. After kneading cover dough and let rise 45 minutes. Punch down and assemble as in original recipe. Cover with a towel and let rise until dough looks puffy, about 40 minutes. Bake as directed above. These breads can also be frozen.


