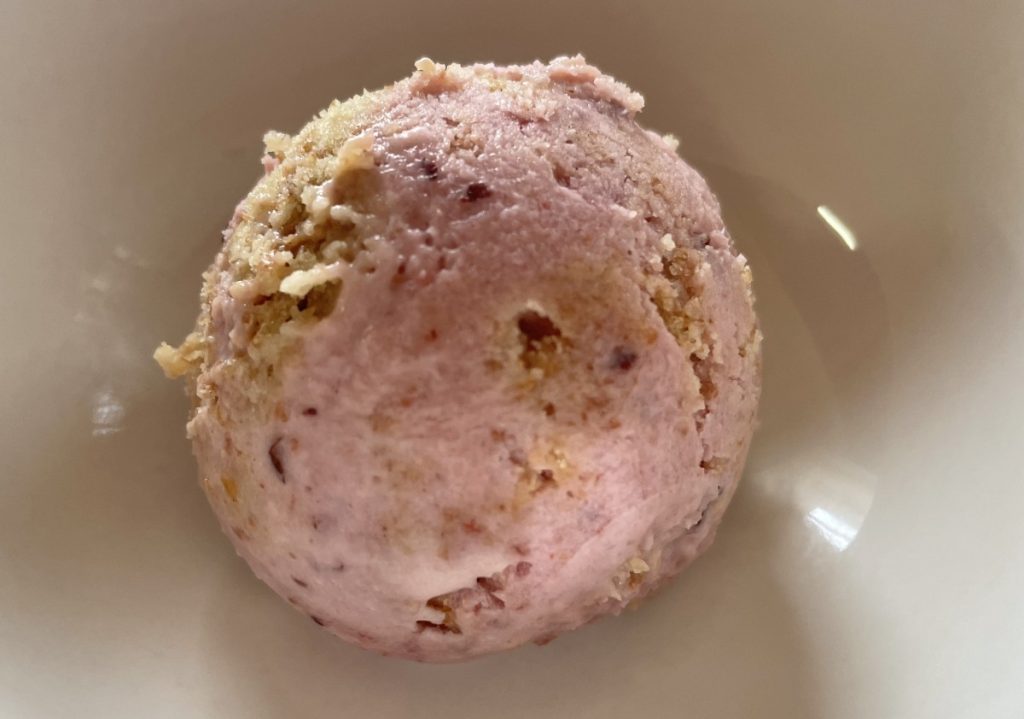
“Melon Ball” Sorbets

I remember making melon balls for fruit salad, when I was a kid. My mom showed me how. It always seemed like a special occasion when we made them. I had to learn how to use the melon “baller” to get pieces that were all perfect little rounds.
I will admit, I haven’t made melon balls in a long time, but I still like the way they look.
I used melon balls at the inspiration for this dish. Funny thing is- there isn’t any melon in the dish. I made three different sorbets- strawberry, mango and kiwi. Each one is meant to resemble a different melon- watermelon, cantaloupe and honeydew. You can, of course, make sorbet from melons. I just didn’t happen to do that.
They can be served alone and make a light, wonderful dessert. You can add a scoop of ice cream or whipped cream, if you like. They can also be served with cakes or cookies. You can even add some to a glass of lemonade or a summer cocktail, just for fun.
This dessert is easy to make and a nice alternative to ice cream. Don’t get me wrong, I love ice cream, but sometimes I want something lighter. Nice for those who are lactose intolerant, too. Once made, you can have them on hand for dessert anytime.
Strawberry Vanilla Sorbet
2 c. fresh or frozen strawberries (allow frozen berries to thaw a little first)
1/4 c. sugar, or to taste
3 T. fresh lemon juice
1 t. vanilla
Place ingredients in food processor and process until smooth. Place in shallow pan and freeze. If you are using frozen berries re-freezing will take only about 1 hour. Up to 30 minutes before serving remove sorbet from freezer and allow to soften enough to break into chunks. Place in processor and blend again until very smooth. Return to freezer until needed.
Mango Honey Ginger Sorbet
2-3 large, ripe mangoes, seed and peeled
1/4 c. honey, or to taste
2-3 t. fresh grated ginger
Place ingredients in food processor and process until smooth. Place in shallow pan and freeze. Up to 30 minutes before serving remove sorbet from freezer and allow to soften enough to break into chunks. Place in processor and blend again until very smooth. Return to freezer until needed. For an even smoother sorbet, you can blend it another time.
Kiwi Lime Sorbet
6 kiwi, peeled
juice of 1 lime
1/4 c. sugar, or to taste
Place ingredients in food processor and process until smooth. Place in shallow pan and freeze. Up to 30 minutes before serving remove sorbet from freezer and allow to soften enough to break into chunks. Place in processor and blend again until very smooth. Return to freezer until needed.
To serve the sorbets, use a cookie scoop to make the “melon” balls. I made them as I was serving them, but you can also make the balls and return them to the freezer until ready to serve.
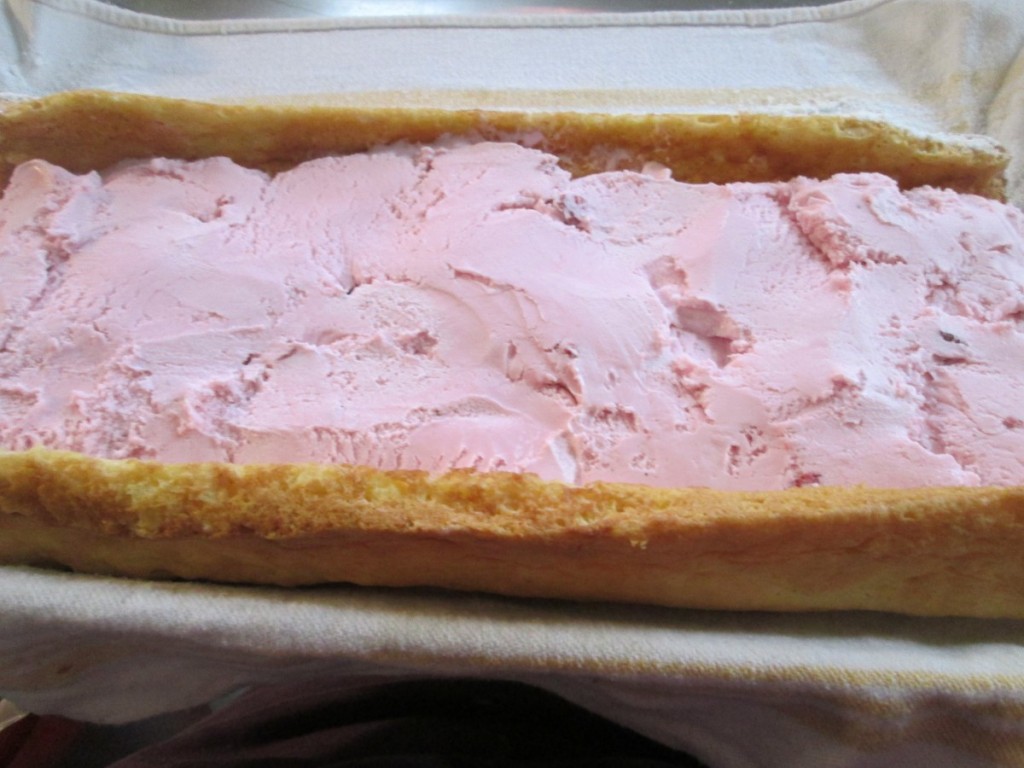
Strawberry Ice Cream Cake Roll

This is the perfect summer dessert. Fresh berries, a light, citrus-scented cake and ice cream. What more could you want?
When you say cake roll, I think a lot of people first think of a pumpkin roll or perhaps a Buche de Noel (yule log). There are so many more desserts you can make with them. Cake rolls can be made in many flavors and they can be filled with custard, frosting, fruit, ice cream and more.
For this sponge cake roll, I used homemade strawberry ice cream to fill it, recipe follows. You could use store bought ice cream, if you prefer.
Start with the sponge cake roll recipe below, and use whatever flavor ice cream you like. You’ll need about a quart of ice cream- or a little more.
Once finished, you just wrap it up and pop the cake in the freezer until needed. Great to have on hand for summer parties and cook outs. Perhaps a nice dessert for Father’s Day? You can decorate with fresh berries when serving. Blueberries would make this a fun red, white and blue dessert for Memorial Day or the 4th of July.
Sponge Cake Roll
This sponge cake roll can be filled with whipped cream or ice cream, or use your favorite filling.
5 eggs, separated
2/3 cup granulated sugar
1 teaspoon lemon juice
1/2 teaspoon finely grated lemon zest
2/3 cup cake flour*
1/4 teaspoon salt
1 teaspoon baking soda
3 tablespoons melted butter
Beat egg yolks until thicken and lemon colored; gradually add 1/3 cup of the granulated sugar, the lemon juice and the lemon zest. Beat egg whites until almost stiff then gradually beat in the remaining 1/3 cup sugar. Beat until stiff peaks form. Fold yolk mixture into whites. Sift dry ingredients into a separate container; add to egg mixture, folding in carefully. Fold in melted butter. Pour batter into waxed paper-lined 10x15x1-inch jelly roll pan. Bake at 375° for 12 minutes. Sprinkle with confectioners’ sugar. Turn onto a clean kitchen towel which has been generously dusted with confectioners’ sugar. Trim edges, if necessary; roll cake up, towel and all, while still warm. Let cool completely. Unroll and fill with whipped cream or ice cream then re-roll cake. The trick is to let the ice cream soften up a few minutes before spreading it on the cake. But don’t wait too long. Rather than trying to let the ice cream get soft enough to spread I used a spatula to sort of cut slices of ice cream and place them on the cake. Store ice cream cake roll in freezer until ready to slice and serve.
*If you don’t have cake flour you can make your own. Measure out a cup of all purpose flour, remove 2 tablespoons of flour and replace them with 2 tablespoons of cornstarch. For larger amounts place 7 cups of flour in a bowl and combine with 1 cup of cornstarch. Mix well or even sift together. Store in an airtight container.
Strawberry Ice Cream
2 c. chopped strawberries
1 c. sugar
1 T. vanilla
2 c. cream or half and half or a combination. You can also use some milk or even almond or rice milk.
Additional sugar to taste
Place strawberries, vanilla and sugar in saucepan and bring to a simmer, stirring occasionally. Remove from heat and chill. Combine chilled berry mixture with cream. Add additional sugar if you like. Remember that once it is frozen the ice cream will not taste as sweet so make this mixture a little sweeter than you want the final product to be. How much sugar you add varies with personal taste, and how sweet the berries are. Place in an ice cream maker and process according to manufacturer’s directions. Once finished put in an air- tight container and place in freezer. Makes about 1 quart.
How to Use French Sorrel
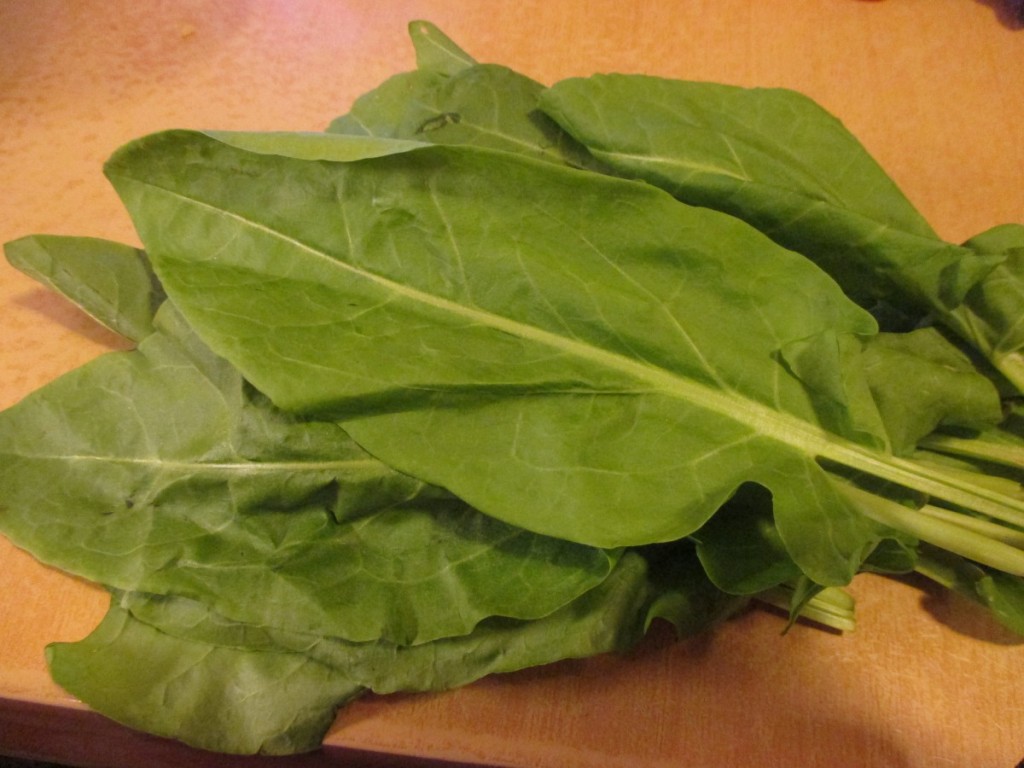
Sorrel is also known as French sorrel and garden sorrel. It’s a member of the dock family and its less cultivated relatives can be harvested in most any field. The sorrel grown in herb gardens produces larger leaves, and is milder in flavor, than its wild cousins. French sorrel produces large, pointed leaves on 6″ stems. When in flower, the plant sends up flower stalks that can reach more than 3′ in height.
Sorrel is a hardy perennial and will produce tasty leaves for many years, once established. It prefers full sun and well-drained soil. The leaves have a sour, almost lemony flavor that is used in dishes like sorrel soup. The lemony/sour flavor makes sorrel a natural match for seafood.
Young leaves can also be served raw in salads. To encourage new, tender growth sorrel can be cut back to the soil line. New leaves will start to grow soon after cutting back. Young sorrel leaves can be added to soups and sauces, egg or pasta dishes. Because sorrel leaves are high in oxalic acid, they should be eaten in moderation. Or, the leaves can be blanched and rinsed to reduce the oxalic acid.
Sorrel can be started from seed, either indoors or directly sown in the garden. You can also buy plants at garden centers that carry herbs. It can be hard to find plants in some areas.
When I was a kid, my Busha (Polish grandmother) would make sorrel soup from wild sorrel. I remember harvesting the tiny leaves in a field. She needed a brown paper grocery bag full for a batch of soup. You can imagine how delighted I was to discover that there was a domestic version I could grow at home- with much larger leaves.
Here are some of my favorite recipes using sorrel.
Sorrel Soup
2 medium onions, chopped
2 T. oil
2 lbs. potatoes. Peeled and cubed
1 rib celery, sliced
1 qt. chicken or vegetable stock
1 qt. milk
1/3 –1/2 c. flour
1 lb. Sorrel leaves, washed and spun dry, chopped
salt and pepper to taste
In soup pot sauté onions in oil until tender. Add vegetables, stock and 3 cups of the milk. Simmer, covered, until vegetables are tender, about 20 minutes. In a container with a tight fitting lid place the flour with the remaining milk and shake until mixture is smooth. Pour into hot soup and simmer 3-4 minutes. Use more or less flour depending on how thick you like your soup. Toss in sorrel, adjust seasonings and serve. Garnish with snipped chives, if desired. Serves 6-8.

Sorrel Pesto
1 c. tightly-packed sorrel leaves
½ c. olive oil
3 – 4 cloves garlic
salt to taste
½ c. pine nuts, sunflower kernels, pecans or walnuts, toasted preferred
1 c. fresh grated Parmesan cheese
Hot sauced to taste
Combine all ingredients in blender or food processor until smooth. Adjust seasonings. Use with chicken or fish. Sorrel Pesto is also good on potatoes, or tossed in a spinach salad with some wine vinegar. Great on grilled vegetables, too!
Sorrel Sauce
This sauce is good with fish and chicken or on baked potatoes. You can also use it as a dip with veggies.
½ c. mayo
½ c. sour cream or Greek yogurt
½ c. fresh chopped sorrel leaves
2 T. minced green onion
1 T. chopped fresh parsley
2 t. fresh lemon or lime juice
salt and pepper to taste
dash red hot pepper sauce
Combine all ingredients and mix until smooth. Adjust seasonings. Chill.
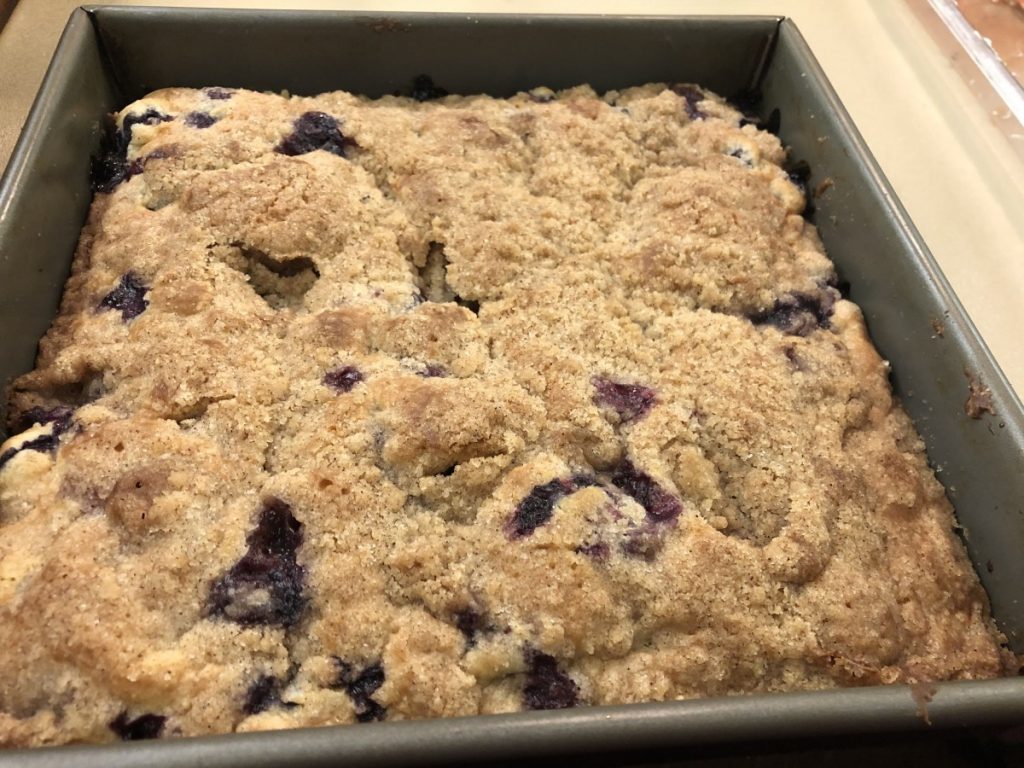
Blueberry Crumb Cake
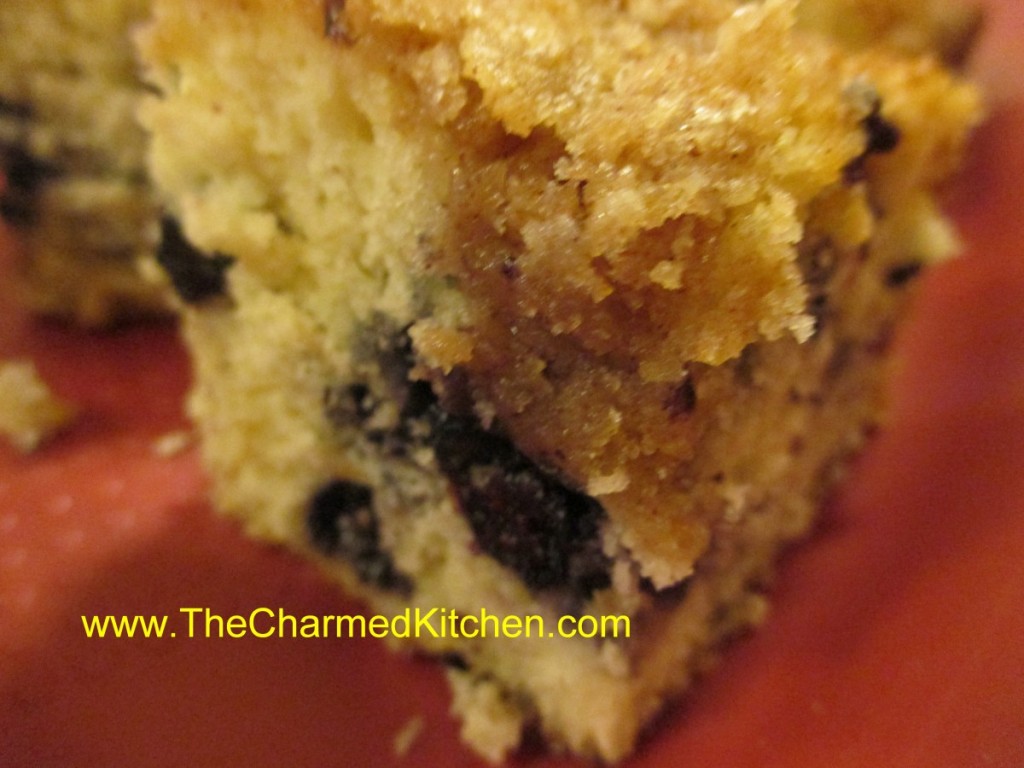
This has always been a favorite cake of mine. The mixture of moist cake and berries would be great on their own, but that crunchy, crumb topping- oh my! Talk about a wonderful combination.
It isn’t a difficult cake to make at all. It is an extra nice cake to take along to picnics and cook outs since there is no frosting to worry about. It can be served plain, or served with a scoop of ice cream or some whipped cream.
So here is the recipe. Enjoy!!
Blueberry Crumb Cake
For cake batter:
2 c. flour
2 t. baking powder
½ t. salt
½ stick (¼ cup) butter, softened
¾ c. sugar
1 egg
½ c. milk
1 pint blueberries, fresh or frozen
For topping:
½ c. sugar
¼ c. flour
½ t. cinnamon
½ stick (¼ c. butter, chilled and cut into bits)
Combine dry ingredients and set aside. In mixing bowl with electric mixer, beat butter and sugar until light and fluffy. Beat in egg and milk. Add flour mixture gradually until just mixed in. Fold in blueberries. Grease and flour an 8 or 9-inch square baking pan and add prepared batter. Combine topping ingredients until they resemble coarse crumbs. Sprinkle over batter in pan and bake in a preheated 375-degree oven and bake for 35-45 minutes. Use toothpick to test.
Note: I have used a 9-inch round pan and it worked fine.
Frozen Cherry-Strawberry Cheesecake
This frozen cheesecake was so easy to make. The ingredients were combined, then frozen. No ice cream maker required. It took me about 10 minutes to put together. With hot weather coming this week, frozen treats seem like a good idea.
I wasn’t sure what to call it at first. It looks like an ice cream, but it isn’t. The secret ingredient-cottage cheese. The cottage cheese was combined with sugar, fruits and flavorings in a food processor until very smooth. Then crumbled graham crackers were added so it is more like a cheesecake, so that is what I called it. I could see making this with other fruits. I made it because I had a big carton of cottage cheese that I wanted to use up. The cherries were in my freezer already and I had just gotten fresh strawberries.
If you want it to be a little creamier, you can add some whipping cream.
Frozen Cherry-Strawberry Cheesecake
1 (28 oz.) carton of cottage cheese
Sugar to taste, I used about 1 cup – you could sweeten with honey or maple syrup, too
1 c. pitted sour cherries- or more if you like
1 c. sliced strawberries- or more if you like
2 T. lemon juice
1 T. vanilla extract
9 graham crackers, crumbled
Combine first 6 ingredients in a food processor or blender until very smooth. Taste to see if you want to add more sugar. Pour into a 2 quart bowl and stir in the crushed crackers. Place mixture in a freezer safe container that has a lid. Affix the lid and freeze. Makes 5-6 cups.
Note: I could see a lot of possible variations for this recipe. I used cinnamon graham crackers, but it might be fun to use chocolate graham crackers. You could use other fruit. I used what I had on hand. Peaches or other berries might be fun. I think the next one I make I will try adding lemon curd and lemon zest for a lemon cheesecake.
Ham and Cheese Filled Bread

This bread is always a crowd pleaser and looks pretty, too. It’s also easier to make than you might think. The dough is a pretty basic yeast dough that is rolled out, filled with ham, cheese, mustard and honey then the dough is folded up over the fillings and baked. Details directions follow.
I have made this bread with all sorts of fillings. Its a great way to get creative, have some fun and even use up leftovers. I will be starting my kids’ cooking camps soon and we always make some variation of this bread in camp. You can make vegetarian versions, too.

Enjoy.
Ham and Cheese Filled Bread
3 ¼ c. all purpose or bread flour, you can add a little rye flour, too
1 T. sugar
1 t. salt
1 package quick-rising yeast, or a scant tablespoon of yeast in bulk
1 c. hot water
1 T. oil
¼ c. spicy mustard – or any mustard you like
2 T. honey
8-12 oz. sliced ham
4-6 oz. sliced cheese – I like cheddar or Swiss in this recipe but any melty cheese works
Set aside 1 cup of the flour. Combine remaining flour with the other dry ingredients in a medium bowl. Stir in water and oil and gradually stir in enough flour to make a soft dough. Turn onto lightly floured surface and knead until dough is smooth and elastic, about 5 minutes. Roll dough into a rectangle about 16 x 8. Spread mustard and honey down center middle of dough. Top with meat slices and cheese. Cut one-inch wide strips of dough from filling to edge on both sides. It will sort of look like fringe. Alternating sides, fold strips up and over the filling at an angle. Carefully lift loaf onto greased baking sheet and place at an angle. Cover with a towel and place sheet on top of a roasting pan half-filled with simmering water for 15 minutes. Bake in a preheated 400-degree for 20-25 minutes or until golden brown. Cool slightly before slicing. Serve warm and refrigerate leftovers.
Note: The variations for this bread are almost endless. Some favorite combinations are a Reuben or Rachel, roast beef and cheddar, chicken, broccoli and cheese, Spinach with ricotta or feta and onions, pizza, assorted fillings. You get the idea. Use your imagination and have fun. Just be careful not to overfill, or the bread will be hard to move, use fillings that aren’t too runny and always fill with cold ingredients so the dough won’t get a soggy bottom.
Note: If you want to use regular yeast use warm, rather than hot water. Also, skip the step of placing the dough over simmering water. After kneading cover dough and let rise 45 minutes. Punch down and assemble as in original recipe. Cover with a towel and let rise until dough looks puffy, about 40 minutes. Bake as directed above.
These breads can also be frozen.
Fairy Butter

If you never heard of fairy butter before you are not alone. I never heard of fairy butter until I read an article about it. Now I love it. It was also a big hit at a brunch with a friend. At the brunch it was served with rolls and bagels.
The recipe is actually very simple, just 4 ingredients. Butter, cooked egg yolks, rosewater ( or orange blossom water) and a little sugar. Such simple ingredients, but the final result was almost magical. After tasting it, I ended up making a second batch right away. It was really good. Even better than expected.
I subscribe to a newsletter from Altas Obscura. Please check out their website. They posted the recipe for fairy butter with its history. That is where I found the recipe. It was popular during Colonial days. The mixture is pressed through a fine sieve that will produce golden threads. The recipe also suggested decorating your fairy butter with edible flowers. I was lucky to have plenty to choose from in my garden. I used pansies, elderberry flowers, false strawberries and perennial geraniums. I had recently received rose water from a friend, so it seemed natural to make something with it. Almost fateful.
Now I want to host a tea party, just to try fairy butter on scones and crumpets!!!
So here is the recipe. Enjoy! And don’t forget to check out Atlas Obscura. I even have their book on obscure recipes. Fun site.
Fairy Butter
2 hard cooked egg yolks
1 Tablespoon rosewater or orange blossom water – I used rosewater
2 teaspoons sugar – you could probably use honey or maple syrup if you prefer
1 stick- 4 oz. of butter, softened I used salted butter
Combine the first 3 ingredients, blending until smooth. The original recipe suggested using a mortar and pestle. I just used a mixing fork and later a small spatula. Then add in the butter and mix until smooth. Now press the mixture through a fine sieve to produce thin, golden threads. Decorate with edible flowers. (This is where I ended up going off recipe a little. I wasn’t happy with how it looked at first. I think my butter might have been too soft. Maybe I should have used a mortar and pestle. In any event, I ran it through the sieve a few times before I liked the way it looked. I placed the fairy butter on a round dish and decorated with edible flowers.)
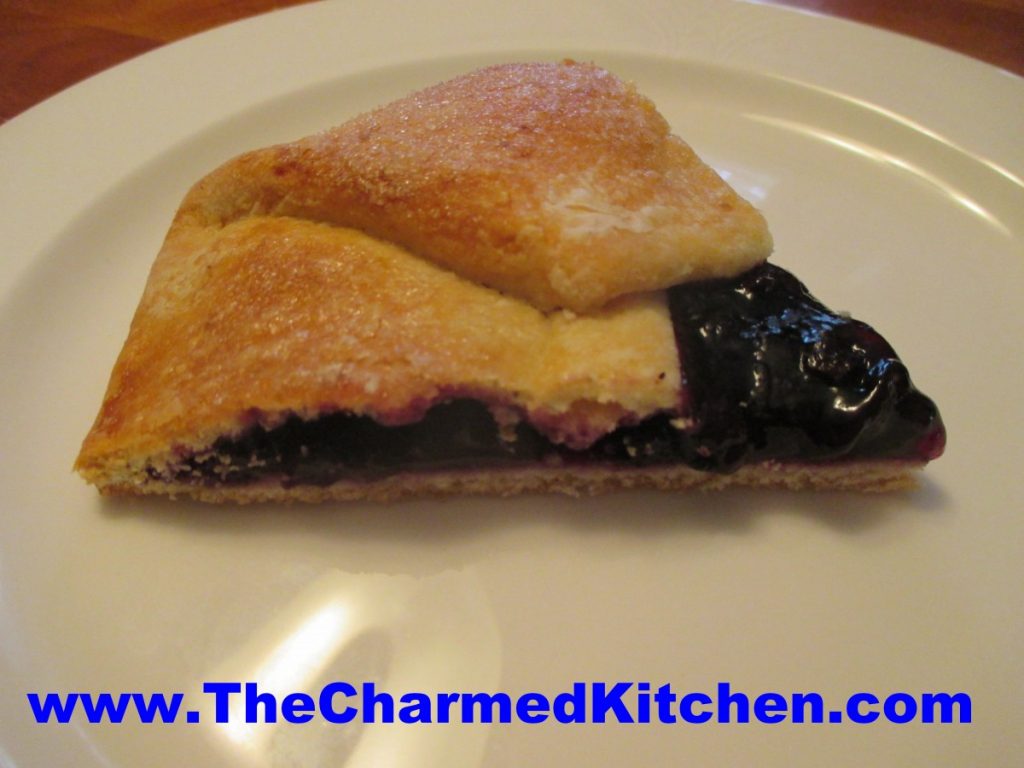
Blueberry Galette

A galette is a cross between a pie and a tart. Rather than placing the crust in a pie pan, the crust is rolled out and the fruit is placed in the middle. The edges of the crust are folded over the fruit, leaving them exposed in the middle. Galettes have a rustic charm. They are also easy to make.
I will be serving this for dessert later. It was one of those times that what I had on hand worked together perfectly. I had an open jar of blueberry pie filling and leftover kolachy dough. Made sense to use them together.
I used homemade blueberry pie filling, but you could use store-bought, if you prefer.
The ingredients are pretty simple, pie crust and pie filling. You’ll need enough pie crust dough for one pie and one cup of blueberry pie filling per galette. After I folded over the edges, I brushed them with a little milk and sprinkled the edges with sugar, to help the crust brown nicely.
Blueberry Galette
Crust for one pie- recipe follows
1 cup blueberry pie filling
milk
2-3 T. sugar
Roll out crust like you would for a pie, about a 10 or 12 inch circle. Place crust on a baking sheet. Spoon filling into the middle of the crust. Fold edges of the crust over the fruit filling, leaving about a three inch circle exposed in the middle. Brush crust with milk and sprinkle with the sugar. Bake in a preheated 375 degree oven for 30 minutes, or until crust is golden brown. Remove to a rack to cool. Serves 4-6.
Here is the recipe I used for the crust. It would make enough for about 3-4 galettes. We used most of the dough for hand pies in cooking camp and I had leftover dough. It can be frozen, too.
Eva’s Kolachy Dough
3 c. flour
1 t. baking powder
½ t. salt
1 c. butter
3 eggs
2 pkts. Yeast
½ c. warm milk
In mixing bowl, combine flour with baking powder and salt. Cut butter into flour until mixture looks like coarse crumbs. Set aside. Place eggs in a small bowl and beat until smooth. In small bowl, dissolve yeast in warm milk. Add to egg mixture and stir to combine. Add egg mixture to flour mixture and stir until combined. If mixture is sticky add a small amount of flour. Roll dough out on floured board. Thinner the better, as this dough will puff some when baked. Unlike a traditional pie crust dough, this one does not need to be chilled. It is also very easy to roll out. Use about 1/3- 1/4 of this dough per galette. Extra dough can be frozen to use later.
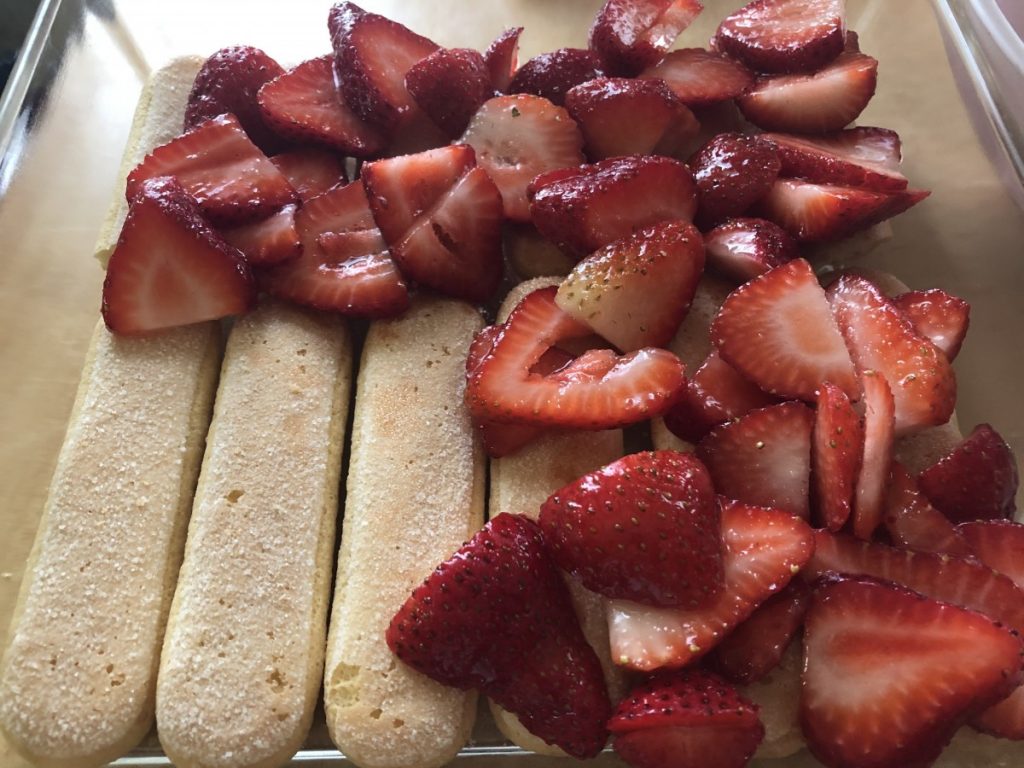
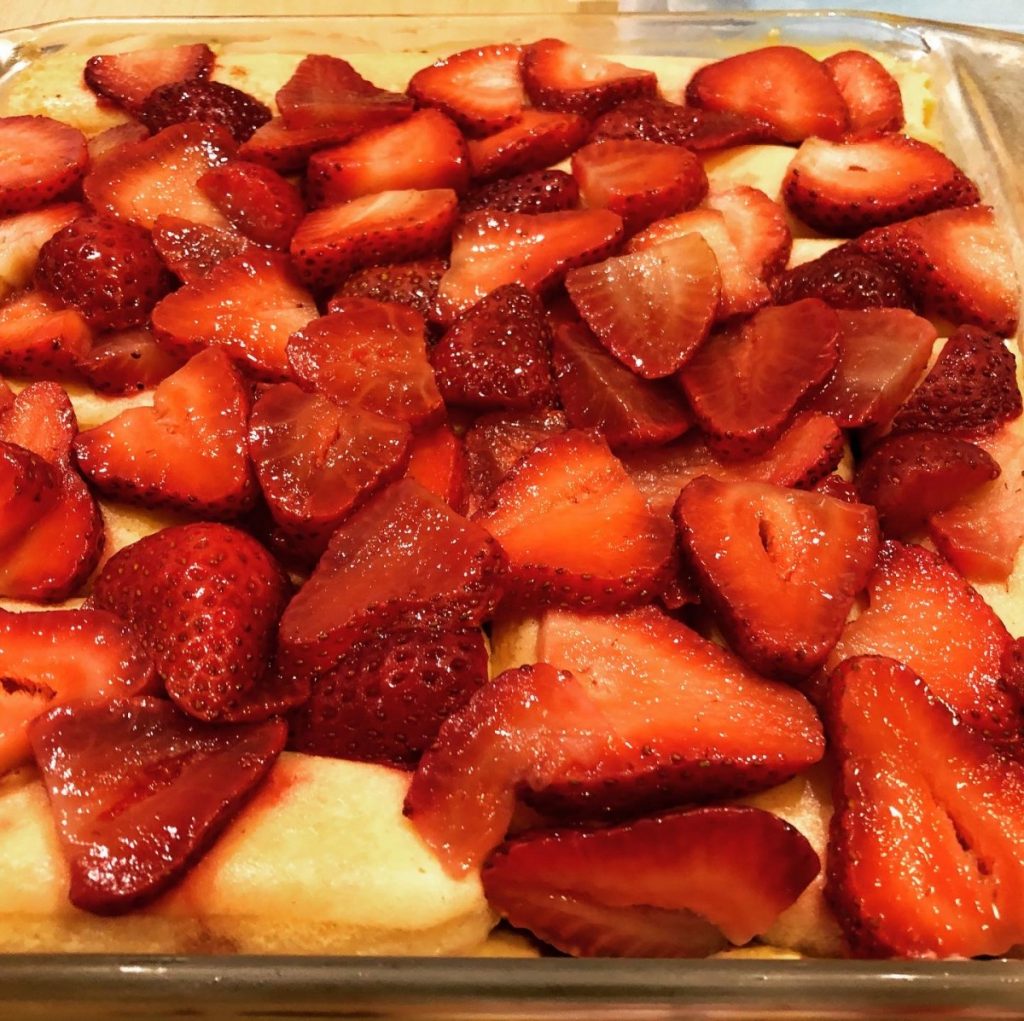
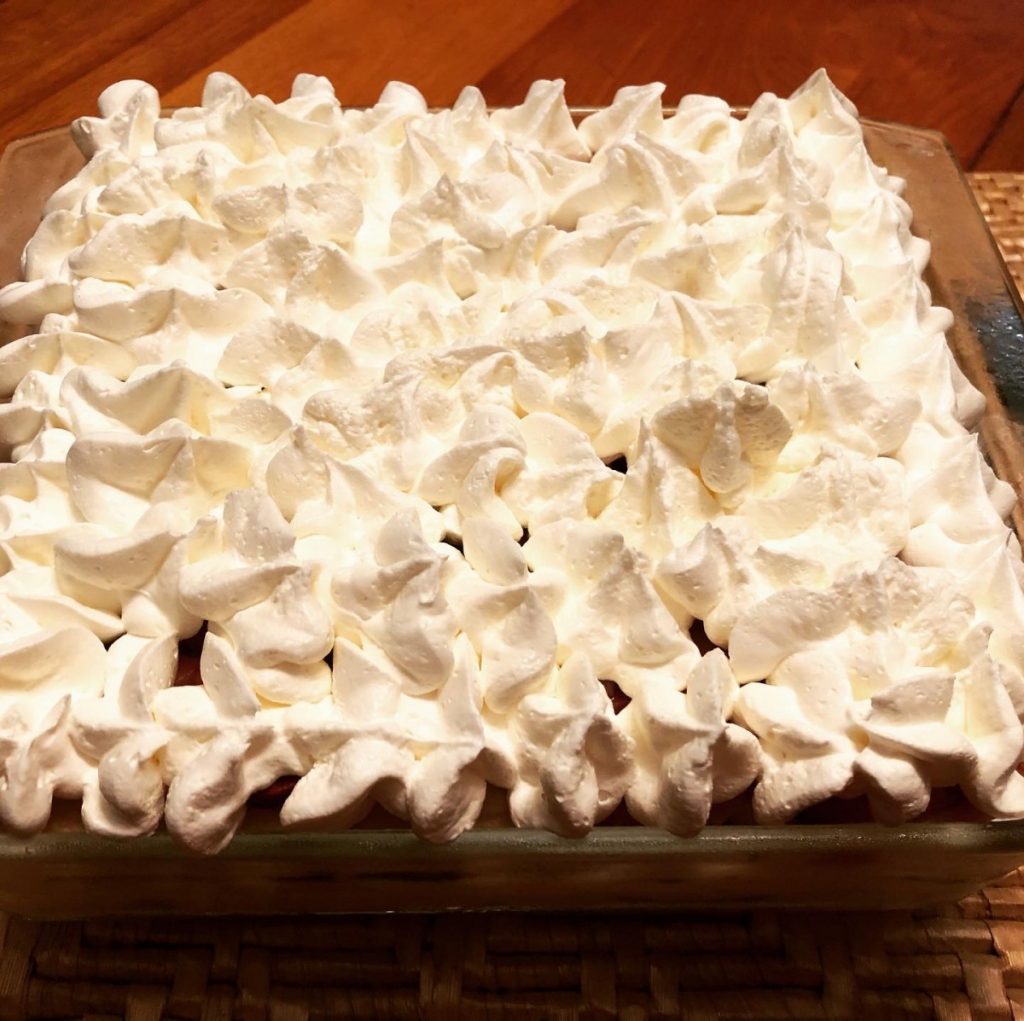
Strawberry Shortcake Trifle
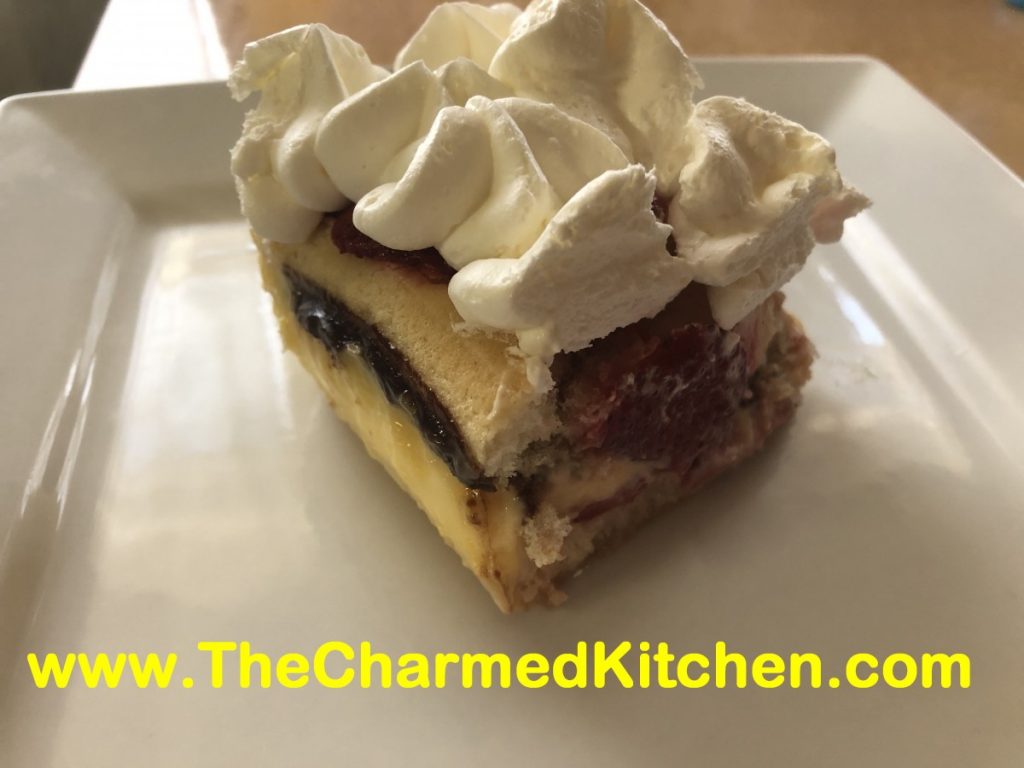
I am not sure why I never combined ladyfingers with strawberries before. Using them together in this dish made a wonderful dessert- that was also very easy. It was something between a trifle and a shortcake so I called it both!
I want to just say something about ladyfingers. There are two types I see in stores around here, soft or crisp. The soft ones are smaller and cake-like and found in bakeries in grocery stores. Like sponge cake. The other ladyfingers are crisp and larger. I find the crispy type at Italian stores and sometimes at specialty grocery stores. The ladyfingers you want for this recipe are the larger, crisp ladyfingers.
I was happy with how it came out. The ladyfingers were soft, not mushy. They actually were kind of fluffy. The flavors blended so nicely. Great summer dessert. Light and refreshing, but a little rich, too. I made vanilla pudding, but make life easier and just use store bought or instant from a box- if you prefer.
Here is the recipe. Enjoy!!
Strawberry Shortcake Trifle
1½ – 2 pounds strawberries, washed, stemmed and sliced
½ c. sugar
24 ladyfingers
1 recipe vanilla pudding- recipe follows
¾ c. Hazelnut chocolate spread
Whipped cream or whipped topping
Combine strawberries with the sugar and set aside. Make the pudding, if you haven’t already. You can use pre-made pudding. You’ll need 2-3 cups of pudding. I had some leftover from the recipe I made. In a 9×9-inch baking dish, place one layer of the cookies. You might have to trim them a little to fit. I had 2 rows of 6 cookies, but I had to break off a little for the second row to fit. Spoon over half of the strawberries, with some of the liquid in the bowl. Spread a layer of pudding over the berries. For the next layer, spread some of the hazelnut spread over each lady finger before putting it in the pan. When you put them in the pan, place them with the spread on the under side. Add another layer of the pudding, then top with the rest of the strawberries. Cover and place in fridge until ready to serve. You can do all this up to 2 days ahead. Before serving, remove cover and top with whipped cream or any whipped topping you like. Serves 6-8.
Vanilla Pudding
1 c. sugar
½ c. cornstarch
½ t. salt
3 ¾ c. half and half
1 T. vanilla- or a little more
2 T. butter
Combine dry ingredients in a medium saucepan. Whisk in half and half and vanilla until well mixed. Heat over medium heat, stirring constantly, until mixture starts to bubble and get thickened. Mixture will get pretty thick. Turn down heat to keep it from scorching. As soon as pudding is thickened, remove from the heat and stir in the butter until melted. Place pudding in a bowl, cover with plastic wrap and chill until ready to use. Makes about 4 cups.
Cooking with Garlic Scapes
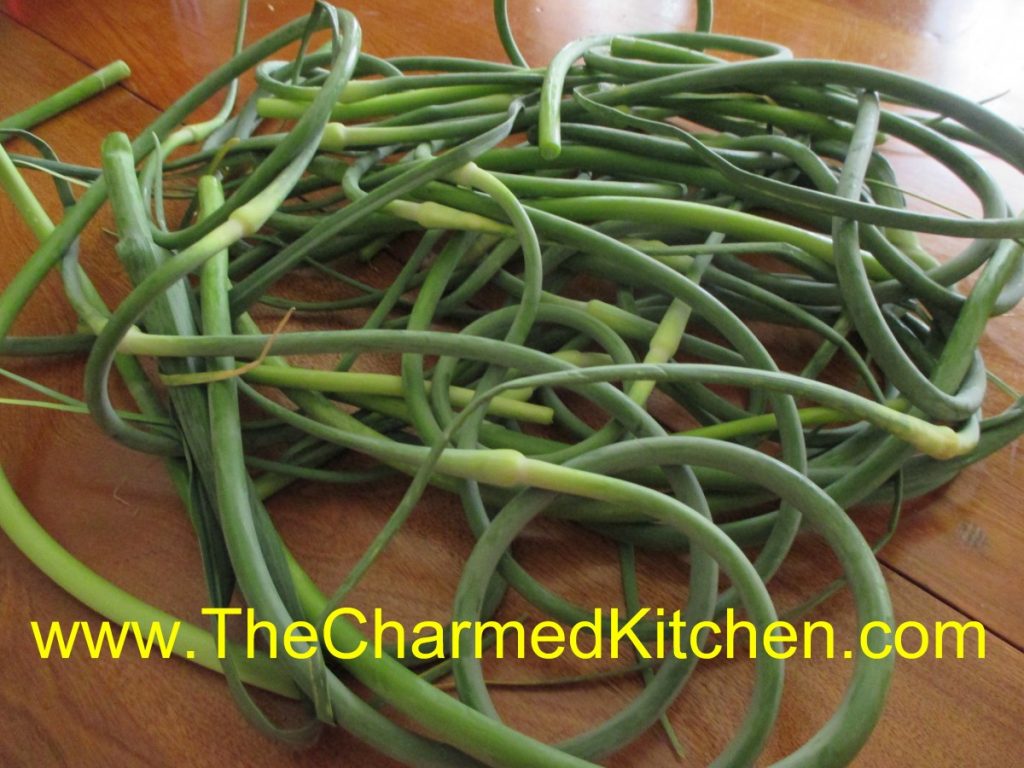
If you have never had garlic scapes, you don’t know what you are missing. Garlic scapes are the green shoots removed from hard-neck varieties of garlic. By removing the shoots, the bulbs will get bigger. So farmers and gardeners remove them. Garlic scapes curl as they grow, so they are easy to identify if you see some at your local farm market. They are showing up at farm markets around here right now.
Garlic scapes are good served raw, or barely cooked. When cooked, the flavor mellows a lot. I love to steam garlic scapes for about 5 minutes, then just eat like fresh green beans, with butter and salt. I steamed a bunch of scapes- then chopped them up and added to potato salad. So tasty!! They can also be grilled! The slight charring gives them a wonderful smokey flavor.
They have a rich, garlic flavor that is all the sweeter because of the short time they are around. Enjoy them when you can- they will be gone soon. I sometimes use scapes in place of basil, in my pesto recipe, or combine them with parsley in a garlic scapes and parsley pesto. You can also combine the garlic scapes with cottage cheese in the blender- add a little lemon juice and hot sauce for a tasty dip. Here are some more recipes for cooking with garlic scapes.

Garlic Scapes Potato Salad
4-5 garlic scapes
2 lbs. red skinned potatoes*
½ cup minced sweet pepper
½ c. olive oil
½ c. apple cider vinegar
2 T. sugar
2 T. chopped parsley
2 t. fresh dill weed
Salt and pepper to taste
Hot sauce to taste
Steam the scapes for 5 minutes. Cool a little, and cut into ¾ -inch slices. You should end up with about 1½ of sliced scapes when done. Place in a medium bowl. Cook potatoes until tender. I baked mine in a microwave until tender and then cut into cubes. Baking them is also a nice way to cook the potatoes. You can also opt to cut into cubes first and boil the potatoes. Whatever method to cook the potatoes is fine with me. Take the potatoes, while still warm, and place in the bowl with the scapes. Mix the rest of the ingredients together in a small bowl and stir until sugar dissolves. Pour over warm potato mix, tossing to coat evenly. Adjust seasonings. Chill and serve. Serves 6-8.
* You can really use any potato you like.
Garlic Scapes Pesto Sauce
1 c. chopped scapes – you can also use half scapes, half parsley
1/4 c. olive oil
3-4 cloves garlic
Salt to taste
1/2 c. pine nuts, sunflower seeds, pecans or walnuts
1 c. fresh grated Parmesan cheese
Combine all ingredients, except the cheese, in a blender and mix until smooth. Stir in the cheese and toss over hot, cooked pasta or use as a sauce on meat and poultry. Sauce will keep a few days in the fridge and makes about 1 1/2 cups, enough for 1 lb. of cooked pasta.
Lebanese Garlic Sauce
1/2 c. chopped garlic scapes
1 cup lemon juice
1 teaspoon salt
2 cups olive oil
In the container of a blender, combine the garlic scapes, lemon juice and salt. Blend at medium speed until smooth. Continue blending while pouring olive oil into the blender in a thin stream. The mixture should become thick and white almost like mayo. Store refrigerated in a glass container. Nice on hot pasta, cooked rice or grains or brushed on meats while cooking. It also is a great salad dressing.
Garlic Scapes with Broccoli
1 c. chopped garlic scapes
1 1/2 teaspoons salt
1 bunch broccoli, cut into florets, steamed 5 minutes, cooled
1/3 cup olive oil
1/4 cup red wine vinegar
1 tablespoon Dijon mustard
1/2 cup grated Parmesan cheese, or to taste
Place garlic scapes in a food processor with the salt and blend into a paste. Add olive oil, vinegar, and mustard. Pulse until smooth. Place garlic scapes mixture in a bowl and add the broccoli. Stir to coat. Chill for 3 hours to marinate, stirring occasionally. Sprinkle with Parmesan cheese before serving. Tastes even better the next day!!!


