Green Tomato Pickles

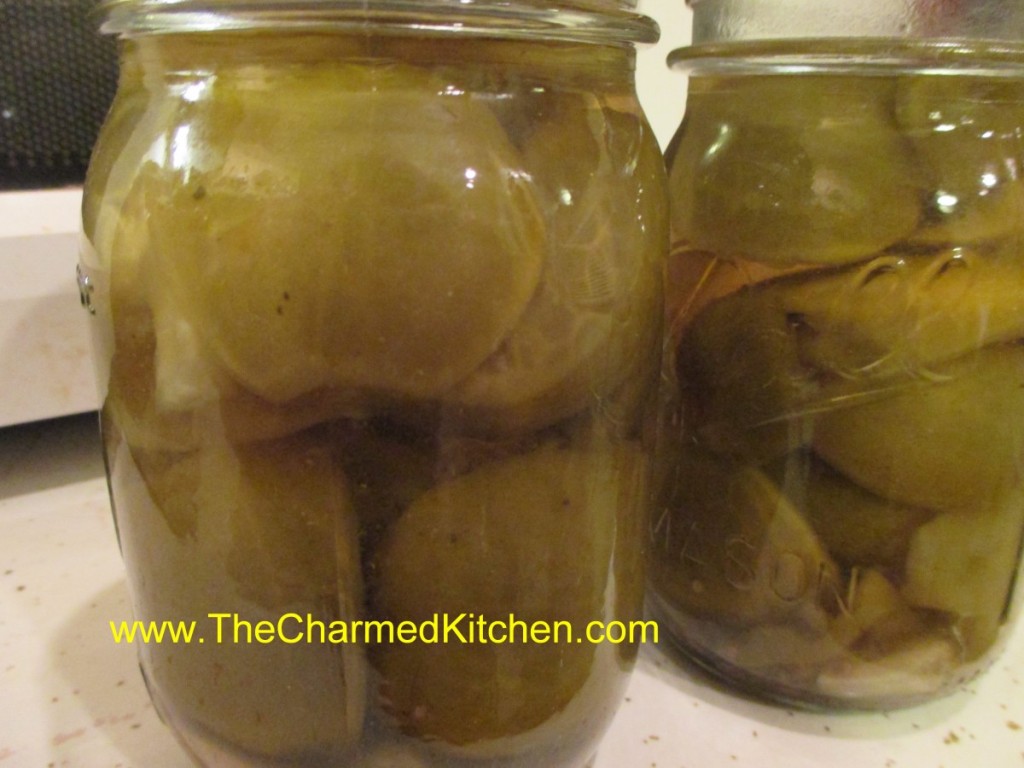
The garden season is winding down around here. A number of friends have posted pictures of their last ripe tomatoes of the year. That is a sad time. But, don’t forget about those green tomatoes. You can make fried green tomatoes, which are great. You can also make these pickles. That way, you can enjoy those home grown tomatoes a little longer.
The recipe is pretty simple. I sometimes add a teaspoon of red pepper flakes to each jar for a spicy version. The hardest part is waiting. Once the tomatoes are canned, you have to give them 4-6 weeks for the pickling to finish. Trust me, it is worth the wait. While the recipe calls for using quart jars, you can use pints. Process for the same time as the quart jars. I like to use pints for the green cherry tomatoes.
Just because your ripe tomatoes are done for the year, harvest those green ones and get a little something more from your garden.
Green Tomato Dill Pickles – Kosher Style
Green tomatoes
6 ribs celery, cut in 2-inch pieces
6 Sweet green peppers
6 cloves Garlic, peeled
2 quarts water
1 quart vinegar- 5% acidity- you can use white or cider vinegar
1 cup canning or pickling salt
Dill, optional
Use small firm green tomatoes. Pack into hot, clean canning jars. Add to each quart jar a clove of garlic, 1 piece of celery, and 1 green pepper cut into fourths. Make a brine of the water, vinegar, and the salt. Boil with the dill for 5 minutes. Pour the hot brine over the pickles to within 1/2 inch of the top of the jar. Put on cap, screw band firmly tight. Process in a boiling water bath for 15 minutes. These pickles will be ready for use in 4- 6 weeks. Yield: About 6 quarts. Source: NCHFP
Fried Green Tomatoes


Tomato season is all about those firm, ripe, juicy tomatoes. For me, tomato season is also about fried green tomatoes.
Green tomatoes have a very different flavor than ripe tomatoes. It is like tomatoes and lemons had a baby. There is a distinct citrus-like tartness in green tomatoes. We fried some up in a class recently. Everyone enjoyed them.
Green tomatoes are pretty firm, compared to ripe tomatoes, which makes them great for frying. They soften, but don’t fall apart when fried.
There are a number of variations on exactly how to fry your tomatoes. I do a traditional breaded method, flour, egg wash and cracker crumbs. Then I pan-fry them.
I like using cracker crumbs, but you could use bread crumbs instead. I have friends that love to use cornmeal instead.
So here is my recipe. I hope you give it a try.
Fried Green Tomatoes
1 c. flour, or 1/2 c. flour and 1/2 c. cornmeal
1 t. salt
1 t. pepper
5 green tomatoes, sliced 1/2-inch thick
1-2 c. cracker crumbs, saltines preferred
2 eggs, beaten
butter or oil for pan frying
Place flour and seasonings in small bowl. Place crumbs in second bowl and eggs in a third bowl. Dip tomato slices in eggs then in flour. Dip slice in egg again and then in crumbs. Fry slices in hot oil until golden and tender in the middle, turning to cook evenly. Drain and serve warm. Serves 4-6.
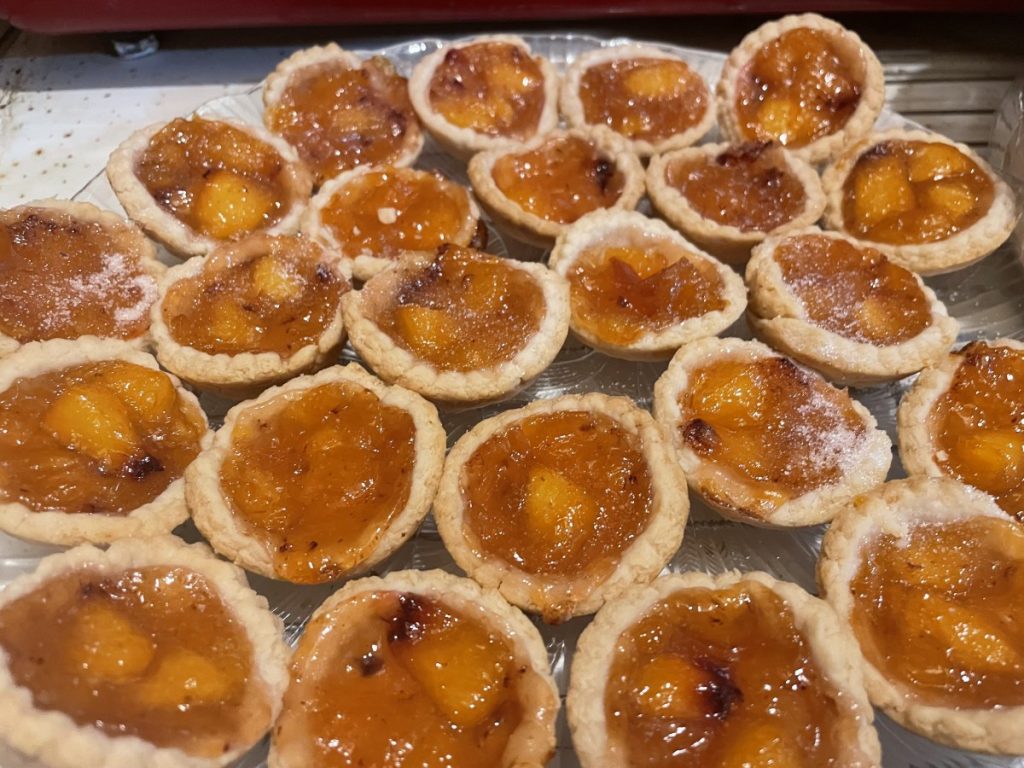
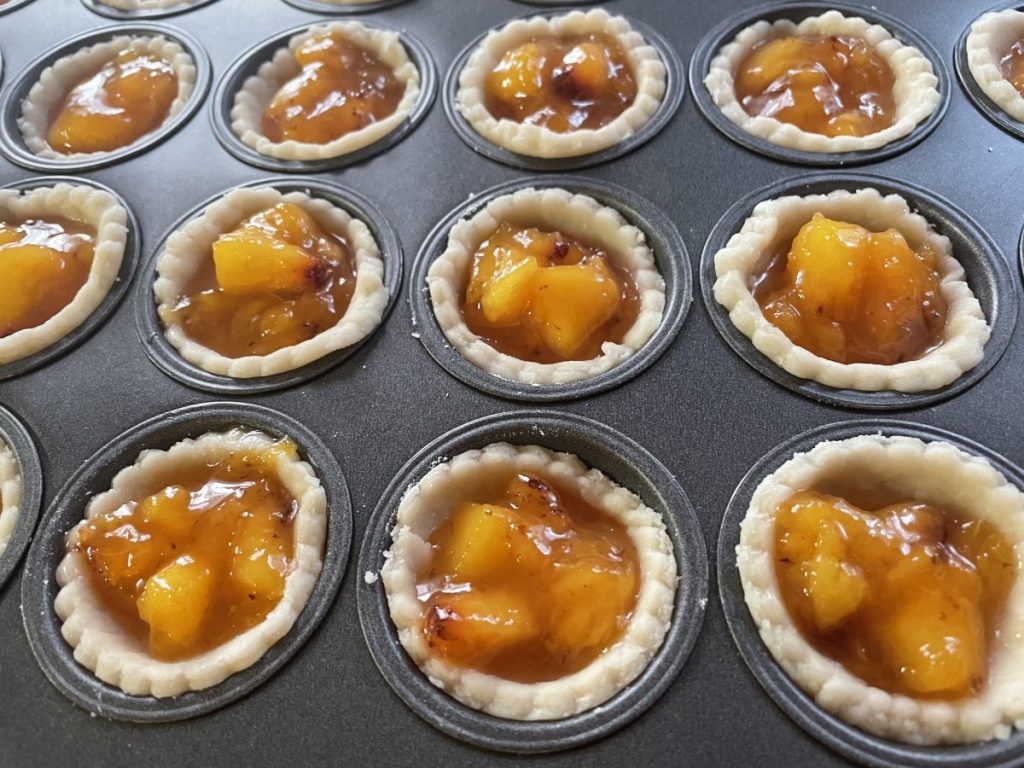
Peach Tartlets -Vegan

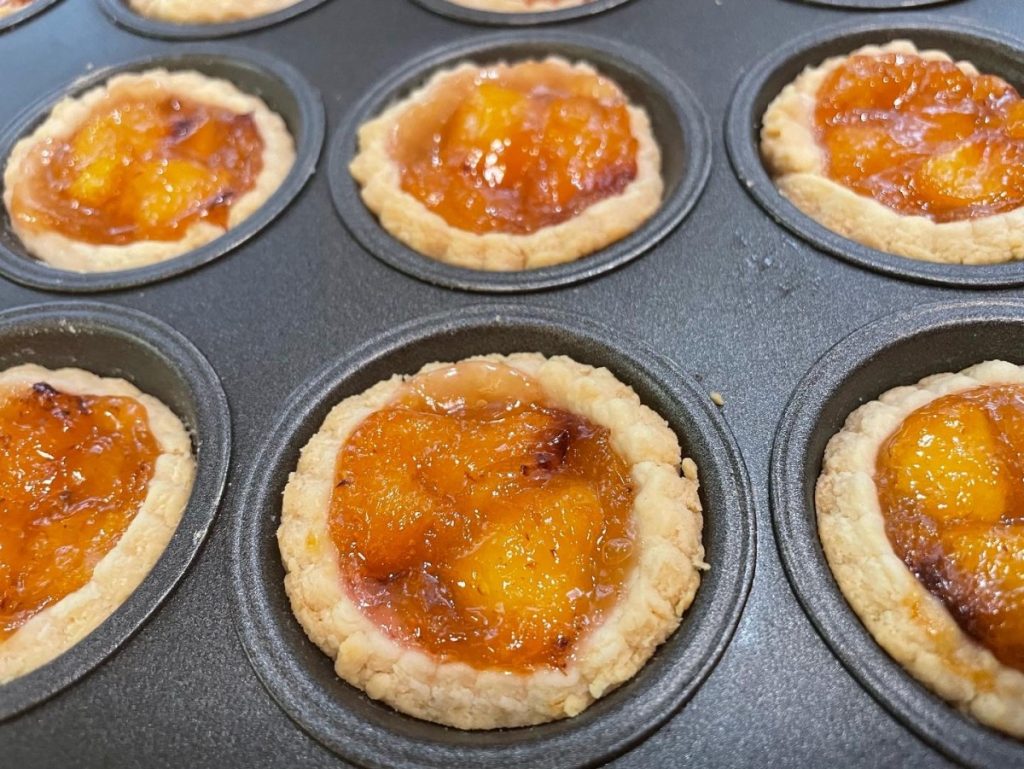
I had friends visiting from out of town earlier this year and wanted to make them a special dessert. They are vegan. I decided to make these tarts. Making them vegan wasn’t hard at all. I just used coconut oil in the crust recipe instead of butter. The crust worked out fine, although it is very crumbly. The texture after baking is amazingly tender, but I found the dough a little harder to handle than when made with butter. I would make this crust again, even if I didn’t need a vegan version.
I used homemade peach pie filling made with peaches I had. You can use store bought pie filling, but I include the recipe at the bottom of the post. The recipe makes just over 2 cups of filling. I had crust left over.
I made 24 and used a little over half of the dough recipe. Had I rolled them out a little thinner, half a recipe would be enough.
Peach Tartlets
dough for 1 pie crust- recipe follows
About 2 cups peach pie filling, room temp or chilled – recipe follows
Preheat oven to 375 degrees. Roll out dough to 1/8-inch thick. Use a 2 1/2-inch biscuit cutter to cut out circles of dough. Place dough circles in mini muffin or tart pans. Press them in gently being careful not to tear them. Repeat with remaining dough and re-roll scraps. You’ll end up with about 24 dozen in all. If you don’t have enough pans, keep the extra dough circles under a towel or plastic wrap so they don’t dry out until you are ready to use them. Place a rounded teaspoonful of peach pie filling into each of the tartlet shells in the prepared pans. Don’t over fill. Bake for 12-15 minutes or until golden brown on top. Can be served hot, warm or at room temperature. Makes about 2 dozen.
Note: If I rolled the dough thinner I could have made more like 3 dozen.
Can be frozen. To reheat take straight from the freezer and place on a baking sheet. Bake in a preheated 325 degree oven and bake for about 20 minutes, but check after 15 minutes.
Flaky Pie Crust
2 c. flour
1 t. salt
3/4 c. coconut oil, chilled – you could use butter, lard or shortening
1 T. cider vinegar
4-5 T. cold water
Combine flour and salt in food processor and add coconut oil. Pulse until mixture resembles coarse crumbs. Toss in vinegar and water, 1 tablespoon at a time, pulsing as you add, until dough just holds together. Remove from processor and press dough together to form a ball. Chill at least 30 minutes before using. Makes enough for 2 pie crusts or up to 48 tarts.
Peach Pie Filling
3 cups diced peaches
3/4 c. sugar
3 T. water
3 T. cornstarch
2 t. cinnamon
Heat peaches and sugar in a saucepan until bubbly. Stir to prevent sticking. Combine water and cornstarch and add to the peach mixture. Heat until thickened and bubbly. Add the cinnamon, too. If the mixture is too thin, add a little more cornstarch and water. Sometimes the peaches are extra juicy.
Corn and Barley Salad with Basil

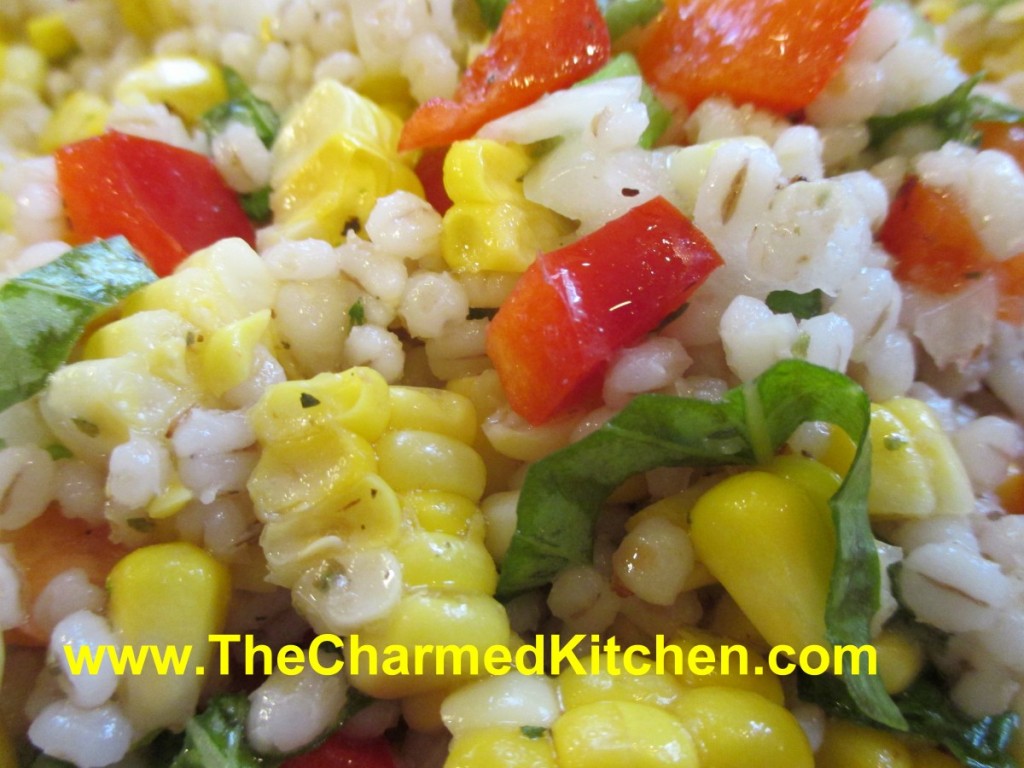
This colorful salad can be a side dish or main dish. I like it as a main dish for hot summer days. It somehow manages to be light and filling at the same time. It makes a wonderful lunch, served over a bed of salad greens.
The combination of sweet corn and barley works so well together. I don’t think most people think of salad, when they think of barley. Barley is more commonly used in soups. But this versatile grain can also be a nice ingredient in a salad. Perfect on a hot day, when you want a lighter meal.
I had grilled corn, and had some leftover, so that is what I used. I think the smokiness of the grilled corn added a nice touch. I had some fresh basil so I added that, too.
If you are looking for a new salad idea- you might try adding barley to your next salad.
Corn and Barley Salad with Basil
½ c. pearl barley
salt
3 T. cider or white wine vinegar
1 t. Dijon mustard
fresh ground pepper
3 T. olive oil
3 T. fresh basil, cut into thin strips
3 c. cooked corn, from about six ears
1 c. diced sweet onion
1 c. diced sweet pepper, any color
¼ c. sliced green onions
Combine barley, 2 cups water and ½ t. salt in saucepan and simmer, covered until barley is tender, about 50 minutes. Drain and rinse under cold water. Combine remaining ingredients and toss with barley in large bowl. Makes 6 servings.
Peach Streusel Muffins


I can’t get enough of peaches these days. I have been eating them fresh, making preserves, freezing peaches and cooking with them. This recipe is one of my favorites.
I hadn’t made them in a long time, so I decided today was the day. Now I remember why I liked them so much. Perfect crumbly texture, not too sweet, and that streusel topping.
They can be for more than breakfast, too. Split, topped with sweetened fruit and ice cream, these muffins make a great “shortcake” dessert.
While they are really great warm from the oven, these muffins are still fine the next day, or even the day after that, assuming they last that long. They freeze, well, too.
Peach Streusel Muffins
Streusel topping:
1/3 c. flour
1/3 c. brown sugar
½ t. nutmeg
4 T. cold butter
Batter:
2 c. flour
½ c. sugar
¼ c. brown sugar
1 T. baking powder
1 t. cinnamon
½ t. nutmeg
½ t. salt
½ c. cold butter- 1 stick
2 eggs
¾ c. half and half or buttermilk
1 t. vanilla
1 c. finely chopped fresh peaches, about 1 large
½ c. finely chopped pecans, optional
Heat oven to 375. Line 15 muffin tins with paper liners or grease them. Set aside. Make streusel by mixing together flour, sugar and nutmeg in a small bowl. Use your fingers, or a pastry blender, to cut the butter into the flour mixture until it resembles coarse crumbs. Set aside. Make batter: In medium bowl combine flour with sugars and other dry ingredients. Mix well. Cut in butter until mixture resembles coarse crumbs. In small bowl beat eggs and add half and half and vanilla. Stir into flour mixture and fold in until just mixed. Mixture will look lumpy. Fold in peaches and nuts, if using. Scoop batter into prepared tins, filling about ¾ full. I get more than 12 from this recipe- normally about15, but it depends on how full you fill them. Sprinkle the tops with streusel. Place muffin tins on a baking sheet and bake for 20 or until golden brown. Cool a little before serving, if you can wait.
Baked Eggplant “Fries”

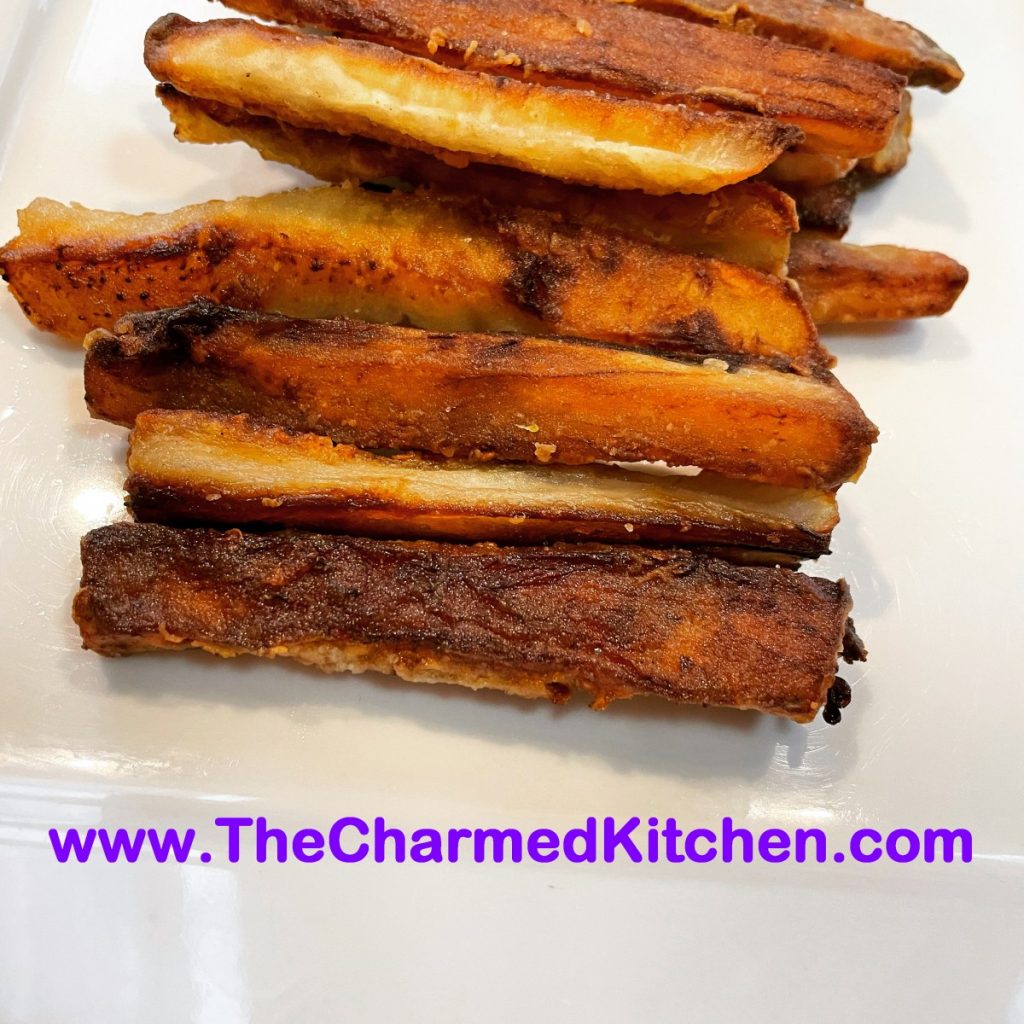
This dish started because I had an eggplant that needed to be used. I love eggplant, but none of my usual recipes were doing it for me. I decided to turn my eggplant into fries. I wasn’t in the mood to actually fry them, so I thought I would try to bake them and see if I could get a result I liked. They came out really good. Plenty crispy.
I shared a picture of my fries and a number of people asked for the recipe. I decided to write out a more detailed version than I posted. People also asked about other ways to make them. I only baked mine, so I can’t give absolute answers, but I can give you a pretty educated guess. Yes, these would work well in an air fryer or convection oven. You’d have to use a lower temp and keep an eye on them for cooking time. Yes, they can be deep fried. I have had deep fried eggplant at restaurants. They were pretty darn good. I have also pan fried them in the past. Just add about 1/2 inch of oil to a large skillet and fry them.
So here is a more detailed recipe. I know I say medium eggplant. I hate to be vague, but that is the best I could do.
Enjoy!!
Baked Eggplant Fries
1 medium eggplant
Salt
½ c. rice flour, but you could use wheat flour or cornstarch
½ c. Oil
Preheat oven to 450F. Peel the eggplant, if you like. You don’t have to. Slice and crosscut into “fry” sized pieces. They are going to shrink some in cooking, so allow for the shrinkage. Lightly salt the eggplant and let it sit for about 10 minutes. The salt will draw some of the water out of the eggplant, making it easier for the flour to stick. Place the eggplant slices in a large bowl. Add the flour and toss until coated. Drizzle the oil on a large baking sheet. Add the eggplant slices, leaving room between them. Bake for 15 minutes. Remove from oven and turn the slices over. Return to oven and bake until golden brown- don’t burn them, but pretty dark brown if you want more crunch. Mine were in the oven for about 25 minutes total. Remove to platter with paper towels on it to drain. Toss with more salt, if needed and serve.
Honey Ice Cream


I love this ice cream. The richness of the custard works wonderfully with the sweet flavor of the honey. I don’t use all that much honey in this recipe. It is sweet, but not overly so. You could make it sweeter if you like.
I think about ice cream as a summertime treat, but honestly, I would eat ice cream in a blizzard!!!
So here is the recipe.
Honey Ice Cream
1 ½ c. whipping cream
1 ½ c. half and half
2/3 c. honey
6 large egg yolks
pinch of salt
Heat together cream and half-and-half to simmer . Whisk honey, yolks and salt in a medium bowl. Gradually whisk in hot cream mixture. Return to pan and heat until mixture thickens (about 170 degrees). Do not boil. Strain into large bowl. Chill until cold. Process in ice cream maker. Makes about 5½ c.

Coffee Waffles
1¾ c. flour
¼ c. brown sugar
1½ t. baking powder
½ t. salt
1½ c. half and half or milk
1 egg, beaten
1/3 c. oil
1 T. instant coffee or espresso powder
1 T. vanilla
Non-stick spray or oil for coating the waffle iron
In medium mixing bowl, mix dry ingredients together and set aside. In a separate bowl, combine the half and half with the remaining ingredients. The dry coffee granules will not dissolve right away. You can let the wet ingredients sit a few minutes and whisk again, if you like. While they are just sitting there, you can heat up the waffle iron. Coat the waffle iron with a non-stick cooking spray or brush with a little oil. Add the wet ingredients to the dry ingredients and stir until mixed together. Don’t get crazy over mixing. That will give you tough waffles, and nobody wants that. Just stir until you don’t see any dry bits in the mix. I like to use a rubber scraper to get to the bottom of the bowl. Ladle some batter into the waffle iron and cook until golden brown. When the steam stops coming out of the waffle iron, or lessens a lot, it is usually good indicator that your waffles are done. Yield depends on the size of your waffle iron. I got 10 waffles, about 4×5 inches.
Note: The instant coffee breaks down more when mixed with the dry ingredients. Espresso powder will dissolve quickly, but if you use instant coffee like I did, expect a few “flecks” of coffee in the batter. I kind of liked the way it looked.
A Trio of Potato Salads


If you are looking for a side dish for Labor Day, why not bring a potato salad? Everybody loves potato salad. I love potato salad.
Actually, I love potatoes pretty much any way they are prepared. With so many cookouts and picnics, you can never have enough potato salad recipes, right? I am sharing three of my favorite potato salad recipes. The first one is really simple, enhanced with fresh thyme leaves. Thyme pairs well with the potatoes. The second one uses some of my fresh basil in a pesto sauce that is tossed with the potatoes. Who says pesto is just for pasta? The third salad is the way I remember my Mom making potato salad. She never wrote down her recipe, but I think I got it right.
Just in Thyme Potato Salad
With my herb garden growing like crazy right now I thought this was the perfect dish to make. This salad can be served warm or cold and goes well with so many dishes. I find when I have leftovers, I’ll even brown it in a skillet and serve it like hash browns with eggs for breakfast.
2 lbs. boiling potatoes, cut into bite sized pieces*
½ c. olive oil
¼ c. red wine vinegar
1 T. fresh lemon juice
2 t. fresh thyme leaves
Salt and pepper to taste
Cook potatoes until tender. Drain and toss with the rest of the ingredients and serve right away or chill to serve later. Serves 6-8.
* You can really use any potato you like. I often bake the potatoes whole and then peel and cut up. Cook them any way you prefer.
Pesto Potato Salad
This salad always makes me think of a warm summer day. I think it’s because of the basil. During the summer, my driveway is lined with pots of basil. I cook with it almost every day. Pesto can be used in a lot of different dishes beyond pasta. Here I’ve paired it up with potatoes. The combination works great together. I always freeze extra basil so I can enjoy it year round.
2 lbs. Boiling potatoes, cut into bite sized pieces
1 c. basil leaves
3 T. pine nuts
3 T. olive oil
2 garlic cloves, minced
1/3 c. Parmesan cheese
Salt to taste
Cook potatoes until tender. Cool. In blender combine remaining ingredients, except 1 tablespoon of the pine nuts. Pour blended mixture over potatoes and sprinkle with the reserved nuts. Chill. Serves 6-8.
Mom’s Mustard Potato Salad
When I was a kid I did not like the taste of mustard- except in this recipe. It adds such a wonderful flavor.
4 lbs. potatoes- I used Klondike Rose and I did not peel them
4 hard cooked eggs, peeled and chopped
1 sweet pepper, seeded and chopped, optional
1 c. mayo- maybe a little less
1/4 c. prepared mustard- I like a grainy brown mustard
salt and pepper to taste
dash of hot sauce
Bake whole potatoes until tender and allow to cool. Cube potatoes into large bowl and combine with remaining ingredients. Chill until ready to serve. Serves 8.

Pesto Potato Salad

Mustard Potato Salad
Honey-Pomegranate Glazed Ribs


I like my ribs to be tender, but still have a crispy exterior glaze. I decided to use a combination of moist and dry heat to get the result I wanted. I finished them off with a sauce made from pomegranate molasses and honey. They were really good.
While I prefer cooking ribs on the grill, you can cook them indoors with good results. Sometimes the weather isn’t right for cooking them outside. Sometimes, you realize too late, that you are out of charcoal. You might be forced to cook your ribs indoors.
Honey-Pomegranate Glazed Ribs
1 slab ribs, cut into 3-4 rib portions
salt and pepper
1 c. apple cider vinegar
2 T. soy sauce
1 T. hot sauce
1 t. garlic powder
1 t. smoked paprika
Glaze:
3/4 c. pomegranate molasses*
1/2 c. honey- or more to taste
1 T. hot sauce, or more to taste
Place rib portions in a large pan and season with salt and pepper. Pour over the vinegar, soy sauce, hot sauce, garlic powder and smoked paprika. Cover and chill for a couple of hours. You could even do this the night before. Preheat oven to 425 degrees. Place rack in large baking dish. Pour 2 cups of water into the bottom of the pan. Place rib portions on the rack. Pour over the marinade. Season with salt and pepper then place in the oven and bake for 1 hour. Turn heat down to 400 degrees. Remove ribs from oven. Place ribs in a fresh baking pan. Combine glaze ingredients and brush all over the ribs. Return to oven and bake 20-30 minutes longer, or until glaze has gotten sticky and browned a little.
*Pomegranate molasses is available in some specialty stores, or you can make your own by boiling down pomegranate juice until it gets thickened.
Plum Glazed Wings

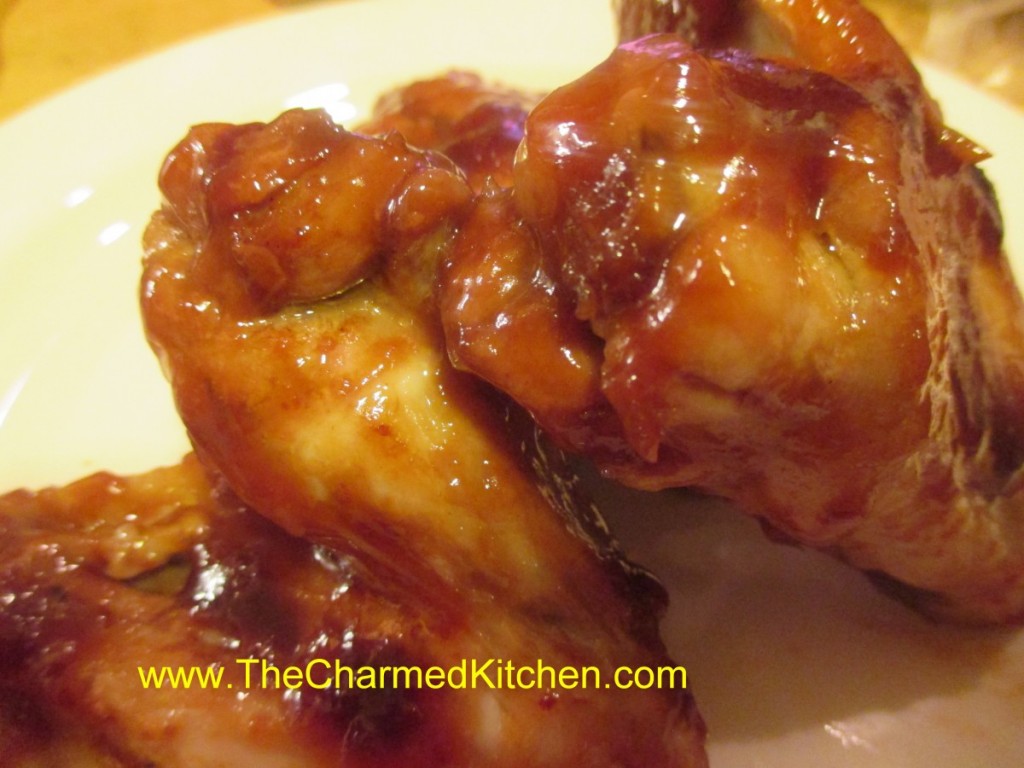
I love when local fruit is in season. I found myself with lovely red plums and I decided to use some of them to make a sauce for chicken wings. The sauce came out really nice. I started with onions, garlic and plum puree. I added more ingredients as I went until I felt the sauce had the flavor I was going for. This sauce/glaze would be great on pork or duck, too.
I pan fried my wings, but they could be grilled and basted with the sauce instead, or baked in the oven.
Plum Sauce/Glaze
2 T. oil, butter or bacon fat
1 medium onion, minced
2-3 cloves garlic, minced
1 c. plum puree made from about 1 lb. of plums
¼ c. cider vinegar
2 T. honey
1 T. hot sauce
1 t. fresh grated ginger
Salt to taste
I started by peeling the plums. You could leave the skins on, if you like, but I prefer them off. I put the plums in boiling water for a minute and then in cold water. The skins came right off. I removed the pits and pureed the plums- I ended up with a cup of fresh plum puree. Saute onion in a little oil- you could use butter or even bacon fat. Add garlic once the onions are tender. After that, add the plum puree and the rest of the ingredients. Let it cook for about 10 minutes to thicken and give it a taste. I decided to smooth the sauce out in the blender but it would be fine to leave it chunky. Makes about 1 1/2 cups.
To cook the wings I just pan-fried them. I had just over a pound of wings. I cooked them in a skillet, covered for about 20 minutes, turning a couple of times. I poured the sauce over them and turned the heat down to medium. I let them cook, covered, another 10 or 15 minutes. Once I was sure the wings were cooked through, I uncovered them and let the sauce cook down and thicken a little. It created a nice glaze on the wings. Easy and very tasty. I could also see baking or grilling the wings and just tossing them in the sauce at the end.
I ended up pureeing more plums and tossed them in the freezer so I can make this sauce again when the weather is chilly and no fresh plums are around.


