Strawberry Shortcake Trifle

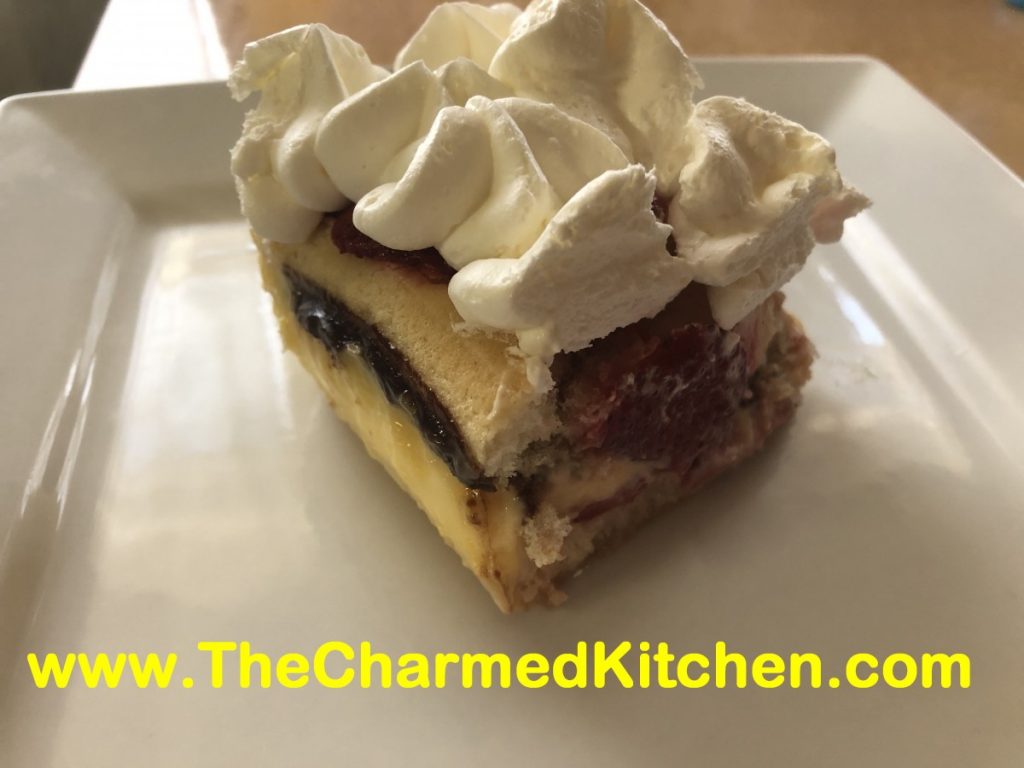
I am not sure why I never combined ladyfingers with strawberries before. Using them together in this dish made a wonderful dessert- that was also very easy. It was something between a trifle and a shortcake so I called it both!
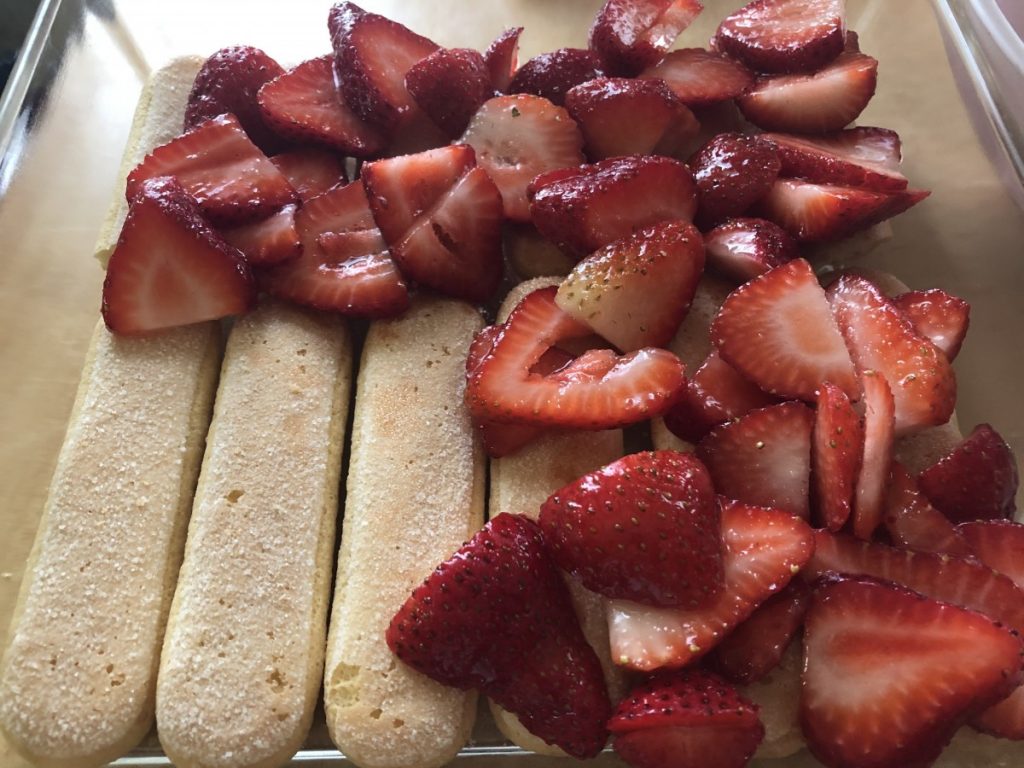
I want to just say something about ladyfingers. There are two types I see in stores around here, soft or crisp. The soft ones are smaller and cake-like and found in bakeries in grocery stores. Like sponge cake. The other ladyfingers are crisp and larger. I find the crispy type at Italian stores and sometimes at specialty grocery stores. The ladyfingers you want for this recipe are the larger, crisp ladyfingers.
I was happy with how it came out. The ladyfingers were soft, not mushy. They actually were kind of fluffy. The flavors blended so nicely. Great summer dessert. Light and refreshing, but a little rich, too. I made vanilla pudding, but make life easier and just use store bought or instant from a box- if you prefer.
Here is the recipe. Enjoy!!
Strawberry Shortcake Trifle
1½ – 2 pounds strawberries, washed, stemmed and sliced
½ c. sugar
24 ladyfingers
1 recipe vanilla pudding- recipe follows
¾ c. Hazelnut chocolate spread
Whipped cream or whipped topping
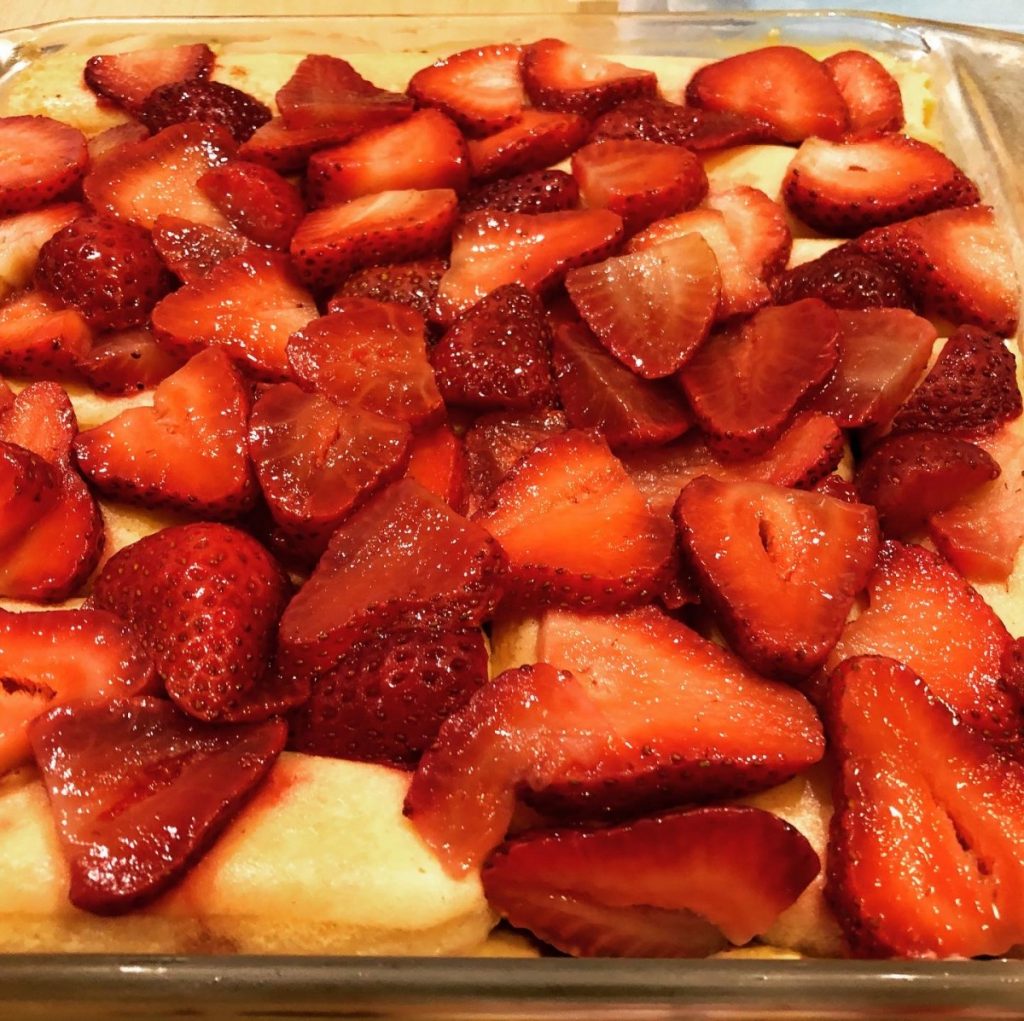
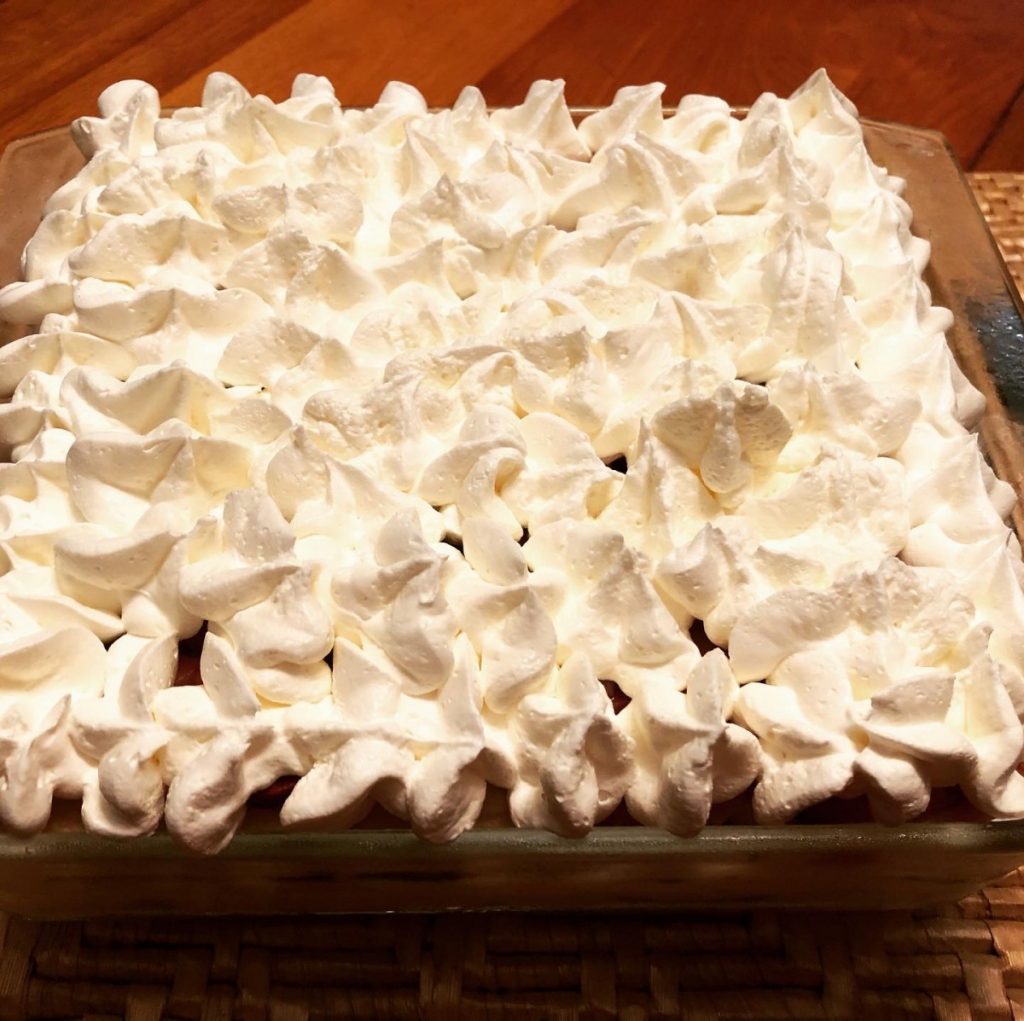
Combine strawberries with the sugar and set aside. Make the pudding, if you haven’t already. You can use premade pudding. You’ll need 2-3 cups of pudding. I had some leftover from the recipe I made. In a 9×9-inch baking dish, place one layer of the cookies. You might have to trim them a little to fit. I had 2 rows of 6 cookies, but I had to break off a little for the second row to fit. Spoon over half of the strawberries, with some of the liquid in the bowl. Spread a layer of pudding over the berries. For the next layer, spread some of the hazelnut spread over each lady finger before putting it in the pan. When you put them in the pan, place them with the spread on the under side. Add another layer of the pudding, then top with the rest of the strawberries. Cover and place in fridge until ready to serve. You can do all this up to 2 days ahead. Before serving, remove cover and top with whipped cream or any whipped topping you like. Serves 6-8.
Vanilla Pudding
1 c. sugar
½ c. cornstarch
½ t. salt
3 ¾ c. half and half
1 T. vanilla- or a little more
2 T. butter
Combine dry ingredients in a medium saucepan. Whisk in half and half and vanilla until well mixed. Heat over medium heat, stirring constantly, until mixture starts to bubble and get thickened. Mixture will get pretty thick. Turn down heat to keep it from scorching. As soon as pudding is thickened, remove from the heat and stir in the butter until melted. Place pudding in a bowl, cover with plastic wrap and chill until ready to use. Makes about 4 cups.
Lemon Curd Ice Cream

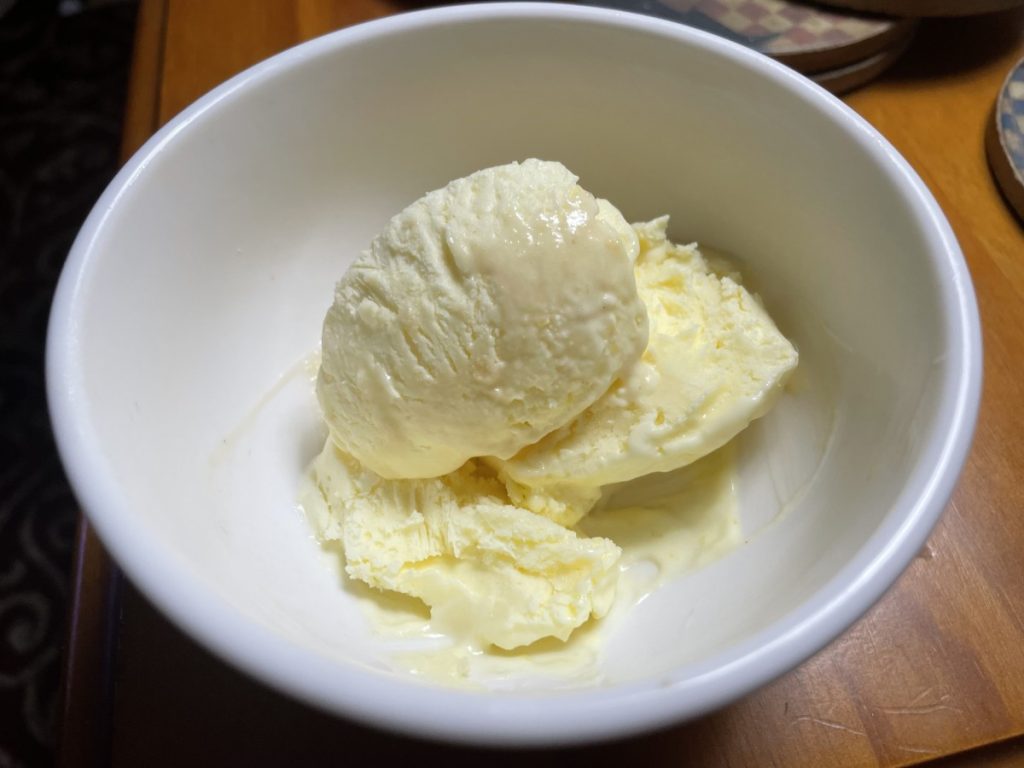
This is one of the easiest ice creams to make. You don’t need an ice cream machine to make it and there are only three ingredients, if you count the lemon curd as one ingredient. I did make my own lemon curd- recipe follows, but you can just use a jar of store bought. It has the nicest flavor and texture.
This ice cream came about because I had made lemon curd for a party and had some left over. I also had whipping cream that needed to be used up. I combined the two and it was even better than I thought. Two friends have tried it so far and both really liked it.
Here is the recipe.
Lemon Curd Ice Cream
1-1 1/2 cups heavy whipping cream
2 cups lemon curd
1/2 c. powdered sugar
In a medium mixing bowl, whip the cream until soft peaks form. Beat in the lemon curd and sugar and place in a freezer container and freeze until ready to eat. Makes about a quart. I told you it was simple!!!
Lemon Curd
1/2 c. lemon juice
zest from one good sized lemon- you should have 2-3 teaspoons
1/2 c. sugar
3 eggs
6 T. unsalted butter- cut into little cubes
In medium saucepan, combine all ingredients. Whisk the mixture until the eggs are well blended. Cook over medium low heat, whisking often, until the mixture thickens. This will take 5-7 minutes. Whisk more often as mixtures warms and starts to thicken. Better to heat over lower heat and take longer than cook over too high a heat. You don’t want the eggs to scramble. Once the mixture is thickened , transfer to a bowl or jar. Cover the surface with a piece of plastic wrap to keep the surface from developing a skin- like any pudding will do. Chill until ready to use. Makes about 2 cups. Will keep in fridge a week or two.
Vanilla Cupcakes with White Chocolate Frosting

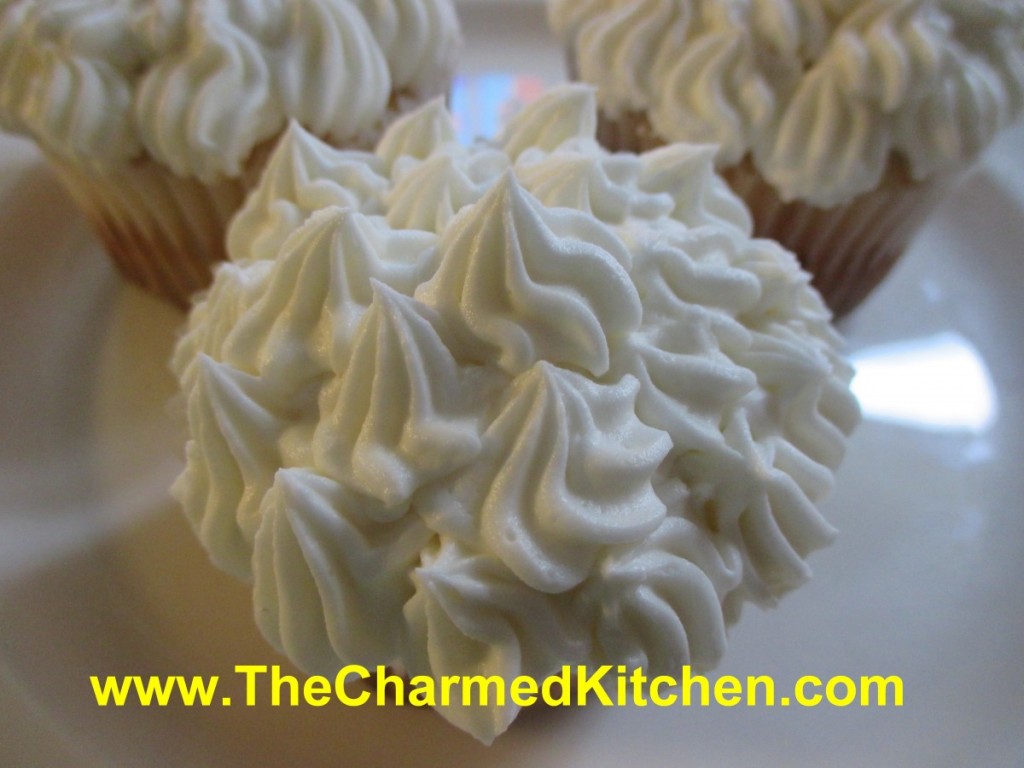
I must admit to being a sucker for the classics. This cupcake is certainly a classic. I made these the first time several years ago when two dear friends were getting married. I offered to make a dessert for the party after and Jon requested white cupcakes with white frosting. I agreed that these are perfect for any reception.
I normally top them with a vanilla buttercream, but decided to make a white chocolate frosting instead. Yes, I know white “chocolate” is not really chocolate. But when I say white chocolate, everyone knows what I am talking about.
I used a white chocolate bar- and broke it into pieces, before melting, but you could you use white chocolate chips instead. The frosting has a really nice flavor and fluffy texture, without being too sweet. Jon and Jim loved them, as did their guests.
So here is the recipe.
Classic White (Vanilla) Cupcakes
1 cup sugar
1/2 cup butter
2 eggs
2 teaspoons vanilla extract
1 1/2 cups all-purpose flour
1 3/4 teaspoons baking powder
1/2 cup milk
Preheat oven to 350 degrees. Line a muffin pan with 12paper liners. In a medium bowl, cream together the sugar and butter. Beat in the eggs, one at a time, then stir in the vanilla. Combine flour and baking powder, add to the creamed mixture and mix well. Finally stir in the milk until batter is smooth. Pour or spoon batter into the prepared pan. Bake 20 to 25 minutes. Cupcakes are done when they springs back to the touch. Makes 12.
White Chocolate Frosting
6 oz. white chocolate – if using bars, chop before melting
1 stick (4 oz.) cold butter, cut into cubes
1-2 c. powdered sugar
1 t. vanilla
Melt chocolate. I just melt mine in a microwave safe dish, but you can use a double boiler. Let chocolate cool down a little. Beat butter into the melted chocolate. Beat until smooth and then beat in the powdered sugar and vanilla. Whip until frosting is smooth and fluffy. I normally beat for 5 minutes or longer. If too thick, add a few drops of water or milk.
This post in dedicated to my dear friend Jon. Love you bunches.
Mom’s Macaroni Salad

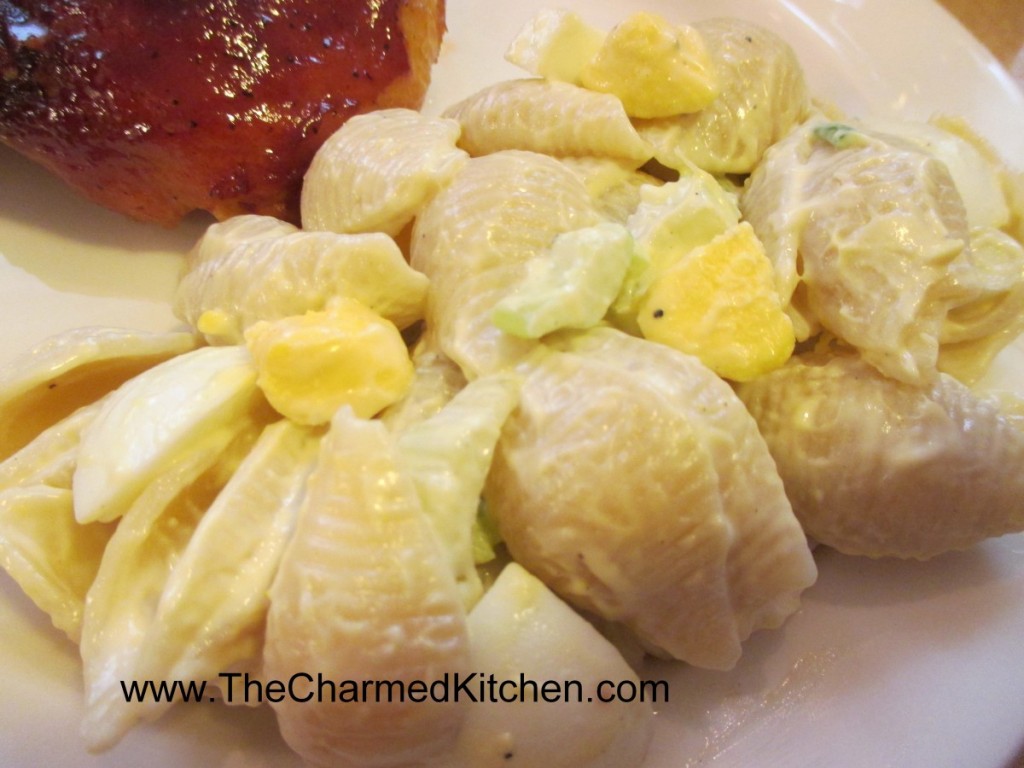
I’ve been in a nostalgic mood this week. Remembering, fondly, the picnics and cookouts from my childhood. For summer cookouts, we always had this salad. Long enough ago that it was called macaroni salad, not pasta salad. I loved it then, and I love it now.
I won’t say I don’t make other pasta salads. I do. I make all sorts of combinations, but this is the salad that brings me home.
Mom used mostly mayo, with a little salad dressing like Spin Blend. She felt it gave the salad just a little more zing. I use straight mayo, but that part of the recipe is flexible.
She added quite a few hard cooked eggs and I think they add a richness to the dish. My dad would cut up the celery and green onions for her. Mom liked the veggies cut into a fairly small dice in this dish, and Dad had great knife skills. I love the image of them cooking together.
So here it is- a family recipe wrapped up nicely with some memories, too.
Mom’s Macaroni Salad
1 lb. uncooked pasta, shells are preferred
Salt and pepper
Mayonnaise, about 11/2 cups
3-4 ribs celery, sliced thin
4-5 green onions, trimmed and sliced thin
8-12 hard-cooked eggs, cooled and peeled
Cook pasta according to package directions, but do not overcook. Rinse with cold water and drain well. Place drained pasta in a large bowl and sprinkle with salt and pepper to taste. Add mayo and vegetables and stir until well mixed. You may want to add more dressing to suit your taste. Chop eggs and stir into salad. Adjust seasonings if needed and chill before serving. Serves 8-10.
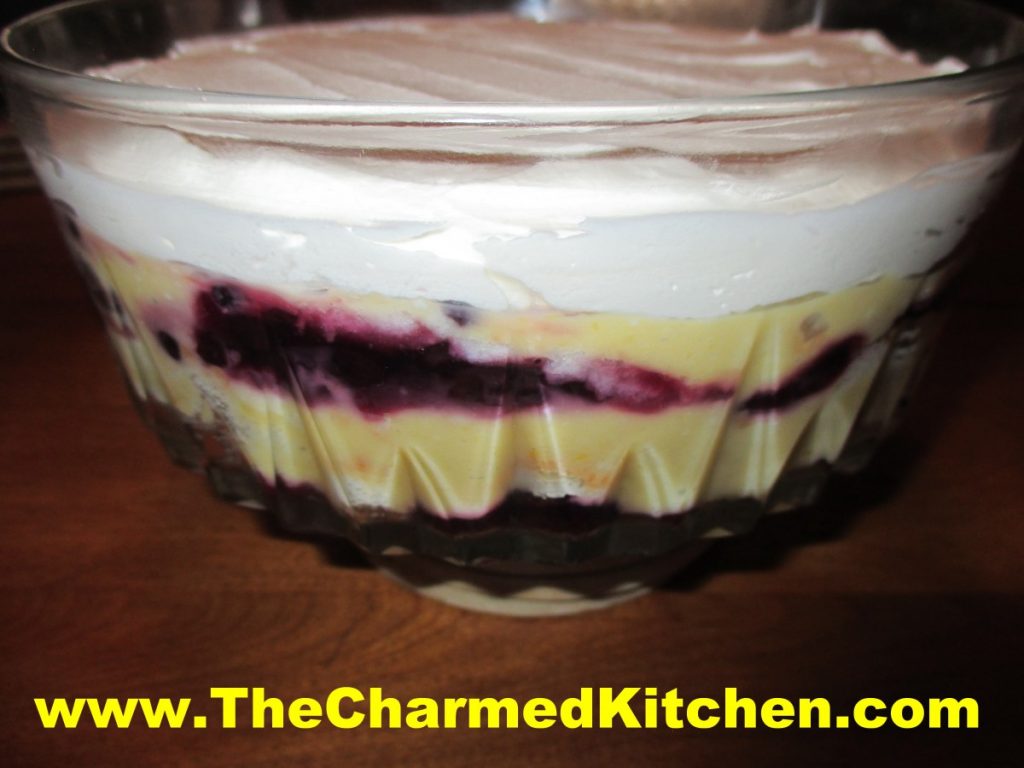
Blueberry Lemon Trifle

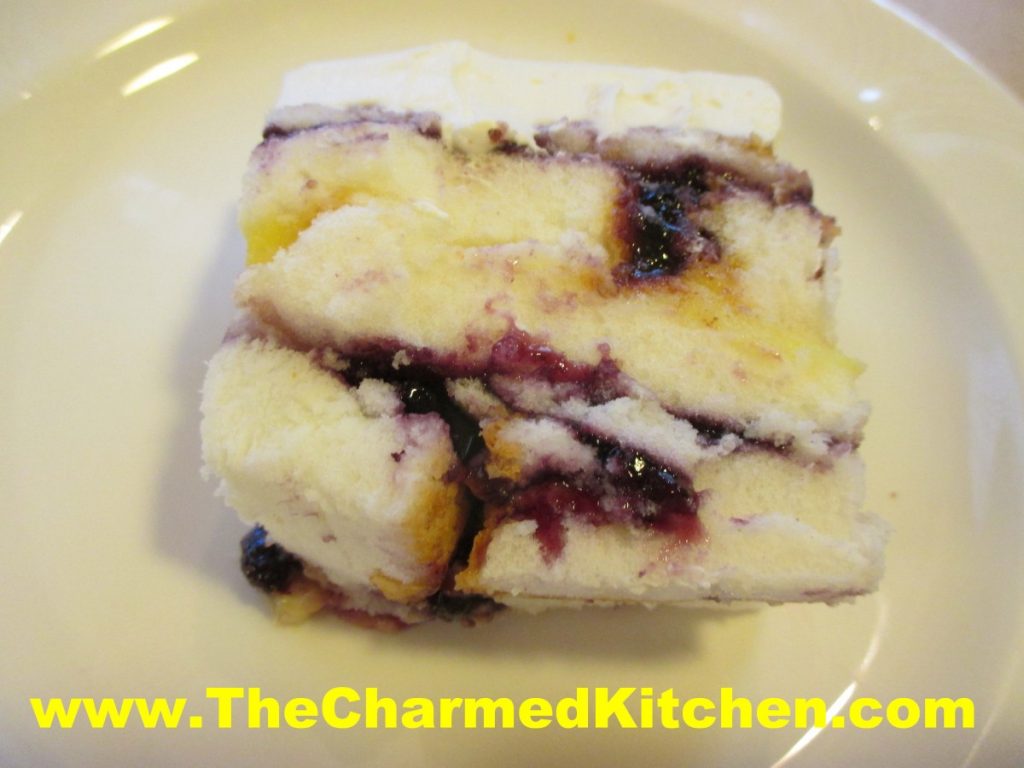
Trifle is one of those desserts that can be whatever you want it to be. The basics of a traditional trifle are sponge cake, layered with some sort of pudding or custard and fruit. The cake is sometimes soaked in sherry or some other alcohol. Trifles are often topped with whipped cream.
This trifle combines angel food cake with blueberry pie filling and lemon curd. I love the combination of flavors.
Once you have all the ingredients, the trifle is simple to assemble. Pick a nice, glass bowl, so you can see the layers in the trifle. It is best to put your trifle together a bit in advance, so the cake can soak up some of the moisture from the berries and the lemon curd. It also helps the trifle to stay together. You can actually slice the trifle to serve it.
So here is the recipe. I made the pie filling and the lemon curd, but you can use store bought, to save time.
Blueberry Lemon Trifle
1 angel food cake, sliced thin
2 c. blueberry pie filling- homemade or store bought- recipe follows
2 c. lemon curd- recipe follows
1 c. whipping cream
1/4 c. powdered sugar
Place a layer of cake slices in the bottom of the bowl. Spread half of the blueberry mixture on top of the cake. Place another layer of cake slices on top of the blueberry layer and press down a little to even it out. Cut cake pieces to fit as best you can. Add half of the lemon curd and top with more cake. Repeat the process one more time. Don’t worry if something isn’t perfect in the layers- that is kind of the charm of a trifle. Just be sure to get all the ingredients in the bowl. Cover and chill the trifle. When ready to serve beat the whipping cream and powdered sugar together until stiff peaks form and spread over the trifle. You can do this part ahead of time, if you prefer, Just keep trifle, covered, in the fridge, until ready to serve. Serves 6-8.
Blueberry Pie Filling
3 1/2 c. blueberries
3/4 c. sugar, or to taste
1/4 c. Clear Gel* or cornstarch
1 c. water
1 T. lemon juice
In saucepan, bring blueberries and sugar to a boil, stirring often. Combine clear gel with water and lemon juice and add to the blueberry mixture. Return to the boil and cook until thickened and bubbly. Makes 4 cups. You won’t need the whole batch for the trifle.
*Clear gel is a modified cornstarch. It is used in commercial pie fillings and in homemade pie fillings, as well. Unlike regular cornstarch, Clear Gel retains it’s thickness, even if you reheat it. You can find it online or in some specialty food stores.
Lemon Curd
1/2 c. lemon juice
zest from one good sized lemon- you should have 2-3 teaspoons
1/2 c. sugar
3 eggs
6 T. unsalted butter- cut into little cubes
In medium saucepan combine all ingredients. Whisk the mixture until the eggs are well blended. Cook over medium low heat, whisking often, until the mixture thickens. This will take 5-7 minutes. Whisk more often as mixtures warms and starts to thicken. Better to heat over lower heat and take longer than over too high a heat. You don’t want the eggs to scramble. Once the mixture is thickened , transfer to a bowl or jar. Cover the surface with a piece of plastic wrap to keep the surface from developing a skin- like any pudding will do. Chill until ready to use. Makes about 2 cups. Will keep in fridge a week or two.
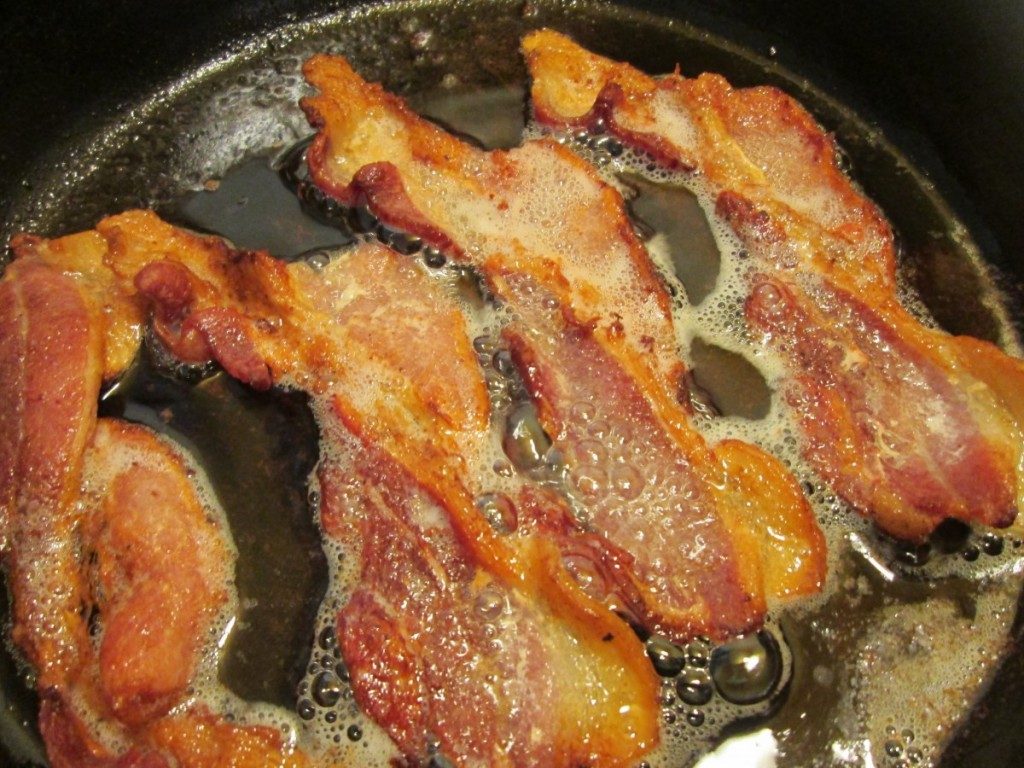
Breakfast Memories with Dad

One of my favorite memories of my Dad, involved a very special breakfast. It was a breakfast only he and I shared.
Every summer, there was a park we would go to for family picnics. It was called Pine Way Trails. It has long ago been sold and the land developed.
The place would get very crowded, so we had to go early to get a prime location by the lake, and enough picnic tables for everyone. My Dad and I would go before anyone else.
Back then, it made me feel so special to go and to help. I am guessing it was because I was the baby, and no one else wanted to get up so early.
Dad and I would get there just as Pine Way Trails opened. The mist would still be rising off the lake. I’d help him unpack the car and place stuff on the tables we were claiming for the day. We would move them together and make sure they were level. Dad didn’t want wobbly tables.
Then, he’d get a fire started in one of the grills. He always brought his cast iron skillet. Over the fire, he’d cook us bacon and then cook a couple of eggs. Dad had his thermos of coffee, and I had orange juice.
On paper plates we’d sit and enjoy our breakfast together. I don’t think, as a kid, I really appreciated the skill it took to get that fire just right. The bacon was crisp, but never burnt and the eggs would be sunny side up- with the yolks warm, yet runny. I’d use my bacon to get the last of the yolk off my plate.
Later in the day, everyone else would arrive. My mom, sister and brother, aunts, uncles, cousins, friends. We’d have a wonderful day together swimming and fishing and eating grilled hot dogs and hamburgers, chicken and salads and fresh melon. It was noisy and so much fun.
That special part of the day for me, was the breakfast my Father and I shared, quietly by the lake.
I got out the cast iron skillet this morning- cooked some bacon and eggs and thought of him.
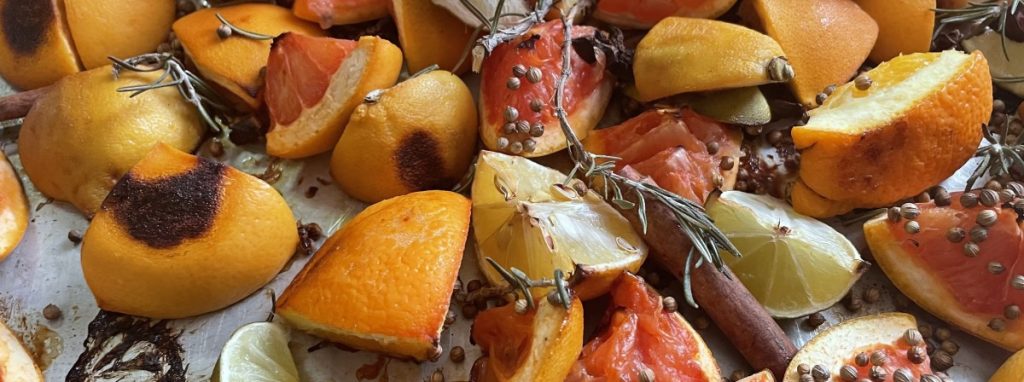
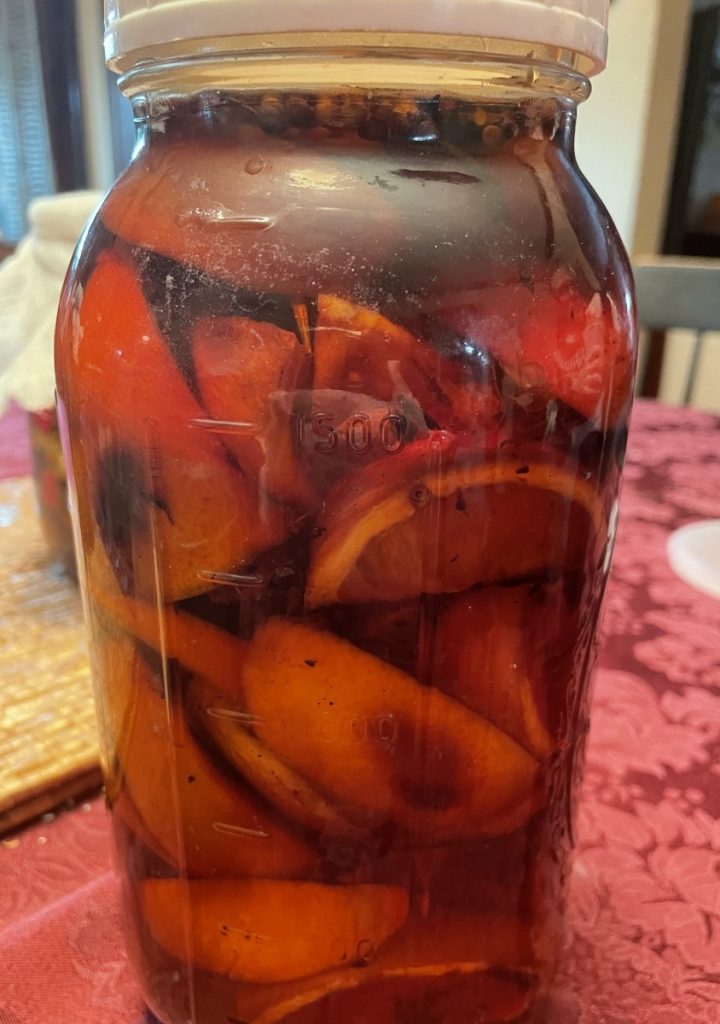
Homemade Chinotto Syrup


I will admit that I didn’t know what chinotto was until a friend sent me the recipe. Thanks, Joe. Now I love it and I usually have a jar of it in the fridge. Inspired by a citrus fruit of the same name, it is a syrup made from assorted citrus fruits and spices that are roasted, sweetened, and later strained out. The chinotto is then used to flavor and sweeten other beverages. It is often just added to soda water, but it can be used in all sorts of cocktails, too. The flavor is complex and fun to play around with in different drinks.
So here is how I make it- based on several recipes I found on-line, several batches and the final way that I make it now.
Chinotto
A good range of citrus – I used three or 4 grapefruit, oranges, lemons and limes
4-5 sprigs of fresh rosemary
1 T. black pepper corns
3-4 whole cloves
3-4 T. Coriander seeds
2-3 Cinnamon sticks
5-6 star anise
Sugar syrup- recipe follows
Cut the citrus up in equal size and lay on a large baking tray and sprinkle them equally with the herbs and spices. Pop into a 300 degree oven and roast slowly until blackened. The blackening of the citrus causes the flavors to really pop. Once blackened, take out of the oven and cool down. When cool enough to handle, spoon into a large jar that has a lid. Pour in enough sugar syrup to completely cover the fruit and spices. You should have about an equal amount- if it’s a quart of fruit and spices, then a quart of sugar syrup. Once you have filled the jar and the fruit is covered, put on the lid and refrigerate for up to a month. The longer you refrigerate the “spicier” it becomes. Strain out the solids and return to the fridge. Add a good drizzle to soda and a slice of citrus fruit and drink!
Simple sugar syrup
Combine equal parts of sugar and water and stir until sugar dissolves. For a recipe of chinotto, I used about 3 cups of water and sugar. You can always make a little more if it isn’t enough to cover the fruit.
Frozen Chocolate Malted Cheesecake

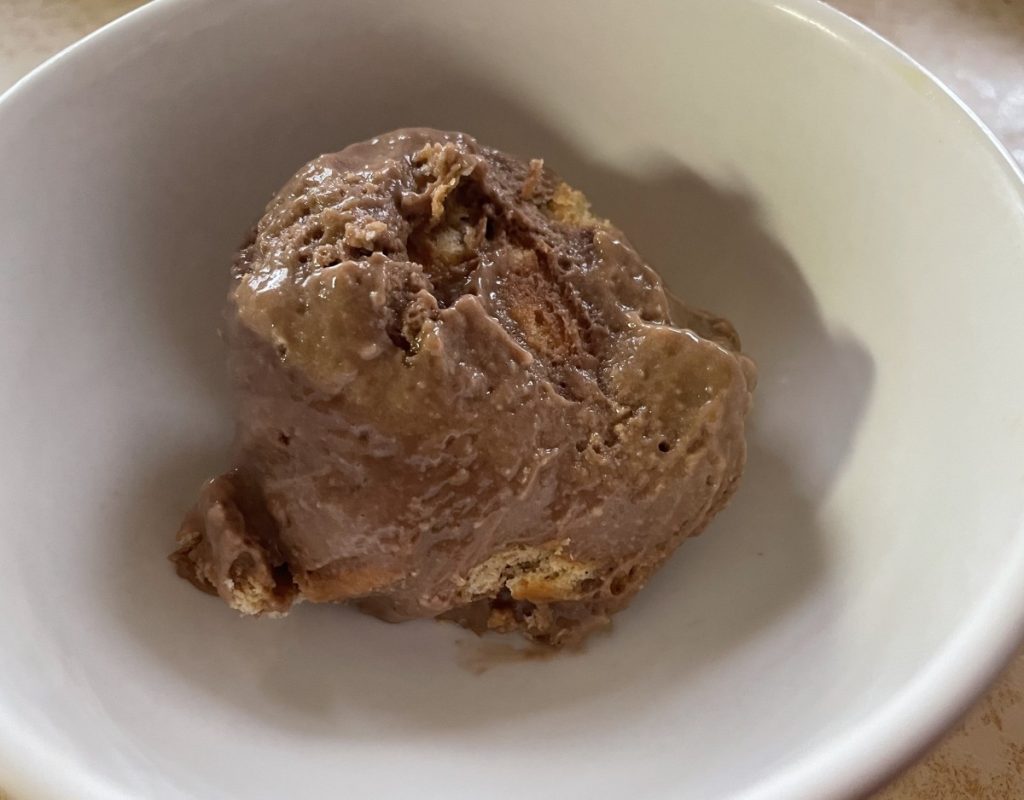
Here is yet another variation on that frozen dessert recipe I have been playing around with. This is the recipe with cottage cheese as the base and any number of add-ins for different versions. I have already made a cherry- strawberry “cheesecake” and a lemon curd one, too.
This chocolate one came out very nice. I might experiment with adding other flavors later or maybe freezing it in Popsicle molds.
Another idea is to pour the mixture in a graham cracker pie crust, rather than crumbling the crackers in the dessert. I could see that working nicely. Maybe even put graham cracker crust in muffin tins…..
They are so simple to make and require just a food processor to blend the ingredients together. No ice cream machine is needed. I called them cheesecakes because that is what they reminded me of.
You can “fatten” them up a little by adding 1/2 cup of whipping cream, but they are nice and creamy without. I also used sugar to sweeten so far, but you could use any sweetener you prefer. So here is the recipe for my latest version of what might be my favorite frozen dessert this summer.
Frozen Chocolate Malted Cheesecake
1 (28 oz.) carton of cottage cheese
¾ c. chocolate syrup
¾ c. malted milk powder
Sugar to taste, I used about ½ cup
1 T. vanilla extract
5-9 graham crackers, crumbled depending on your preference
Combine first 5 ingredients in a food processor or blender until very smooth. Taste to see if you want to add more sugar. Pour into a 2 quart bowl and stir in the crushed crackers. Place mixture in a freezer safe container that has a lid. Affix the lid and freeze. Makes 5-6 cups.
Note: I could see a lot of possible variations for this recipe. I used cinnamon graham crackers, but it might be fun to use chocolate graham crackers or crushed up chocolate sandwich cookies. You could add some instant coffee powder or mint extract. Perhaps some chopped chocolate. Have some fun with this recipe.
Strawberry Ice Cream Cake Roll

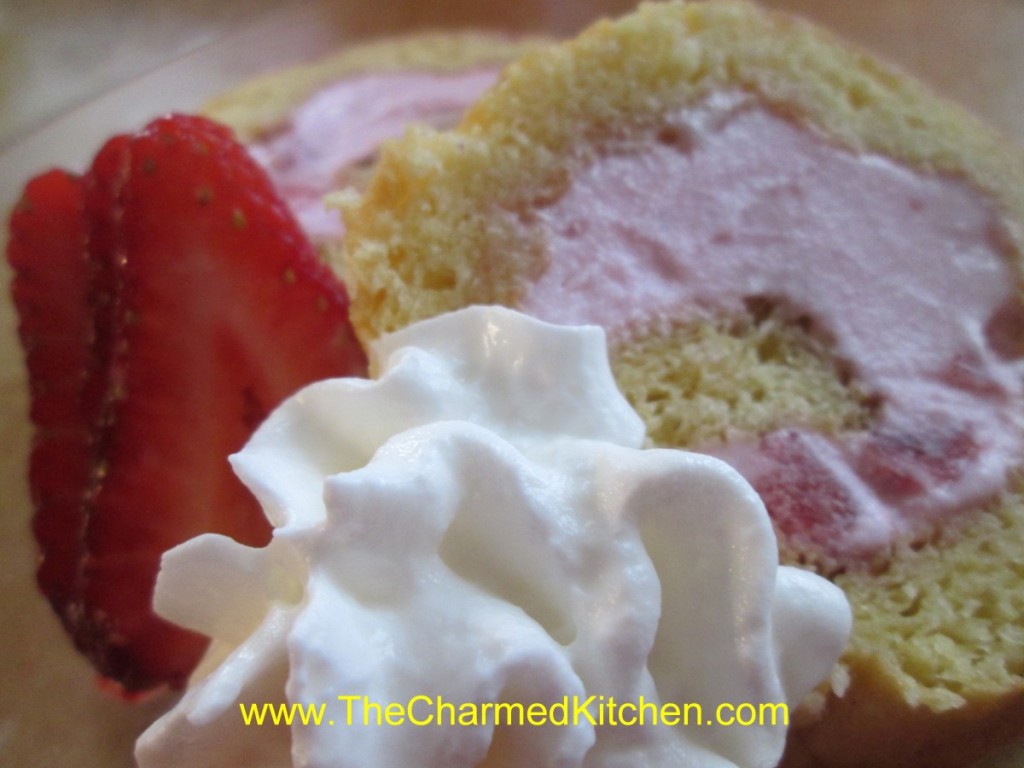
This is the perfect summer dessert. Fresh berries, a light, citrus-scented cake and ice cream. What more could you want?
When you say cake roll, I think a lot of people first think of a pumpkin roll or perhaps a Buche de Noel (yule log). There are so many more desserts you can make with them. Cake rolls can be made in many flavors and they can be filled with custard, frosting, fruit, ice cream and more.
For this sponge cake roll, I used homemade strawberry ice cream to fill it, recipe follows. You could use store bought ice cream, if you prefer.
Start with the sponge cake roll recipe below, and use whatever flavor ice cream you like. You’ll need about a quart of ice cream- or a little more.
Once finished, you just wrap it up and pop the cake in the freezer until needed. Great to have on hand for summer parties and cook outs. Perhaps a nice dessert for Father’s Day? You can decorate with fresh berries when serving. Blueberries would make this a fun red, white and blue dessert for Memorial Day or the 4th of July.
Sponge Cake Roll
This sponge cake roll can be filled with whipped cream or ice cream, or use your favorite filling.
5 eggs, separated
2/3 cup granulated sugar
1 teaspoon lemon juice
1/2 teaspoon finely grated lemon zest
2/3 cup cake flour*
1/4 teaspoon salt
1 teaspoon baking soda
3 tablespoons melted butter
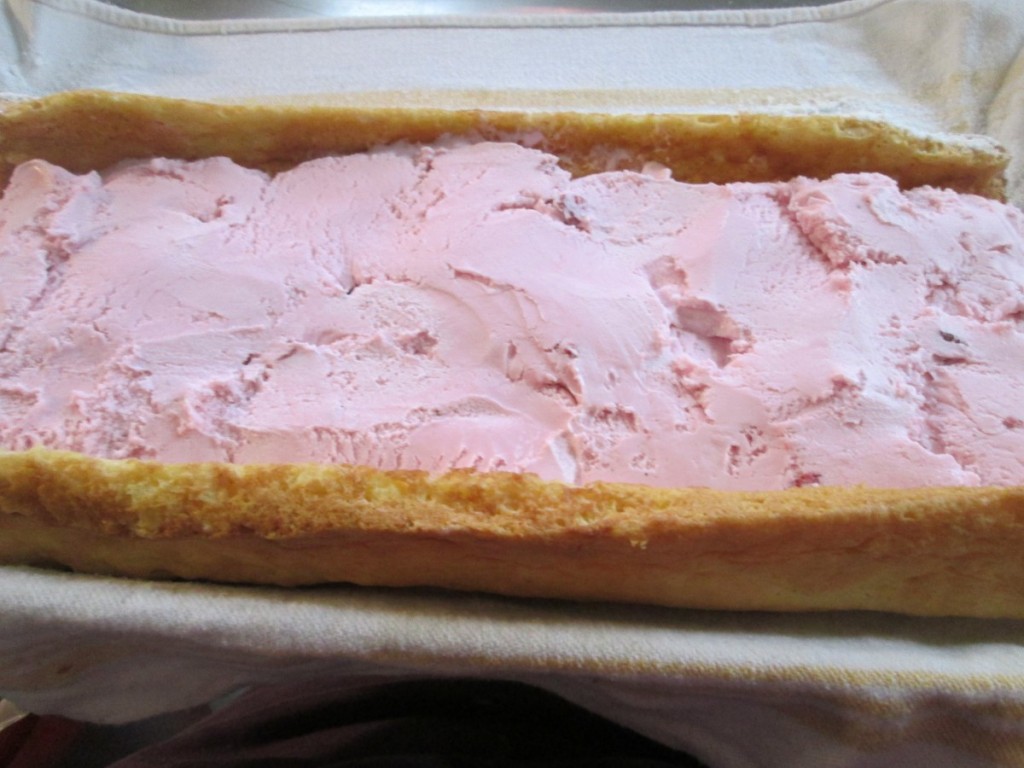
Beat egg yolks until thicken and lemon colored; gradually add 1/3 cup of the granulated sugar, the lemon juice and the lemon zest. Beat egg whites until almost stiff then gradually beat in the remaining 1/3 cup sugar. Beat until stiff peaks form. Fold yolk mixture into whites. Sift dry ingredients into a separate container; add to egg mixture, folding in carefully. Fold in melted butter. Pour batter into waxed paper-lined 10x15x1-inch jelly roll pan. Bake at 375° for 12 minutes. Sprinkle with confectioners’ sugar. Turn onto a clean kitchen towel which has been generously dusted with confectioners’ sugar. Trim edges, if necessary; roll cake up, towel and all, while still warm. Let cool completely. Unroll and fill with whipped cream or ice cream then re-roll cake. The trick is to let the ice cream soften up a few minutes before spreading it on the cake. But don’t wait too long. Rather than trying to let the ice cream get soft enough to spread I used a spatula to sort of cut slices of ice cream and place them on the cake. Store ice cream cake roll in freezer until ready to slice and serve.
*If you don’t have cake flour you can make your own. Measure out a cup of all purpose flour, remove 2 tablespoons of flour and replace them with 2 tablespoons of cornstarch. For larger amounts place 7 cups of flour in a bowl and combine with 1 cup of cornstarch. Mix well or even sift together. Store in an airtight container.
Strawberry Ice Cream
2 c. chopped strawberries
1 c. sugar
1 T. vanilla
2 c. cream or half and half or a combination. You can also use some milk or even almond or rice milk.
Additional sugar to taste
Place strawberries, vanilla and sugar in saucepan and bring to a simmer, stirring occasionally. Remove from heat and chill. Combine chilled berry mixture with cream. Add additional sugar if you like. Remember that once it is frozen the ice cream will not taste as sweet so make this mixture a little sweeter than you want the final product to be. How much sugar you add varies with personal taste, and how sweet the berries are. Place in an ice cream maker and process according to manufacturer’s directions. Once finished put in an air- tight container and place in freezer. Makes about 1 quart.
Frozen Lemon Cheesecake

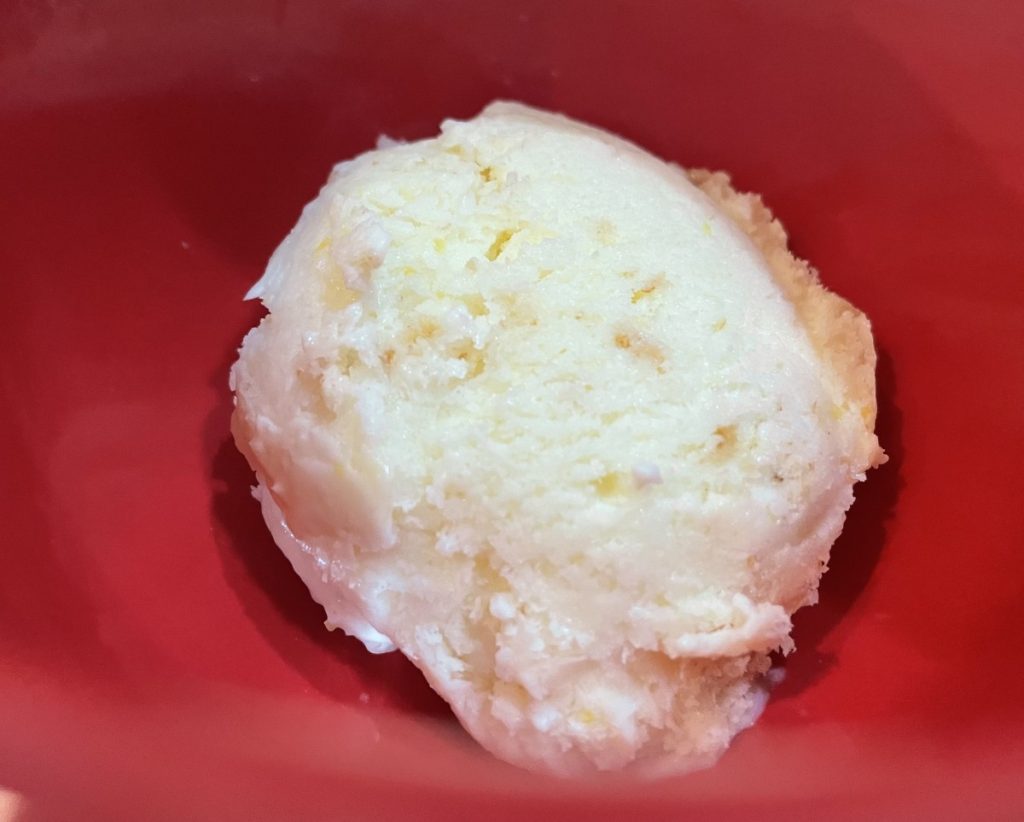
This is a great summertime dessert. It is refreshing and very easy to make. No special equipment, other than a blender or food processor. No ice cream maker required. The result is sweet and creamy with just enough lemony tang.
Not too long ago I posted a recipe using cottage cheese to make a frozen dessert. I couldn’t call it ice cream, so I called it a frozen cheesecake. It kind of reminded me of cheesecake. The first was made with cherries and strawberries, but I wanted to try new variations. I have also made it with blackberry jam and another version with chocolate syrup and malted milk powder. Those recipes will be posted soon.
This is my lemon cheesecake version. It is a combination of cottage cheese and lemon curd, with a few other ingredients. Crumbled graham crackers are stirred in before freezing. It may be my favorite variation so far. I used homemade lemon curd, but you could use a jar of store bought. The recipe for the lemon curd is below the cheesecake recipe.
So here is the recipe.
Frozen Lemon Cheesecake
1 (28 oz.) carton of cottage cheese
Sugar to taste, I used about ½ cup
1 recipe lemon curd- recipe follows, or 2 cups store bought lemon curd
2-4 T. lemon juice
1 T. vanilla extract
6-9 graham crackers, crumbled
Combine first 5 ingredients in a food processor or blender until very smooth. Taste to see if you want to add more sugar or lemon juice. Pour into a 2 quart bowl and stir in the crushed crackers. Place mixture in a freezer safe container that has a lid. Affix the lid and freeze. Makes 5-6 cups.
Lemon Curd
1/2 c. lemon juice
zest from one good sized lemon- you should have 2-3 teaspoons
1/2 c. sugar
3 eggs
6 T. unsalted butter- cut into little cubes
In medium saucepan, combine all ingredients. Whisk the mixture until the eggs are well blended. Cook over medium low heat, whisking often, until the mixture thickens. This will take 5-7 minutes. Whisk more often as mixtures warms and starts to thicken. Better to heat over lower heat and take longer than cook over too high a heat. You don’t want the eggs to scramble. Once the mixture is thickened , transfer to a bowl or jar. Cover the surface with a piece of plastic wrap to keep the surface from developing a skin- like any pudding will do. Chill until ready to use. Makes about 2 cups. Will keep in fridge a week or two.


