Garlic Scapes Hummus


Around here, garlic scapes are in season. I am lucky to have a dear friend who shared some with me- thanks Courtney!! I find myself cooking with them in everything I can. Everyone seems to be talking about scapes and looking for new ways to use them. There is even a word for it – scorpacciata.
Scorpacciata is an Italian word that means consuming large amounts of a particular local ingredient while it’s in season.
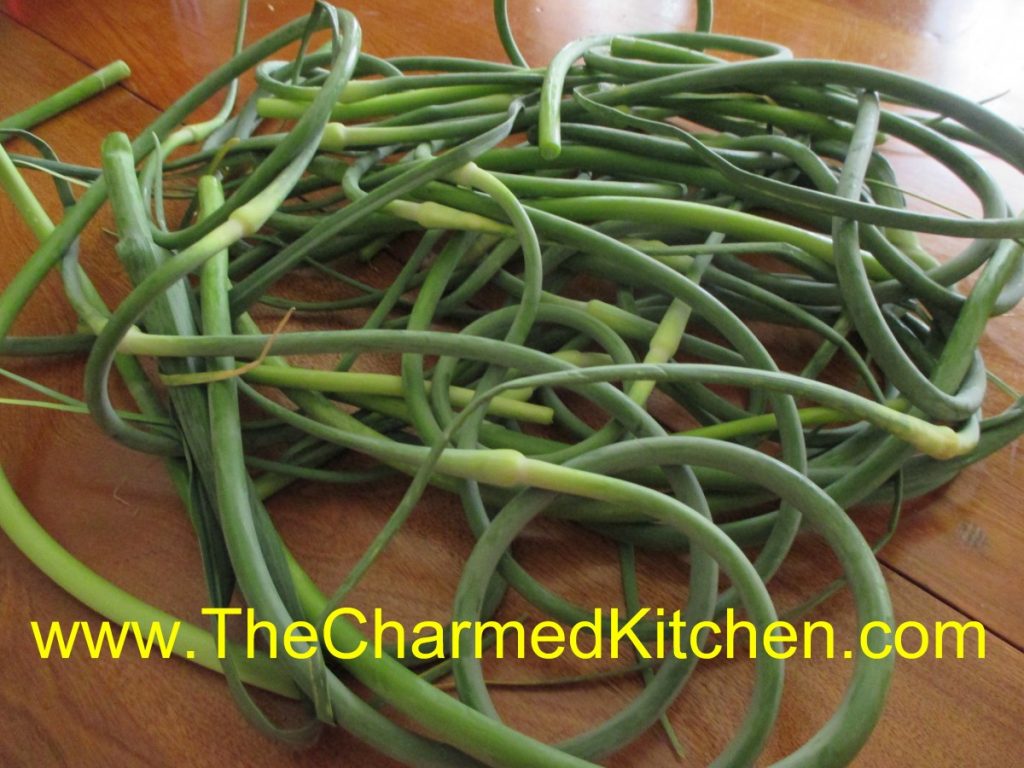
Scapes, if you didn’t know, are the tops of hard-neck variety garlic. They are cut off this time to year- to help the plants produce larger heads. They curl as they grow. You should be able to find them at your local farm market. They can be eaten raw or cooked. They can be a little woody when raw.
This time, I steamed the scapes, and added them to my hummus. The end result was really good. The scapes replaced the garlic cloves, adding their own personality to the dish. I switched the dish up a little more, by using avocado oil, instead of the traditional olive oil.
So here is one more recipe to use those lovely, seasonal garlic scapes.
Garlic Scapes Hummus
1 can garbanzo beans, drained- I used 2 cups of cooked garbanzos I had made from dried
½ c. chopped garlic scapes- 1 or 2 garlic scapes- steamed 5 minutes and chopped
¼ c. olive oil or avocado oil
2 T. lemon juice – about 1 lemon
2 T. tahini (sesame seed paste)
salt and hot pepper sauce to taste
Combine all ingredients in a blender or food processor until smooth. Adjust seasonings. Chill. Serve with pita bread, crackers or fresh vegetables. Also nice spread in a pita bread with sliced tomatoes, cucumbers and lettuce. Freezes well.
Cooking with Garlic Scapes

If you have never had garlic scapes, you don’t know what you are missing. Garlic scapes are the green shoots removed from hard-neck varieties of garlic. By removing the shoots, the bulbs will get bigger. So farmers and gardeners remove them. Garlic scapes curl as they grow, so they are easy to identify if you see some at your local farm market. They are showing up at farm markets around here right now.
Mine were a gift from a friend. Thanks, Courtney, for my scapes. Joe says thanks, too.
Garlic scapes are good served raw, or barely cooked. When cooked, the flavor mellows a lot. I love to steam garlic scapes for about 5 minutes, then just eat like fresh green beans, with butter and salt. I steamed a bunch of scapes- then chopped them up and added to potato salad. So tasty!! They can also be grilled! The slight charring gives them a wonderful smokey flavor.
They have a rich, garlic flavor that is all the sweeter because of the short time they are around. Enjoy them when you can- they will be gone soon. I sometimes use scapes in place of basil, in my pesto recipe, or combine them with parsley in a garlic scapes-parsley pesto. You can also combine the garlic scapes with cottage cheese in the blender- add a little lemon juice and hot sauce for a tasty dip. Here are some more recipes for cooking with garlic scapes.

Garlic Scapes Potato Salad
4-5 garlic scapes
2 lbs. red skinned potatoes*
½ cup minced sweet pepper
½ c. olive oil
½ c. apple cider vinegar
2 T. sugar
2 T. chopped parsley
2 t. fresh dill weed
Salt and pepper to taste
Hot sauce to taste
Steam the scapes for 5 minutes. Cool a little, and cut into ¾ -inch slices. You should end up with about 1½ of sliced scapes when done. Place in a medium bowl. Cook potatoes until tender. I baked mine in a microwave until tender and then cut into cubes. Baking them is also a nice way to cook the potatoes. You can also opt to cut into cubes first and boil the potatoes. Whatever method to cook the potatoes is fine with me. Take the potatoes, while still warm, and place in the bowl with the scapes. Mix the rest of the ingredients together in a small bowl and stir until sugar dissolves. Pour over warm potato mix, tossing to coat evenly. Adjust seasonings. Chill and serve. Serves 6-8.
* You can really use any potato you like.
Garlic Scapes Pesto Sauce
1 c. chopped scapes – you can also use half scapes, half parsley
1/4 c. olive oil
3-4 cloves garlic
Salt to taste
1/2 c. pine nuts, sunflower seeds, pecans or walnuts
1 c. fresh grated Parmesan cheese
Combine all ingredients, except the cheese, in a blender and mix until smooth. Stir in the cheese and toss over hot, cooked pasta or use as a sauce on meat and poultry. Sauce will keep a few days in the fridge and makes about 1 1/2 cups, enough for 1 lb. of cooked pasta.
Lebanese Garlic Sauce
1/2 c. chopped garlic scapes
1 cup lemon juice
1 teaspoon salt
2 cups olive oil
In the container of a blender, combine the garlic scapes, lemon juice and salt. Blend at medium speed until smooth. Continue blending while pouring olive oil into the blender in a thin stream. The mixture should become thick and white almost like mayo. Store refrigerated in a glass container. Nice on hot pasta, cooked rice or grains or brushed on meats while cooking. It also is a great salad dressing.
Garlic Scapes with Broccoli
1 c. chopped garlic scapes
1 1/2 teaspoons salt
1 bunch broccoli, cut into florets, steamed 5 minutes, cooled
1/3 cup olive oil
1/4 cup red wine vinegar
1 tablespoon Dijon mustard
1/2 cup grated Parmesan cheese, or to taste
Place garlic scapes in a food processor with the salt and blend into a paste. Add olive oil, vinegar, and mustard. Pulse until smooth. Place garlic scapes mixture in a bowl and add the broccoli. Stir to coat. Chill for 3 hours to marinate, stirring occasionally. Sprinkle with Parmesan cheese before serving. Tastes even better the next day!!!
Candied Bacon

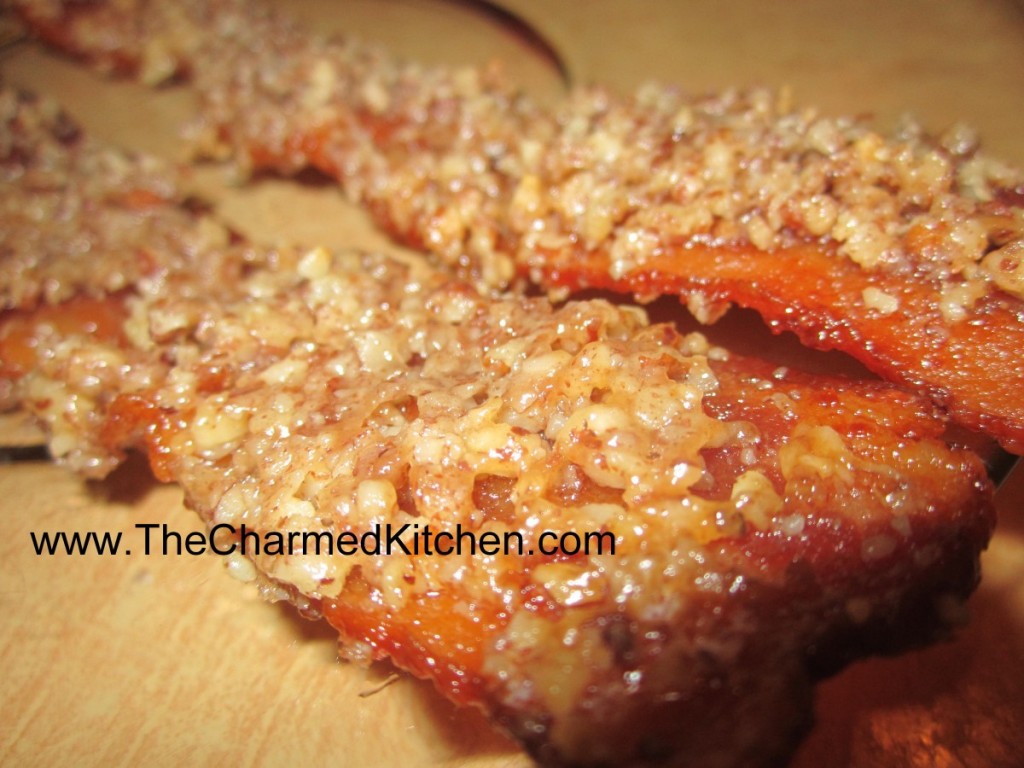
This candied bacon only has three ingredients- bacon, maple syrup and chopped nuts. The combination in sublime. Salty, sweet, smoky all in one crunchy bite. Friends and family love it!! Nice for dad on Father’s Day.
The bacon is baked, then coated with maple syrup and chopped nuts. It is returned to the oven, where it bakes until the bacon is crisp and the coating it toasted, almost caramelized. It gets crisper once it cools down.
You can make a spicier version by sprinkling with a little cayenne pepper or adding hot sauce to the maple syrup.
Candied Bacon
1 lb. bacon
3/4 c. – 1 c. maple syrup
3/4 c. – 1 c. crushed pecans (or any nuts you like! I like to leave some
larger pieces and then mix in some more finely ground)
Preheat oven to 350. Put bacon in baking pan and bake about halfway through (about 5-7 minutes or so). Drain most of the grease and allow to cool slightly. Coat each piece in syrup, roll in nuts and put back on pan. You may need more nuts as you go along, though it’s up to you how much to cover them. Bake another 7-9 minutes, until desired crispness. If you do like crisper bacon, just be sure to move the cooked bacon quickly off the baking sheet onto parchment paper, since the syrup will harden. Allow longer cooking times with thicker bacon.
Homemade Strawberry Liqueur


This strawberry liqueur is like summer in a bottle. I make a lot of different liqueurs and strawberry is one of my absolute favorites. It is wonderful for sipping or over ice. It is also a fun addition to any number of cocktails. A friend adds it to ice cream with extra berries and blends it up for an adult strawberry milkshake.
With strawberries in season, this is the time of year to enjoy them. I want to preserve some for later, too. I made strawberry jam and dehydrated some. I will also freeze some.
Another way to preserve strawberries, is by making a liqueur with them. It is pretty simple. Just combine berries with vodka and a small amount of powdered sugar. I use half gallon canning jars for this, but you could use any food safe container with a tight fitting lid.
Let the mixture steep long enough for the berries to infuse the alcohol with their flavor. You can sweeten it later on, or even leave it unsweetened, if you prefer. I like to sip the liqueur as is, or serve on the rocks with a splash of club soda.
Strawberry Liqueur
3 cups fresh strawberries, sliced
3 T. powdered sugar
3 c. vodka
1 c. simple syrup*
Sprinkle powdered sugar over berries and let dissolve. Pour over vodka and let steep 2 weeks. Crush berries and strain then filter. Add sugar syrup and mature 1 week. Makes 5 cups.
*Simple syrup is made from 1 cup of sugar and ½ cup of water. Bring to a boil, then cool. You will have 1 cup of syrup. You can sweeten your liqueur with honey, if you prefer. Watch when you substitute honey for sugar, as it is sweeter and stronger flavored. Better to use orange or clover honey. Add to suit your taste.
Rhubarb Glazed Chicken


It is rhubarb season around here. Rhubarb is turning up at local farm markets and even in some grocery stores.
Like a lot of people, when I think of rhubarb, I first think of dessert, like pie or cobbler. But rhubarb’s tangy, tart flavor, lends itself to lots of savory uses.
I had some rhubarb and could not decide what to do with it. I chopped it up, and cooked it in a little water until tender. I ended up with 2 cups of cooked rhubarb.
I used this as the base for the sauce. I added the other ingredients, cooked it down until it was thick, and ended up with about 2 cups of sauce. It had a nice balance of sweet, tart and heat.
I used some of it as a glaze for chicken I was cooking. I froze the rest. The sauce would be good on other meats or even on grilled veggies.
Rhubarb Glazed Chicken
8 chicken thighs or 1 whole chicken, cut up
1 cup rhubarb sauce (recipe follows)
salt and pepper to taste
Place chicken pieces in roasting pan, season to taste and bake in a preheated 375 degree oven for 30 minutes. Remove from oven and drain any fat out of the pan. Pour over the rhubarb sauce and return chicken to oven for an additional 35 minutes. Baste the chicken with some of the sauce in the pan and return to oven for 15 minutes more. Serves 4.
Rhubarb Sauce
2 c. cooked rhubarb*
1 c. apple cider vinegar
1/4 c. brown sugar
2 T. honey
2 T. dried minced onion
1 T. hot sauce
1 T. paprika
2 t. minced garlic
1 t. Worcestershire sauce
1 t. cumin
1 t. cinnamon
salt to taste
Place all ingredients in a saucepan and cook over medium heat until thickened. Stir more often as mixture thickens. Cook until sauce has reduced to about 2 cups. Use as a glaze on meats and vegetables. It was great on chicken but would also go well on pork or duck. I could also imagine it on portobello mushrooms. It would make a nice dipping sauce, too. Note: I liked the tang of it but you could make it a little sweeter to suit your own taste. Makes 2 cups. Will keep a few weeks in the fridge or can be frozen.
*To cook the rhubarb, cut the stems into 2-3 inch pieces and simmer in a little water until tender. You can also steam until tender
Elderflower Liqueur

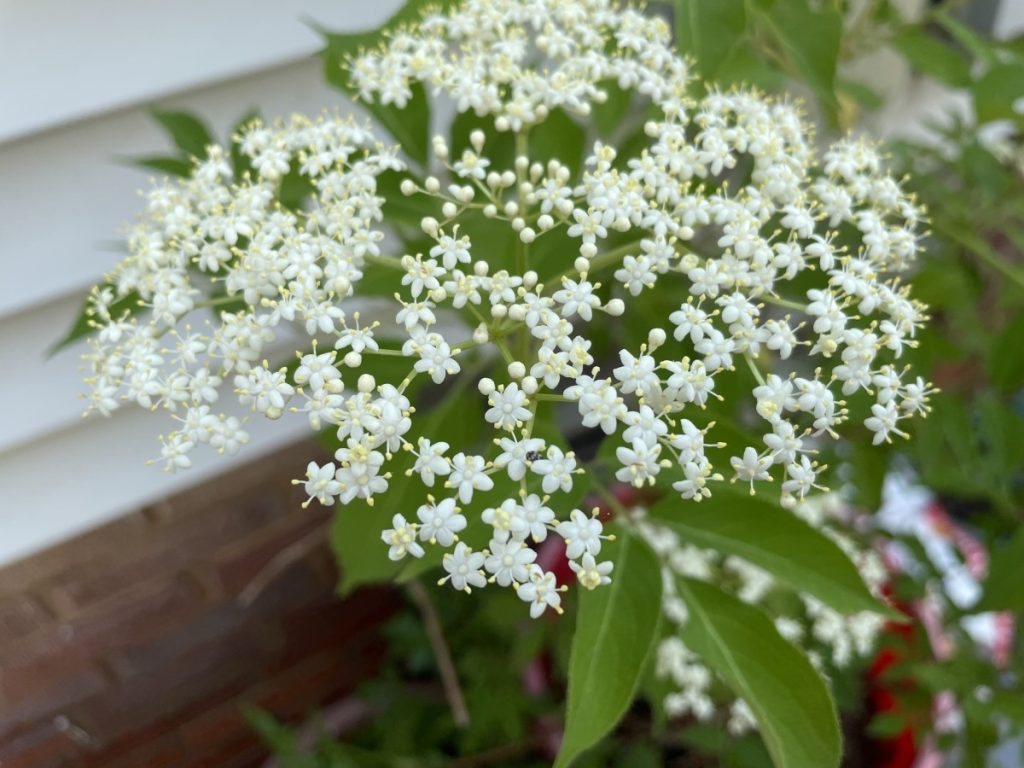
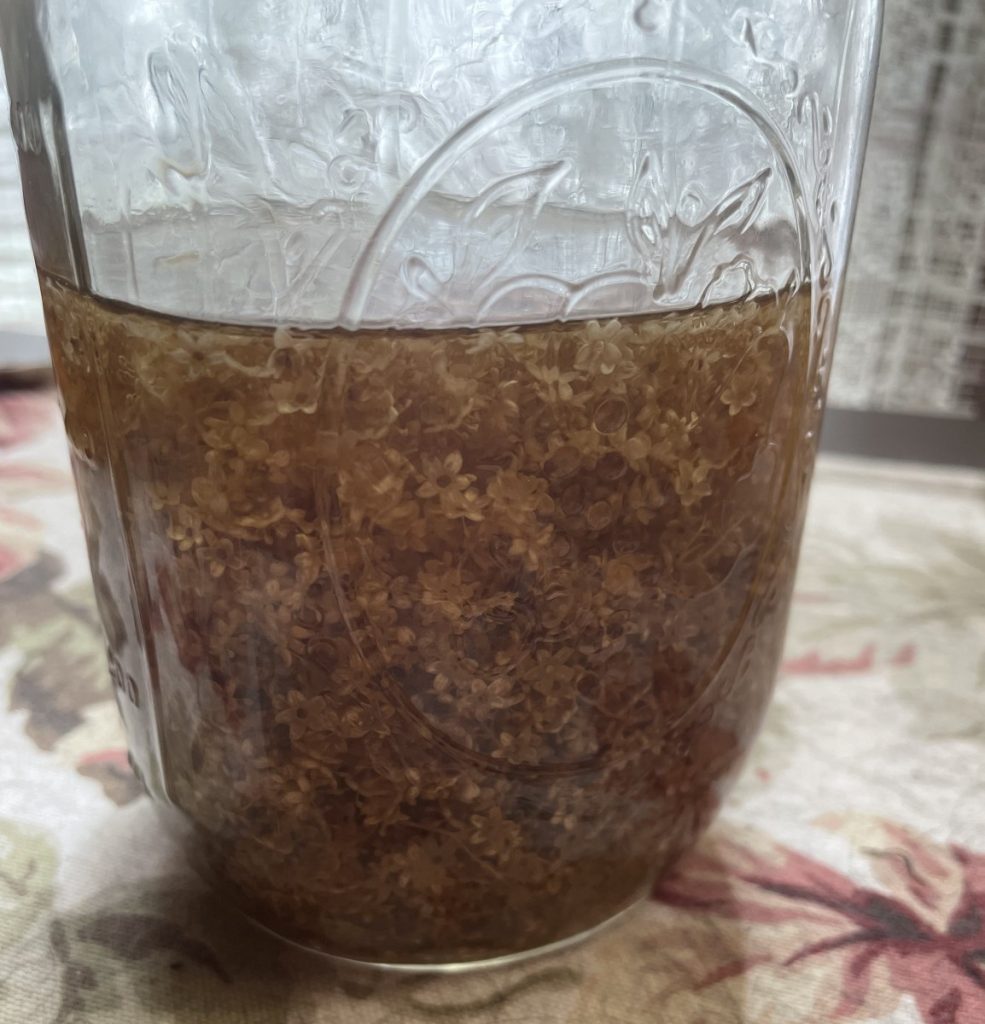
I make a lot of different liqueurs, most of which are fruit based. This one is quite different. This liqueur is made from the flowers of elderberry bushes. It has a sweet, slightly spicy flavor. Since my elderberry is blooming, it is time to harvest some of the blossoms and get started. They will been steeped in vodka- gin also works- then strained and sweetened. Could not be easier.
It is important to use ONLY THE BLOSSOMS. Elderberry stems and branches are toxic. It takes a few extra minutes, but get those flowers off the stems. Here is the recipe, with a few notes on options for sweetness levels.
Elderflower Liqueur
10 elderflower blossoms, about 1 cup of flowers, stems removed
2 c. vodka or gin
1/4 -1/2 c. sugar*
Remove all the flowers from the stems. They are small and it seems tedious, but it is important to get as many stem pieces off as possible. Place in a clean jar and pour over the alcohol. Cover the jar with a tight fitting lid and place in a cool dark place for at least a week or two. Strain out the flowers, using several layers of cheesecloth to get the liquid as clear as possible. Stir in sugar until dissolved. Return to jar, cover and let sit a few days before checking sweetness levels. You might want to add a little more sugar. Place in a pretty bottle and store in a dark place. Enjoy!! Makes 2 cups.
*You can add a lot more sugar, creating more of an elderflower cordial or syrup. It’s all about personal preference and how you want to use the liqueur. Add in 1/4 cup amounts, stirring to dissolve before adding more.
Bacon Waffles for Dad

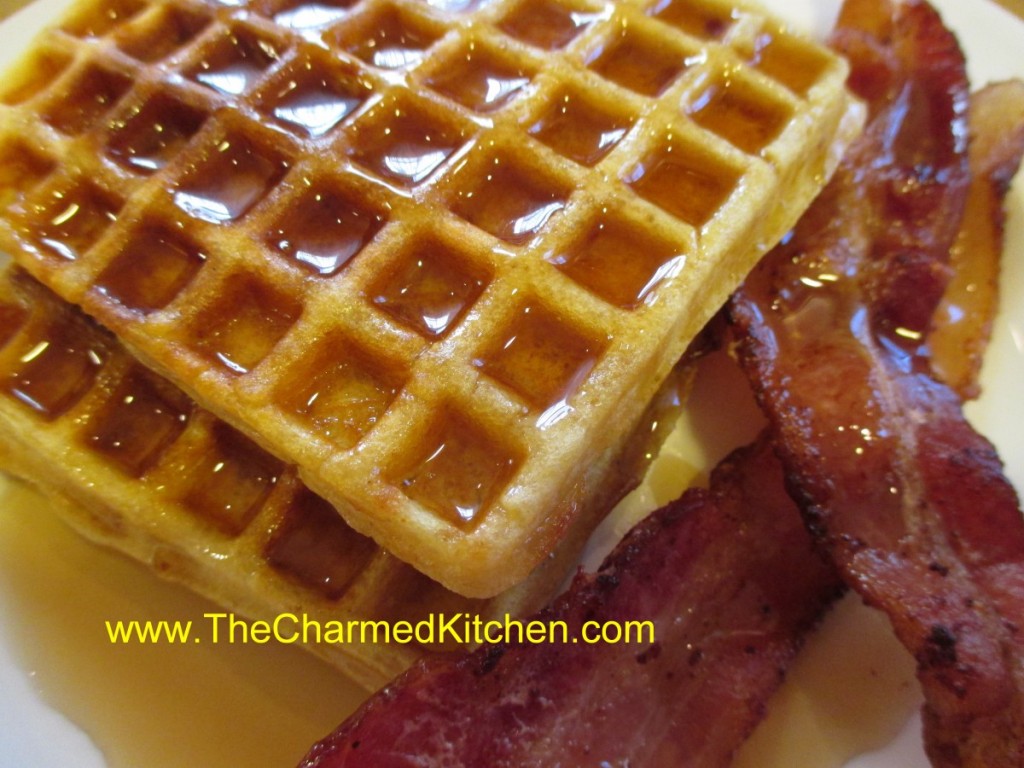
If you are looking for a special breakfast for Father’s Day, maybe dad would like some waffles. Even better, make him waffles with bacon inside them. Then serve your bacon waffles with extra bacon on the side!!!
For me, breakfast doesn’t get much better than waffles. Well, unless maybe you add bacon to the waffle batter.
Truth is, I don’t treat myself to waffles all that often, but if I am going to eat waffles, I go all out.
These are truly wonderful waffles. Light, crispy on the outside and studded with bacon. A drizzle of warm maple syrup and you are good to go.
So, if you are looking for a special treat for dad for breakfast, or lunch, or dinner or a snack… try these bacon waffles. You can thank me later.
Bacon Waffles
1 pound sliced bacon
1 3/4 cups all-purpose flour
1 tablespoon sugar
2 teaspoons baking powder
1/2 teaspoon salt
3 eggs, separated
1½ cups milk
¼ cup butter, melted
In a skillet, cook bacon until crisp. Drain; crumble and set aside. In a mixing bowl, combine the flour, sugar, baking powder and salt. Beat egg yolks, milk and butter; stir into dry ingredients until smooth. Beat egg whites until stiff peaks form; fold into batter. Add bacon. Before making each waffle, stir batter. Bake in a preheated waffle iron according to manufacturer’s directions until golden brown.
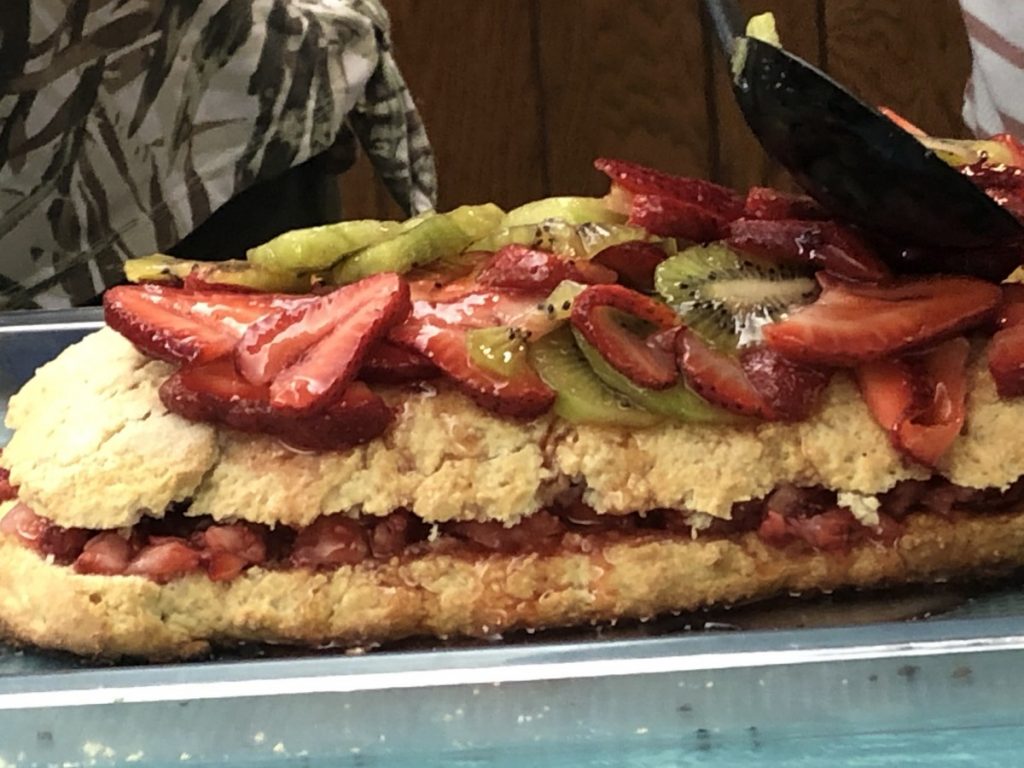
Giant Strawberry Shortcake

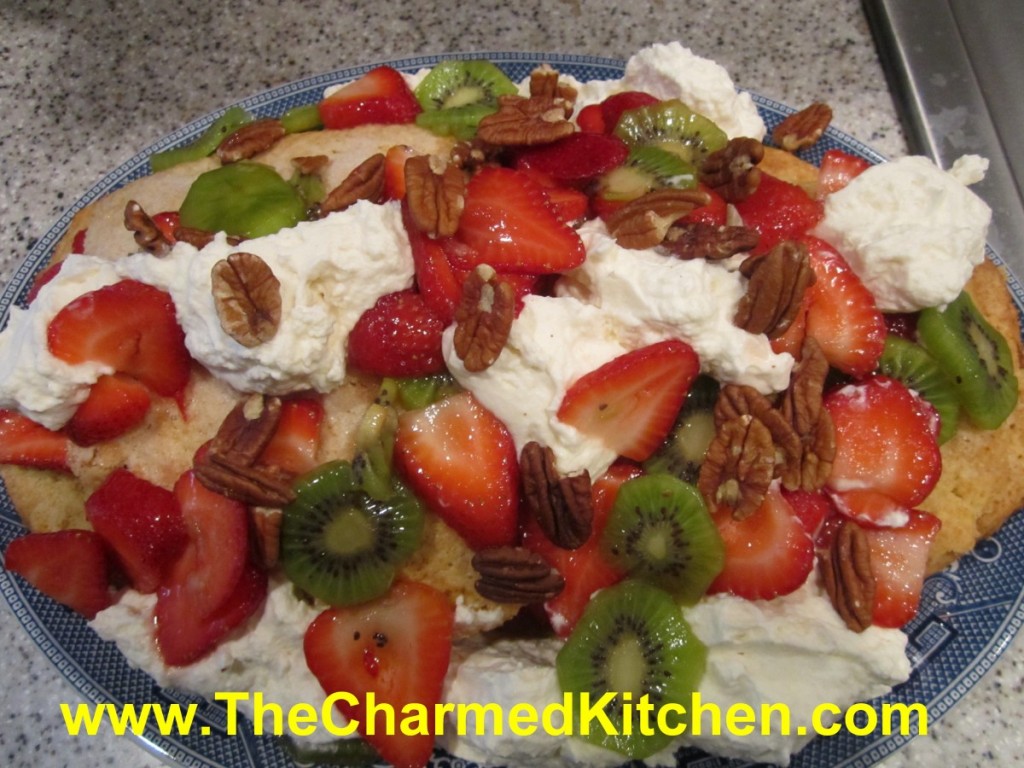
This is a great dessert for a party, picnic or barbecue. Instead of making a bunch of individual shortcakes, make one really big one. It makes quite an impression.
When ready to serve it, just cut into slices, like cake or pie. I often serve this shortcake with ice cream on the side. Feel free to switch up which fruits you use. I used kiwi fruit with the strawberries, but you can add different fruits. Peaches would go well with the strawberries or blueberries. Just have fun and use fruit combinations you like. We made it with strawberries and blueberries in class yesterday.
For the 4th of July, you could use a combination of strawberries, raspberries and blueberries.
Giant Strawberry Shortcake
1 egg
3/4 c. milk
1/2 t. lemon juice
2 c. flour
1/4 c. brown sugar
1 T. baking powder
1/2 stick cold butter plus 1 T. softened
1/2 c. plus 1 T. sugar
1 qt. strawberries, sliced thin
2 kiwi fruit, peeled and sliced thin or use other fruit like blueberries or blackberries
1/4 c. nuts, toasted, I left the nuts whole
whipped cream, optional
In small bowl combine egg, milk and lemon juice and set aside. In larger bowl combine the flour, brown sugar and baking powder. Cut in cold butter to resemble coarse crumbs. Add egg mixture and stir until mixture forms into a soft dough. Knead dough gently on a lightly floured surface about 10 times. On greased baking sheet pat dough into a 15×6-inch oval. Sprinkle dough with the 1 tablespoon of sugar and dot with the softened butter. Bake in a preheated 400 degree oven for 20-25 minutes, or until lightly golden. Place on wire rack to cool. Toss the berries with the remaining 1/2 cup of sugar. Allow to stand 30 minutes. Split the shortcake lengthwise and remove the top. Spoon over the half the berries and replace top of shortcake. Combine the kiwi with the remaining berries.Spoon over the remaining fruit and sprinkle with the nuts. Dot with whipped cream, if desired. Cut in wedges to serve. Serves 8.
Note: you can bake shortcake day ahead and prep the fruit day ahead, keeping it chilled and just assemble when ready to serve.
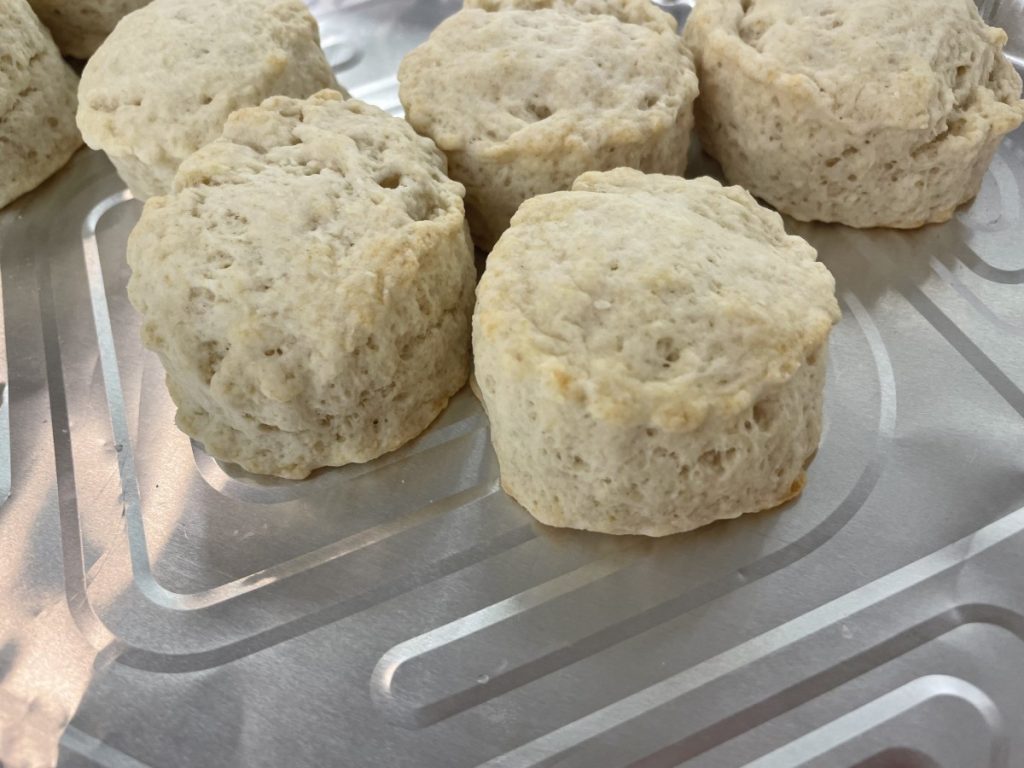
Cream Scones

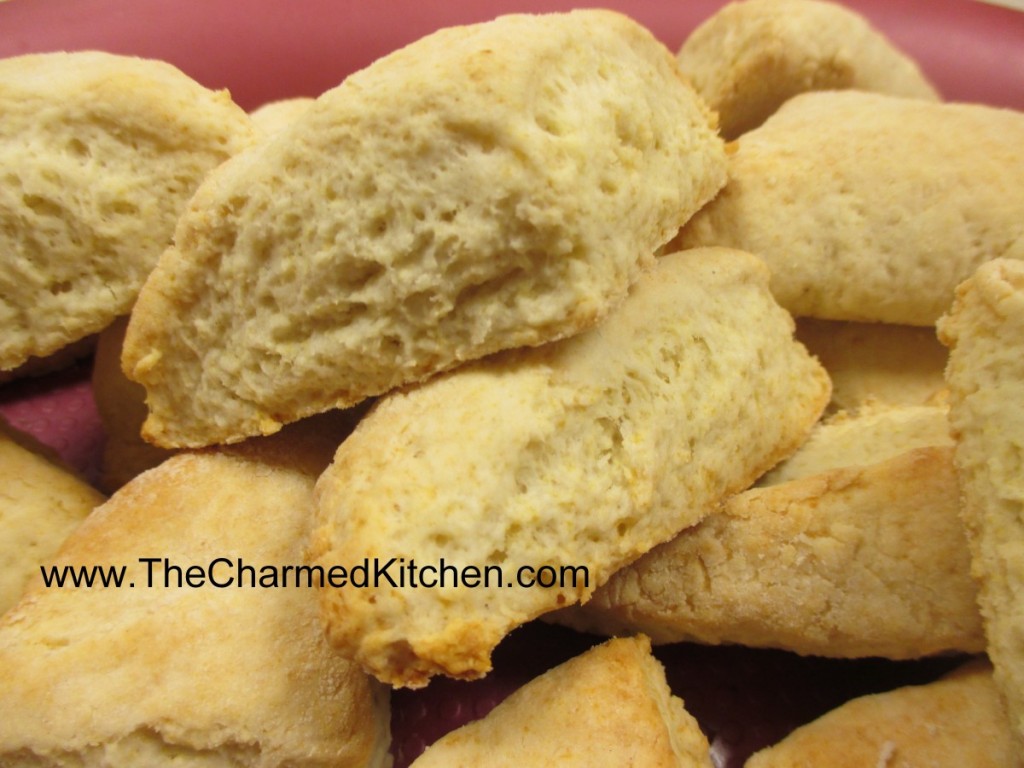
I must admit that for me, the difference between a scone and a biscuit is sometimes hard to see. Both use the same ingredients, for the most part. They can be rolled and cut out the same way, too. I often say that scones are like biscuits, but with more stuff in them. Scones are often sweeter, too.
This recipe is a tough call for me. I was given the recipe by a friend a long time ago. She called them Cream Scones. I could easily see calling them Cream Biscuits, instead. Whatever you call them, these little gems are tender, flaky and super easy to make. You can make variations with all sorts add ins. I recently made some with mini chocolate chips and orange zest. They also are great for shortcakes!!
Cream Scones
2 c. flour
1 T. sugar
½ t. salt
1 T. baking powder
1 c. heavy cream
Preheat oven to 425 degrees. Sift together dry ingredients and gradually add cream to form soft dough. Knead lightly on a floured board until dough sticks together. Roll to ½ – ¾ –inch thickness and cut with 2-inch biscuit cutter. Re-roll scraps and continue cutting, handling dough as little as possible.* Place on baking sheet and bake 10-12 minutes or until golden. Makes 8-10.
* Instead of rolling them out and cutting into rounds, I pressed the dough into an 8-inch square. I cut the square into 4 smaller squares. I then cut and “x” across each of the four squares, making 4 triangles (16 in all). Bake as directed above.
Here is the cut out version made in class last week
Mini Strawberry Shortcakes


These little shortcakes are as cute as they are tasty. You can have all the components ready, then just assemble when ready to serve.
Fun to serve at parties, picnics and cook outs. Because these are small, they work well with other desserts on larger dessert trays.
I made the shortcake base with a scone recipe, and used a small ice cream scoop to put the batter on the baking sheet. They ended up looking like little sandwich buns. One friend said they looked like sliders.
I split them, and filled with sweetened strawberries. I replaced the top and added chocolate ganache and whipping cream to finish them off.
The scone is tender and not too sweet. Satisfying and light at the same time.
Mini Strawberry Shortcakes
The shortcakes
2 c. flour
1/4 c. sugar
½ t. salt
1 T. baking powder
1 1/4 c. heavy cream or 1 cup half and half
Preheat oven to 425 degrees. Sift together dry ingredients and gradually add cream to form soft dough. Stir mixture until it just holds together. Using an ice cream scoop place batter on baking sheet a couple of inches apart. You should get about a dozen. Bake 10-12 minutes or until golden. Makes about 12. Cool on rack until ready to use.
The berries
2 lbs. strawberries, sliced thin
1/2 c. sugar, or to taste
Combine berries and sugar in medium bowl and place in fridge until ready to use. Berries should be in the sugar for at least a couple of hours and can even be prepped a day ahead to allow the juices to come out of the berries.
The ganache
1 c. semi sweet chocolate chips or 6 oz. semi sweet chocolate, chopped
1/2 c. heavy whipping cream.
Combine both in double boiler or in microwave and heat until mixture is just warm enough to melt the chocolate. Stir until smooth.
The whipped cream – use whipped cream, sweetened or unsweetened according to your taste.
Assembly: Slice the caps off the tops of the shortcakes. Place a generous spoonful of the sliced berries on the bottoms of the shortcakes and spoon some of the strawberry liquid over them as well. Place the tops of the shortcakes back on and spoon on a dollop of the chocolate ganache. I let me get to room temperature so it didn’t drip down exactly as I had planned. Top with some whipped cream and serve. Makes about 12.


