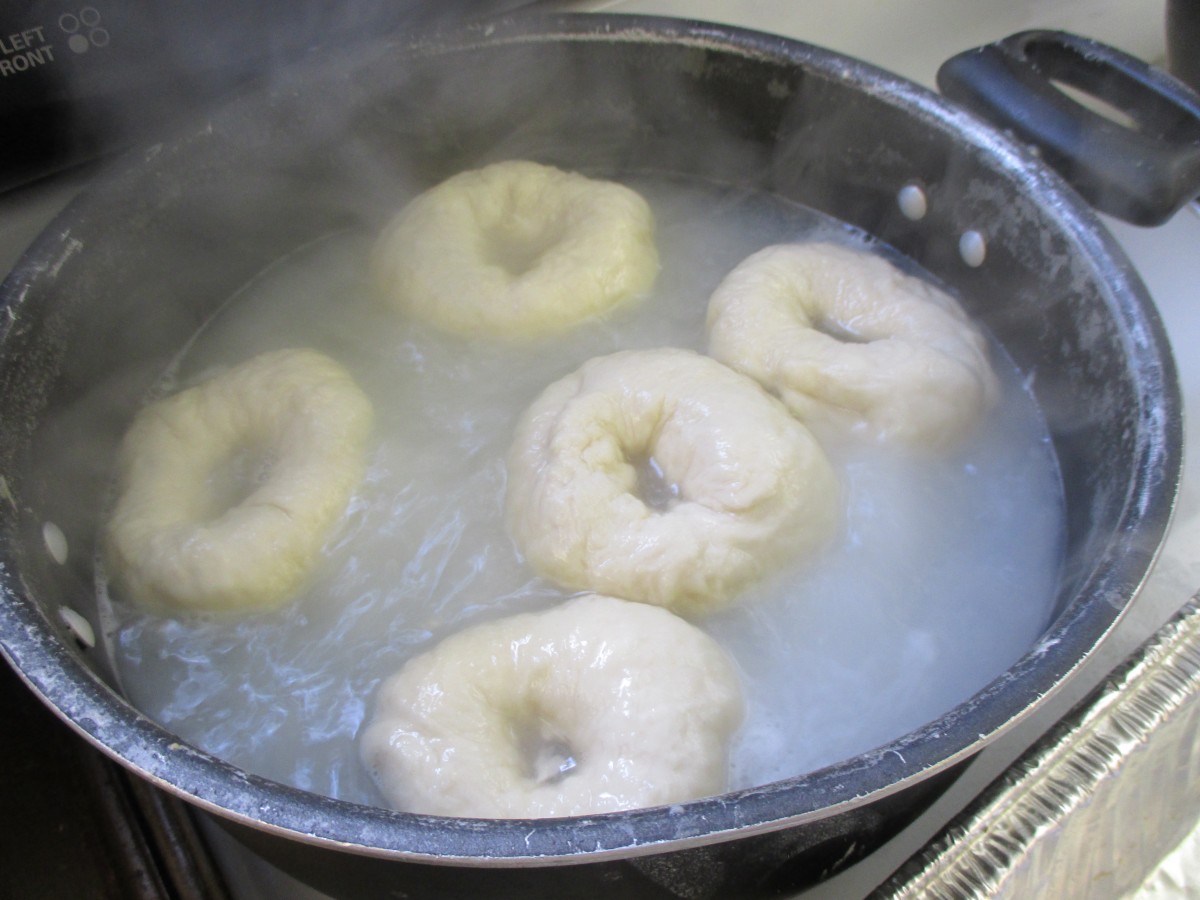
Homemade Bagels

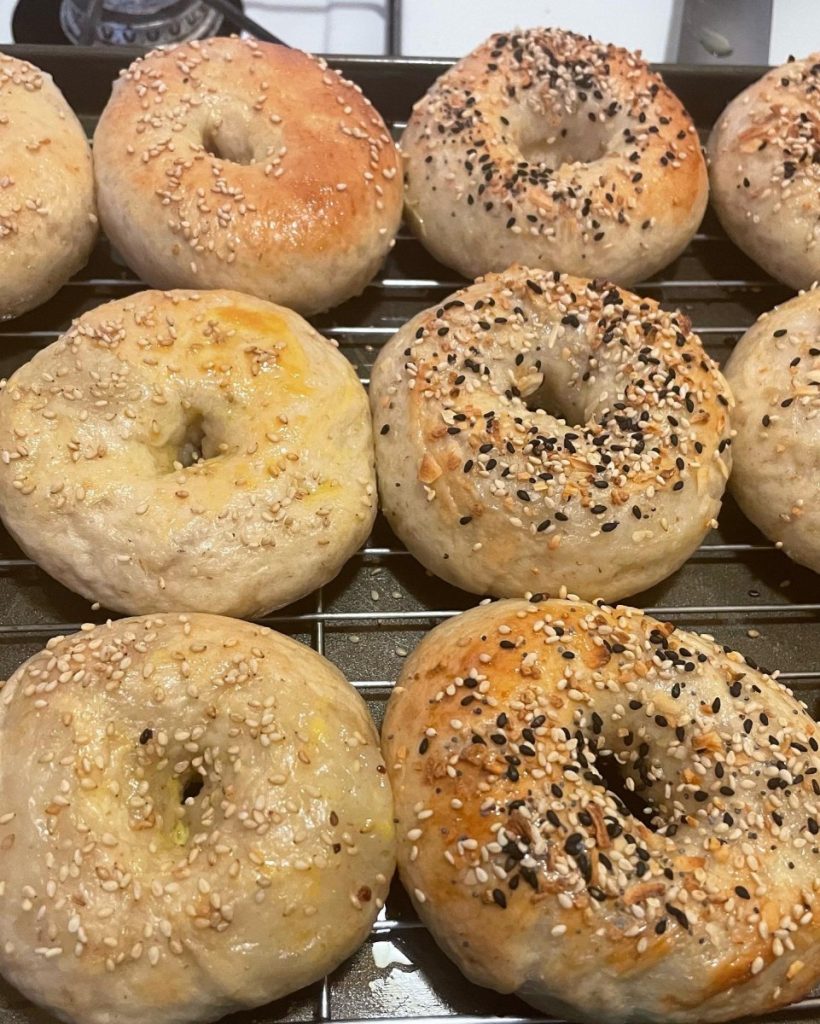
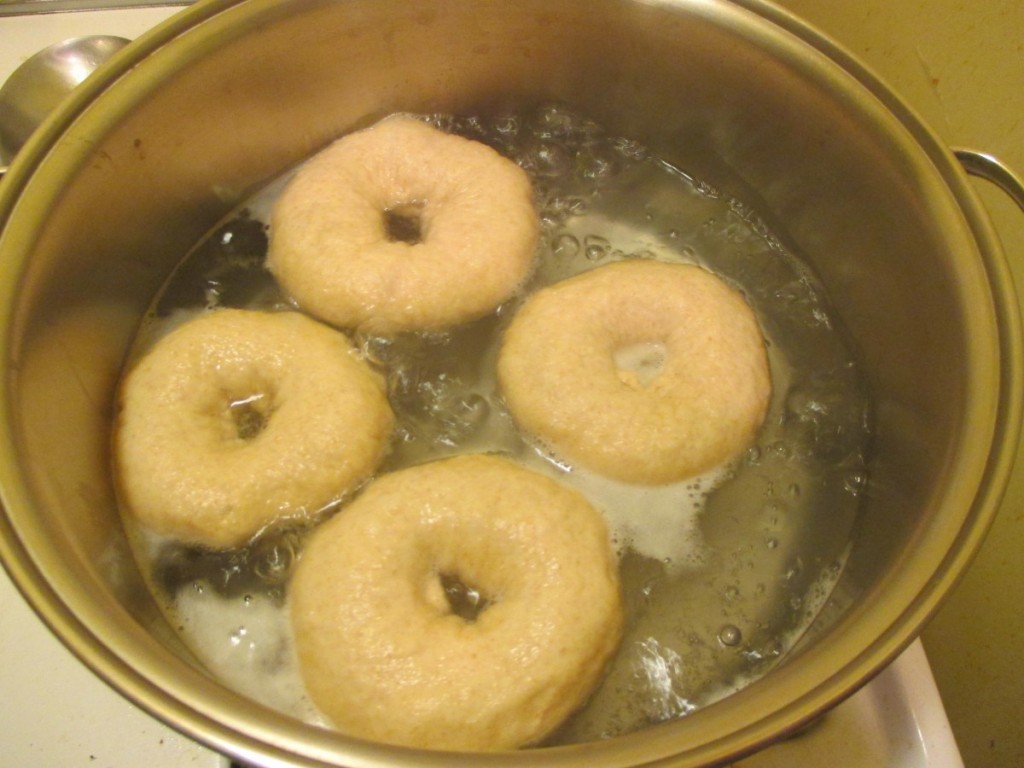
I taught a class last night on making bagels. It was a lot of fun. I think people were surprised on how easy they are to make. The chewy texture in bagels comes from boiling the bagels before baking them. In class we made plain bagels, Parmesan, and spelt. Such a fun evening.
Bagel History
Bagels began in Austria when a baker in Vienna in 1683 wanted to honor the visiting president of Poland. He created a roll that was round, or shaped like the stirrup on the King’s saddle. The new creation was called beugel, which was a variation of the German word for stirrup. Over time the word evolved into bagel. Because they were made with white flour, everyone, other than the rich considered bagels a special treat for special occasions. Today bagels are found in almost every grocery store throughout the country.
Lox and Cream Cheese
Probably the most traditional way to top a bagel. A toasted bagel is spread with cream cheese and then a few thin slices of lox (salt cured salmon). Some people like to also add thin slices of sweet onion. I do. I also like to add a few capers. Years ago this became a tradition in my family. My niece and I always have bagels with lox on Thanksgiving morning.
Bagels
4 ½ -5 c. flour
3 T. sugar
1 T. salt
2 pkgs. Yeast
1 1/2 c. water
2 t. butter
1 T. sugar
2 t. salt
1 egg white
Mix 1 ½ cups flour, 3 tablespoons sugar, 1-tablespoon salt and yeast in a medium bowl. Heat 1½-cup water with butter and add to flour mixture. Beat 2 minutes at medium speed. Add ½ c. flour and beat 1 minute. Stir in enough flour to make a soft dough. Turn onto a floured surface and knead until smooth and elastic, about 8-10 minutes. Set in greased bowl and turn to grease top. Cover and allow to rise in a warm place 1 hour. Punch dough down cover and let rest 15 minutes. Divide dough into 12 pieces and form into smooth balls. Cover with towel and let rest 10 minutes. In large skillet heat 1 inch of water to a simmer. Add remaining sugar and salt to water. With floured finger poke a hole in the center of three of the dough balls. Drop into simmering water cooking 3 minutes. Turn over and cook 2 minutes. Turn to first side and simmer 1 more minute. Remove to greased baking sheet and repeat with remaining dough. Mix egg white with 1 tablespoon of water and brush tops of bagels. Sprinkle with seeds if desired. Bake in a 375 –degree oven for 20 –25 minutes. Makes 12.
Variations:
Light Rye: Prepare as above except substitute 1¼ c. rye flour for 1¼ c. of the regular flour.
Whole Wheat: Substitute 1 ¼ c. whole wheat flour for 1 ¼ c. of the regular flour
Herb: Use ½ tablespoon dried marjoram or parsley or 1 teaspoon dried dill. You can also add ½ teaspoon of garlic powder. Add herbs to flour/ yeast mixture.
Parmesan: Add ¼ c. grated Parmesan cheese to flour/ yeast mixture.
Onion Bagels: Cook ½ cup finely chopped onion in 3 tablespoons butter until tender. Brush onion mixture over the tops of the bagels after they have been baking for 15 minutes.
Sesame or Poppy Seed: Just before baking brush tops of bagels with beaten eggs and sprinkling with sesame seeds or poppy seeds.
Extra crusty: Place under boiler (4-5 inches away) for 3-4 minutes, turning once just before boiling. Bagels should not brown.
More Variations
Blueberry: Prepare dough as usual. When you first start to knead the dough add 1 cup of fresh or frozen (thawed) blueberries and knead as usual. You will need a little more flour.
Cinnamon-Raisin: Add 1-2 T. cinnamon to flour/yeast mixture. Add ½ cup raisins when you start to knead dough.
Multigrain: To flour and yeast mixture add ¼ c. each wheat germ, oat bran and cracked wheat. You’ll need a little less flour.
Super seedy: To flour and yeast mixture add ¼ cup each pumpkin seeds, sunflower seeds and sesame seeds. Also add 2 tablespoons poppy seeds and 1 tablespoon fennel or caraway seeds. You will need a little less flour.
Cocoa: Add ½ cup cocoa powder to flour and yeast mixture. You will need a little less flour. These are great with cream cheese and fruit preserves.
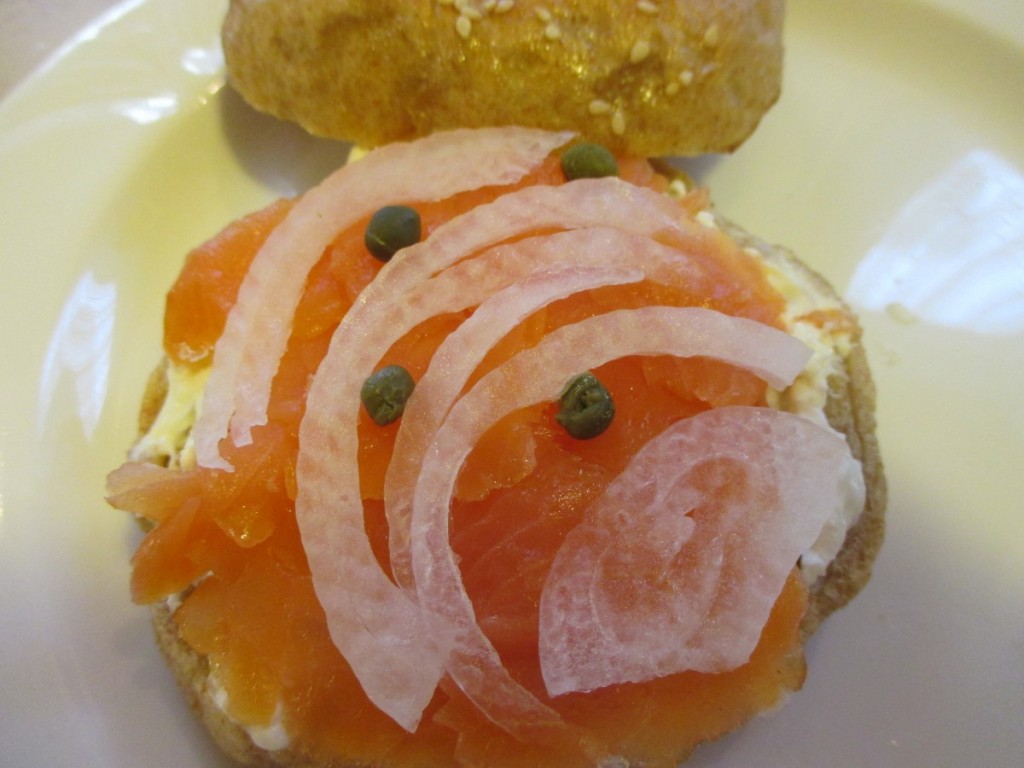
With cream cheese, lox, sweet onion and capers.
Coconut Shrimp


Coconut shrimp is a favorite of mine, and pretty easy to make. Cleaned, raw shrimp are dredged in flour, egg wash and a Panko bread crumb-coconut mix, then fried. I add some homemade curry powder to the eggs, for a little extra flavor.
You can serve coconut shrimp as an appetizer or over rice as a main dish. I serve mine with a sweet chili sauce. These would be fun to serve for a Super Bowl party or Valentine’s Day.
At a recent class, I was using desiccated coconut in a dessert. I was asked a lot of questions about it. This is not the coarsely shredded sweetened version you will find at the local grocery store. Desiccated coconut looks like white bread crumbs. That is the coconut used in this dish.
Here is my recipe for coconut shrimp. You don’t need a special occasion to make it, but it makes any occasion special.
Coconut Shrimp
2 cups oil – I like to use peanut oil or avocado oil
1 cup Panko bread crumbs
1 cup unsweetened shredded coconut- often found in Asian grocery stores or in candy making stores
1 pound shrimp, peeled and deveined
salt and freshly ground black pepper, to taste
1/2 cup all-purpose flour
2 large eggs, beaten
1-2 t. curry powder, or to taste
Heat oil in a large skillet or Dutch oven over medium high heat. In a large bowl, combine Panko bread crumbs and shredded coconut; set aside. Combine eggs with curry powder, set aside. Season shrimp with salt and pepper, to taste. Working one at a time, dredge shrimp in the flour, dip into the egg mixture, then dredge in the coconut mixture, pressing to coat. Working in batches, add shrimp to the Dutch oven and fry until evenly golden brown and crispy, about 2-3 minutes. Transfer to a paper towel-lined plate. Serve immediately with sweet chili sauce, if desired. Serves 4.
Basque Soup


This soup has hearty and rich flavored. I used oil and almond milk, so the soup was vegan. You could use milk and butter, if you prefer. It tastes great, either way. It also comes together quickly, with ingredients you can keep on hand, so it is a great homemade soup when you don’t have a lot of time. The combination of milk, tomatoes and corn also makes it a pretty dish to serve. I used a jar of my home canned tomatoes and corn I had frozen last summer.
While the soup calls for canned butter beans, you can also cook up dry beans and add them to the soup after cooking them.
Basque Soup
1 c. chopped onions
1 1/2 c. chopped celery
1/4 c. oil or butter
1/4 c. flour
3 c. milk*
1 (16 oz.) jar stewed tomatoes, undrained
1 can whole kernel corn, undrained- I used frozen corn
3-4 cans butter beans, drained and rinsed
3-4 cups water and 1T. paste-type vegetable soup base
or 3-4 cups vegetable broth
pepper to taste
hot pepper sauce to taste
shredded mild cheese, optional
Sauté onions and celery in oil until tender. Stir in flour until smooth and add milk, stirring to keep lumps from forming. Stir over medium heat until milk has thickened and begins to boil. Stir constantly as mixture simmers for an additional minute or two. Add remaining ingredients, except cheese and bring up to a simmer. Adjust seasonings. Ladle into bowls and top with cheese, if desired. Serves 8-10.
Note: You can use almond, rice, oat, coconut or soy milk in place of the dairy milk, if you like.
Smokey Brussels Sprout Salad


I know some people don’t like Brussels sprouts. I am not one of them. I have always loved them, even when I was a kid. I like them steamed with butter, roasted, pan fried and even raw. This salad is a great way to enjoy their crunchiness in raw form. The smoky flavor come from the bacon. The dressing, sweetened with maple syrup, really makes the dish.
The nice thing about this salad, is that it tastes good even the next day. The sprouts are like little cabbages. Unlike leaf lettuce, which wilts quickly once dressed, the sprouts soften some, but retain most of their crunch.
Smoky Brussels Sprouts Salad
8- 10 oz. Brussels sprouts
1 large orange, peeled and cubed
4 slices bacon, cooked and crumbled
¾ c. dried cranberries
½ c. toasted slivered almonds*
Dressing:
¼ c. olive oil
¼ c. apple cider vinegar
2 T. maple syrup
1 T. fresh chopped parsley- or 1 t. dried
2 t. hot sauce, or to taste
½ t. dried thyme
½ t. dried basil
Salt and pepper to taste
Trim bottoms off the sprouts, cut in half and slice thin. You should end up with about 4 cups of sliced sprouts. Place in large bowl with the remaining salad ingredients. Place dressing ingredients in a jar with a tight fitting lid and shake well to combine. Toss over Brussels sprout mixture.
Note: The salad ingredients can all be assembled a day ahead, then just dressed when ready to serve. This salad is also good the next day.
*To toast the almonds, place in a skillet over medium low heat and stir occasionally, until toasted. Be careful, once they start to brown, they can burn easily. In class last night, the ladies making the salad toasted the almonds in the bacon fat. They came out perfect!!!
North Carolina Lemon Pie


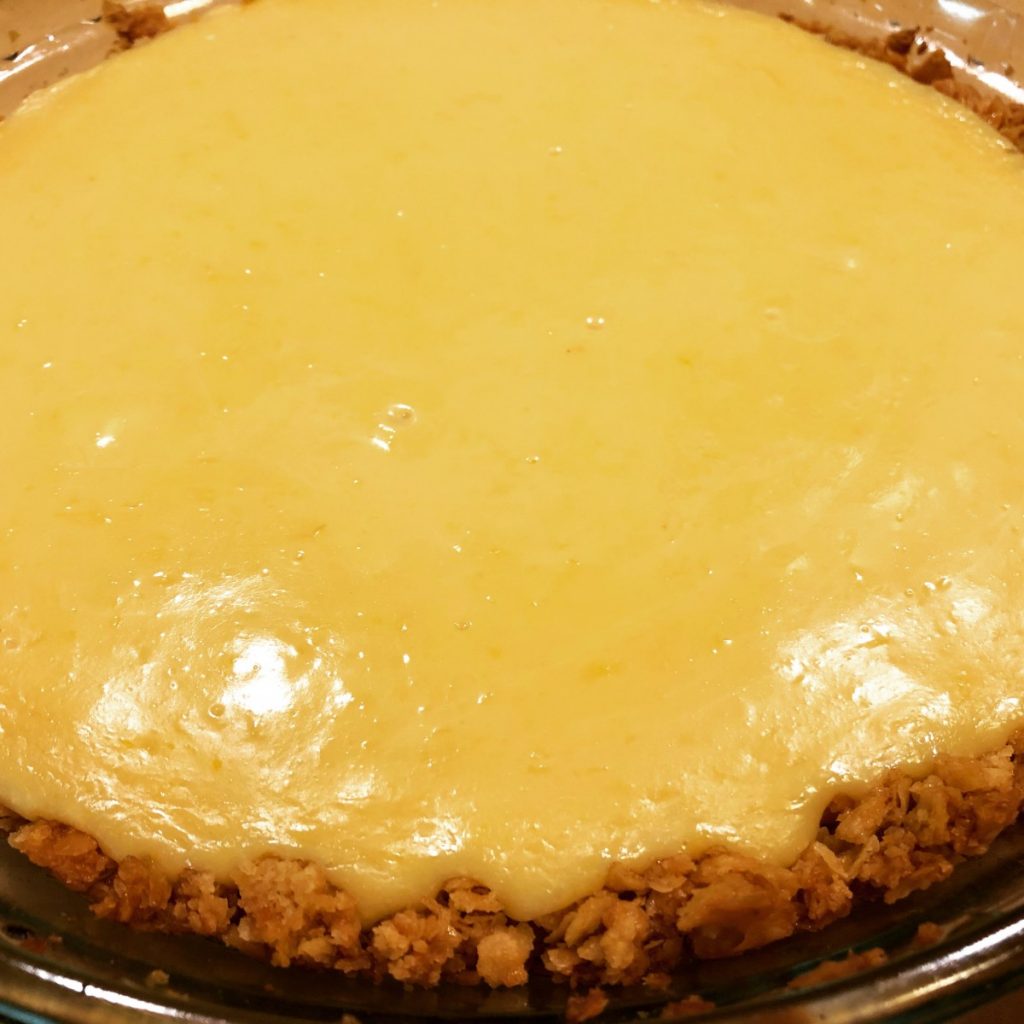
This might be one of the best lemon pies I have ever had. It was simple to make, with a surprise ingredient in the crust. That ingredient is saltine crackers! They work so well in this crunchy and slightly salty/slightly sweet crust. Perfect with the lemon filling.
I first heard about this pie in one of my cooking classes. A woman mentioned it to me after class. Said she saw it on a TV show. I looked for it online. Odd thing was that every recipe was exactly the same. Even down to the wording in the directions.
I found one reference to the recipe first showing up in Cook’s Country Magazine about 6 years ago. I prefer to credit the source of a recipe, when possible.
I did change a couple of things from the original recipe. I added more lemon zest- from 1 tablespoon to 2. What can I say? I like a zesty pie.
I also thought it was odd to make so little whipped cream for the topping. Assuming you had a cup of whipping cream to start with, you use 1/4 cup in the pie filling. That leaves you with 3/4 cup of whipping cream. The recipe only calls for whipping up 1/2 a cup of whipping cream. I rounded it up in the recipe to 3/4 cup. Honestly, I would make even more topping the next time.
I really enjoyed the pie. I think you will, too.
North Carolina Lemon Pie
Crust
6 oz. saltine crackers (about 1½ sleeves)
1/8 teaspoon salt
10 tablespoons unsalted butter, melted
1/4 cup light corn syrup
Filling
1 can sweetened condensed milk (14-ounce)
4 large egg yolks
¼ cup heavy cream
1-2 T. grated lemon zest- I used 2 tablespoons
½ cup lemon juice
Topping
¾ c. heavy cream, chilled- increase from original recipe. I think even more whipped cream would be better. Just my preference.
1 T. sugar
1 t. vanilla extract
Preheat your oven to 350 degrees. Add the saltines and salt to the food processor and pulse until you have coarse crumbs (about 15 pulses). Add the melted butter and corn syrup and pulse until the crumbs are well combined.* Add the cracker mixture to a greased 9-inch pie plate. Use the bottom of a dry measuring cup or glass and press the crumbs into an even layer on the bottom and up the sides of the dish. Place the pie plate on a baking sheet and bake until light golden brown, 17 to 19 minutes. Prepare filling while the crust is baking. Whisk the sweetened condensed milk, egg yolks, cream, and lemon zest together in a bowl, add the lemon juice and whisk until well combined. With the pie plate on the baking sheet, remove it from the oven and pour in the filling (the crust does not need to be cooled) and place it back in the hot oven. Bake until the edges of the pie are set but the center still jiggles, 15 to 17 minutes. Place the pie on a wire rack and let it cool completely. Refrigerate the pie until completely chilled.
For the topping, use a stand mixer fitted with a whisk and whipped the cream, sugar, and vanilla on medium low until foamy (about a minute). Increase the mixer speed to high and whip until stiff peaks form, 1 to 3 minutes. Spread the whipped cream over the top of the pie and serve cold.
*Note: I will admit to just crushing up the crackers by putting them in a bag and using a rolling pin. I had a few larger pieces. Still worked. I think it gave the crust a crunchier texture. Although it sank down into the pie pan when I baked it- so maybe next time I will crush the crackers a little more.
Pecan Crusted Salmon

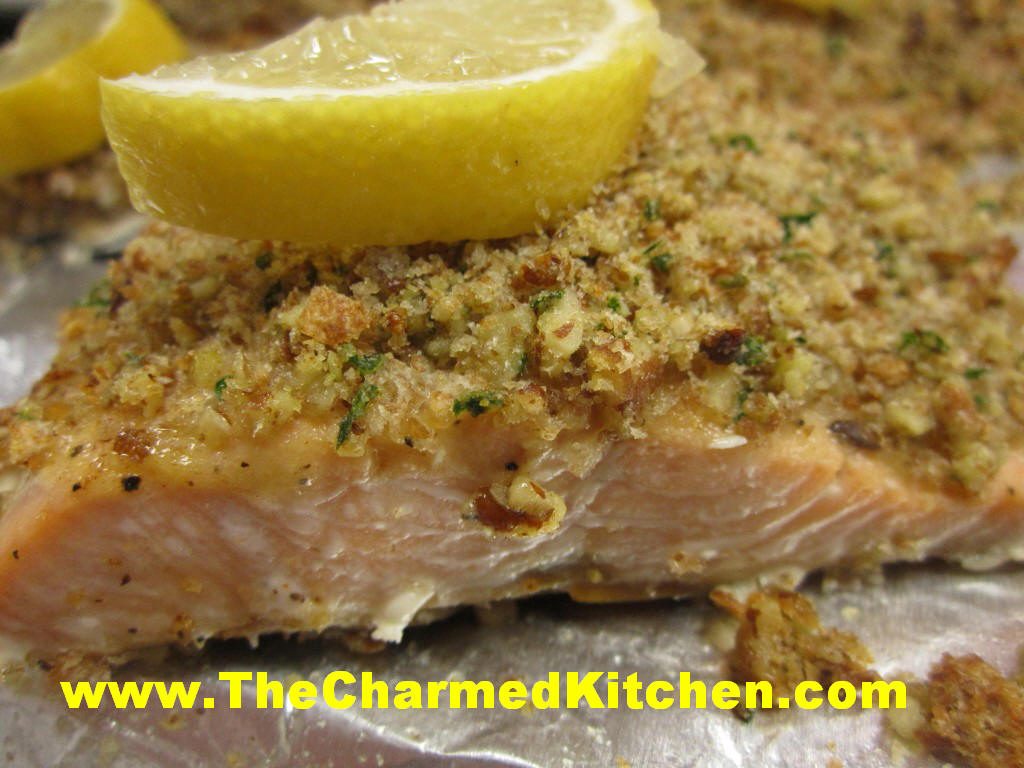
If you love salmon like I do, this is a fun way to prepare it. The crunch from the nuts adds a nice contrast to the texture of the fish. The flavors work well together, too. You don’t have to use pecans. I prefer them, but finely chopped walnuts, hazelnuts, almonds or even pumpkin seeds might be fun.
A combination of Dijon mustard, butter and honey helps the nuts to stick to the fish. There are a few fresh bread crumbs in there as well.
This dish is simple enough to prepare any night of the week, but special enough to make for company.
I used salmon fillets. You could use a whole side of salmon. You just have to increase the baking time to about 20-25 minutes and reduce the oven to 425 degrees. Depending on the size of the piece of salmon, it might take a few more minutes.
You could use other fish, but you need a sturdy fish that will stand up to the topping. I have made it with Steel Head Trout and it worked out beautifully.
Pecan Crusted Salmon
2 T. Dijon Mustard
2 T. melted butter
4 t. honey
1/4 c. fresh bread crumbs
1/4 c. finely chopped pecans or walnuts
2 t. chopped parsley
4 salmon fillets
Salt and pepper
Lemon wedges
Mix together mustard, butter and honey and set aside. Mix together bread crumbs, nuts and parsley and set aside. Season each fillet with salt and pepper. Place on lightly greased baking or broiling pan. Brush each fillet with mustard mixture. Divide crumb mixture among fillets, patting to hold. Bake in 450 degree oven for 10 minutes per inch thickness of fillets. Serve with lemon wedges. Serves 4.
Lemon Tea Cake

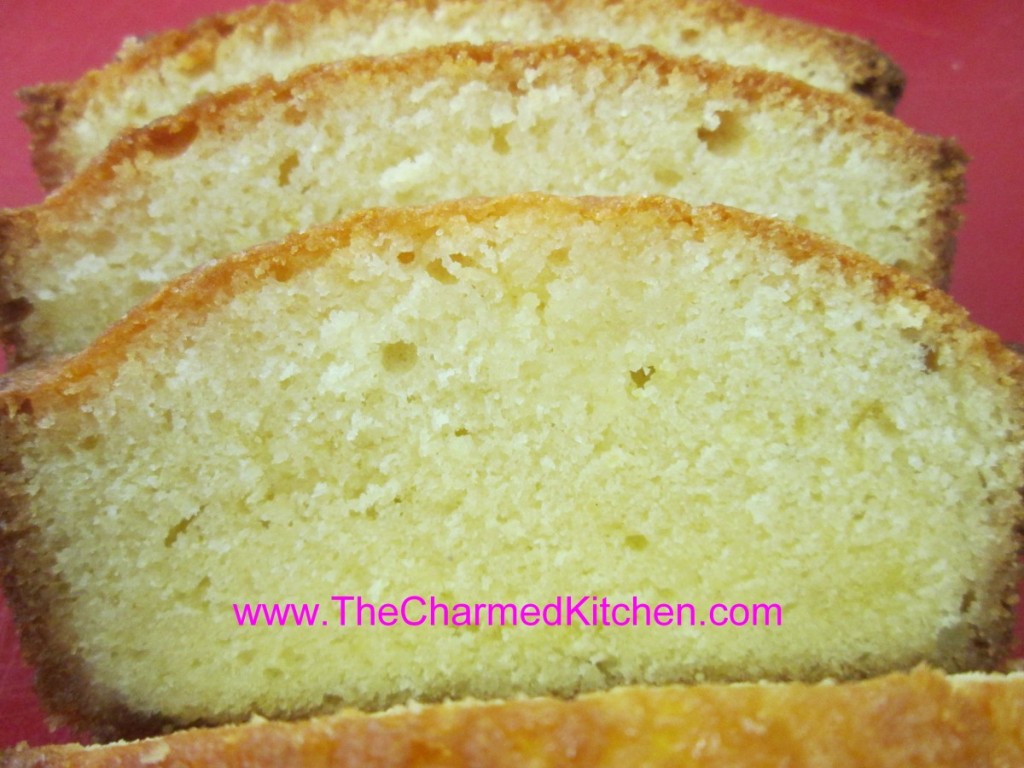
This is one of my favorite cakes of all time. It is a simple cake, enhanced with the flavor of lemon juice and lemon zest. Once out of the oven, you poke the hot cake with a large fork or a skewer, and pour a lemon syrup over it. The syrup gives the cake an extra lemony tang. It is a perfect addition to afternoon tea.
When my friend Courtney gave me some Meyer lemons she grew, I knew I wanted to do something special with them. I couldn’t think of anything better than this cake. Meyer lemons are a little sweeter than other lemons, but still tangy enough for this cake.
Great all on its own, this cake is also wonderful served with fresh berries and whipped cream for a Spring dessert. On a hot day, I have been known to top it with a scoop of ice cream.
Before you ask, the measurements are correct- only 3/4 cup of flour. No leaveners like baking powder or baking soda, either. The cake does not rise a whole bunch, but the texture is still very nice. The texture of the cake helps it to stand up to the lemon syrup.
Lemon Tea Cake
2 lemons
3 T. sugar for topping
½ c. butter, softened
¾ c. sugar
2 eggs, beaten
3/4 c. flour
6 T. milk or half and half
Preheat oven to 375 degrees. Grease an 8- inch loaf pan and line with wax or parchment paper. Grate the lemon rinds and set aside. Combine the juice of 1 of the lemons with the 3 tablespoons of sugar, stirring to dissolve sugar. Set aside.
Cream together the butter with the rest of the sugar and beat until fluffy. Beat in the eggs, a little at a time until well mixed. Stir in the flour and lemon peel and beat well. Add the milk and beat well. Pour batter into prepared pan and bake at least an hour. The cake should spring back when touched lightly. As soon as you remove the cake from the oven pierce it all over with a long-tined fork or a skewer. Pour over the reserved lemon juice mixture. Cool cake in pan before serving. Cake will be moist and tangy.
Mom’s Pierogi


My mother taught me how to make pierogi, the way her mother taught her. They are part of my family’s food traditions.
Pierogi, if you didn’t know, are pasta, filled with different fillings, often potato based. They are also sometimes stuffed with prune filling or sauerkraut. Today you can find pierogi filled with all sorts of fillings.
Filled with potato and cheese, they make a great meat-free meal, too. We often had pierogi on Fridays in Lent when I was a kid.
There are variations in the dough, too. Some use just eggs, flour, water and salt. Others add some dairy, in the form of milk or sour cream.
Once the pierogi are made, you can boil them and just serve them up, or brown the boiled pierogi in butter and serve with caramelized onions and sour cream. My mother used to make sweet and sour cabbage and serve it with the pierogi, or sometimes even use it as a filling. I can’t make them without remembering her.
Pierogi
Dough:
2 c. flour
1 t. salt
½ c. water (you can also use half milk and half water)
1 egg
Mix all ingredients together and knead on floured surface until smooth. Cover and let rest at least 15 minutes. Roll out thin and cut into circles. Re-roll scraps. You should get between 20-30. Spoon filling of your choice on center of dough circle. Fold dough in half over filling and press edge with fork to seal. Wetting the edge of the dough will help the dough to stick. Don’t overfill or the pierogi will split. Test a couple first to get the hang of it. Place a few at a time into salted boiling water and cook until they float. You can eat them as is or brown cooked pierogi in butter in a skillet. Serve with grilled onions and/or sour cream. We would often make a larger batch and then freeze them, uncooked on wax paper-lined baking sheets. When frozen they would be transferred to a freezer bag or container. Place right from the freezer into boiling water when ready to use.
Potato filling:
2 lbs. Potatoes, peeled and boiled
½ onion, minced
2-3 T. cottage cheese or farmer’s cheese, optional
salt and pepper to taste
Mash potatoes with other ingredients and season to taste.
Note: you can also add cheddar cheese if you like. In class we had some with cheddar cheese and added ham, too.

Mini Cream Puffs


If you want to surprise someone with a very special sweet treat, you could make cream puffs. These are a bit of work, but the end result is so wonderful. I think they are worth the effort, especially for special occasions. These would be a big hit at any party.
You start by make a pate a chou, or cream puff pastry. This is the same dough used to make eclairs. It is a combination of water, butter, milk and flour- cooked on top of the stove, then enriched with the addition of eggs. The dough is piped onto baking sheets and baked until puffed, golden and crisp. Once cooled, they are filled with sweetened whipped cream or, more traditionally, a custard filling. You can serve them as is, or top with chocolate or dust with powdered sugar.
The size you make your cream puffs is really a matter of personal choice. I decided to make mini puffs- about an inch in size. I find them a fun size to serve at a party.
You can also split your puffs and fill them with a savory filling, instead. A crab salad would be a tasty choice.
Homemade Cream Puffs
1 recipe Cream Puff Pastry (Pate a Chou)- recipe follows
Egg custard- for filling, or sweetened whipped cream- recipe follows
Chocolate Ganache- for topping- recipe follows, or just use melted chocolate.
Start by making the dough. This recipe will make 3-4 dozen mini cream puffs.
Cream Puff Pastry
¾ c. water
¼ c. milk
¼ t. salt
½ c. (1 stick) unsalted butter
1¼ c. flour – unbleached or bread flour preferred
4 large eggs
Extra milk for brushing
In saucepan, heat together water, milk butter and salt into a full boil. Butter has to be melted. While stirring, dump flour into saucepan, stirring constantly. Mixture will form into a ball. Reduce heat to medium and continue cooking dough, while stirring, for another minute or two. Place dough in an electric mixer and allow it to cool down a little before adding the eggs. Mixture has to be at 140 degrees F, or below, before you start adding the eggs. I use the paddle attachment and beat the dough before adding the eggs. This cools the dough down faster. Beat in eggs, one at a time, until each is fully incorporated. Beat until dough is shiny. A spoon, lifted out of the batter, should leave a peak that does not fall down.
Preheat oven to 425. Line a baking sheet with foil or parchment. I used a silicone liner and was happy with the result. Don’t grease the pan. Using a piping bag, squeeze the dough into 1-inch balls on the baking sheet- leaving a little room in between. Using a little milk on your finger, smooth down any peaks on the puffs. I missed a few and did get a couple that had cracks on the top. The smoother the balls look, the nicer your puffs will look. Bake at 425 for 15 minutes, then turn oven down to 375. Bake puffs 5- 10 more minutes, or until golden brown. Tap the shells. They should sound hollow. Turn off the heat and leave oven door open a crack, allowing them to dry completely. Cool before filling. Makes 3-4 dozen.
Custard Filling
2 cups milk or half and half
2 tablespoons cornstarch
1⁄3 cup sugar
2 eggs, lightly beaten
1 teaspoon vanilla
Using a whisk, combine milk, sugar and cornstarch in a medium saucepan over medium heat on stove top. Allow milk to scald (heat to the point when tiny bubbles form around edges of pan). Whisk occasionally to prevent cornstarch from clumping on bottom edges of pan. Remove milk mixture from heat, preferably to a burner that’s turned off.
Mix about 2 tablespoons of scalded milk mixture into eggs using whisk, then introduce eggs into milk mixture in a slow stream, whisking milk mixture constantly. Immediately return pan to heat and whisk gently until custard thickens, another two or three minutes. Do not allow to boil. (If you find that you have egg white strands in custard, feel free to pass it through a fine-mesh sieve into a different bowl now.) Remove pan from heat and stir in vanilla. Cool before using. Makes 3 cups.
To fill the puffs, using a small piping tip with a pastry bag, filled with the custard. Squeeze filling in on the bottom, squeezing until it feels full.
Once cream puffs are filled, top with melted chocolate or chocolate ganache. I just dipped the tops of the cream puffs in melted chocolate. The chocolate hardened into a thin, crisp shell of chocolate on the puffs, adding a fun crunch.Filled puffs should be stored in fridge until ready to serve. They can be frozen.
Chocolate Ganache
4- 6 oz. dark chocolate, chopped- or 1 cup chocolate chips
2 oz. heavy whipping cream
In saucepan, heat chocolate and cream together until just heated through. Remove from heat and stir until smooth. You can also do this in a microwave safe bowl, in the microwave for about a minute. Remove and stir until smooth. Makes 1 cup.
Lentil and Brown Rice Stuffed Peppers

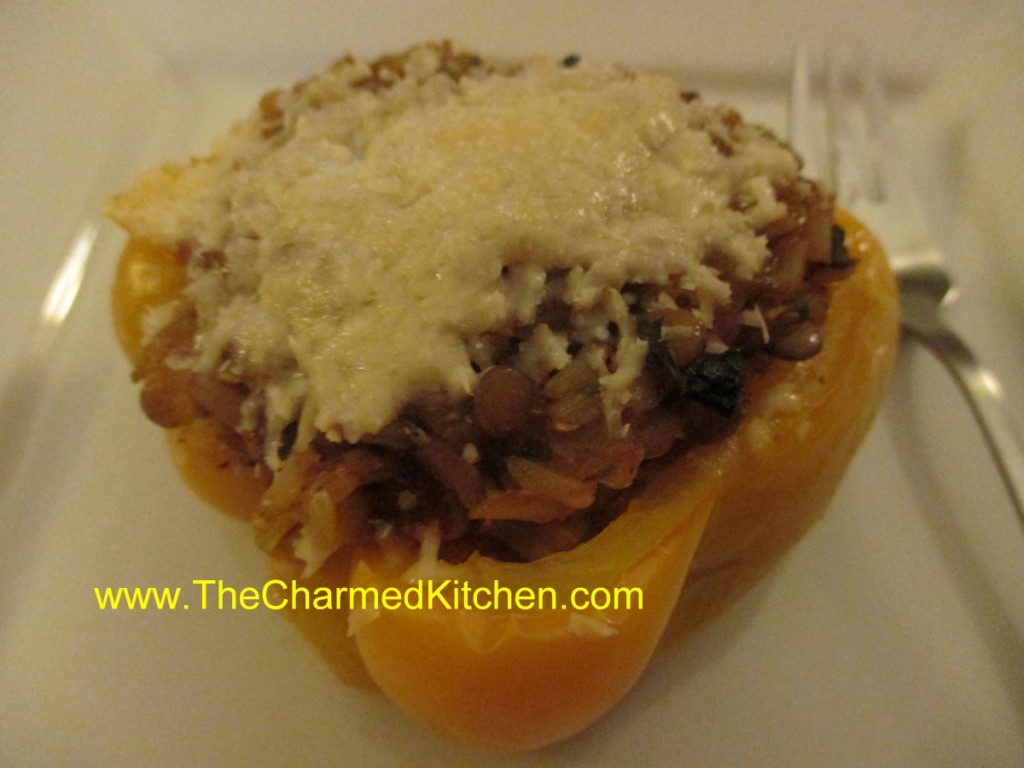
A friend was in town and stopping by. I wanted to offer her dinner. Since I know she doesn’t eat meat- I knew we’d be going vegetarian. I had just picked up some beautiful sweet peppers at the local produce market. I knew I would use them in the dish. Stuffed peppers seemed like a fun way to go. I precooked most of the ingredients so I wouldn’t have to watch them too carefully once in the oven. That way, we were free to visit. I did top them with cheese- but you could omit the cheese, if you prefer.
Lentil and Brown Rice Stuffed Peppers
1 onion, chopped
Oil
¾ c. uncooked brown rice- I used brown jasmine rice
Water or vegetable stock – probably around 3 cups or a bit more
¾ c. lentils, rinsed and drained
2 c. peeled and chopped fresh tomatoes- or 2 c. canned tomatoes
2 – 3 sweet peppers, cut in half and seeded
3 garlic cloves, peeled and chopped
¼ c. Marsala wine
2 T. apple cider vinegar
¼ c. chopped parsley
2 T. fresh chopped basil
1 T. fresh oregano or 1 t. dried
1 t. chopped rosemary
Hot sauce to taste
Salt and pepper to taste
Romano or Parmesan cheese- optional
In soup pot, heat oil and cook onion until it gets tender and a little golden. Add the rice and stir to coat the rice in the oil. Toast the rice a couple of minutes. Add 2 cups stock or water to cover the rice, and then bring up to a simmer. Reduce heat and cook, covered, for about 20 minutes. While rice is cooking, place the peppers in a pot of boiling water and cook for 3-4 minutes. Remove from heat and drain peppers. After the rice has been cooking for 20 minutes, add the lentils, garlic and tomatoes, wine, vinegar and seasonings and continue cooking, covered, until the rice and lentils are tender, about 25 more minutes Add more stock, if needed. Rice mixture should be a little runny. Place peppers, cut side up in a shallow baking dish. Spoon in the lentil mixture, dividing it among the 4 pepper halves. Cover dish with foil and bake in a 350 degree oven for 30-40 minutes. Mixture will be heated through and peppers will be tender. Serve as is – or top with some cheese and return to the oven until cheese melts- about 5 minutes. Makes 4 pepper halves.


