Baked Potato Soup


When I was a kid, I loved getting a baked potato, when we went out for dinner. I loved my Mom’s home cooking, including her baked potatoes, but it was different at a restaurant. It would come to the table wrapped in foil and all puffed up in the middle. As a kid it looked very special to me. They also had so many toppings you could get. Choices included sour cream, butter, chives, bacon and cheese. This soup starts off as a cream of potato soup, and then combines many of the toppings you might have on a baked potato. It feels just like those baked potatoes at the steakhouse. Comfort food on a couple of levels.
Baked Potato Soup
4 slices bacon, chopped
1 large onion, chopped
4- 5 medium potatoes, peeled and cubed
4-5 cups chicken stock
1/2 c. chopped fresh parsley
2 c. half and half
3 T. flour
salt and pepper to taste
Toppings:
Sour cream
chopped green onions or chives
shredded cheese
extra bacon, cooked crisp and crumbled
In soup pot combine bacon and onion and cook over medium heat until bacon is cooked and onion is tender. Add potatoes and stock and simmer, covered, until potatoes are tender, about 20 minutes. Add parsley and most of the half and half. Reserve a couple of tablespoons of the half and half and combine with the flour and stir until smooth. Ladle a little of the warm soup into the flour mixture and whisk until smooth. Add the flour mixture to the rest of the soup and stir until smooth. Cook until soup is thickened and bubbly. Adjust seasonings and serve. Add toppings of your choice at the table. Makes 4 servings.
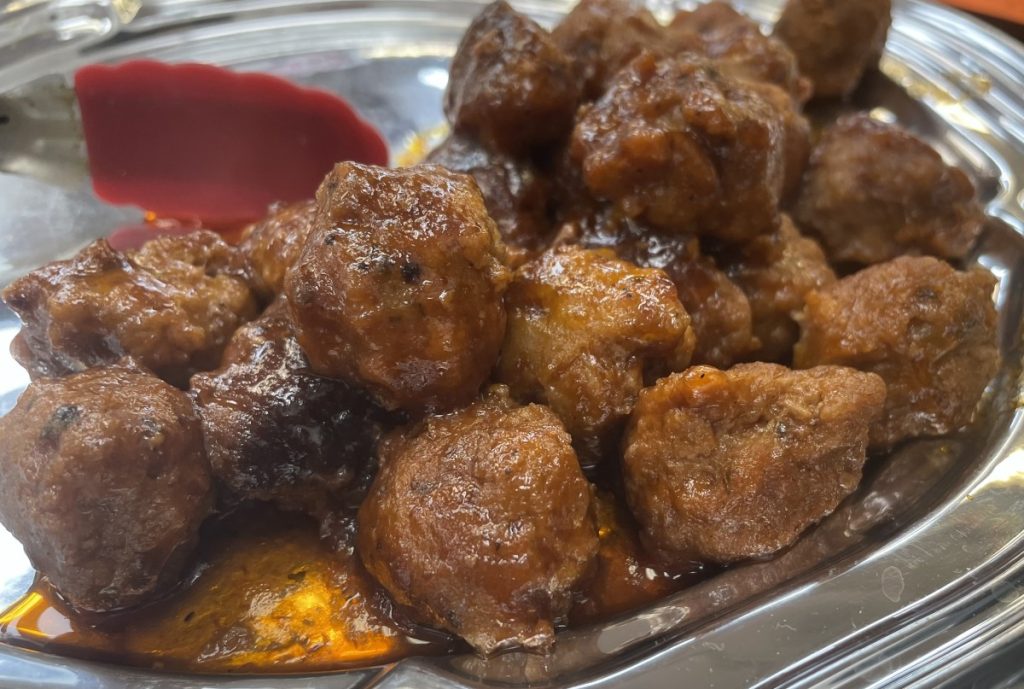
Appetizer Meatballs


Mini meatballs are always a hit when I serve them. They can be an appetizer or served as a main dish with pasta and a sauce. They are easy to make and you can make a big batch and freeze some for later.
You can use ground beef, pork, chicken, turkey or a combination of ground meats. Maybe go outside the box a bit and use venison or bison.
These would make a great appetizer for any party and the the Superbowl right around the corner…..
So here is the recipe. There is always room to get creative and play with different flavors. I often take a small piece of the mixture and cook it, just to see if my seasonings are right. Easier to adjust before cooking them all. Enjoy!!
Classic Appetizer Meatballs (or Any Size You Like)
The essential ingredients:
1 lb. ground beef, pork, chicken, turkey, or a combination
1 egg
½ c. panko bread crumbs
1 t. salt
The seasonings:
These might include fresh or dried herbs, spices, black pepper, garam masala, red pepper flakes, cumin, smoked paprika, Italian herbs. You can make your meatballs Italian, Greek, spicy, Asian or almost anything you want by playing with seasonings.
Alliums:
For more flavor and texture you can add minced garlic, shallot or onion. For small meatballs you have to mince them pretty fine. For larger meatballs you still want a pretty fine chop, but you can leave them a little bigger. They can be added raw, or try browning the onions a little first, or using roasted garlic.
Oil, optional, if you want to fry them
In a large bowl, gently combine all ingredients. Roll into 1-1½-inch balls. Transfer to a baking sheet. Broil until golden and firm, 7 to 10 minutes. Or fry in oil until deeply browned all over. Sprinkle with more salt before serving.
Sauces:
You can serve the meatballs with any number of sauces either for dipping or heating up and serving the meatballs in the sauce. Barbecue, sweet and sour, marinara, honey-mustard, gravy, chili sauce, salsa or spicy peanut are only a few of the options you have.
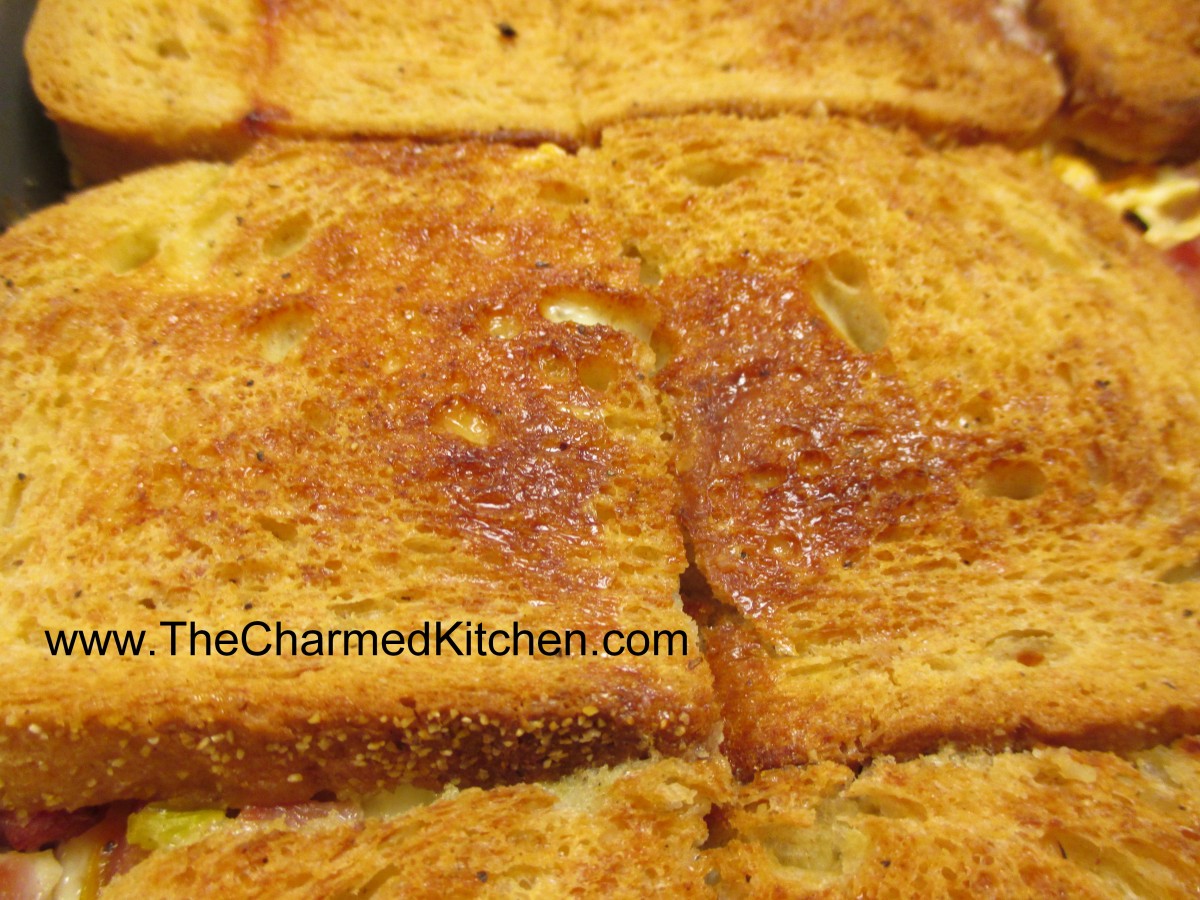
Ham and Cheese Strata


I really love this dish when I have company coming over. It is easy to make and always goes over well. Since it is assembled ahead of time you can make it the day before and then just bake it when you want it.
What is a strata? The simple answer is that it just means layers. Strata is a dish that can be made so many ways with all sorts of ingredients. In this strata you make sandwiches, top them with a mixture of egg and milk and then bake it up. I used rye bread, ham and Swiss cheese, but you can use different bread, cheese and meats (or even no meat) to make any number of combinations. I have made a Reuben strata with corned beef, Swiss, sauerkraut and thousand island dressing.
Ham and Cheese Strata
12 slices bread, crusts removed if desired – I used rye
6 slices cheese – I used Swiss
1/4 c. diced green onions
1/2 c. chopped sweet pepper
2 c. diced cooked ham or turkey ham
3 eggs
2 c. milk
1 t. salt
1/8 t. pepper
Place six slices of bread on bottom of 2-quart oblong casserole. Top each slice of bread with a slice of cheese. Top cheese with the onions, peppers and ham. Top with remaining bread and cut each “sandwich” in half diagonally. Combine remaining ingredients and pour over sandwiches. Cover dish and let stand several hours or overnight in the fridge. Bake uncovered in a 350-degree oven for 40-45 minutes, or until puffed and set. Serves 6.
Chicken and Herb Dumplings

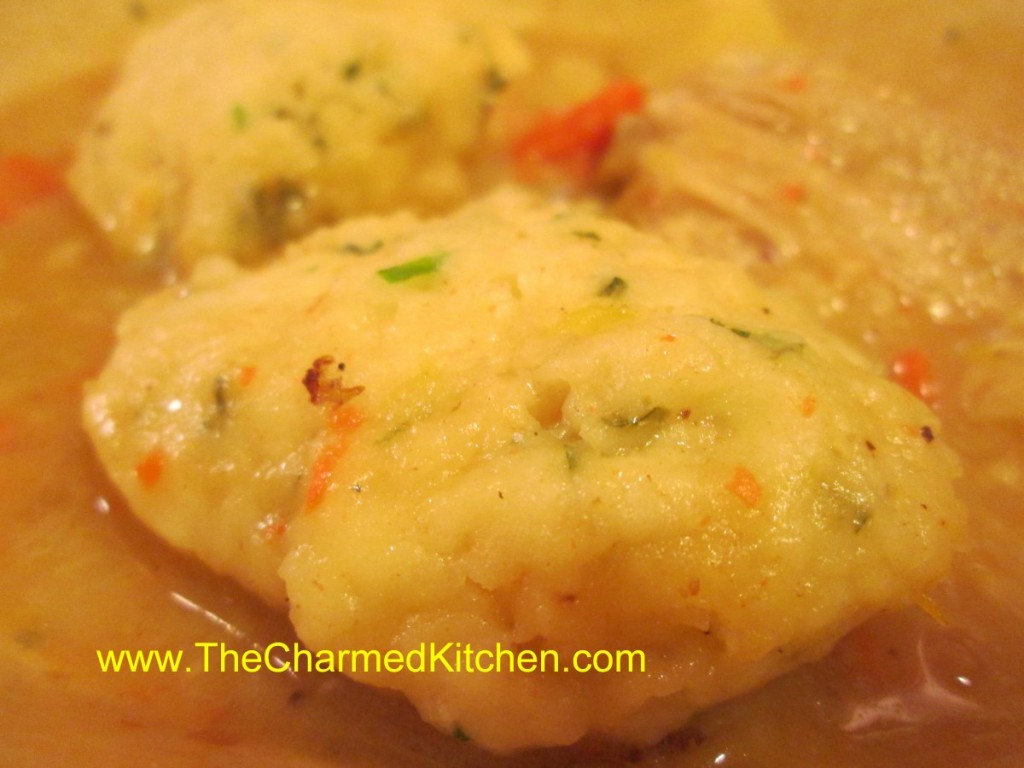
There are foods I will always associate with my childhood. Chicken and dumplings is one of those dishes. I can remember watching my Mom spooning the dumpling batter over the simmering pot of chicken and vegetables. She’d cover the pot and wait.
When she uncovered it, the dumplings had puffed up, and pretty much covered the whole dish. It was magical to me. The dumplings were so tender and light. I can’t make this dish, all these years, later without thinking of her.
My mom made her dumpling batter with a buttermilk baking mix- like Bisquick. Eventually, she started making her own baking mix, like I do today.
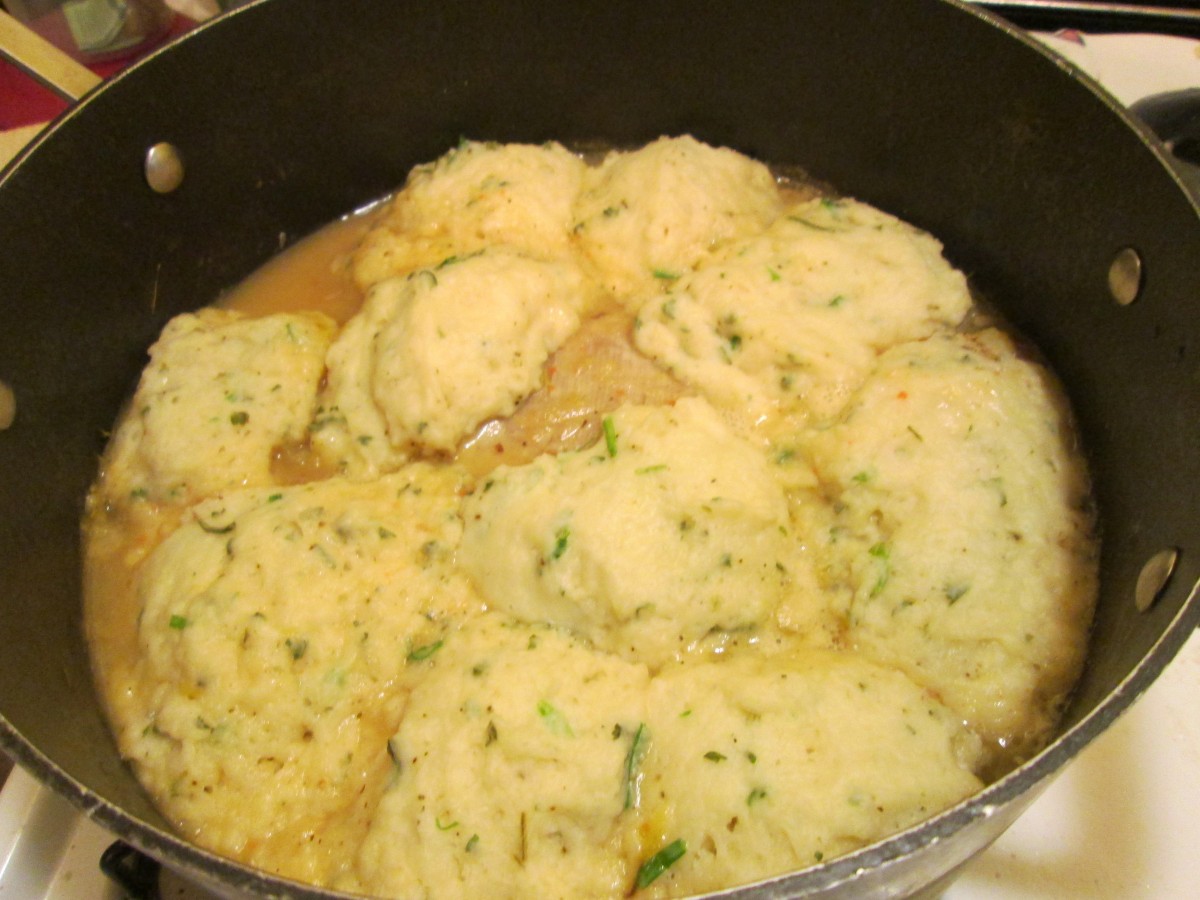
Dumplings will puff up when cooked
Mom’s Chicken and Herb Dumplings
1 T. oil
1 (3 lb.) broiler, cut into pieces
salt and pepper
flour for dredging
1 medium onion, chopped
2 carrots, peeled and sliced
3-4 potatoes, cut into chunks
2-3 c. chicken stock
1 t. each marjoram and thyme
1 c. buttermilk baking mix* , like Bisquick,I make my own, recipe follows
1/3 c. milk
2 t. fresh parsley
2 t. snipped chives or green onions
1/2 t. red pepper flakes
Season chicken pieces with salt and pepper and dredge pieces in flour. Heat oil in large skillet and brown chicken pieces on all sides. Remove chicken pieces and sauté onion until tender. Add carrots, potatoes, broth and chicken to skillet and cook, covered, 20 minutes. Sprinkle herbs over the chicken. Combine baking mix with milk, parsley, chives and red pepper flakes and spoon batter in skillet in 8 mounds. Cover and cook over low heat 20 more minutes. Serves 4.
*Here are two versions of the biscuit mix.
Chef Pastry Mix/ Biscuit Mix
8 cups sifted, all-purpose flour
1 c. powdered milk
1 c. powdered buttermilk
¼ c. baking powder
1 T. salt
2 c. shortening, coconut oil or butter- if using butter store in the fridge- coconut oil version should be stored in fridge in warm weather
Sift dry ingredients together 3 times. Cut in fat to resemble cornmeal. Keep in an airtight container. Store in a cool dry place and use within six months.
Whole Wheat Baking Mix
5 c. flour
3 c. whole wheat pastry flour
1 c. whole wheat flour
1/3 c. baking powder
1 c. powdered milk, not non-fat
2 t. salt
3 1/2 sticks butter
Mix dry ingredients together well, then cut in butter. Store in fridge for up to 3 months and can be frozen for up to a year. Makes about 12 cups.
Grapefruit Scones


I wanted something to serve with tea and decided to make scones. I am not sure why I decided to use grapefruit in the recipe. It might have been that big bowl of pink grapefruit sitting on the counter.
I started with a scone recipe I had used before, then tweaked it by adding grapefruit zest and juice. I added grapefruit juice and zest every where I could think of.
They came out great. You could even see little flecks of pink here and there.
Scones, done right, are very tender. These scones came out just perfect. A little crispy on the outside, tender on the inside. Not too sweet and the delicate flavor of grapefruit. So here is the recipe.
Grapefruit Scones
2 c. flour
½ c. sugar
1 T. baking powder
1 t. baking soda
½ t. salt
Zest of 1 grapefruit
½ c. cold butter
1 egg, beaten
¼ c. half and half
¼ c. grapefruit juice
Topping:
2-3 T. half and half
4 T. sugar
1 T. grapefruit zest
Glaze:
1½ powdered sugar
1 T. grapefruit zest
3-4 T. grapefruit juice
Preheat oven to 375. Line a baking sheet with parchment paper or silicone liner- or grease lightly. Set aside. In medium bowl, combine flour with sugar, baking powder, baking soda, salt and zest. Cut in cold butter until mixture looks like coarse crumbs. In small bowl, combine egg with half and half and grapefruit juice. Add to flour mixture and stir until mixture forms into a soft dough. Mix until combined, but don’t over mix. On lightly floured surface, divide dough in half. Dust an 8-inch round cake pan. Add half of the dough and press in until dough is evenly spread in the pan. Turn the pan over, quickly, onto the prepared baking sheet to get the dough out. Note: this part seems a little tricky, but it gives you a perfect 8-inch circle of dough. Don’t under-flour the pan and the dough will come right out. Also, be sure to flip the dough near one corner of the baking sheet, so you will have room for the other half of the dough. Re-flour the cake pan, press in the rest of the dough and flip it onto the baking sheet. Now you have 2 ( 8-inch) circles of dough on the baking sheet- hopefully. Don’t sweat this part. If the dough doesn’t come out easily, just scrape it out of the cake pan, add more flour, return the dough to the cake pan, and try it again. And when you are flipping it out of the pan- do it quickly. If you prefer, you can place the dough on the baking sheet, in two piles, and shape it into 2 ( 8-inch) circles. Using a dough cutter or a spatula, cut each circle of dough into 8 wedges. For the topping, brush the scones with half and half. Combine the sugar and zest and sprinkle over the dough. Bake for 20-22 minutes, or until golden brown. Re-cut the scones where you cut them before, and place the scones on a cooling rack. Let them cool a few minutes. Meanwhile, make the glaze. Combine the powdered sugar and zest, then add enough grapefruit juice to make a glaze you can drizzle. Using a small spoon or even a fork, drizzle the tops of the scones with the glaze. Make a pot of tea and eat your scones. Makes 16.
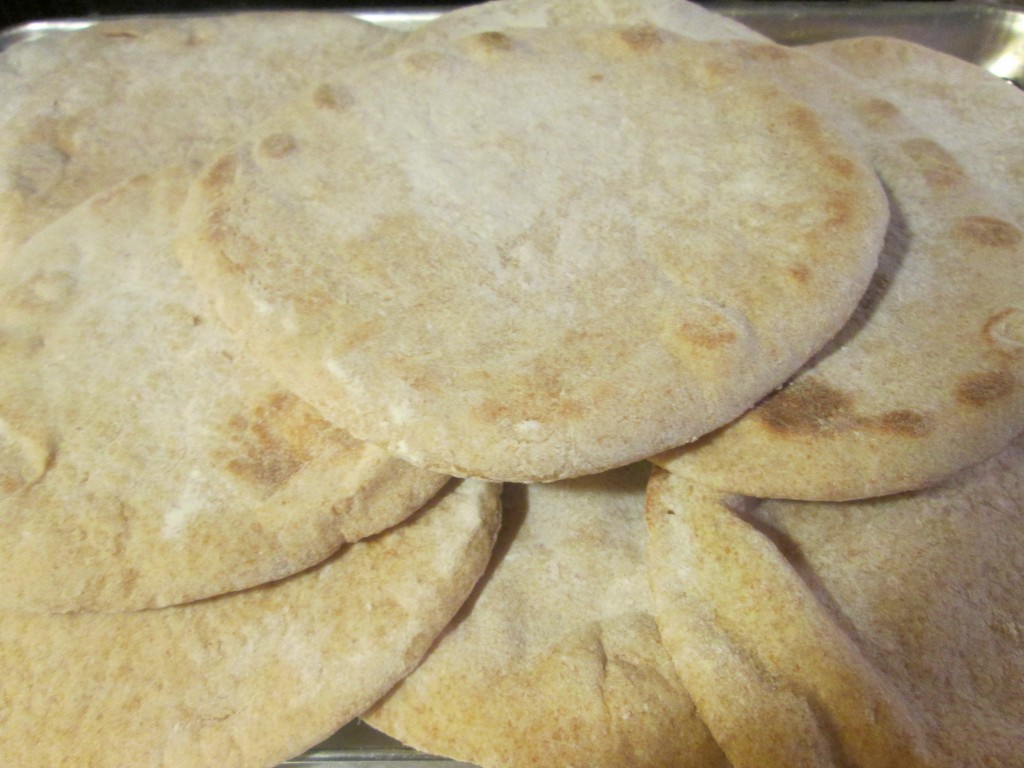
Homemade Pita Bread


Pita bread is easy to make and so tasty. It is also fun to watch the bread puff up as it bakes. We made some in bread class this week.
One of my favorite memories from a cooking camp involves pita bread. We were making it in camp that day. Two little boys sat in front of the oven, watching the bread puff up. They were so excited. This is a fun bread to make with kids.
Although the recipe calls for placing the rolled out dough directly on the oven rack, I sometimes place the dough on baking sheets in the oven. Just a little easier and neater. I put the pans in the oven to heat up before using.
If the pita doesn’t puff up, it will still taste wonderful. For better success, make nice smooth balls of dough. The more careful you are when rolling out the dough- the better your odds of a good puff. Roll pretty thin, use enough flour on the board, and try not to tear the dough when rolling out.
You can add some whole wheat flour, if you like. The dough pictured is a mix. I added about 2 cups of whole wheat flour to the dough, in place of some of the white flour. I also made a batch with just white flour.
Pita Bread
4 ½- 4 ¾ c. flour, you can use some whole wheat flour
1 pkt. Active dry yeast
1 ½ t. sugar
1 ½ t. salt
1 ¾ c. water
2 T. oil
In large bowl combine 2 cups of the flour with other dry ingredients. Heat water and oil to 120-130 degrees (warm) and add to flour mixture in bowl beating until smooth. Beat three minutes then begin stirring in enough flour to make a soft dough. Knead on floured surface until smooth and elastic, about 10 minutes. Cover dough with plastic wrap and then a towel and let rest on board 20 minutes. Punch dough down and divide into 12 pieces. Shape each into a smooth ball and place on board, allowing space in between. Cover and let rise 30 minutes. Pre-heat oven to 500 degrees. Roll dough balls into circles. Place 3 circles at a time directly on oven rack. They will puff up and brown in about three minutes. Remove to rack to cool and repeat with remaining dough. Makes 12.
Firecracker Chicken


Sometimes the best recipes happen when you don’t have time to plan. This is one of those recipes. Even better because it only uses 4 ingredients.
I needed an appetizer, but didn’t have extra time for prep. I also did not have time to go to the store, so I used what I had on hand. I had some boneless chicken breasts. I could also have used boneless thighs or even chicken wings. I used what I had.
I cut them into strips and poured a bunch of hot sauce over them. Put them in the fridge to marinade overnight. The next day I just tossed the chicken strips in breadcrumbs and fried them in a little oil. Served with extra hot sauce on the side, they were a big hit.
Firecracker Chicken
2 lbs. boneless chicken
3/4 c. hot sauce, plus extra when serving
2 c. bread crumbs
2 c. oil, for pan frying
Cut chicken into strips and place in a bowl. Pour over the hot sauce and stir to coat evenly. Cover and chill overnight, or even for a couple of days. Place bread crumbs in a plastic bag. Place a small handful of chicken in the bag and shake to coat. Place on a plate and continue with the rest of the chicken. Heat oil in skillet to 350- 375 degrees. Fry chicken in several batches- you don’t want to crowd them in the skillet- that will make the oil cool down too much. Fry for a minute or two per side. Remove to platter lined with paper towels and cook the rest of the chicken. Keep chicken warm until ready to serve. Serve with extra hot sauce on the side. Serves 8 or more as an appetizer, but can be served as a main dish, too.
Sweet and Sour Chicken Wings


Rumor has it that chicken wings are one of the most popular appetizers served on Super Bowl Sunday. I don’t think you need to wait for a football game to enjoy these.
If you want something different than Buffalo Style wings, you might want to try this recipe. The wings are baked in a pineapple sweet and sour glaze. They are just the right combination of sweet, sour and a little salty. No matter who you are cheering for- your guests will cheer for these.
They are pretty simple to make and you can even make them the day before, then just reheat before serving.
Sweet and Sour Glazed Chicken Wings
12 chicken wings
1 medium onion, chopped
1 can (or jar) of pineapple chunks, drained, reserving liquid- I used a pint jar- if using store bought use the 20 oz. can.
salt and pepper
Sauce:
1/2 c. apple cider vinegar
1/2 c. sugar
3 T. ketchup
3 T. sherry
2 T. soy sauce
1 t. minced garlic
1 t. red pepper flakes
reserved pineapple juice
3 T. cornstarch
Preheat oven to 400 degrees. Place wings in pan and season with salt and pepper. Bake chicken wings in roasting pan for 20 minutes. Add the onions and pineapple chunks to the pan with the chicken wings and return to the oven for 30 minutes longer. While chicken is cooking combine the first seven sauce ingredients in a small pot and bring to a boil. Check baking pan for any juices- Spoon them out and add to the sauce. Combine pineapple juice and cornstarch in small bowl, stirring until smooth and add to the sauce. Return to boil and stir until sauce is thickened and bubbly. Pour hot sauce over chicken and return to the oven to bake 20-30 minutes longer or until wings look nicely glazed and sauce has started to brown. Serves 3-4.
Extra Crispy Chicken Wings


I like a wing with very crispy skin. These wings are super crispy, even though they are baked in the oven, not fried. It may have to do with a rather unusual ingredient.
I got this recipe from a local television show and have made it a couple of times now. Thanks, David Moss, for this one. The wings are coated with a little salt and baking powder.
Yes, baking powder. I am not sure how it works, but the combination leaves you with wings that are super crisp on the outside and juicy inside. The only thing I changed from the original recipe, is that I use a little less salt.
These would be great served at a Super Bowl party.
Once the wings are done cooking, you can toss them in whatever sauce you like.
Extra Crispy Chicken Wings
3-4 lbs. chicken wings
2 T. baking powder
1 t. salt
Hot sauce and butter- or assorted dipping sauces
Cut wings into three pieces- discard tips, or use to make stock. Pat the wings dry. This step is important. The dry skin helps them to get crisp. Place baking powder and salt in a plastic bag and add the wing pieces, a few at a time, shaking to coat evenly. Continue until all the wings are coated. Place wings on a rack that is placed on a baking sheet. Bake wings in a preheated 250 degree oven for 30 minutes. Turn the heat up to 425 and continue cooking 45 minutes more. Remove wings from oven. You can melt butter, mix with some hot sauce and toss the wings in that mixture, or just serve the wings with your favorite sauce.
Curried Vegetables


On a cold winter day, a bowl of curried veggies can really warm you up. There is something about curried dishes that always feel like comfort food to me. The flavor and fragrance of curry always warms me up.
This dish is really a simple one to make. I just sauteed some veggies, then added curry powder and let them all cook together until the veggies got tender. I wouldn’t call it a stew- there is no added liquid, sauce or gravy. Feel free to use the veggies you have around. I used what I have and what I like.
Curry is one of those flavors people seem to love or hate. I am a curry lover. Curry is a blend of spices, so it may vary from one recipe to the next. Depending on the ingredients used, curry can be mild (sweet) or hot. You can buy curry powder at most grocery stores, but the selection will be better at stores that carry international foods. I actually prefer to make my own curry powder. That way I can adjust the seasonings to my taste preference. A recipe for homemade curry powder follows the recipe for the curried veggies.
This dish can be a side dish, a main dish, served on its own or spooned over rice or pasta.
Here is the recipe. Hope you give it a try.
Curried Vegetables
3-4 T. oil – I like avocado oil
1 large onion, cut in chunks
2 cloves garlic, minced
2 medium carrots, peeled and cut into chunks
2 ribs celery, trimmed and cut into chunks
2 c. chopped cabbage
2 medium sweet potatoes, peeled and cut in chunks
1 sweet red pepper, seeded and cut into chunks
1 sweet yellow pepper, seeded and cut into chunks
salt to taste
1-2 T. curry powder –recipe follows
1/4 t. cloves
Heat oil in large skillet. Add onion and saute until tender. Add the garlic, carrots, celery and cabbage and cook until vegetables are tender, stirring often. Add remaining ingredients and cook, covered, over low heat until all vegetables are tender, about 10-15 minutes. Add more curry powder if you like. Serves 6-8.
Curry Powder
2 t. ground cumin
2 t. ground coriander
2 t. ground turmeric
1 t. nutmeg
1 t. salt
½ t. cinnamon
¼ t. cayenne pepper
¼ t. ground black pepper
Combine all ingredients and store in a cool dry place.


