Honey Orange Glazed Sweet Potatoes


I will admit it – I am not a fan of really sweet, sweet potato dishes. Not unless it is a dessert. My Mom never served sweet potatoes with marshmallows, but they were still served “candied”. Sweet potatoes, sometimes canned, cooked in a glaze of brown sugar and butter. It was just what we did.
Then, one year, I grew my own sweet potatoes. Everything changed after that. I can still remember the joy of digging that first plant up. There they were, a cluster of beautiful sweet potatoes. I grew a lot of them that first year. I steamed them, baked them, made soup with them. Even had them for breakfast a few times.
My Mom was so pleased when I told her I was supplying them for her Thanksgiving dinner that year. I suggested we just cook them with a little butter, salt and pepper. They were so naturally sweet, that they surely, did not need to be candied.
Not everyone was so pleased with that choice. Clearly, how to prepare sweet potatoes evokes some of the same passion as how to cook the turkey. So for awhile, there were two competing dishes of sweet potatoes on the Thanksgiving table. As if there weren’t enough dishes to worry about- we now had to have 2 types of sweet potatoes.
I hope this dish might just bridge the gap between the two camps. A little sweet, but not overly sweet. The orange juice and honey enhance the sweet potatoes nicely. The sugared nuts are a fun addition, too.
Honey Orange Glazed Sweet Potatoes
4 T. butter
4-5 c. peeled and sliced sweet potatoes
1 c. fresh orange juice
Zest of 2 oranges
¼ c. honey
2 t. hot sauce, or to taste
Salt and pepper to taste
Fresh grated nutmeg
Sugared nuts- optional* recipe follows
Melt butter in large skillet. Add sweet potatoes and cook over medium heat, for 5- 8 minutes. Potatoes should start to turn a little golden. Add orange juice, honey and seasonings and turn heat down to low. Cook, uncovered, until potatoes are tender and liquid is evaporated, about 10 minutes. If you want more color on the sweet potatoes, turn the heat up a little once they are tender, and liquid is mostly gone. Serve with sugared nuts sprinkled on top, if you like. These can be made a day ahead and reheated.
*Sugared Nuts
4-5 c. nuts, I like walnuts or pecans
2 c. sugar
1 c. water
1 t. cinnamon
1 t. orange peel
1 t. salt, optional
Place all ingredients in heavy skillet and cook over medium heat, stirring often, until all the water disappears. Whatever liquid in the pan will be clinging to the nuts and syrupy. Dump nuts onto a large cookie sheet and break apart with a wooden spoon to prevent clumping. As nuts cool, stir once or twice to remove any remaining clumps, and to cool faster. Nuts will lose their glossy appearance and attain a sugary crust. If it looks like nut soup, you didn’t cook them long enough, and you must return all to the skillet and cook longer. As the nuts start to get drier during cooking, you can turn down the heat a little to prevent burning. Once you’ve made a few batches, though, you will get good at judging when to stop cooking. You can also make a spicy version by adding a teaspoon of cayenne pepper along with the other ingredients. Store in cool, dry place to keep nuts fresh longer.
Canning Pumpkin and Winter Squash


I bought quite a few winter squash and pumpkins this fall. They are both pretty autumn decorations and tasty when cooked. Even though they should hold up well, I decided to can some of them. So why can them?
Most of them were very big. Too much to use at one time. Rather than cutting up and cooking them one at a time, I decided to can some of them. That way when I want some cooked pumpkin or squash for a recipe, it is ready to use. A few had started to go bad. I didn’t want to wait for any more to spoil.
So why not freeze them? I also am a little tight on freezer space right now, so this solved that problem as well. I processed a pie pumpkin and several butternut squash and ended up with 18 pints. I roasted the seeds for a friend.
The directions I used were from the NCHFP (National Center for Home Food Preservation). Here they are.
Canning Winter Squash/Pumpkin
Wash, remove seeds, cut into 1-inch- wide slices, and peel. Cut flesh into 1-inch cubes. Boil 2 minutes in water. Caution: Do not mash or puree. Fill jars with cubes and cooking liquid, leaving 1-inch headspace. Adjust lids and process following the recommendations in Table 1 and Table 2.
For making pies, drain jars and strain or sieve cubes.
| Table 2. Recommended process time for Pumpkin and Winter Squash in a weighted-gauge pressure canner. | ||||
| Canner Pressure (PSI) at Altitudes of | ||||
| Style of Pack | Jar Size | Process Time | 0 – 1,000 ft | Above 1,000 ft |
| Hot | Pints | 55 min | 10 lb | 15 lb |
| Quarts | 90 | 10 | 15 | |
Source NCHFP website
Sweet and Sour Pork


I have to admit to loving all things sweet and sour. It takes a bit of work- but it is worth the effort. I used a fresh pineapple, which I prefer, but canned pineapple could be used, too. You can buy sweet and sour sauce in most grocery stores, but I like my own better.
Make the sauce first, so you can just toss it over the pork and veggies when ready to serve.
The pork is cubed and marinated overnight in a mixture of soy sauce, cornstarch and an egg. The pork comes out very tender, when prepared this way. You could substitute cubed chicken, for the pork, if you prefer.
Sweet and Sour Pork
1-2 lbs. boneless pork
1 egg
1 t. cornstarch
2 t. soy sauce
Additional cornstarch for dredging
oil for frying
1 medium onion, chopped
1 sweet red or yellow pepper, seeded and chopped
2 cups peeled and cubed fresh pineapple, or 1 can pineapple in juice, drained, reserving juice for sauce
Sweet and Sour Sauce, recipe follows
Chopped green onions
Cut meat into cubes and place in bowl. Combine egg, 1-t. cornstarch and soy sauce and pour over the meat, stirring to coat. Allow marinating at least 1 hour in fridge, but best if done the day before, or early in the day.
When ready to cook, heat 1-2 inches of oil in a medium sauce pan to 350 degrees. Dredge the pork in corn starch to coat. Set aside. Heat 1T. oil in large skillet or wok. In wok, sauté onions on high until tender. While you are cooking the onions and other vegetables, start cooking the cubed pork in the sauce pan in the 1-2 inches of hot oil. It will take several batches to cook the pork. As the pork cooks- it will take about three minutes per batch- remove the pork from the pan and drain on paper towels. Continue to cook the pork in batches while finishing the veggies and pineapple in the wok. Add pepper to onion and sauté 3 minutes more. Add pineapple and cook until pineapple starts to brown a little. Add the cooked pork to the onion mixture. Then and some of the sweet and sour sauce and toss until coated. There is usually extra sauce for a later use. Serve over rice, and top with some green onions. Makes 4-6 servings.
Sweet and Sour Sauce- see note
1/2 c. apple cider vinegar
1/2 c. sugar
1/2 c. pineapple juice
3 T. ketchup
2 T. soy sauce
2 T. cornstarch
1 t. dried minced garlic
1-t. fresh grated ginger
Hot pepper flakes to taste
In saucepan combine all ingredients. Cook over medium heat, stirring as mixture gets hot, until sauce begins to bubble. It will also get much clearer. Boil gently 1 minute, stirring constantly before removing You may also want to use only some of the sauce and save the rest for another use.from heat. Makes 1 1/2 c. Keeps in the fridge for a couple of weeks.
Note: If you make the sweet and sour sauce ahead of time it will get runny when reheated if made with regular cornstarch. Either use modified cornstarch (Clear Gel ) or make sauce just before using.
Posted in Cooking |
Bacon and Corn Chowder


I was sorting out my freezer and found local sweet corn I had frozen last summer. I had forgotten all about it. I wanted to make soup for a dinner, so I decided to use the frozen corn to make this chowder. I also had a pound of bacon, which gave the soup a wonderful smoky flavor. I cooked the bacon in the soup pot, allowing it to get pretty crisp. I removed as much of the fat as I could, but left the bacon in the pot. Then, when I cooked the onions and added the stock, all the little brown bits of bacon in the pot added even more flavor. It came out great!! A perfect dish for a chilly, snowy evening.
Bacon and Corn Chowder
1 lb. bacon
1 onion, chopped
2 carrots, peeled and sliced
6 c. chicken stock
2 potatoes, peeled and cubed
6 c. corn – I used frozen corn
2 cups half and half or milk
¼ c. flour
Salt and pepper to taste
Hot sauce to taste
Fresh chopped parsley
Cut bacon in 1-inch pieces and fry in a Dutch oven until crisp. Tip pot and spoon out most of the fat. Add the onion and sauté until translucent. Add carrots and stock. Cover and simmer 10 minutes, then add the potatoes and corn. Cover and simmer 15-20 minutes, or until potatoes are tender. In jar with a tight fitting lid, combine 1 cup of the half and half or milk with the flour. Put on the lid and shake until mixture is smooth. Stir into the pot along with the remaining half and half or milk and cook, stirring often until mixture thickens up. Adjust seasoning to taste. Stir in parsley and serve. Serves 6.
Chili Stew


We made this dish in class the other night. It’s a great dish when time is short. It is fast to make and still has plenty of flavor. It falls somewhere between a chili and a stew, so that is where the name came from. I like it because it can be made from so many ingredients I already have in my pantry/freezer. This is a fun dish to serve for Super Bowl Sunday!!
Can be served as is, or topped with cheese, sour cream or chopped onions. Perfect dinner for a “chili” night.
Chili Stew
1 pound ground beef or turkey
1 medium onion, chopped
1 small sweet pepper, chopped
1 (15 ounce) can black beans
2 (16 ounce) cans kidney beans, rinsed and drained
2 c. corn, fresh, frozen or canned (drained)
1 (14.5 ounce) can diced tomatoes
1 (8 ounce) can tomato sauce
1 (4 ounce) can chopped green chilies
1 envelope taco seasoning
2 tablespoons chili powder
1/2 teaspoon salt
In a Dutch oven or large saucepan, cook the meat, onion and pepper over medium heat until meat is no longer pink; drain. Stir in remaining ingredients. Bring to a boil. Reduce heat; simmer, uncovered, for 15 minutes, stirring occasionally. Serves 4-5.
Orange Tea Bread


Winter is citrus season and I have been eating a lot of oranges lately. Besides eating them fresh, I also like to cook with oranges. If you are looking for a new recipe for a quick bread, I would recommend trying this one.
The bread is flavored with orange zest in the batter, then a warm orange syrup is drizzled over the bread, right out of the oven. This makes for a bread that is flavorful and moist. It can be breakfast, a brunch dish or even a dessert, when topped with ice cream or whipped cream. The recipe makes one loaf, but I often double the recipe and make two. It seems to disappear around here pretty quickly. The bread freezes well, too.
Orange Tea Bread
2 cups all-purpose flour
1-1/2 teaspoons baking powder
1 teaspoon baking soda
1/2 teaspoon salt
2/3 cup Greek yogurt or sour cream
2/3 cup sugar
2 large eggs
3 tablespoons melted unsalted butter
1 tablespoon grated orange zest
Syrup:
1/2 cup orange juice
1/4 cup sugar
Preheat oven to 350 degrees. Grease an 8×4″ loaf pan. Line pan with wax paper or parchment and set aside. Sift flour, baking powder, baking soda and salt into a bowl. In a separate bowl, whisk together yogurt, sugar, eggs, butter and orange zest. Add liquid ingredients to dry ingredients, and stir mixture until well combined. Transfer batter to loaf pan, smoothing top, and bake in oven for 45 to 50 minutes, or until skewer inserted in middle comes out clean. While the bread is baking, combine orange juice and sugar in a saucepan. Bring mixture to a boil over moderate heat while stirring, and simmer for 1 minute. Keep syrup warm. Make holes in top of bread with a thin wooden skewer and drizzle with syrup. Let stand in pan until cool. Makes 1 loaf.
Homemade Lemon Curd


Lemon curd is one of my favorite desserts to make. Lemon curd is such a versatile dish. It’s a sort of lemon pudding and can be served plain, or with a dollop of whipped cream. It is also great in trifle or served as a topper for any number of cakes and sweet treats. I especially like to make lemon curd to serve with scones. It is also really nice served with berry shortcakes.
It is easy to make and packed with fresh lemon flavor. Lemon curd is just a few ingredients, cooked over low heat until it thickens up. You can make a batch in under 10 minutes. The longest part of the prep time is just waiting for it to cool down after cooking.
So here is the recipe for the lemon curd. If you never made your own- you might want to give it a try. Certainly worth the effort.
Lemon Curd
1/2 c. lemon juice
zest from one good sized lemon- you should have 2-3 teaspoons
1/2 c. sugar
3 eggs
6 T. unsalted butter- cut into little cubes
In medium saucepan combine all ingredients. Whisk the mixture until the eggs are well blended. Cook over medium low heat, whisking often, until the mixture thickens. This will take 5-7 minutes. Whisk more often as mixtures warms and starts to thicken. Better to heat over lower heat and take longer than over too high a heat. You don’t want the eggs to scramble. Once the mixture is thickened , transfer to a bowl or jar. Cover the surface with a piece of plastic wrap to keep the surface from developing a skin- like any pudding will do. Chill until ready to use. Makes about 2 cups. Will keep in fridge a week or two.
100% Whole Wheat Bread


A lot of us want to eat more whole grains, but are unhappy when we try to make 100% whole wheat bread at home. There is a secret to baking whole wheat bread that is both tender, and slices easily.
Whole wheat flour, high in gluten, also is high in fibers, which make it harder to get the gluten to that stretchy state. If you knead whole wheat bread dough for 5- 10 minutes, like white bread dough, you’ll have a dough that is far from elastic.
The secret? Knead it longer. I knead my whole wheat bread dough about 20 minutes. That is easy if you have it in a stand mixer. Just set it on low and let the dough hook do the work. Not so easy if you are kneading by hand. When kneading for 20 minutes by hand, more and more flour gets added to the dough, to keep it from sticking. The extra flour results in a heavy dough, and a loaf of bread that is best used as a door stop. If you have to knead by hand- knead on a wet surface. The dough won’t stick to your hands or the board and you can knead it long enough to get a properly worked dough. How do you know your dough has been worked long enough? Hold the dough up to light and pull it. It should stretch thin enough so that you can see the light through it, without tearing. Here is one of several recipes I have for 100% whole wheat bread. I love it and I think you will, too.
100% Whole Wheat Bread
2 packets active dry yeast
2 2/3 c. warm water
½ c. oil
½ c. honey, molasses or maple syrup
6 ½ -7 c. whole wheat flour
½ c. non fat dry milk
2½ t. salt
Combine first 4 ingredients in a mixing bowl and stir in 3 cups of the flour, the dry milk and the salt. Beat with electric mixer for 3 minutes. Stir in enough flour for mixture to form a thick batter and continue mixing on low in mixer for 15-20 minutes. Dough takes time to become elastic. Add extra flour slowly until dough comes away from the sides of the work bowl, but not too soon. Note: if you must do this by hand add flour until dough starts to come away from the sides of the bowl and knead with wet hands on wet work surface for 15-20 minutes. Transfer dough to lightly greased bowl and cover, allowing to rise until puffy, about 1 hour. Punch dough down and transfer to a lightly floured surface. Divide in half and shape each half into a loaf. Place in a lightly greased 9×5 – inch pan. Brush top with oil and place a piece of plastic wrap over the top. Allow to rise until doubled. Bake in a preheated 350 degree oven for 40 minutes. Tent with foil after 20 minutes to prevent over browning of the top. Test for doneness by removing bread from pan and thumping on the bottom. Bread should sound hollow. Makes 2.
Salmon Quiche


I like canned salmon. There, I said it. I know it sometimes gets a bad rap, but I find canned salmon very convenient to have around. If you didn’t already know this- canned salmon is made from wild caught salmon and has all the nutritional benefits of fresh. If you are looking for something different to do with canned salmon, you might want to try this recipe.
If you prefer, you could use fresh salmon. About 12 oz. of cooked salmon, flaked, would be used in place of the canned salmon.
The crust is a breeze to make. It’s pressed into the pie pan, rather than being rolled out. The crust is made with whole wheat flour, almonds and cheddar cheese. Yum. You could use this crust recipe for other quiches.
Did I mention it also freezes well?
Salmon Quiche
1 c. whole wheat flour
2/3 c. shredded sharp cheddar cheese
1/4 c. chopped almonds
1/2 t. salt
1/2 t. paprika
6 T. oil
1 (15 oz.) can salmon, flaked, drained, liquid reserved, bones and skin removed
3 eggs, beaten
1 c. sour cream
1/4 c. mayo or salad dressing
1/2 c. shredded sharp cheddar cheese
1 T. grated onion
1/2 t. dillweed
3 drops Tabasco
For crust, combine first 5 ingredients in a bowl. Add oil and mix well. Press into a 9 inch pie plate. Bake in a 400 degree oven for 10 minutes. Remove pie crust from oven and reduce oven temperature to 325 degrees. Meanwhile, begin filling. If needed, add water to reserved salmon juice to measure 1/2 cup. Combine remaining ingredients in a bowl, including reserved liquid. Pour into prepared crust and bake for 45 minutes or until set in the center. Makes 6 servings.
How to Make Ghee


Ghee, if you haven’t had it before, is a kind of clarified butter, often used in Indian cooking. You can buy it at stores that carry international foods, but it is easy to make. I had a lot of butter left over from holiday baking, so I used some to make ghee.
Ghee has a wonderful, toasted, nutty flavor and it can be used in all sorts of dishes. You can add it to veggies or spread it on toast. I love to add ghee to rice or pasta.
A wonderful bonus when using ghee, because the milk solids have been removed, you can fry foods in it. It doesn’t burn quickly, like regular butter.
Because the solids have been removed, you can store ghee at room temperature. Although, it is recommended to use up home made ghee in a month or so. For longer storage, you can pop it in the fridge, but you don’t have to.
The difference between ghee and clarified butter is that ghee is cooked longer, to develop a darker color and wonderful toasted flavor. The longer cooking also removes any water in the butter, leaving just the fat behind.
There are several methods for making ghee. Some suggest long, slow cooking. Others a little more heat and less cooking time. I prefer the latter. I am not the most patient person.
Here is how I made my ghee.
Start with a pound of unsalted butter. Place the butter in a heavy bottomed, medium sized saucepan. Melt the butter over low heat. As soon as the butter is melted, turn the heat up a bit- to medium. It will start to form foam on the top at this point. After a few minutes, the foaming will stop. Turn up the heat a little more- not high heat, but a little higher medium, if that makes sense. Watch for the second foam to form on the top. This takes about 7-8 minutes. It will have turned a pretty, golden color. At this point, your ghee is done. You’ll have to strain it, to keep out the solids, which will have settled to the bottom of the pan. I strained my ghee twice, through several layers of cheesecloth. Be sure the container you are straining the ghee into is heat proof- it is pretty hot at this point. I used a stainless steel bowl, then transferred the ghee to a canning jar. You could also use a fine mesh strainer, if you don’t have cheesecloth. Store in a container with a tight fitting lid- you don’t want moisture to get to your ghee. It will get more solid as it cools down.
One last thing. I used a stainless steel pot and the brown bits took a bit of scrubbing to get out of the pot. Small price to pay for your own ghee.
That’s all there is to it. Try to use within a month or store in the fridge. Trust me, it never lasts that long around here!!
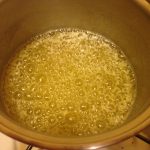
first foam
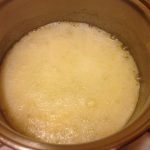
second foam
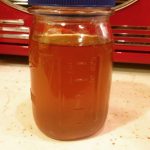
strained, still warm

All cooled down


