Chocolate Biscotti
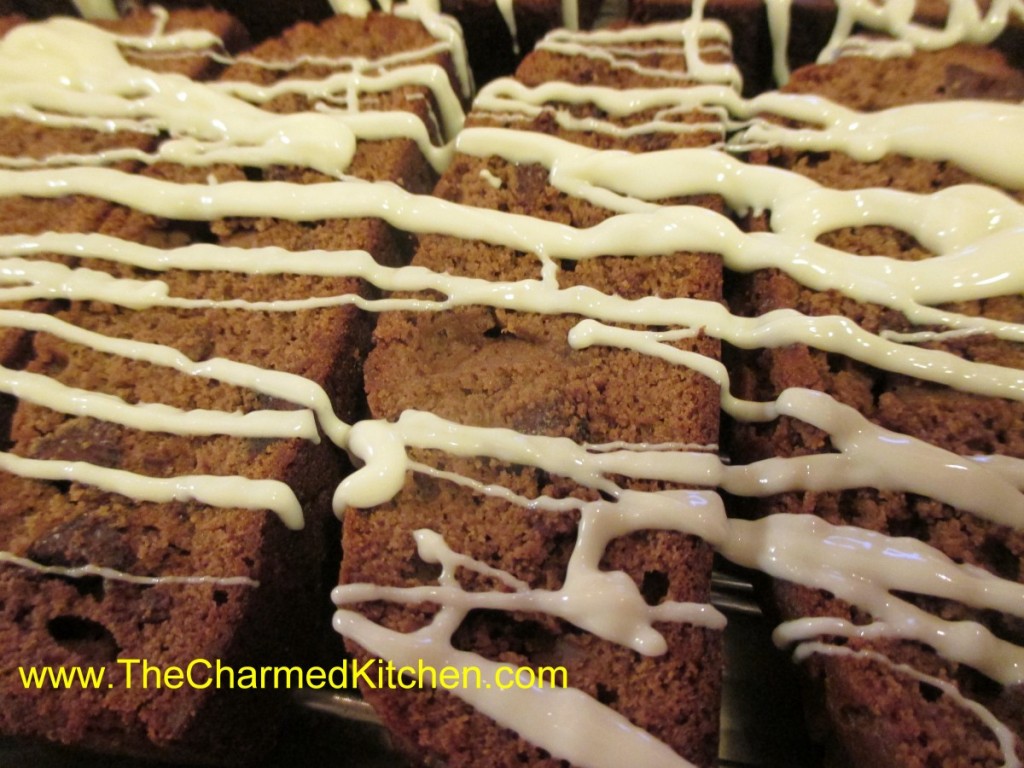
I don’t think I ever met a biscotti I didn’t love. These chocolate biscotti are so good. They are not too sweet and have plenty of chocolate flavor. If you haven’t made your own biscotti before, you should. These crisp, twice baked cookies, are easy to make. The second bake is where biscotti get their famous crunch. They are baked until they have this lovely crisp texture, meant to be dipped in coffee. Of course they are also good dipped in tea or even a glass of milk.
Handy tip: Once biscotti are baked the first time, they are sliced and baked a second time. Most recipes call for you to turn the biscotti over half way through the second bake- to get them crisp/dried evenly. To save time, I just place a cooling rack on my baking sheet before the second bake. I then lay the sliced biscotti on the cooling rack. Now, during baking, air flows under the biscotti and there is no need to turn them over while baking. Saves time.
Chocolate Biscotti
3/4 c. brown sugar
1/2 c. butter, room temperature
2 eggs
3/4 c. chocolate syrup
2 1/2 c. flour
2 t. baking powder
1/2 t. salt
1 c. chocolate chips (mini, regular or flavored)
1 c. chopped nuts, optional
3 oz. white chocolate
Grease 2 9×5-inch loaf pans and set aside. Beat sugar and butter together than beat in eggs and syrup. Beat in dry ingredients. Dough will be soft. Stir in chips and nuts. Divide batter in prepared pans and use spatula to spread evenly. Bake in a 350-degree oven for about 35 minutes. Tester inserted in center should come out clean. Turn loaves onto rack and cool 15 minutes. Reduce oven temperature to 300-degrees. Using a serrated knife cut loaves into 3/4 -inch slices. Place cooling rack on a baking sheet. Place biscotti slices cut side down on cooling rack and bake about 18-19 minutes. Cookies will become harder/crisper as they cool. Cool completely. Melt white chocolate and drizzle over biscotti. Allow to set up. Makes about 2 dozen.
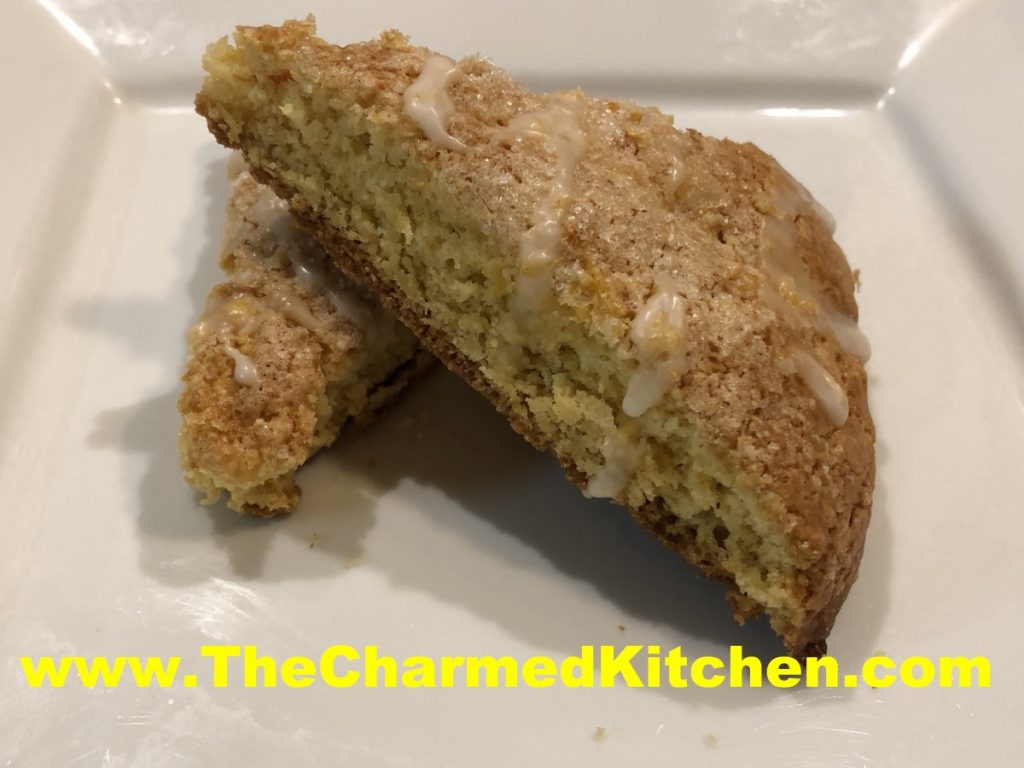
Grapefruit Scones
I wanted something to serve with tea and decided to make scones. I am not sure why I decided to use grapefruit in the recipe. It might have been that big bowl of organic pink grapefruit sitting on the counter.
I started with a scone recipe I had used before, then tweaked it by adding grapefruit zest and juice. I added grapefruit juice and zest every where I could think of.
They came out great. You could even see little flecks of pink here and there.
Scones, done right, are very tender. These scones came out just perfect. A little crispy on the outside, tender on the inside. Not too sweet and the delicate flavor of grapefruit. So here is the recipe.
Grapefruit Scones
2 c. flour
½ c. sugar
1 T. baking powder
1 t. baking soda
½ t. salt
Zest of 1 grapefruit
½ c. cold butter
1 egg, beaten
¼ c. half and half
¼ c. grapefruit juice
Topping:
2-3 T. half and half
4 T. sugar
1 T. grapefruit zest
Glaze:
1½ powdered sugar
1 T. grapefruit zest
3-4 T. grapefruit juice
Preheat oven to 375. Line a baking sheet with parchment paper or silicone liner- or grease lightly. Set aside. In medium bowl, combine flour with sugar, baking powder, baking soda, salt and zest. Cut in cold butter until mixture looks like coarse crumbs. In small bowl, combine egg with half and half and grapefruit juice. Add to flour mixture and stir until mixture forms into a soft dough. Mix until combined, but don’t over mix. On lightly floured surface, divide dough in half. Dust an 8-inch round cake pan. Add half of the dough and press in until dough is evenly spread in the pan. Turn the pan over, quickly, onto the prepared baking sheet to get the dough out. Note: this part seems a little tricky, but it gives you a perfect 8-inch circle of dough. Don’t under-flour the pan and the dough will come right out. Also, be sure to flip the dough near one corner of the baking sheet, so you will have room for the other half of the dough. Re-flour the cake pan, press in the rest of the dough and flip it onto the baking sheet. Now you have 2 ( 8-inch) circles of dough on the baking sheet- hopefully. Don’t sweat this part. If the dough doesn’t come out easily, just scrape it out of the cake pan, add more flour, return the dough to the cake pan, and try it again. And when you are flipping it out of the pan- do it quickly. If you prefer, you can place the dough on the baking sheet, in two piles, and shape it into 2 ( 8-inch) circles. Using a dough cutter or a spatula, cut each circle of dough into 8 wedges. For the topping, brush the scones with half and half. Combine the sugar and zest and sprinkle over the dough. Bake for 20-22 minutes, or until golden brown. Re-cut the scones where you cut them before, and place the scones on a cooling rack. Let them cool a few minutes. Meanwhile, make the glaze. Combine the powdered sugar and zest, then add enough grapefruit juice to make a glaze you can drizzle. Using a small spoon or even a fork, drizzle the tops of the scones with the glaze. Make a pot of tea and eat your scones. Makes 16.
Sweet Heart Sugar Cookies
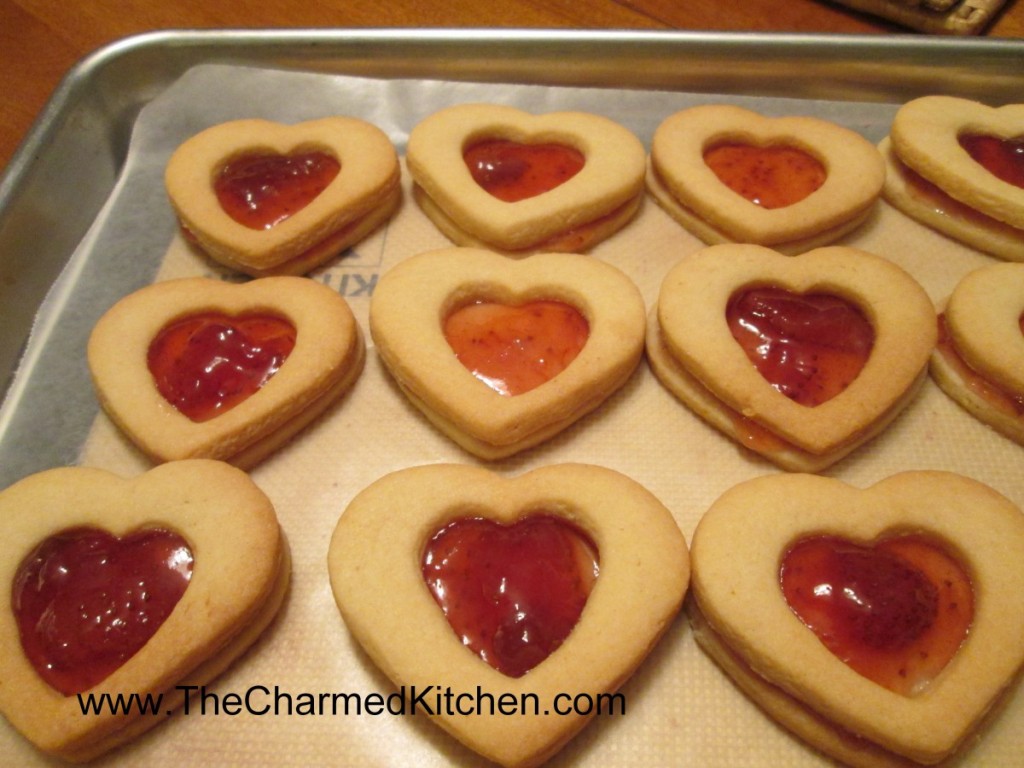
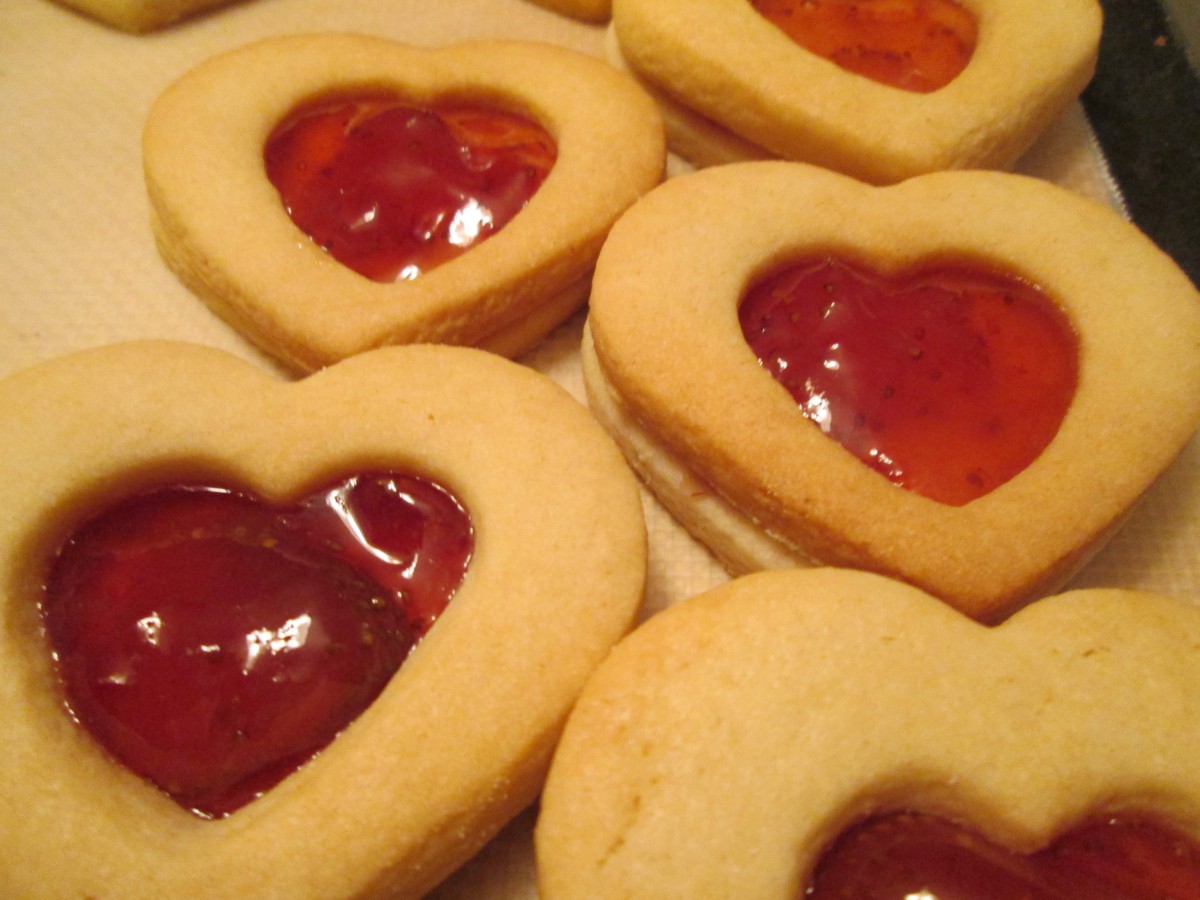
For Valentine’s Day, not every dessert has to be chocolate. These sugar cookies would be a great way to share the love.
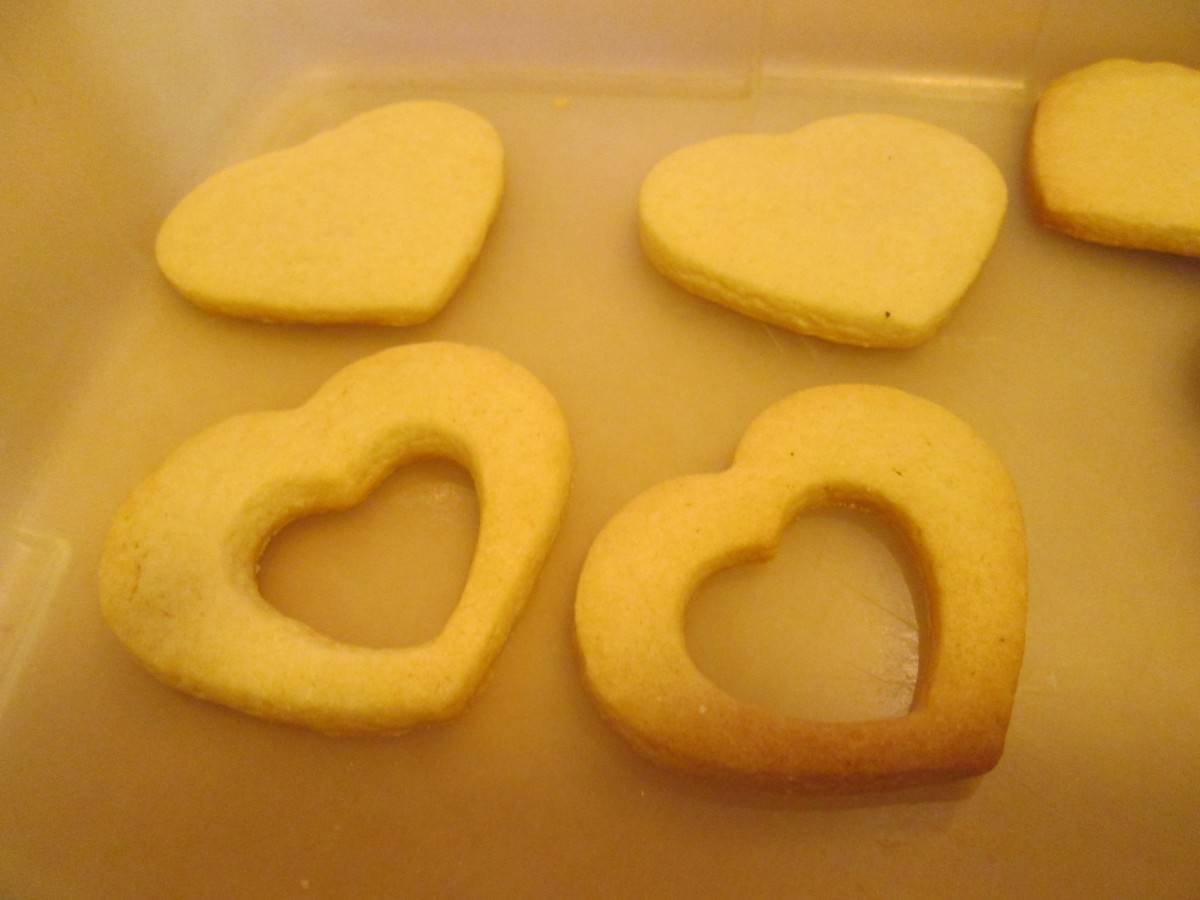
I used my favorite sugar cookie recipe and cut out hearts. Then used a smaller heart cookie cutter and cut out smaller hearts from the center of half of the cookies.
Sandwich the baked cookies together with homemade strawberry preserves. Use one of the “cutout” cookies on top. It gives a pretty effect to the finished cookies. I used strawberry jam, but any red jelly or jam could be used.
Since I also had a bunch of tiny heart cookies from the cut outs, I used melted chocolate to turn them into tiny heart shaped sandwich cookies.
Sweetheart Sugar Cookies
1 c. butter
1 c. sugar
1 egg
1 t. vanilla
3 c. flour
2 t. baking powder
3 T. milk
Extra sugar for sprinkling, if desired
strawberry preserves or jam or raspberry
Beat butter and sugar until fluffy. Beat in egg and vanilla. Combine dry ingredients and add to butter mixture. Beat in milk. Heat oven to 375-degrees. Roll dough on lightly floured surface to about 1/3- inch thickness. Cut out with lightly floured cutters and sprinkle with sugar or colored sugar if you like and if you are not going to frost them. Bake on an ungreased baking sheet for 10-12 minutes. Cool on baking sheet 3 minutes before placing on wire rack to cool completely. Sandwich together with jam when cooled. Makes about 4 dozen.
Sweetheart Sugar Cookies
Chocolate Waffles
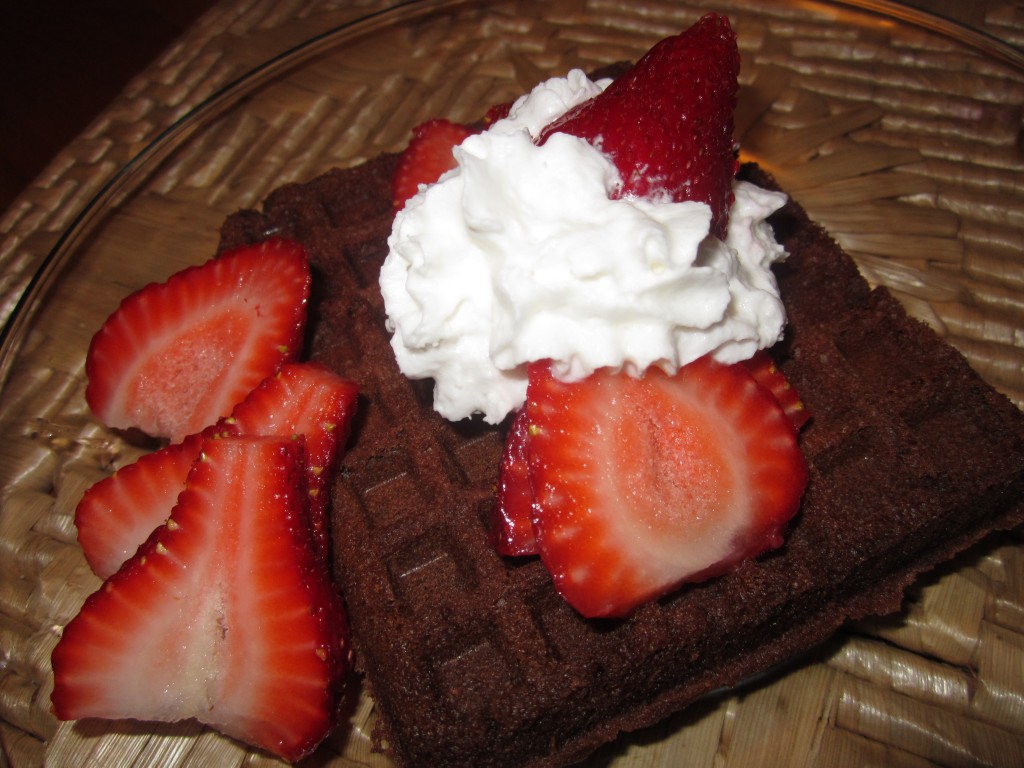
These waffles can make a great start to Valentine’s Day. Chocolate for breakfast? Why not? They also make a wonderful dessert.
The waffle batter has cocoa in it, for the chocolate flavor, but I added some cinnamon and nutmeg for a little spice. The flavor is wonderful.
Top them with whatever you like. For breakfast, warm maple syrup or a dusting of powdered sugar work well.
I enjoy topping them with whipped cream and berries. You can also top with a scoop of ice cream and hot fudge. If you like, you can even add some chocolate chips to the batter for a stronger chocolate taste.
Chocolate Waffles
2 eggs, room temperature
1/2 stick butter, melted and cooled
1 t. vanilla
1 c. buttermilk
1 c. flour
3/4 c. sugar
1/2 c. cocoa
1 t. cinnamon
1/2 t. each baking powder and baking soda
1/4 t. salt
1/4 t. nutmeg
Beat first three ingredients until light and foamy, about 2 minutes. Stir in milk. Beat in dry ingredients just until blended. Bake until waffles are cooked through. Makes 4 cups batter. Serve with whipped butter or sour cream and fresh fruit. I like them just dusted with powdered sugar, too.
Mini Chocolate Eclairs

If you want to surprise someone with a very special sweet treat, you could make them some eclairs. These are a bit or work, but the end result is so wonderful. I think they are worth the effort, especially for special occasions.
I decided to make a mini version this time, just for fun.
You start by make a pate a chou, or cream puff pastry. This is the same dough used to make cream puffs. It is a combination of water, butter, milk and flour- cooked on top of the stove, then enriched with the addition of eggs. The dough is piped onto baking sheets and baked until puffed, golden and crisp. Once cooled, they are filled with sweetened whipped cream or, more traditionally, a custard filling, then topped with chocolate ganache.
Mini Eclairs
1 recipe Cream Puff Pastry (Pate a Chou)- recipe follows
Egg custard- for filling, or sweetened whipped cream- recipe follows
Chocolate Ganache- for topping- recipe follows
Start by making the dough. This recipe will make 12-18 medium eclairs or 3 dozen of the mini ones.
Cream Puff Pastry
¾ c. water
¼ c. milk*
¼ t. salt
½ c. (1 stick) unsalted butter
1¼ c. flour – unbleached or bread flour preferred
4 large eggs
Extra milk for brushing
In saucepan, heat together water, milk butter and salt into a full boil. Butter has to be melted. While stirring, dump flour into saucepan, stirring constantly. Mixture will form into a ball. Reduce heat to medium and continue cooking dough, while stirring, for another minute or two. Place dough in an electric mixer and allow it to cool down a little before adding the eggs. Mixture has to be at 140 degrees F, or below, before you start adding the eggs. I use the paddle attachment and beat the dough before adding the eggs. This cools the dough down faster. Beat in eggs, one at a time, until each is fully incorporated. Beat until dough is shiny. A spoon, lifted out of the batter, should leave a peak that does not fall down. *You can use all water, instead of the combination of water and milk, if you prefer. Use 1 cup water in total, if omitting milk.
Preheat oven to 425. Line a baking sheet with foil or parchment. Don’t grease the pan. Using a piping bag, squeeze the dough into 2-3-inch strips on the baking sheet- leaving a little room in between. Strips should be about ¾ -inch in diameter. Using a little milk on your finger, smooth down any peaks on the puffs. They should resemble miniature hot dog buns. Bake at 425 for 10 minutes, then turn oven down to 375. Bake eclairs 10 more minutes, or until golden brown. Tap the shells. They should sound hollow. Turn off the heat and leave oven door open a crack, allowing them to dry completely. Cool before filling. Makes about 36.
Custard Filling
2 cups milk
2 tablespoons cornstarch
1⁄3 cup sugar
2 eggs, lightly beaten
1 teaspoon vanilla
Using a whisk, combine milk, sugar and cornstarch in a medium saucepan over medium heat on stove top. Allow milk to scald (heat to the point when tiny bubbles form around edges of pan). Whisk occasionally to prevent cornstarch from clumping on bottom edges of pan. Remove milk mixture from heat, preferably to a burner that’s turned off.
Mix about 2 tablespoons of scalded milk mixture into eggs using whisk, then introduce eggs into milk mixture in a slow stream, whisking milk mixture constantly. Immediately return pan to heat and whisk gently until custard thickens, another two or three minutes. Do not allow to boil. (If you find that you have egg white strands in custard, feel free to pass it through a fine-mesh sieve into a different bowl now.) Remove pan from heat and stir in vanilla. Cool before using. Makes 3 cups.
To fill the eclairs, using a small piping tip with a pastry bag, filled with the custard. Squeeze filling in on one end, on through the bottom, squeezing until it seems full.
Once eclairs are filled, top with a chocolate ganache. I just dip the tops of the eclairs in the warm ganache and chill until chocolate sets. Filled eclairs should be stored i8n fridge until ready to serve. They can be frozen.
Chocolate Ganache
4- 6 oz. dark chocolate, chopped- or 1 cup chocolate chips
2 oz. heavy whipping cream
In saucepan, heat chocolate and cream together until just heated through. Remove from heat and stir until smooth. You can also do this in a microwave safe bowl, in the microwave for about a minute. Remove and stir until smooth. Makes 1 cup.
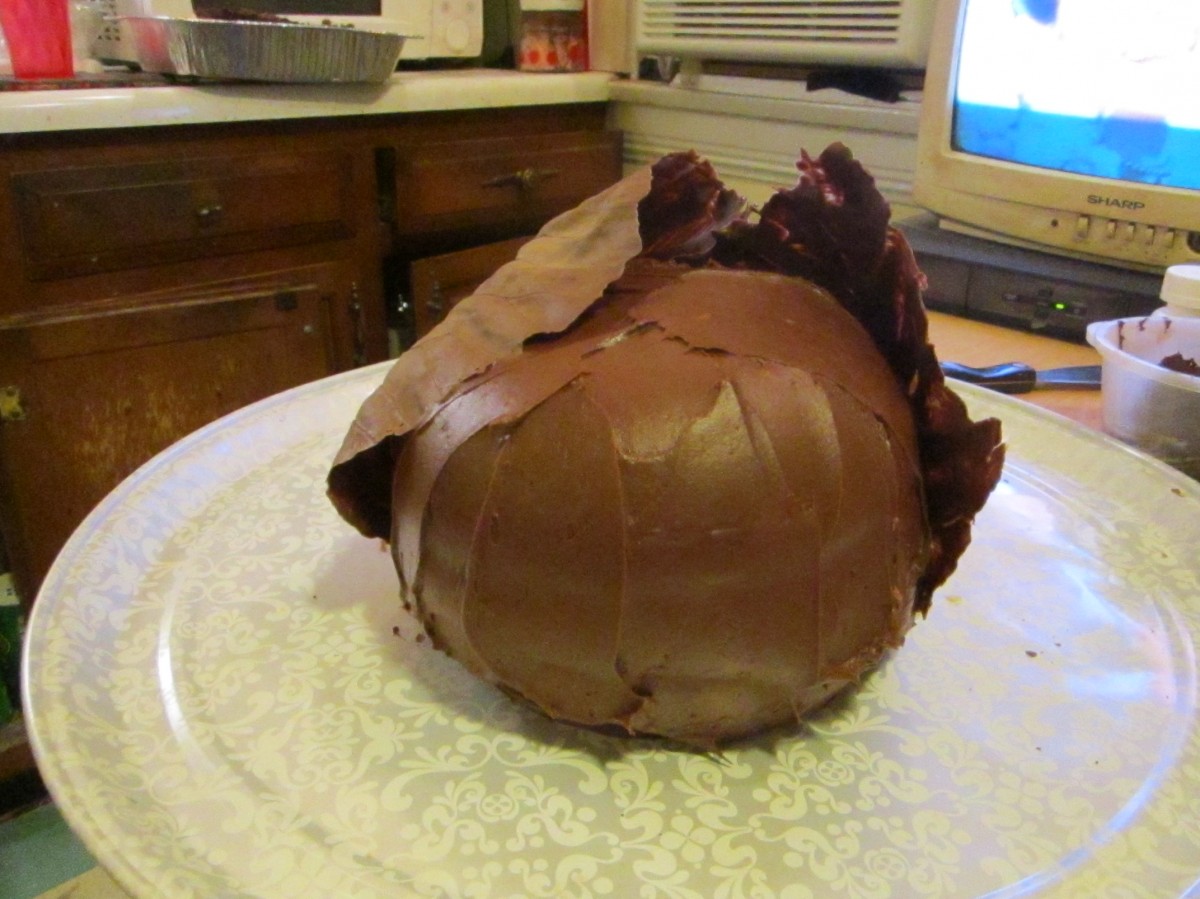
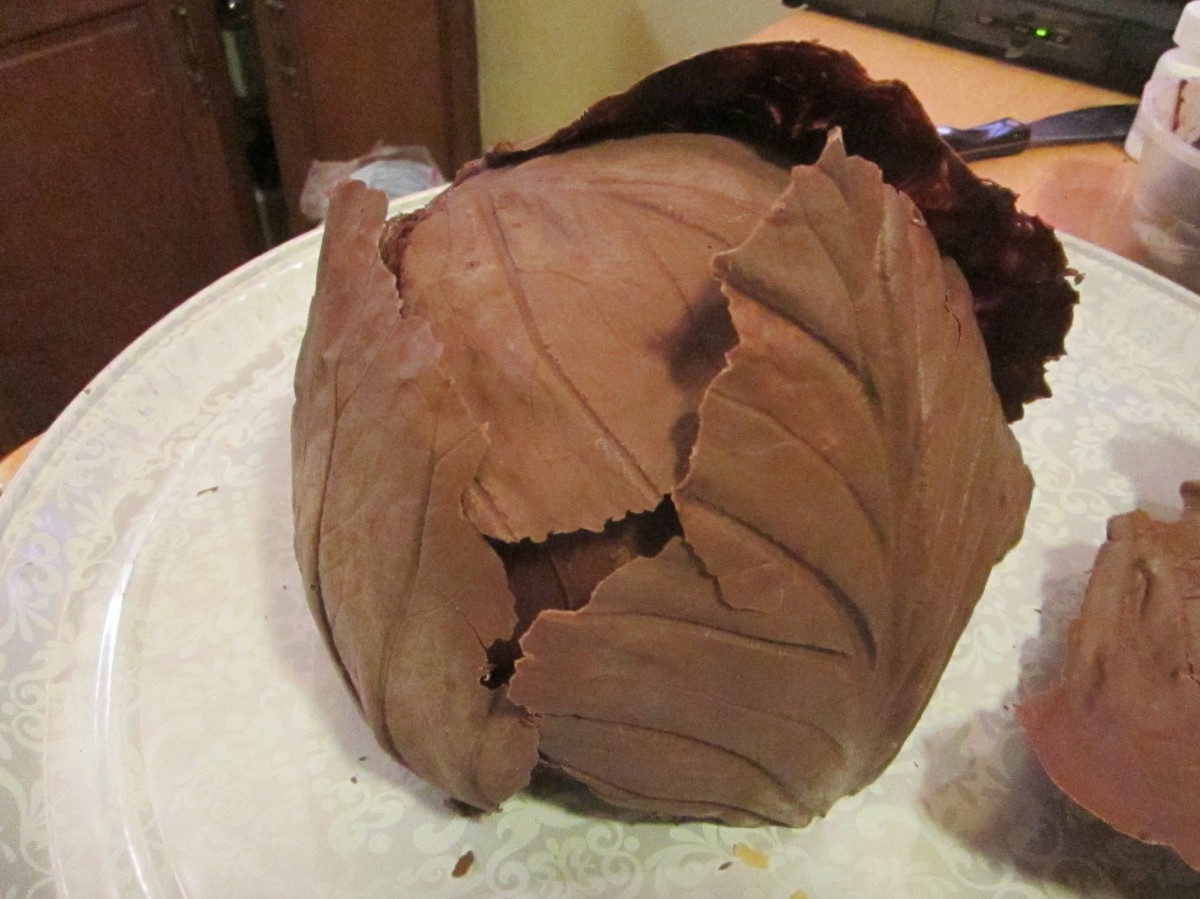
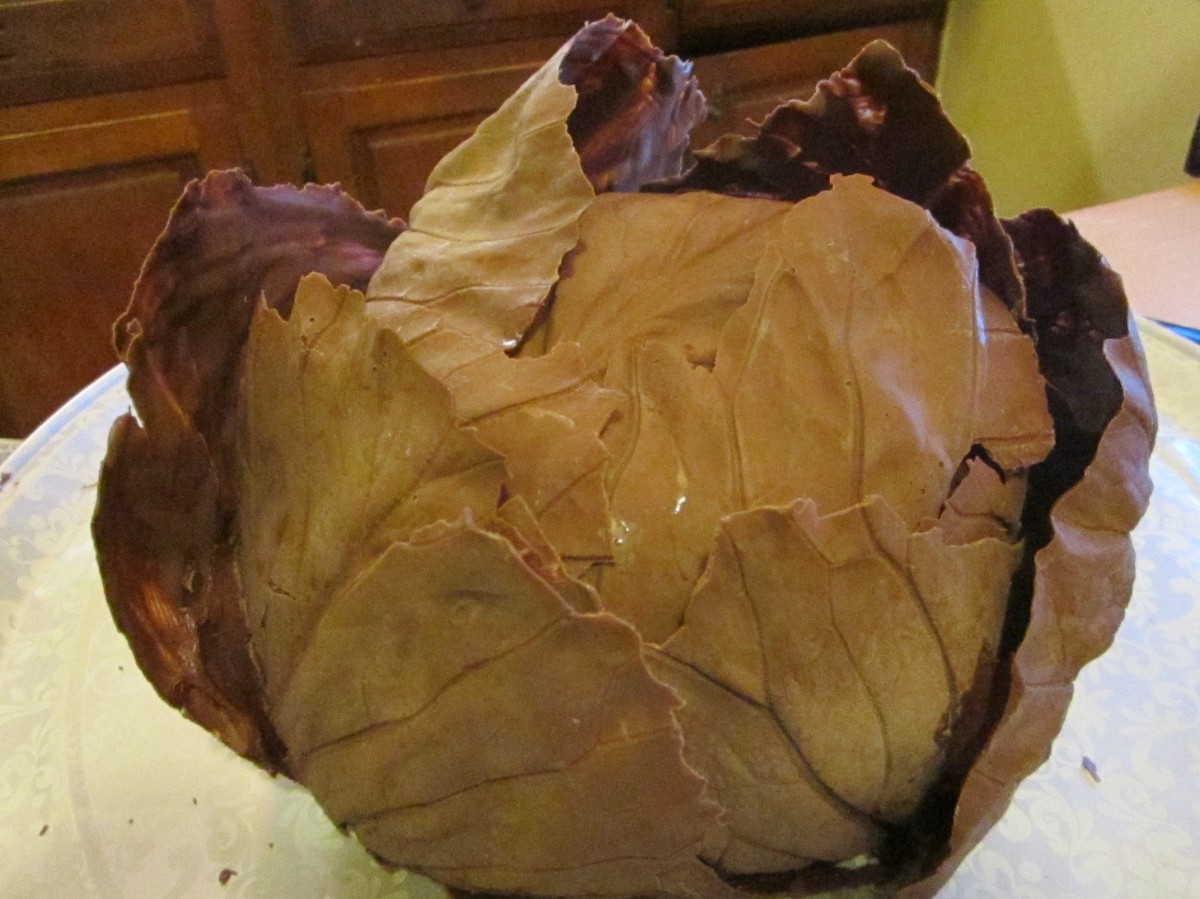
Chocolate Cabbage Cake
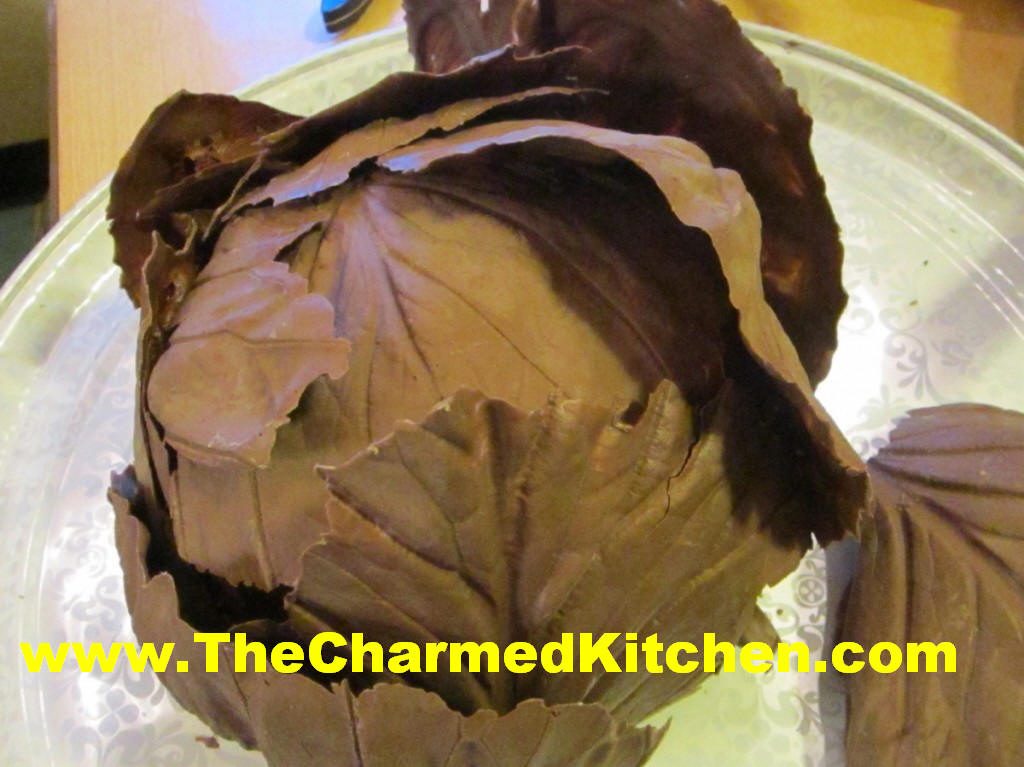
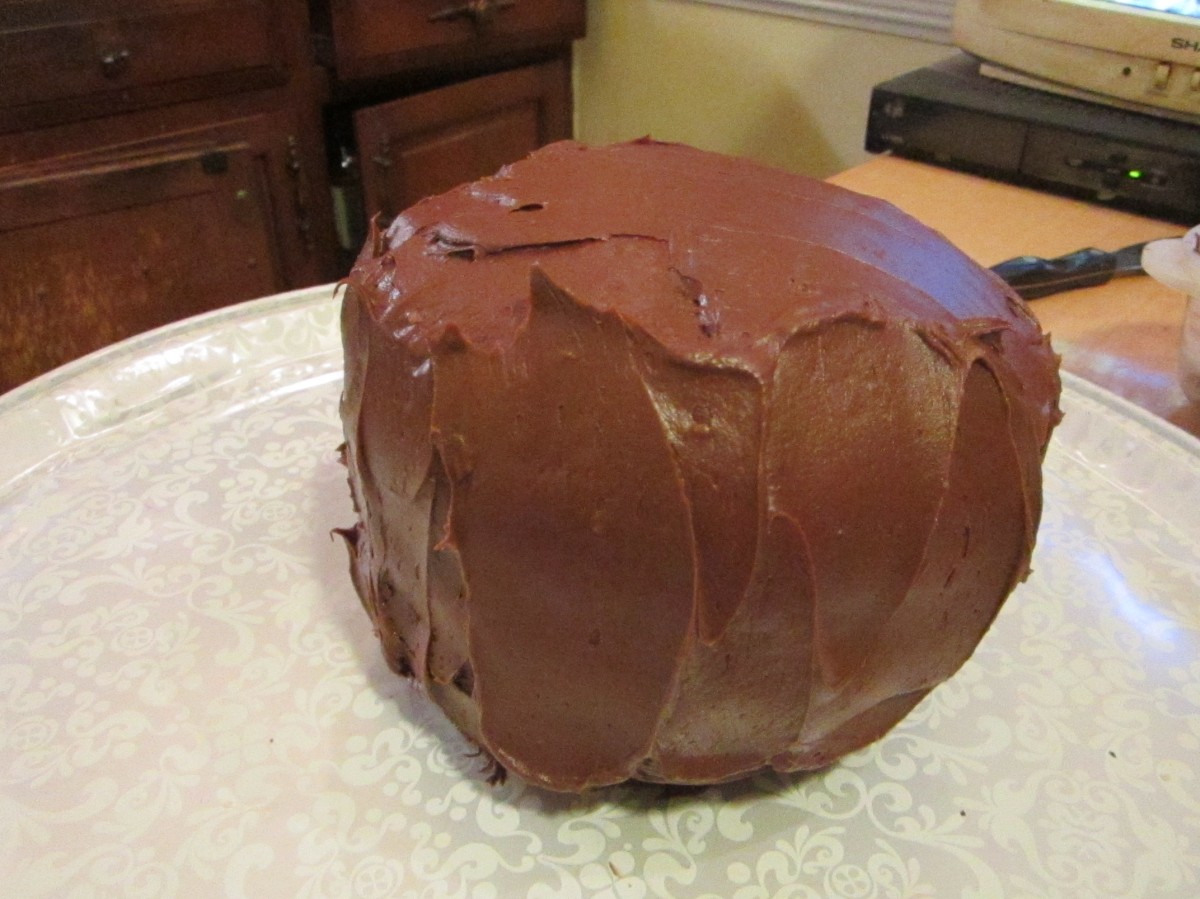
When you make a cake that looks like a giant head of cabbage- people are going to notice. While the cake looks like a head of cabbage- there is no cabbage in the cake. The cake is a round, chocolate cake covered in chocolate leaves. To make the leaves, melted chocolate is painted on cabbage leaves, cooled and then the leaves are peeled off. While it takes some work, the cake is not as hard to make as you might think. You just have to be patient. We made the cake in class last night and everyone made perfect leaves. This is a fun cake to make for gardeners or for baby showers. I made it once for a friend that is notorious for never eating veggies!!
Start by making a round cake. Use 2 stainless steel bowls that are the same size. The bowls I used were 1 quart size. Bake them, and after they are cooled, frost them together into a round cake. Recipe for cake and frosting follow.
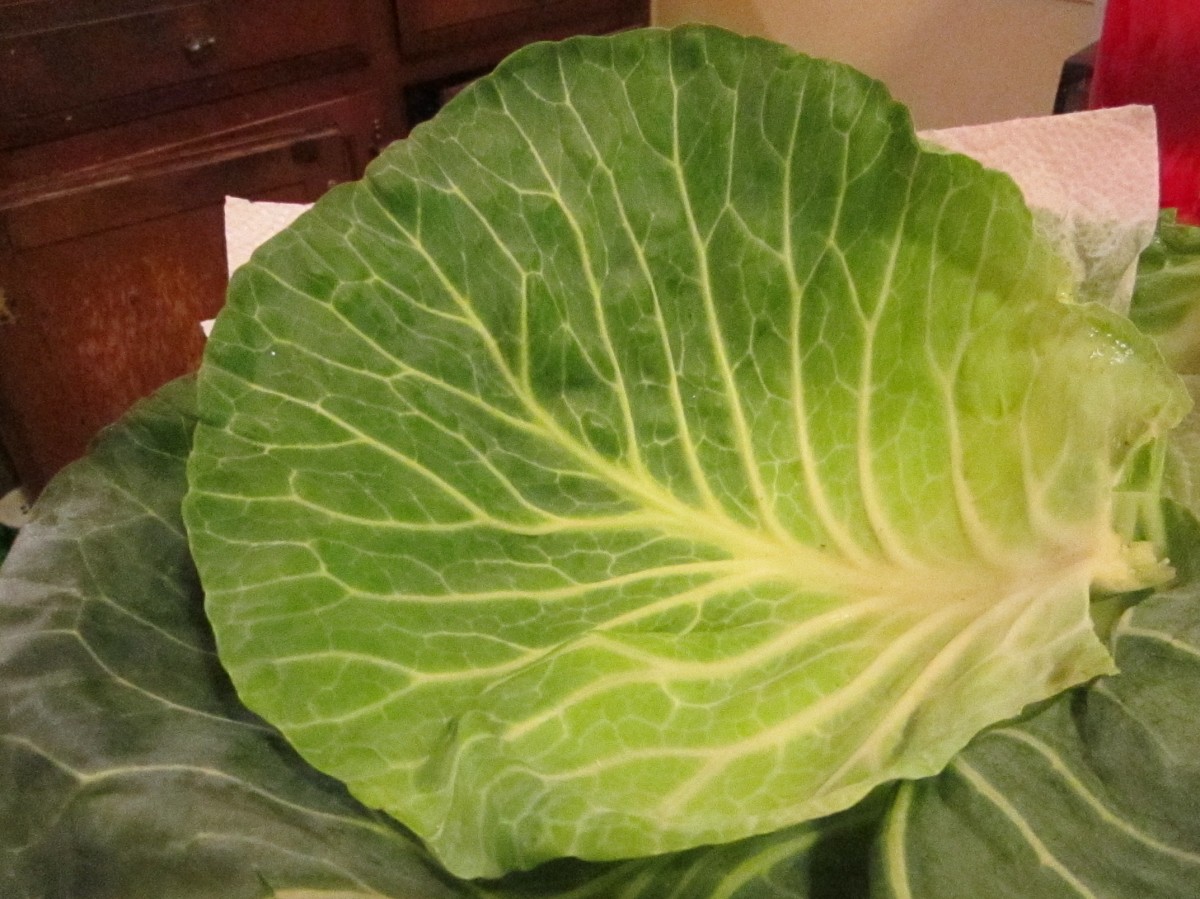
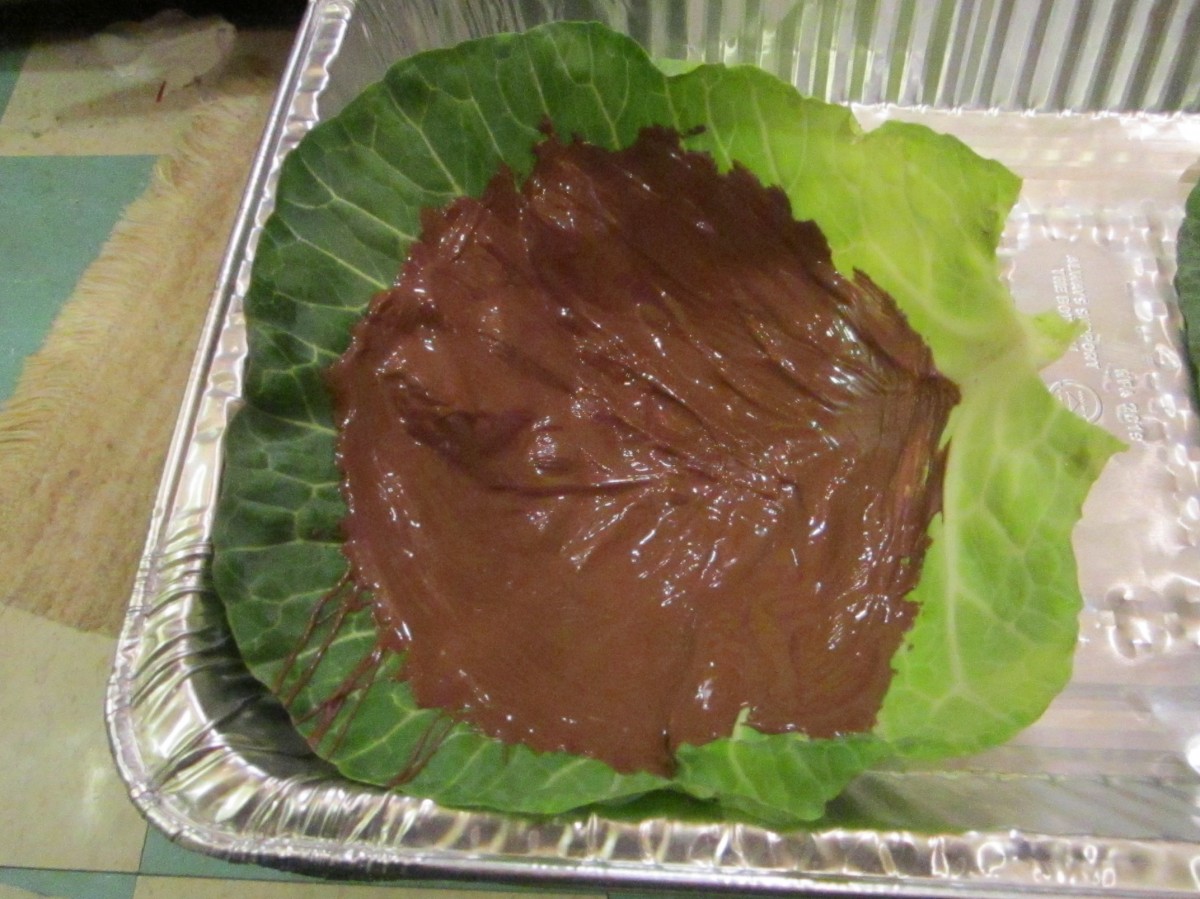
The fun starts when you paint large, clean cabbage leaves with melted chocolate. You will need a pound of chocolate. Maybe more. Ok, for sure more than a pound. I melt my chocolate in the microwave. Double boiler works , too.
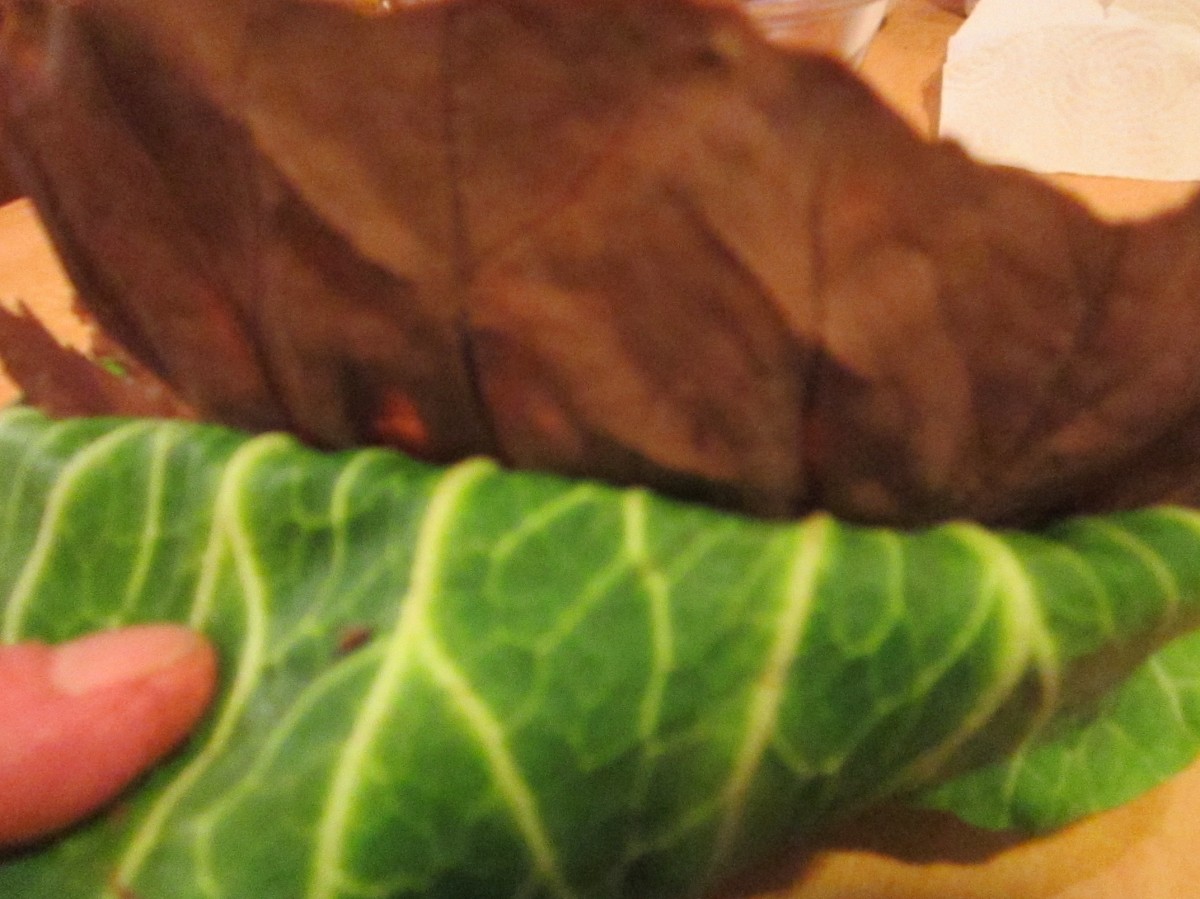
Once the chocolate is painted on the leaves, I put the leaves in the fridge to set the chocolate faster. Hint: Leave a little leaf showing all around the edges. Easier to remove later. After they are cooled, I carefully peel off and discard the cabbage leaves. What I am left with are chocolate “leaves”. Press the chocolate leaves all around the cake until it is covered. Make a few extra leaves to decorate the plate and to allow for breakage and the chocolate you are going to eat. Also keep extra frosting on hand to use to affix the leaves.
Old-Fashioned Chocolate Cake
2 c. sugar
1¾ c. all-purpose flour
¾ c. cocoa
1½ t. baking powder
1½ t. baking soda
1 t. salt
2 eggs
1 c. milk
½ c. oil – I like avocado or olive oil
2 t. vanilla
1 c. boiling water
Heat oven to 350°F. Grease and flour two (1 qt.) metal bowls. Set aside. Stir together sugar, flour, cocoa, baking powder, baking soda and salt in large bowl. Add eggs, milk, oil and vanilla; beat on medium speed of mixer 2 minutes. Stir in boiling water (batter will be thin). Pour batter into prepared pans. Bake 35 to 40 minutes or until wooden pick inserted in center comes out clean. Cool 10 minutes; remove from pans to wire racks. Cool completely.
Chocolate Butter Cream
12 T. butter, softened
1½ c. cocoa, or more, depending on how dark you want your frosting.
5 c. powdered sugar
¼ c. milk
1 T. vanilla
Cream butter. Combine cocoa and sugar. Beat cocoa mixture in alternately with the milk until frosting is spreading consistency. Beat in vanilla. You may need an additional tablespoon of milk. Makes about 4 cups. You need a good amount of frosting for the cabbage cake. You should have frosting left over.


Chocolate Shortbread
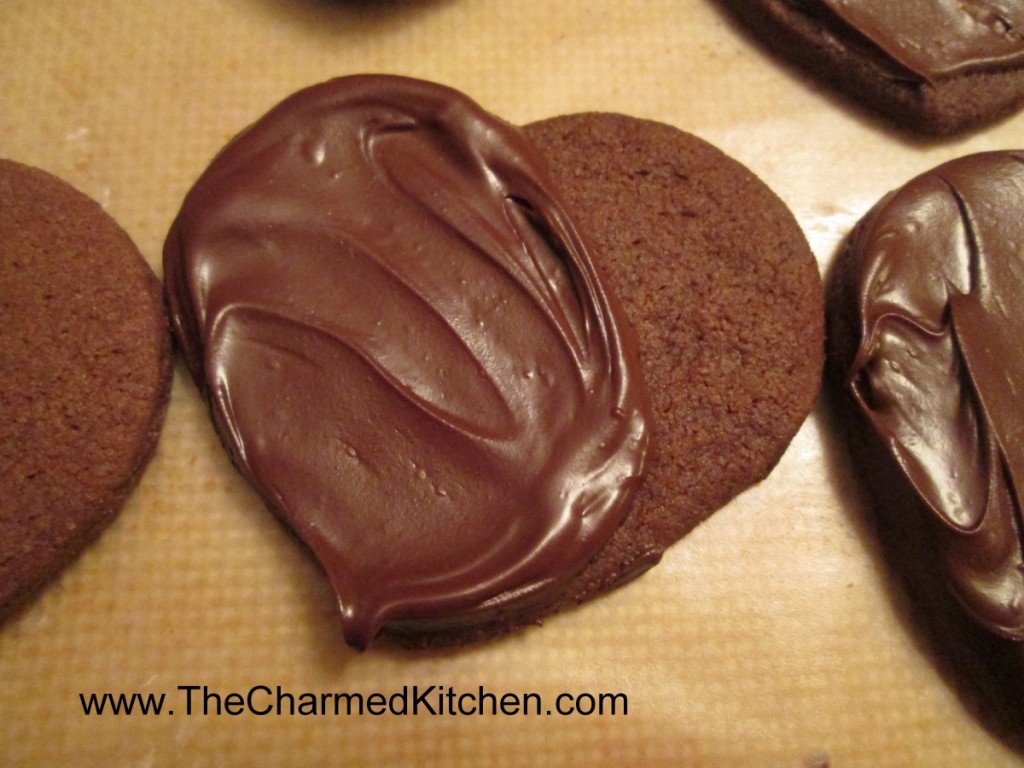
I never met a shortbread cookie I didn’t like. These are no exception. With the addition of cocoa, you end up with a cookie that has the traditional delicate texture of shortbread, with the added bonus of a rich, chocolate flavor.
They are great just plain, dusted with powdered sugar or, my favorite way, brushed with a little melted bittersweet chocolate.
Simple, tasty and a nice treat for the chocolate lovers you love.
Chocolate Shortbread
1 c. butter, room temperature
3/4 c. sugar
2 c. flour
1/3 c. cocoa
1/4 t. salt
8 oz. semi-sweet chocolate
Beat together butter and sugar until well blended. Mix together dry ingredients and slowly beat into butter mixture, stirring it in at the end. Roll out dough about 1/4 inch thick and cut out with cookie cutters. Re-roll scraps and cut out the remaining dough. Place on an un-greased baking sheet and bake at 325 degrees until cookies are firm around the edges, about 20 minutes. Cool on baking sheet 5 minutes before transferring to a rack to cool. Melt chocolate and dip cookies in it or use chocolate to hold 2 cookies together. You can also use a buttercream frosting to make them sandwich cookies. Makes 2-3 dozen, depending on the size.
Chocolate Mint Scones
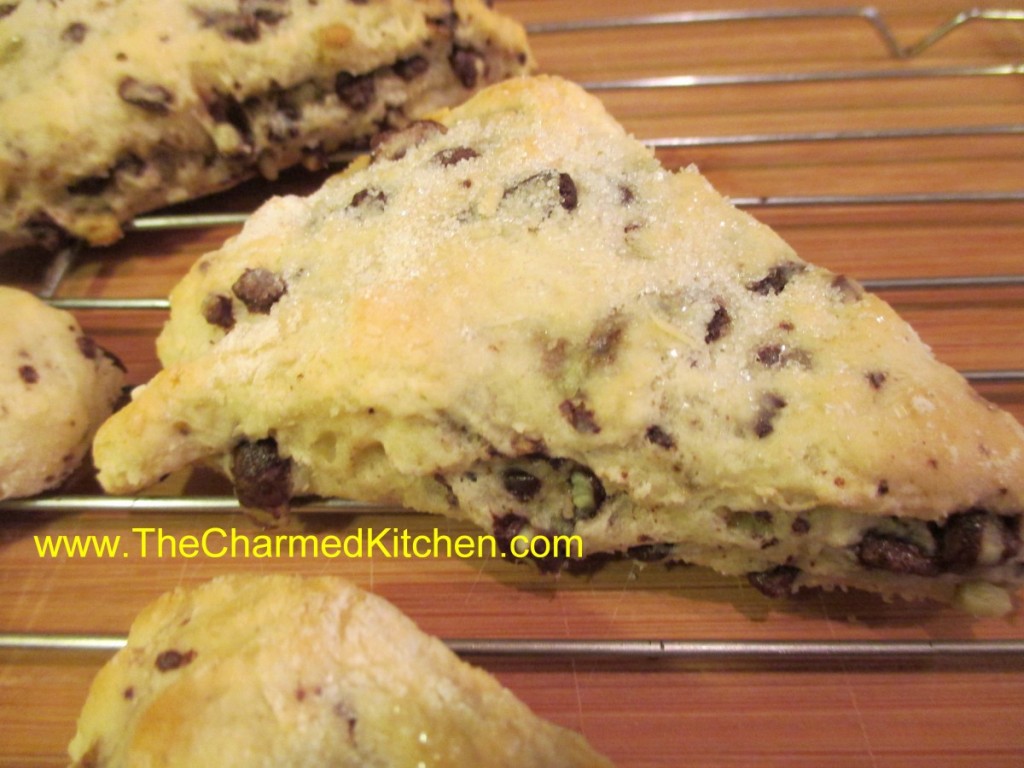
I guess I just have chocolate on my mind these days. I was going to just make a simple biscuit, but looked around at what I had, and came up with these minty chocolate scones. I used baking mix- like Bisquick- but I use a home made mix. I also had some sour cream so used that in the dough. The chocolate mint part came from a bag of Andes chocolate chips. These are just like the Andes candies, but in chip form. I have used them to make cookies before and had just enough left in the bag for the scones. The scones are very tender and flaky.
These would pair up nicely with berries and whipped cream to make shortcakes. Just let them cool completely before trying to slice for shortcakes.
Chocolate Mint Scones
1 c. baking mix- like Jiffy Mix or Bisquick- I used homemade
1/2 c. sour cream
1 egg
1/2 c. Andes chocolate mint chips
sugar for sprinkling
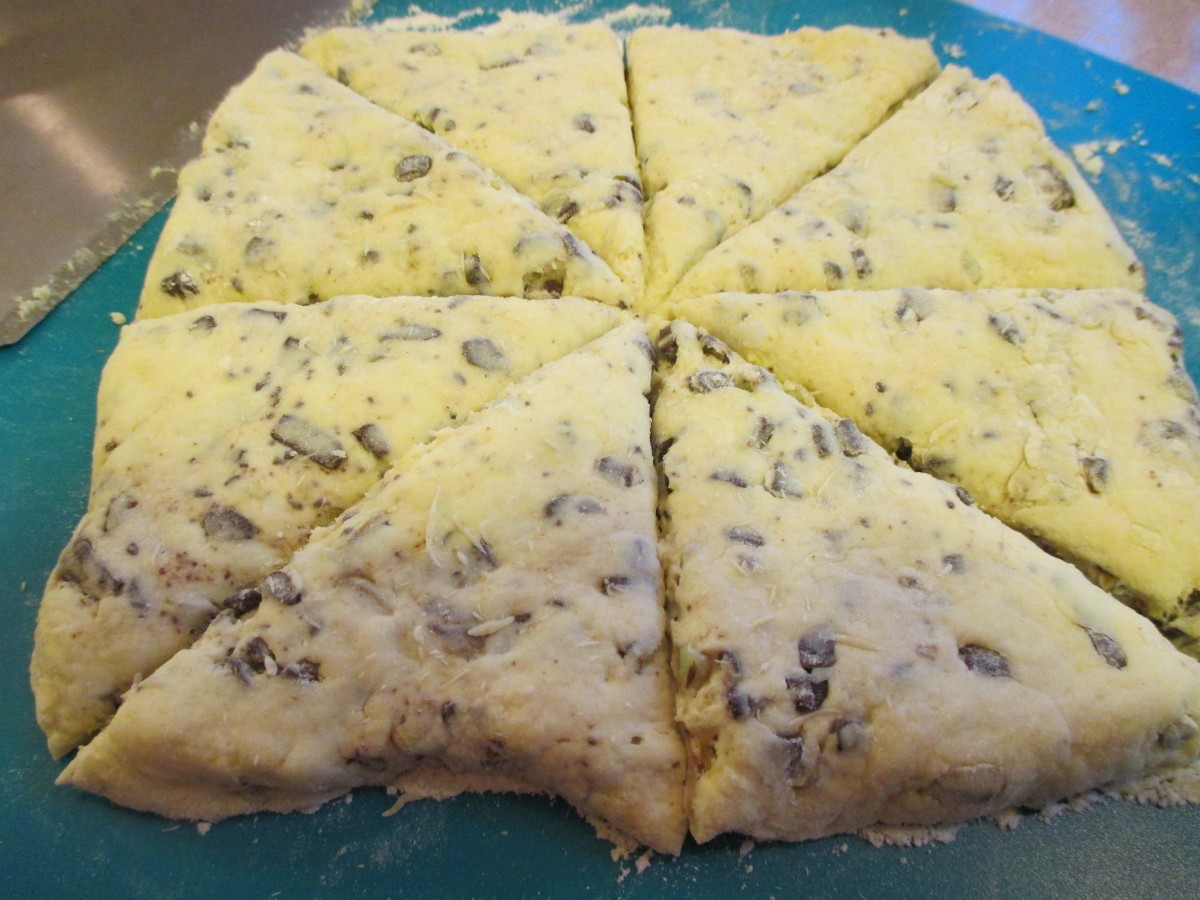
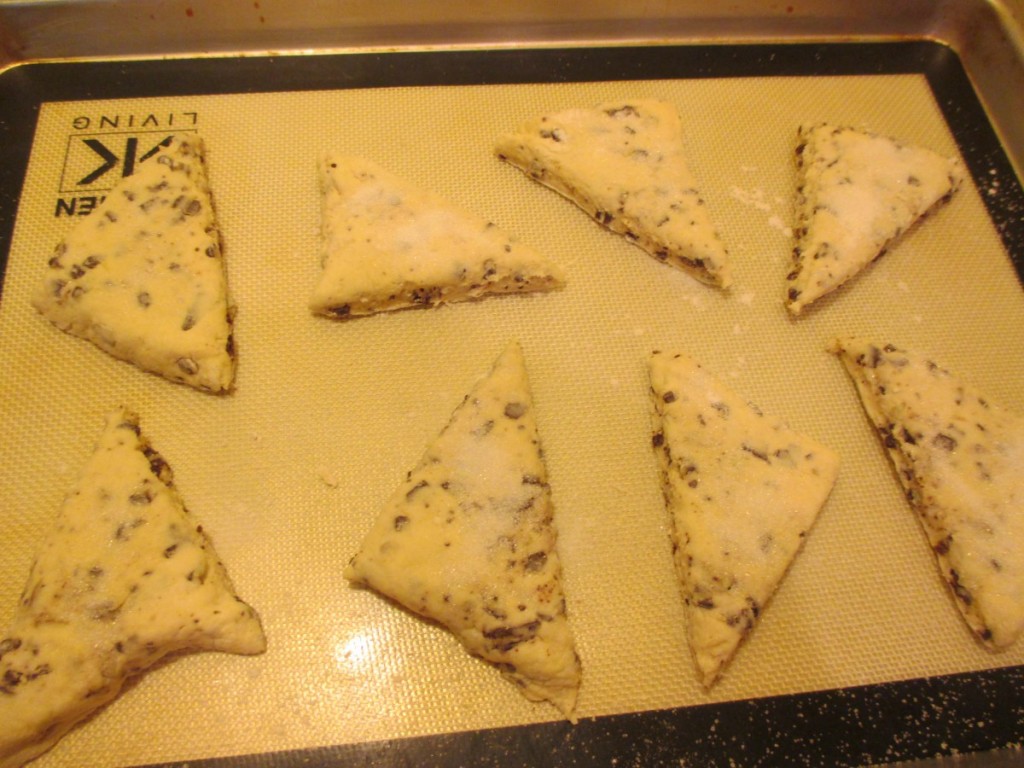
In small bowl place the baking mix. In another bowl mix together the sour cream and egg. Mix into the baking mix, along with the chips and stir until mixture turns into a soft dough. On lightly floured surface press the dough into an 8-inch square. Cut in half- then cut across in half again- you’ll have 4 squares. Cut diagonally across each square to form 8 triangles. Place triangles of dough onto ungreased baking sheet and sprinkle with a little sugar. Bake in a preheated 400 degree oven for 12-15 minutes, or until golden brown on top. Don’t over bake. Cool on wire rack. Makes 8.


Chocolate Crepes
These chocolate crepes make a great dessert, or breakfast, for Valentine’s Day. The crepes pair nicely with fresh berries, but you could add any number of fillings. Ice cream, jam, pudding, custard or whipped cream all work well.
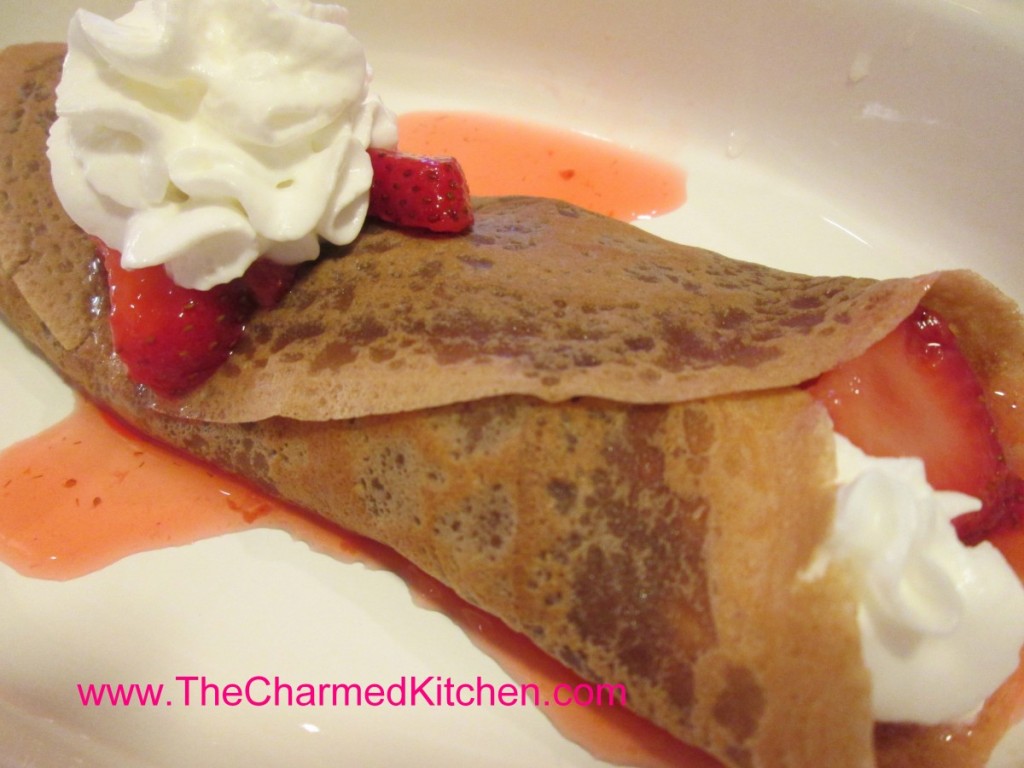
I topped mine with berries and whipped cream. You could also add some shaved chocolate as a topping.
If you haven’t made crepes, this might be just the recipe to convince you. They aren’t that hard to make. It just takes a little practice.
I often make a double batch of the crepes, then freeze some, between layers of wax paper. That way I can have crepes whenever I want.
Truth is, you can fill these crepes with all sorts of stuff. I had fresh berries, so that is what I used. I added some Kahlua to the batter for a little extra flavor and it worked out just great.
You can have all the components ready, then just assemble when ready to serve. Such a lovely dessert.
Here is the recipe.
Chocolate Crepes
1 c. flour
4 eggs
1 1/2 c. milk
¼ c. cocoa
3 T. sugar
¼ c. Kahlua or other coffee flavored liqueur or ¼ c. strong coffee
1/4 c. butter, melted and cooled
Mix all ingredients in blender (except butter) until smooth, scraping sides often. Add butter and blend well. Let stand for 30 minutes before using, or batter can be refrigerated, covered, overnight. Beat again, just before using.
Heat 6 or 7 inch skillet. Brush with butter or oil and pour in about 1 tablespoon of batter, tipping pan to cover bottom of pan completely with batter. Cook until edges start to brown, turn over and cook until lightly browned (about 2 minutes per side.)
Crepes can be made day ahead or even frozen between sheets of waxed paper and frozen. Makes 18.
Strawberry filling: I just sliced a couple of pounds of berries and added a little sugar- about ½ cup- a tablespoon of vanilla and a healthy dash of cinnamon.
When filling the crepes I spooned some berries down the center of the crepe and added some whipped cream. Folded over, topped with a few berries and another bit of whipped cream.
Pepperoni Pizza Bread

If you are still looking for food to serve for your favorite football game, you can make these filled breads in no time at all. They might look difficult, but they are pretty easy to make. They are similar to Stromboli. You can fill them with all sorts of ingredients.
I have made them with Reuben sandwich fillings, spinach with cheese, and have even made a breakfast version with scrambled eggs, cheese and sausage.
The pizza fillings are always popular with my friends and family. You could certainly add other favorite pizza toppings to your fillings. Pictured is a double batch- which made two loaves. The recipe below makes one bread, but feel free to double the recipe.
Here is the recipe for one loaf.
Pepperoni Pizza Bread
3 ¼ c. flour
1 T. sugar
1 t. salt
1 package quick-rising yeast
1 c. hot water
1 T. oil
Extra oil for brushing on the dough
1/2 c. marinara sauce
6 oz. mozzarella or provolone cheese
2 oz. sliced pepperoni, about
Set aside 1 cup of the flour. Combine remaining flour with the other dry ingredients in a medium bowl. Stir in water and oil and gradually stir in enough flour to make a soft dough. Turn onto lightly floured surface and knead until dough is smooth and elastic, about 5 minutes. Roll dough into a rectangle about 16 x 8. Brush with oil down center middle of dough. Top with sauce, cheese and pepperoni. Cut one-inch wide strips of dough from filling to edge on both sides. It will sort of look like fringe. Alternating sides, fold strips up and over the filling at an angle. Carefully lift loaf onto greased baking sheet and place at an angle. Cover with a towel and place sheet on top of a roasting pan half-filled with simmering water for 15 minutes. Bake in a preheated 400-degree for 20-25 minutes or until golden brown. Cool slightly before slicing. Serve warm and refrigerate leftovers. Makes one loaf.
Note: The variations for this bread are almost endless. Some favorite combinations are ham and Swiss with mustard, roast beef and cheddar, chicken, broccoli and cheese, spinach with ricotta or feta and onions, curried veggies. You get the idea. Use your imagination and have fun. Just be careful not to overfill, or the bread will be hard to move, use fillings that aren’t too runny and always use cold fillings.
If you want to use regular yeast, use warm, rather than hot water. After kneading cover dough and let rise 45 minutes. Punch down and assemble as in original recipe. Cover with a towel and let rise until dough looks puffy, about 40 minutes. Bake as directed above. These breads can also be frozen.
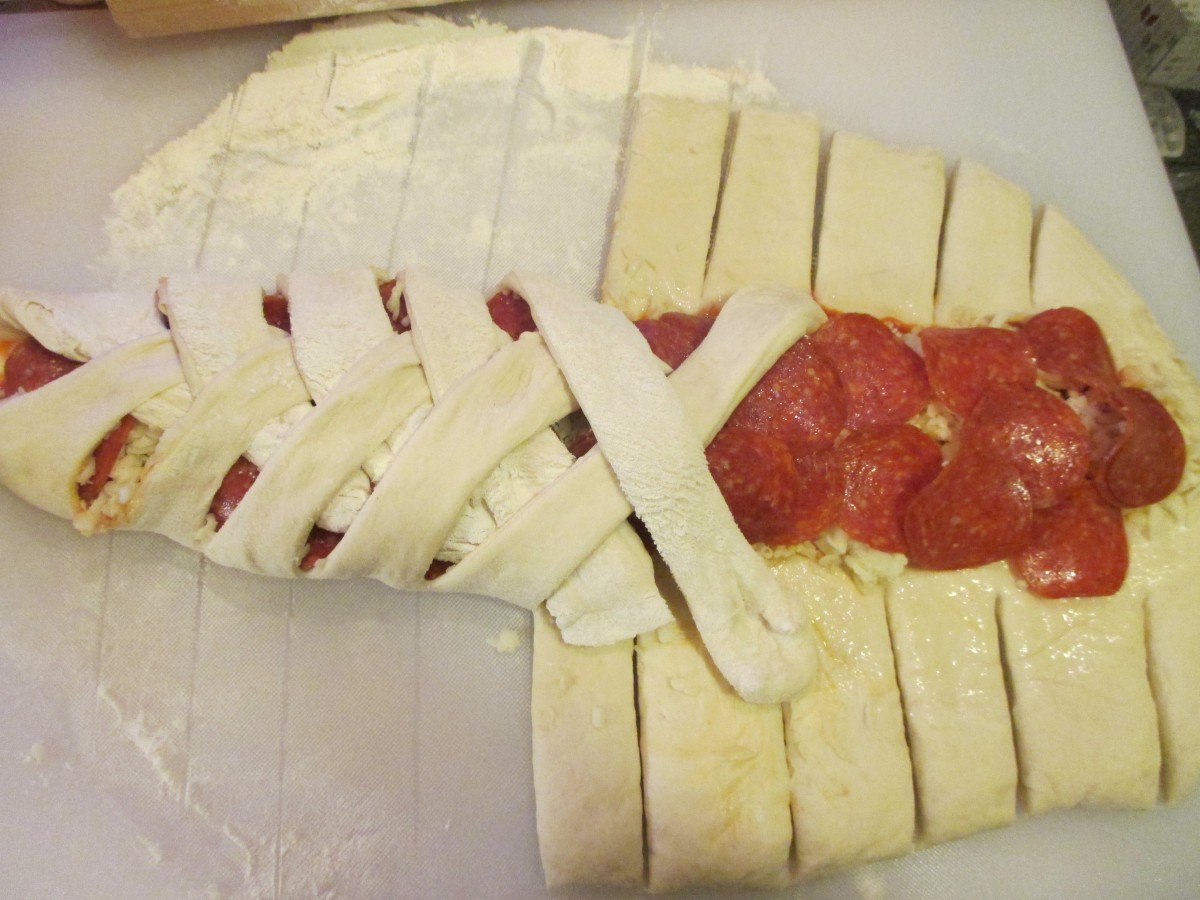
Cut strips of dough and fold over the filling
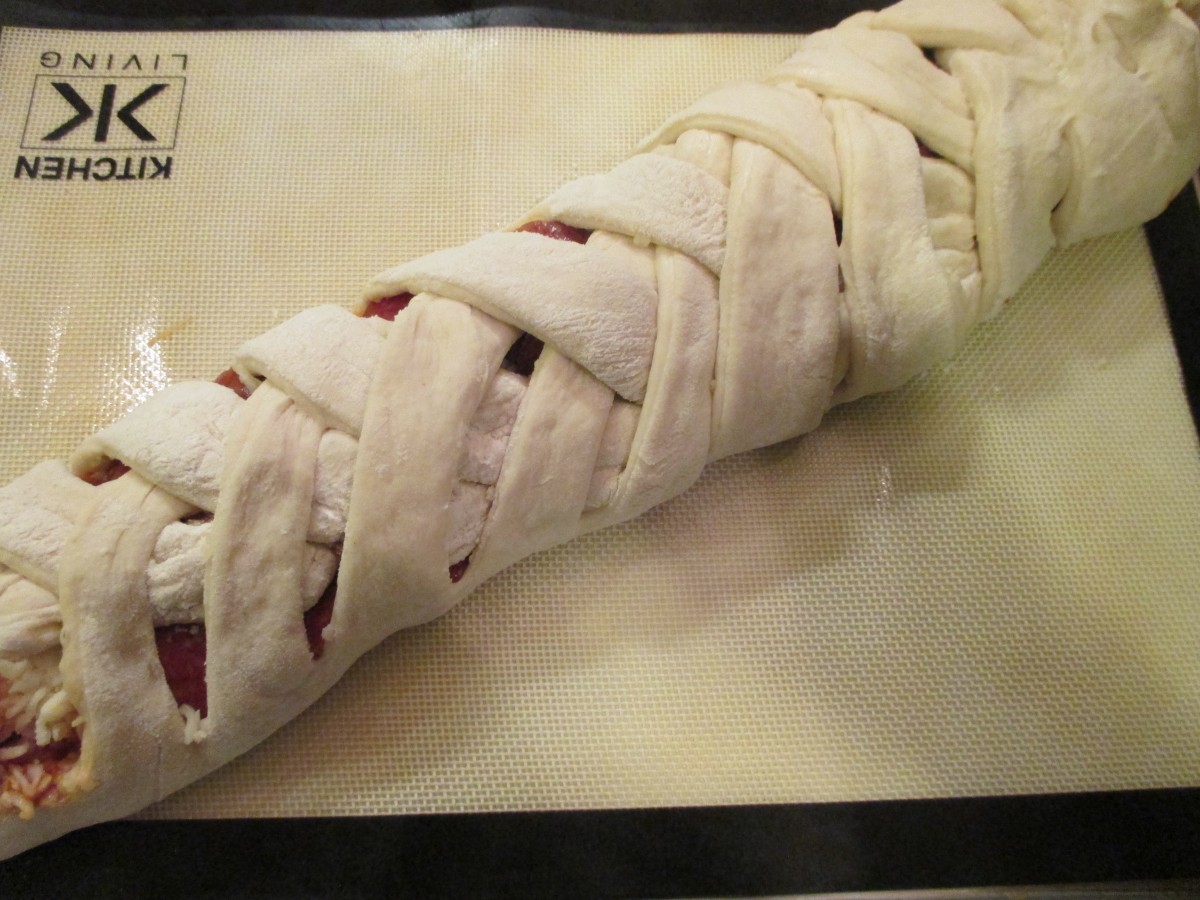
Transfer to baking sheet to rise.
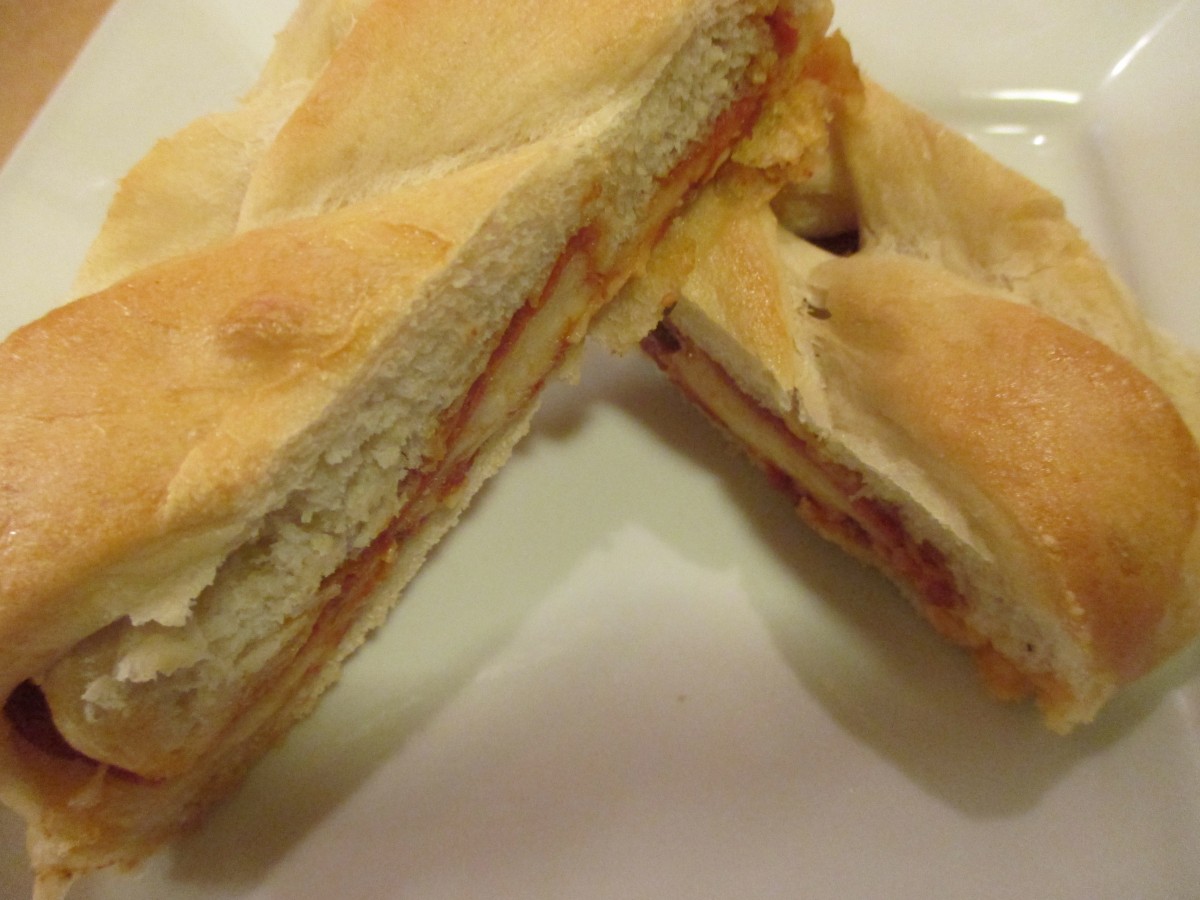
Cool a few minutes before slicing


