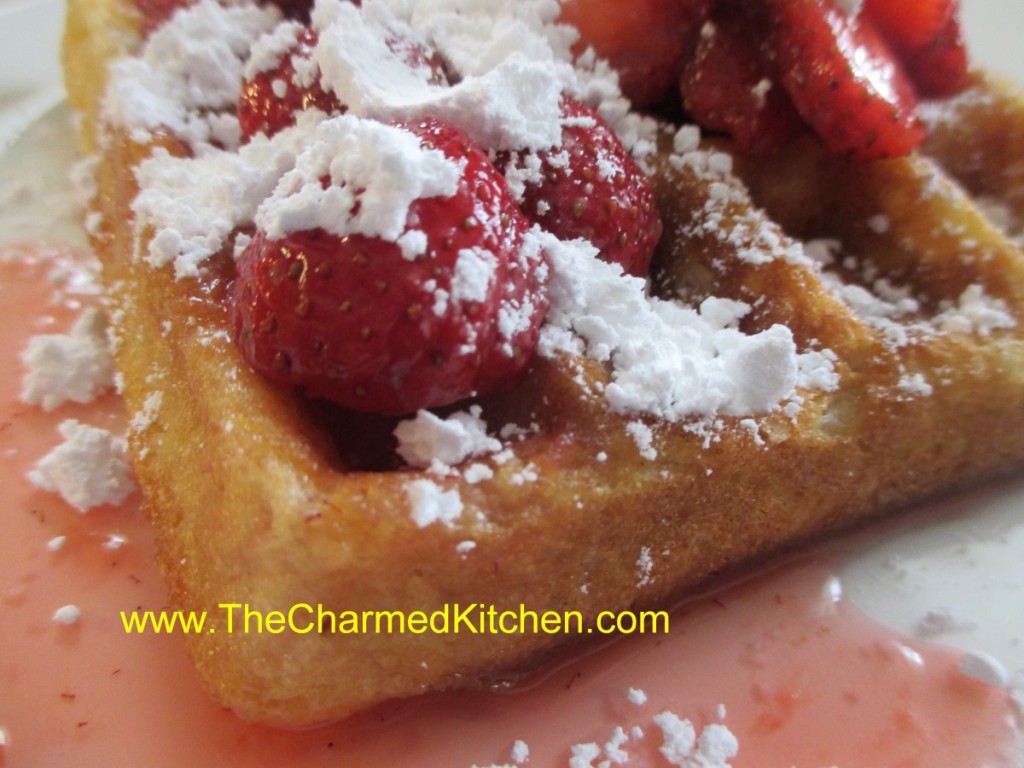
Belgian Waffles

When I want a special breakfast, I make waffles. No one ever complains when you make waffles for breakfast. Or if you make waffles for lunch or dinner, for that matter.
The response is even better when you make Belgian waffles. At least that has been my experience. My theory is, that because Belgian waffles are bigger, people love them even more.
These waffles are light and rich at the same time.
Belgian waffles can be used as a dessert, too. For dessert, just top them with ice cream, chocolate sauce or whipped cream – or all three.
You can even freeze any extras. Oh, who are we kidding? There aren’t going to be leftovers. But if there were, you could freeze them.
Cinnamon-Vanilla Belgian Waffles
2 c. all-purpose flour
3/4 cup sugar
3-1/2 teaspoons baking powder
2 t. cinnamon
2 eggs, separated
1-1/2 cups half and half- or milk
1 cup butter, melted
2 t. vanilla extract
Sliced fresh strawberries, powdered sugar or syrup
In a bowl, combine dry ingredients. In another bowl, lightly beat egg yolks. Add milk, butter and vanilla; mix well. Stir into dry ingredients just until combined. Beat egg whites until stiff peaks form; fold into batter. Bake in a preheated waffle iron according to manufacturer’s directions until golden brown. Serve with strawberries, powdered sugar or syrup. Yield: 10 waffles (about 4-1/2 inches).
Homemade Grape Jelly

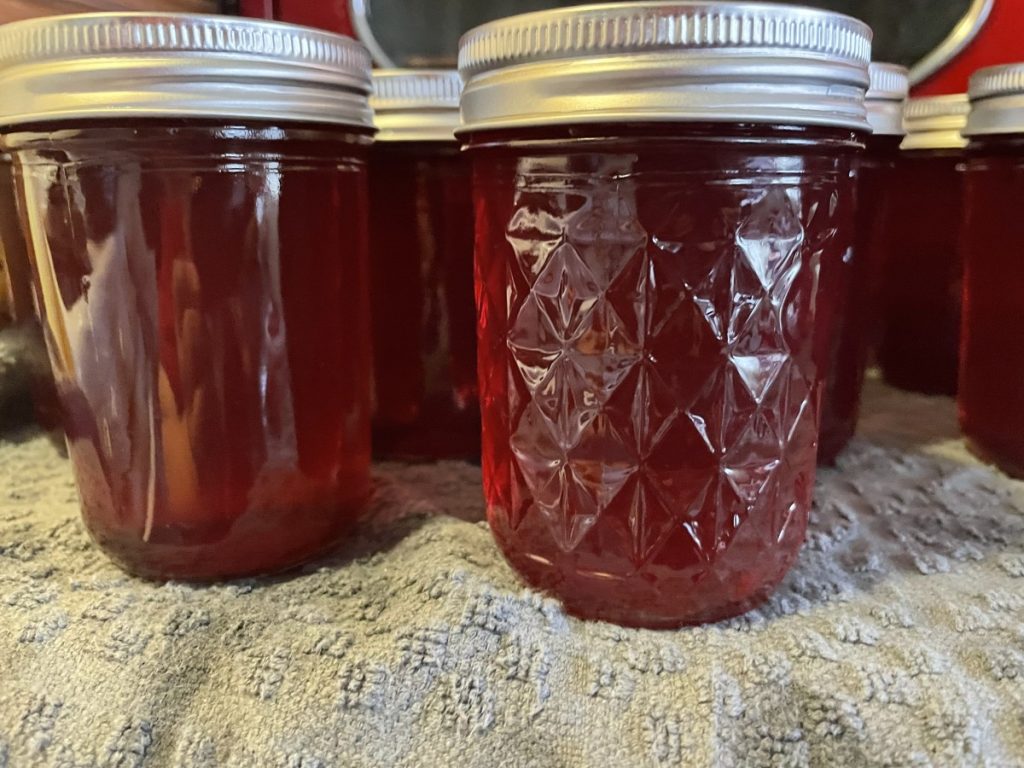
You might think it isn’t worth your time to make grape jelly. Homemade grape jelly is nothing like what you can find in your local grocery store. The flavor is so much better.
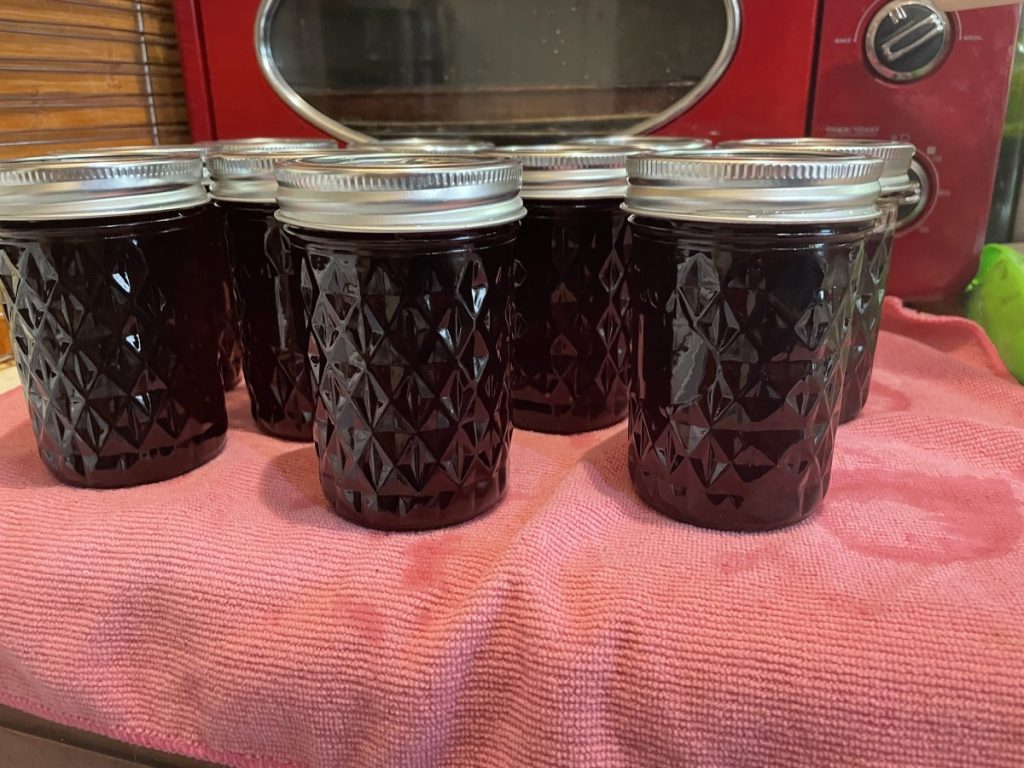
A friend was looking for someone to make grape jelly out of her grapes and I volunteered. I love making jelly and I hadn’t made grape jelly in some time. Her grapes were a dark pink color and they made the prettiest jelly. A dark pink, almost like a rose wine. I had so much fun and suddenly it seemed everyone I know was saying how much they like homemade grape jelly. I decided to grab some concord grapes at my local produce market and make a second batch. The Concord grapes gave me the dark purple color you probably think of when you picture grape jelly. The flavor was just as good as that first batch.
Making grape jelly is a two day process. Don’t let that throw you off. You just want to cook the grapes and extract the juice the first day. Then chill the juice overnight. Little crystals will often form in the juice and this way you can strain them out the next day and not get them in your jelly.
As an added bonus, your house smells really good when you make grape jelly.
Grape Jelly
5 cups grape juice (about 3½ pounds Concord grapes and 1 cup water)
1 package powdered pectin- 6 Tablespoons
7 cups sugar
Yield: About 8 or 9 half-pint jars
This is a two day project. You make the juice on the first day, then let it sit in the fridge overnight.
To prepare juice. Sort, wash, and remove stems from fully ripe grapes. Crush grapes, add water, cover, bring to boil on high heat. Reduce heat and simmer for 10 minutes. Extract juice. I strain through a fine strainer. Place in a bowl, cover and place in the fridge.
Note: To prevent formation of tartrate crystals in the jelly, let juice stand in a cool place overnight, then strain through two thicknesses of damp cheesecloth to remove crystals that have formed. I always put in the fridge.
To get ready to make the jelly, put water in a water bath canner and turn on medium heat. Water should be deep enough to cover jars by an inch or two when they are placed in the canner. Keep water at a simmer until ready to can. Wash your jars and lids. I fill the jars with hot water.
Measure juice into a kettle. Add pectin and stir well. Place on high heat and, stirring constantly, bring quickly to a full rolling boil that cannot be stirred down. Add sugar, continue stirring, and heat again to a full rolling boil. Boil hard for 1 minute. Remove from heat; skim off foam quickly.
Empty water out of jars. Pour hot jelly immediately into hot jars, leaving ¼ inch headspace. Wipe rims of jars with a dampened clean paper towel; adjust two-piece metal canning lids. Place jars in the canner, put on the lid and turn up the heat and bring water to a boil. When water boils start processing time. Process pints or half pints for 10 minutes. Turn off heat and leave jars in the canner 5-10 minutes. Remove to cooling rack or towel. Check seals once jars have cooled down. Makes 8-9 half pint jars.
Recipe adapted from NCHFP.
Curry Cauliflower Salad


Long before cauliflower became trendy, I was a fan. I love it steamed, served with a little butter and salt or pan fried and mixed with garlic and a bit of Parmesan cheese. I have enjoyed cauliflower in any number of salads as well.
I picked up a huge cauliflower from a local produce market. I decided to turn it into a salad. I was not disappointed.
Here is the recipe I made with a head of cauliflower.
I used curry powder- I make my own- but you can use a store bought one. The recipe for curry powder is at the end of the recipe. I also added some green onions and peanuts for crunch. It came out quite nice.
I have used curry powder in hot cauliflower dishes before, but the salad was a pleasant change of pace.
Curry Cauliflower Salad
1 head cauliflower, cooked
½ c. chopped green onions
¾ c. mayo – or less or more depending in the size of the head of cauliflower
1 T. curry powder- or to taste
1 t. hot sauce, or to taste
Salt and pepper to taste
1 c. peanuts
First break the cauliflower into florets. Cook the cauliflower any way you like. I steamed mine for about 5 minutes. You could roast it, or sauté it in a little oil. You want it tender, but still a little crisp. Don’t cook it to mush. I would also advise against boiling it, as it gets too wet. Once the cauliflower is cooked, let it cool down before proceeding. Combine the cauliflower with the green onions, the mayo and seasonings. It was hard to be exact because your head of cauliflower might be bigger or smaller than mine. I could have said 5 cups of cooked cauliflower- but would that really help? Then you’d have leftover cooked cauliflower. Or perhaps not enough. So add a little more mayo, if needed, and adjust the seasonings to suit your taste and the amount of cauliflower you have. Chill and toss the peanuts in closer to serving time. If you add the peanuts at the end, they stay crunchier.
Curry Powder
2 t. ground cumin
2 t. ground coriander
2 t. ground turmeric
1 t. nutmeg
1 t. salt
½ t. cinnamon
¼ t. cayenne pepper
¼ t. ground black pepper
Combine all ingredients and store in a cool, dry place.
Grape Jelly Coconut Peanut Bars

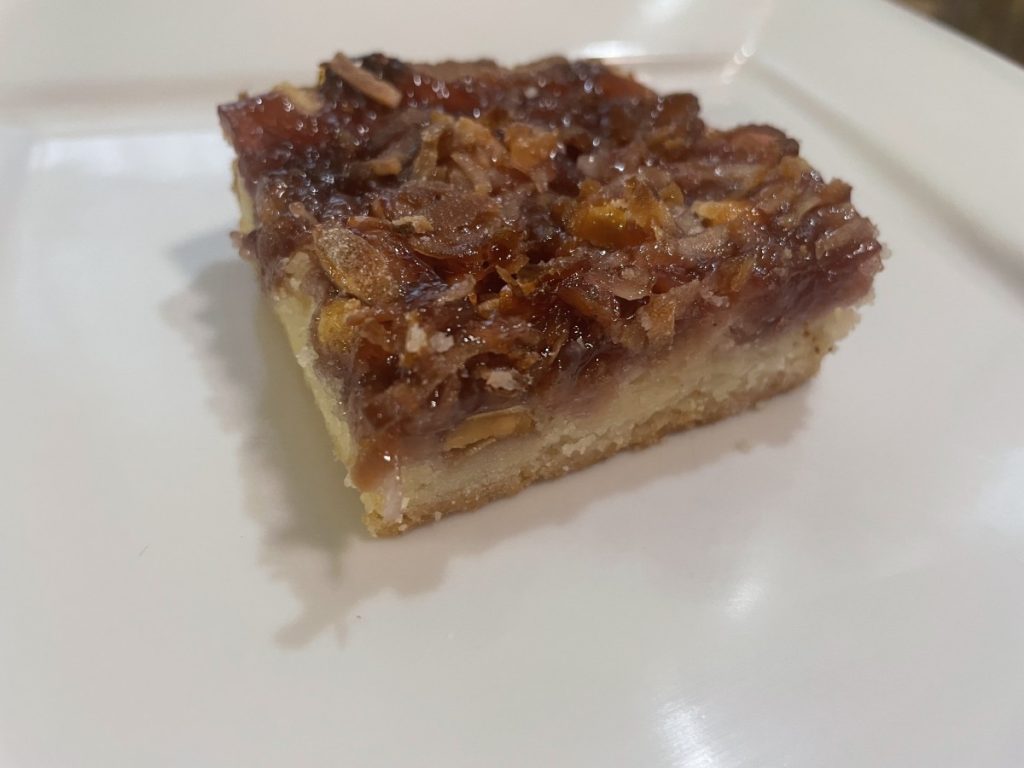
This delightful dessert came about because I hate to waste stuff. After cooking camps were over, I found myself with an open jar of grape jelly. It was far more than I could use up on toast. I started looking around and found a number of recipes for using them in cookie bars. I used those recipes as inspiration for the bars I ended up making. I took some to a friend’s house and got some very positive feedback.
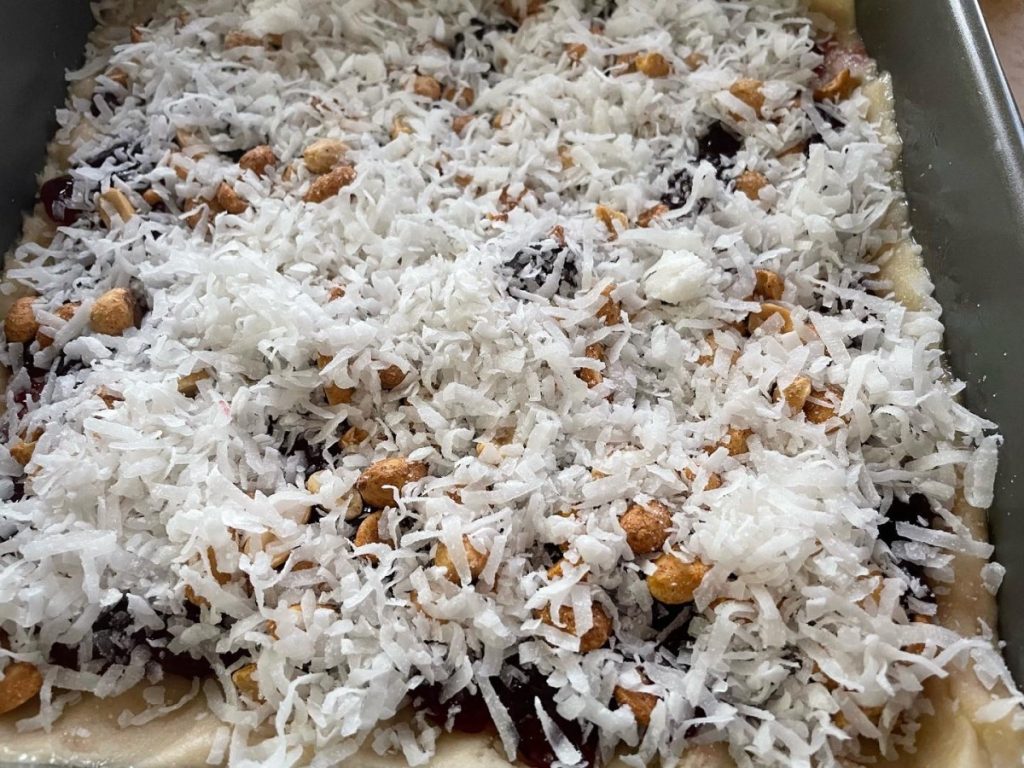
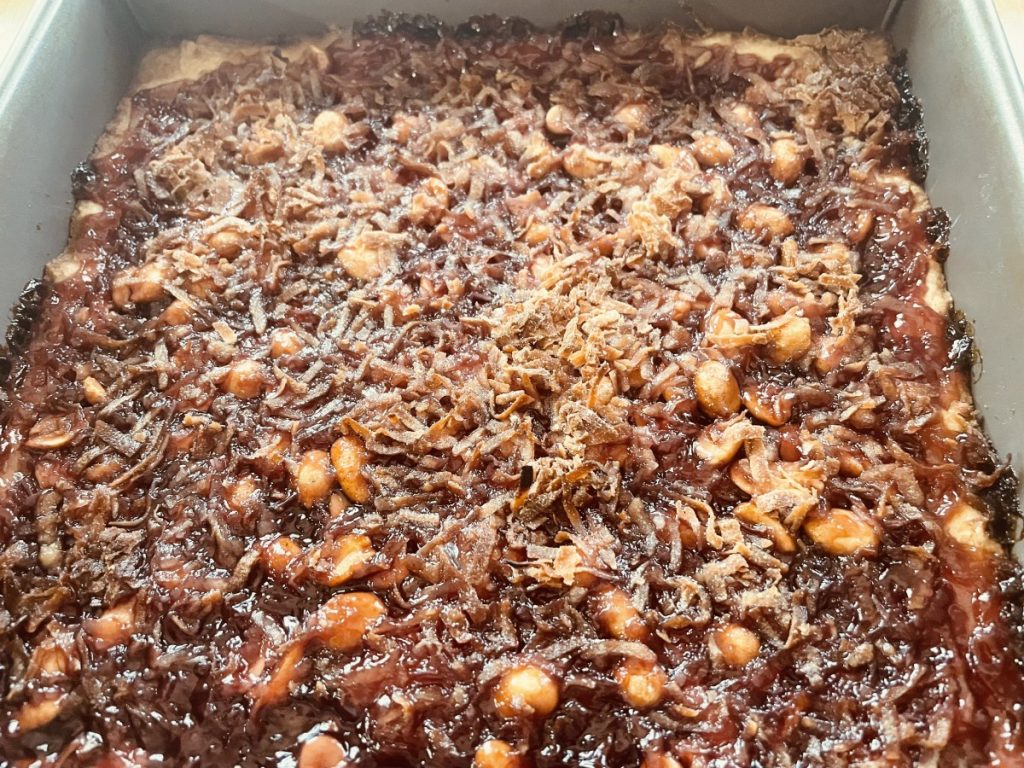
The crust is a simple shortbread dough, topped with grape jelly, peanuts and shredded coconut. Some recipes added eggs and other seasonings. I kept mine pretty simple. Some called for prebaking the crust a little, but I opted not to and they baked up just fine. You could certainly add more nuts or coconut. You could use any flavor of jelly or jam, too.
Grape Jelly Coconut Peanut Bars
1¼ c. all-purpose flour
¼ c. sugar
½ t salt
½ c. butter, room temp
1 c. grape jelly
1 c. peanuts
1 c. flaked coconut
Preheat oven to 325 degrees F. Grease a 9×9 pan and set aside. Mix the flour, sugar and salt together, then work in the butter. Mixture might be a little crumbly. Pat the crust evenly into bottom of the baking dish. Spread the jelly over the top of the crust evenly. Sprinkle peanuts on top of the jelly , then top with the coconut. Bake for 35-45 minutes or until the topping is golden brown. You should see a little bit of color around the edge of the crust. Remove and cool completely, then slice and serve! These freeze well.
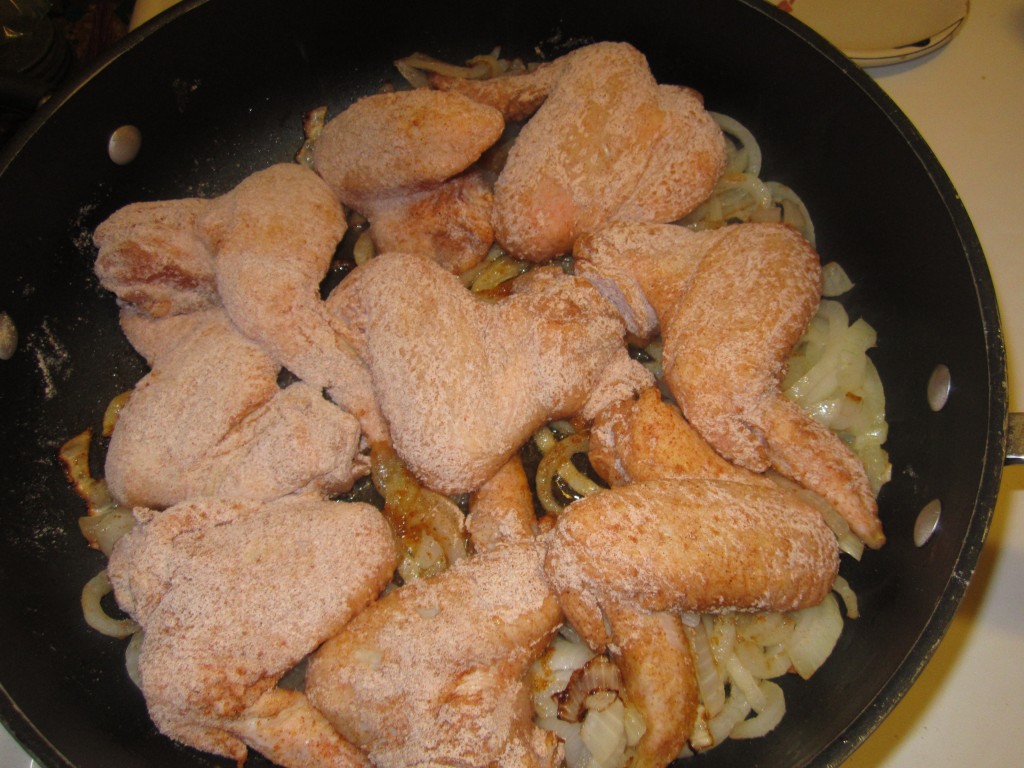
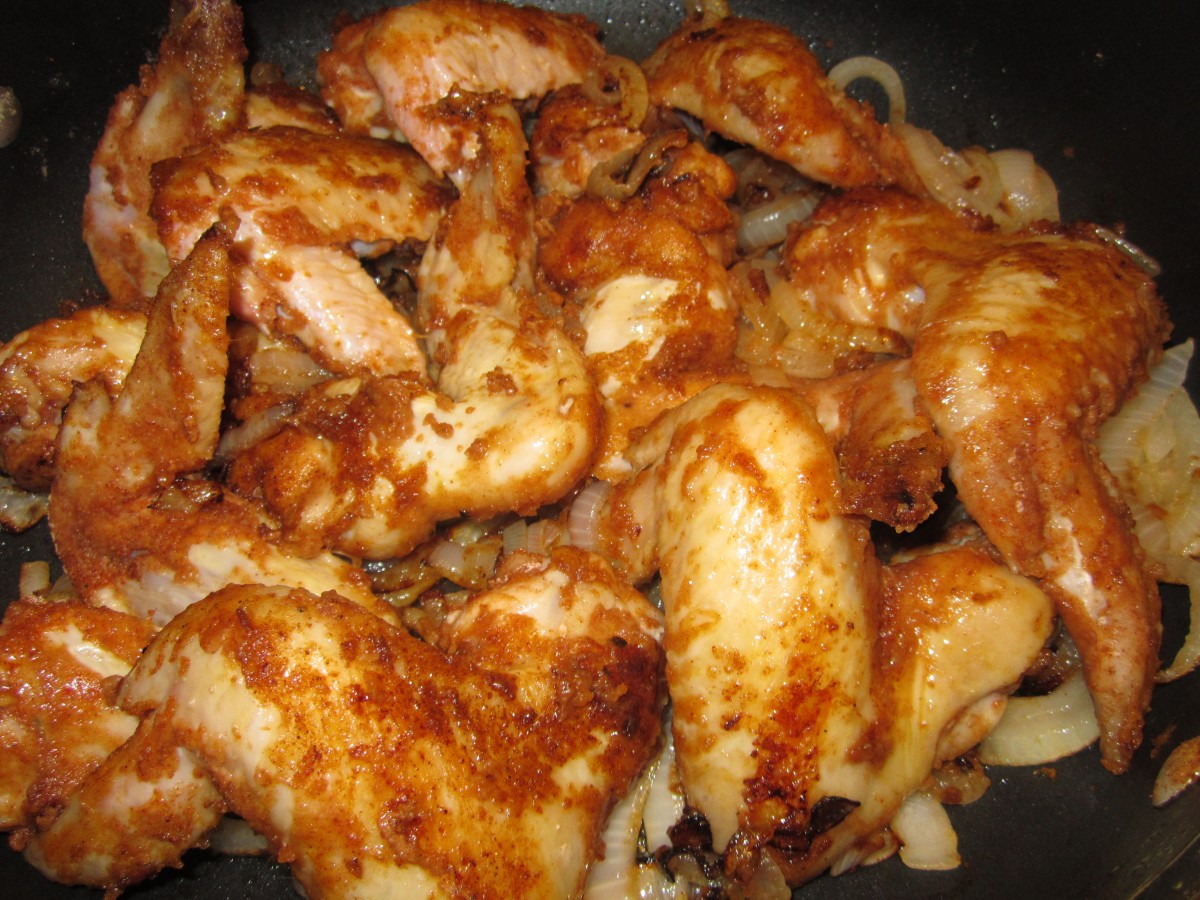
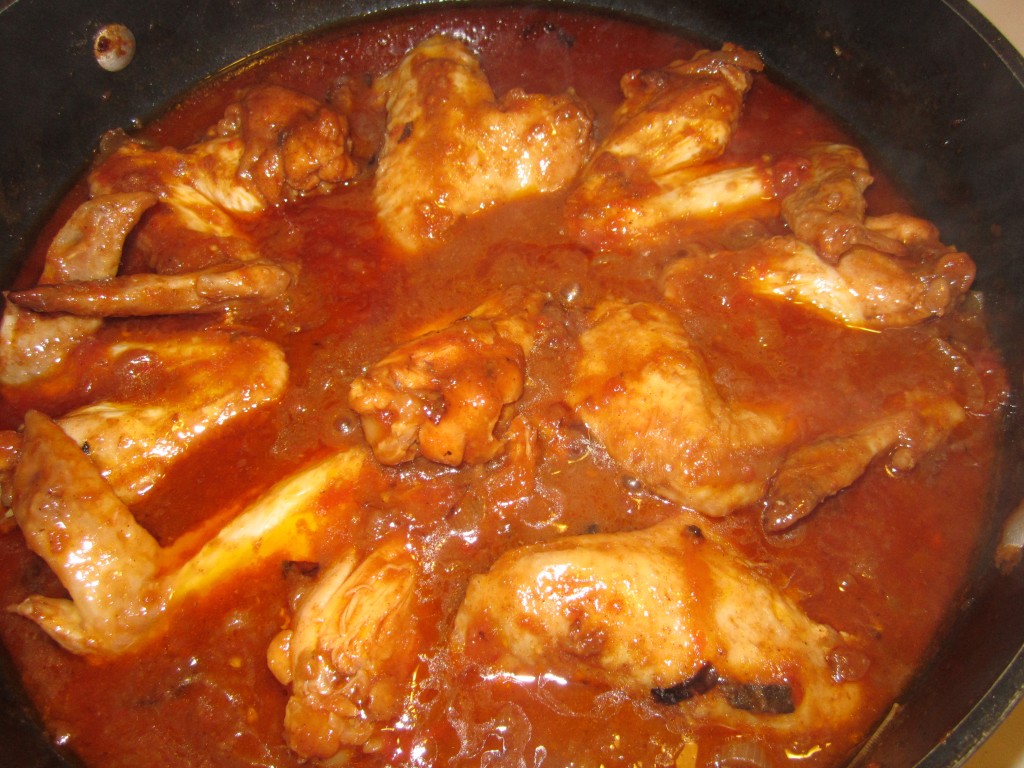
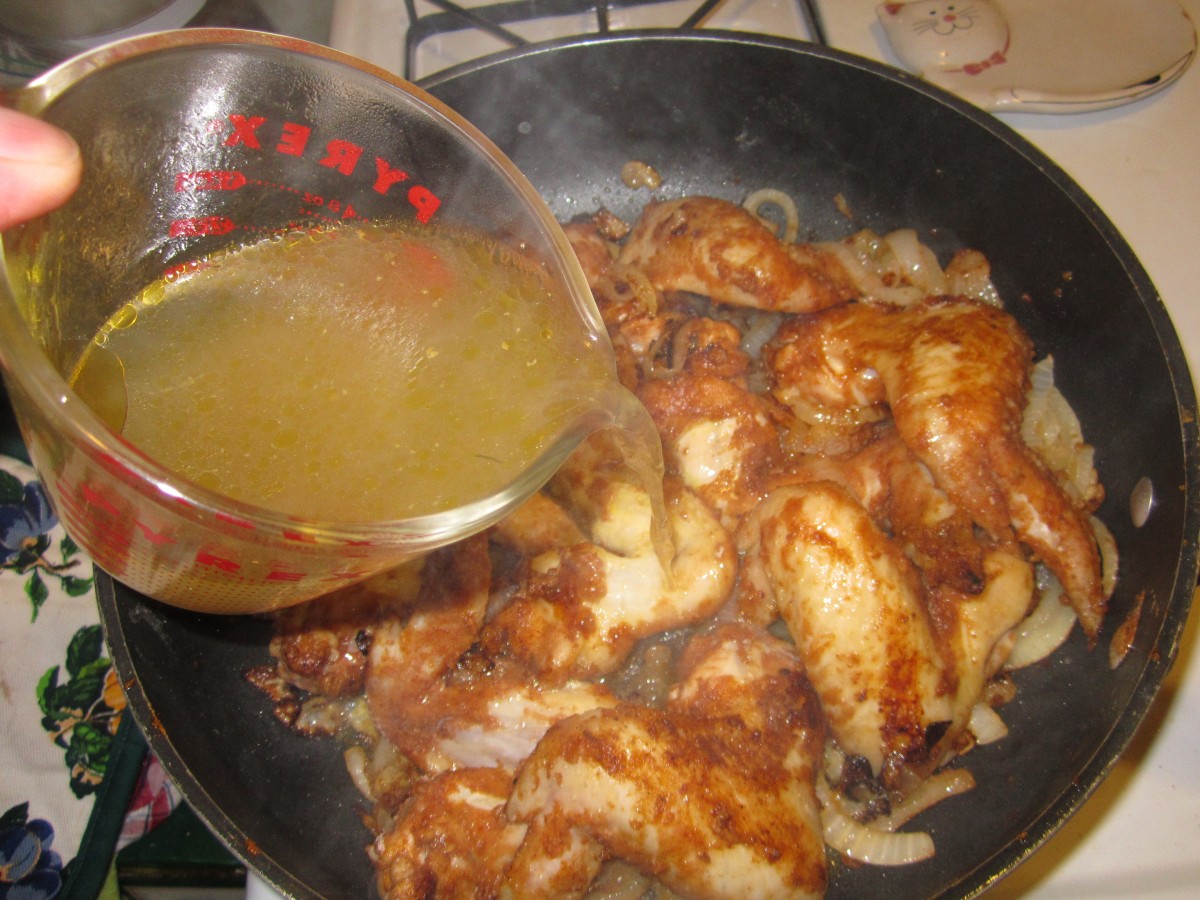
Ethiopian Chicken

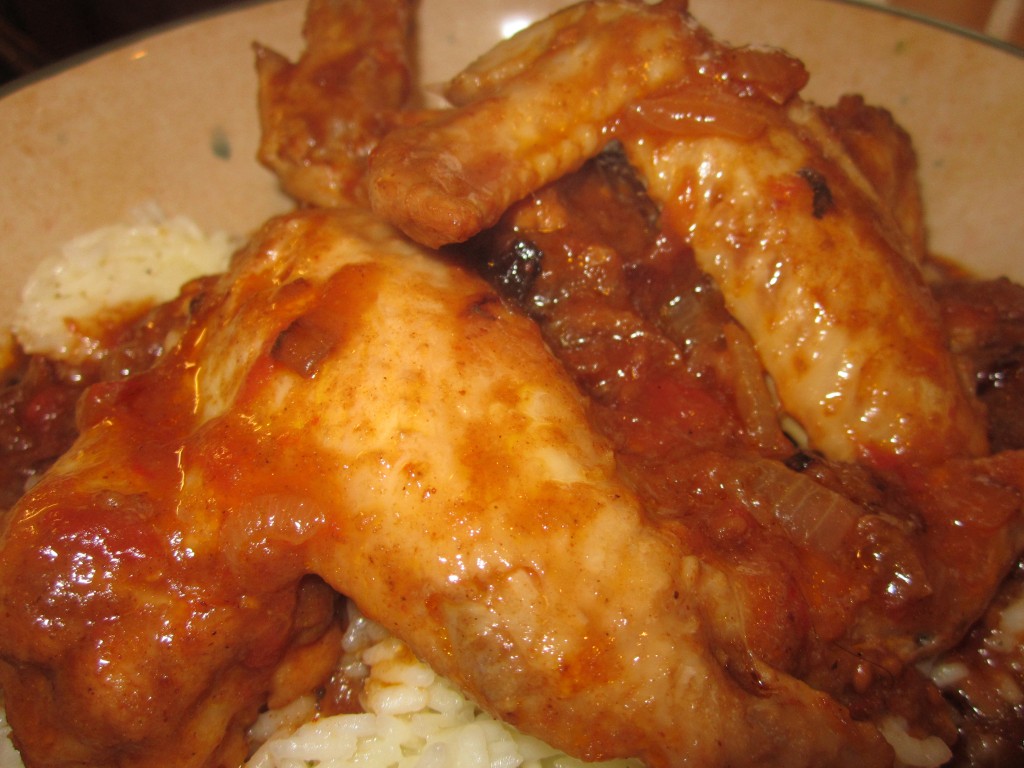
With a mix of warm and sweet spices Ethiopian Chicken is full of rich flavor. Easy to make, too. You can make it with any cut of chicken. I used wings in this batch. Traditionally the chicken should be on the bone, but feel free to swap out boneless chicken, if you prefer. Just reduce the cooking time by 15 minutes.
Ethiopian Chicken
1 chicken, cut into pieces or 3-4 lbs. chicken pieces
1 T. paprika
1 t. each cayenne pepper, cumin, garlic powder, salt and ginger
1/2 t. allspice
1/4 t. cinnamon
1/2 c. flour
3 T. oil
2 large onions, sliced thin
1 c. tomato sauce or 2 c. stewed tomatoes
1 c. chicken stock
Combine spices with flour in a plastic bag. Add the chicken a few pieces at a time and shake to coat. Set aside. Add onion to hot oil in large skillet and cook until onions are browned. Add chicken pieces and brown on all sides. Add sauce and stock. Cover and simmer 35 minutes, adding water if sauce gets too thick. Serve with a cooked grain such as rice, millet, quinoa, wheat berries etc. This dish is also good served with lentils and cooked greens. Serves 4.
Carrot Pasta Sauce

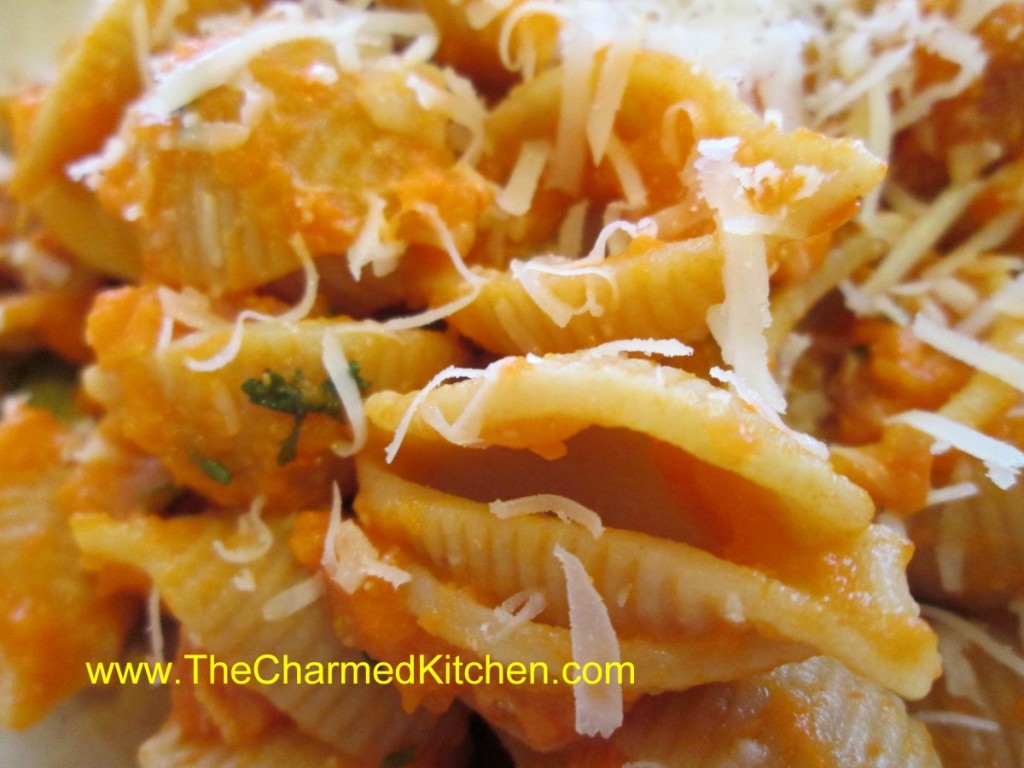
This pasta sauce is one of my favorites. Most people don’t think of carrots, when they think of pasta sauce, but maybe they should. It tastes wonderful and looks pretty, too. It’s a simple sauce that packs a lot of flavor.
We made this sauce in cooking camp this summer. The kids seemed to doubt that they would like it. Turned out, most of them loved it. I made it for a friend the other night. He enjoyed it, too.
The process is easy. Just cook carrots, with sauteed onions and garlic in stock, until the carrots are really tender. Most of the liquid cooks off. Puree, adding cream or half and half, and some dill. Adjust seasonings and you are done!
I used chicken stock, but you could use a vegetable stock for a vegetarian version of this dish. Toss the sauce with pasta, rice, or even with veggies or meats. You can add some fresh grated cheese, too, if you like. For the version we did in camp, I was going to have the kids sprinkle some cheddar cheese over the pasta once it was tossed with the carrot sauce. The cheese got dumped in the carrot sauce instead, so we just mixed it in until it melted. The carrot sauce tasted like mac and cheese.
Here is the recipe. I hope you try it.
Carrot Pasta Sauce
1 T. oil
1 onion, chopped
1 garlic clove, minced
1 lb. carrots, peeled and sliced
2 c. chicken or vegetable stock
Salt and pepper to taste
1/2 c. cream, half and half or evaporated milk
1T. fresh dill or 1 t. dried
Hot cooked pasta
Sauté onion in oil until tender. Add garlic, carrots and stock and cook until carrots are very tender. Much of the liquid should have evaporated by then. Place mixture in blender and add cream or milk, mixing until smooth. Add dill and adjust seasonings, tossing over hot pasta to serve. I sometimes top with some shredded Parmesan cheese, too.
Variations: Use sweet potatoes, pumpkin, winter squash or even peas for different tastes.
Peach Scones


I’ve really been in the mood to make scones lately. Since I had some beautiful peaches, I decided to use them in the batter.
They worked out even better than I had hoped. I added cinnamon, nutmeg and cloves into the dough, for a little extra flavor. Nicely complimented the sweetness of the peaches.
These are wonderful for breakfast, brunch or with tea or coffee. They would also make a nice base for shortcake. I could see them with berries and whipped cream for a perfect summer dessert.
I used a 2 oz. cookie scoop and got 25 scones. You could make them bigger, just increase the baking time a couple of minutes. I also placed only one baking sheet in the oven at a time. You could put both in at once, but reverse the rack you have them on- half way through baking- so they bake more evenly. Also, if both trays are in the oven at once, increase baking time a couple of minutes.
Peach Scones
3 cups flour
½ c. sugar
1 tablespoon baking powder
1 t. cinnamon
1 t. nutmeg
Pinch of cloves
½ t. salt
10 T. cold butter (1 stick plus two tablespoons)
¾ c. half and half or milk
1 egg
1½ t. vanilla
1½ c. peeled, chopped peaches – about 3-4 peaches
Glaze:
2 c. powdered sugar
About 2-3 T. half and half
1 t. vanilla
Preheat oven to 425. Line 2 baking sheets with parchment paper, or use silicone liners. In a bowl, place the dry ingredients and stir to mix. Cut in butter to resemble coarse crumbs. Make a well in the center and stir in half and half, vanilla and egg. Stir to make a soft dough. Fold in peaches. Use ice cream scoop to make scones, placing scoops of dough onto baking sheets. Bake until browned – 14-16 minutes. Cool on a rack. Make glaze and dip tops of scones in glaze or drizzle it over them. Makes 22-25 depending on size.
Braided Herb Breads

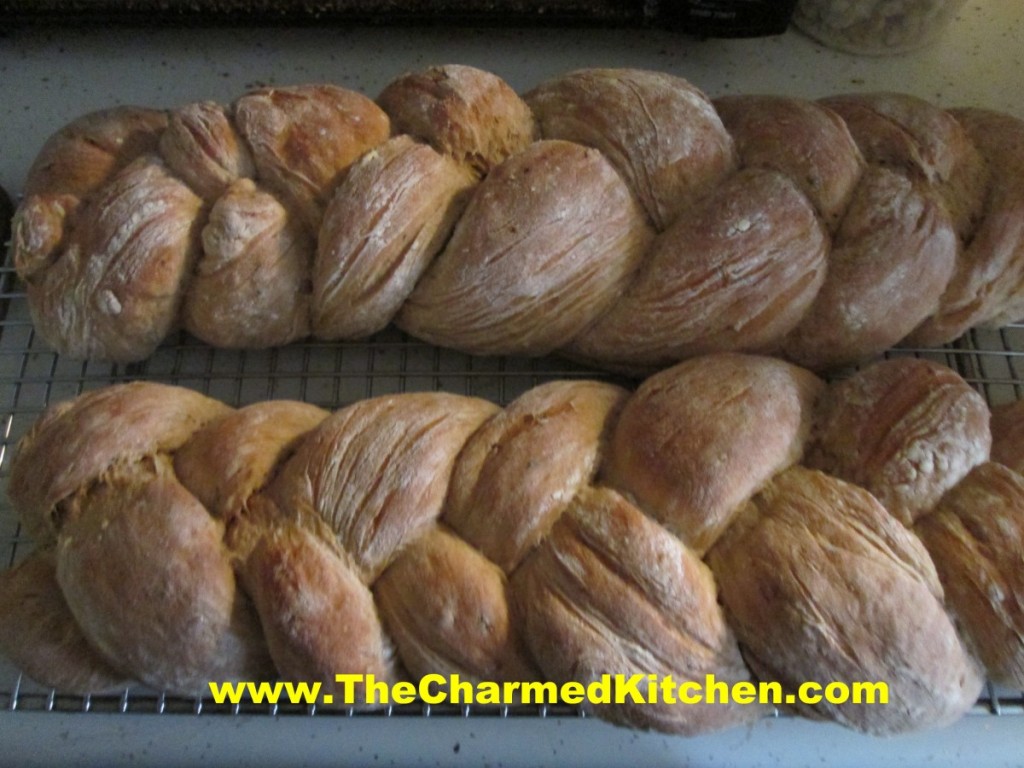
One of the benefits about baking your own bread is the aroma. The house gets filled with the most wonderful smells. In this case, the experience is even better because the breads I baked are filled with herbs and shallots, so those fragrances are also in the mix.
I like to make these loaves in braids and place them on a baking sheet- but they could just as easily be baked in bread pans for more traditional loaves. Great for sandwiches.
I like to toast some of this bread, and use as croutons or as a base for stuffing.
You can also slice the bread, brush with softened butter, then toast, for a twist on garlic bread. The garlic is already in the bread, but feel free to add more to the butter, before brushing it on the bread.
Braided Herb Bread
5 ½ -6 ½ c. flour
2 packages quick rising yeast
¼ c. sauteed shallots
2 T. each dried marjoram and parsley
1 T. each dried oregano and minced garlic
1 T. honey
2 t. dried thyme
2 t. salt
¼ c. olive oil
2 ¼ c. hot water
In a mixing bowl combine 2 c. of flour with the rest of the ingredients and mix until smooth. Beat with electric mixer 4 minutes then add 1-cup additional flour and beat 1 minute longer. Stir in flour ½ cup at a time until soft dough forms. Turn onto surface and knead, adding flour gradually until dough is smooth and elastic. Place dough in lightly greased bowl and turn to cover. Cover with a towel and let rise until doubled, about 30 minutes. Turn dough onto surface and cut in half. Cut each half into thirds. Roll each piece of dough into an 18-inch rope. Loosely braid three ropes together and repeat with the remaining dough. Place on greased baking sheet and cover until doubled in size, about 20 minutes.
Bake in a preheated 375-degree oven for 25-30 minutes, or until bread sounds hollow when tapped lightly. Makes 2.
Variation: Whole wheat: Add 2 cups of whole-wheat flour to replace 2 cups of white flour. Also try adding ¼ c. of wheat germ, oat bran or 2 tablespoons of seeds (sesame, pumpkin, sunflower, poppy, etc.)
Regular yeast can be used, but rising times will be longer and water should be warm, not hot.
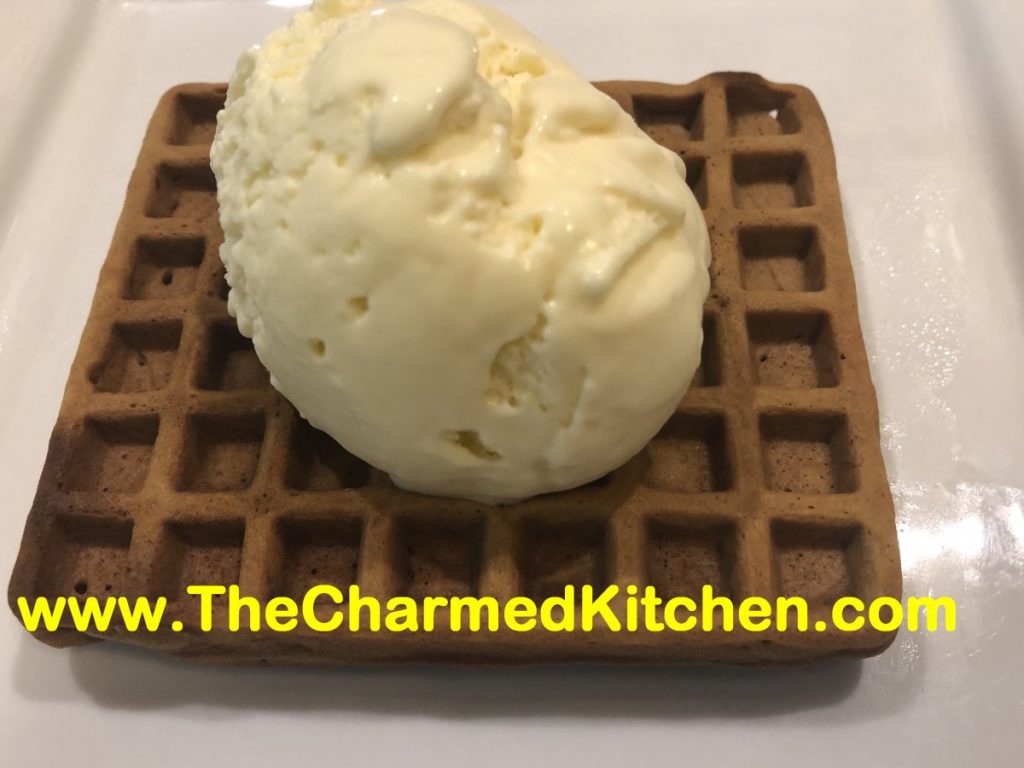
Coffee Waffles


Yes, you read that right. Coffee waffles. Waffles with coffee already inside them. They are quite wonderful actually. Great for breakfast, which is obvious, I suppose. These waffles also make a fun base for desserts. I am serving them with honey ice cream as a dessert.
I wanted to add coffee flavor to waffles, but I knew even strong coffee would water down the batter too much. The only solution was to use either instant coffee or espresso powder. I knew I could get enough coffee flavor into them, without affecting the batter in a negative way.
It worked!! Plenty of coffee flavor and a nice, crispy waffle. I was thinking it might be fun to add cinnamon to the next batch. I got 10 rectangular waffles out of the recipe. Froze most of them for later.
You can serve them topped with butter, syrup, whipped cream or powdered sugar.
So here is the recipe. Hope you give them a try.
Coffee Waffles
1¾ c. flour
¼ c. brown sugar
1½ t. baking powder
½ t. salt
1½ c. half and half or milk
1 egg, beaten
1/3 c. oil
1 T. instant coffee or espresso powder
1 T. vanilla
Non-stick spray or oil for coating the waffle iron
In medium mixing bowl, mix dry ingredients together and set aside. In a separate bowl, combine the half and half with the remaining ingredients. The dry coffee granules will not dissolve right away. You can let the wet ingredients sit a few minutes and whisk again, if you like. While they are just sitting there, you can heat up the waffle iron. Coat the waffle iron with a non-stick cooking spray or brush with a little oil. Add the wet ingredients to the dry ingredients and stir until mixed together. Don’t get crazy over mixing. That will give you tough waffles, and nobody wants that. Just stir until you don’t see any dry bits in the mix. I like to use a rubber scraper to get to the bottom of the bowl. Ladle some batter into the waffle iron and cook until golden brown. When the steam stops coming out of the waffle iron, or lessens a lot, it is usually good indicator that your waffles are done. Yield depends on the size of your waffle iron. I got 10 waffles, about 4×5 inches.
Note: The instant coffee breaks down more when mixed with the dry ingredients. Espresso powder will dissolve quickly, but if you use instant coffee like I did, expect a few “flecks” of coffee in the batter. I kind of liked the way it looked.
Honey Ice Cream


I love this ice cream. The richness of the custard works wonderfully with the sweet flavor of the honey. I don’t use all that much honey in this recipe. It is sweet, but not overly so. You could make it sweeter if you like.
I think about ice cream as a summertime treat, but honestly, I would eat ice cream in a blizzard!!!
So here is the recipe.
Honey Ice Cream
1 ½ c. whipping cream
1 ½ c. half and half
2/3 c. honey
6 large egg yolks
pinch of salt
Heat together cream and half-and-half to simmer . Whisk honey, yolks and salt in a medium bowl. Gradually whisk in hot cream mixture. Return to pan and heat until mixture thickens (about 170 degrees). Do not boil. Strain into large bowl. Chill until cold. Process in ice cream maker. Makes about 5½ c.