Tips for a Better Cheesecake

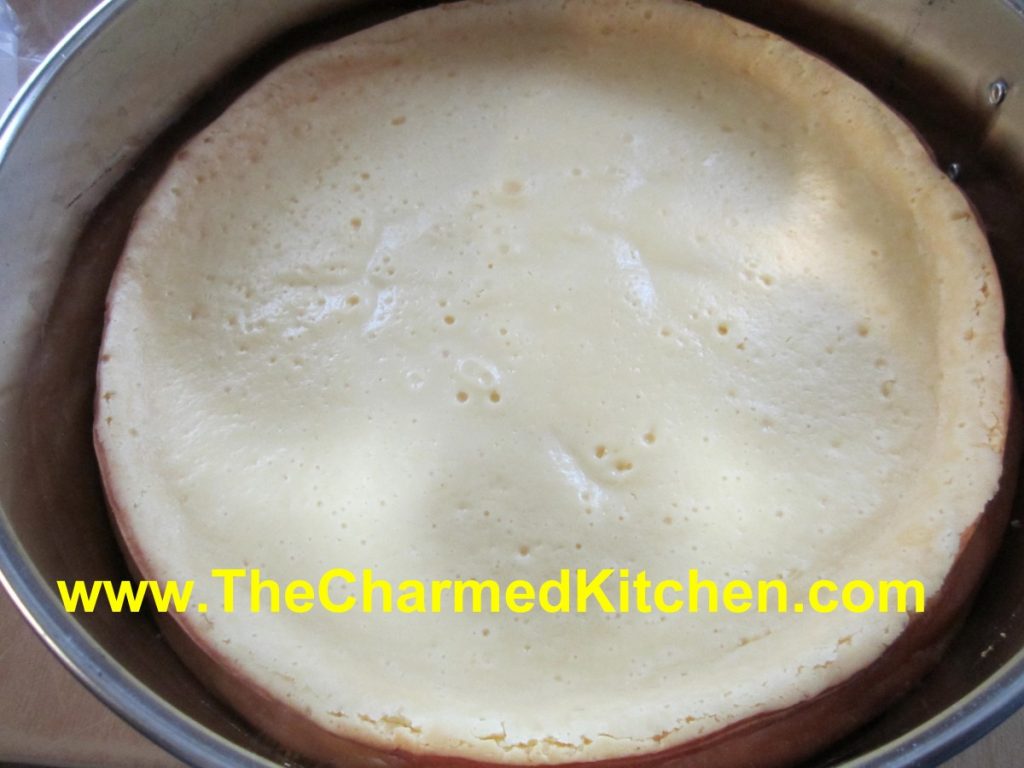
I thought I’d share some tips with you for better cheesecake. Have you ever had a cheesecake crack? You did everything according to the directions and it comes out of the oven just fine and then- a crack. It happens a lot but it doesn’t have to. There is a simple solution.
I followed the rules, too. I did not over beat the eggs, sometimes I added a pan of water to the oven. There are recipes that call for leaving the cheesecake in the oven, with it turned off, to cool down slowly. All work sometimes- but then- a crack. You cover it up with pie filling or sour cream but it still bothers you- what did you do wrong?
I came upon the solution that has worked for me. It’s simple really. Cheesecakes puff up while baking and then as they cool down they deflate. They crack because they stick to the sides of the pan. As it shrinks it pulls on the cheesecake and a crack results.While cheesecake recipes almost never tell you to do this- I just spray the pan with a non-stick coating or brush with a little oil or melted butter. So simple. Every time I have done this the cheesecake puffs then shrinks while cooling and the result- no cracks.
Here are some more cheesecake baking tips.
- Let the cream cheese and eggs stand at room temperature for 30 minutes before using.
- Mix the ingredients until just mixed, don’t over mix as that also causes cheesecakes to puff up and then fall and crack.
- Use a springform pan so you can remove sides after baking.
- Either butter the sides of the springform pan or loosen the sides as soon as it comes out of the oven to prevent cracks as the cake cools.
- Place springform pan on baking sheet or pizza pan to catch any drips.
- Keep oven humid during cooking to reduce cracking. Just place a pan of water on a lower oven rack for recipes that are not already using a water bath.
- Let baked cheesecakes cool down slowly. Cool on a wire rack and remove sides when the recipes specifies.
- Test for doneness near the end of the baking period by gently shaking the cheesecake. When fully cooked a 1-inch section in the middle will jiggle slightly. This area will be 2 inches wide in a sour cream recipe. This soft spot will firm up after cooling down. Knife tests do not work on cheesecakes because the knife will cause the cake to crack and cakes including sour cream will always test undone even when fully cooked.
- Stored cooled cheesecake in the refrigerator covered with plastic wrap or an inverted bowl to prevent drying out and also to keep it from picking up odors. Cheesecake will keep for up to 3 days.
- To freeze, place the cooled whole cheesecake or cheesecake slices in the freezer unwrapped. Leave in until partly frozen and then wrap tightly in freezer wrap. Use within a month for best flavor. Thaw in the refrigerator. Loosen wrap, but keep cake covered during thaw.
Bonus Tip: Don’t be afraid to play around with recipes. You can interchange crust recipes or add fine chopped nuts to a crust. Experiment with flavorings. Try using mint, lemon, almond, chocolate and nut flavorings to add a little zing to a favorite recipe. You can also decorate your cheesecake with powdered sugar, cocoa, fruit, nuts, candies, shaved chocolate…
Sweet Corn Ice Cream


This is one of those times when you just need to trust me. Ice cream flavored with sweet corn might sound odd to you, but it is really quite tasty. The corn flavor actually works very well when added to traditional ice cream ingredients like cream, sugar and eggs.
What a fun dessert to make for your next summer barbecue. You can even let people taste it to see if they can guess the secret ingredient!
I had heard of ice cream being made with corn before, but only tasted it recently. A cousin of mine made some and I was lucky enough to try it. It was really good. Corn ice cream is popular in Mexico, at least that is what I read.
I decided to make some of my own. It was perfect timing. I had some cream and half and half that needed to be used soon. I also had 2 ears of corn in the fridge. You can just cut the corn from the cob and add it to the recipe. That will leave you with kernels of corn in the finished ice cream. Nothing wrong with that. I pureed the corn mixture, because I wanted a smoother finished ice cream. Either is fine, based on your preference. I used 2 ears of corn- that was all I had. I could see adding another ear of corn for a more corny flavor. Frozen corn could also have been used.
Sweet Corn Ice Cream
2 ears sweet corn
1½ c. half and half
1 c. heavy whipping cream
¾ c. sugar- or a little more or less, to taste
4 egg yolks
1 t. vanilla
Scrape the corn kernels off the cobs and place in a medium saucepan. Add the half and half and the cream and bring to a simmer. You can leave the kernels as is, or puree the mixture at this point. I wanted a smoother ice cream, so I used my immersion blender to puree the corn in the pot. In a medium bowl, beat together the egg yolks, sugar and vanilla. Add ½ cup of the hot cream mixture to the eggs, whisking in well. Add another ½ cup of the cream mixture, whisking again. Add one last ½ cup of the hot cream and again, whisk until smooth. Pour the egg mixture into the saucepan with the cream and while whisking, simmer until mixture starts to thicken and will coat the back of a spoon. This will take about 5 minutes. Don’t use too high a heat, or you will scramble your eggs. Mixture should reach 160 degrees to be sure eggs are cooked. Remove from heat and pour mixture into a bowl. Allow ice cream base to cool down, then chill in fridge. Chilled mixture can be frozen in an ice cream maker once cold- in a few hours- or even the next day. Once mixture has been frozen in ice cream maker, place in a container and freeze until ready to serve. Makes about 5-6 cups of ice cream.
Cinnamon Pecan Crisps

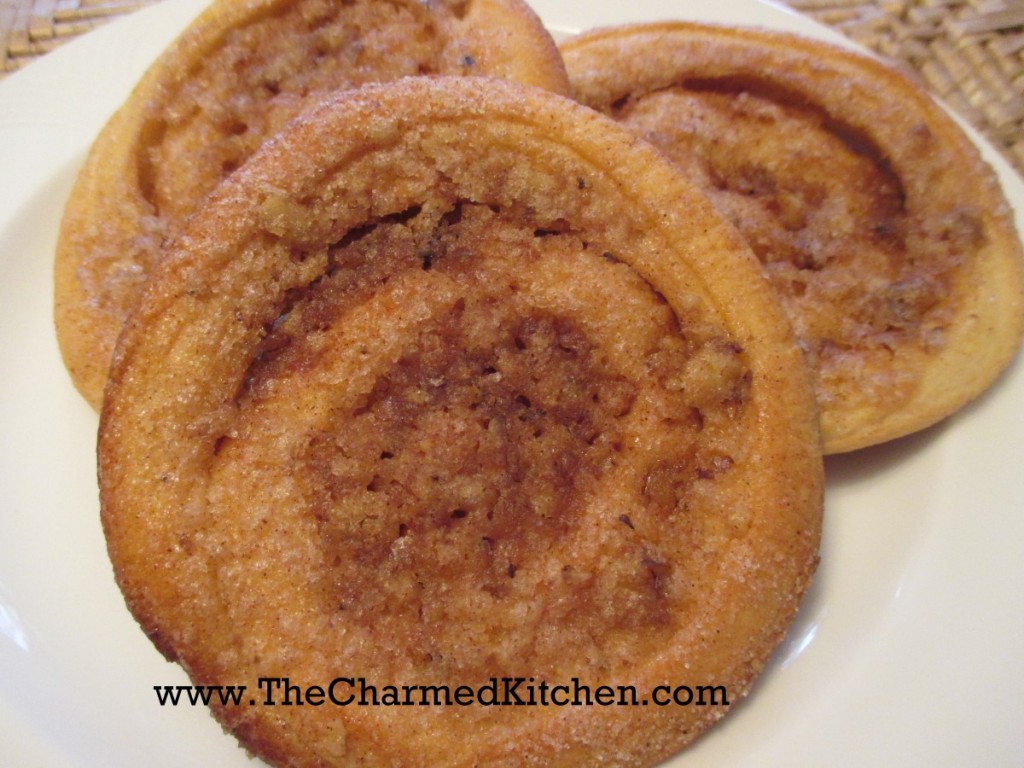
Imagine a cinnamon roll, but crispy. These pastries start out being made like a cinnamon roll, but then they are rolled flat, before baking, to create a crispy texture.
Reminds me of elephant ears. You know, those yummy fried treats from your local fair or carnival. If you are craving fair foods, why not make a batch of these? Unlike elephant ears you get at the fair, these are baked, not fried. They still give you the yummy cinnamon flavor and crispy texture of traditional elephant ears.
I serve them as they are, but you could top them with powdered sugar, a powdered sugar glaze, or a drizzle of melted chocolate.
I love them. I think you will, too.
Cinnamon Pecan Crisps
3½ – 4 c. flour
¼ c. sugar
1 pkt. Active dry yeast
1 t. salt
1¼ c. milk
¼ c. butter
1 egg
Filling:
½ c. brown sugar
½ c. sugar
¼ c. butter, melted
1 t. cinnamon
Topping:
¼ c. butter, melted
1 c. sugar
½ c. chopped pecans
1½ t. cinnamon
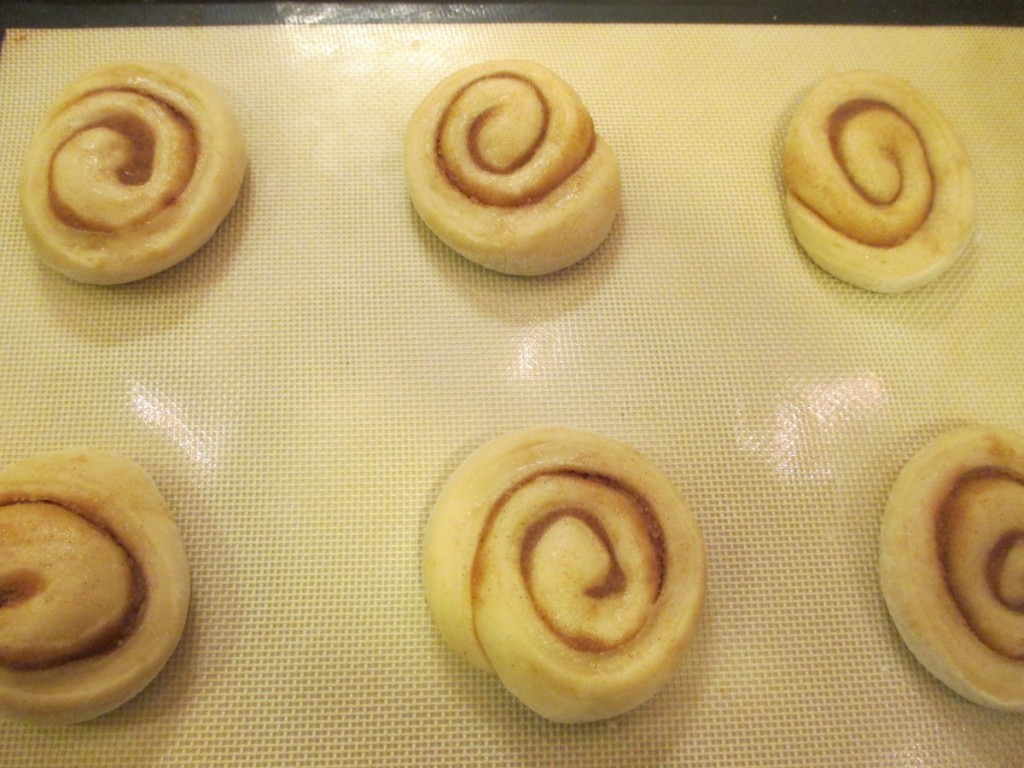
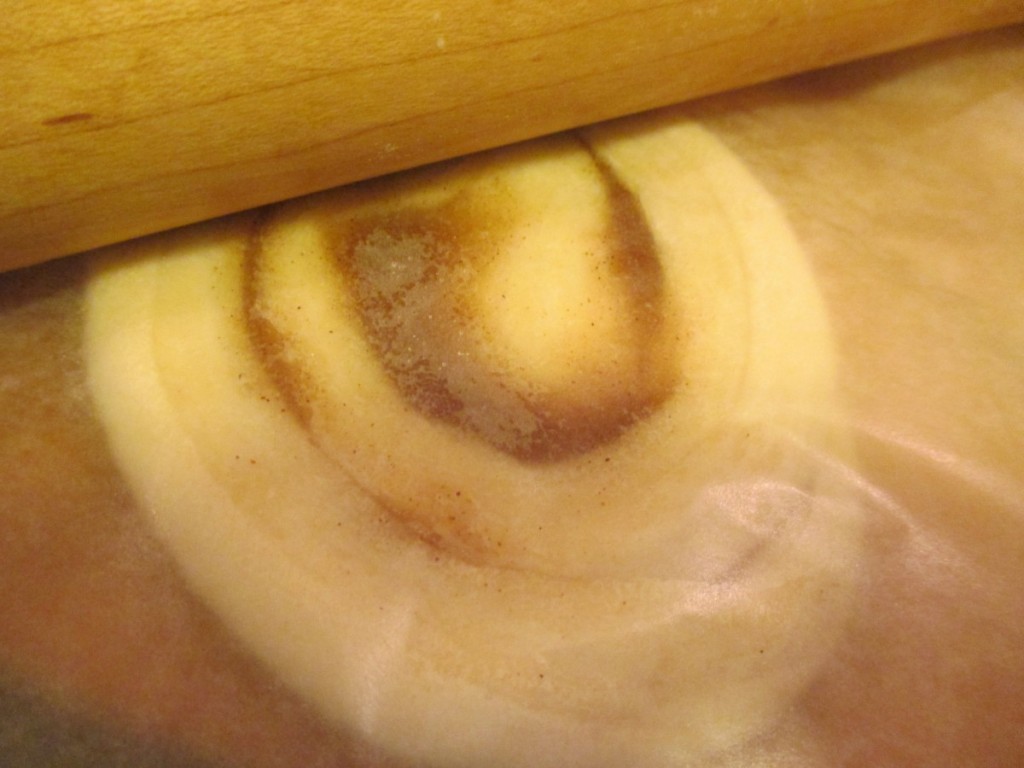
In mixing bowl combine 2 cups of the flour with the sugar, yeast and salt. Heat together the milk and butter until warm. Add to the flour mixture and beat for 3 minutes. Add another cup of flour and the egg and beat another 3 minutes. Gradually add enough of the flour to make a soft dough. Knead until dough is smooth- 3-5 minutes. Place dough in lightly oiled bowl and turn dough to coat in oil. Cover and let rise until doubled, about 1½ hours. Punch dough down and allow to rest 10 minutes. Meanwhile, prepare filling by combining sugars with cinnamon and stir in the melted butter. Divide dough in half. Roll one half into a square about 12 inches big. Let’s be honest here- rolling dough into a perfect square is pretty hard. Don’t freak out if it isn’t perfect, just shoot for sort of square. Spread half of the filling over the dough and roll it up. Slice the dough into 12 pieces. Prepare 2 baking sheets for these 12 pieces of dough. You’ll need 2 more for the rest of the dough. Line the baking sheet with parchment paper or a silicon baking sheet. Place 6 of the dough circles on each sheet- spacing them at least 3 inches apart. Flatten them to be about 3 inches across. I tuck the end under so they stay in a nice circle. Cover and let rise until doubled, about 30 minutes. Repeat this with the second half of the dough. You will end up with 4 baking sheets and 24 rolls in all. After the rolls have doubled preheat the oven to 400 degrees. Prepare the topping by combining the sugar, nuts and cinnamon in a bowl. Slide the parchment paper or silicone baking sheet off the cookie sheet and on to your work surface. Place a piece of wax paper over the rolls and roll then out pretty flat. Remove the wax paper and brush each of them with the butter and add a sprinkling of the sugar and pecan mixture to each one. I find a slightly rounded tablespoonful is about right. Put the wax paper back on the rolls and use a rolling pin to roll them again, pressing the nut mixture into them. Remove the wax paper. Repeat with the remaining rolls. I start baking the first 12 rolls while prepping the last 2 trays. It just saves me some time. Bake for 10-12 minutes. I put 2 in at a time and switch them halfway through the baking time. They should be a pretty golden brown color- top and bottom. Cool on a wire rack. Don’t be tempted to taste one when they are hot- the sugar will burn your mouth. Besides, they get crisper as they cool. Makes 24.

Pizza Zucchini


I started making this dish out of necessity. I was fresh out of college and never seemed to have much money. I did have a big garden, though. It was August and the garden was full of zucchini, tomatoes and peppers. I had to find a tasty way to combine them. Pizza Zucchini was born.
The name is a little misleading. It isn’t really a pizza at all. Rather, it is a saute of several veggies, seasoned with pizza seasoning. I top it off with cheese, and often serve it over pasta or rice or stuffed in a pita bread. Last night, I served it on a whole wheat tortilla, so it did sort of have a pizza feel to it.
Not much work, but this dish packs a lot of flavor. You can use other veggies, depending on what you have around. So if you have a few extra zucchini laying around, this is a fun and tasty way to enjoy them. You might even get your family to eat more veggies.
“Pizza” Zucchini
1 T. oil
½ c. chopped onion
1 sweet pepper, seeded and chopped
1 c. sliced mushrooms, optional
3-4 c. sliced zucchini or other summer squash, trimmed and sliced
3 c. diced fresh tomatoes, or use canned or 1 c. tomato sauce
1-2 t. pizza seasoning, or to taste*
8 oz. Mozzarella cheese
Sauté onion in oil until tender add pepper and mushrooms and sauté 2 minutes more. Add squash and cook until tender. Add tomatoes or sauce, seasonings and salt, if desired. Heat through, turn down heat and add cheese. Cover and allow to cook on low until cheese melts. Serve as is, over rice or pasta or in pita bread. Serves 3-4.
*Pizza Seasoning
3 T. dried basil
2 T. dried oregano
1-T. red pepper flakes
1 T. dried minced onion
1-T. fennel seeds
1 t. garlic powder
Combine all ingredients and store in a cool, dark, dry place.
To use: Add 1-2 teaspoons per cup of tomato sauce to make pizza sauce. Also good sprinkled on bagels with sauce and cheese or added to any tomato or pepper dish.

Spiced Chocolate Zucchini Cupcakes


It’s that time of year. Zucchini time. Maybe I should call it, “What do I do with all my zucchini time?” Zucchini and other summer squash are in abundance right now. This recipe is another, tasty way, to use them.
These are wonderfully spiced, moist cupcakes. Instead of frosting them, I decided to top them with melted butter and cinnamon sugar. It’s something I’ve done with muffins, in the past. I didn’t see why I couldn’t do the same thing with cupcakes.
It was a really good idea. The cupcakes stand up well in summer heat. Besides, not everyone likes frosting.
As an added bonus- it is a another recipe using zucchini, and that is never a bad thing.
Spiced Chocolate Zucchini Cupcakes
2 cups all-purpose flour
1 t. baking soda
½ t. salt
1 t. cinnamon
½ t. nutmeg
Pinch of cloves
¼ c. unsweetened cocoa
½ cup butter, softened
½ cup olive oil
1½ c. sugar
2 eggs
½ c. buttermilk
1½ t. vanilla
2½ c. grated zucchini
1 cup chocolate chips
Topping:
½ c. butter, melted
½ c. sugar
2 t. cinnamon
Preheat oven to 325 degrees. Grease and flour 24 muffin cups or use paper liners. Mix together the dry ingredients. Set aside. In a large bowl, cream together the butter, olive oil and sugar until light and fluffy. Beat in the eggs one at a time, then stir in the buttermilk and vanilla. Beat in the flour mixture, just until incorporated. Stir in the grated zucchini and chocolate chips. Pour batter into prepared pans. Bake for 25 to 30 minutes, or until the top of the cupcakes spring back when lightly pressed. Cool in pans over a wire rack for at least 10 minutes or until cool enough to handle. Dip top of cupcakes in melted butter, then dip in the cinnamon sugar. Place on rack to finish cooling off. Makes 24.
Zucchini and Corn Saute

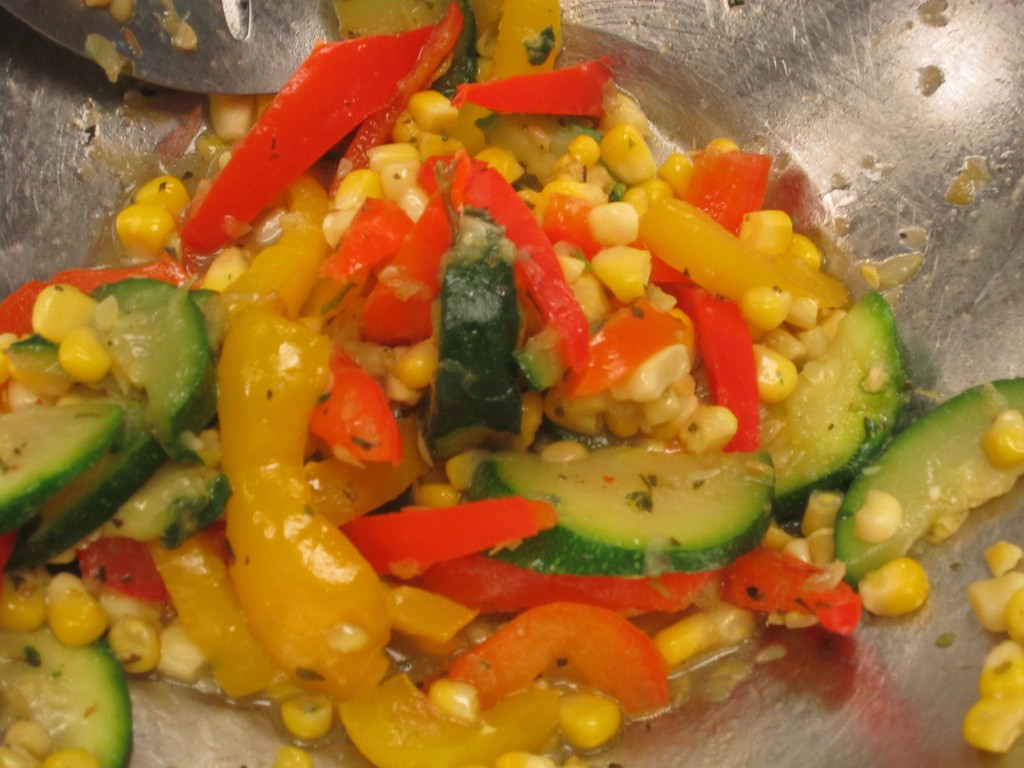
For those of you looking for another way to use some of those zucchini this dish is really fun and easy. The flavors of the zucchini, corn and peppers work really well together and makes a tasty side dish in just a few minutes. I served mine in pita bread. I sometimes add a little cheese, too.
Quick Zucchini and Corn Sauté
2 sweet peppers, seeded and cut into strips
2 medium zucchini, sliced
Oil
2 c. corn kernels cut from cobs, about 3 ears
2-3 cloves garlic, minced
1 t. salt
2 t. Italian seasoning
In oil, cook peppers and zucchini until crisp tender, about 5 minutes. Add remaining ingredients and cook 4 more minutes, or until heated through. Serves 6-8.
Peaches and Cream Crepes


Peaches are such a natural addition to any summer dessert. I decided to use some of my fresh peaches in crepes. Crepes are a nice dessert any time of the year. I think especially nice in summer, using fresh, seasonal fruit.
The crepes were filled with unpeeled, sliced peaches that had been tossed with sugar ahead of time. The sugar softens the peaches a little. I also added some sweetened cream cheese and a little strawberry jam to the filling. We loved them.
They can be assembled ahead of time, and just kept chilled until ready to serve. Serve as is, with a dusting of powdered sugar or even a vanilla caramel drizzle- recipe follows.
Peaches and Cream Crepes
1 recipe basic crepes- recipe follows
2-3 peaches, pitted and sliced thin
¼ c. sugar
1 t. vanilla
1 t. cinnamon
8 oz. cream cheese, softened
¼ c. powdered sugar
Strawberry jam, optional
Make a batch of basic crepes and set aside until ready to use. Place sliced peaches in a bowl with sugar, vanilla and cinnamon and stir until sugar is dissolved. Best to do this at least a couple of hours before you want to use them. This softens the peaches and allows juices to come out of the peaches. You need the juices for the cream cheese. You can do this the day before, then just finish the cream cheese and assemble.
Place cream cheese in a bowl and start beating with an electric mixer. Drain juices off the peaches and add the juice to the cream cheese. Add the powdered sugar, too. Beat until cream cheese is fluffy.
To assemble the crepes: Place a crepe on work surface. Spread with some of the cream cheese. Along one side of the crepe place a small amount of strawberry jam, like a stripe. Place several slices of peach in a row, on top of the strawberry jam. Starting on the side of the crepe with the peaches gently roll up the crepe. Repeat with remaining ingredients. You will have 12. Serve as is, or you can top with powdered sugar, peach slices, warm jam, whipped or caramel sauce – recipe follows.
Basic Crepes
3/4 c. flour
1/8 t. salt
3 eggs, beaten
2 T. melted butter
3/4 c. milk, approximately
Butter or oil for pan
Beat together flour, salt and eggs until smooth. Stir in melted butter and then stir in milk until batter consistency is that of cream. Let stand for 30 minutes before using, or can be refrigerated, covered, overnight. Beat again, just before using.
Heat 6 or 7 inch skillet. Brush with butter or oil and pour in about 2 teaspoons of batter, tipping pan to cover bottom of pan completely with batter. Cook until edges start to brown, turn over and cook until lightly browned (about 2 minutes per side.)
Crepes can be made day ahead or even frozen between sheets of waxed paper and frozen. Makes 12.
Vanilla Caramel
I made a light caramel sauce for the crepes. I just put 1/4 cup of water in a small saucepan with a cup of sugar. Boiled it all together for about 3 minutes. Removed from the heat and added a teaspoon of vanilla, 4 tablespoons of butter and a 1/4 cup of half and half. Stirred until smooth, then added a pinch of salt, for extra flavor.

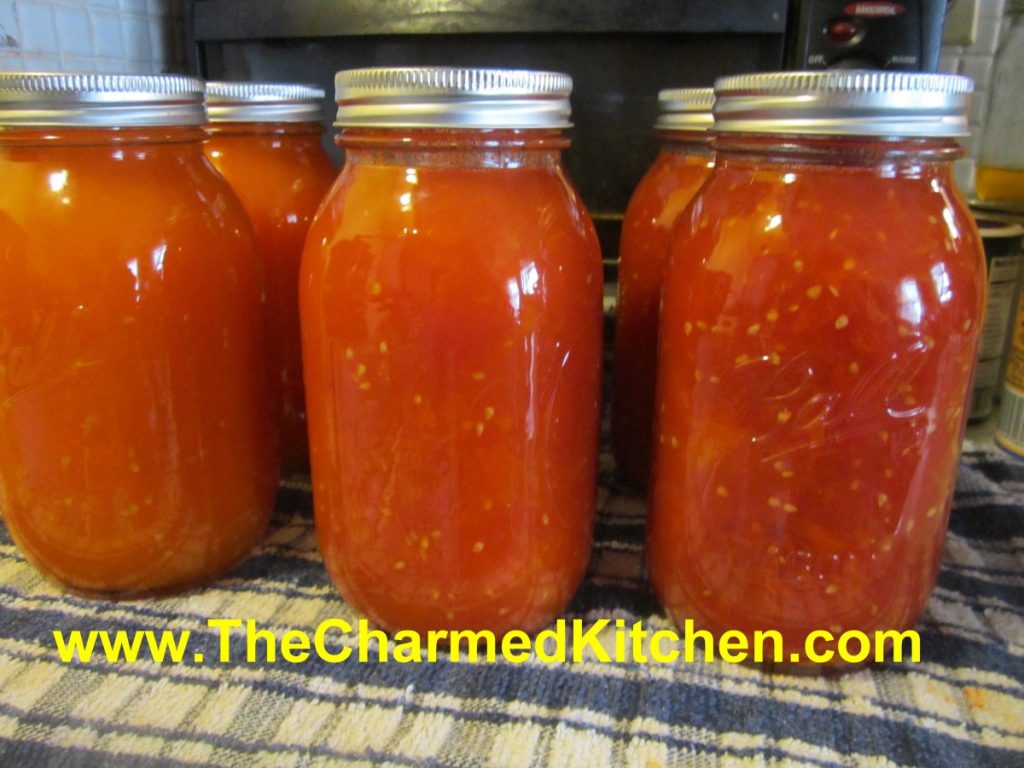
Canning Tomatoes

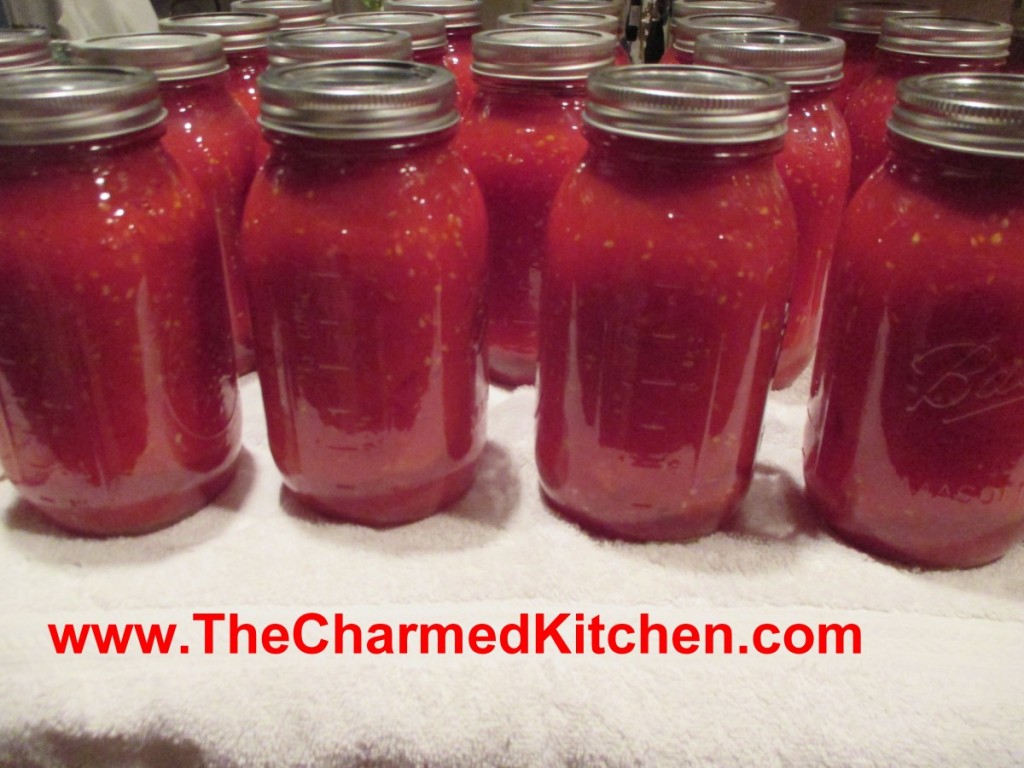
I love my home-canned tomatoes. They taste so much better than anything than comes in a can. Worth the effort.
You have options when canning tomatoes- crushed, juice, sauce- and more. The one option you won’t see for home- canned tomatoes is diced. There is a reason for that. When tomatoes are canned commercially, calcium is added to keep them firm. That is why commercially canned diced tomatoes hold their shape. Home canned diced tomatoes will just cook down, get very soft and not hold their shape. Canning tomatoes whole will give you a firmer end product, if that is what you want.
I have been asked several times in canning classes, if it is safe to can yellow or orange tomatoes. We have all heard that yellow and orange tomatoes are lower in acid, so are they still safe to can? The answer is yes, they are safe to can.
Why?
In spite of you might have been told, orange and yellow tomatoes are not acid free or low acid.
Truth is, that yellow and orange tomatoes have just as much acid as red tomatoes.
Well, for the most part at least. In terms of acidity or Ph, yellow and orange tomatoes are about average. Some cultivars have more, some less. Bottom line is that all tomatoes are safe to can- as long as you acidify them.
Adding salt is optional, and is for flavor only. Use canning/pickling salt or non-iodized salt when canning.
Here are some popular canning recipes to get you started.
All follow the NCHFP (National Center for Home Food Preservation) recommended procedures.
Crushed Tomatoes
Peel and core tomatoes , trim off any bad spots and quarter. Place about 1/4 of your prepared tomatoes in the kettle and cook, stirring constantly over high heat. Use a potato masher to crush tomatoes and extract juices. Once they are boiling add remaining tomatoes, stirring constantly. You don’t need to crush these tomatoes. Bring to a boil and boil for 5 minutes. In clean, hot jars add needed acidity listed below. You can also add 1 teaspoon of canning salt per quart if desired. Ladle in hot tomatoes, leaving 1/2-inch headspace. Wipe jar rims clean and adjust lids. Process in boiling water bath. Pints 35 minutes, quarts, 45 minutes. 1,000-3000 ft over sea level add 5 minutes. Twenty-two pounds of tomatoes will yield about 7 quarts of tomatoes.
Whole Tomatoes in Juice
Use any extra tomatoes to make juice. I use tomatoes that are too big to can whole, or those that have blemishes that need to be trimmed. Cut up clean, unpeeled tomatoes in a kettle and cook, stirring often until tomatoes are mushy. Strain mixture, pressing on solids or run through a food mill or tomato juice extractor. Set aside,. Place peeled, whole tomatoes in kettle and add enough tomato juice to cover them. Heat to a simmer and simmer gently 5 minutes. Add lemon juice or citric acid to jars, using amounts listed below. Add salt, if desired. Add tomatoes and cover with hot juice, leaving 1/2 -inch headspace. Wipe rims and adjust lids. Process both pints and quarts 85 minutes in a boiling water bath.
Tomato Juice
Wash, stem and trim bruises off tomatoes. Cut into chunks. Add about 1 pound of tomatoes to kettle and bring to a boil while crushing. Continue to add additional cut up tomatoes slowly, keeping mixture boiling. This will keep the juice from separating later. Simmer an additional 5 minutes once the tomatoes have all been added. Press mixture through a strainer , sieve or food mill to remove seeds and skins. Add lemon juice or citric acid to jars according to directions listed below. Add salt if desired. Return juice to boil and add to prepared jars leaving 1/2-inch headspace. Wipe rims and adjust lids. Process n a boiling water bath pints 35 minutes and quarts 40 minutes. Add 5 minutes processing time at elevations between 1,001 and 3,000 ft.
Tomato Sauce
Prepare as for juice. After juice is made return to pot and start cooking down to desired thickness. You’ll lose about 1/3 of the volume for thin sauce and 1/2 of the volume for thick. Add lemon juice or citric acid to prepared jars as described below. Add salt if desired. Add boiling sauce leaving 1/4 -inch headspace. Wipe rims and adjust lids. Process in a boiling water bath 35 minutes for pints and 40 minutes for quarts. Add five minutes at 1,001-3,000 ft. elevation.
Acidity and Tomatoes
Tomatoes must be acidified before canning. When canning either whole, crushed or juiced tomatoes you must add either 2 T. bottled lemon juice per quart or 1/2 t. citric acid . For pint use 1 T. lemon juice or 1/4 t. citric acid. You can also use 4 T. (5%) vinegar per quart, but it will alter the flavor and is not recommended. You can add a little sugar to offset the flavor, if you like.
Spicy Bread and Butter Pickles

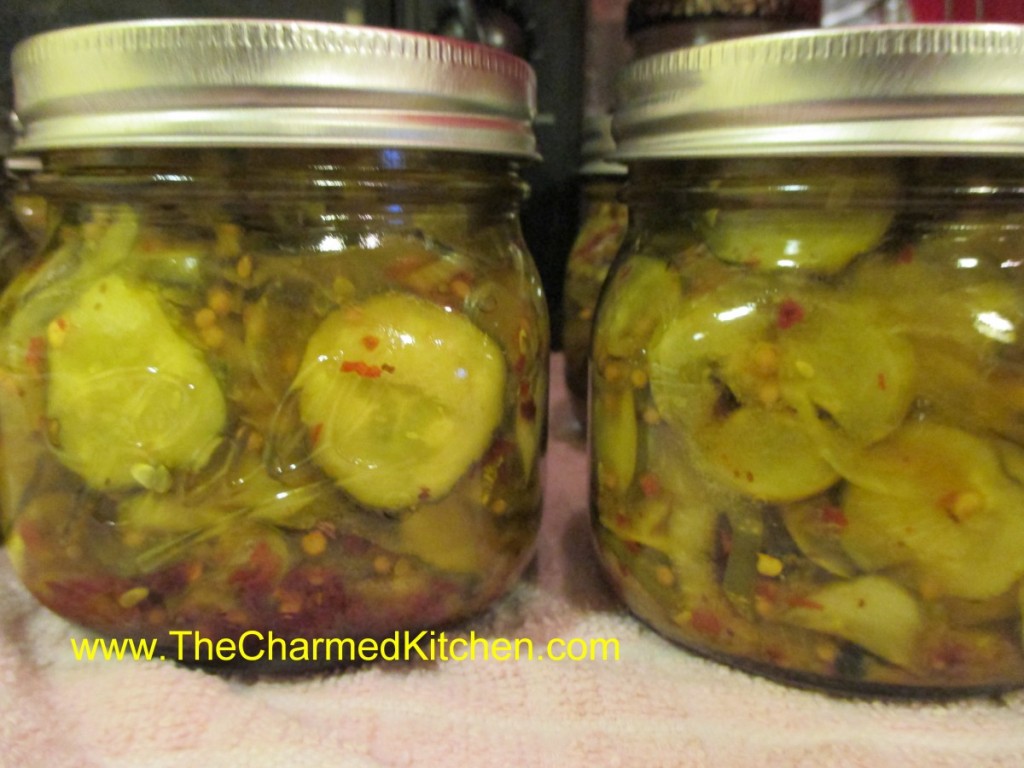
I am a big fan of homemade bread and butter pickles. I make several batches every year. Friends and family really like them, too. I get requests, every year, for these Spicy Bread and Butter Pickles.
While you should follow recipes for pickles carefully- those amounts of vinegar, salt, sugar etc., all are important for safety and a good end product, you can play around with seasonings a little.
In this case, I just add a teaspoon of red pepper flakes to each pint jar for the spicy version. Just enough of a kick. You might want to add a little more or less, according to your taste.
So here is the recipe for classic Bread and Butter Pickles- with the variation for Spicy included.
Bread and Butter Pickles*
6 quarts thinly sliced pickling cucumbers
6 medium onions, peeled and sliced thin
½ c. pickling salt
1½ quarts vinegar
4½ c. sugar
½ c. whole mustard seed
1 T. Pickling spice
1 T. celery seeds
Wash cucumbers and trim off ends before slicing. Place in non-reactive bowl
(stainless steel, enamel, plastic) add the onions and then salt and stir. Allow cucumbers and onions to sit in the salt for 3 hours. After 3 hours drain well, but do not rinse. Meanwhile combine remaining ingredients and bring to a boil. Add cucumbers and onions and return to the boil. As soon as the mixture is boiling ladle into clean, hot pints jars, leaving a good ½ -inch of headspace. Wipe rims and screw on lids firmly. Place in boiling water bath and process for 10 minutes. Remove to counter and allow to cool naturally. Makes 12 pints.
* For Spiced Bread and Butter Pickles add 1 teaspoon of red pepper flakes to each pint jar just before filling.
Note: These need a couple of weeks for the flavors to develop. They can also be made with firm, small zucchini. For crisper pickles, you can also add Pickle Crisp, which Ball makes. Follow package directions.
Source: Putting Food By
Creamy Zucchini Soup – Hot or Cold


You can never have enough recipes for zucchini. If you have ever planted zucchini, you know what I mean.
This is a recipe I’ve had for ages, but had not made in a while. I forgot how much I liked it. As an added bonus, it can be served hot or cold.
I leave the skins on my zucchini, I like the way the little green flecks look in the soup, but you can peel, if you prefer. You can also use a combo of green and yellow summer squash.
Here is the recipe.
Creamy Zucchini Soup
1 medium onion, chopped
2 T. butter
4-6 medium zucchini, sliced
1 large potato, peeled and diced
1 T. chopped parsley
½ t. each basil, marjoram and thyme
1 t. hot sauce, or to taste
salt and pepper to taste
6 c. chicken or veggie broth
1 c. milk or half and half- I prefer the half and half
In Dutch oven cook onions in butter until tender. Add vegetables and seasonings and cook until hot. Add broth, heat to a simmer and cook 15 minutes. Puree mixture in blender in batches and return to pot. Add milk and heat through. Adjust seasonings. Serve hot or cold. I topped mine with some fresh chopped parsley and a little hot sauce. Serves 6-8.


