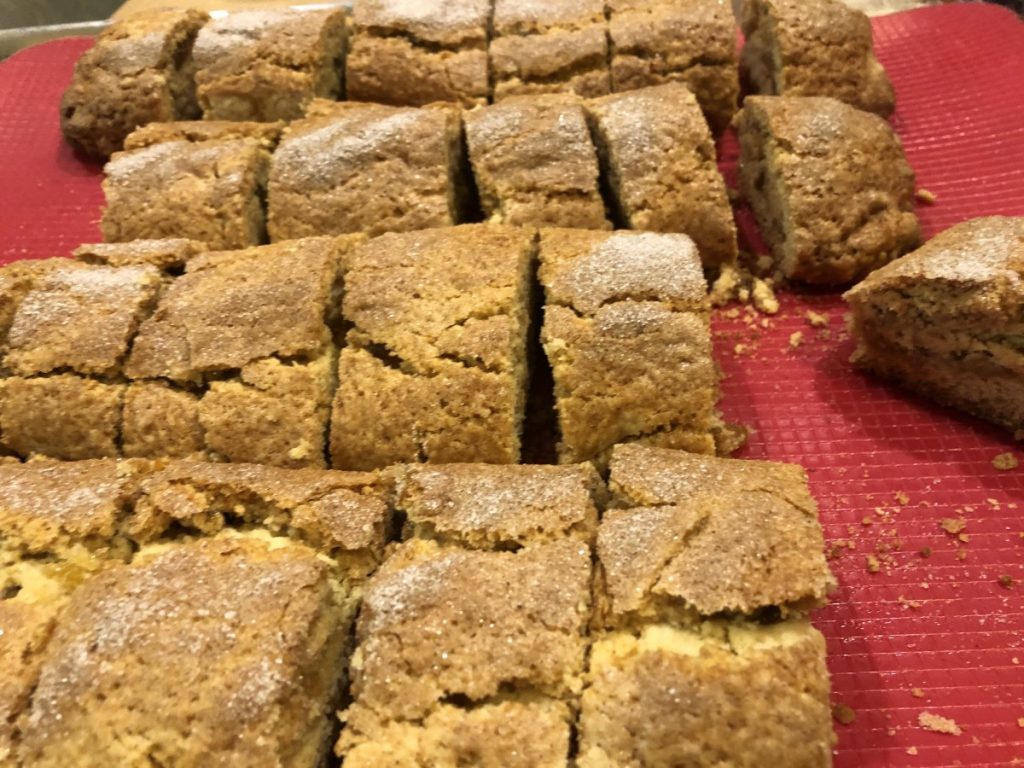
Cindy’s Squash Rolls

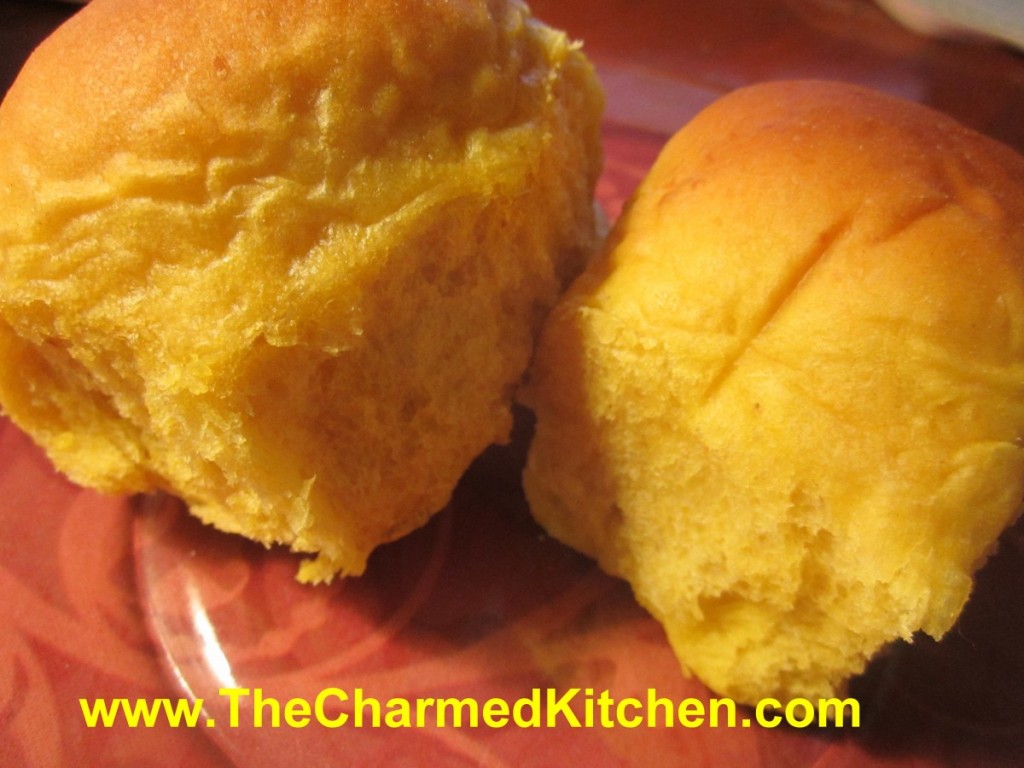
I love these dinner rolls. I think you will, too. The addition of squash is what makes them so special. The squash adds beautiful color to the rolls. It also creates a soft texture and an earthy sweetness.
These rolls are wonderful for any fall or winter dinner or holiday. They are especially nice for Thanksgiving.
We have them every Thanksgiving. My sister Cindy always makes them, and has been making them for years. They are rich, soft and sweet and make a perfect addition to the dinner table. Even with all the other foods at Thanksgiving dinner- you always save room for these dinner rolls.
While I use cooked butternut squash in mine, pumpkin could be used, as well as other winter squashes.
The recipe makes a pretty big batch. You can bake them, then freeze some for later use.
I love slicing them in half, and making mini turkey sandwiches with them the day after Thanksgiving.
Cindy’s Squash Rolls
1 c. milk
4 T. butter
½ c. sugar
¼ c. brown sugar
1 t. salt
1 pkt. Yeast
4-5 c. flour
1 ½ c. cooked butternut squash, strained, or 1 (16oz.) can squash or pumpkin
2 eggs, room temperature
Scald milk and butter. Place sugar and salt in large bowl and pour in milk mixture. Cool to lukewarm. Add yeast and 2 cups of flour. Beat at medium speed with mixer for 2 minutes. Add squash and eggs and mix until smooth. Add flour gradually to form a stiff dough. Knead on floured board for 7-8 minutes. Place in a greased bowl, turning dough to coat evenly. Cover with a towel and allow to rise until doubled. Punch dough down and shape into rolls. Dough can be placed in a greased cake pan where they will touch each other as they rise making softer rolls. You can also place them in muffin tins, or shape into rolls and place on greased baking sheet for crispier rolls. Cover and let rise until doubled. Bake at 375 degrees for about 25 minutes. Butter tops while warm. Makes 2 ½ -3 dozen.
Variation: you can also add ½ t. ground nutmeg, 1-2 T. chopped chives, or 1T. parsley flakes for a little different flavor.
Mom’s Pumpkin Squares

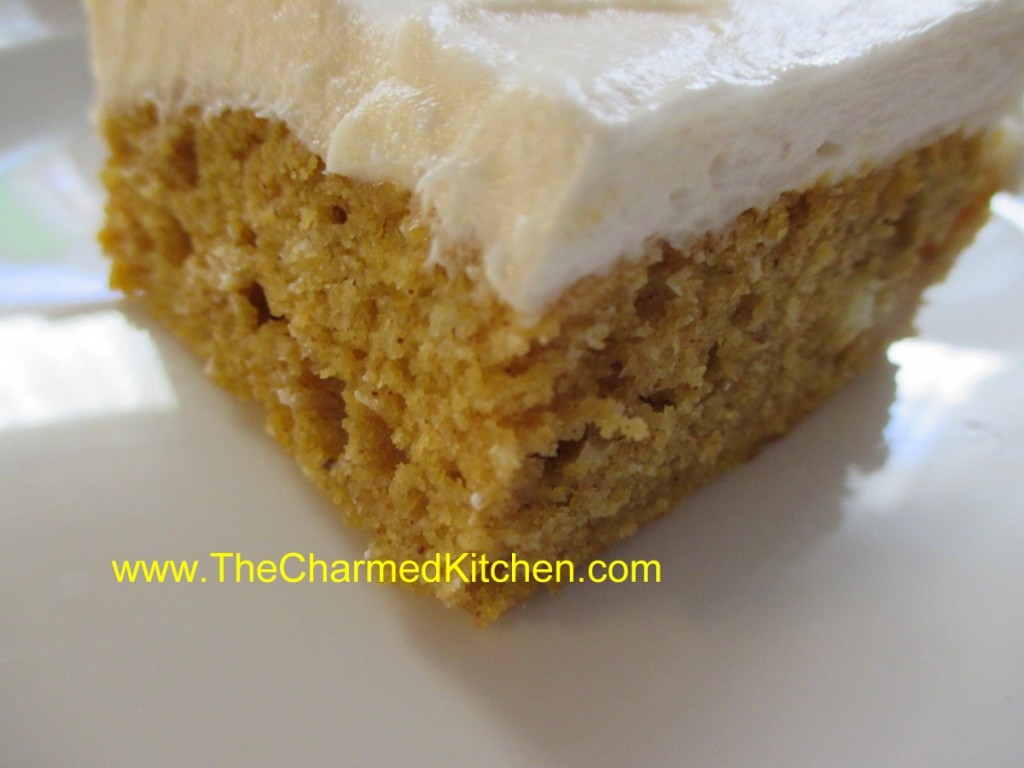
This recipe has been part of our family for years now. My mom made them for Thanksgiving every year- and I continue that tradition. Like my mom, I use fresh (or frozen) cooked pumpkin or winter squash. My mom didn’t care much for the taste of canned pumpkin. She would cut up the Halloween pumpkin, cook it, puree it and freeze it- so she could make pumpkin squares anytime she wanted.
The original recipe came from Bisquick, but it had 2 cups of sugar in it. My Mother’s sensibilities kicked in and she cut the sugar down to one cup. Great move on her part. The cake is still plenty sweet with less sugar.
It mixes and bakes up in no time. I normally top it with cream cheese frosting, but it would be good with a simple powdered sugar glaze, a buttercream frosting, or even just a dusting of powdered sugar mixed with a little cinnamon.
The texture is moist and tender and I think you’ll enjoy it as much as I do.
Pumpkin Squares
1 c. sugar
½ c. oil
16 oz. cooked pumpkin, canned, fresh (preferred) or frozen
4 eggs, beaten
2 c. biscuit mix (homemade or Bisquick or Jiffy Mix)
2 t. cinnamon
½ c. raisins, optional
Grease a jelly roll pan and set aside. Preheat oven to 350 degrees. Beat first 4 ingredients for 1 minute. Stir in mix, cinnamon and raisins. Pour in prepared pan and bake 25-30 minutes. Test for doneness with a toothpick. Cool and frost. Frosted cake must be kept refrigerated between servings.
Frosting:
8 oz. cream cheese
2/3 c. butter
2 T. milk
2 t. vanilla
3 c. powdered sugar, or more
Beat together until smooth.
Mom’s Butter Coffeecake Braids


The name of this bread is a little misleading. It really isn’t a coffeecake. These loaves just have a texture that reminds you of sweet breads. The bread itself isn’t sweet. There is less than 3 tablespoons of sugar in the two loaves combined. But it is a rich dough with butter, eggs and evaporated milk.
Mom would often top the cooled loaves with a powdered sugar glaze or a buttercream. Sometimes she would add toasted nuts, too. You could easily add raisins to the dough.
The thing is, after a while, we all kind of decided we liked the bread plain. The bread has just over 2 cups of flour in each loaf. That is low by most bread standards. It is just different from most any other bread I make.
In our family, my mom was famous for this bread. Every gathering, she would bring it. For large parties, she often started baking, and freezing, the loaves a few weeks ahead, so she would have enough.
The bread really is exceptional, with a texture that is soft and a little chewy at the same time. Since my Mom’s birthday is coming up, I wanted to remember her by making and sharing some of her favorite recipes. So here is the recipe.
Mom’s Butter Coffeecake Braids
4 1/2 c. flour
2 T. sugar
1 t. salt
½ c. butter
1 packet yeast
¼ c. warm water
2 t. sugar
1 c. evaporated milk
2 eggs, beaten
Combine flour with sugar and salt. Cut in butter or duck fat and set aside. Dissolve 2 teaspoons sugar in warm water. Dissolve yeast in warm water mixture and set aside. Allow to become bubbly, about 5 minutes. Combine milk with eggs. Stir in yeast mixture and add to flour mixture stirring well. Knead dough in bowl until smooth, about 10 minutes. Place on lightly floured surface and knead until smooth. Cover and let rise until doubled, about 1½ hours. Divide dough in half and then each half into thirds. Roll dough into ropes and braid three ropes together. Repeat with remaining 3 ropes. Place braids in 9×5 inch greased bread pans and cover with a towel. Place in a warm, draft-free place and allow to rise until doubled, about 1½ hours. Bake in a preheated 350 degree oven for 25 minutes. If you like glaze loaves while warm with a mix of powdered sugar, a little milk, butter, and vanilla. Toasted almonds or walnuts can be added, if desired. Makes 2 loaves.
Note: You can also refrigerate the dough after kneading it if you would prefer. Just place dough in an oiled bowl, cover with plastic wrap and chill overnight. Roll and shape dough into braids when cold from the fridge. Rise, covered, until doubled in bulk, about 2-3 hours. Bake as directed.
Note: You can also place loaves on a greased baking sheet for a longer, flatter bread rather than in loaf pan.
Note: This is the same dough my parents used to make jelly doughnuts.
Spinach Puffs

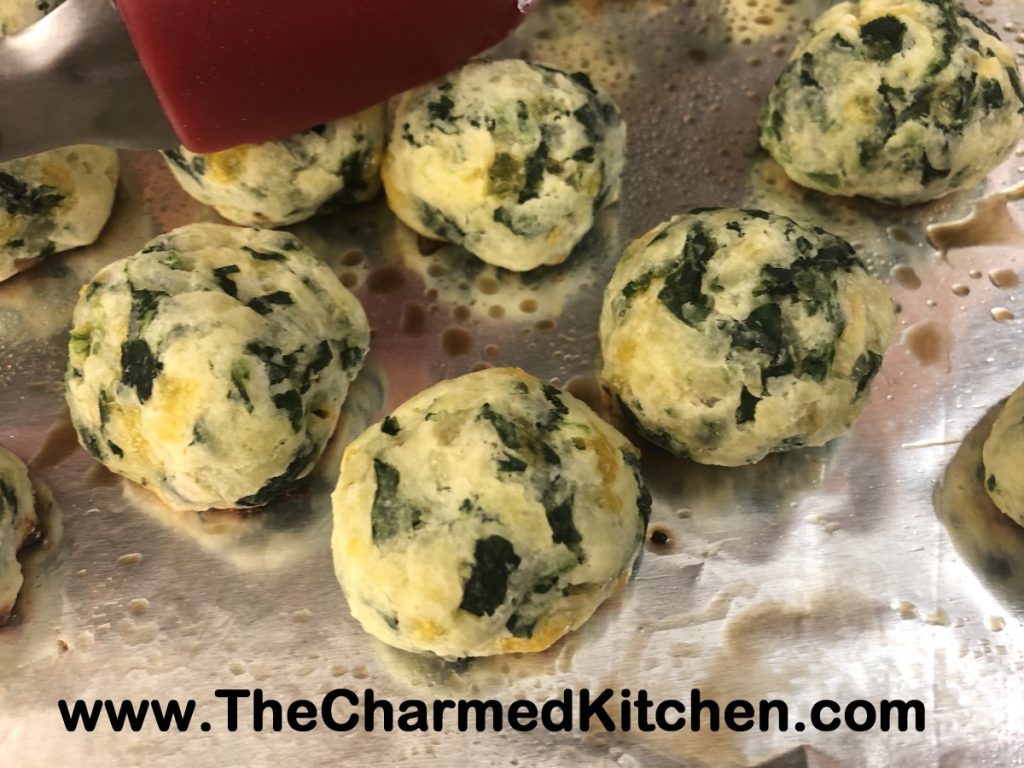
I love these little spinach puffs. They are tender balls of dough, filled with spinach and cheeses. They can be served on their own, or with honey mustard or a marinara sauce for dipping. We made a batch in cooking class the other night.
The holidays are a time to celebrate and spend time with friends and family. There are going to be parties. And food, lots of food. Time is often not on our side, though. I love recipes that taste great, but don’t take too much time to make- or can be made ahead. These Spinach Puffs do both. The dough can be mixed ahead and then just bake a few when you want them. You can also bake up a batch, then freeze them. Take out as many as you need and reheat in no time.
These tend to brown on the bottom very quickly. Bake them in the upper half of the oven.
Spinach Puffs
1 (10oz.) package frozen spinach, cooked and drained well
2 T. dried minced onion
2 eggs
½ c. shredded cheddar cheese
½ c. grated Parmesan cheese
½ c. ranch dressing
2 T. oil
¼ t. garlic powder
2 c. biscuit mix (Bisquick or Jiffy Mix)
Mix all ingredients and chill several hours or overnight. Roll into 1-inch balls and place 2-inches apart on a greased baking sheet. Bake in a 350-degree oven for 10-12 minutes. Makes about 60.
“Pumpkin” Ravioli Soup

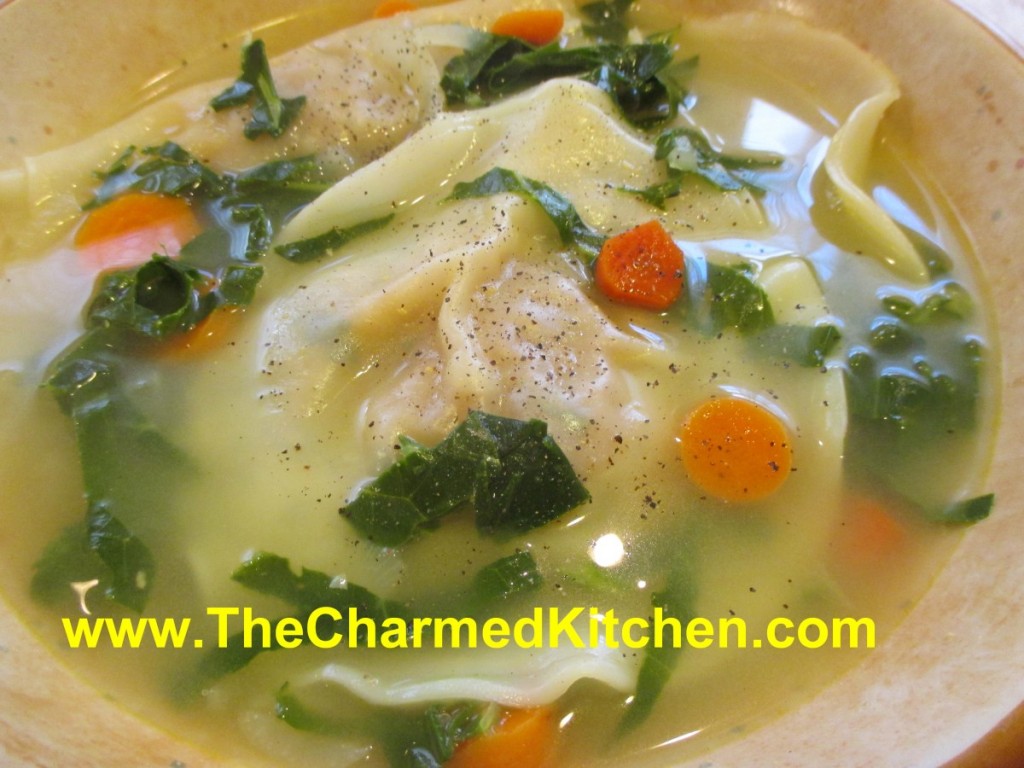
Fall is the time for cooking with pumpkin and other winter squash. I make plenty of pumpkin bread, pumpkin cake, pumpkin soup, and so on. I often am actually using butternut or Hubbard squash in place of the pumpkin.
This was the case with this soup. I have made it with pumpkin before, but this time I had a butternut squash, so that is what I used. Many winter squash can be used in place of pumpkin in cooking.
After cooking up one of my butternut squash, I was looking for a way to use some of it in a soup. I decided to use the squash as a filling for ravioli, then just put the ravioli in the soup.
I played with the spices and added some butter to the filling, too. It needed that extra bit of fat for flavor. It worked well. I just cooked the ravioli right in the soup, but you could cook and eat the ravioli without soup at all.
If you want the ravioli without the soup, you would cook the ravioli in salted water. Once they are tender, drain and top with the sauce of your choice. I like brown butter with a little sage, but even a red sauce would be nice with these ravioli. Here is the recipe- for both the ravioli and the soup.
“Pumpkin” Ravioli Soup
Ravioli:
24 round won ton/dumpling wrappers
Filling:
1 cup cooked pumpkin or winter squash
2 T. softened butter
1 T. chopped parsley
1 t. paprika
1 t. nutmeg
½ t. garlic powder
Salt and pepper to taste
Pinch of cayenne
Soup:
2 T. oil or butter
2 onions, peeled and sliced
6 c. stock- chicken or veggie
3-4 carrots, peeled and sliced
2-3 c. thinly sliced collard greens- other greens could be used, I just had collards
Salt and pepper
Dash of hot sauce
Fresh chopped parsley
Combine ravioli filling. Adjust seasonings. Place a rounded tablespoonful of filling on one of the wrappers. Dampen edges with water and place another wrapper on top. Seal, pressing out as much air as possible. Continue with remaining filling and wrappers- you should have 12 raviolis in all. Set aside while making the soup.
Heat oil or butter in a pot and add the onions. Cook until onions are tender. Add stock and bring to a boil. Add carrots and collards and cook until veggies are tender. Add seasonings and bring soup to a boil. Add the raviolis and let the soup simmer gently until they are cooked- about 4 minutes. Stir a little to keep them from sticking, but gently. They get a lot bigger and are sort of delicate. Transfer gently with a large spoon to soup bowls and ladle over the soup. Serves 4- 6.
My Favorite Apple Cake

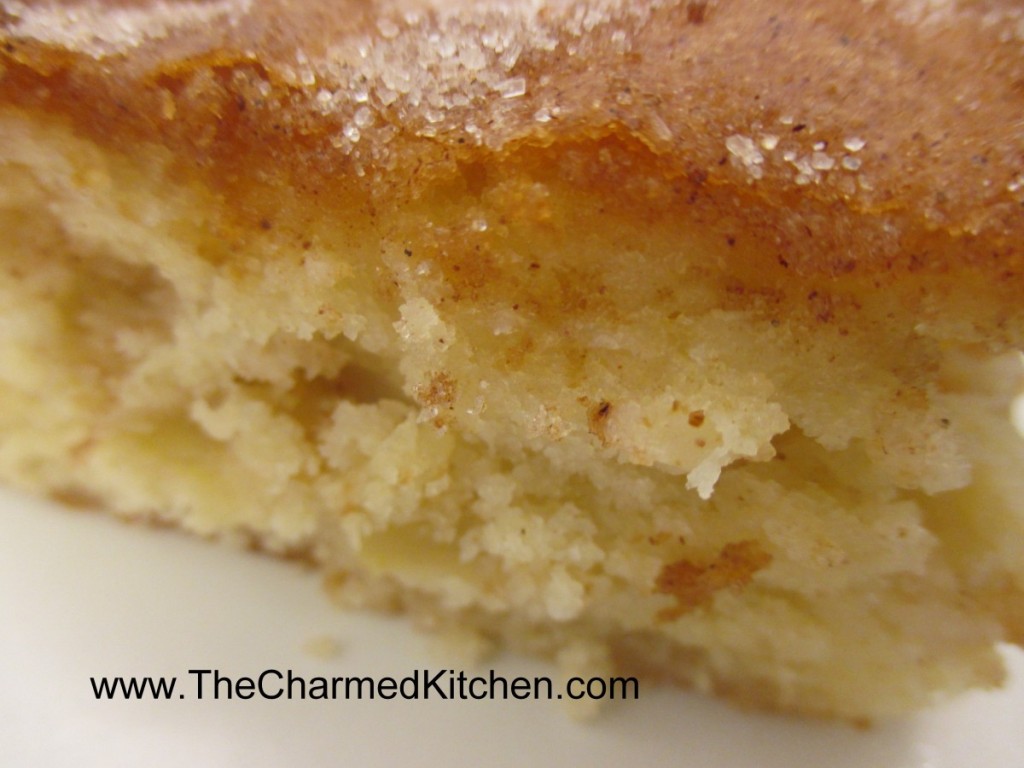
I have posted this cake recipe in the past. It truly is my favorite apple cake ever. I was talking with a cousin about this cake yesterday, so here it is.
I’ve enjoyed this cake since I was a kid. My Aunt Josie gave the recipe to my mom. Not sure where she got, it but it has been a family favorite since we first made it. She called it Jewish Apple Cake. Not sure why. It’s just what we all called it.
It’s a simple recipe that comes out moist and flavorful. I normally bake it in a 13×9- inch pan but it can be baked in a Bundt pan. While the recipe calls for cinnamon sugar- I sometimes add a little fresh ground nutmeg, too. I also like to use olive oil or even avocado oil in this cake. It gives it a really nice flavor.
Almost any apple works in this recipe- except maybe Red Delicious. Perfect for dessert or even served with brunch. Who am I kidding? I would eat this cake for breakfast.
Note: The batter is really thick. Don’t think you’ve done something wrong.
Jewish Apple Cake
1 c. oil, I use olive oil or avocado oil
4 eggs
1 t. vanilla
1/3 c. orange or lemon juice
Combine above ingredients and set aside.
Mix together the following dry ingredients. Make a well and stir in egg mixture to make a stiff batter.
3 c. flour
2 c. sugar
3 t. baking powder
¼ t. salt
Mix ½ c. sugar and 2 t. cinnamon and set aside
Peel, core and slice 4 medium apples.
Grease a 9×13 inch pan or a Bundt pan. Preheat oven to 350-degrees. Place ½ of batter in prepared pan. Arrange apple slices on batter and sprinkle on ½ of the cinnamon mixture. Pour on remaining batter and sprinkle with remaining sugar mixture.
Bake 45-50 minutes for 13×9-inch pan and 1 1/2 hours for Bundt. I find that sometimes it takes less than 90 minutes in a Bundt, so I check at an hour and 15 minutes.
How to Can Applesauce

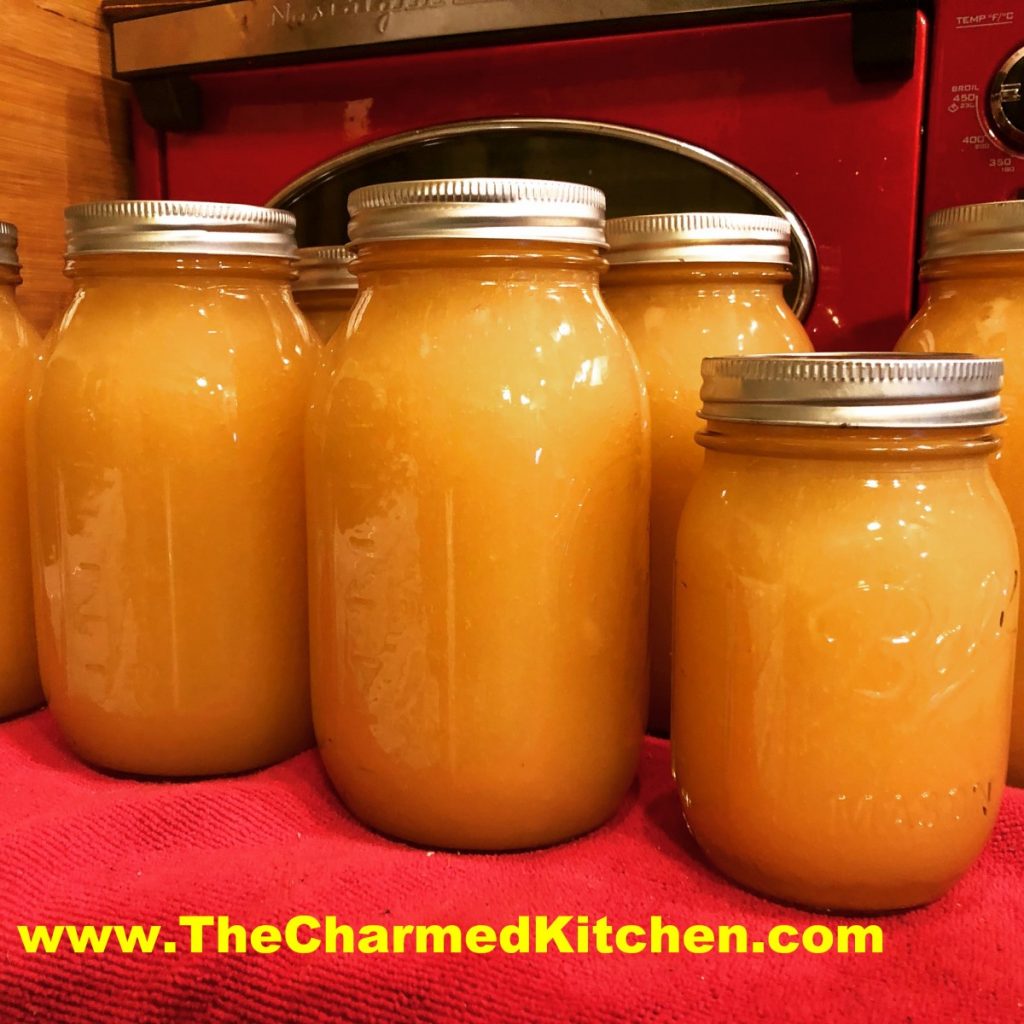
I love homemade applesauce so much better than anything I can buy at the store. It really is easy to make.
There is some disagreement about whether or not you have to peel your apples before making applesauce. It is a personal choice. You can cut up your apples without peeling them, if you are running them through a food mill. The food mill will remove the skins. If you use red-skinned apples, the skins will give your sauce a rosy tint.
I actually peeled my apples, mostly because I knew I was not using a food mill, but was using an immersion blender to make my sauce smooth. Either method is fine.
Sweetening is also a personal choice. You can leave your applesauce unsweetened, if you like. I normally use sweet apples for my sauce, so I don’t need a lot, or any, sugar. Plus, I’ll let you in on a little secret. You need some water to help cook down the apples and keep them from sticking to the pot. Instead of water, I use apple juice or cider. It adds natural sweetness to the applesauce and a more intense apple flavor.
You can also add a couple of cinnamon sticks to the batch- don’t forget to remove them before processing.
Home Canned Applesauce
12 lbs. apples, I used Melrose and Mutsu, but use the apples you like
Water*
2-3 cinnamon sticks, optional
4 T. lemon juice
sugar to taste
Peel and core apples. Put in water with some ascorbic acid, citric acid or lemon juice to prevent discoloration. Place apples in a pot with enough water* to prevent sticking. Add the cinnamon sticks, if using, and lemon juice. Cook over medium high heat until soft. Time will vary depending on the type of apples you are using, and how large the apples are. Turn off the heat and remove cinnamon sticks. I wanted smooth applesauce, so I used an immersion blender. Return apple mixture to a boil. Sweeten with sugar, if you like, or leave unsweetened. Have water bath full of boiling water and have hot, clean canning jars and lids and rings ready. Ladle hot applesauce into hot jars, leaving 1/2 inch of headspace. Wipe rims and apply lids. Process in a boiling water bath for 20 minutes for pints or quarts. Turn off heat and let jars stand in water bath 5 minutes before removing. Set in a draft free area to cool down. Yield: 4 quarts or 8 pints.
*rather than add water, to prevent the apples from sticking, you can use cider or apple juice instead.
Pumpkin Pancakes


These pancakes make a wonderful breakfast for Thanksgiving morning- or any morning for that matter.
I want to be honest with you from the start. I made these pancakes with cooked butternut squash and not pumpkin. They were terrific. Many winter squash can be used just like pumpkin in cooking. The problem is that when I post a recipe as “squash” instead of pumpkin, people get confused. Perhaps they are thinking summer squash, like zucchini. Maybe the word pumpkin just conjures up a clearer image.
The pancakes were really good, and isn’t that what matters?
I make my own baking mix, and that is what I used as the base for the pancakes. You can just buy a mix, like Jiffy or Bisquick, if you prefer. The pancakes are light and fluffy, with a nice “pumpkin” flavor. I had them with warmed maple syrup, but they would also be nice served with powdered sugar or perhaps a fresh berry syrup.
“Pumpkin” Pancakes
2 c. baking mix – like Bisquick or Jiffy Mix – I make my own*
3 T. brown sugar
2 t. cinnamon
1 t. nutmeg
1 1/2 c. evaporated milk
1 c. pureed pumpkin or winter squash
2 eggs, beaten
2 t. vanilla
Combine dry ingredients in mixing bowl and set aside. Whisk together wet ingredients and stir into dry ingredients. Lightly grease a skillet and cook over moderate heat. Use about 1/3 c. of batter per pancake. Turn when edges appear dry. Makes 16.
*Chef Pastry Mix/ Biscuit Mix
8 cups sifted, all-purpose flour
1 c. powdered milk
1 c. powdered buttermilk
¼ c. baking powder
1 T. salt
2 c. shortening, butter or coconut oil*
Sift dry ingredients together 3 times. Cut in shortening, butter or coconut oil to resemble cornmeal. Keep in an airtight container. Store in a cool dry place and use within six months.
* I use coconut oil and store in the fridge. If you use butter or coconut oil- you have to keep in the fridge.
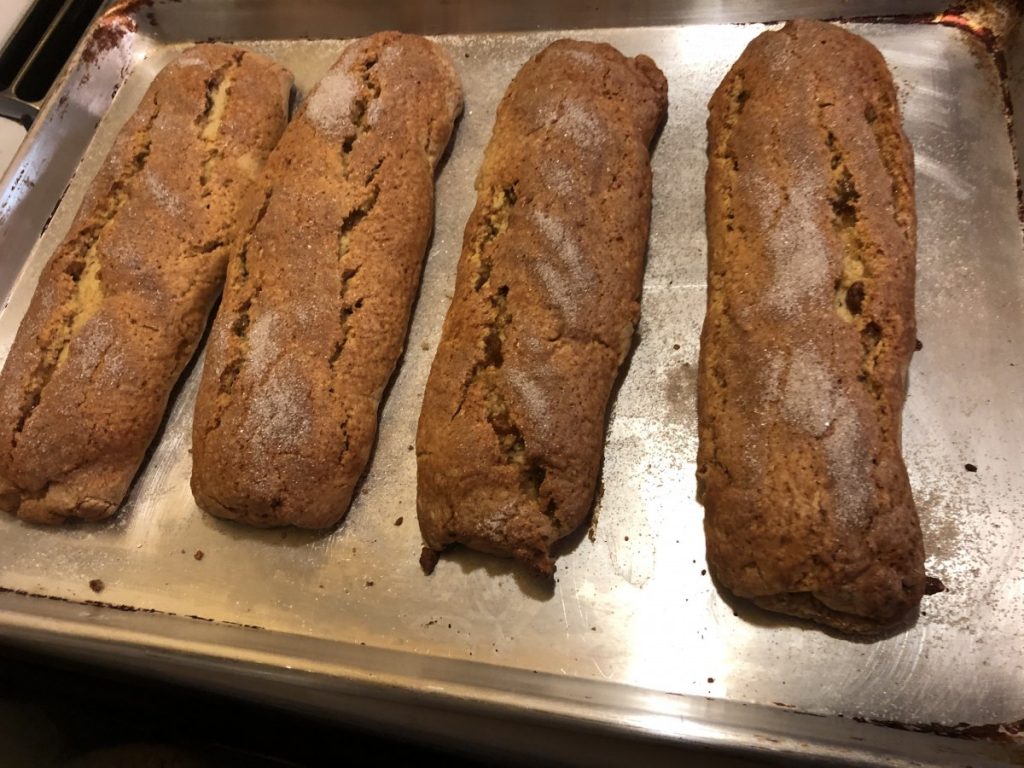
Russian Tea Biscuits

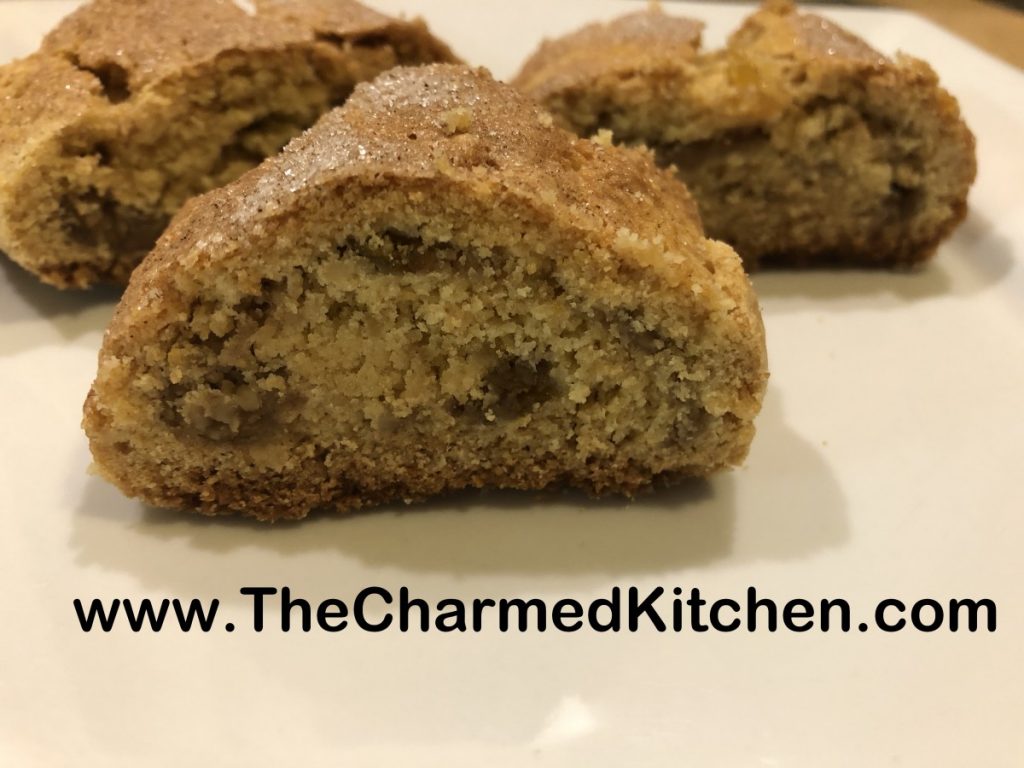
Russian tea biscuits are like a kind of cookie. A magical cookie, filled with jam and raisins and nuts. The are crispy, tender and rich. They also are not all that sweet, which appeals to me. You can serve them as a dessert, but also serve them with breakfast or brunch. And of course, with your tea or coffee.
I can remember the first time I ever had a Russian tea biscuit. It was at the Cedar-Lee theater. I guess you could say I got my love for foreign films and Russian pastry at the same place. I found a recipe in my mother’s recipe collection. I tried them and they were pretty close to the ones at the Cedar-Lee. I did tweak that recipe a bit.
My only regret was not having raspberry jam. That is my favorite. The swirl of red in the biscuits is very pretty. I used what I had- peach- and am happy with them. Not as colorful, but very tasty, all the same.
Here is the recipe. I think you might want to try these with that next cup of tea.
Russian Tea Biscuits
3½ c. flour
½ c. sugar
1 t. baking powder
1 t. baking soda
¼ t. salt
1 c. butter, softened
2 eggs, separated
½ c. orange juice
1 1/3 c. preserves, (strawberry, raspberry, plum or apricot are favorites)
1 c. chopped walnuts
1 c. raisins, dark or golden
1 t. cinnamon
3 T. sugar
Combine dry ingredients in a mixing bowl and cut in butter until mixture is the size of peas. Stir in egg yolks and orange juice. Knead until dough is well blended. Divide dough into 4 equal pieces. Roll out a piece of dough 1/4 -inch thick into an 8×10-inch rectangle. Spread with 1/3 c. of the preserves and sprinkle with 1/4 c. each of the raisins and nuts. Roll up jelly roll fashion and set, seam side down, on ungreased baking sheet. Repeat with remaining dough. Beat egg whites until foamy and brush on dough. Combine cinnamon and sugar and sprinkle on dough. Bake in a 350-degee oven for 25-35 minutes, or until golden. Use a toothpick to test for doneness. They can be golden, but a little under baked in the middle. Slice while warm into 6 pieces for each roll. Makes 24.
Cheesy Butternut Squash Bake

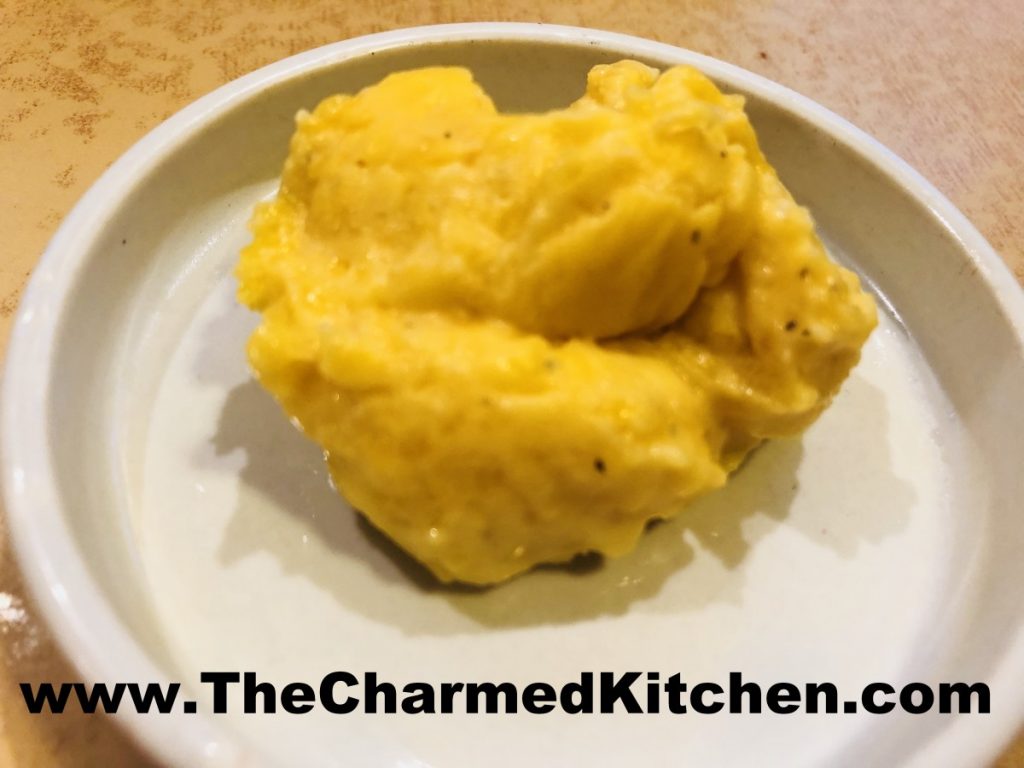
This recipe turned out to be a wonderful way to prepare squash or pumpkin. It tasted so good. I had some butternut squash I wanted to use in a savory dish. I peeled and cubed the squash, then steamed it until tender. I mashed up the squash, then rummaged in my fridge. I had some sharp white cheddar cheese. I shredded it up, adding it to the squash. I also had an open carton of whipping cream- so I added some, too. I was worried it would be too runny, so in went a little cornstarch. Then I added a generous amount of salt and fresh ground pepper.
I put the mixture in a baking dish and popped it in the oven. I took it out when it was all bubbly and hot. In hindsight, I could have given it a few more minutes to brown a little on the top.
Sometimes the hardest part about cooking is coming up with a name for a new dish. I wasn’t quite sure what to call this one. I thought about calling it a mash or maybe a casserole. I ended up with the innocuous name, “bake”. Well, whatever you call it, I think you will love it as much as I did.
Feel free to play around with the cheese you use. Anything that melts will work. You can also use different winter squashes or pumpkin, too.
So here is the recipe.
Cheesy Butternut Squash Bake
4 c. cubed butternut squash
8 oz. shredded cheese- I used a sharp cheddar
½ c. heavy whipping cream- or half and half
2 T. cornstarch
Salt and pepper to taste
Cook the cubed squash until tender. You can steam, boil or roast. If boiling, be sure to drain well. Place cooked squash in a bowl and mash. It is ok if there are still some small lumps. Add remaining ingredients and combine well. Place in a one-quart baking dish and bake in a 350-degree oven for 30 minutes, or until mixture is bubbly. Serves 4-6.


