Scotch Eggs

Scotch Eggs
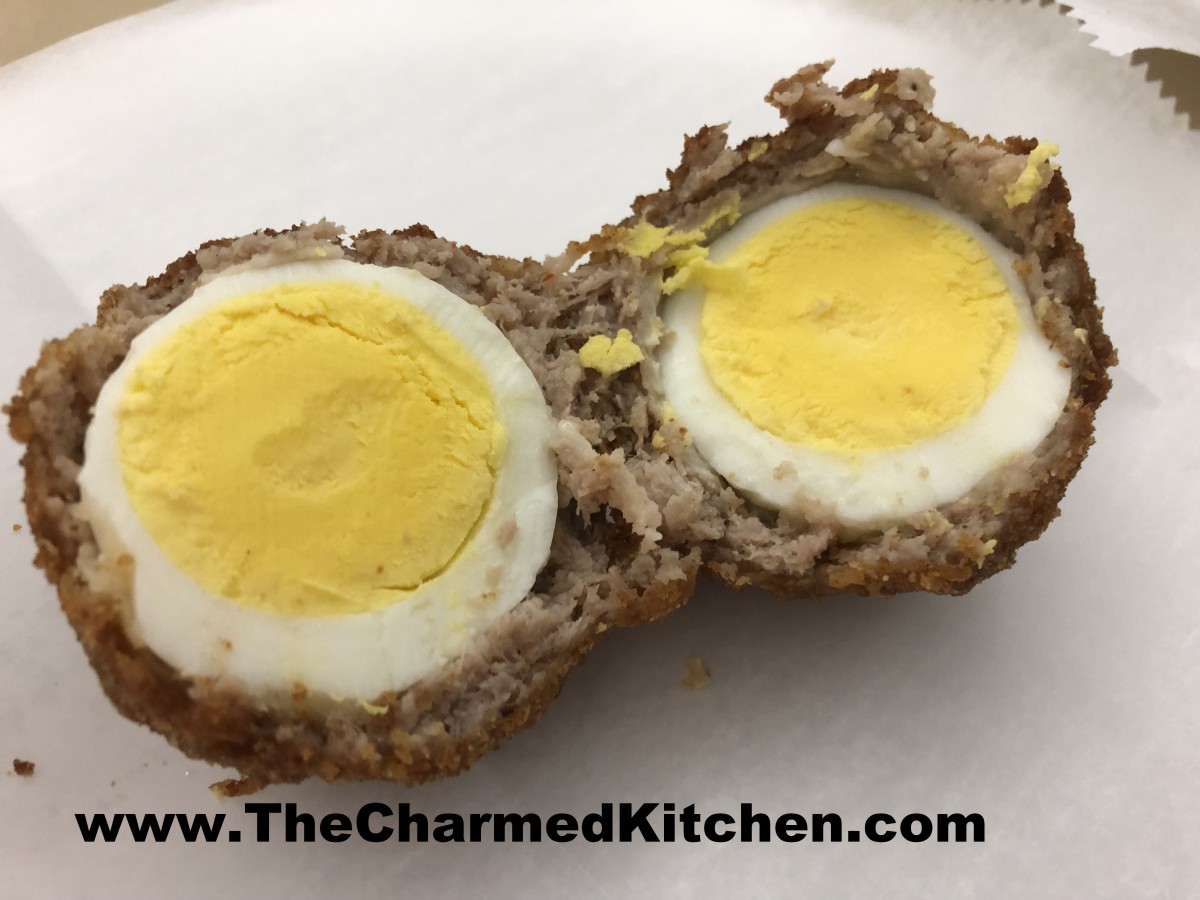
Scotch eggs are a fun dish to make for breakfast, brunch or dinner. If you never had one before, a Scotch egg is a hard cooked egg, encased in sausage, then breaded and fried. They are really good.
We made them in a British cooking class last night and everyone loved them.
The first time I had Scotch eggs was when my friend, Dale, made them and brought them to a party. I have loved them ever since.
This is also a fun dish to make after Easter, when you might have hard-cooked eggs you are wanting to use.
Scotch eggs can be served plain, or with a dipping sauce. I used a pork breakfast sausage, but you could use a different sausage, if you like. Hot sausage would be good. You can make them the day before, then just warm up before serving.
Scotch Eggs
6 hard-cooked eggs, well chilled
1 pound breakfast sausage
1/2 cup flour
2 eggs, beaten
3/4 cup fine bread crumbs
Vegetable oil for frying
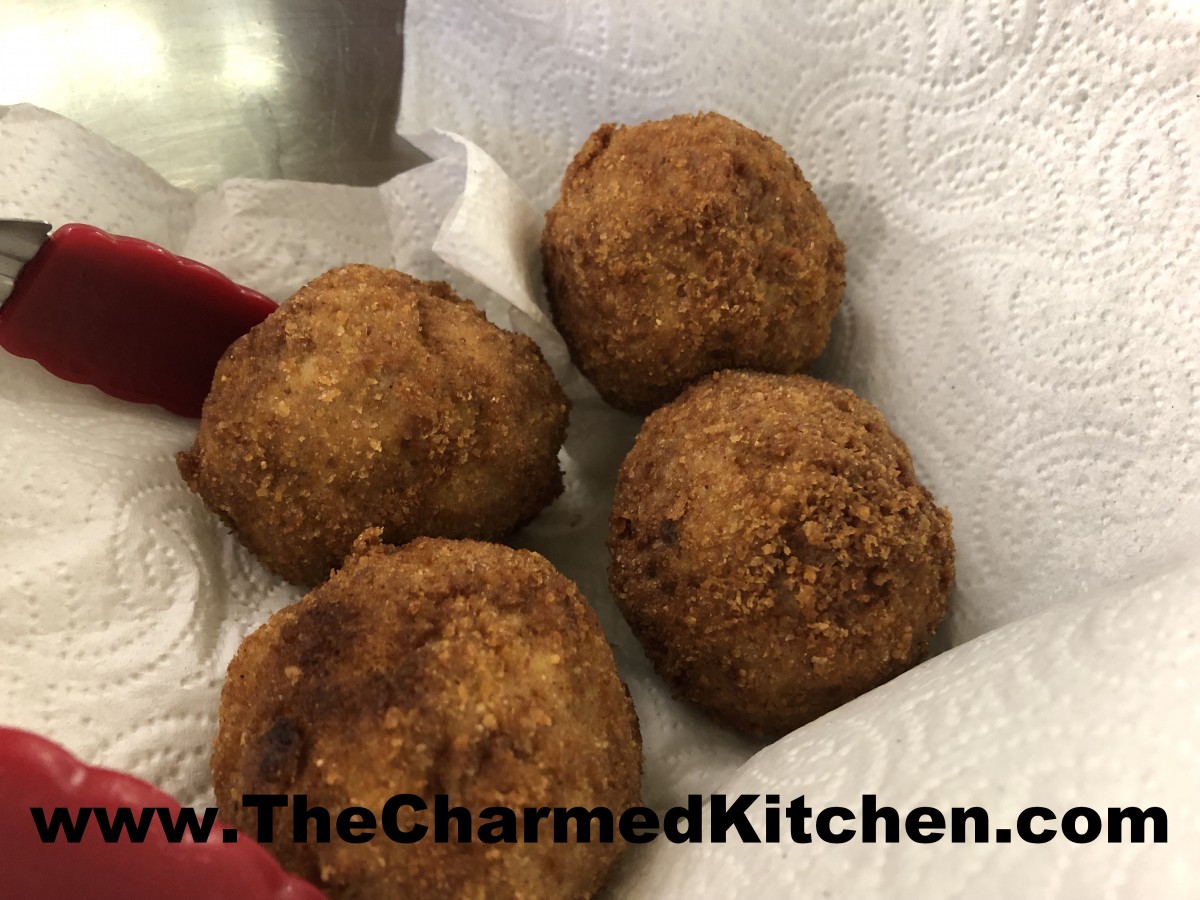
Peel eggs and set aside. Divide sausage into 6 portions. Roll each egg in flour and with hands press a portion of the sausage around each egg. If the sausage sticks to your hands, dip your hands in a little water to make pressing the sausage easier. Dip sausage-wrapped eggs into beaten eggs and roll in bread crumbs. Heat vegetable oil to 350 degrees. Cook each egg in oil about 4-5 minutes or until sausage is cooked and browned. Drain on paper toweling. Serve warm. Makes 6.
Scotch eggs, ready to serve
Amy’s Skillet Chicken Pot Pie

Amy’s Skillet Chicken Pot Pie
I am not sure there is better comfort food than chicken pot pie, at least not for me. Brings back very nice memories.
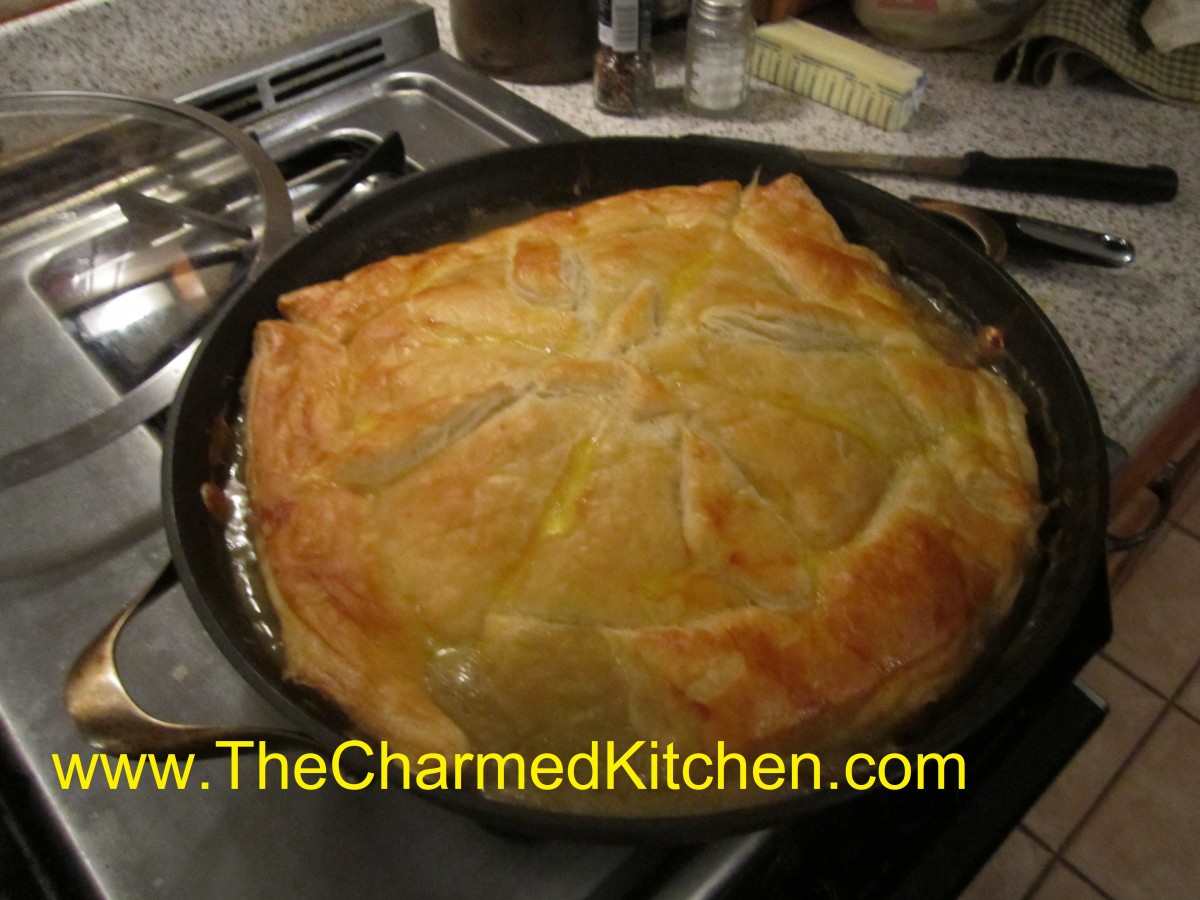
This chicken pot pie is made in a cast iron pan. It is started on top of the stove, then finished in the oven. Kind of the ultimate one-pot dinner.
My friend Amy was so proud of how this recipe turned out. She found the original recipe somewhere, but changed it, to make it her own.
It was a while back when she made this for a dinner with me and other friends, but it seemed like a good time to share the recipe. It was, and is, the best chicken pot pie I ever tasted. For our dinner that night, Amy doubled the original recipe, and used a larger skillet. You could easily cut it in half and use an 8 or 10-inch skillet
Here is Amy’s recipe. Enjoy!!
Amy’s Skillet Chicken Pot Pie
¼ c. olive oil
2 T. butter
1 sweet onion, chopped
4 parsnips, peeled and sliced
4 cloves garlic, minced
1 tablespoon chopped fresh sage, optional
1 small bunch kale, center ribs and stems removed, leaves chopped
Kosher salt
freshly ground pepper
¼ cup all-purpose flour
3 cups low-sodium chicken broth
2 T. sherry
½ small butternut squash, peeled, cut into 1/2-inch pieces (about 1½ cups)
½ of a roasted chicken- meat removed from bones, torn onto bite sized pieces – about 1½ cups of meat
1 sheet frozen puff pastry, thawed
1 large egg
Place a rack in upper third of oven; preheat to 425°. Heat oil in a deep 12-inch cast-iron or other heavy ovenproof skillet over medium-high heat. Add onions; cook, stirring occasionally, until beginning to brown, about 4 minutes. Reduce heat to medium-low. Add parsnips, garlic and sage to skillet and cook, stirring occasionally, until garlic begins to brown, about 2 minutes. Add kale and season with salt and pepper. Cook, tossing often, until wilted, about 4 minutes. Sprinkle flour over. Cook, stirring constantly, for 4 minutes. Stir in broth, 1/2-cupful at a time, then add squash. Bring to a boil, reduce heat, and simmer until squash is just softened and broth is thickened, 8-10 minutes. Add chicken to skillet, stir, and season with salt and pepper. Unfold pastry and smooth any creases; place over skillet, allowing corners to hang over sides. Whisk egg and 1 teaspoon water in a small bowl. Brush pastry with egg wash; cut four 1-inch slits in top to vent. Bake pot pie until pastry is beginning to brown, 15-20 minutes. Reduce oven temperature to 375° and bake until pastry is deep golden brown and crisp, 15-20 minutes longer. Let cool for 10 minutes before serving.
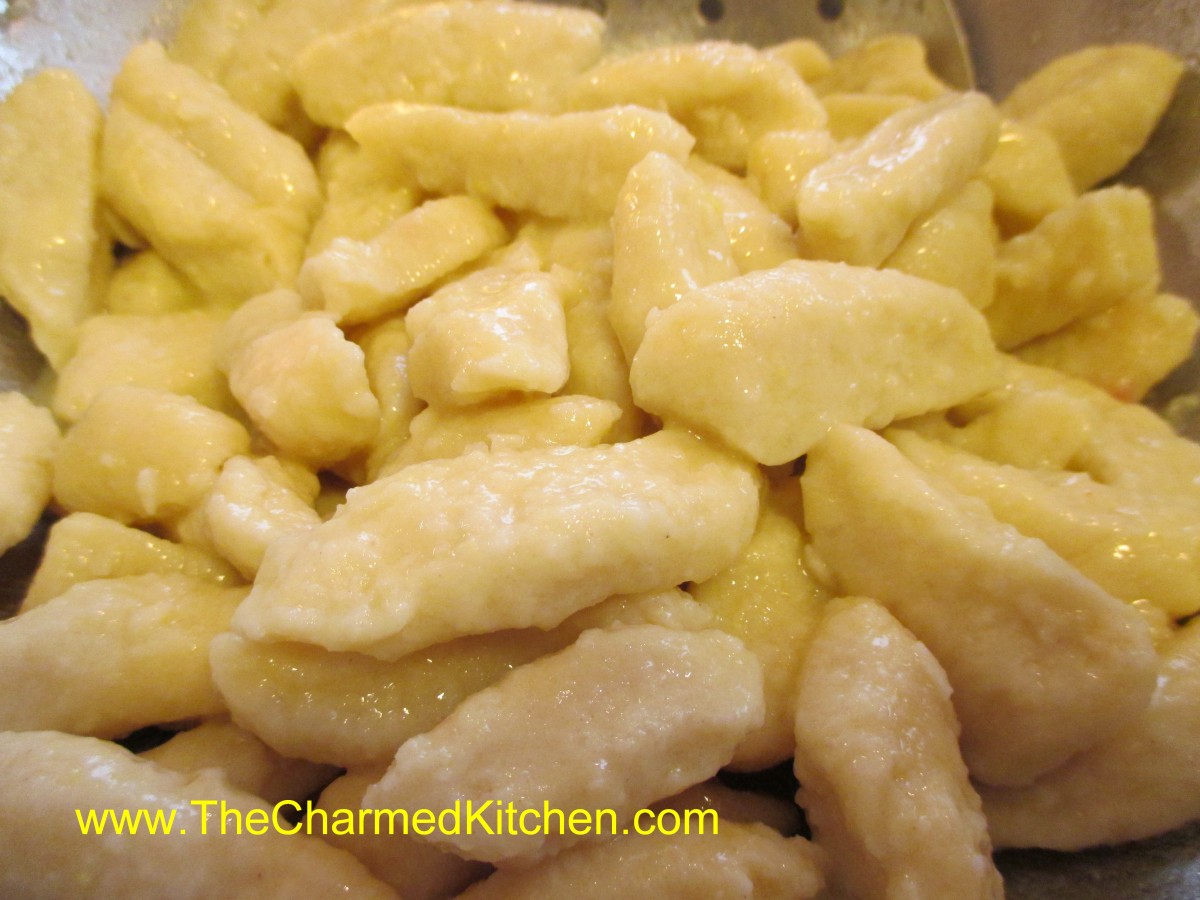
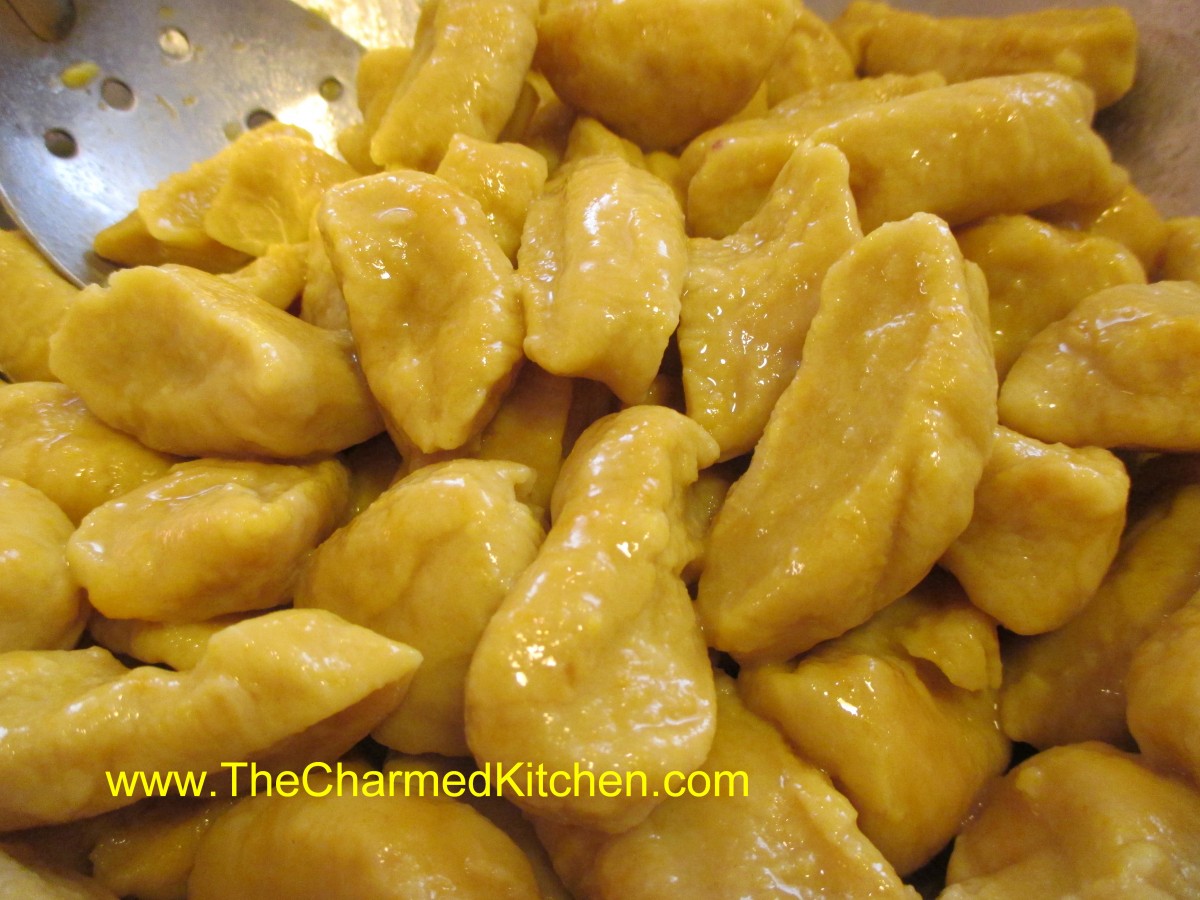
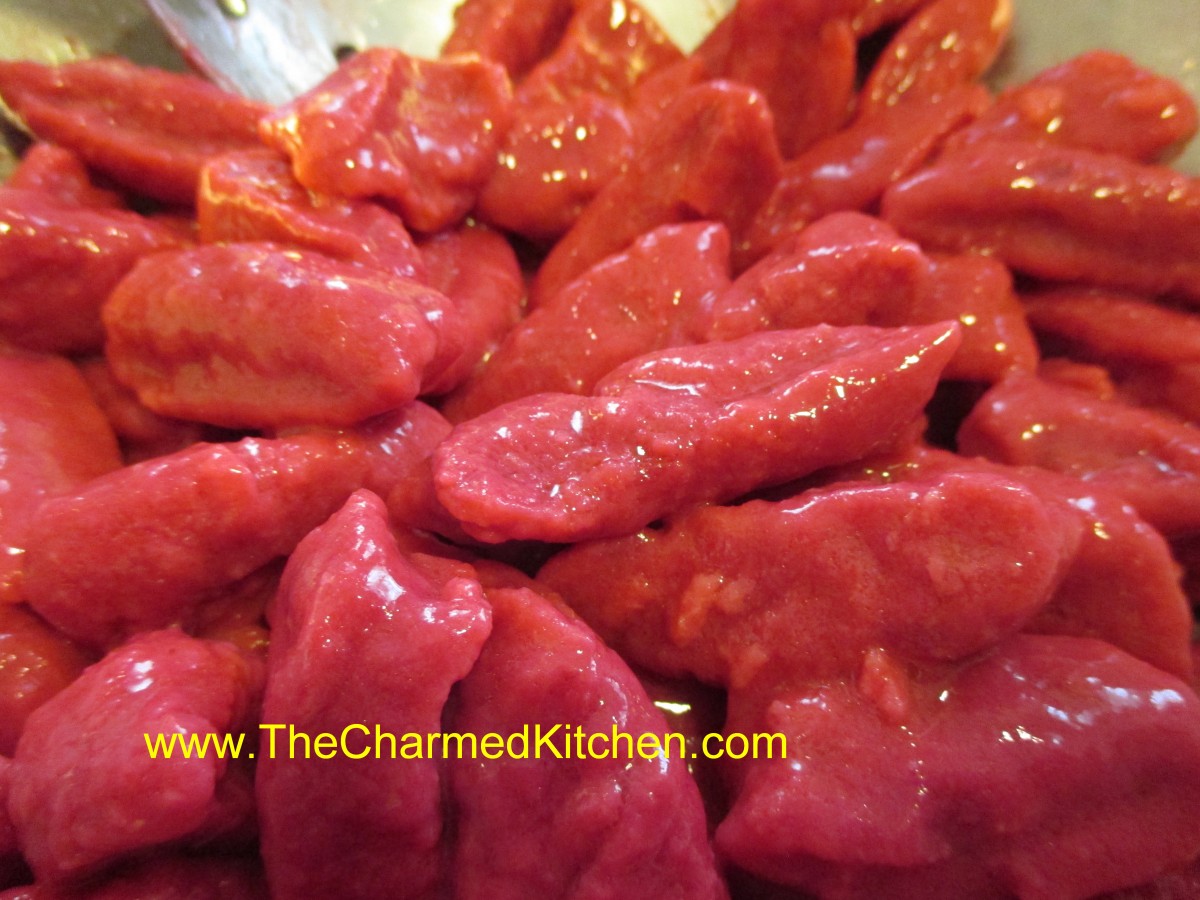
A Trio of Gnocchi

A Trio of Gnocchi
When I was a kid, my mother made dumplings or spaetzle. That was part of my Eastern European heritage. I was much older before I tasted gnocchi for the first time. Similar to dumplings, gnocchi are Italian in origin.
Made with cooked potatoes, flour and eggs, when done right, gnocchi are quite light and tender. I wish I could remember where I got this recipe. I have a hand written copy of it- but it isn’t my handwriting. This is the version I have been making forever. The original recipe calls for steaming the potatoes, but I will admit to baking them or using leftover boiled potatoes. I sometimes use red skinned or Yukon Gold, too, with nice results. All methods produced a product I was happy with.
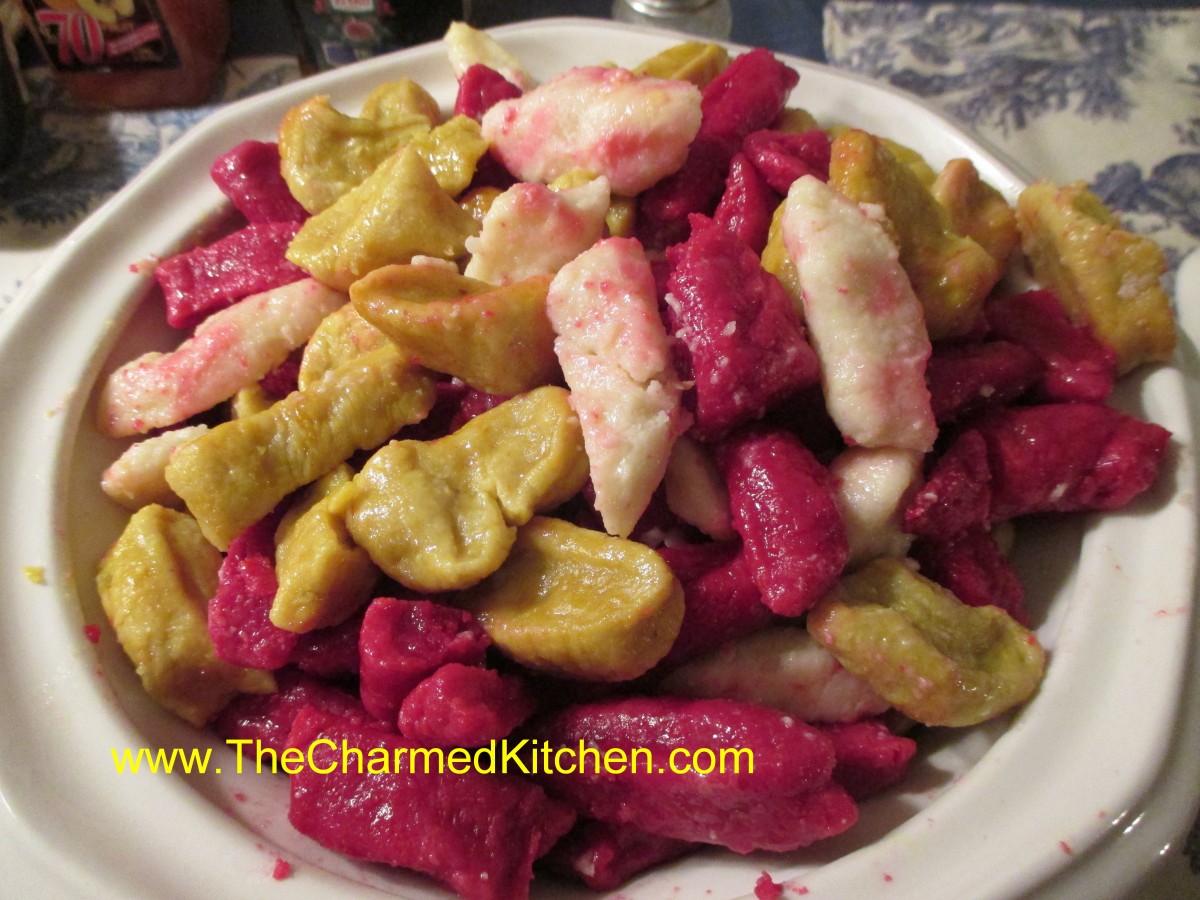
A few times, I decided to go off course a bit, and make gnocchi using additional ingredients Ingredients that changed the color and the flavor, but still left me with the gnocchi I loved.
Two of my favorite “non-traditional” gnocchi recipes include using sweet potatoes or beets. These ingredients make for very colorful, tasty gnocchi. So here are the recipes for all three recipes. They make a great addition to any Spring menu.
Classic Gnocchi
4 small russet potatoes, 22-24 oz. total, peeled, diced into 1/2-inch cubes
1 egg
2 T. whipping cream
1 1/4 t. salt
1/8 t. nutmeg
1 1/2 c. (about) flour
Steam potatoes over boiling water until tender, about 12 minutes. Place in bowl and mash or put potatoes through a ricer. Place in bowl and cool about 10 minutes. Add egg, cream, salt and nutmeg and mix well. Stir in flour and combine until slightly sticky dough forms. Add more flour a tablespoon at a time if the mixture is too moist. Turn dough onto lightly floured work surface and divide into 6 equal portions. Roll out 1 piece into a rope about 20-inches long by 3/4 inch. Cut dough into 3/4 -inch pieces and roll each piece over the tines of a fork or over a wire whisk to make grooves in them. Arrange finished gnocchi in a single layer on a floured baking sheet and repeat the process with the remaining dough. Boil the gnocchi in well-salted boiling water, about 1/3 at a time. Boil for 4-5 minutes. They will come to the surface and be tender. Check after 4 minutes. Serve with butter and Parmesan cheese or with a favorite pasta sauce.
Sweet Potato Gnocchi
1 c. mashed, cooked sweet potatoes
1/2 c. mashed, cooked russet potatoes
2 eggs
1 t. salt
1 t. turmeric, optional
2 c. flour or more
Get a pot of water boiling. In mixing bowl combine the sweet potatoes with the eggs and seasonings. Add about 1 1/2 cups of the flour and stir until a soft dough forms. Continue adding flour, a little at a time, until the dough can be handled without sticking to your hands but is still soft. Take about 1/4 of the dough at a time and roll into a rope, about 15 inches long, on a floured work surface. Cut dough into 1/2 thick pieces. Place pieces in a pot of boiling water and after a few minutes the gnocchi will float to the top. Cook them for several minutes after they have risen to the top of the pot. Remove with a slotted spoon and drain. If you aren’t going to use them right away drizzle with a little oil to prevent sticking or toss with butter. You can also run a little cold water over them instead. Repeat with the remaining dough.
Beet Gnocchi
2 small russet potatoes, 11-12 oz. total, peeled, diced into 1/2-inch cubes
2 medium/small beets, roasted, skin on, cooled
1 egg
1/4 c. whipping cream
1 1/4 t. salt
¼ t. dill weed
1 1/2 c. (about) flour
Steam potatoes over boiling water until tender, about 12 minutes. Place in bowl and mash or put potatoes through a ricer. Place in bowl and cool about 10 minutes. Remove skins from cooled beets and dice. Place beets in a food processor or blender. Add the cream and process until smooth. Combine with potatoes, egg, salt and dill and mix well. Stir in flour and combine until slightly sticky dough forms. Add more flour a tablespoon at a time if the mixture is too moist. Turn dough onto lightly floured work surface and divide into 6 equal portions. Roll out 1 piece into a rope about 20-inches long by 3/4 inch. Cut dough into 3/4 -inch pieces and arrange finished gnocchi in a single layer on a floured baking sheet and repeat the process with the remaining dough. Boil the gnocchi in well-salted boiling water, about 1/3 at a time. Boil for 4-5 minutes. They will come to the surface and be tender. Check after 4 minutes. Serve with butter and Parmesan cheese or with your favorite sauce. Serves 6.
Classic Gnocchi
Sweet Potato “Gnocchi”
Beet Gnocchi
Macaron Madness


Macarons
I have been baking forever. There aren’t that many baking “firsts” for me anymore. One bucket list item was to make macarons. Macarons are French cookies, made from almond flour, egg whites and sugar. Simple ingredients, with an elegant end result. They are similar to meringues, which I have made often in the past.
They can be tricky, so I decided to do some research before trying to bake them myself. I watched videos, searched recipes and then decided it was time to go for it. My first batch did not go according to plan. They got over- baked and the dough was too stiff. I went back and tried again.
Sometimes failure can teach us more than success.
I had clearly not mixed the dough long enough. Not the stage where you beat the egg whites. They were mixed to perfection in very stiff peaks. Where I messed up the first time, was not mixing the egg whites with the almond flour mixture long enough. I was so focused on the folding in directions, I was afraid to over mix it. Big mistake.
When you get to the “folding in” part, don’t be afraid to mix the batter. The more you mix, the softer the batter gets. The second time around, I folded and stirred long enough for the batter to get a little runny. Think of a bowl of oatmeal.
After that, the rest was pretty easy. I piped to dough into circles on the baking sheet. They weren’t perfect, but so much better than the first batch. I expect them to look even better with more practice.
When they baked, they got their “feet”. When done the right way, macarons rise a bit, forming a ring below the original circle of batter.
Once baked, I let them cool before filling with a strawberry buttercream frosting. For the buttercream, I just mixed a few tablespoons of softened butter with half a cup of powdered sugar and a tablespoon of strawberry jam. I had added a little pink food coloring to the batter, so I thought the pink frosting would look pretty.
So here is the recipe I used.
Macarons
¾ c. almond flour
1 c. powdered sugar
2 egg whites
3 T. granulated sugar
Food coloring, optional
½ -¾ c. jam or frosting for filling the cookies
Sift almond flour and powdered sugar together. Mix well and set aside. In mixing bowl, beat egg whites for 3 minutes on medium. Egg whites should be foamy. With mixer running, sprinkle in the sugar. Beat another 3 or 4 minutes, or until soft peaks form. Add food coloring at this point, if using, and increase speed on mixer to high. Continue to beat egg whites until stiff peaks form, another 3 minutes, or so. Take about a third of the egg whites and mix into the almond flour mixture. Mixture will be sort of dry- don’t worry. Fold in the rest of the egg whites and stir/fold until mixture has the consistency of a thick batter. Think of cooked oatmeal. You don’t want to over or under mix at this point. Just stir until it gets to the “oatmeal” stage. Probably 50 strokes or so. Line a baking sheet with parchment- or use a silicone liner. Place batter in a piping bag with a round tip. Squeeze the batter into circles on the baking sheet, trying to keep them even in size. I did circles just under 2 inches across. They don’t spread during baking. Batter should settle, but if there are any little peaks, use a wet finger to press them down. Tap baking sheet on the counter 4 or 5 times to remove any air bubbles. Set aside for about 15 minutes. You need to let the dough form a kind of dry skin on the top. The way to test is to lightly touch the dough. If it sticks your finger, wait a few more minutes. Once the dough had dried enough- bake them in a preheated 350 degree oven for 12-15 minutes, depending on the size of your macarons. Remove from oven and allow to cool on baking sheet before removing. Use frosting or jam to sandwich cookies together.
Tiramisu

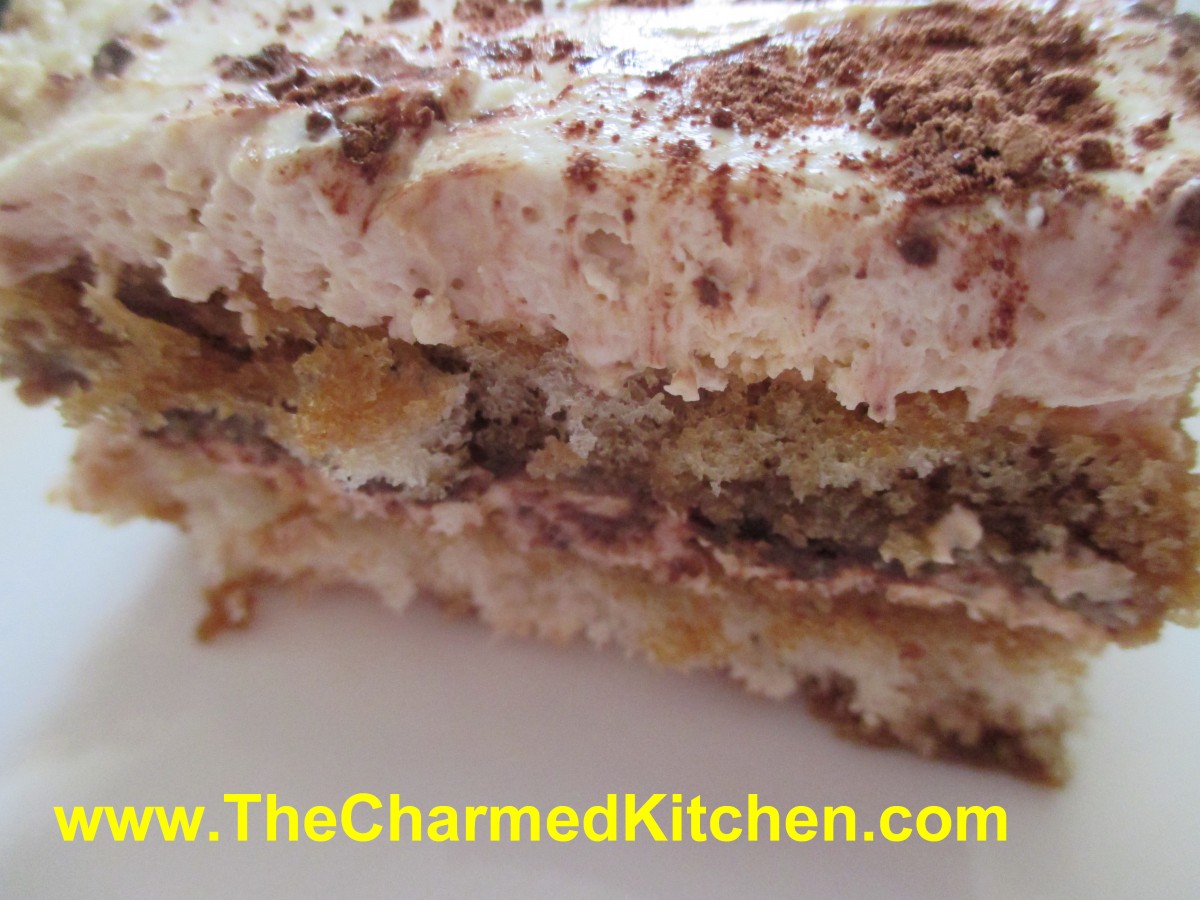
Tiramisu
Tiramisu is one of those desserts that everybody seems to like. Tiramisu is a layered dessert, made from ladyfingers, drizzled with coffee, egg custard (zabaglione) and cocoa. There are a lot of variations out there. This happens to be one I like.
We made tiramisu in an Italian cooking class the other night. Not surprising, everyone loved it. I think the magic of tiramisu is how it can be rich and light at the same time. For me, that starts with the creamy layer. The egg custard is made first, then chilled. Later it is combined with mascarpone and whipped cream. The end result is bliss.
Tiramisu is not hard to make. The custard requires a little work, but the rest is just about assembly. It might be a lot more work if you bake your own ladyfinger cookies. I just buy them.
I prefer to use the larger, crisp ladyfinger cookies. I find them at Italian grocery stores. Other grocery stores sell ladyfingers that are soft, like sponge cake. I have used them in a pinch, but they are not my favorite. I think they get too soft after the coffee is added.
In the end, no matter which cookies you use- the flavor of your tiramisu is sure to be a crowd pleaser.
Classic Tiramisu
5 egg yolks
1/4 c. sugar
1/2 c. Marsala wine (not cooking wine)
1 c. whipping cream
2 T. sugar
1 lb. mascarpone cheese
2 c. strong coffee, room temp.
2 T. sugar
1/2 c. brandy
1 T. vanilla
48 ladyfingers
3 T. cocoa
Make zabaglione (egg custard). In double boiler, over simmering water, beat together egg yolks and sugar until lemon colored. Stir in Marsala and continue cooking, stirring constantly until mixture thickens and will mound on a spoon. This will take about 10 minutes. Remove from heat and cool down. You can place in bowl in fridge 30 minutes or so. Beat together whipping cream and sugar until stiff peaks form. Beat in mascarpone and chilled zabaglione. Chill 1 hour. Stir together coffee with remaining sugar, brandy and vanilla and set aside. Assemble tiramisu by placing 16 of the ladyfingers in the bottom of a 9×13-inch pan. Drizzle about 1/3 of the coffee mixture over the ladyfingers, about 1 tablespoon each. Top with 1/3 of the cream mixture and sprinkle with 1 tablespoon of the cocoa. Repeat this process 2 more times until all ingredients are used. Chill until ready to serve. Serves 12.
Caponata

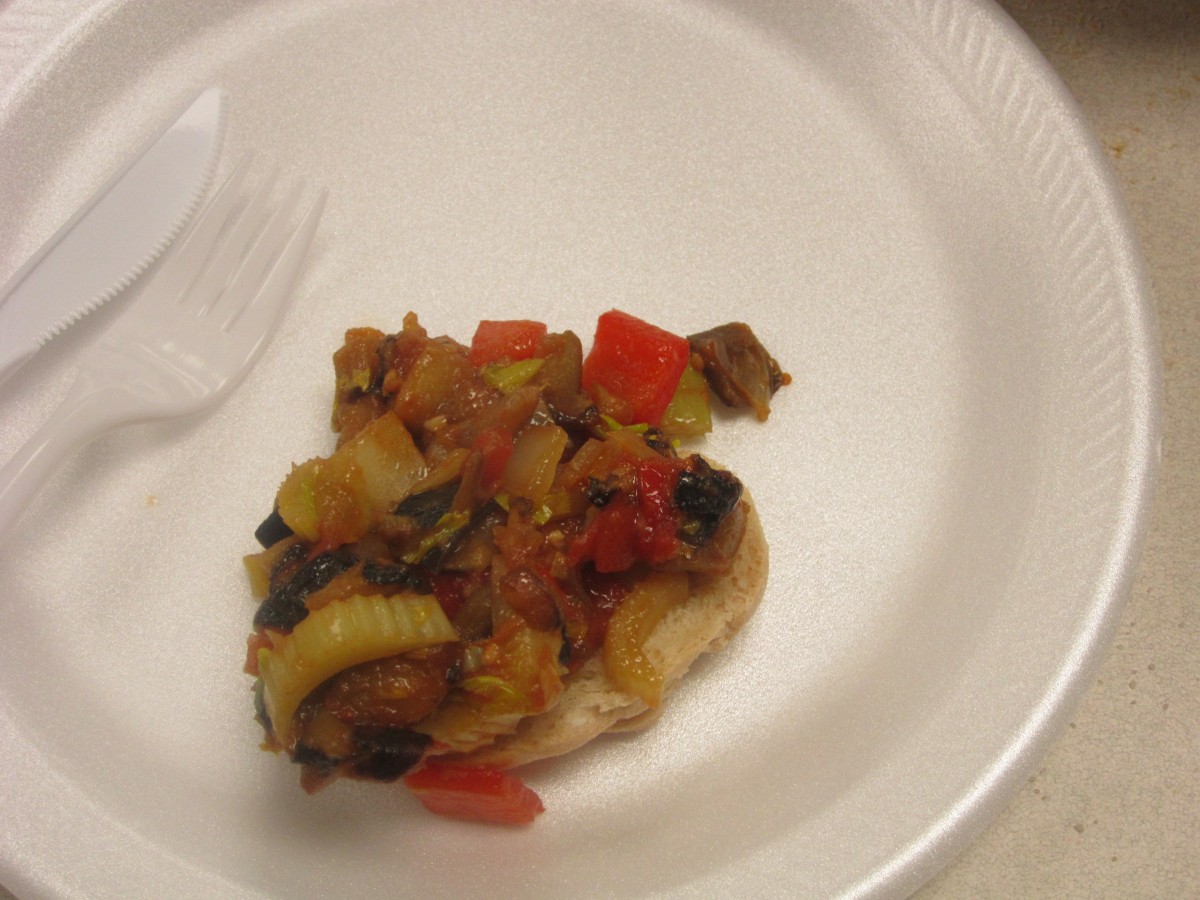
Caponata on crusty bread
For an Italian cooking class the other night we made Caponata. Someone once asked me what it was, and I said kind of like salsa- only with Italian ingredients. Not sure if that sums it up, but Caponata is a mix of several vegetables with some seasonings.
Caponata can be served cold, at room temperature or hot. I enjoy it as an appetizer with crusty bread but I also add it to marinara sauce, top pizza with it or add it to vegetable stock with some cannelini beans for a great vegetarian soup. While my version does not contain capers- I sometimes add them. They marry well with the other flavors in this dish.
This is one of those vegetarian dishes that everyone seems to love. The version here is vegan- but I like it with a few curls of Parmesan on the top.
Caponata
2 small eggplants, unpeeled and cut into 1/2-inch pieces, about 5-6 cups
1 large onion, chopped
1/2 c. olive oil, or a little more
4 celery ribs, sliced
2 sweet peppers, seeded and chopped
1 heaping tablespoon chopped garlic
3 tomatoes, chopped- or 1 (14.5) can diced tomatoes- undrained
1 c. sliced black olives
3-4 T. red wine vinegar
salt and pepper to taste*
Soak eggplant in salted water for at least 15 minutes. Rinse, drain and pat dry. Set aside. Meanwhile in skillet cook onion in 2 tablespoons of the oil until tender. Add the celery and cook until the celery is tender-crisp. Place mixture in a mixing bowl and set aside. Heat 2 tablespoons more of the oil and cook the peppers until tender. Add garlic and cook 1 minute longer. Add the tomatoes and cook 1 minute longer. Add this mixture to onion mixture and return skillet to the heat. Add remaining oil to skillet and cook eggplant until golden brown and tender. You may have to do this in 2 batches. Add remaining ingredients to bowl while eggplant is cooking. When eggplant is done add it to the bowl and mix well., Season to taste. Serve with crusty breads cold, hot or at room temperature. Serves 10-12.
* While I don’t have any herbs listed in the ingredients I often add oregano and basil or an Italian or Tuscan seasoning blend. I also like to add capers.
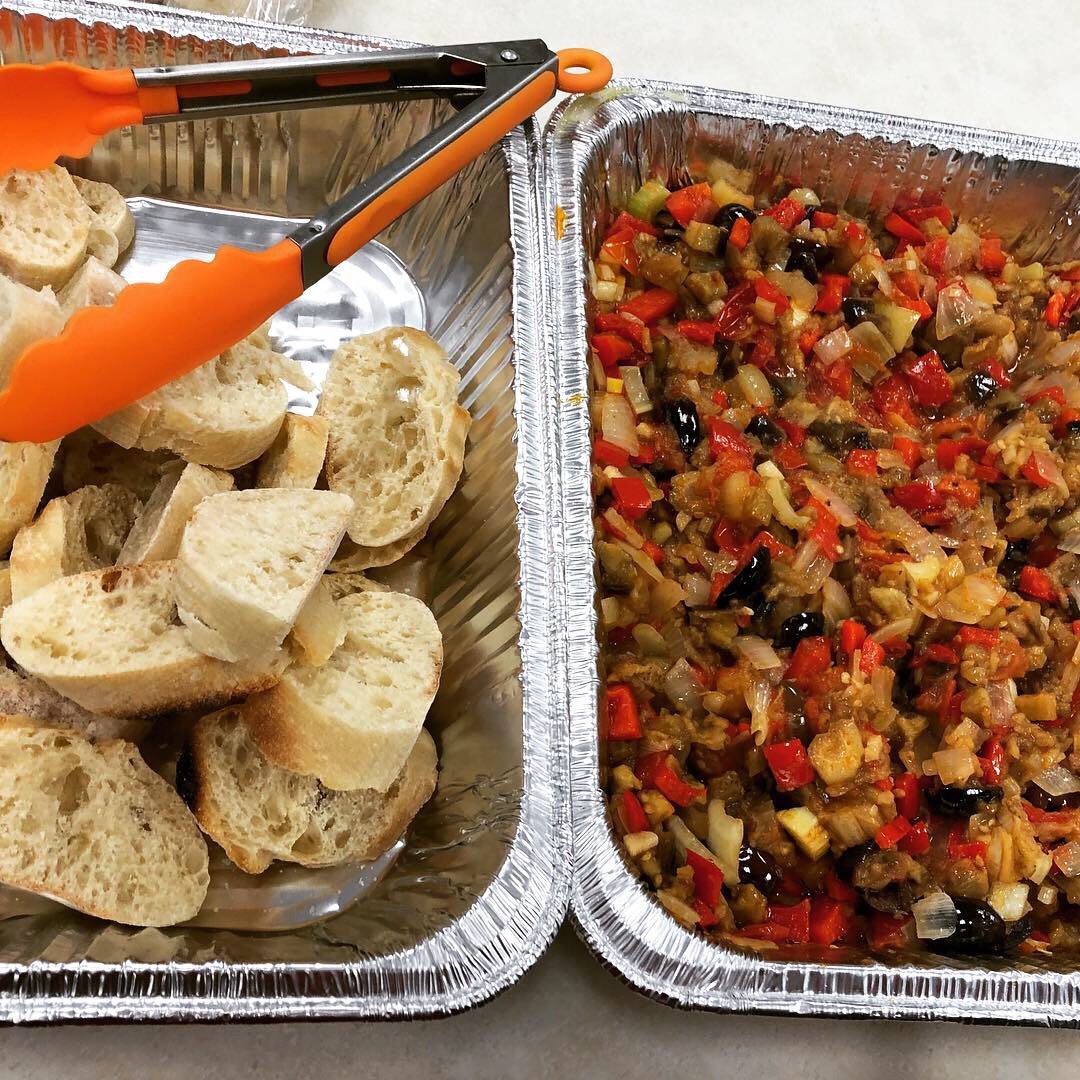
Fresh caponata with crusty bread
Venetian Cabbage

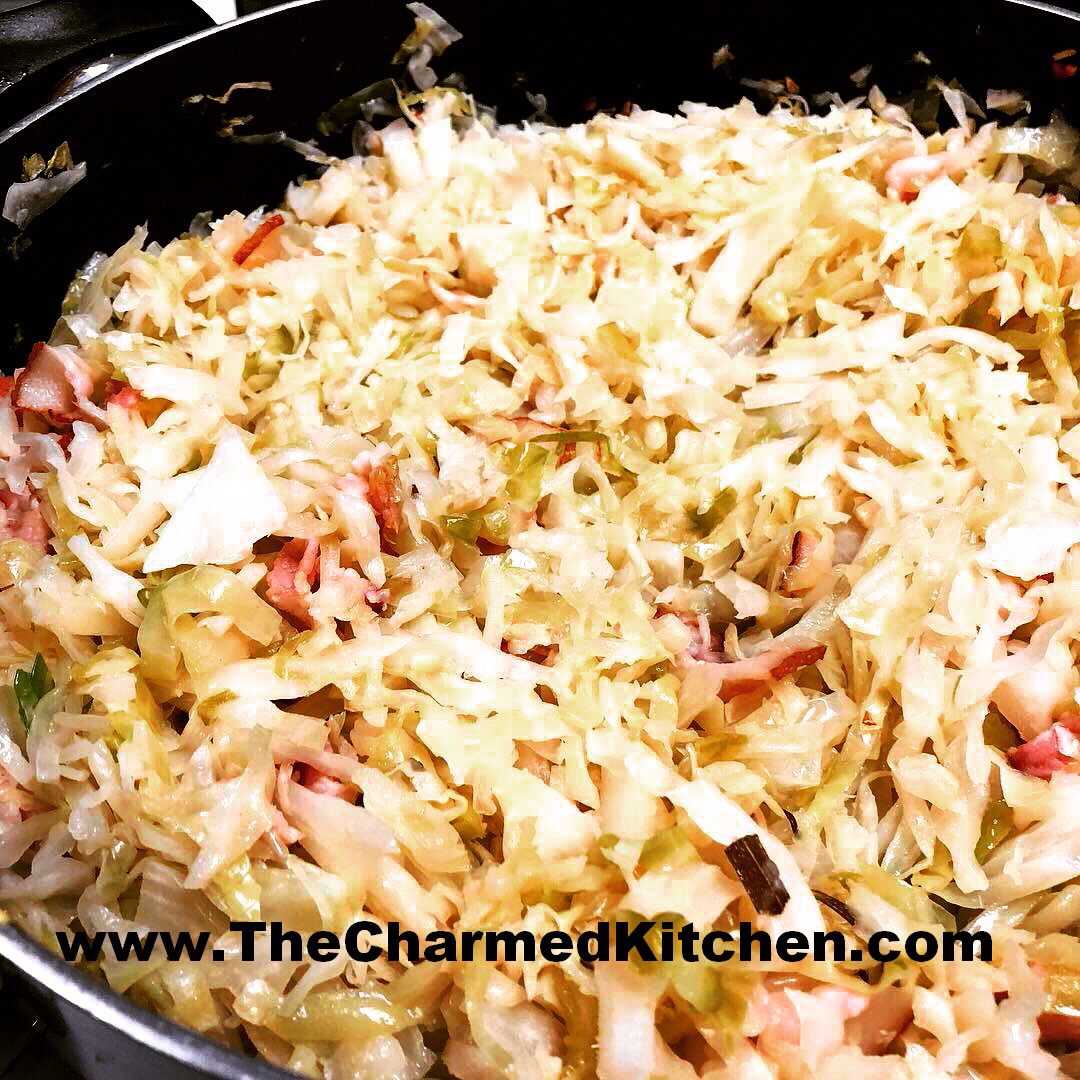
Venetian Cabbage
If you still have some cabbage sitting around after St. Patrick’s Day, you might want to try making Venetian cabbage. This Italian-inspired recipe really elevates the humble cabbage.
I love cabbage in all sorts of dishes. Maybe it’s from my Eastern European roots, but I like cabbage in salads, soups and side dishes. I really love it prepared this way.
Smokiness from the pancetta and a hint of rosemary and garlic really makes this dish sing. We made it in class last night- and everyone loved it. We ended up cooking it for less time than the original recipes says. I think I prefer it less cooked. The cabbage retained some crispness. My best advice is to taste this dish as it cooks to see how “done” you like it.
If you are looking for an easy and tasty way to prepare cabbage, try this recipe for Venetian Cabbage. I think you will be pleased.
Venetian Cabbage
1/2 c. minced pancetta (Italian bacon) or thick bacon
2 cloves garlic, minced
pinch of rosemary, minced- I used a bit more
1 T. olive oil
2 1/2 lbs. green cabbage, trimmed and shredded
1/2 c. chicken stock or white wine
Cook bacon, garlic and rosemary and oil in saucepan until mixture starts to sizzle. Stir in the cabbage, tossing to coat well. Cook, covered, over low heat for an hour, or less, adding the stock or wine a little at a time. Add salt to taste before serving. Serves 6.
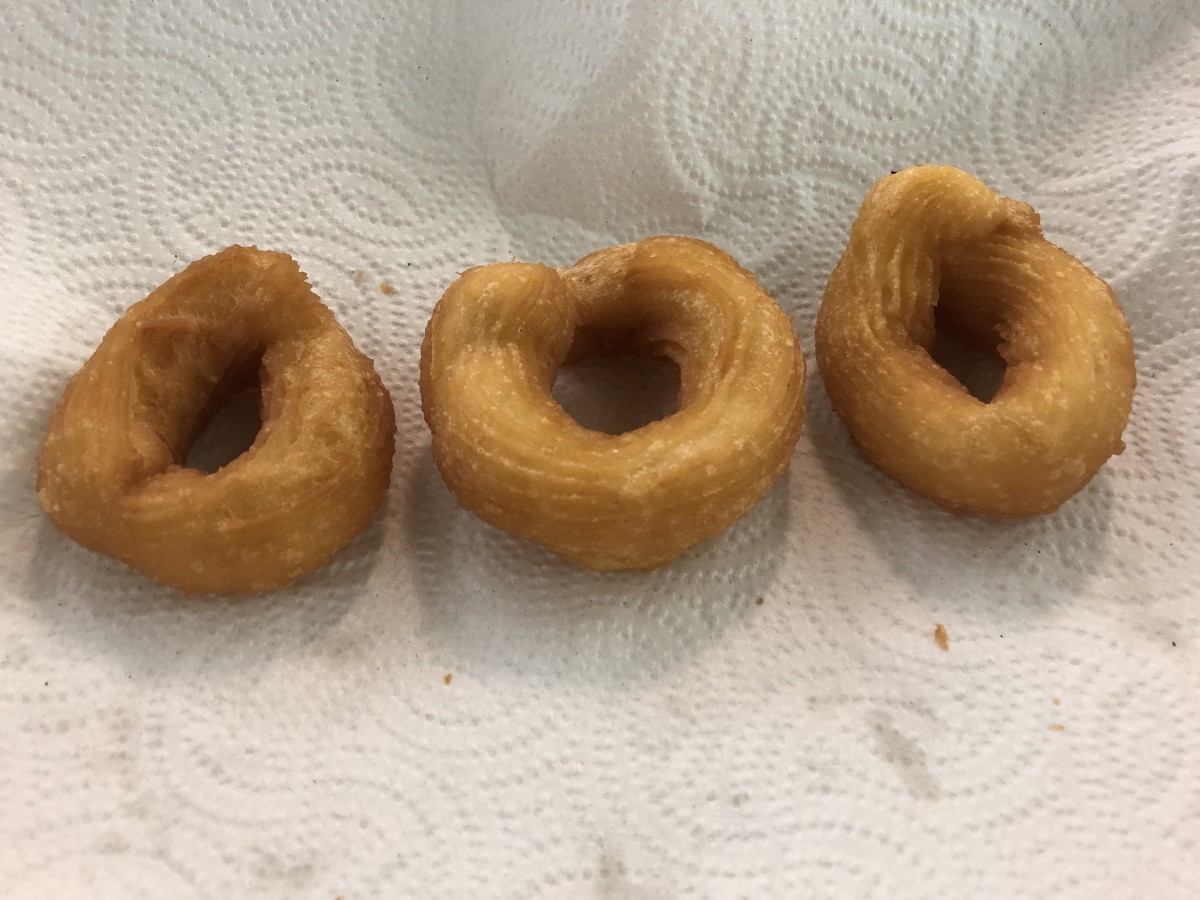
Crazy for Crullers

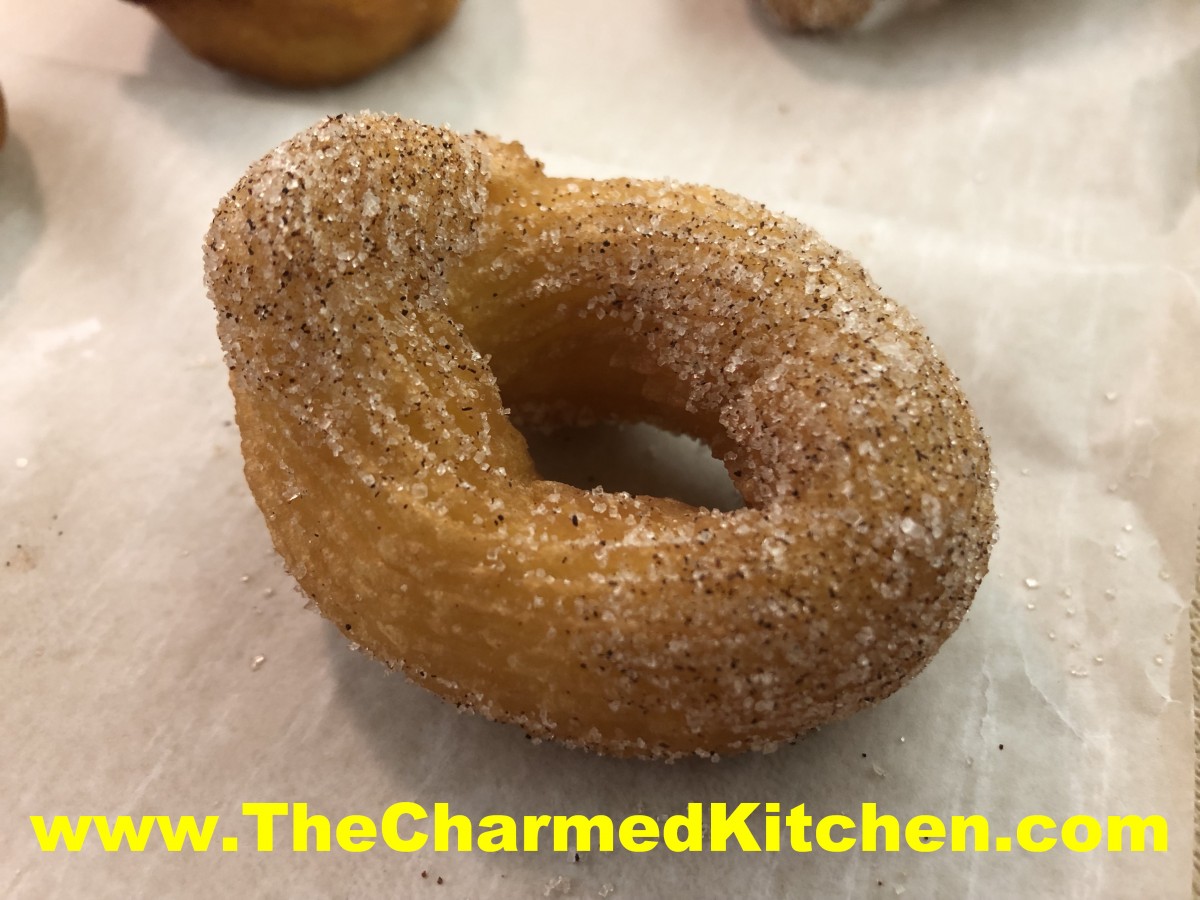
French Cruller, Rolled in Cinnamon Sugar
Of all the doughnuts I make, crullers are one of my absolute favorites. I grew up in a family that made their own doughnuts, so I’ve been making doughnuts since I was a kid. I hadn’t made crullers in awhile, though. I won’t make that mistake again. I forgot just how good they are.
I taught a doughnut making class last night. These were the clear winner. Everyone loved them.
In class we made the crullers. We also made fritters, yeast doughnuts and even fried up some biscuit dough. All were fun and tasty.
Crullers are different. It is all in the dough. Crullers are made from pâte à choux, the same dough used to make cream puffs and eclairs. Rather than baking the dough- crullers are fried. Although you can bake them, if you like.
There is some art in getting the dough just right. I tried to include at much detain in the directions as possible.
Here is the recipe I use. A bit of work, but well worth the effort.
French Crullers
1 c. water
6 T. unsalted butter
2 t. sugar
1/4 t. salt
1 c. all-purpose flour, sifted
3 large eggs, divided
1 to 2 egg whites, slightly beaten
Vegetable oil for frying
Basic Sugar Glaze
Place the water, butter, sugar, and salt in a heavy-bottomed pot and bring to a brisk boil over medium high heat. Add the flour and stir with a wooden spoon until the flour is completely incorporated. Continue to cook and stir for 3 to 4 minutes to steam away as much water as possible. The more moisture you can remove, the more eggs you can add later and the lighter your pastry will be. The mixture is ready when a thin film coats the bottom of the pan. Move the mixture to the bowl of a stand mixer fitted with the paddle attachment. Although you can mix the pâte à choux by hand, this can be rather arduous, so use a mixer if you have one. Stir the mixture for about 1 minute to allow it to cool. Then mix on medium speed and add the first egg. Let it mix in completely and then scrape down the sides of the bowl. Add the remaining eggs, one at a time, and mix in completely. Add the egg whites, a little at a time, until the paste becomes smooth and glossy and will hold a slight peak when pinched with your fingers. Be careful not to add too much egg white or your crullers will become heavy. Transfer the batter to a pastry bag fitted with a 1/2-inch star piping tip. To fry the crullers, heat at least 2 inches of oil in a heavy-bottomed pot until a deep-fat thermometer registers 370°F. While the oil is heating, cut out twelve 3-by-3-inch squares of parchment paper and lightly grease them. Pipe a ring onto each square. When the oil is hot, place one cruller at a time in the oil, paper side up. Remove the paper with tongs. Fry on each side until golden brown, 2 to 3 minutes. Remove with a slotted spoon and drain on a paper towel for at least 1 minute. Once cool to the touch, the crullers can be glazed. Crullers also bake very well, although they will have slightly firmer crusts than the fried versions. Preheat the oven to 450°F. Line a baking sheet with parchment paper and pipe the crullers onto it, at least 2 inches apart. Bake for 5 minutes, then reduce heat to 350°F and bake for another 15 minutes. Turn off the heat, open the oven door slightly and let the crullers sit in the cooling oven for 5 to 10 minutes. Remove, dip in glaze, and cool on a rack until the glaze has set.
Just out of the fryer

You can play around with shapes and sizes
Banana Fritters

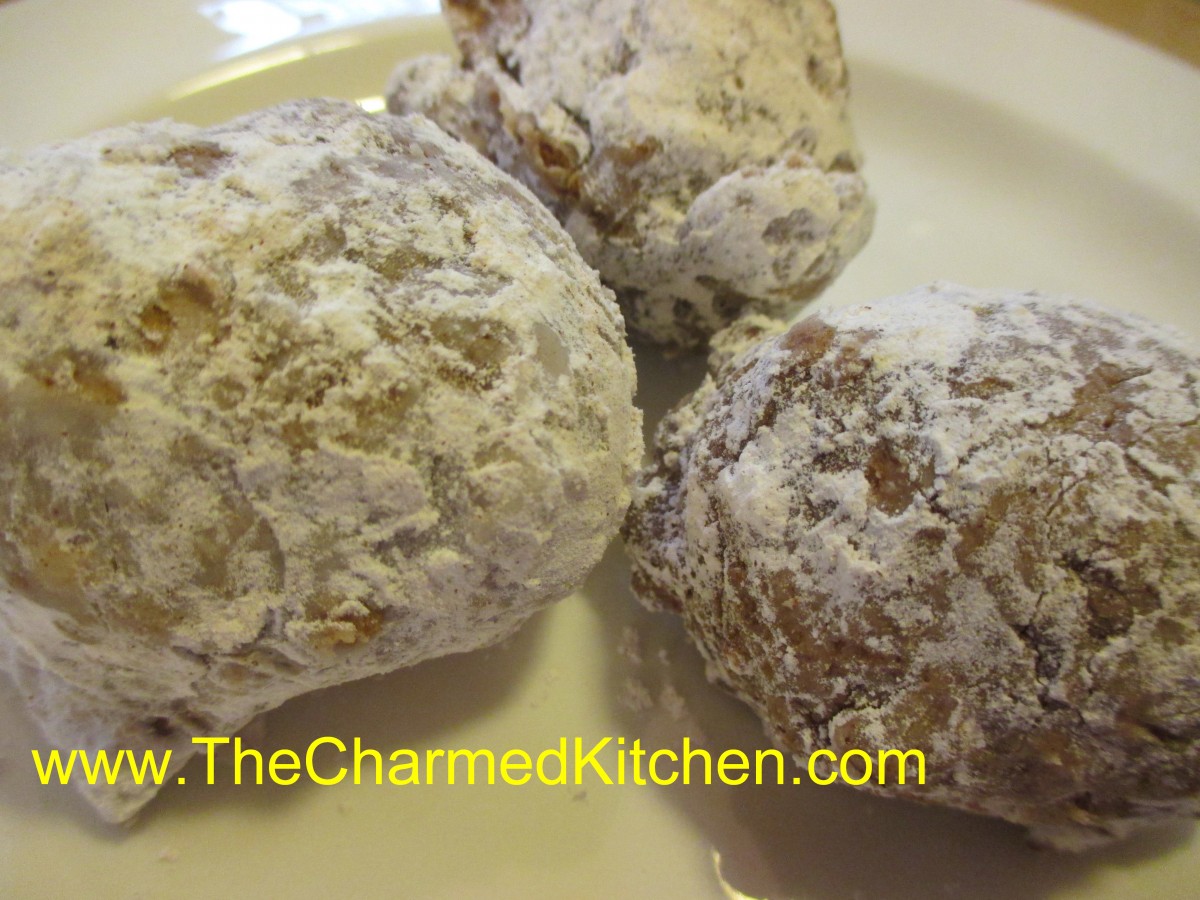
Banana Fritters
I had some ripe bananas and wanted to do something different with them. I wasn’t in the mood for banana bread. I had a class with kids recently and we had made doughnuts. That is where the idea for these fritters came from. Only a few ingredients, too. Simple to make and a nice change from banana bread.
I started with a couple of bananas, which I peeled and mashed with a fork. I purposely left some small chunks of banana. Then I added eggs and sour cream. I knew the sour cream would add richness and help keep the fritters tender. I also used cinnamon, both in the batter and in the powder sugar I rolled the finished fritters in. I like the combination of banana and cinnamon.
The fritters puffed up beautifully when fried. They were just a little crisp on the outside, tender and light in the middle. There is no sugar in the batter. The only sweetness comes from the bananas and the cinnamon powdered sugar I rolled them in. I think they would be great with a powdered sugar glaze, too.
So here is the recipe. A fun way to use ripe bananas.
Banana Fritters
2 large ripe bananas
2 eggs, beaten
½ c. sour cream
1 t. cinnamon
2 c. flour
2 t. baking powder
1 t. baking soda
Oil for frying
1 c. powdered sugar
1 t. cinnamon
Peel bananas. Mash bananas with a fork, leaving some smaller chunks. You should end up with about a cup of mashed bananas. Combine in a small bowl with the eggs, sour cream and cinnamon. Combine flour with the baking powder and baking soda and stir into the banana mixture. Heat oil in a pot to 350 degrees. Oil should be at least a couple of inches deep. By rounded tablespoonful drop batter into the hot oil to fry. Only do a few at a time, so you don’t overcrowd them, or bring the temperature of the oil down too much. Fry until golden brown. It will take several minutes. Remove with slotted spoon and drain on paper towels. Repeat with all the batter. You will end up with 2-3 dozen fritters.
Once the fritters are cooled down you can roll them in powdered sugar, cinnamon sugar or even make a powdered sugar glaze. I combined cinnamon with a little powdered sugar and rolled the fritters in that. The cinnamon worked nicely with the bananas.
Corned Beef Quesadillas

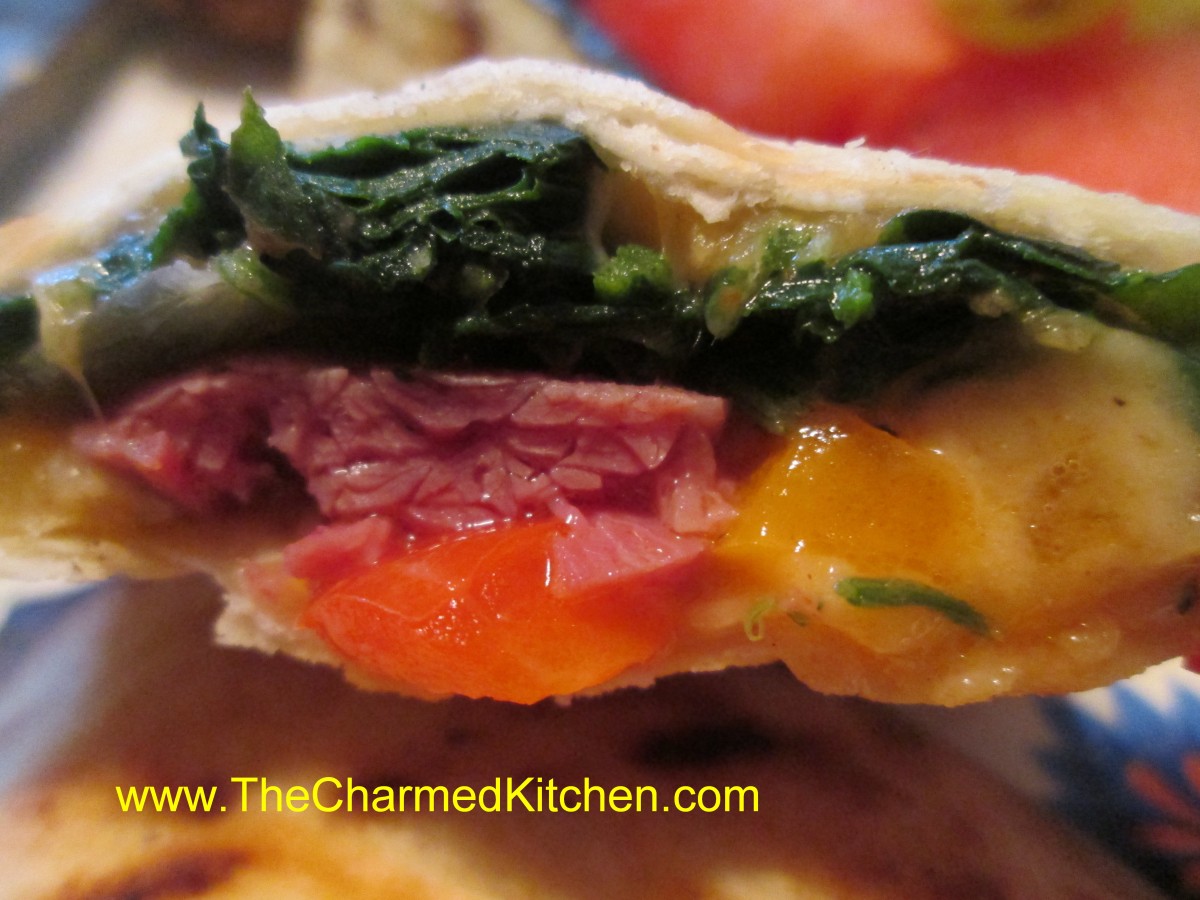
Corned Beef and Spinach Quesadilla
For those of you with leftover corned beef, you might want to try making corned beef quesadillas. You could use a number of fillings, including a maybe Reuben quesadilla.
I used a combination of cheese, corned beef, caramelized onion and spinach. It came out so tasty.
The quesadilla make a great lunch dish- maybe served with a salad. You can also serve them as appetizers or a fun snack.
Make sure any fillings are not too wet- they will cause the tortilla to be soggy, instead of crisp. I like to cook most of my veggies first, to wilt them down and remove some moisture. I also drain any veggies that are really wet.
Cheese can be sliced thin, or shredded. Corned beef should also be in thin slices or shredded.
You have options for how you want to cook your quesadillas. You can cook in a little oil, in a skillet, cooking until golden brown on both sides. You can brush them with oil and bake in the oven. You can also grill them. The important thing is to get them crisp. No microwave cooking for this recipe.
Don’t be afraid to be a little creative. You can serve them as is, or with a dipping sauce on the side.
Corned Beef Quesadillas
4 large flour tortillas- 8-inch or larger
8 oz. corned beef, sliced thin or shredded
1½ c. shredded cheese or 6 oz. sliced cheese- I used sharp cheddar
12 oz. fresh spinach, cooked down in a little oil or 10 oz. box frozen spinach, thawed and squeezed dry
1 sweet pepper, seeded and diced
2 medium onions, sliced thin and cooked in oil or butter until wilted down and golden- season with salt and pepper
Whole grain mustard, optional
Mayo- mustard
Oil for frying or brushing the tortilla before grilling
Get all your ingredients prepped before starting. If baking in the oven- have oven preheated to 425 degrees. Place tortilla on a work surface and brush with mustard and mayo, if you are using them. Place 2 oz. of corned beef on the tortilla. Keep all the ingredients on one half of the tortilla, since you will be folding it in half. The mayo and mustard can be spread over the whole tortilla. Top the corned beef with ¼ of the cheese, spinach, pepper and onions. Fold in half, set aside. Repeat with remaining ingredients. You will have 4 tortillas, filled and folded in half. Cook one of several different ways. I heated a skillet, added oil, and cooked the quesadillas until golden brown on both sides. You can place them on a baking sheet and bake in the oven until crisp and golden. You can also brush the outsides of the quesadillas with a little oil and grill, turning until golden on both sides. Cut in wedges to serve. Makes 4.


