Asian Turnip Cakes


Turnip Cake
I first had turnip cakes at a local Asian restaurant. I loved them, and was intrigued at how to make them. They were little squares, lightly crisped on the outside, smooth and creamy in the middle.
When I first heard turnip cake- I was thinking of the purple and white turnips I knew. That is not what these turnip cakes are made from.
It helped a lot when I realized the “turnip” cake was actually made from Daikon radish. Daikon radishes are also called Chinese turnips. They are really big, white radishes. They are available at Asian grocery stores and other grocery stores. Now that I knew the ingredient I needed, I had to find a recipe.
I searched the internet and found a lot of different variations for how to make them.
The first recipe I tried was more like a potato pancake. Shredded radish paired with eggs and bread crumbs. They were good, but not what I had at the restaurant. The turnip cake I had enjoyed was smooth and sort of starchy. Plus, it was a neat square shape.
I found several recipes that included the steaming step. This enabled the cakes to be set up with a starch, cooled and sliced before the final frying step. This was what I wanted!!
The most promising recipe included rice flour- but I was out of rice flour, so I improvised with cornstarch and a little wheat flour. It worked really well.
Most recipes included shrimp or Chinese sausage and sometimes green onions. I decided, this time, to make them vegetarian. That worked well, but you certainly could add meat or shrimp to yours.
I shredded the daikon pretty fine, but you could still discern the radish in the final dish. I liked that a lot. I did not grate them as some recipes suggested.
So here is my version of turnip cakes. They sound like a bit of work, but it really is worth the time. I also like that all the prep can be done a day or two ahead of time, then just slice and fry when you want them.
Turnip Cakes
1 large Daikon radish- about 1¼ lbs., give or take
1 c. water
½ c. minced onion
1 t. salt
½ t. white pepper
½ c. cornstarch
2 T. flour
Oil for frying
Oyster sauce for dipping, optional
Peel and shred radish. I used a fine shredding blade. Squeeze out some of the liquid from the radish. Place shredded radish in bowl with the water and onion and steam in microwave for 4-5 minutes- you can also place radish and onion in saucepan with water and simmer 4-5 minutes. Set aside to cool. Combine the radish mixture with the cornstarch, flour salt and pepper. Oil an 8×4-inch loaf pan. Place the radish mixture in the prepared pan and steam for 50 minutes.* I placed plastic wrap over the pan to prevent water from dripping into the pan. Remove pan from steamer and cool down for at least 30 minutes. . At this point you can finish preparing the turnip cakes- or place in fridge until ready to make them. When ready to fry the turnip cakes, remove from the pan and cut into slices- about ¾ -inch thick. Heat oil in a skillet over medium high heat. Cook cakes in oil on both sides until golden brown and crisp. Drain on paper towels. Serve with oyster sauce- or whatever dipping sauce you prefer. Makes about 10.
* To steam the mixture- I just used a large stock pot with a cooling rack in it. I brought about 2 inches of water to a boil, placed the pan on the rack and covered the pan. You could also steam in the oven with a roasting pan, with an inch of boiling water in it and covered with foil.

Slicing the turnip cakes before frying
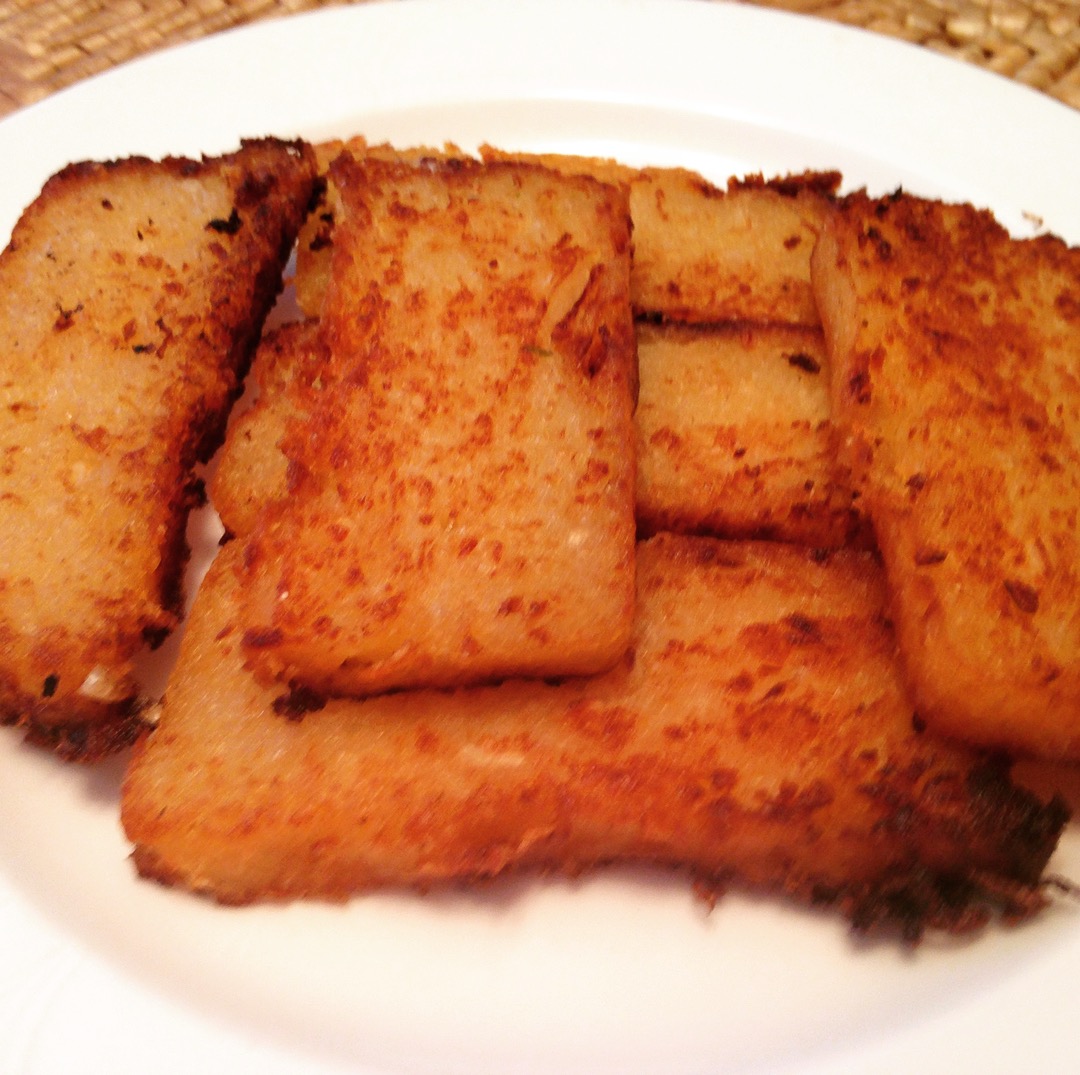
Ready to serve
Ham and Asparagus Quiche


Ham and Asparagus Quiche
I had some fresh asparagus and wanted to make something special with it. I decided to make a quiche. I also had some ham, so combining the two ingredients in a quiche seemed like a good idea.
It was a very good decision.
Quiches are so versatile. You can fill them with almost any ingredients. They can be served for breakfast, brunch, lunch or dinner. You can also bake it right away, or freeze it for later. I often make two quiches, just so I can freeze one for later use.
The mix of ham, asparagus and Havarti cheese worked well together. You could use any number of cheeses that you like. Swiss would be nice, Gruyere or even a sharp cheddar would also work.
I use a homemade crust, but you can use a store bought crust, if you prefer.
Ham and Asparagus Quiche
1 (9-inch) unbaked pie crust
1½ c. shredded cheese – I used Havarti
4 t. flour
1½ c. diced cooked ham
12 oz. asparagus, trimmed, cut in ½- inch pieces and steamed 3 minutes
4 eggs
1 c. milk or half and half
2 T. fresh chopped parsley or 2 teaspoons dried
¼ t. salt
1T. Dijon mustard
1 t. hot sauce
Toss cheese with flour in a bowl and place in pie crust. Sprinkle the ham and asparagus over the cheese and set aside. Combine remaining ingredients in a small bowl beating well to combine. Pour over the ham and asparagus mixture and bake in a preheated 400-degree oven for 15 minutes. Turn down heat to 350-degrees and bake until knife inserted off-center comes out clean, about 30 minutes more. Makes 1.
Note: This quiche freezes well. After adding the fillings just wrap in heavy foil and freeze solid until ready to bake. When ready to bake unwrap and allow to sit at room temperature for 30-60 minutes. Bake as with the fresh version, but add another 10-15 minutes to the baking time. If you don’t want to freeze the pie pan, you can line the pie pan with foil before you add the crust. Once it is frozen you can remove the frozen quiche from the pie pan and wrap, returning to freezer. When ready to use unwrap and put the quiche back in the pie pan before baking. Or, if you are planning on freezing it, you can use a foil pie pan.
10 Plants You Might Not Know You Can Eat

 A lot of people don’t realize how many common plants they can eat. I thought it might be fun to share a few of them with you. Some of these are plants we grow as landscape/ornamental plants. Others are more often thought of as “weeds”. All have one thing in common. They are edible.
Some you may already know. I hope I might show you a few edibles you didn’t know about before.
I tried to stick to plants that were easy to identify. If you are not sure what it is – don’t eat it. Don’t eat plants where pesticides have been sprayed, either.
With any luck, you have at least a few of these in your yard.
 Violets: Violet flowers are edible and used to decorate pastries and to make jelly. Did you know you can also eat the leaves? They are mild flavored- especially when young- and are a great addition to salads. Violet leaves are also high in vitamin C.
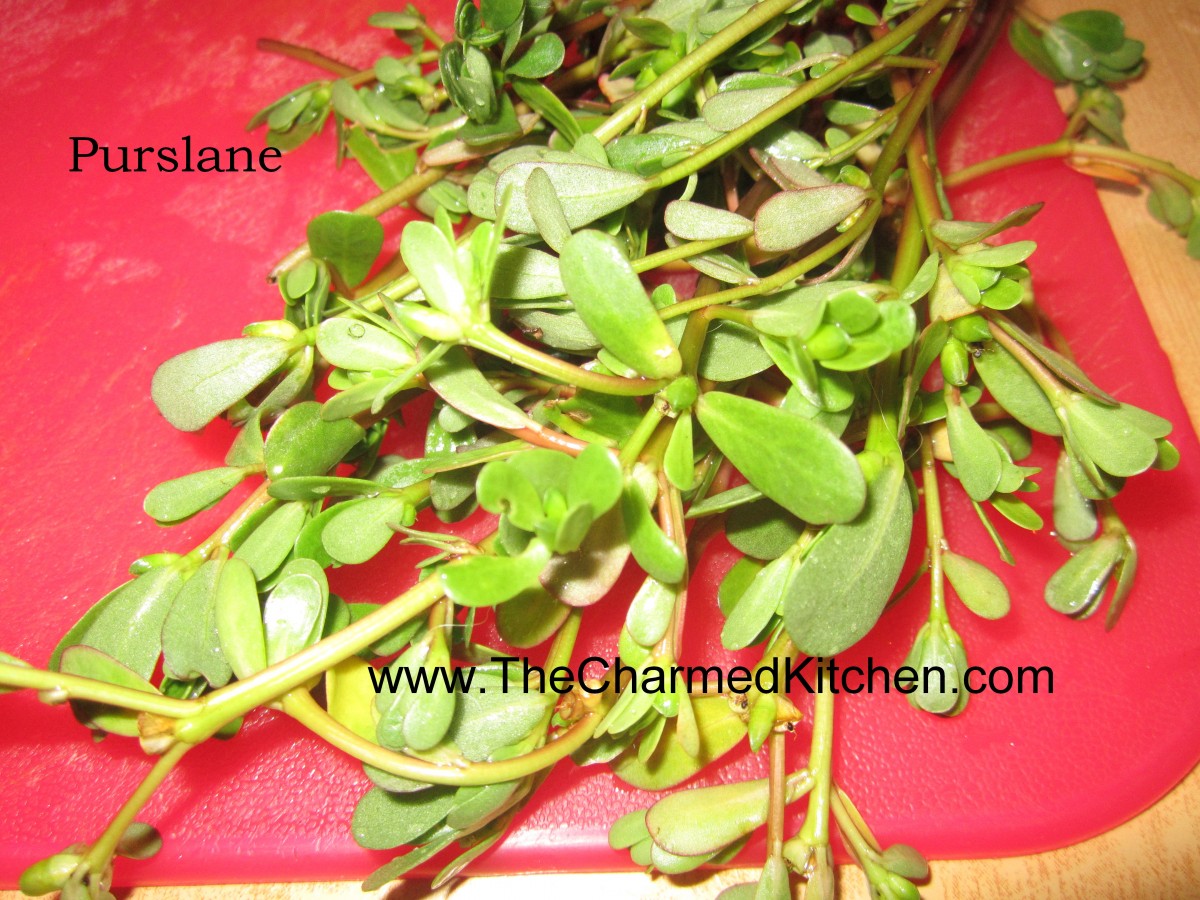 Purslane: The thick, fleshy leaves of purslane are easy to identify. Many vegetable gardeners make every effort to keep them out of their yards. Truth is, purslane is grown as a vegetable in many parts of the world. The leaves can be eaten raw in salads, can be cooked in a stir fry or just steamed as a fresh veggie. They can also be pickled. I make a salsa out of purslane leaves. They are crunchy with a slightly citrus flavor.
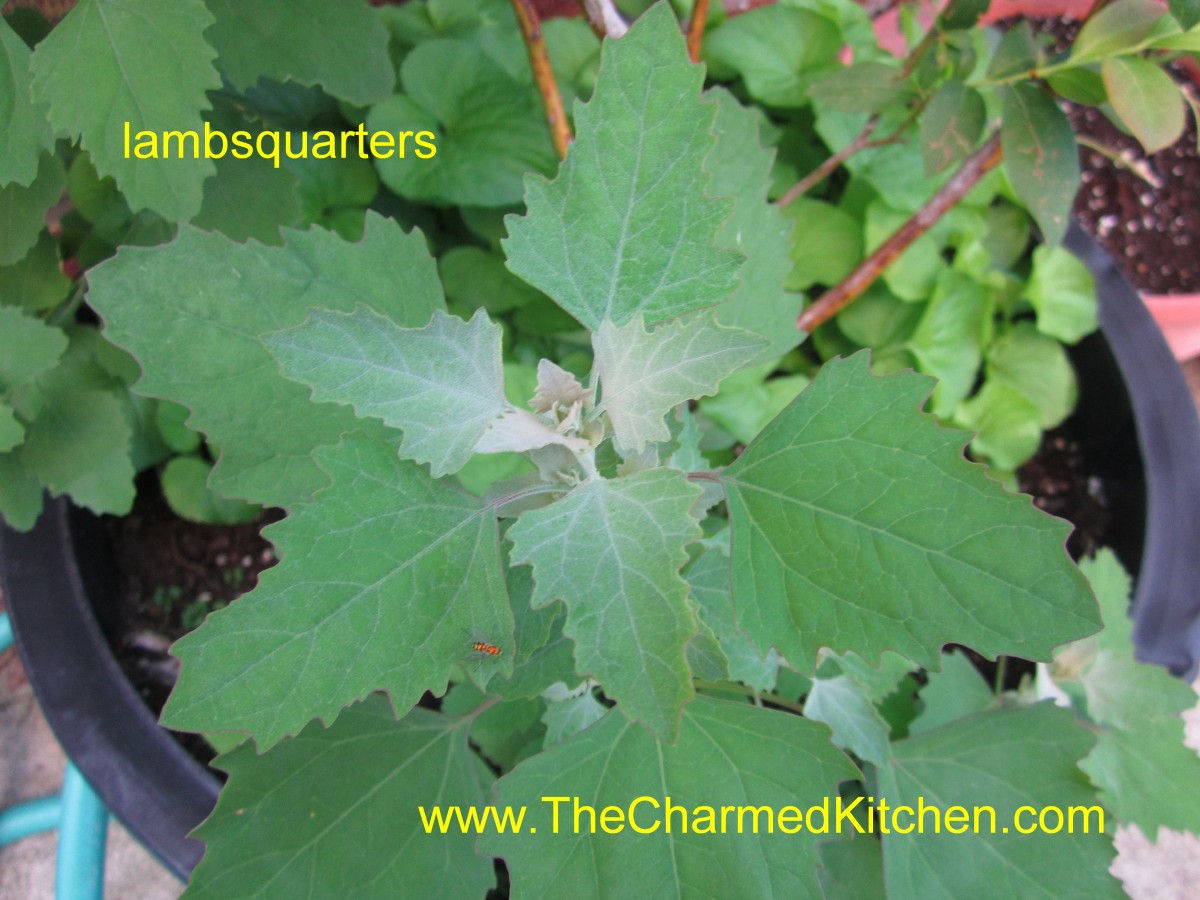 Lambsquarters: Lambsquarters are one of my favorites. They sprout all over my yard and in pots as soon as the weather warms up in the Spring. The leaves can be eaten raw when young or cooked as they mature. They taste just like spinach and are even better for you. Plants can get quite large and provide an easy harvest of nutritious greens.
 Dandelions: We spend so much money trying to kill them. Sad because they are really a tasty green. Dandelions were brought to America by European immigrants as a vegetable. Their bitter greens can be an acquired taste. By combining the greens with certain foods you make them taste less bitter. Starchy foods like breads or potatoes, dairy products, tomatoes and vinegars all seem to tame the bitterness. Dandelion greens can be eaten cooked or raw. Flowers are used to make jelly and wine and can be added to baked goods.
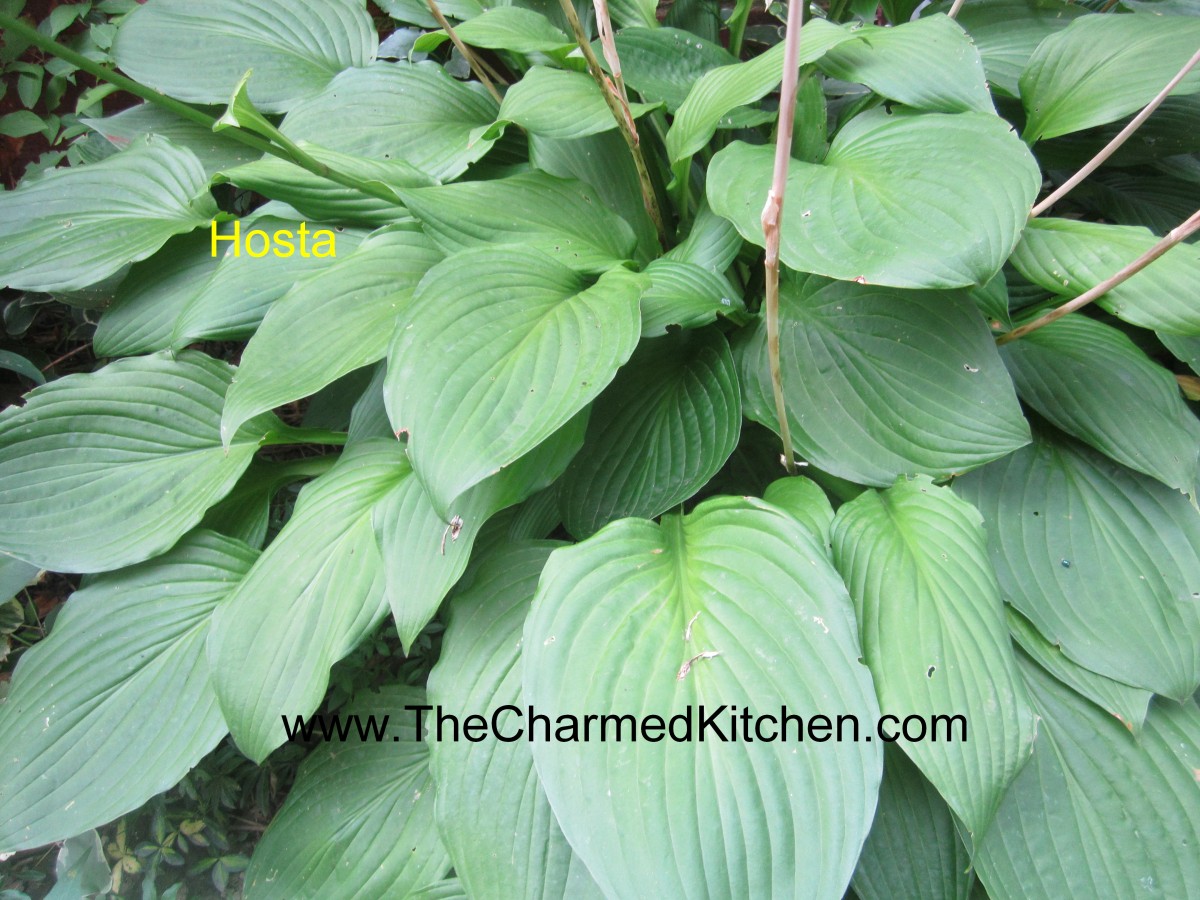 Hosta: If you can get to them before the deer do, you will be pleasantly surprised. Hosta leaves are quite mild flavored, similar to Bibb lettuce. I add them to salads and even serve them with dips. The older leaves get tough so pick young leaves.
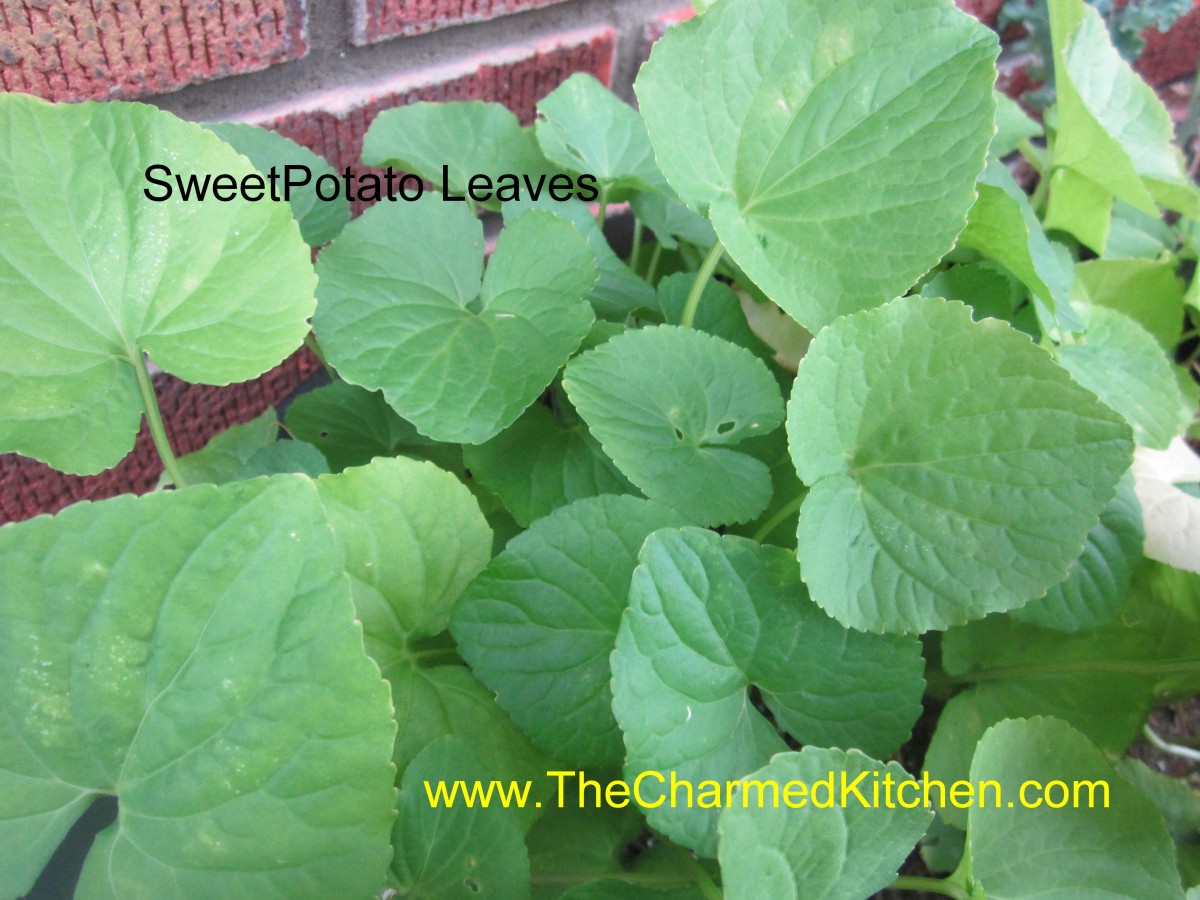 Sweet Potato Leaves: A friend from Hawaii first told me about eating sweet potato leaves. The leaves are pretty mild flavored. I normally eat them cooked although I have friends that eat them raw as well. You can eat the leaves of all sweet potatoes, including ornamental types.
 Lilac: Lilac flowers are fragrant and edible. I use them every year to make lilac infused vinegar. They have a nice spicy taste that works well in the vinegar. Blossoms can be added to salads, too. This year I also made lilac jelly.
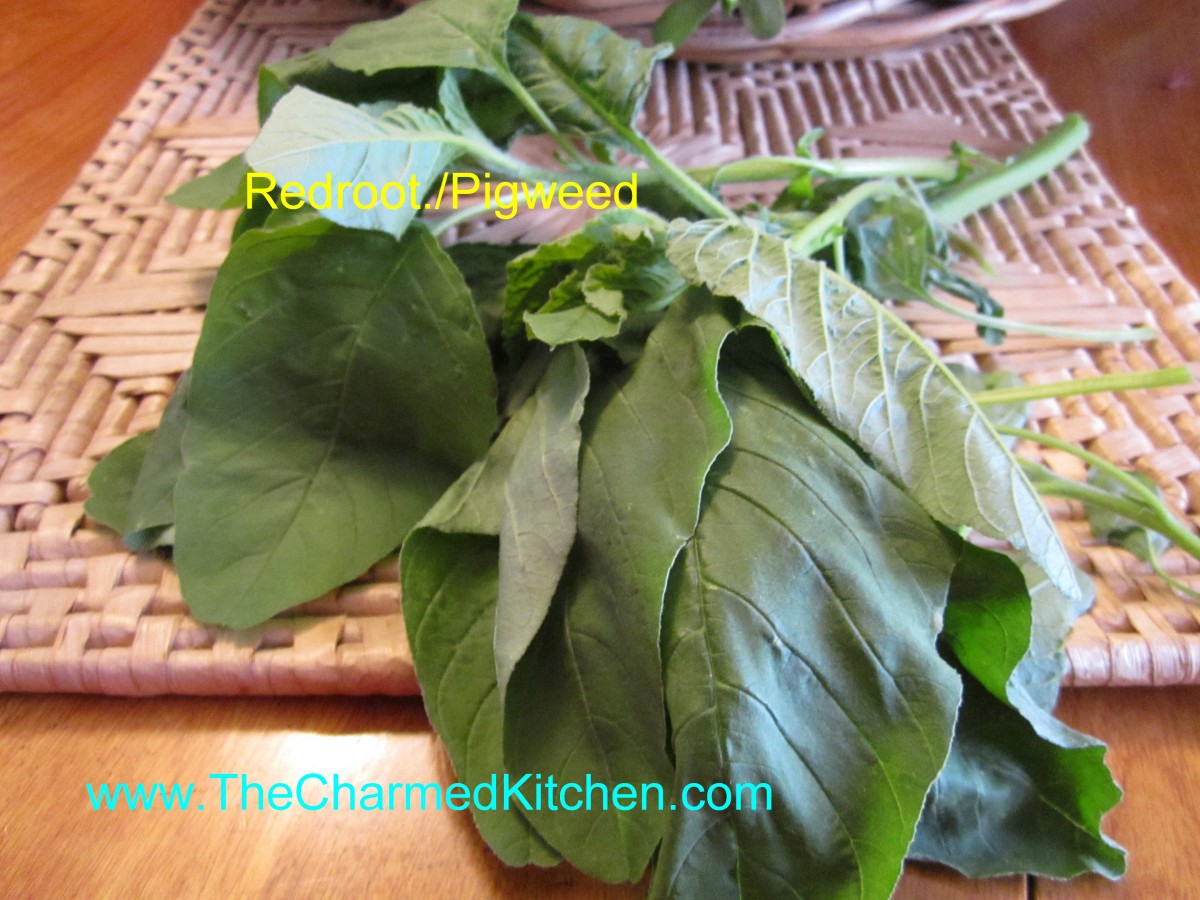 Redroot/Pigweed: This member of the amaranth family is distinguished by a reddish color to its roots. It has a spinach like flavor and can be cooked and used like spinach is any recipe. The plants can get several feet tall and often show up in places where the soil has been tilled.
 Tulips: Tulips are more than pretty, they are also quite tasty. The petals taste like a mild flavored lettuce and can add a beautiful touch to salads. The bulbs are also edible but we rarely eat them because to do so would destroy the plant. The petals, however, can be harvested and eaten year after year without harming the plant.
 Roses: Rose petals have been used to make fragrances for a very long time. The petals are also edible and can be added to salads and used to make jelly, syrup and of course, rose water. The hips are also quite edible. Rose hips are the round balls that are left after the bloom is spent. They are full of vitamin C and can be cooked and used to make tea and jelly.
This is far from a complete list. Just a few things from my yard that I thought you might have, too.
Lemon Lover’s Tart


Lemon Tart
I wasn’t sure what to call this dessert. It started out as one thing, but sort of ended up somewhere else. I finally decided to just call it a tart. Let me explain.
I was leaning towards making a cheesecake. I needed to make dessert for a dinner. Everybody loves cheesecake, right? I already had cookie crumbs, I could use for the crust. Then, I discovered I only had one box of cream cheese. Not enough for a cheesecake.
While searching my fridge for cream cheese, I found a couple of lemons.
I suppose I could have made a lemon pie, but I decided to just make something up with what I had, including the cream cheese.
What I ended up with is a sweet/tart lemon dessert. Really nice, actually.
Before I get to the actual recipe, let me talk about the lemons, and including fresh lemon juice in recipe directions.
Recipes will often list the “juice of a lemon” in the ingredients. There is about the same amount of lemon juice in all lemons, so that a little difference, one way or the other, is no big deal. The amount is anywhere from 2-3 tablespoons of juice in a lemon. You might get 4 tablespoons, if the lemon is really big. I have used that phrase in recipes myself.
Sometimes, however, you have to recognize when you have lemons that aren’t “average”.
The two lemons I had on hand were big, really big. When I juiced them, I ended up with 2/3 of a cup of lemon juice. So, in this recipe I used the actual measurement of the juice, rather than saying, “the juice of 2 lemons.” Three or four average sized lemons should give you 2/3 cup of juice.
So here is the recipe for my lemon tart, the happy end result of using what I had, and making it work.
Lemon Tart
Crust:
1½ c. crushed vanilla cookies
4 T. melted butter
Filling:
1 (8oz.) container cream cheese, softened
½ c. sugar
2/3 c. lemon juice
Zest of two lemons
3 eggs
¼ c. cornstarch
Combine crust ingredients in medium bowl. Press crumb mixture into a 9 –inch springform or tart pan. Bake in a preheated 350-degree oven for 10 minutes. While the crust is baking, make the filling. In mixing bowl combine the cream cheese with the sugar and beat until fluffy. Add the lemon juice and zest and beat well. Add the eggs and cornstarch and beat until smooth. Pour filling over the baked crust and return to oven. Bake for 35 minutes, or until golden on top. Center will be soft, but firms as the tart cools. Cool, then refrigerate until ready to serve. You can dust with powdered sugar, if you like.
Herb Gardening Program

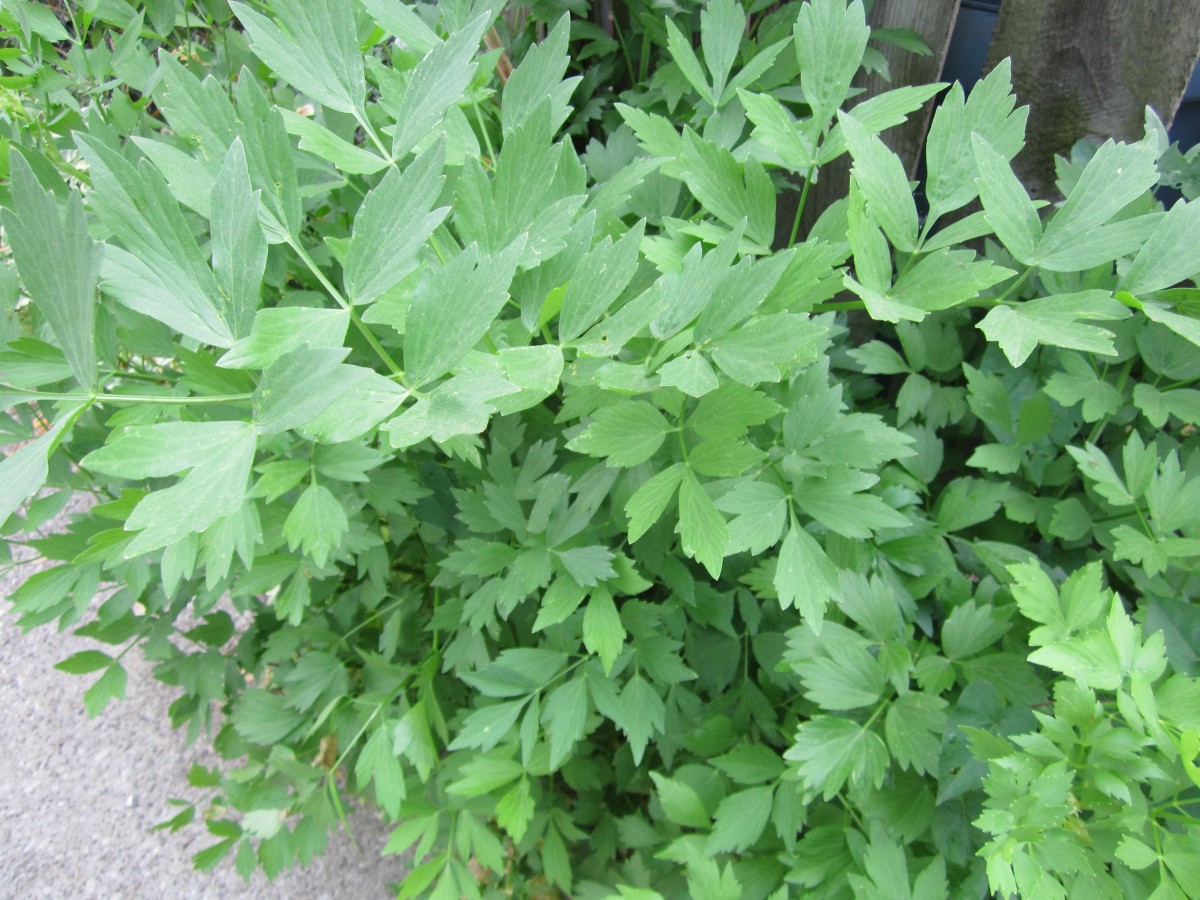
Lovage
I will be giving a talk tomorrow evening, on Herb Gardening at the Solon Library. After the recent snow- it might be nice to think about warmer days ahead.
This is a free program, open to the public. If you want to learn more about growing your own herb garden- please plan on coming.
Here are the details.
Herb: Spice Up Your Garden program on Monday, April 1 at 7pm at the Solon Library. The branch address is 34125 Portz Parkway, Solon, OH 44139
I have a few more programs coming up at other branches, in case you can’t make it tomorrow.
Easter Cupcakes


Trio of Easter Cupcakes
These cupcakes would make a great dessert for Easter- or any spring time party. They are also a fun dessert for kids to make.
I started out by making a double batch of my classic white cupcakes- recipe follows.
I also made a double batch of white chocolate frosting. You could certainly make a vanilla buttercream, if you prefer.
To add a little color to the cupcakes, I divided the batter into three bowls and tinted each of them a different pastel color.
As I filled the pans, I just added a spoonful of each of the tinted batters in them. They came out really nice. I made three different cupcakes: bunnies, chicks and nests.
Details on how to make each of them are listed below.
Classic White (Vanilla) Cupcakes
1 cup sugar
1/2 cup butter
2 eggs
2 teaspoons vanilla extract
1 1/2 cups all-purpose flour
1 3/4 teaspoons baking powder
1/2 cup milk
Preheat oven to 350 degrees. Line a muffin pan with 12 paper liners. In a medium bowl, cream together the sugar and butter. Beat in the eggs, one at a time, then stir in the vanilla. Combine flour and baking powder, add to the creamed mixture and mix well. Finally stir in the milk until batter is smooth. Pour or spoon batter into the prepared pan. Bake 20 to 25 minutes. Cupcakes are done when they springs back to the touch. Makes 12.
White Chocolate Frosting
6 oz. white chocolate – if using bars, chop before melting
1 stick (4 oz.) cold butter, cut into cubes
1-2 c. powdered sugar
1 t. vanilla
Melt chocolate. I just melt mine in a microwave safe dish, but you can use a double boiler. Let chocolate cool down a little. Beat butter into the melted chocolate. Beat until smooth and then beat in the powdered sugar and vanilla. Whip until frosting is smooth and fluffy. I normally beat for 5 minutes or longer. If too thick, add a few drops of water or milk. For this recipe, I made a double batch of frosting.
Bunnies
extra white chocolate
food coloring- pink or red
chocolate chips
pastel ( pink) M&M’s
Make bunny ears by melting some white chocolate and putting it in a piping bag or bottle. On wax paper, make outline of the ears in white chocolate and allow to cool/harden. Place a drop or two of pink or red food coloring in a microwave safe bowl and add some white chocolate. Melt in microwave, being careful not to burn the chocolate and stir until it turns pink. Pipe the pink chocolate into the middle of the ears. Allow to harden before peeling off of the was paper. Using a star tip, pipe frosting on cupcake. I made three layers – to add height to the cupcake. place ears on cupcake and add chips/candy for eyes and mouth.
Chicks
Frosting tinted yellow and green
mini chocolate chips
fruit roll up
Using star tip, pipe the chick’s body onto the cupcake in yellow frosting. Pipe on head and wings. Pipe green frosting around chick to form a nest. Use mini chips for eyes and cut fruit roll up for beak.
Nests
Frosting tinted green
egg shapes malted milk balls- or you could use jelly beans
Pipe green frosting on cupcakes to make nests. Add three, or more, candies in the middle for eggs.

Piping pink filling in ears
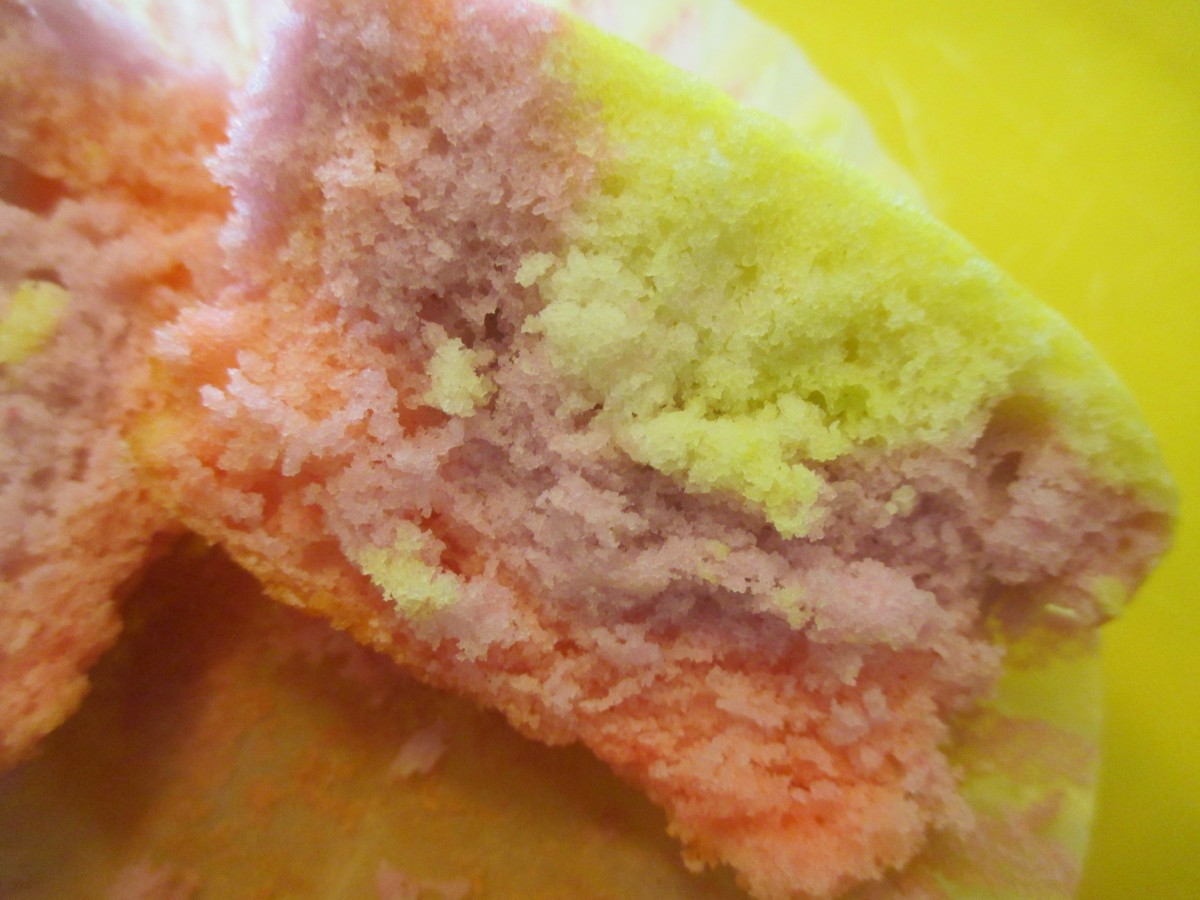
rainbow cupcake

bunnies
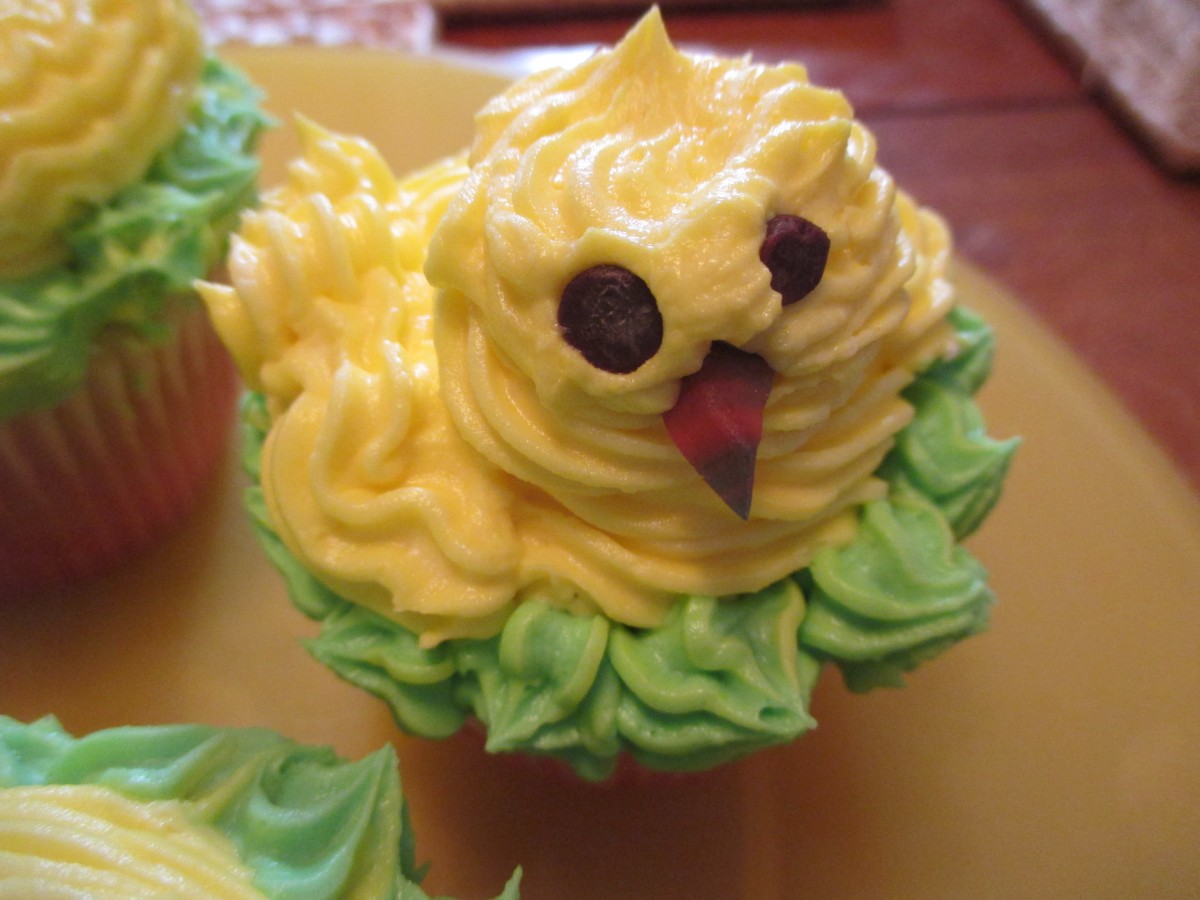
Chick cupcake
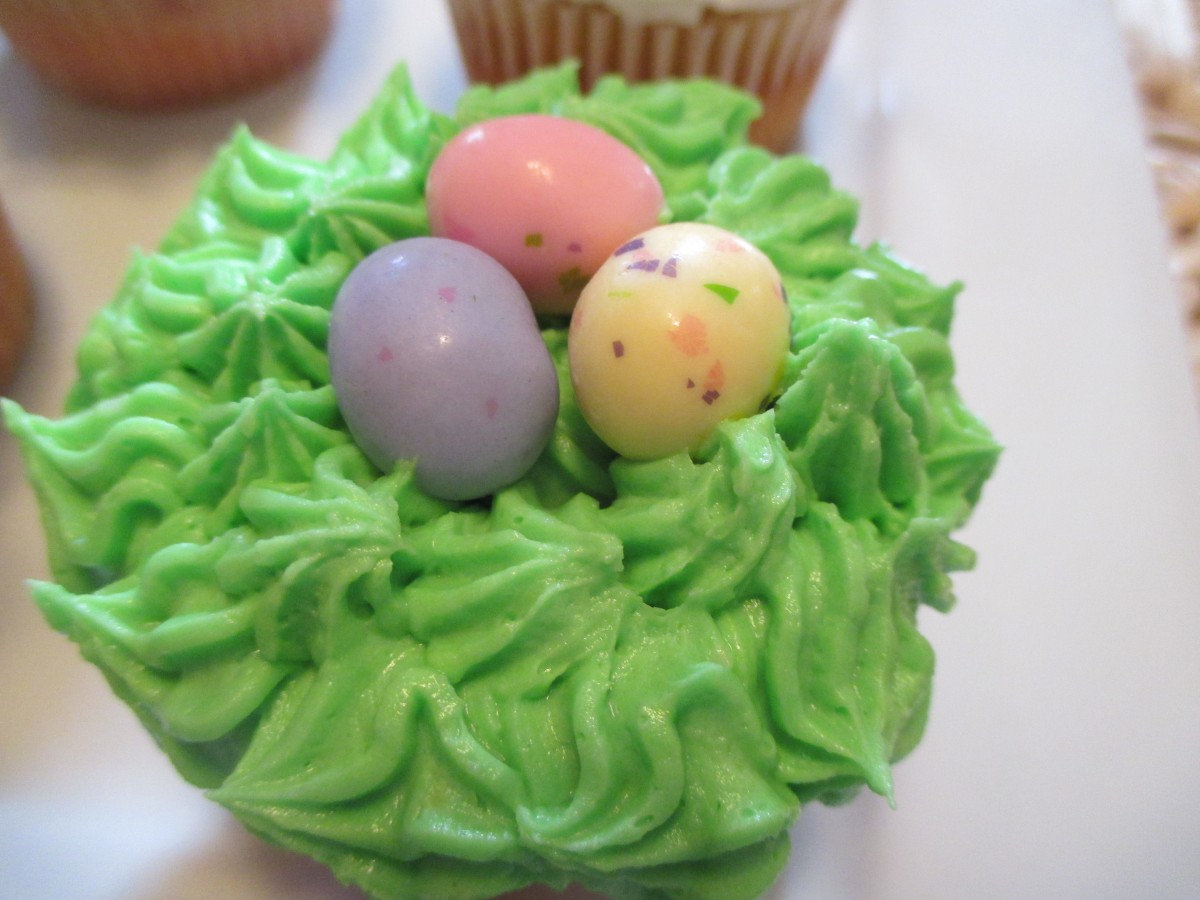
The nest cupcake
Really Good Crab Cakes


Crab Cakes
Crab cakes are one of those foods I save for special occasions. I had good friends over for dinner last night. I wanted to make something special- so I made them crab cakes. They loved them.
Both friends said they had not been big crab cake fans before. Past experiences had been less than amazing. They loved mine- said they were “really good.”
The secret to crab cakes it adding just enough ingredients to hold the crab meat together, without losing the beautiful texture of the crab in the process. These crab cakes did all that.
I used a little sour cream to help hold them together and to add moisture. I know many who prefer mayo as a binder. Either works, I just like sour cream.
I have pan-fried them in the past, but decided to bake these in the oven. Either method works. It just comes down to what you prefer. By baking them, I had more time to get the rest of the dinner together. We ate our shrimp and corn chowder while the crab cakes baked.
We had them with fresh asparagus with hollandaise , coleslaw and croissants. It was a truly special meal.
Really Good Crab Cakes
2 eggs
2 T. sour cream or Greek yogurt
1 t. thyme
1 t. lemon juice
½ t. cayenne pepper
½ t. dry mustard
Salt to taste
¼ c. fresh chopped parsley
¼ c. fresh chopped green onions or chives
About ½ c. breadcrumbs
1 lb. lump crab meat
Olive oil
Mix all the ingredients together, except oil. Start with about ¼ cup of the breadcrumbs and add just enough to hold the mixture together. Mixture will be crumbly. Form into patties- you can make 4 large or 8 small.
You can cook them one of two ways.
To bake: Place the crab cakes on a lightly oiled baking sheet and brush the cakes with a little more oil. Bake in a preheated 450- degree oven for 15 – 18 minutes, for small cakes. Bake 20-24 minutes for large cakes. Turn them once during baking to brown both sides.
To pan fry: Heat skillet to medium hot. Add oil and gently add the cakes. Cook for 4-5 minutes per side, or until golden brown and crispy. Turn once, carefully, to brown on both sides.
Rainbow Pierogi

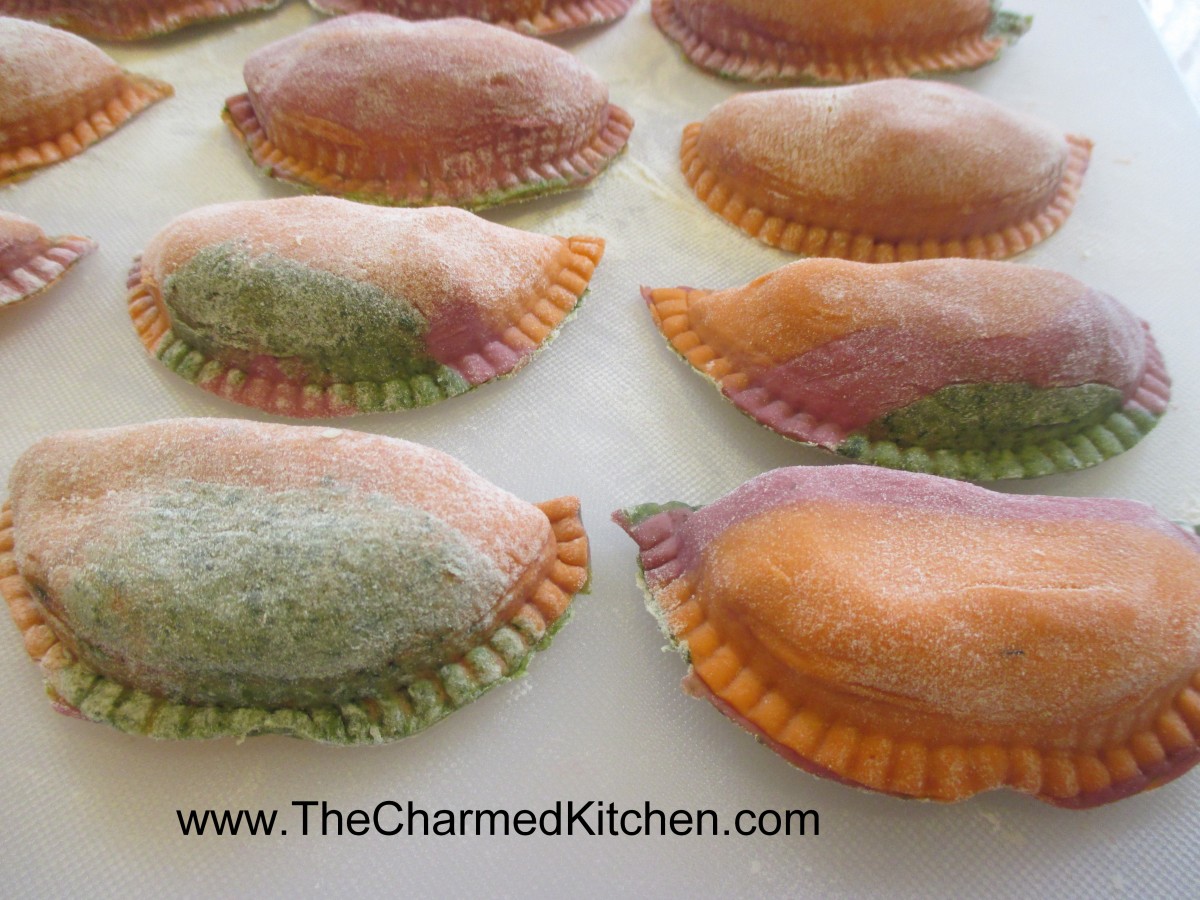
Rainbow Pierogi
Pierogi, if you don’t know, are filled dumplings. They are part of my Polish heritage. Pierogi are often filled with potatoes, but they can be filled with any number of ingredients. They are a nice choice for a meat-free dinner.
I used a potato and cheese filling, so that part is pretty traditional. The dough I made- not so traditional
I already enjoy making pasta with veggie- based dough. The colors are so pretty, and I love the way they taste. So, I went a step further and used my veggie-based dough to make these colorful pierogi.
These are so pretty for any Spring dinner. They would also be nice for Easter- they sort of look like Easter eggs!!!
You can freeze them, too. So if you make a big batch- you can enjoy them for several meals.
I served them with sauteed onions and sour cream. Here is the recipe for all.
Rainbow Pierogi
All of the vegetable doughs were mixed using a food processor. If you want to mix them by hand- puree the veggies first. Once the doughs are made allow them to rest at least 30 minutes. Since veggie pasta dough tends to be a little softer than traditional pasta- I actually prefer to make them a day ahead and chill. Chilling the dough, even for an hour, will help. The traditional pierogi dough was mixed in a stand mixer.
To make the pierogi a little sturdier, you can also make regular pierogi dough and mix a little of that dough in with the veggie-based doughs.
When ready to roll out your dough, grab a hunk of each dough and press them together. If the the dough is a little sticky that will help. Then on a floured surface roll out to the desired thickness. Folding and rolling a couple of times helps to mix up the color pasta better. I use a template to make my pierogi- but you can cut them out with any round cutter or even a glass or jar. Spoon filling of your choice on center of dough circle. Fold dough in half over filling and press edge with fork to seal. Wetting the edge of the dough will help the dough to stick. Don’t overfill or pierogi will split. Test a couple first to get the hang of it. Place a few at a time into salted boiling water and cook until they float. You can eat them as is, or brown cooked pierogi in butter in a skillet. Serve with grilled onions and/or sour cream. We would often make a larger batch and then freeze them, uncooked, on wax paper-lined baking sheets. When frozen they would be transferred to a freezer bag or container. Place right from the freezer into boiling water when ready to use.
Carrot Pasta
1 c. flour
1/2 t. dried dill
1/3 c. carrot puree
1-2 T. water, if needed
Beet Pasta
1 c. flour
1/2 t. dill
1/3 c. beet puree
1-2 T. water, if needed
Spinach Pasta
2 c. flour
1 10 oz. package frozen spinach, cooked, drained, reserving some of the liquid
Mix this dough as for other pastas, but don’t be too quick to add reserved liquid. While kneading you’ll get water out of the spinach. May require more kneading and rolling than other pasta doughs. Be patient, it’s worth the work.
Classic Pierogi Dough
2 c. flour
1 t. salt
½ c. water (you can also use half milk and half water)
1 egg
Mix all ingredients together and knead on floured surface until smooth. Cover and let rest at least 15 minutes. Roll out thin and cut into circles. Re-roll scraps. You should get between 20-30.
Pierogi Filling
1 lb. Potatoes, peeled and boiled
4 oz. cream cheese – normally I would use farmer’s cheese or cottage cheese, but cream cheese was what I had
1/2 c. shredded cheddar cheese, optional
salt and pepper to taste
Mash potatoes with other ingredients and season to taste.
I usually add some chopped sweet onion to my filling, but one of my guests isn’t crazy about onions, so I am leaving them out. Feel free to add some, if you like.
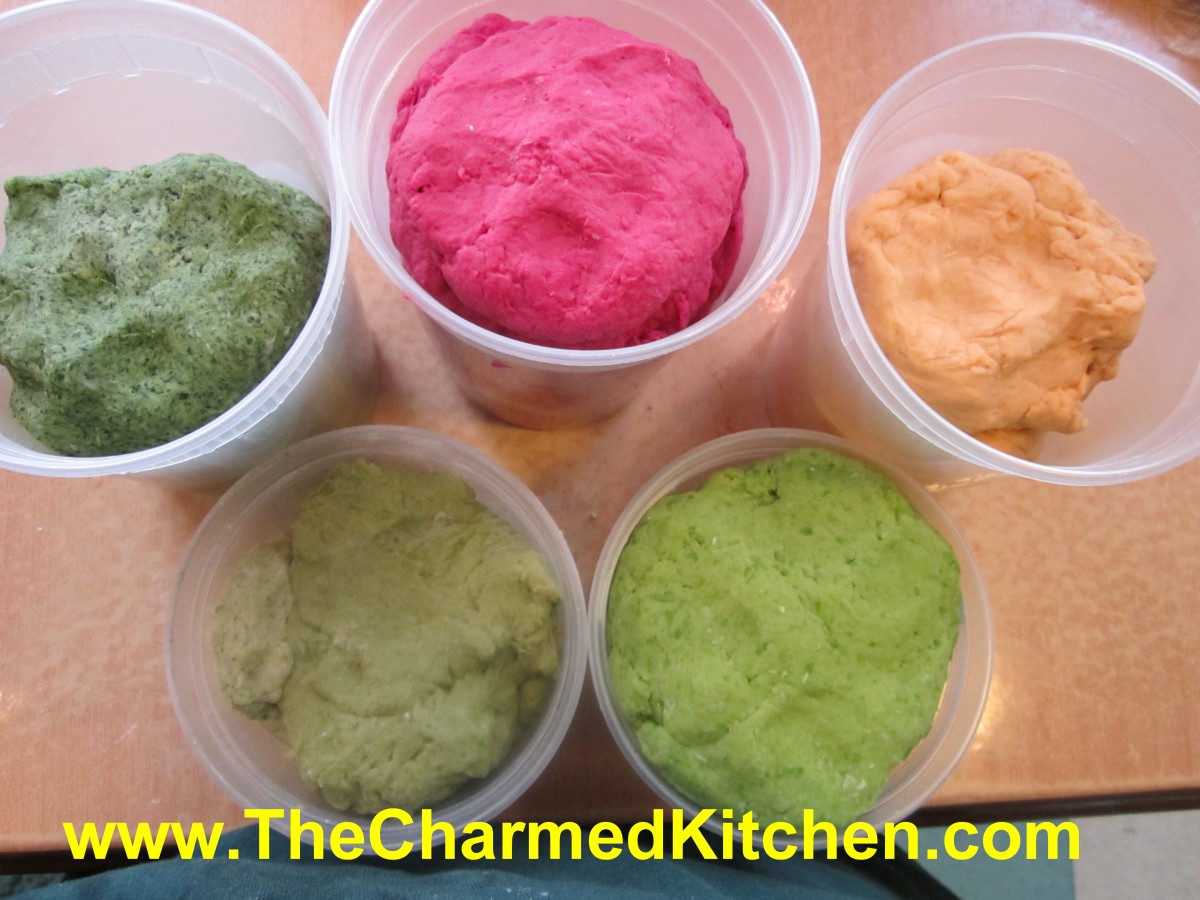
Veggie Pasta Dough
Easter Bread Wreath

Easter Bread Wreath
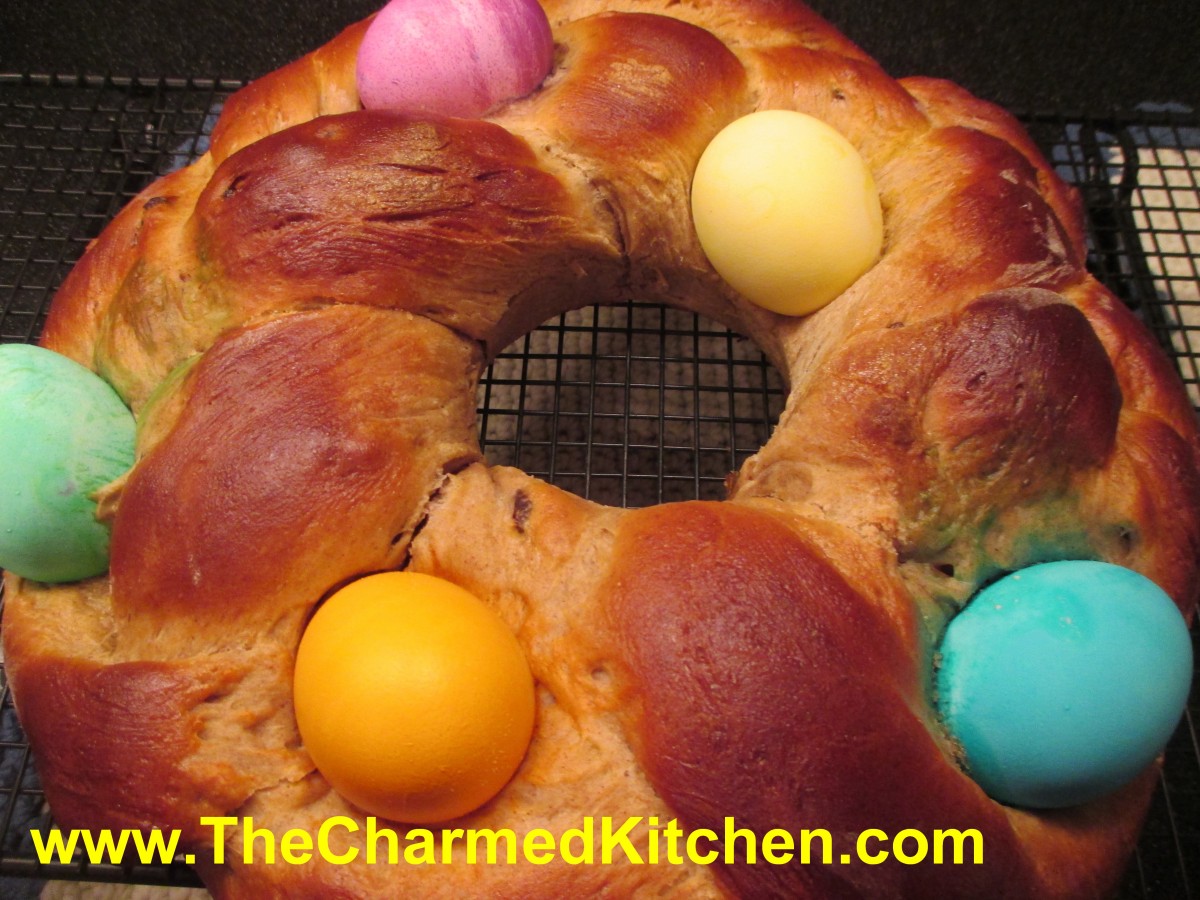
This Easter bread wreath, with eggs baked on top, is a fun bread to make for the holiday. It is a tradition in many families.
I hadn’t made one in a long time, and when I went to find my recipe, I couldn’t locate it. I decided to make a new recipe.
I wanted it to have a lot of flavor- something that would be fun served at a breakfast, brunch or with dinner, but not too sweet. I added spices and raisins, but I could see using other dried fruits.
I left it plain on top – but you could easily add a powdered sugar glaze. No, I did not hard cook the eggs first. They cook while the bread is baking. Saves a step, for sure.
I tested the bread out with friends. Almost half was eaten before dinner, so I am confident to say, that this recipe is a winner. The texture of the bread is really nice and the dough is richly spiced.
I added mace, but if you don’t have any mace, add a little more nutmeg or allspice. Mace is a spice I would encourage you to try sometime. So here is the recipe. Hope you like it as much as we did.
Cinnamon Raisin Easter Wreath Bread
4½ -5 c. flour
1 pkt. yeast
½ c. brown sugar
2 t. cinnamon
1 t. salt
½ t. allspice
½ t. nutmeg
½ t. mace
1 c. warm water
½ c. butter, melted
2 eggs
½ c. raisins
5-6 uncooked eggs, dyed if you like
Combine 2 cups flour, yeast, sugar, seasonings and salt in large bowl. Heat together water and butter until warm and add to flour mixture. Beat 2-3 minutes. Beat eggs and reserve 1 tablespoon of the eggs for brushing the top of the bread later. Add remaining eggs and another cup of flour to the bowl. Beat 4 minutes. Add the raisins and enough of the remaining flour to make a soft dough. Knead on a floured surface until smooth and elastic, but still soft. Place in oiled bowl turning to oil top. Note: I actually used my stand mixer, and just left the dough in the bowl to knead, and then covered it to rise. I was able to leave the dough a little sticky this way, using less flour. Cover and let rise until doubled, about 45 minutes. While dough is rising, prepare a pan. Grease a large baking sheet- or use a silicone baking mat. Grease a one cup oven-proof custard cup and place it upside down on the middle of the baking sheet. This will keep a “hole” in the middle of your wreath. If you don’t have a custard cup, you can use a metal one-cup measure instead. Punch dough down and divide in three pieces. Roll each piece into a 20-inch long rope. Braid the ropes together. Wrap the braid around the custard cup on the baking sheet and pinch ends together to keep the braid from coming apart. Cover and allow to rise until doubled (50-60 minutes). Just before baking, combine reserved egg with a little water and brush the wreath with the egg wash. Place 5 or 6 eggs on the top of the braid- being careful not to press down too hard. Bake in preheated 350-degree oven for 25 minutes. Cover bread with foil and bake 10-15 minutes longer, or until bread sounds hollow when tapped lightly. Here is the only tricky part. You have to remove the wreath, but not drop the glass custard cup in the middle. You can let the bread cool a few minutes before moving. I use a silicone baking sheet so I slide the whole thing off the baking sheet and onto a cooling rack. I use two large spatulas to lift the wreath up and leave the custard cup behind. If it doesn’t come right out, use a knife to loosen. Just lift the wreath up enough to slide the custard cup out. Let cool before serving- store leftovers in fridge – because of the eggs on top. Makes 1.
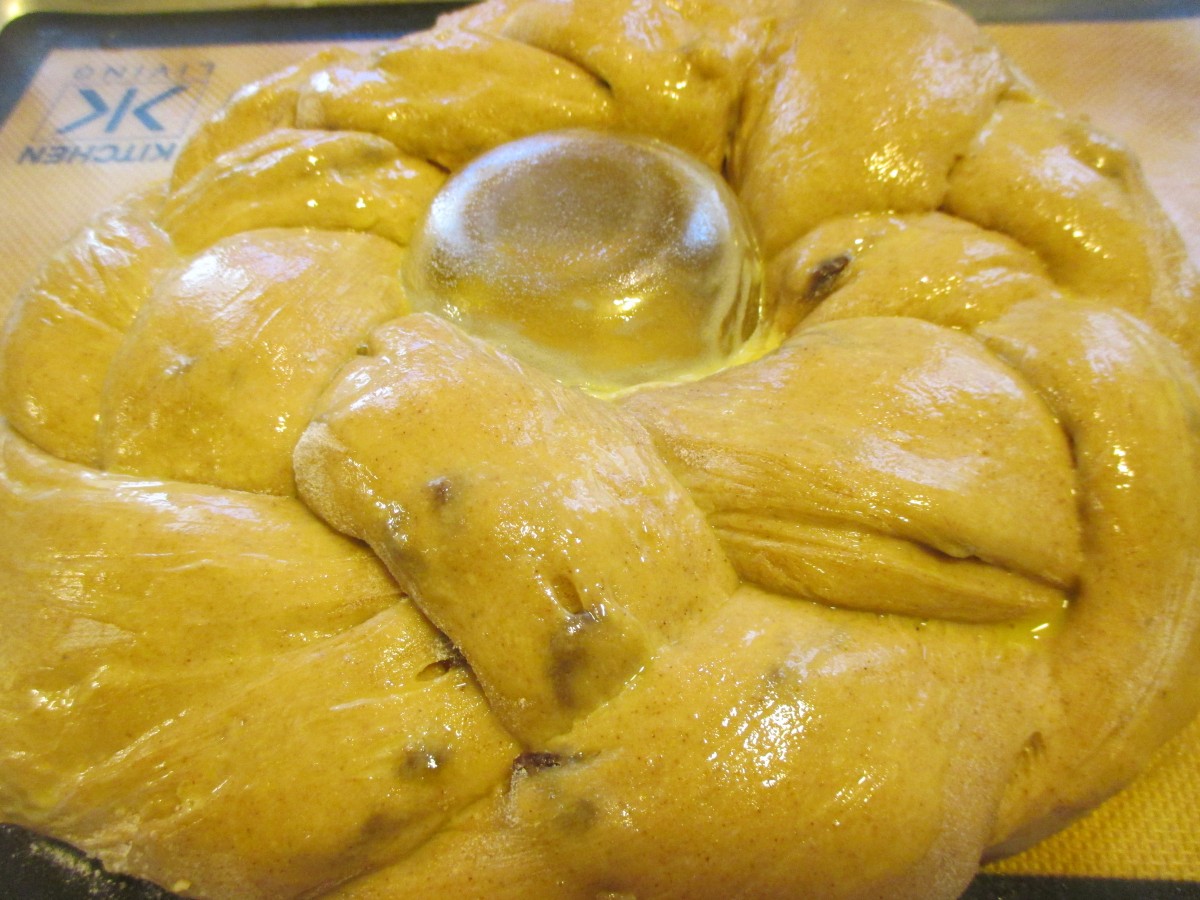
Ready for the oven
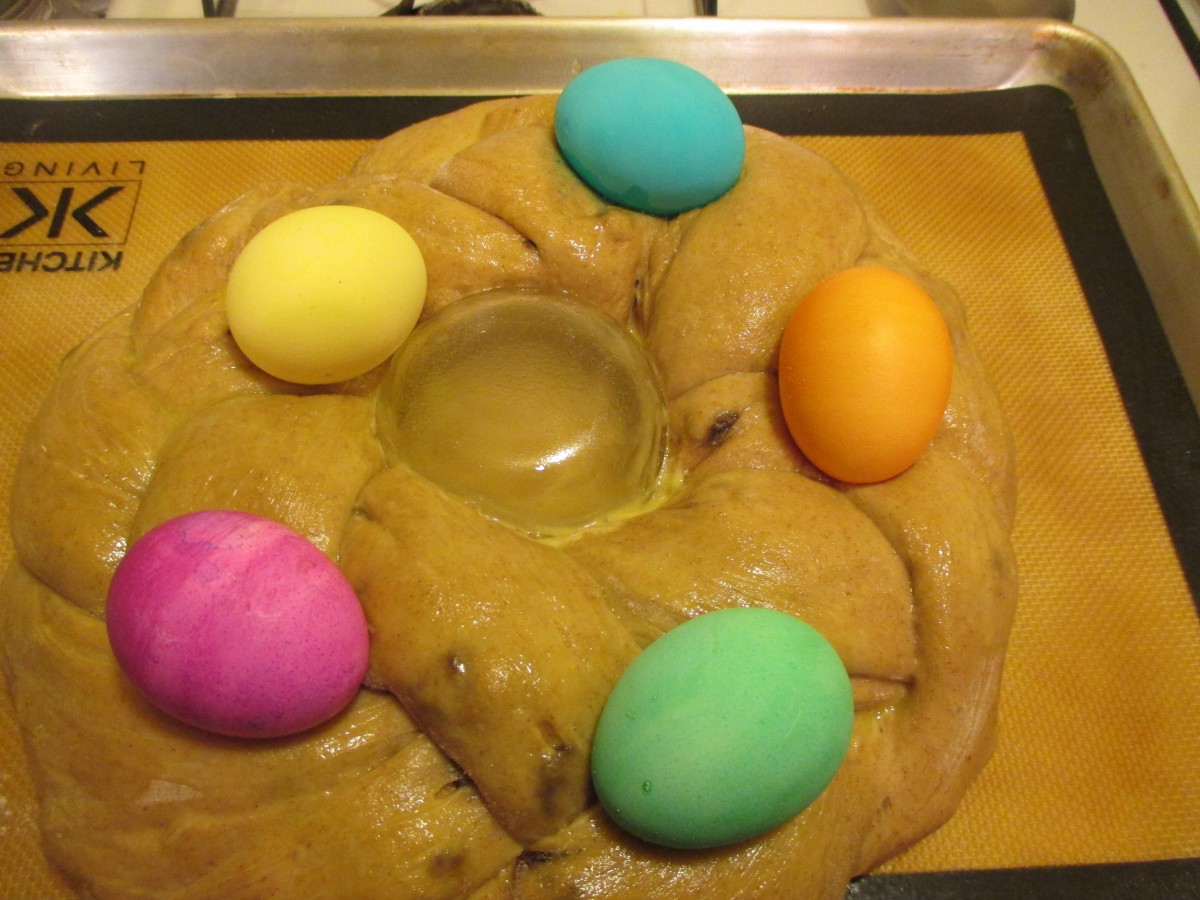
Place eggs on top before baking
Scotch Eggs


Scotch Eggs
Scotch eggs are a fun dish to make for breakfast, brunch or dinner. If you never had one before, a Scotch egg is a hard cooked egg, encased in sausage, then breaded and fried. They are really good.
We made them in a British cooking class last night and everyone loved them.
The first time I had Scotch eggs was when my friend, Dale, made them and brought them to a party. I have loved them ever since.
This is also a fun dish to make after Easter, when you might have hard-cooked eggs you are wanting to use.
Scotch eggs can be served plain, or with a dipping sauce. I used a pork breakfast sausage, but you could use a different sausage, if you like. Hot sausage would be good. You can make them the day before, then just warm up before serving.
Scotch Eggs
6 hard-cooked eggs, well chilled
1 pound breakfast sausage
1/2 cup flour
2 eggs, beaten
3/4 cup fine bread crumbs
Vegetable oil for frying
Peel eggs and set aside. Divide sausage into 6 portions. Roll each egg in flour and with hands press a portion of the sausage around each egg. If the sausage sticks to your hands, dip your hands in a little water to make pressing the sausage easier. Dip sausage-wrapped eggs into beaten eggs and roll in bread crumbs. Heat vegetable oil to 350 degrees. Cook each egg in oil about 4-5 minutes or until sausage is cooked and browned. Drain on paper toweling. Serve warm. Makes 6.

Scotch eggs, ready to serve


