Pickled Eggs and Eggs with Pickles

Pickled Eggs
A lot of people color eggs for Easter every year. In another week, they will be looking for ways to use hard cooked eggs. Deviled eggs are great, as is egg salad, but you have more options.
Here are a couple of ways you might want to enjoy some of your eggs. The first recipe is for classic pickled eggs. The second recipe came from my friend Jimmy. It is a type of fresh relish made with beets, pickles and hard cooked eggs.
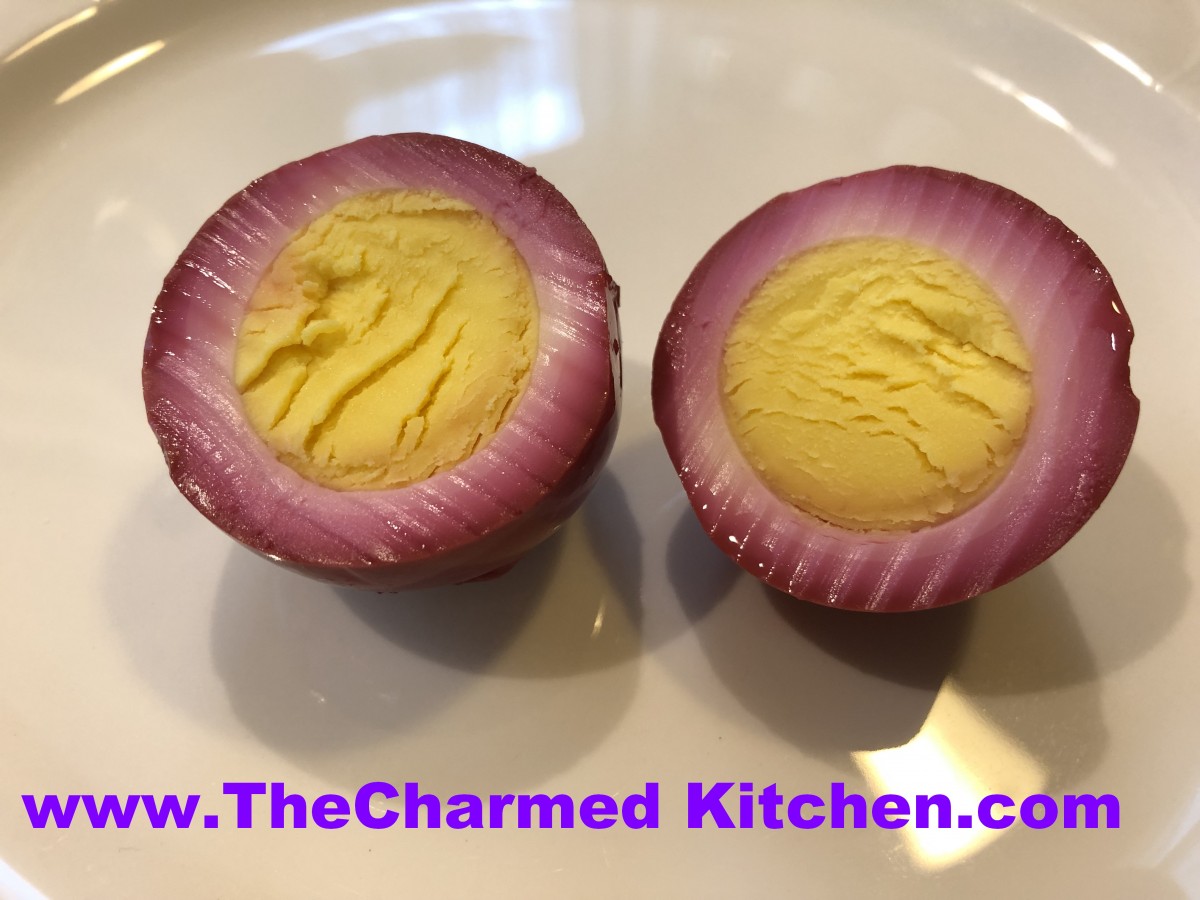
Pickled eggs are fun and easy to make. They are traditionally pickled with beet juice, so they turn a pretty pink color, too. The recipe can be made without beet juice, but what fun is that? Actually, you can leave out the beets, just use plain water.
Once the eggs are ready, I store them in a jar in the fridge. If you add beets to the jar, they will “pickle” along with the eggs. Pickled eggs will keep for a couple of weeks in the fridge.
To get beet “juice” you just cook peeled beets in water until tender. The water turns bright red from the beets. You can skip the cooking beets parts by using canned beets, if you prefer.
Pickled Eggs
1 c. beet juice (cooking liquid)
1 c. apple cider vinegar
1 c. sugar- you can use less
1 onion, sliced thin, optional
1 T. pickling spice
2 t. salt
6-12 hard cooked eggs, peeled
In saucepan, heat all ingredients together, except the eggs. Bring to a simmer and cook 5 minutes on low heat. Cool mixture down. Place eggs in a jar or other container with a tight fitting lid. Pour over the beet juice mixture. Cover jar and place in the fridge. Wait one day before eating. Eggs will keep a few weeks.
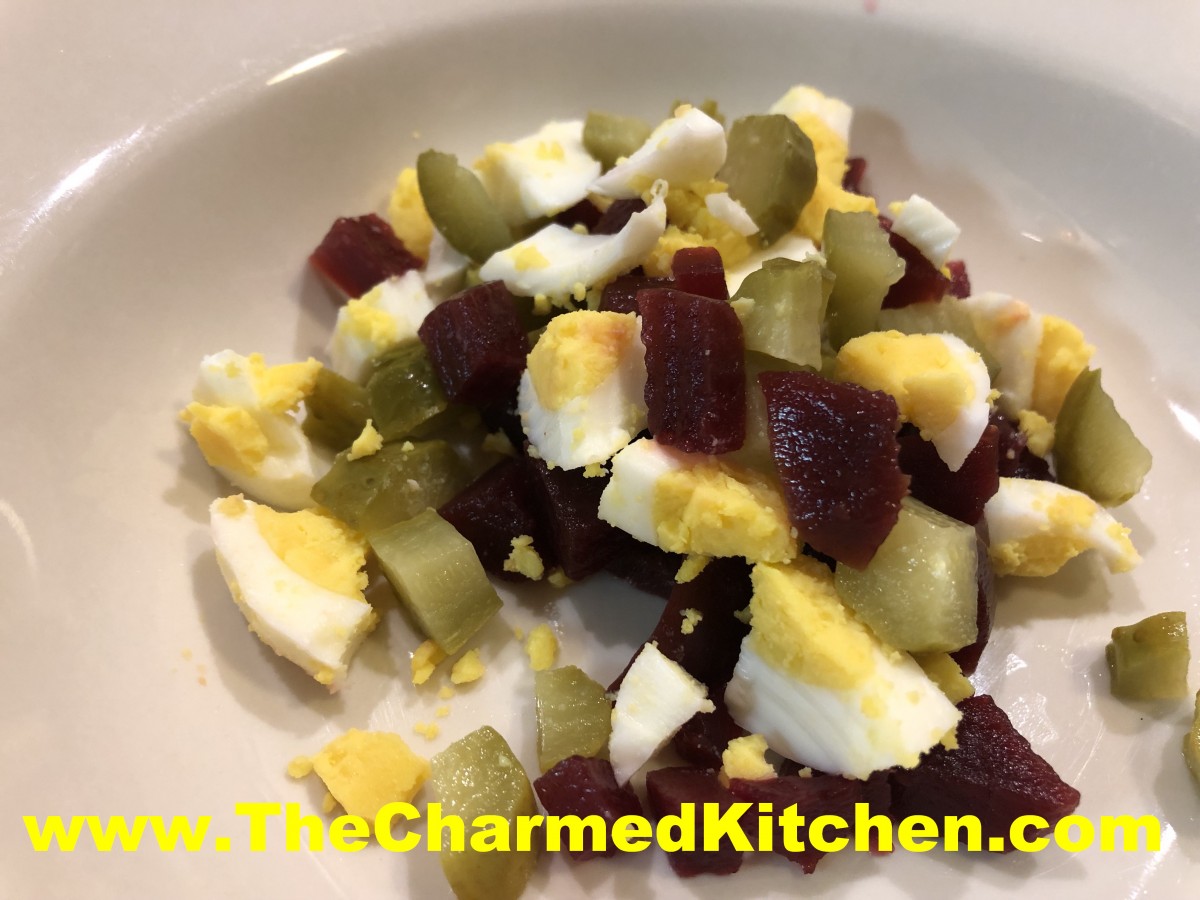
Eggs with Pickles and Beets
This recipe was given to my friend Jimmy, by an Ukranian co-worker of his.
I don’t have an exact recipe. Jimmy said she took pickles, eggs and beets, all diced fine, and layered them. When I asked him what kind of pickles- sour or sweet- he said both.
It is served as a side with meals, or with bread or crackers as an appetizer.
I played around with the ingredients and really loved the combination. I used both kinds of pickles and used pickled beets as well. You could use cooked, diced beets, either fresh or canned.
Eggs with Pickles and Beets
½ c. diced sweet pickles
½ c. diced dill pickles
½ c. diced cooked or pickled beets- if you made pickled eggs, you can use those beets
3 hard cooked eggs, peeled and diced
Pepper to taste
Combine all ingredients in a bowl- or layer in a glass dish. Chill before serving. Serve with crusty bread or crackers, or just as a side dish with meals. Makes 2 cups.
Honey Bunny Rolls

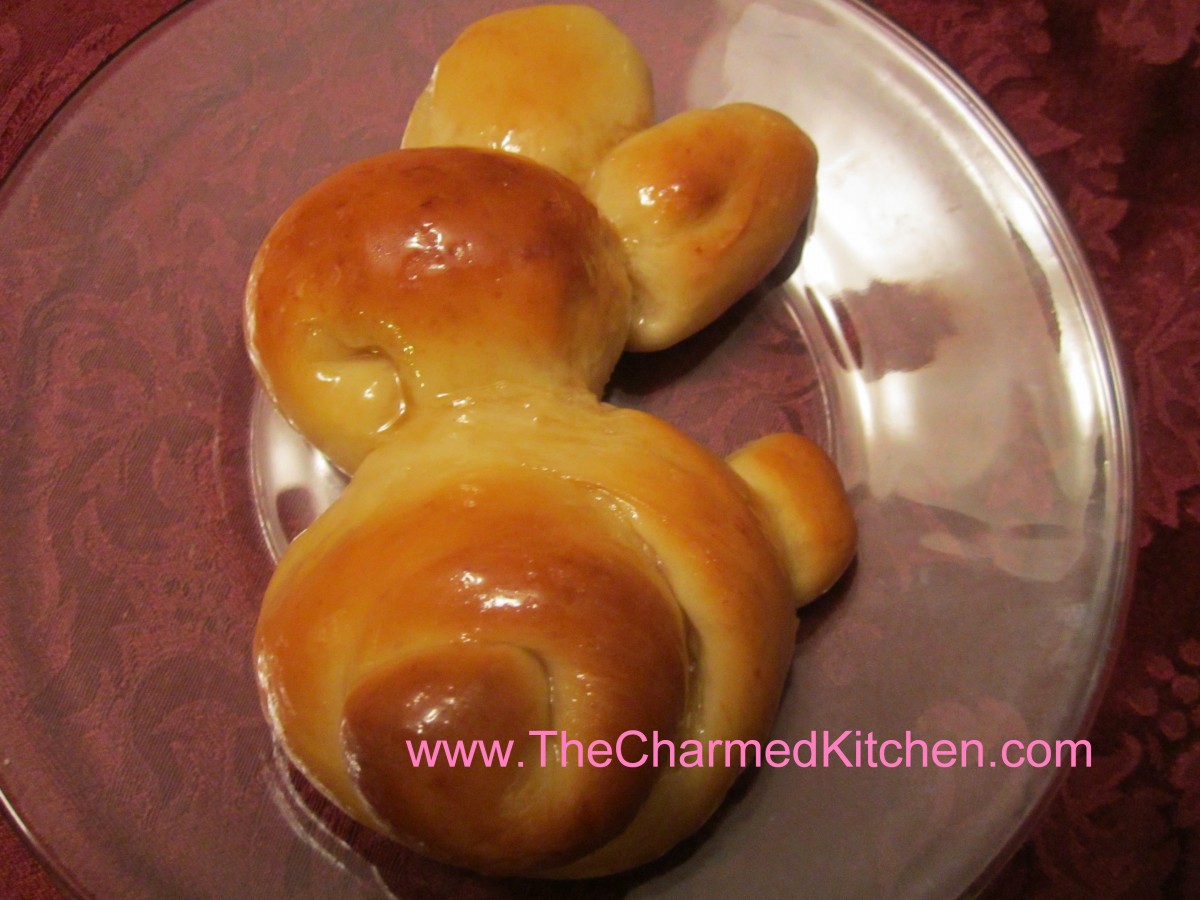
Honey Bunny
If you are looking for a fun dish to serve for Easter, you might want to bake a batch of bunnies. They can be served with Easter dinner, or with breakfast or brunch.
The honey-sweetened yeast dough is rolled into ropes, and then the ropes are formed into these bunny shapes. Once the rolls are baked, they are brushed with a mixture of warm honey and melted butter. This is a fun recipe to make with kids.
I make them every Easter. Sweet and so cute, they are sure to be a hit when you make them.
The dough is chilled before rolling, so you can mix up a batch in the evening- put in the fridge- then roll them out the next day. They are actually pretty easy to make.
You can add raisin “eyes”, if you like. It is an option.
Honey Bunnies
4-5 c. flour
2 packages yeast
1 t. salt
2/3 c. evaporated milk
½ c. each water, honey and butter
2 eggs
Raisins, optional
Honey glaze
1/2 c. honey and 1/4 c. butter or margarine heated together until warm.
In bowl combine 1 c. flour, yeast and salt. Heat together milk, water, honey and butter until very warm and beat into the flour mixture. Beat 2 minutes on high speed. Beat in 1 cup flour and eggs. Beat 2 more minutes, until batter thickens. Stir in enough flour to make a stiff batter and chill, covered with plastic wrap for 2-24 hours.
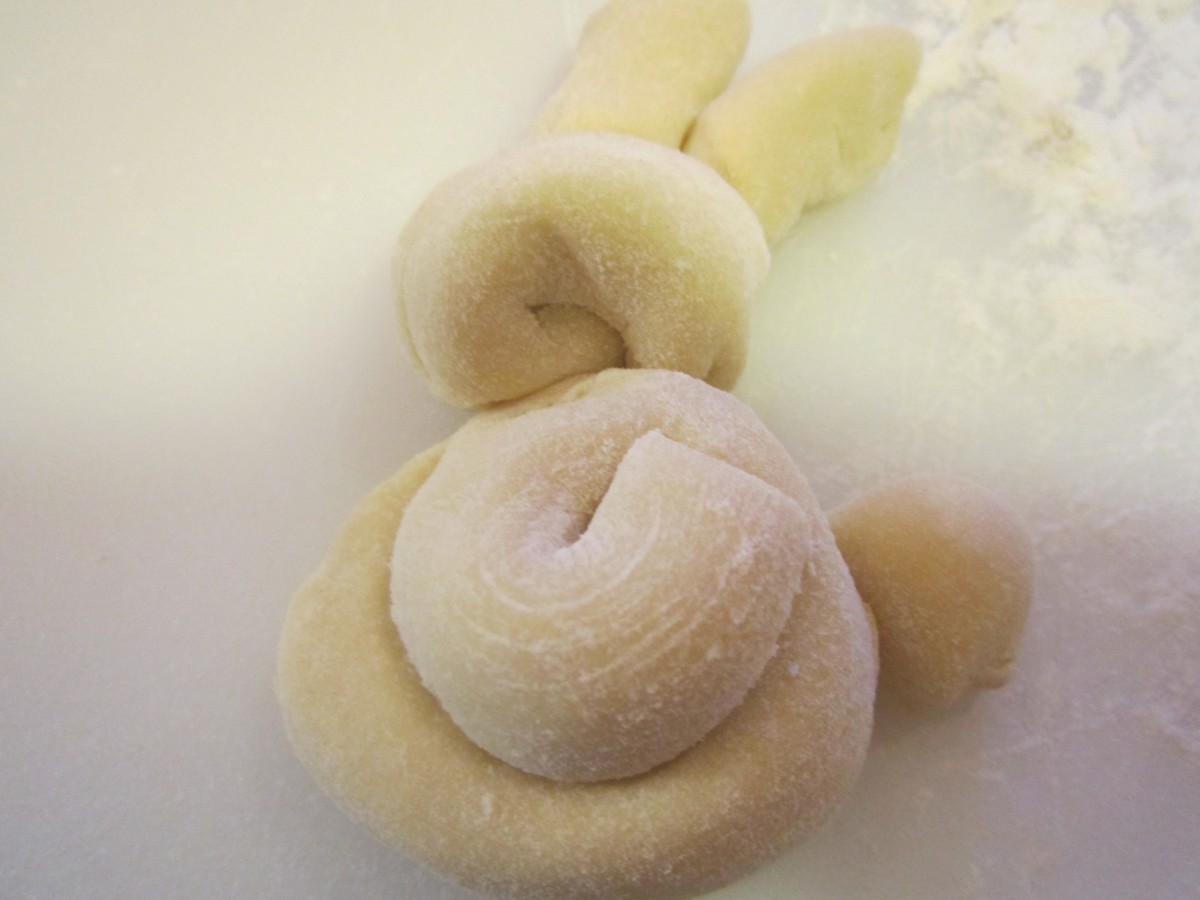
Place dough on lightly floured surface and divide into 15 equal pieces. Roll one piece of dough into a 20- inch rope. Cut rope into a 12- inch piece, a 5-inch piece and 3 one-inch pieces. Coil 12 inch piece to form body, five inch piece to form head and one inch pieces to form ears and tail. Place the body on greased cookie sheet and then place the head next to the body, making sure they are touching. Place ears and tail on the bunny, making sure they make good contact with the rest of the “bunny”. I tuck them under a little. Repeat with the remaining dough. Let rise, covered until doubled, about 25 minutes. Bake in a 375-degree oven for 12-15 minutes. Remove to cooling rack and brush with honey glaze. Place raisins on each to make eyes, if you like. Brush with additional glaze before serving, if desired. Makes 15 bunnies.
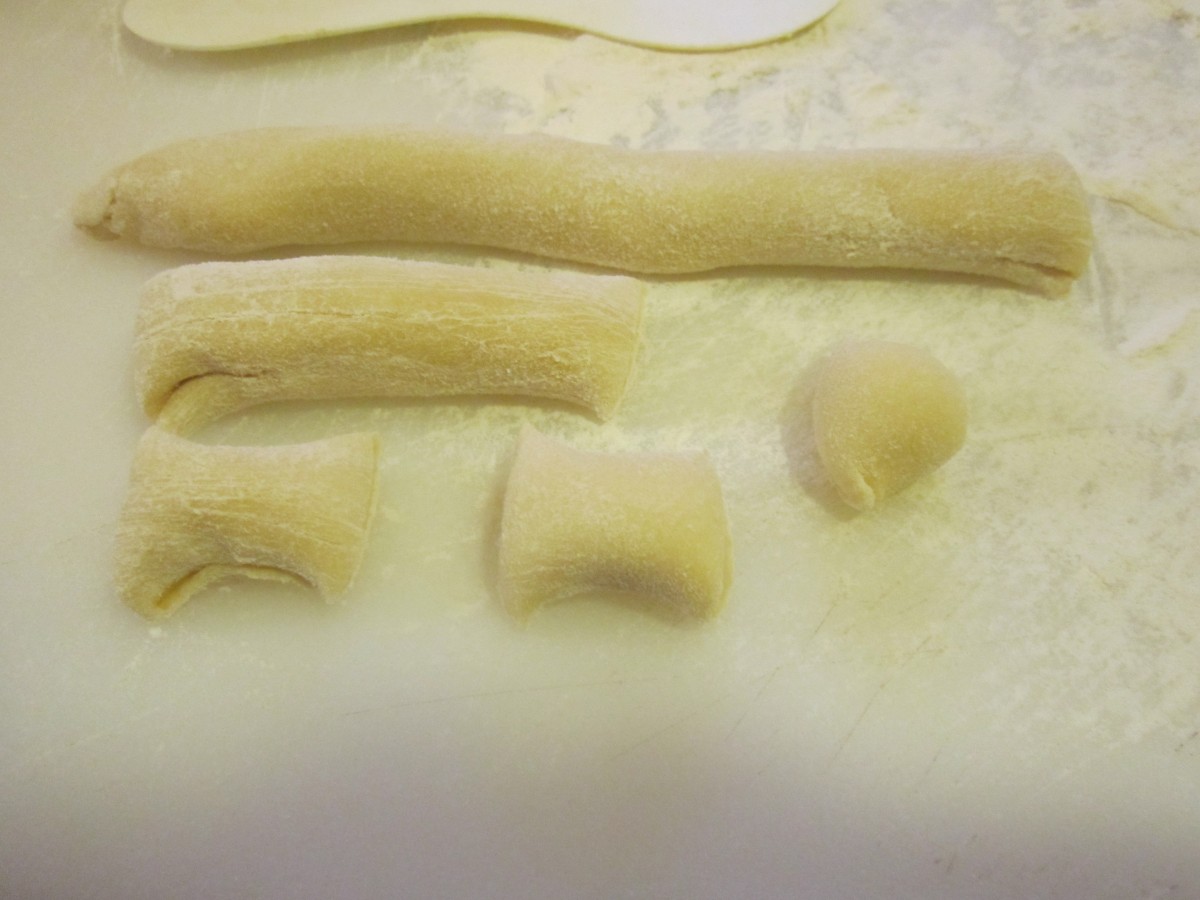
Dough is rolled out and cut into pieces for each of the bunny parts
Unbaked bunny
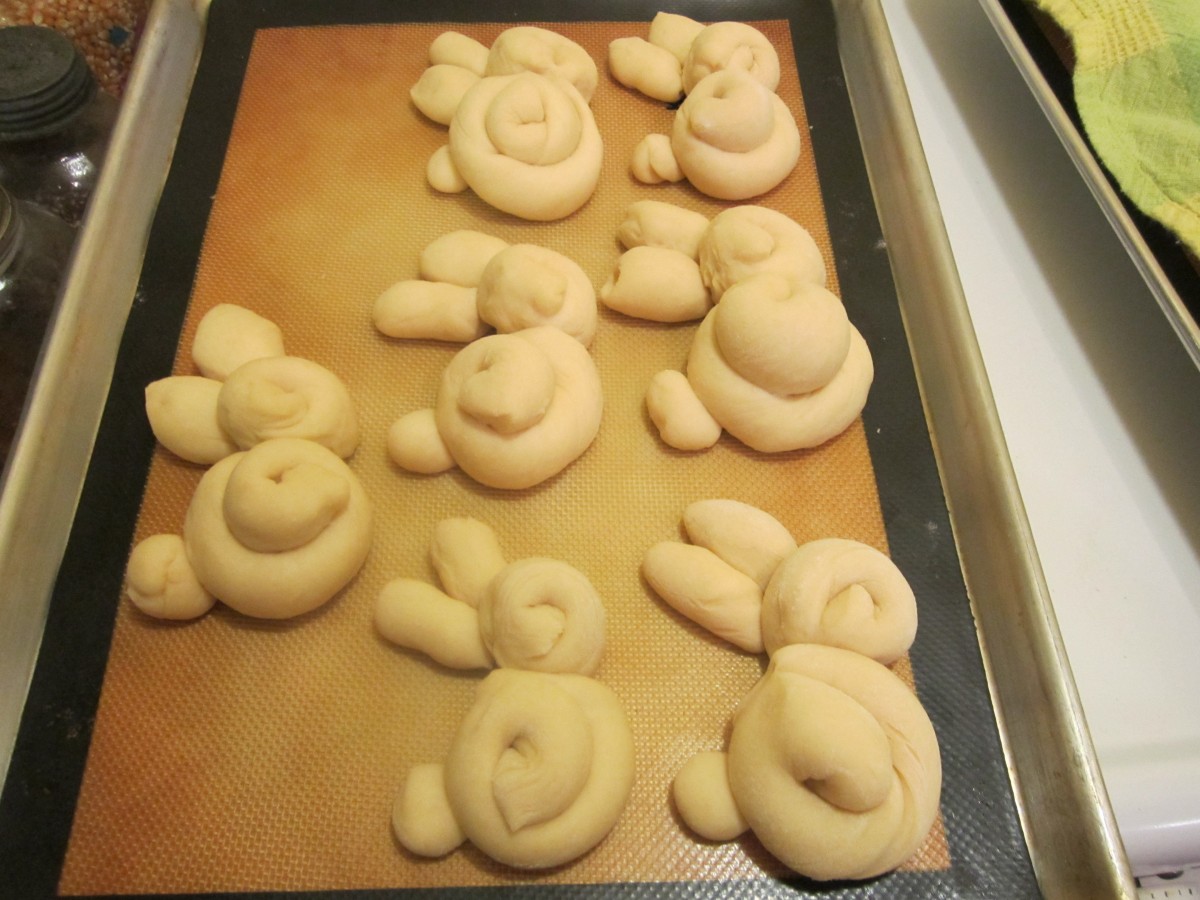
A colony of rabbits!!
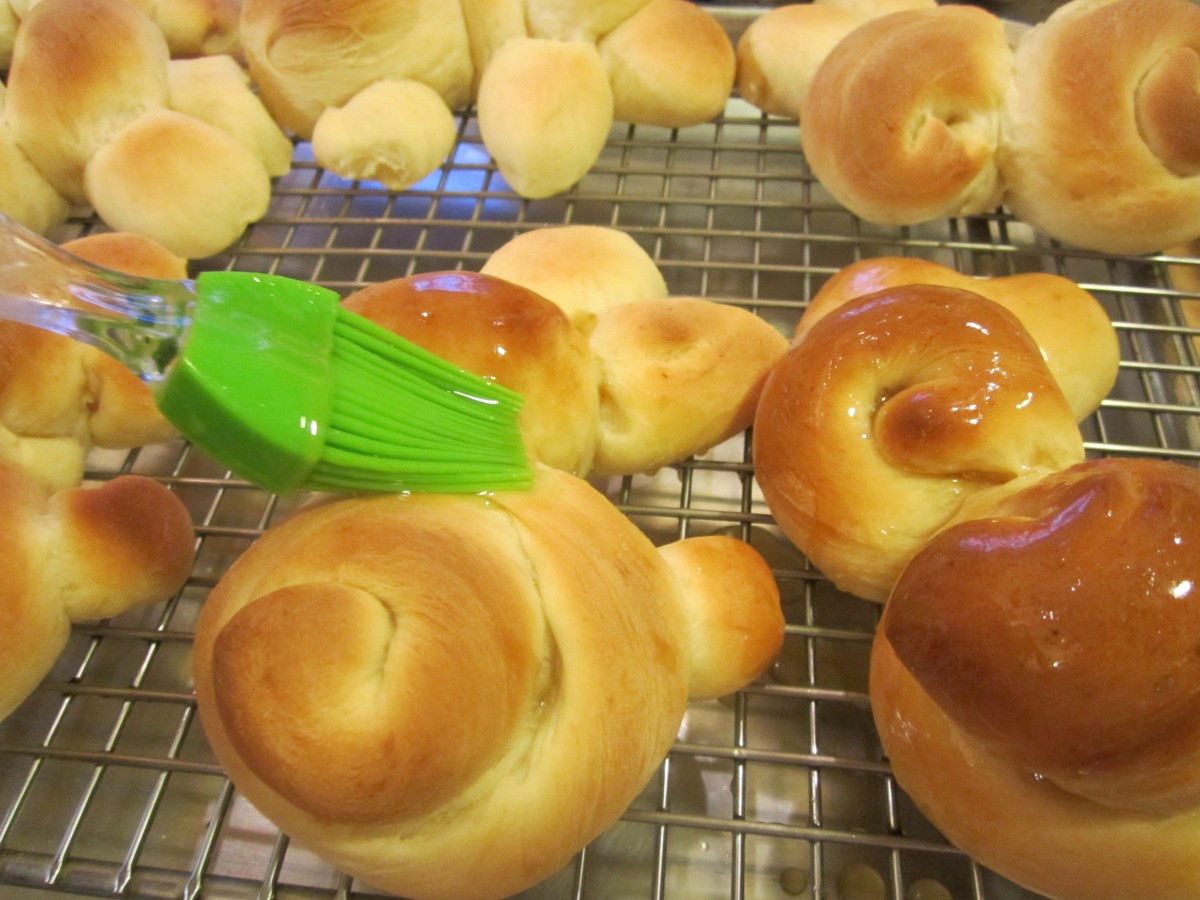
Brushing baked bunnies with honey/butter glaze
Hot Cross Buns

Hot Cross Buns
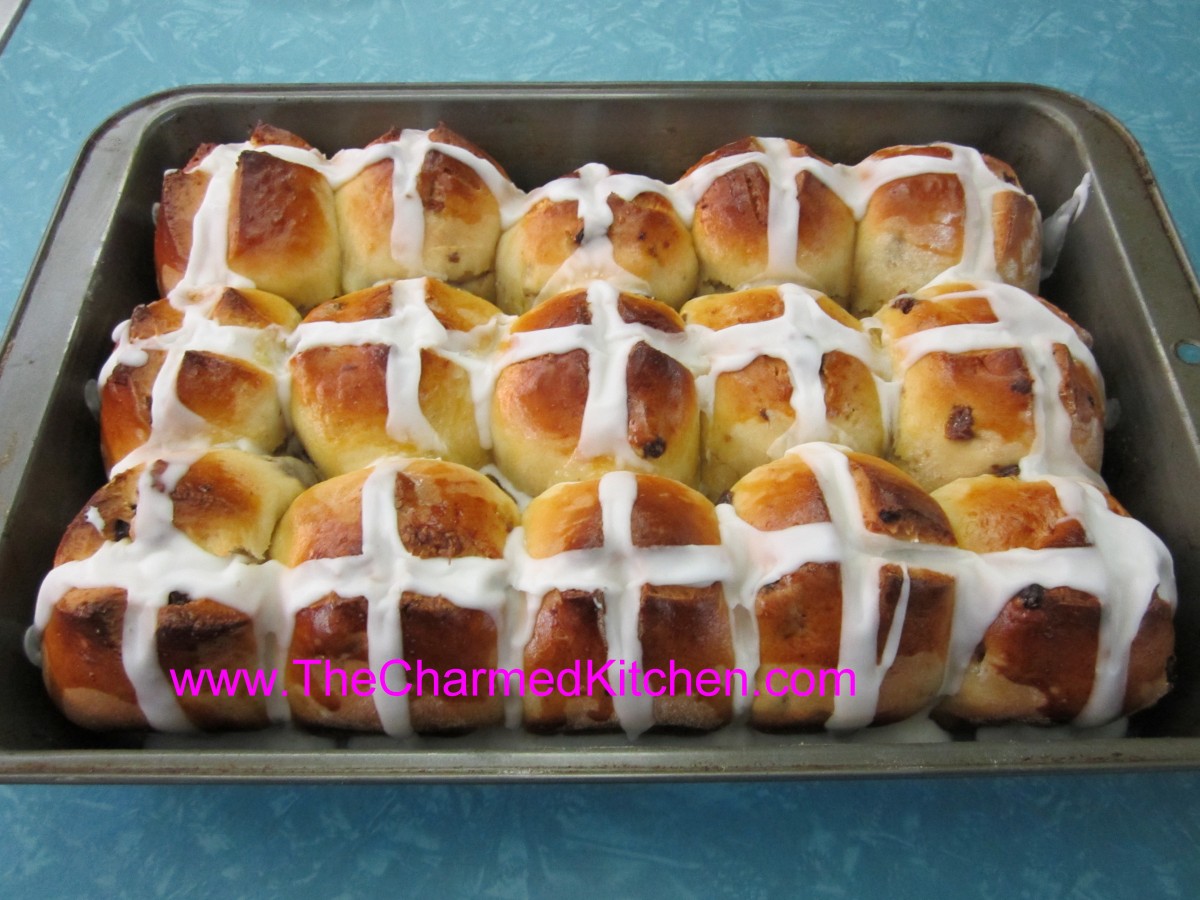
These rich rolls are a traditional at Easter. At least they are in my house. The dough is rich and slightly sweet. The frosting on top adds to their sweetness.
Hot cross buns can be served at breakfast, brunch or even as a dinner roll. I have served them with coffee, after dinner. So I guess they can be a dessert, too. I used leftover buns to make bread pudding one year.
Because the dough is rich, they are slow to rise. If they aren’t jumping out of the pan after an hour or so, don’t worry. They do rise quite a bit in the oven.
After they cool a bit- pipe on the icing in the crisscross pattern that gives these rolls their name.
Hot Cross Buns
2/3 c. sugar
1 t. salt
2 packages active dry yeast
About 5 cups bread flour
1 ½ c. milk
½ c. butter
2 eggs
1 c. raisins
Icing
¾ c. powdered sugar
1 T. milk
In bowl combine sugar, salt, yeast and about 1 ½ c. flour. Heat together milk and butter until very warm. Beat milk mixture into to flour mixture and beat 2 minutes with electric mixer. Beat in 1 egg and 1 cup flour and beat 2 more minutes until batter thickens. Stir in raisins and enough additional flour to make a soft dough. Turn dough onto a floured surface and knead until smooth, about 10 minutes. Place dough in greased bowl, turning to grease top, cover with a towel and allow to rise in a draft free place until doubled in bulk, about 1 hour.
Place dough on floured surface and divide into 15 equal pieces. Cover with towel and lest rest 15 minutes. Meanwhile grease a 9×13 inch pan. Form dough into smooth balls and place in prepared pan. Cover and let rise until doubled, about an hour. Preheat oven to 350 degrees. Beat remaining egg. Cut a cross in each bun and brush with the egg. Bake for 25 minutes or until buns are golden. Remove buns to wire rack to cool 15 minutes. Make frosting, place in decorating bag and pipe onto buns. Makes 15.
In Love with Lovage


Lovage
Lovage is one of my favorite herbs. I feel like it doesn’t get enough attention. So many people have never even heard of lovage. It’s leaves taste just like celery leaves, so it is very useful in the kitchen. As an added bonus, it is very easy to grow- and it is a perennial.
I love celery in so many foods. I don’t think you can make a decent stock without it. I especially like using celery leaves. Problem is, often the celery I see in the store has few, if any, really nice leaves. The solution? Lovage.
Lovage leaves can be used in any dish you would use celery leaves: soups, stews, stocks and salads. The seeds can also be used as a substitute for celery seeds in recipes.
Lovage grows to a height of a couple of feet, except when it is in bloom. When blooming, lovage sends up stems that can reach 6 feet!
The stems of lovage are tough, almost woody. While they can’t be used chopped like celery, the stems are hollow and can be cut to size and used as straws in drinks like Bloody Marys or vegetable juices.
I’ve never seen lovage sold as a fresh herb. As far as I know, the only way you can enjoy this lovely plant is to grow it yourself. It thrives in sun, but will tolerate some shade. For a little effort you can have fresh “celery” leaves whenever you want. I also freeze plenty for use throughout the year.
Here is a favorite recipe of mine using lovage. Perfect for Spring.
Fresh Pea Soup with Lovage
2 T. butter or oil
1 medium onion, chopped
2 c. fresh English peas, pea pods (sliced), or sugar snaps (sliced)
¼ –½ c. fresh lovage leaves, chopped fine
3 c. chicken stock or veggie stock
salt and pepper to taste
1 c. sour cream
Heat butter or oil in medium saucepan. Sauté onion until tender. Add peas, lovage, stock, and salt and pepper. Cook until peas are the desired tenderness, about 3 – 7 minutes. Puree soup in batches until smooth. Place sour cream in a small bowl. Ladle 1 cup of hot soup into the sour cream, and stir to smooth. Pour this mixture into the soup and cook, barely simmering, until soup is heated through, about 2 minutes. To serve, ladle into bowls and garnish with lovage sprigs. Serves 3 – 4.
Note: You can also serve this soup cold.

Fresh Pea Soup with Lovage
Cinnamon and Vanilla Belgian Waffles

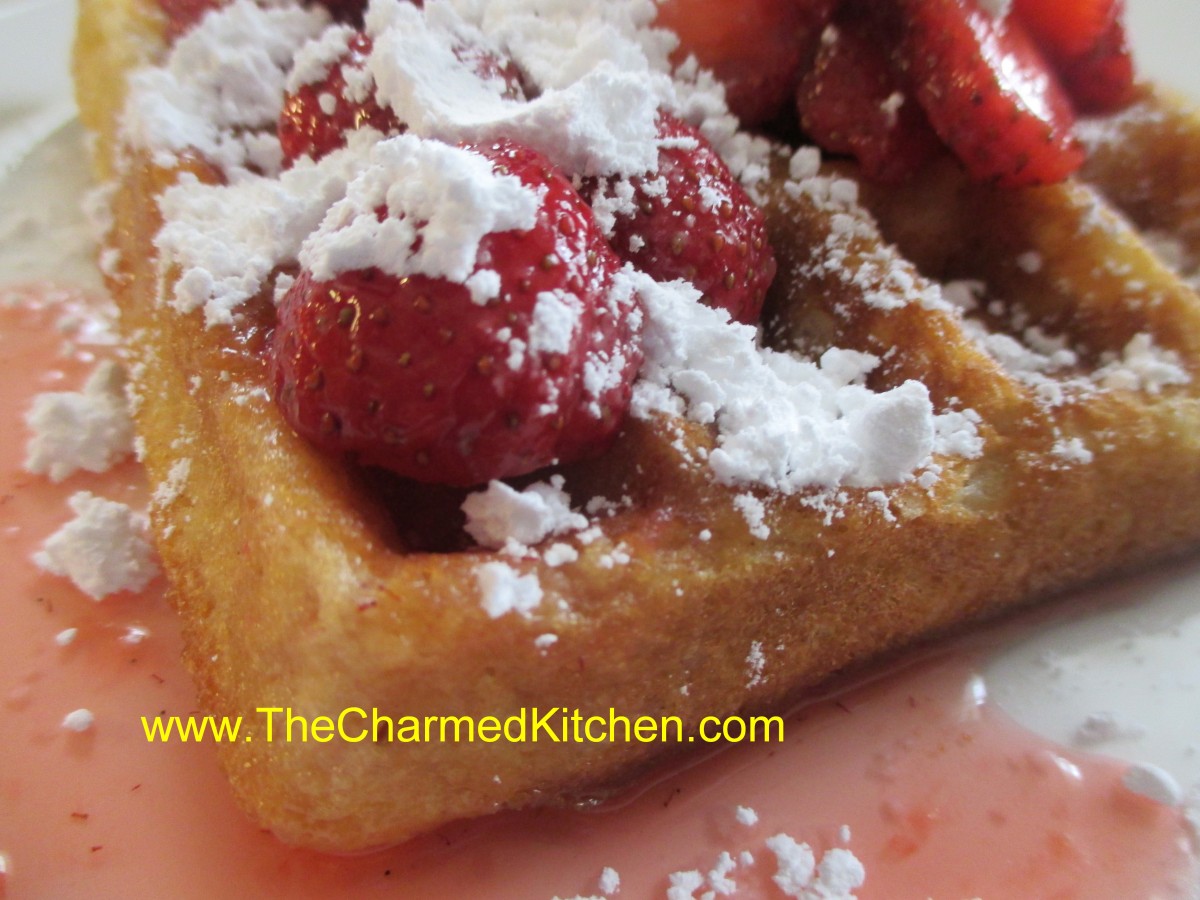
Cinnamon-Vanilla Belgian Waffles
Today we are making waffles in cooking camp. I just know the kids are going to love them. Who doesn’t love waffles?
When I want a special breakfast, I make waffles. No one ever complains when you make waffles for breakfast. Or if you make waffles for lunch or dinner, for that matter.
The response is even better when you make Belgian waffles. At least that has been my experience. My theory is, that because Belgian waffles are bigger, people love them even more.
These waffles are light and rich at the same time.
Belgian waffles can be used as a dessert, too. For dessert, just top them with ice cream, chocolate sauce or whipped cream – or all three.
You can even freeze any extras. Oh, who are we kidding? There aren’t going to be leftovers. But if there were, you could freeze them.
Cinnamon-Vanilla Belgian Waffles
2 c. all-purpose flour
3/4 cup sugar
3-1/2 teaspoons baking powder
2 t. cinnamon
2 eggs, separated
1-1/2 cups half and half- or milk
1 cup butter, melted
2 t. vanilla extract
Sliced fresh strawberries, powdered sugar or syrup
In a bowl, combine dry ingredients. In another bowl, lightly beat egg yolks. Add milk, butter and vanilla; mix well. Stir into dry ingredients just until combined. Beat egg whites until stiff peaks form; fold into batter. Bake in a preheated waffle iron according to manufacturer’s directions until golden brown. Serve with strawberries, powdered sugar or syrup. Yield: 10 waffles (about 4-1/2 inches).
Easter Bunny Breads

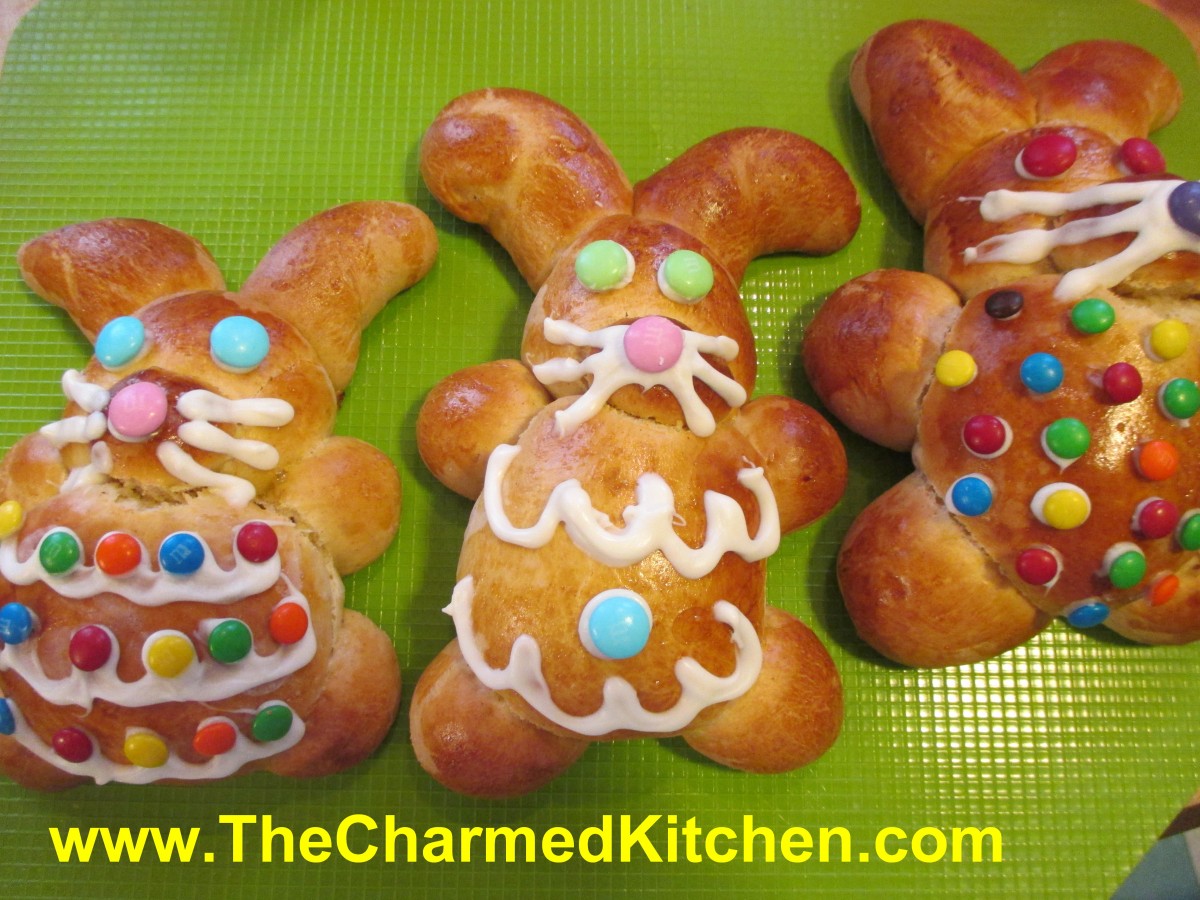
Easter Bunny Breads
These slightly sweet bunny breads are a great addition to your Easter table. They can be used for breakfast or brunch. They could also be served with dinner, minus the candies!! The dough itself has plenty of cinnamon flavor and a slightly dense texture.
They are moist enough to eat just the way they are, or spread with butter. My favorite parts are the feet- which are a little crunchy. The recipe makes 6 bunnies. I chose to decorate mine with melted white chocolate and candies, but they are also pretty when left un-decorated. This would be a fun decorating activity for kids, too.
Cinnamon “Bunny” Breads
6-6½ c. flour
¾ c. sugar
2 pkts. Active dry yeast
1 T. cinnamon
1 t. salt
1 c. milk
½ c. water
¼ c. butter – half a stick
5 eggs – save one for brushing the breads
White chocolate and tiny candies for decorating
In mixing bowl place 2 cups of the flour with the other dry ingredients. Heat milk, water and butter together until very warm. Butter does have to melt completely. Place milk mixture in bowl with flour mixture and beat for 3 minutes. Add another cup of flour and beat another 2 minutes. Beat in 4 eggs and gradually add enough flour to make a soft dough. Place dough on a floured surface. Knead until smooth. Return dough to bowl and cover, allowing to rise until doubled, about an hour. Grease two large baking sheets, or cover in parchment or use a silicone liner. You will put 3 bunnies on each sheet. Place dough on floured surface. Divide into 6 pieces. Each piece will be a bunny. To form a bunny, take about a third of one of the pieces of dough. Shape into a round and place on a greased baking sheet. This is the body. Use about ¼ cup of the dough to form the head. Flatten the head a little on one edge and tuck the flattened part under the body. Pinch off a tiny piece for the nose and place on the head. Divide the rest of the piece of dough into 6 pieces. Use 4 pieces to form the feet. Shape into balls and tuck one edge under the body, like you did with the head. Use the last two pieces for the ears. Roll each into a tube, shape a little to look like ears, and stick one edge under the head. Repeat with the rest of the dough pieces. You’ll end up with 6 bunnies. Cover with plastic wrap, then a towel, and allow to rise in a warm place until doubled, 30-60 minutes. Preheat oven to 350 degrees. Combine remaining egg with a tablespoon of water and beat to combine. Remove the plastic wrap from the bunnies. Brush the bunnies with the egg mixture, covering completely. Bake for 20-25 minutes, or until golden brown and bread sounds hollow when tapped lightly. I switched the baking sheets in the oven after 10 minutes, so the bunnies bake evenly. Cool on rack. Once cool, decorate with melted chocolate, piped on to make whiskers. You can also use the melted chocolate to affix candies. Makes 6 bunnies.
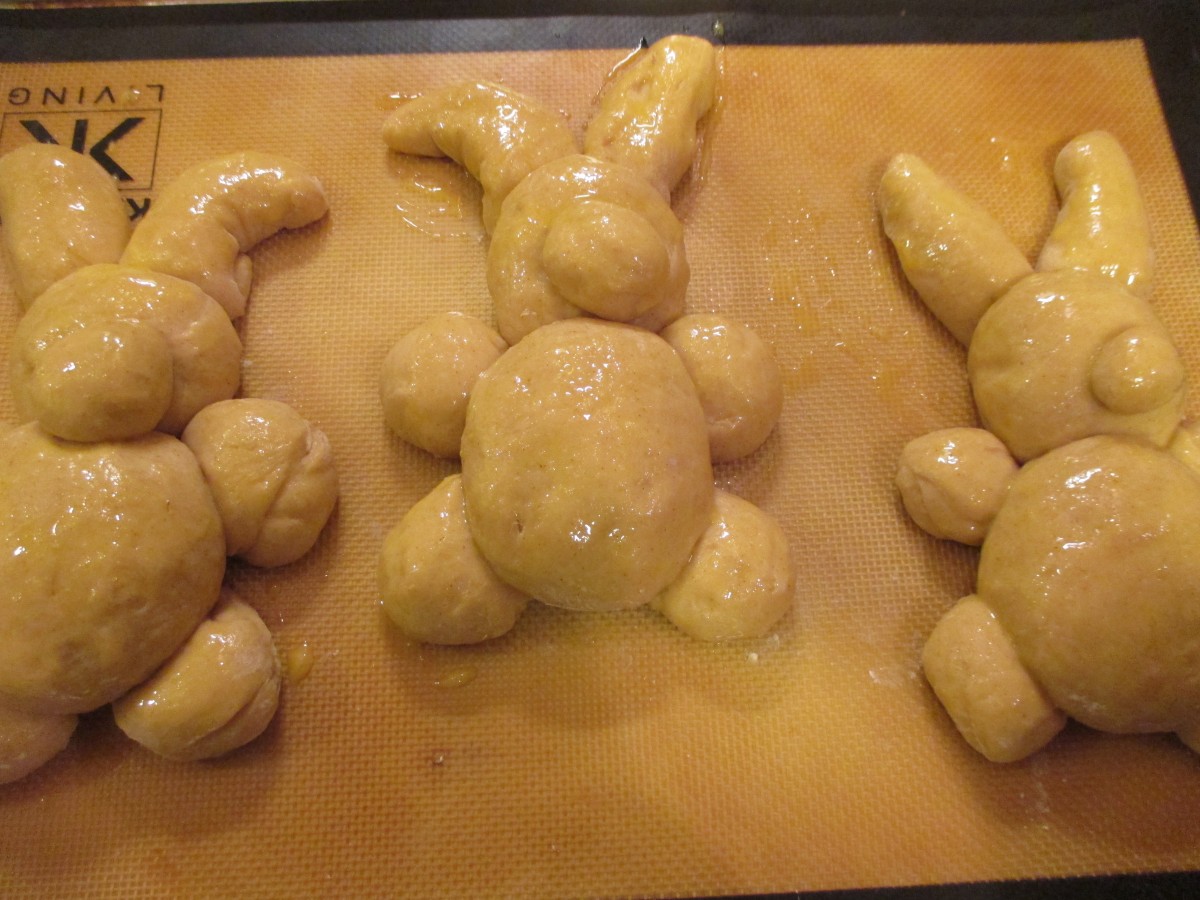
ready to bake

Freshly baked
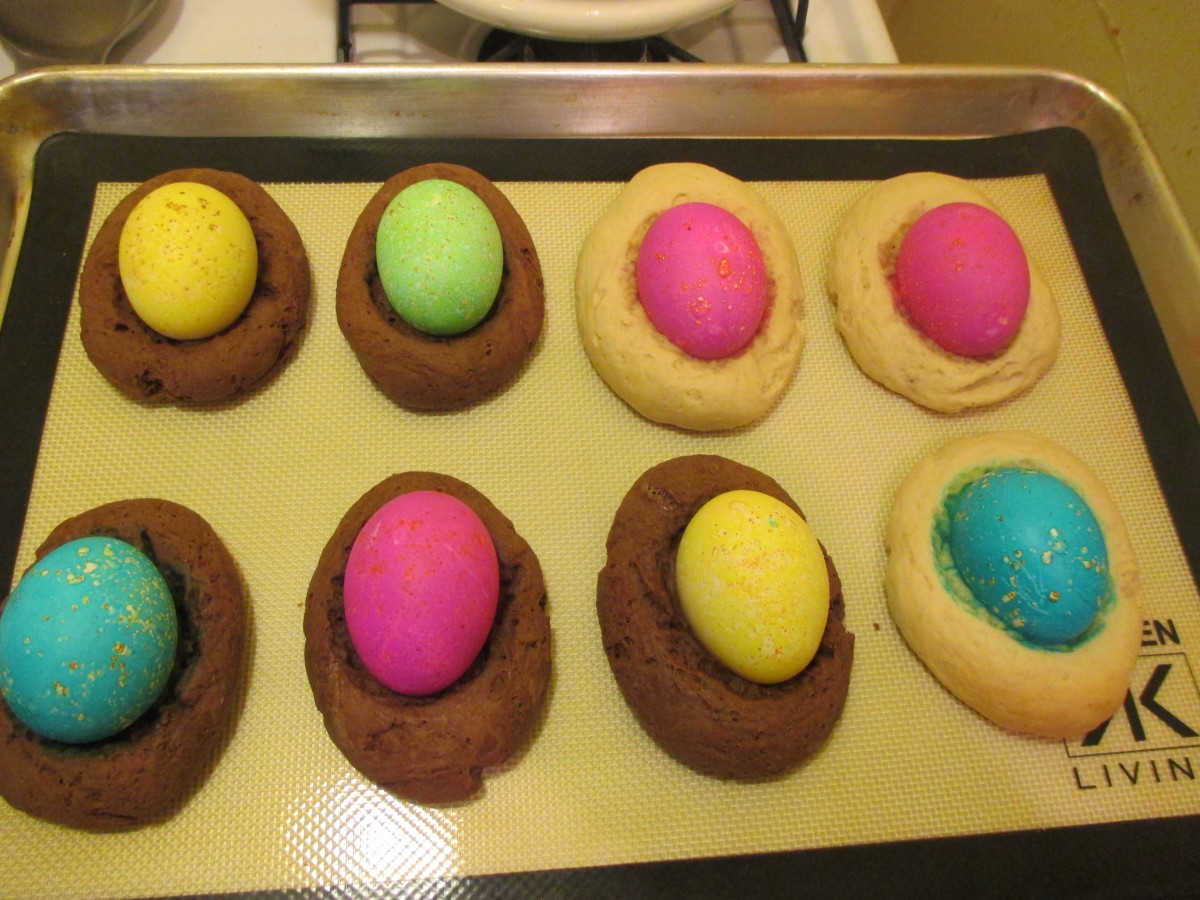
Chocolate Easter Egg Biscotti

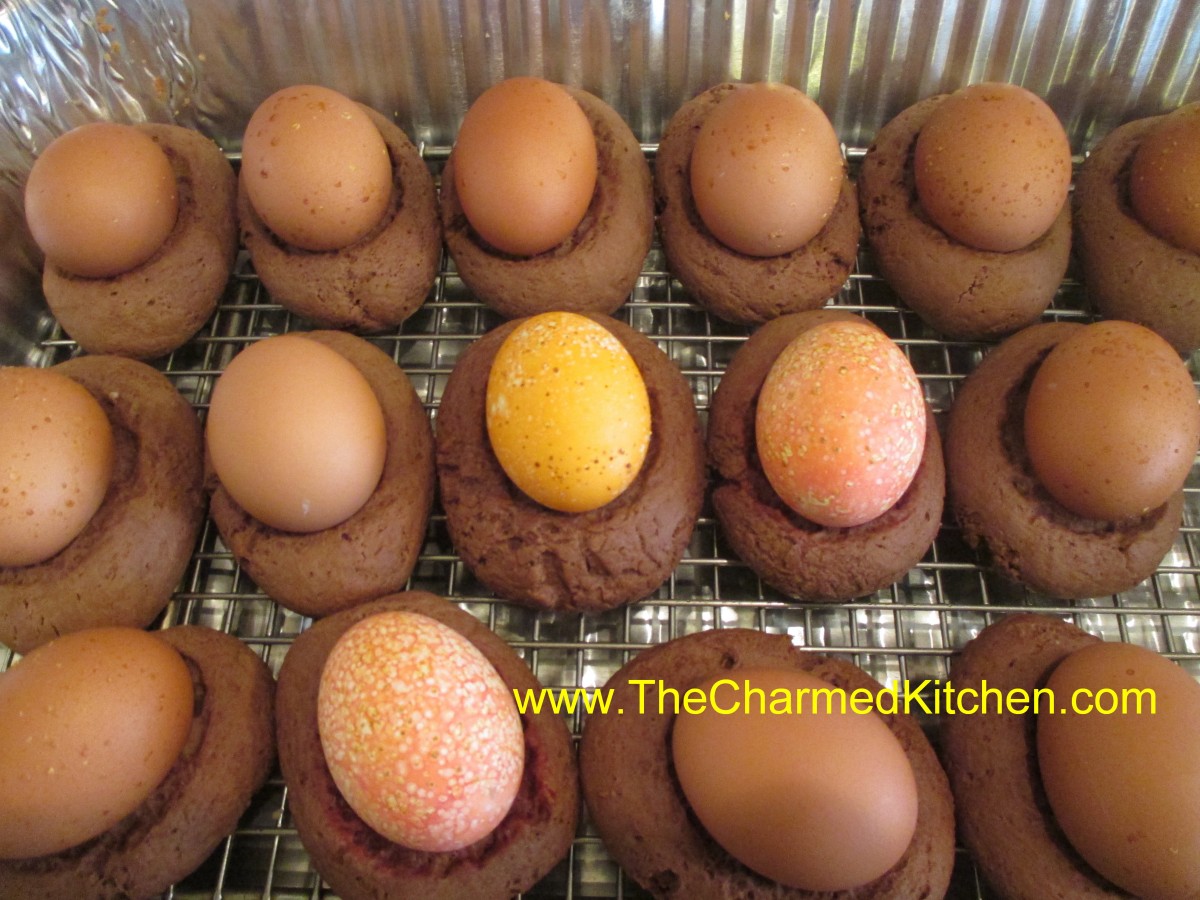
Chocolate Easter Egg Biscotti
After a friend mentioned that she would love my Easter Egg Biscotti even better if they were chocolate, I decided to try to make her some.
The biscotti are really just a big cookie, baked around an egg. Once cooled, I drizzle with a powdered sugar glaze. They are such a fun treat for Easter.
You don’t have to precook the eggs used in the middle. They will cook when the biscotti bake around them. If your eggs are already hard- cooked, that is fine, too.
This is the end result of my experiment. I used the original recipe, and added cocoa powder. Worked out really nice, so I thought I’d share them with you.
The original recipe came from the mother of a childhood friend. Rose made them with shortening. Over time I started making mine with butter, instead. The only change is, I chill the dough 30 minutes, or so, before using.
Chocolate Easter Egg Biscotti
1 c. shortening or butter – I use butter
1 ½ c. sugar
4 eggs
5 t. baking powder
1 t. salt
2 t. vanilla
1 c. milk
6 c. flour
¾ c. cocoa powder
24-30 eggs, plain or dyed
Powdered sugar glaze- recipe follows
Preheat oven to 350 degrees. Cream together shortening and sugar. Beat in eggs. Add next 4 ingredients and blend until smooth. Mix flour with cocoa. Stir in flour mixture 2 cups at a time. Dough should be pliable. If dough is too sticky add a little more flour. If using butter in the recipe, chill dough at this point. Take a piece of dough about the size of a large egg and roll until smooth. Place on a greased baking sheet. Indent middle slightly and then place an egg in the center, pressing down slightly. It should look like a nest. Continue with remaining dough allowing about 2-3 inches in between, as they will spread some. You can fit 6-8 on a large baking sheet. Bake 20 –25 minutes or until browned on the bottom. Cool on wire rack before drizzling with frosting. Makes 24-30. Store in the fridge.
Sugar glaze
2 c. powdered sugar
2-3 T. milk or orange juice
1 t. vanilla
Food coloring, if desired
Mix together until smooth and of drizzling consistency.
Chocolate and original biscotti waiting to be baked
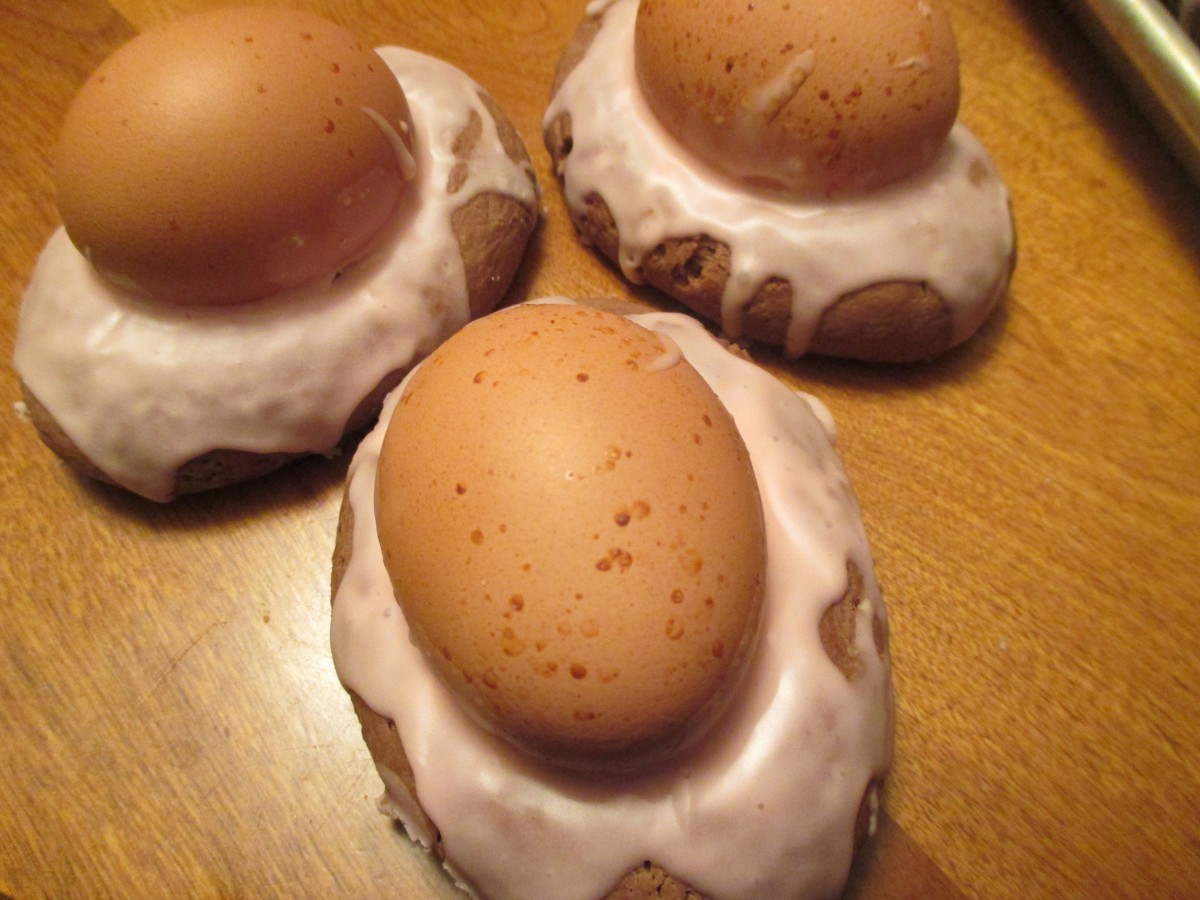
Glazed and ready to enjoy
Easter Egg Biscotti

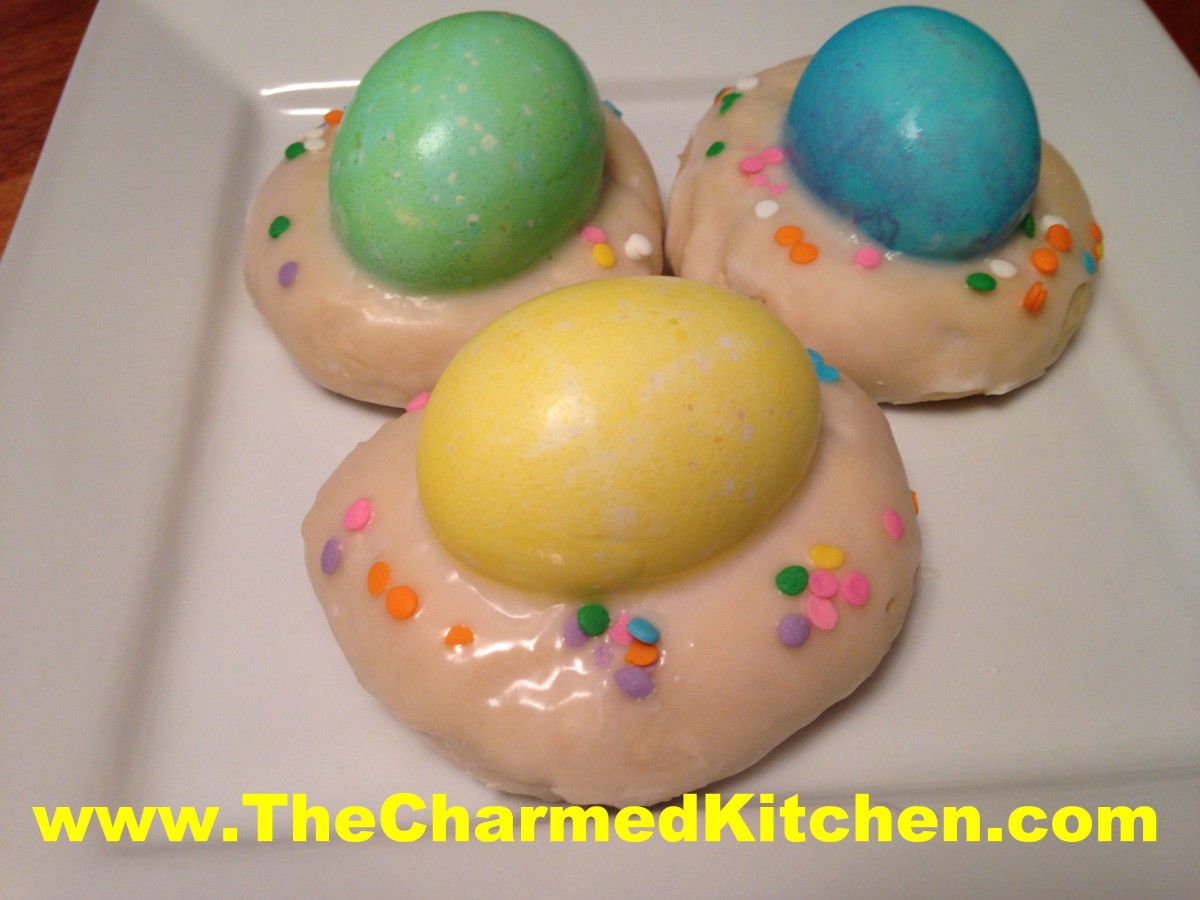
Easter Egg Biscotti
I get so many requests for this recipe, I decided to post it again. This is a treat from my childhood. Rose Dieglio was the mother of my best friend, Debbi. Rose made these every year, and I loved them. Years later, she was kind enough to share her recipe with me. I always make a bunch to hand out to friends and family. It is a tradition I enjoy very much.
The dough is a type of cookie. You roll the dough out in pieces about the size of eggs. Make an indent in the dough and press in a tinted egg. The egg does not have to be cooked- it will cook when the biscotti bakes.
The dough is a little sticky. Just add a little flour to your fingers when shaping the dough, if needed.
The original recipe calls for shortening. I make them with butter, instead. If you use butter in the dough- chill it before baking.
Once baked, the biscotti can be topped with a powdered sugar glaze and sprinkles, if you like.
Easter Egg Biscotti
1 c. shortening or butter- I use butter*
1 ½ c. sugar
4 eggs
5 t. baking powder
1 t. salt
2 t. vanilla
1 c. milk
6 c. flour
24-30 eggs, plain or dyed
Powdered sugar glaze
Preheat oven to 350 degrees. Cream together butter or shortening and sugar. Beat in eggs. Add next 4 ingredients and blend until smooth. Stir in flour 2 cups at a time. Dough should be pliable. If dough is too sticky add a little more flour. Take a piece of dough about the size of a large egg and place on a greased baking sheet. Indent middle slightly and then place an egg in the center, pressing down slightly. It should look like a nest. Continue with remaining dough allowing about 2-3 inches in between as they spread when baking. You can fit 6-8 on a large baking sheet. Bake 20 –25 minutes or until browned on the bottom. Cool on wire rack before drizzling with frosting. Makes 24-30. Store in fridge.
* If using butter- chill dough a couple of hours before baking.
Sugar glaze
2 c. powdered sugar
2-3 T. milk or orange juice
1 t. vanilla
Food coloring, if desired
Mix together until smooth and of drizzling consistency.

Cooling down
Lemon Squares


Lemon Squares
For me, Lemon Squares are a blast from the past. They were a treat I remember making with my mother when I was a kid. A crisp, tender crust, topped with a lemon custard. Just the right balance of sweet and tart.
I decided to make them for a dinner with my cousin and her husband. They loved them.
I forgot just how much I loved them, too. I also forgot how easy they are to make. These are a great dessert any time of the year, but I think especially nice for Spring. They also would make a wonderful dessert for Easter.
Lemon squares are baked in two steps. The crust is pressed into the pan and baked. Then the crust is topped with the egg/lemon mixture and returned to the oven for the second bake. So simple- and so good.
I did make a couple of changes from the original recipe. I was very happy with how they came out.
Here is the recipe. Enjoy!!
Lemon Squares
1 c. flour
½ c. butter
¼ c. powdered sugar
3 eggs
1 c. sugar
2 T. lemon juice
2 t. lemon zest
½ t. baking powder
¼ t. salt
Mix together flour, butter and powdered sugar and press into the bottom of an 8×8-inch pan. Bake in a 350-degree oven for 20 minutes. Beat together remaining ingredients and pour over baked crust. Return to oven for 20-25 minutes or until golden and puffed. Cool. Cut. Makes 16 squares.
Cranberry Orange Scones

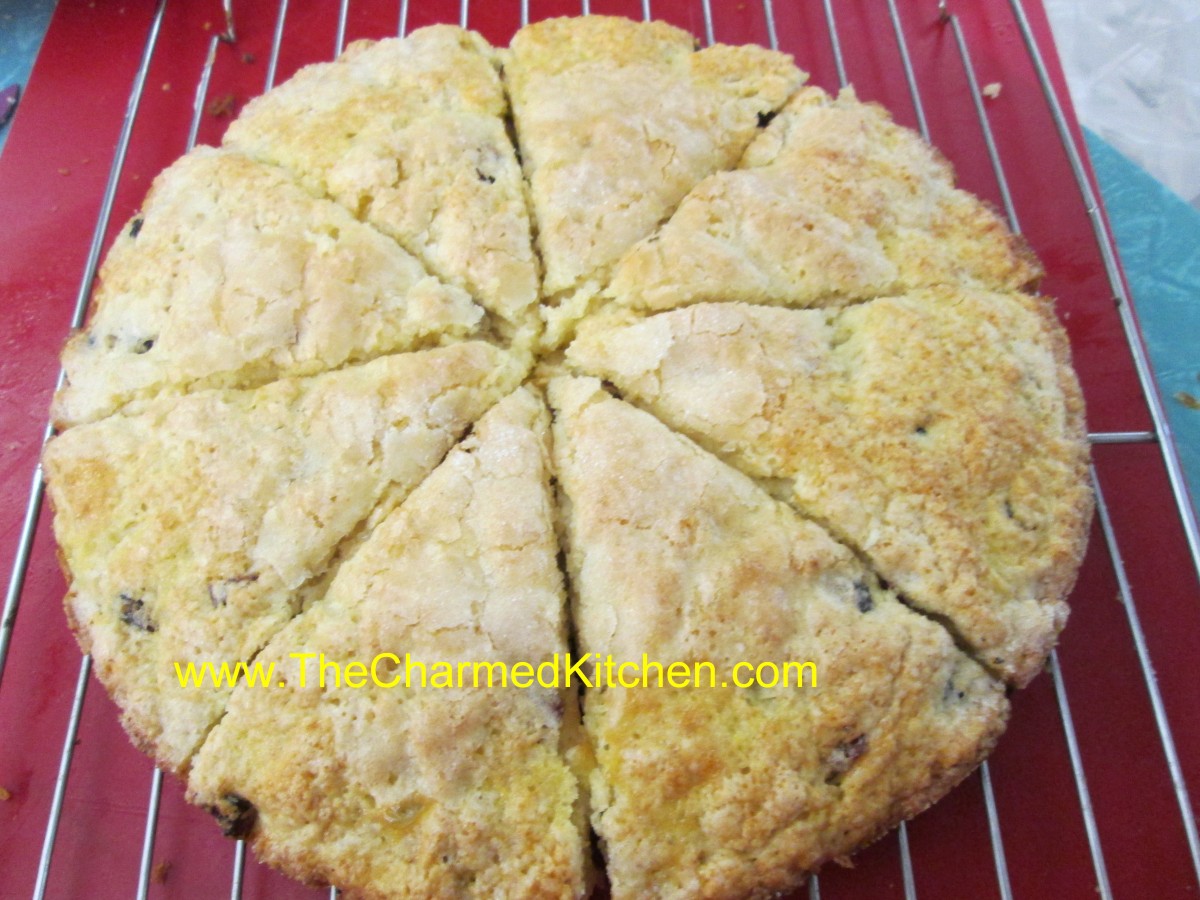
Cranberry Orange Scones
I make scones pretty often. There is nothing quite like the taste of fresh baked scones. Plus, baking them makes the house smell wonderful.
I taught a British cooking class recently , and we made scones in class. Someone asked me what scones are. I told her I think of scones as biscuits for company. Maybe biscuits with extra stuff in them is also a good definition.
The procedure for making both scones and biscuits is the same. You just put more fun ingredients in scones. Although scones can be plain, they often contain fruits, nuts and spices.
These scones are shaped by pressing the dough in a round cake pan, then cut into wedges before baking.
They come out looking great and tasting great, too. If you don’t have buttermilk just add a little lemon juice to regular milk. I actually used half and half instead of milk, and added 1 tablespoon of lemon juice to the half and half. It worked great.
Perfect breakfast for this weekend. Serve warm with butter and jam.
Cranberry-Orange Scones
2 c. flour
4 T. sugar
2 t. baking powder
1 t. baking soda
1 t. grated orange peel
½ t. salt
¼ c. butter
1 c. dried cranberries
2/3 c. buttermilk
1 egg
Extra milk and sugar, for topping
Preheat oven to 425 degrees and lightly grease a baking sheet. Combine dry ingredients in medium bowl and cut in butter to resemble coarse crumbs. Stir in cranberries. Beat together milk and egg and add to flour mixture, stirring with fork until just coming together. Turn onto floured surface and knead 5-6 strokes or until ball of dough holds together. Transfer dough to prepared sheet and with floured hands, press dough into an eight-inch circle. I place dough in floured 8-inch cake pan, then invert onto the baking sheet- for a nice, even circle. With a sharp, floured knife cut dough into 8 wedges. Brush top of dough with a little extra milk, then sprinkle tops with a bit of sugar. Bake 14-16 minutes. Makes 8.
Dough can also be patted out on work surface and cut into circles or pressed into a square and cut into smaller squares.


