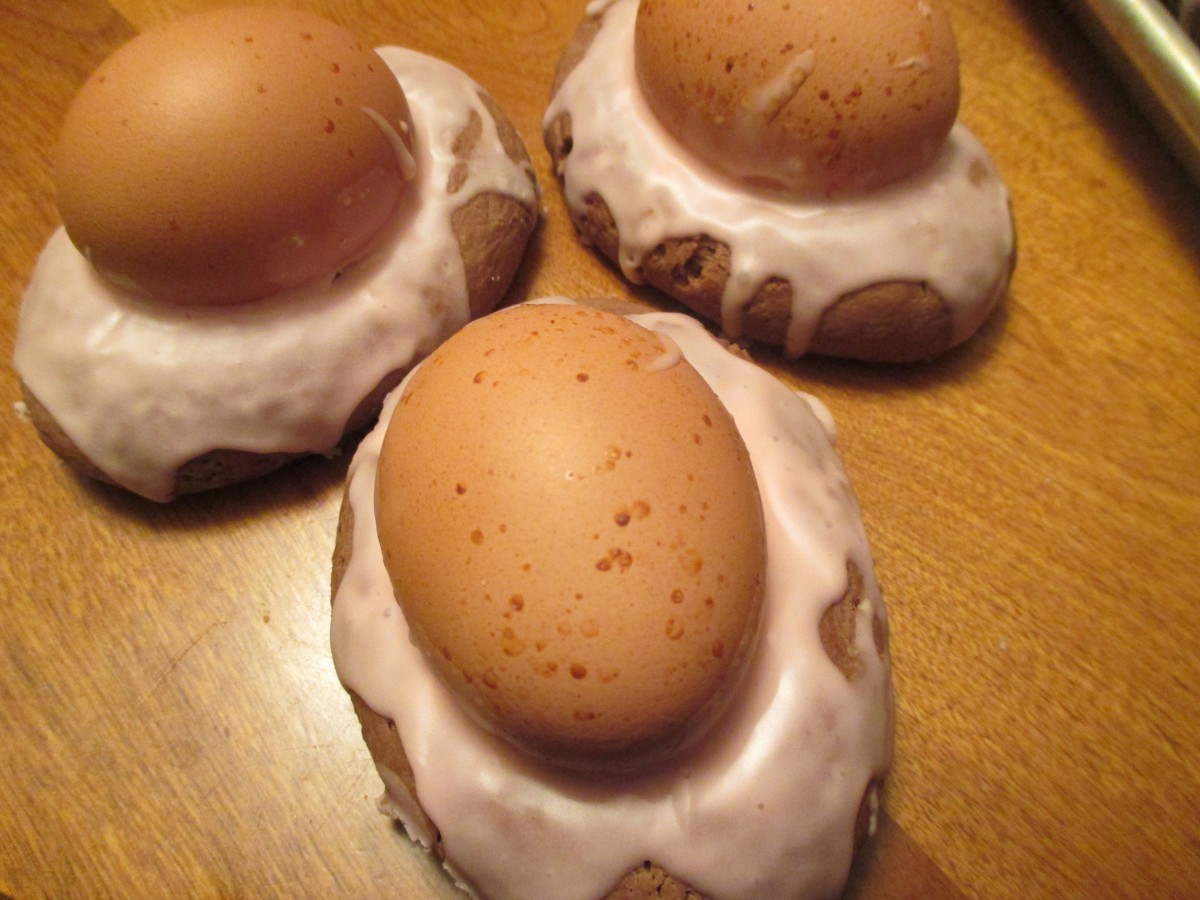
Easter Egg Biscotti
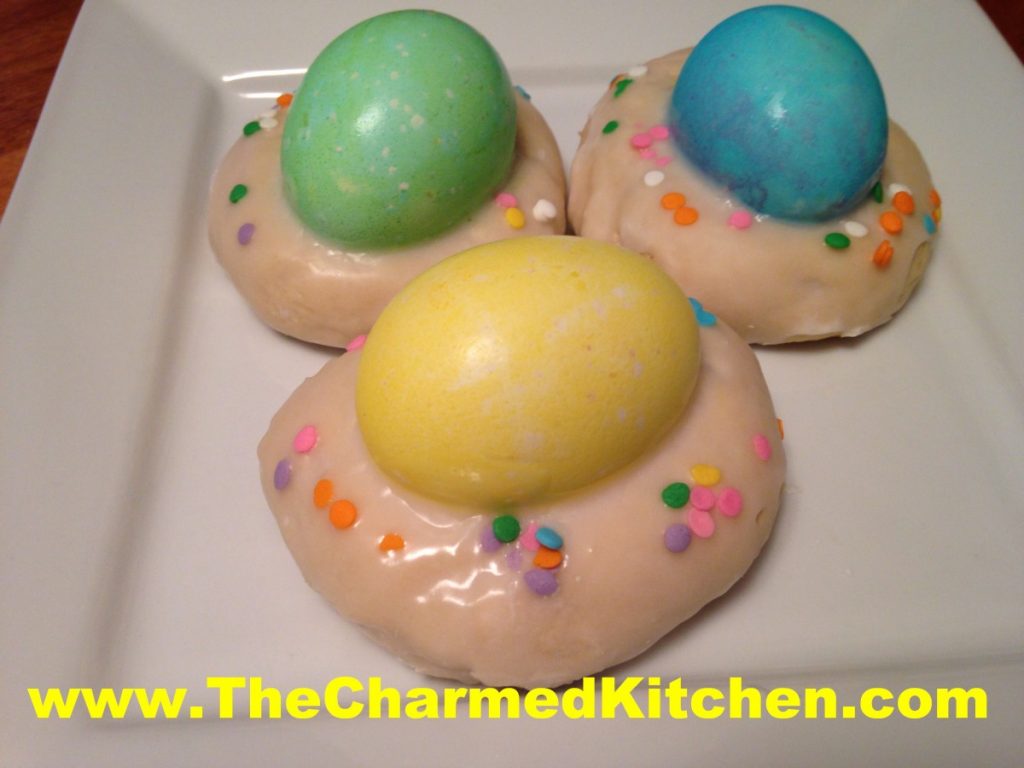
I get so many requests for this recipe, I decided to post it again. This is a treat from my childhood. Rose Dieglio was the mother of my best friend, Debbi. Rose made these every year, and I loved them. Years later, she was kind enough to share her recipe with me. I always make a bunch to hand out to friends and family. It is a tradition I enjoy very much.
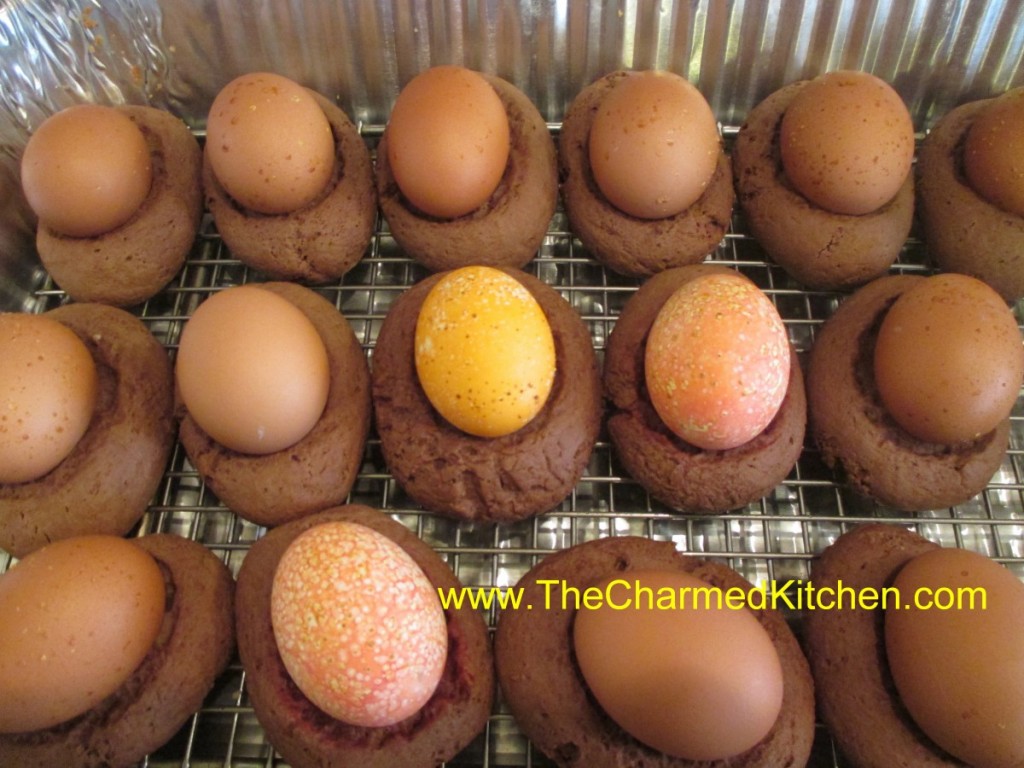
The dough is a type of cookie. You roll the dough out in pieces about the size of eggs. Make an indent in the dough and press in a tinted egg. The egg does not have to be cooked- it will cook when the biscotti bakes.
The dough will be a little sticky. Just add some flour to your fingers when shaping the dough, if needed.
The original recipe calls for shortening. I make them with butter, instead. If you use butter in the dough- chill it before baking.
For years I made the biscotti with hard cooked eggs, that I dyed. My mom always asked if I needed to cook the eggs. She wondered if the eggs would cook during the baking process. So I tried it a few years ago. I placed a raw, un-decorated egg on one of the biscotti “nests” and baked it with the rest. What do you know? The egg cooked in the oven when the biscotti baked. The lesson here- always listen to Mom. Saves a whole step in making this recipe. Just be gentle when you press the eggs into the dough. They are raw eggs, after all.
Once baked, the biscotti can be topped with a powdered sugar glaze and sprinkles, if you like. Because they have hard cooked eggs in them, store in fridge after cooking.
Easter Egg Biscotti
1 c. shortening or butter- I use butter*
1 ½ c. sugar
4 eggs
5 t. baking powder
1 t. salt
2 t. vanilla
1 c. milk
6 c. flour
24-30 eggs, plain or dyed
Powdered sugar glaze
Preheat oven to 350 degrees. Cream together butter or shortening and sugar. Beat in eggs. Add next 4 ingredients and blend until smooth. Stir in flour 2 cups at a time. Dough should be pliable. If dough is too sticky add a little more flour. Take a piece of dough about the size of a large egg and place on a greased baking sheet. Indent middle slightly and then place an egg in the center, pressing down slightly. It should look like a nest. Continue with remaining dough allowing about 2-3 inches in between as they spread when baking. You can fit 6-8 on a large baking sheet. Bake 20 –25 minutes or until browned on the bottom. Cool on wire rack before drizzling with frosting. Makes 24-30. Store in fridge.
* If using butter- chill dough a couple of hours before baking.
Sugar glaze
2 c. powdered sugar
2-3 T. milk or orange juice
1 t. vanilla
Food coloring, if desired
Mix together until smooth and of drizzling consistency.

Cooling down
Easter Cupcakes
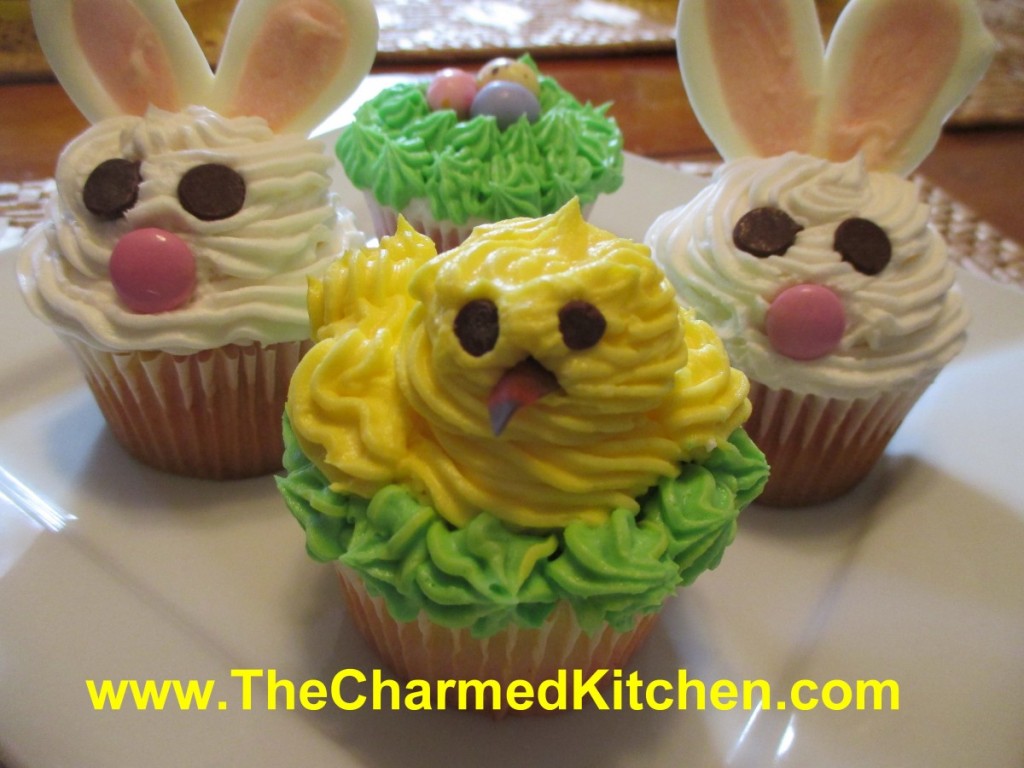
These cupcakes would make a great dessert for Easter- or any time. They are also a fun dessert for kids to make.
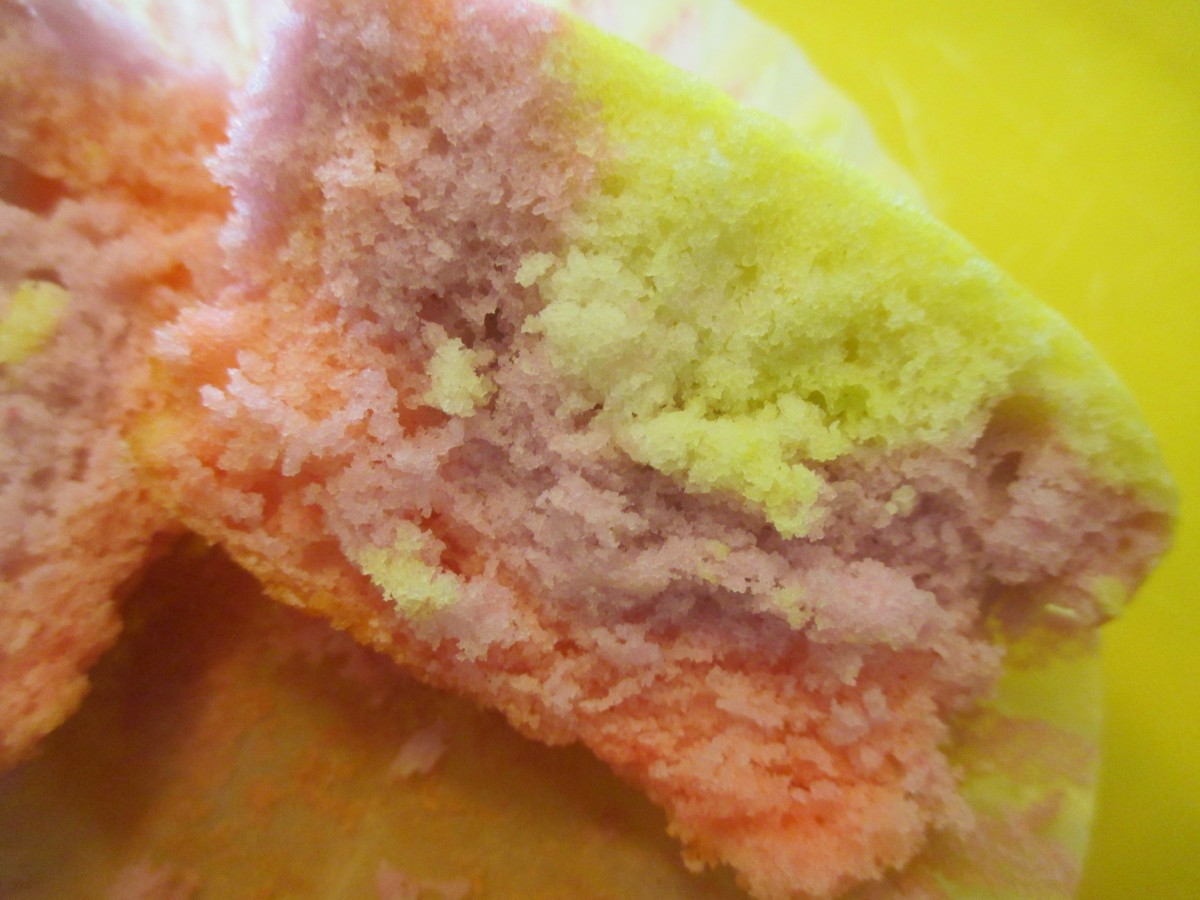
I started out by making a double batch of my classic white cupcakes- recipe follows. To add a little color to the cupcakes, I divided the batter into three bowls and tinted each of them a different pastel color.
As I filled the pans, I just added a spoonful of each of the tinted batters in them. They came out really nice.
I made three different cupcakes: bunnies, chicks and nests.
I also made a double batch of white chocolate frosting. You could certainly make a vanilla buttercream, if you prefer.
Details on how to make each of them are listed below.
Classic White (Vanilla) Cupcakes
1 cup sugar
1/2 cup butter
2 eggs
2 teaspoons vanilla extract
1 1/2 cups all-purpose flour
1 3/4 teaspoons baking powder
1/2 cup milk
Preheat oven to 350 degrees. Line a muffin pan with 12 paper liners. In a medium bowl, cream together the sugar and butter. Beat in the eggs, one at a time, then stir in the vanilla. Combine flour and baking powder, add to the creamed mixture and mix well. Finally stir in the milk until batter is smooth. Pour or spoon batter into the prepared pan. Bake 20 to 25 minutes. Cupcakes are done when they springs back to the touch. Makes 12.
White Chocolate Frosting
6 oz. white chocolate – if using bars, chop before melting
1 stick (4 oz.) cold butter, cut into cubes
1-2 c. powdered sugar
1 t. vanilla
Melt chocolate. I just melt mine in a microwave safe dish, but you can use a double boiler. Let chocolate cool down a little. Beat butter into the melted chocolate. Beat until smooth and then beat in the powdered sugar and vanilla. Whip until frosting is smooth and fluffy. I normally beat for 5 minutes or longer. If too thick, add a few drops of water or milk. For this recipe, I made a double batch of frosting.
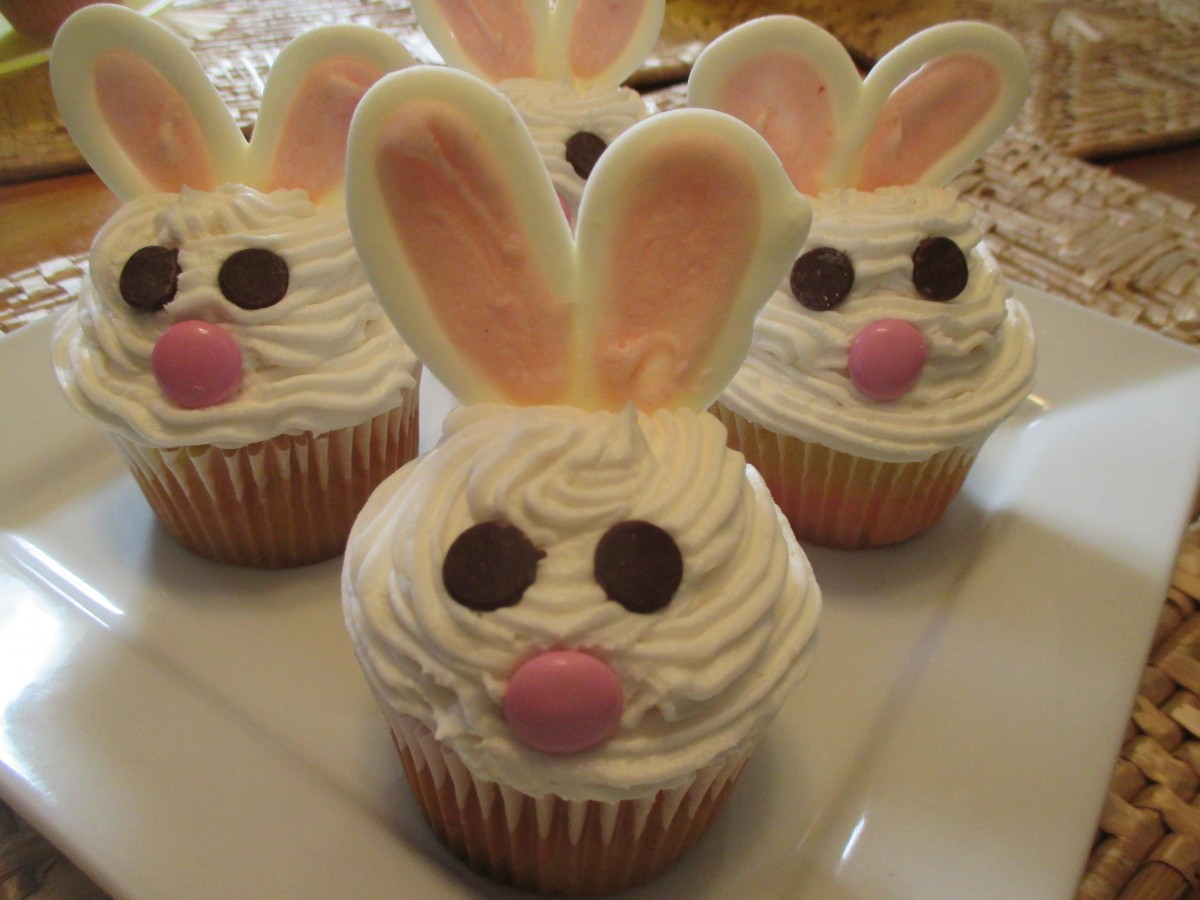
Bunnies
extra white chocolate
food coloring- pink or red
chocolate chips
pastel ( pink) M&M’s
Make bunny ears by melting some white chocolate and putting it in a piping bag or bottle. On wax paper, make outline of the ears in white chocolate and allow to cool/harden. Place a drop or two of pink or red food coloring in a microwave safe bowl and add some white chocolate. Melt in microwave, being careful not to burn the chocolate and stir until it turns pink. Pipe the pink chocolate into the middle of the ears. Allow to harden before peeling off of the was paper. Using a star tip, pipe frosting on cupcake. I made three layers – to add height to the cupcake. place ears on cupcake and add chips/candy for eyes and mouth.
Chicks
Frosting tinted yellow and green
mini chocolate chips
fruit roll up
Using star tip, pipe the chick’s body onto the cupcake in yellow frosting. Pipe on head and wings. Pipe green frosting around chick to form a nest. Use mini chips for eyes and cut fruit roll up for beak.
Nests
Frosting tinted green
egg shapes malted milk balls- or you could use jelly beans
Pipe green frosting on cupcakes to make nests. Add three, or more, candies in the middle for eggs.

Piping pink filling in ears
rainbow cupcake
bunnies
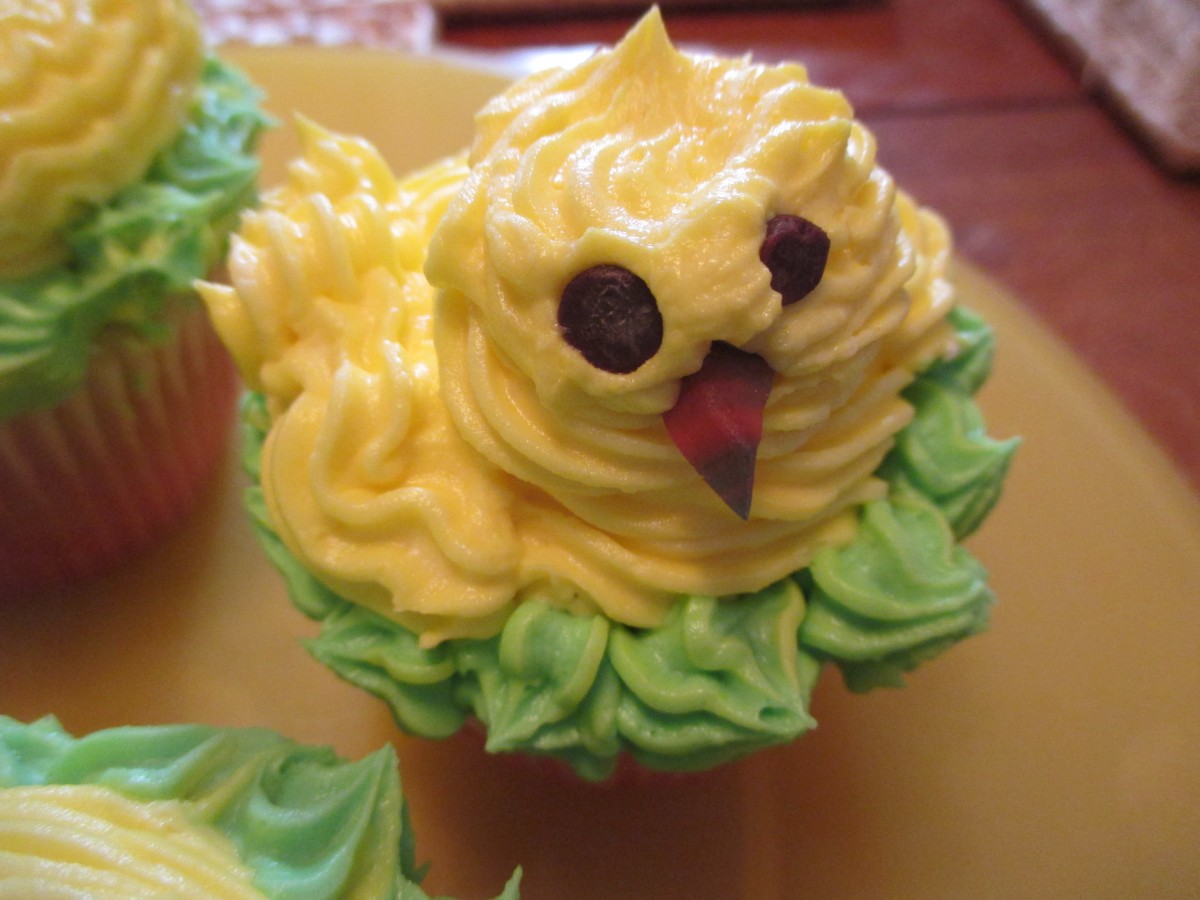
Chick cupcake
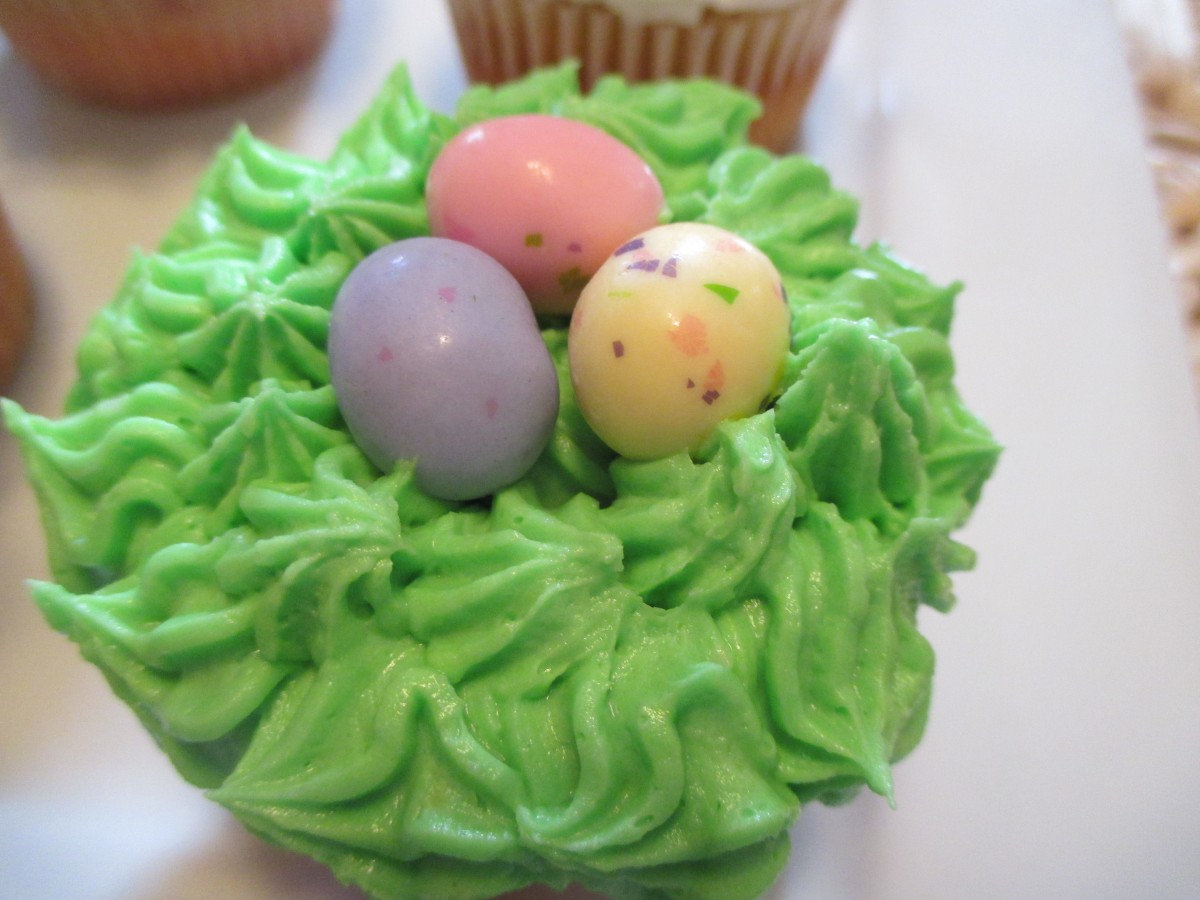
The nest cupcake
Chocolate Easter Egg Biscotti
After a friend mentioned that she would love my Easter Egg Biscotti even better if they were chocolate, I decided to try to make her some.
These biscotti are really just a big cookie, baked around an egg. Once cooled, I drizzle with a powdered sugar glaze. They are such a fun treat for Easter.
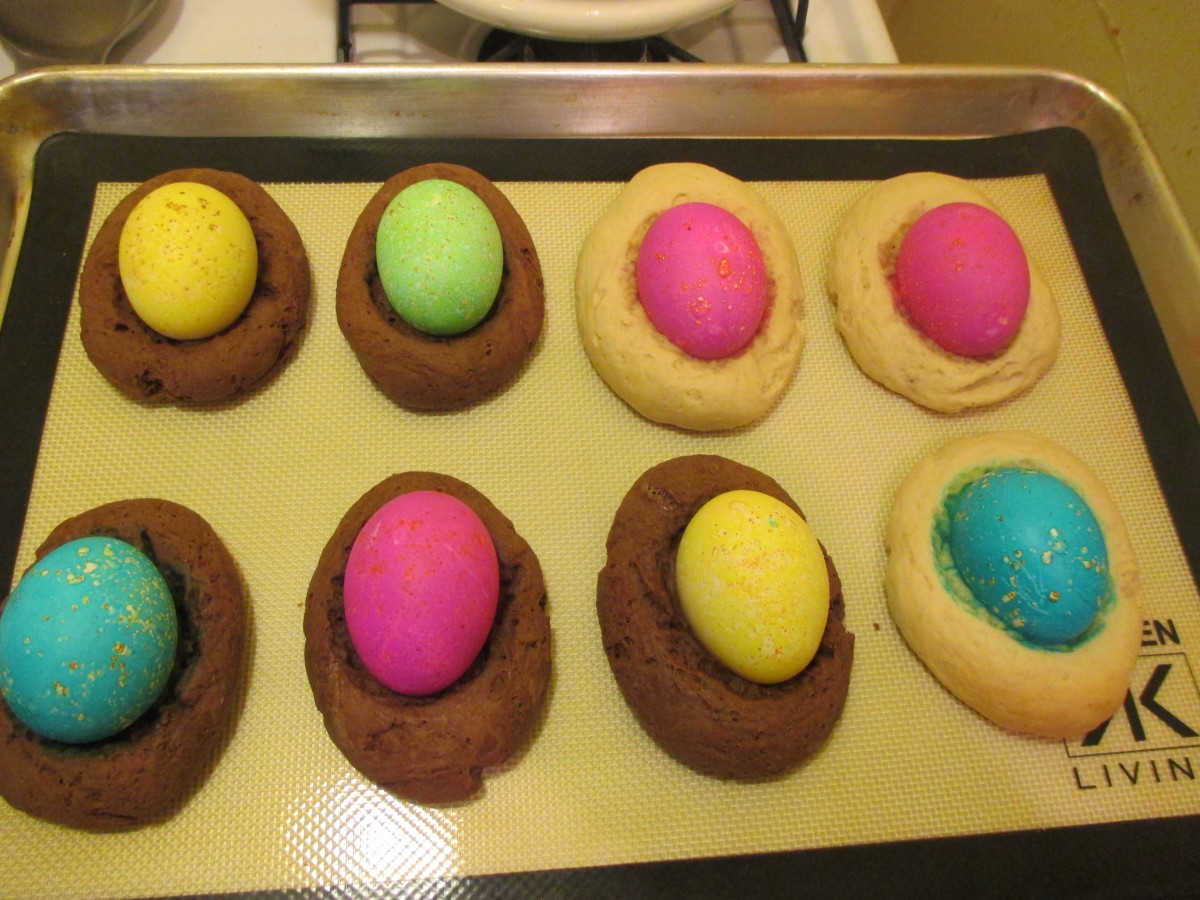
You don’t have to precook the eggs used in the middle. They will cook when the biscotti bake around them. If your eggs are already hard- cooked, that is fine, too. You can used dyed eggs or brown eggs.
This is the end result of my experiment. I used the original recipe, and added cocoa powder. Worked out really nice, so I thought I’d share them with you.
The original recipe came from the mother of a childhood friend. Rose made them with shortening. Over time I started making mine with butter, instead. The only change is, I chill the dough 30 minutes, or so, before using.
Chocolate Easter Egg Biscotti
1 c. shortening or butter – I use butter
1 ½ c. sugar
4 eggs
5 t. baking powder
1 t. salt
2 t. vanilla
1 c. milk
6 c. flour
¾ c. cocoa powder
24-30 eggs, plain or dyed
Powdered sugar glaze- recipe follows
Preheat oven to 350 degrees. Cream together shortening and sugar. Beat in eggs. Add next 4 ingredients and blend until smooth. Mix flour with cocoa. Stir in flour mixture 2 cups at a time. Dough should be pliable. If dough is too sticky add a little more flour. If using butter in the recipe, chill dough at this point. Take a piece of dough about the size of a large egg and roll until smooth. Place on a greased baking sheet. Indent middle slightly and then place an egg in the center, pressing down slightly. It should look like a nest. Continue with remaining dough allowing about 2-3 inches in between, as they will spread some. You can fit 6-8 on a large baking sheet. Bake 20 –25 minutes or until browned on the bottom. Cool on wire rack before drizzling with frosting. Makes 24-30. Store in the fridge.
Sugar glaze
2 c. powdered sugar
2-3 T. milk or orange juice
1 t. vanilla
Food coloring, if desired
Mix together until smooth and of drizzling consistency.
Easter Cupcakes
These cupcakes would make a great dessert for Easter- or any time. They are also a fun dessert for kids to make.
I started out by making a double batch of my classic white cupcakes- recipe follows. To add a little color to the cupcakes, I divided the batter into three bowls and tinted each of them a different pastel color.
As I filled the pans, I just added a spoonful of each of the tinted batters in them. They came out really nice.
I made three different cupcakes: bunnies, chicks and nests.
I also made a double batch of white chocolate frosting. You could certainly make a vanilla buttercream, if you prefer.
Details on how to make each of them are listed below.
Classic White (Vanilla) Cupcakes
1 cup sugar
1/2 cup butter
2 eggs
2 teaspoons vanilla extract
1 1/2 cups all-purpose flour
1 3/4 teaspoons baking powder
1/2 cup milk
Preheat oven to 350 degrees. Line a muffin pan with 12 paper liners. In a medium bowl, cream together the sugar and butter. Beat in the eggs, one at a time, then stir in the vanilla. Combine flour and baking powder, add to the creamed mixture and mix well. Finally stir in the milk until batter is smooth. Pour or spoon batter into the prepared pan. Bake 20 to 25 minutes. Cupcakes are done when they springs back to the touch. Makes 12.
White Chocolate Frosting
6 oz. white chocolate – if using bars, chop before melting
1 stick (4 oz.) cold butter, cut into cubes
1-2 c. powdered sugar
1 t. vanilla
Melt chocolate. I just melt mine in a microwave safe dish, but you can use a double boiler. Let chocolate cool down a little. Beat butter into the melted chocolate. Beat until smooth and then beat in the powdered sugar and vanilla. Whip until frosting is smooth and fluffy. I normally beat for 5 minutes or longer. If too thick, add a few drops of water or milk. For this recipe, I made a double batch of frosting.
Bunnies
extra white chocolate
food coloring- pink or red
chocolate chips
pastel ( pink) M&M’s
Make bunny ears by melting some white chocolate and putting it in a piping bag or bottle. On wax paper, make outline of the ears in white chocolate and allow to cool/harden. Place a drop or two of pink or red food coloring in a microwave safe bowl and add some white chocolate. Melt in microwave, being careful not to burn the chocolate and stir until it turns pink. Pipe the pink chocolate into the middle of the ears. Allow to harden before peeling off of the was paper. Using a star tip, pipe frosting on cupcake. I made three layers – to add height to the cupcake. place ears on cupcake and add chips/candy for eyes and mouth.
Chicks
Frosting tinted yellow and green
mini chocolate chips
fruit roll up
Using star tip, pipe the chick’s body onto the cupcake in yellow frosting. Pipe on head and wings. Pipe green frosting around chick to form a nest. Use mini chips for eyes and cut fruit roll up for beak.
Nests
Frosting tinted green
egg shapes malted milk balls- or you could use jelly beans
Pipe green frosting on cupcakes to make nests. Add three, or more, candies in the middle for eggs.
Piping pink filling in ears
rainbow cupcake
bunnies
Chick cupcake
The nest cupcake
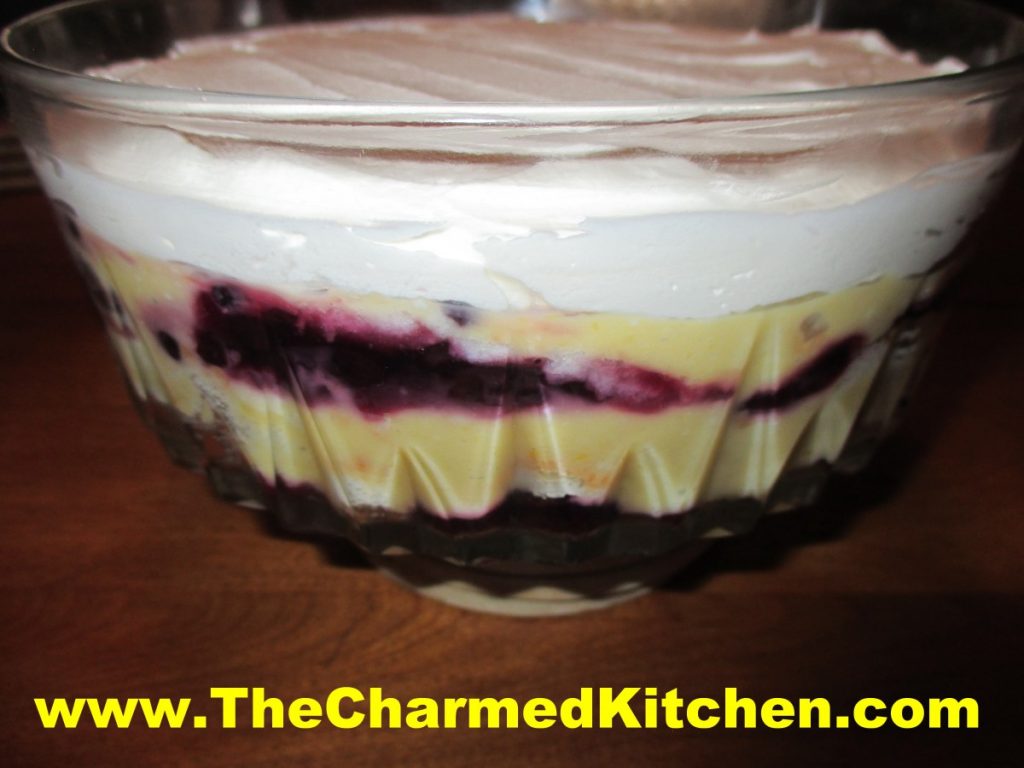
Blueberry Lemon Trifle
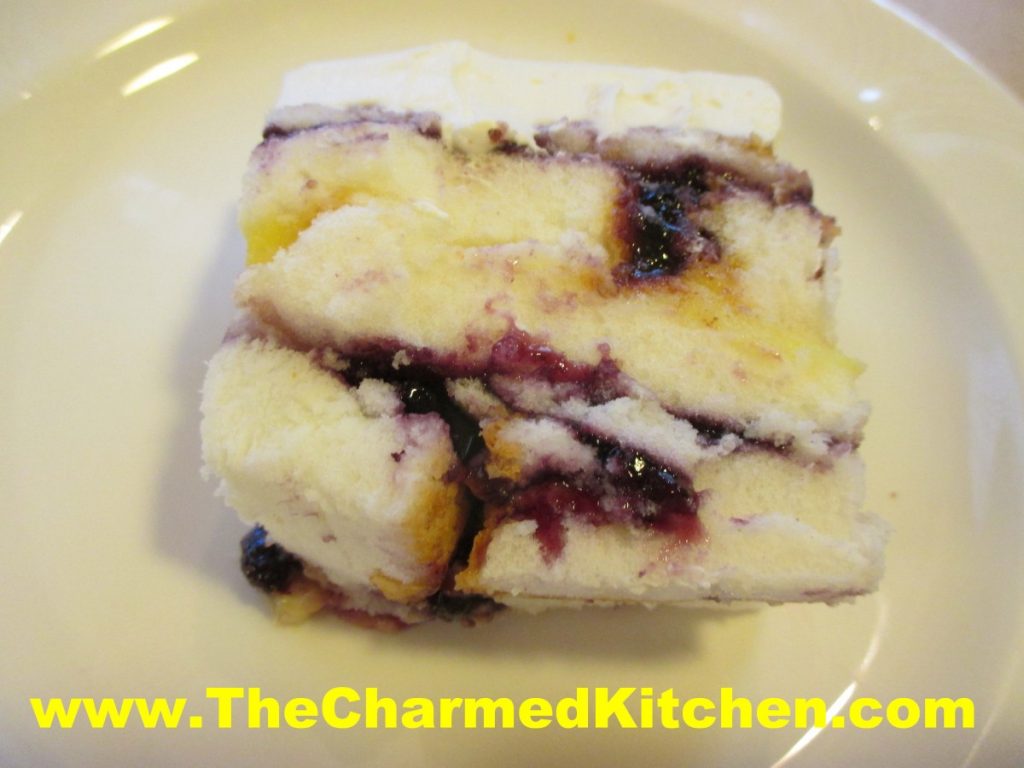
Trifle is one of those desserts that can be whatever you want it to be. The basics of a traditional trifle are sponge cake, layered with some sort of pudding or custard and fruit. The cake is sometimes soaked in sherry or some other alcohol. Trifles are often topped with whipped cream.
This trifle combines angel food cake with blueberry pie filling and lemon curd. I love the combination of flavors.
Once you have all the ingredients, the trifle is simple to assemble. Pick a nice, glass bowl, so you can see the layers in the trifle. It is best to put your trifle together a bit in advance, so the cake can soak up some of the moisture from the berries and the lemon curd. It also helps the trifle to stay together. You can actually slice the trifle to serve it.
So here is the recipe. I made the pie filling and the lemon curd, but you can use store bought, to save time.
Blueberry Lemon Trifle
1 angel food cake, sliced thin
2 c. blueberry pie filling- homemade or store bought- recipe follows
2 c. lemon curd- recipe follows
1 c. whipping cream
1/4 c. powdered sugar
Place a layer of cake slices in the bottom of the bowl. Spread half of the blueberry mixture on top of the cake. Place another layer of cake slices on top of the blueberry layer and press down a little to even it out. Cut cake pieces to fit as best you can. Add half of the lemon curd and top with more cake. Repeat the process one more time. Don’t worry if something isn’t perfect in the layers- that is kind of the charm of a trifle. Just be sure to get all the ingredients in the bowl. Cover and chill the trifle. When ready to serve beat the whipping cream and powdered sugar together until stiff peaks form and spread over the trifle. You can do this part ahead of time, if you prefer, Just keep trifle, covered, in the fridge, until ready to serve. Serves 6-8.
Blueberry Pie Filling
3 1/2 c. blueberries
3/4 c. sugar, or to taste
1/4 c. Clear Gel* or cornstarch
1 c. water
1 T. lemon juice
In saucepan, bring blueberries and sugar to a boil, stirring often. Combine clear gel with water and lemon juice and add to the blueberry mixture. Return to the boil and cook until thickened and bubbly. Makes 4 cups. You won’t need the whole batch for the trifle.
*Clear gel is a modified cornstarch. It is used in commercial pie fillings and in homemade pie fillings, as well. Unlike regular cornstarch, Clear Gel retains it’s thickness, even if you reheat it. You can find it online or in some specialty food stores.
Lemon Curd
1/2 c. lemon juice
zest from one good sized lemon- you should have 2-3 teaspoons
1/2 c. sugar
3 eggs
6 T. unsalted butter- cut into little cubes
In medium saucepan combine all ingredients. Whisk the mixture until the eggs are well blended. Cook over medium low heat, whisking often, until the mixture thickens. This will take 5-7 minutes. Whisk more often as mixtures warms and starts to thicken. Better to heat over lower heat and take longer than over too high a heat. You don’t want the eggs to scramble. Once the mixture is thickened , transfer to a bowl or jar. Cover the surface with a piece of plastic wrap to keep the surface from developing a skin- like any pudding will do. Chill until ready to use. Makes about 2 cups. Will keep in fridge a week or two.
Spring Lemon Tart

This would make a lovely dessert for any Spring dinner. It would be a nice dessert for Easter, too. Since the first day of Spring is tomorrow, I thought it was a perfect time to share this recipe.
I was leaning towards making a cheesecake. Then I discovered I only had one box of cream cheese. Not enough for a cheesecake. While searching my fridge for cream cheese, I found a couple of lemons. I suppose I could have made a lemon pie, but I decided to just make something up with what I had, including the cream cheese. This lemon tart was the result.
Before I get to the actual recipe, let me talk about the lemons, and including fresh lemon juice in recipe directions. Recipes will often list the “juice of a lemon” in the ingredients. There is about the same amount of lemon juice in all lemons, so that a little difference, one way or the other, is no big deal. The amount is anywhere from 2-3 tablespoons of juice in a lemon. You might get 4 tablespoons, if the lemon is really big. I have used that phrase in recipes myself.
Sometimes, however, you have to recognize when you have lemons that aren’t “average”.
The two lemons I had on hand were big, really big. When I juiced them, I ended up with 2/3 of a cup of lemon juice. So, in this recipe I used the actual measurement of the juice, rather than saying, “the juice of 2 lemons.” Three or four average sized lemons should give you 2/3 cup of juice.
So here is the recipe for my lemon tart, the happy end result of using what I had, and making it work.
Spring Lemon Tart
Crust:
1½ c. crushed vanilla cookies
4 T. melted butter
Filling:
1 (8oz.) container cream cheese, softened
½ c. sugar
2/3 c. lemon juice
Zest of two lemons
3 eggs
¼ c. cornstarch
Combine crust ingredients in medium bowl. Press crumb mixture into a 9–inch springform or tart pan. Bake in a preheated 350-degree oven for 10 minutes. While the crust is baking, make the filling. In mixing bowl combine the cream cheese with the sugar and beat until fluffy. Add the lemon juice and zest and beat well. Add the eggs and cornstarch and beat until smooth. Pour filling over the baked crust and return to oven. Bake for 35 minutes, or until golden on top. Center will be soft, but firms as the tart cools. Cool, then refrigerate until ready to serve. You can dust with powdered sugar, if you like. Serves 6.
Easter Egg Biscotti
I get so many requests for this recipe, I decided to post it again. This is a treat from my childhood. Rose Dieglio was the mother of my best friend, Debbi. Rose made these every year, and I loved them. Years later, she was kind enough to share her recipe with me. I always make a bunch to hand out to friends and family. It is a tradition I enjoy very much.
The dough is a type of cookie. You roll the dough out in pieces about the size of eggs. Make an indent in the dough and press in a tinted egg. The egg does not have to be cooked- it will cook when the biscotti bakes.
The dough will be a little sticky. Just add some flour to your fingers when shaping the dough, if needed.
The original recipe calls for shortening. I make them with butter, instead. If you use butter in the dough- chill it before baking.
For years I made the biscotti with hard cooked eggs, that I dyed. My mom always asked if I needed to cook the eggs. She wondered if the eggs would cook during the baking process. So I tried it a few years ago. I placed a raw, un-decorated egg on one of the biscotti “nests” and baked it with the rest. What do you know? The egg cooked in the oven when the biscotti baked. The lesson here- always listen to Mom. Saves a whole step in making this recipe. Just be gentle when you press the eggs into the dough. They are raw eggs, after all.
Once baked, the biscotti can be topped with a powdered sugar glaze and sprinkles, if you like. Because they have hard cooked eggs in them, store in fridge after cooking.
Easter Egg Biscotti
1 c. shortening or butter- I use butter*
1 ½ c. sugar
4 eggs
5 t. baking powder
1 t. salt
2 t. vanilla
1 c. milk
6 c. flour
24-30 eggs, plain or dyed
Powdered sugar glaze
Preheat oven to 350 degrees. Cream together butter or shortening and sugar. Beat in eggs. Add next 4 ingredients and blend until smooth. Stir in flour 2 cups at a time. Dough should be pliable. If dough is too sticky add a little more flour. Take a piece of dough about the size of a large egg and place on a greased baking sheet. Indent middle slightly and then place an egg in the center, pressing down slightly. It should look like a nest. Continue with remaining dough allowing about 2-3 inches in between as they spread when baking. You can fit 6-8 on a large baking sheet. Bake 20 –25 minutes or until browned on the bottom. Cool on wire rack before drizzling with frosting. Makes 24-30. Store in fridge.
* If using butter- chill dough a couple of hours before baking.
Sugar glaze
2 c. powdered sugar
2-3 T. milk or orange juice
1 t. vanilla
Food coloring, if desired
Mix together until smooth and of drizzling consistency.
Cooling down
Spring Lemon Tart
This would make a lovely dessert for any Spring dinner. It would be a nice dessert for Easter, too.
I was leaning towards making a cheesecake. I already had cookie crumbs, I could use for the crust. Then, I discovered I only had one box of cream cheese. Not enough for a cheesecake. While searching my fridge for cream cheese, I found a couple of lemons. I suppose I could have made a lemon pie, but I decided to just make something up with what I had, including the cream cheese.
What I ended up with is a sweet/tart lemon dessert. Really nice, actually.
Before I get to the actual recipe, let me talk about the lemons, and including fresh lemon juice in recipe directions.
Recipes will often list the “juice of a lemon” in the ingredients. There is about the same amount of lemon juice in all lemons, so that a little difference, one way or the other, is no big deal. The amount is anywhere from 2-3 tablespoons of juice in a lemon. You might get 4 tablespoons, if the lemon is really big. I have used that phrase in recipes myself.
Sometimes, however, you have to recognize when you have lemons that aren’t “average”.
The two lemons I had on hand were big, really big. When I juiced them, I ended up with 2/3 of a cup of lemon juice. So, in this recipe I used the actual measurement of the juice, rather than saying, “the juice of 2 lemons.” Three or four average sized lemons should give you 2/3 cup of juice.
So here is the recipe for my lemon tart, the happy end result of using what I had, and making it work.
Spring Lemon Tart
Crust:
1½ c. crushed vanilla cookies
4 T. melted butter
Filling:
1 (8oz.) container cream cheese, softened
½ c. sugar
2/3 c. lemon juice
Zest of two lemons
3 eggs
¼ c. cornstarch
Combine crust ingredients in medium bowl. Press crumb mixture into a 9–inch springform or tart pan. Bake in a preheated 350-degree oven for 10 minutes. While the crust is baking, make the filling. In mixing bowl combine the cream cheese with the sugar and beat until fluffy. Add the lemon juice and zest and beat well. Add the eggs and cornstarch and beat until smooth. Pour filling over the baked crust and return to oven. Bake for 35 minutes, or until golden on top. Center will be soft, but firms as the tart cools. Cool, then refrigerate until ready to serve. You can dust with powdered sugar, if you like. Serves 6.
Spring Lemon Tart
I wasn’t sure what to call this dessert. It started out as one thing, but sort of ended up somewhere else. I finally decided to just call it a tart. This is a perfect example of using what you have on hand. I was so pleased with the result.
I was leaning towards making a cheesecake. I already had cookie crumbs, I could use for the crust. Then, I discovered I only had one box of cream cheese. Not enough for a cheesecake.
While searching my fridge for cream cheese, I found a couple of lemons.
I suppose I could have made a lemon pie, but I decided to just make something up with what I had, including the cream cheese.
What I ended up with is a sweet/tart lemon dessert. Really nice, actually.
Before I get to the actual recipe, let me talk about the lemons, and including fresh lemon juice in recipe directions.
Recipes will often list the “juice of a lemon” in the ingredients. There is about the same amount of lemon juice in all lemons, so that a little difference, one way or the other, is no big deal. The amount is anywhere from 2-3 tablespoons of juice in a lemon. You might get 4 tablespoons, if the lemon is really big. I have used that phrase in recipes myself.
Sometimes, however, you have to recognize when you have lemons that aren’t “average”.
The two lemons I had on hand were big, really big. When I juiced them, I ended up with 2/3 of a cup of lemon juice. So, in this recipe I used the actual measurement of the juice, rather than saying, “the juice of 2 lemons.” Three or four average sized lemons should give you 2/3 cup of juice.
So here is the recipe for my lemon tart, the happy end result of using what I had, and making it work.
Spring Lemon Tart
Crust:
1½ c. crushed vanilla cookies
4 T. melted butter
Filling:
1 (8oz.) container cream cheese, softened
½ c. sugar
2/3 c. lemon juice
Zest of two lemons
3 eggs
¼ c. cornstarch
Combine crust ingredients in medium bowl. Press crumb mixture into a 9 –inch springform or tart pan. Bake in a preheated 350-degree oven for 10 minutes. While the crust is baking, make the filling. In mixing bowl combine the cream cheese with the sugar and beat until fluffy. Add the lemon juice and zest and beat well. Add the eggs and cornstarch and beat until smooth. Pour filling over the baked crust and return to oven. Bake for 35 minutes, or until golden on top. Center will be soft, but firms as the tart cools. Cool, then refrigerate until ready to serve. You can dust with powdered sugar, if you like.


