Frozen Chocolate Malted Cheesecake
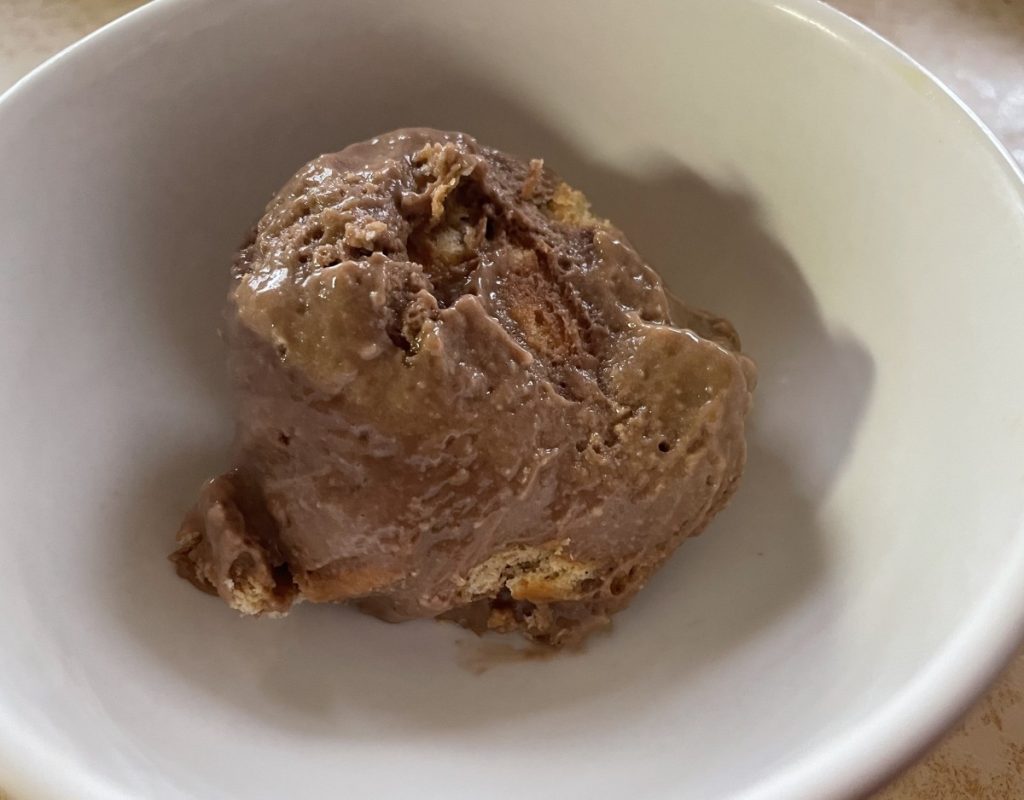
Here is yet another variation on that frozen dessert recipe I have been playing around with. This is the recipe with cottage cheese as the base and any number of add-ins for different versions. I have already made a cherry- strawberry “cheesecake” and a lemon curd one, too.
This chocolate one came out very nice. I might experiment with adding other flavors later or maybe freezing it in Popsicle molds.
Another idea is to pour the mixture in a graham cracker pie crust, rather than crumbling the crackers in the dessert. I could see that working nicely. Maybe even put graham cracker crust in muffin tins…..
They are so simple to make and require just a food processor to blend the ingredients together. No ice cream machine is needed. I called them cheesecakes because that is what they reminded me of.
You can “fatten” them up a little by adding 1/2 cup of whipping cream, but they are nice and creamy without. I also used sugar to sweeten so far, but you could use any sweetener you prefer. So here is the recipe for my latest version of what might be my favorite frozen dessert this summer.
Frozen Chocolate Malted Cheesecake
1 (28 oz.) carton of cottage cheese
¾ c. chocolate syrup
¾ c. malted milk powder
Sugar to taste, I used about ½ cup
1 T. vanilla extract
5-9 graham crackers, crumbled depending on your preference
Combine first 5 ingredients in a food processor or blender until very smooth. Taste to see if you want to add more sugar. Pour into a 2 quart bowl and stir in the crushed crackers. Place mixture in a freezer safe container that has a lid. Affix the lid and freeze. Makes 5-6 cups.
Note: I could see a lot of possible variations for this recipe. I used cinnamon graham crackers, but it might be fun to use chocolate graham crackers or crushed up chocolate sandwich cookies. You could add some instant coffee powder or mint extract. Perhaps some chopped chocolate. Have some fun with this recipe.
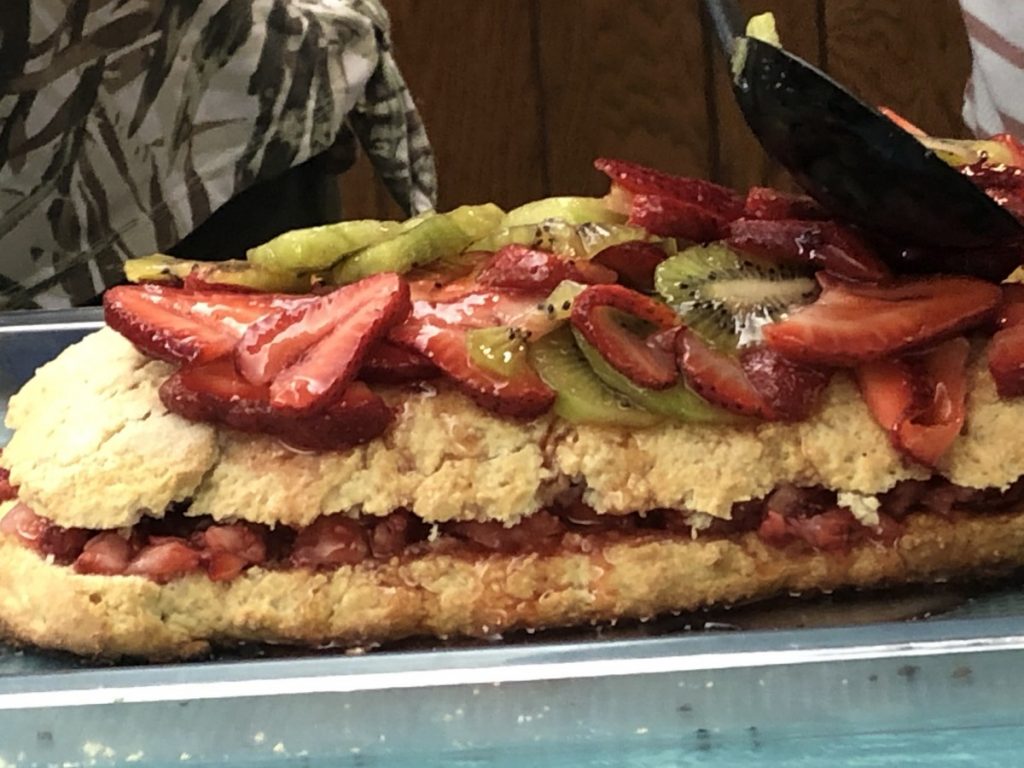
Giant Strawberry Shortcake
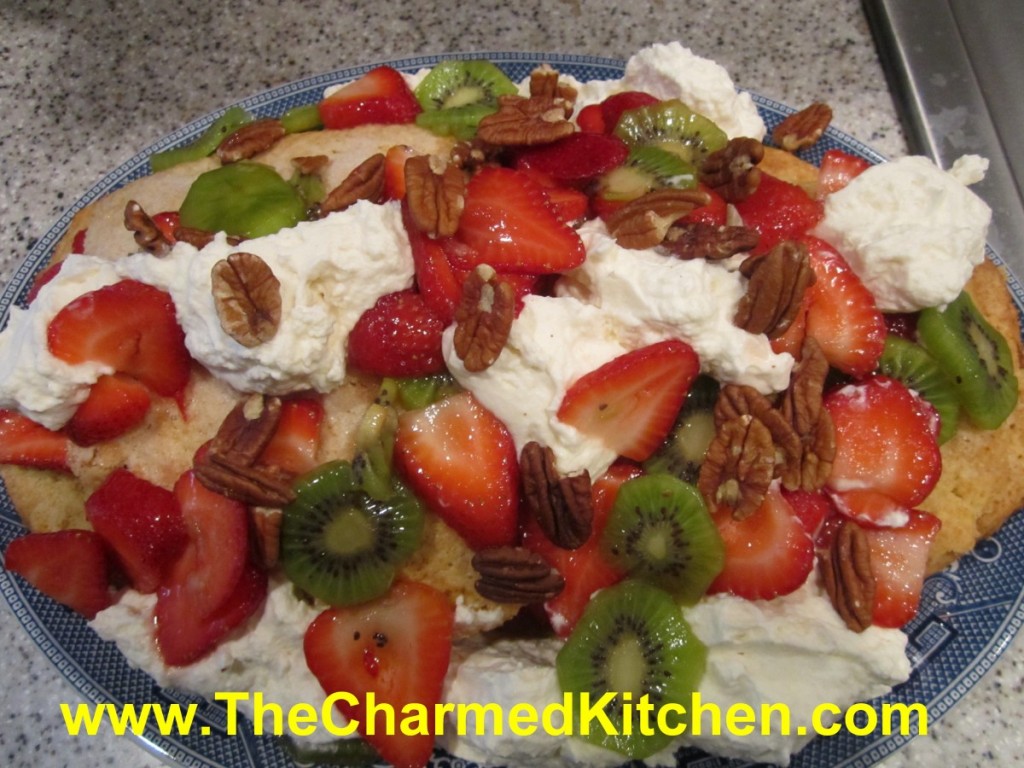
This is a great dessert for a party, picnic or barbecue. Instead of making a bunch of individual shortcakes, make one really big one. It makes quite an impression.
When ready to serve it, just cut into slices, like cake or pie. I often serve this shortcake with ice cream on the side. Feel free to switch up which fruits you use. I used kiwi fruit with the strawberries, but you can add different fruits. Peaches would go well with the strawberries or blueberries. Just have fun and use fruit combinations you like. We made it with strawberries and blueberries in class yesterday.
For the 4th of July, you could use a combination of strawberries, raspberries and blueberries.
Giant Strawberry Shortcake
1 egg
3/4 c. milk
1/2 t. lemon juice
2 c. flour
1/4 c. brown sugar
1 T. baking powder
1/2 stick cold butter plus 1 T. softened
1/2 c. plus 1 T. sugar
1 qt. strawberries, sliced thin
2 kiwi fruit, peeled and sliced thin or use other fruit like blueberries or blackberries
1/4 c. nuts, toasted, I left the nuts whole
whipped cream, optional
In small bowl combine egg, milk and lemon juice and set aside. In larger bowl combine the flour, brown sugar and baking powder. Cut in cold butter to resemble coarse crumbs. Add egg mixture and stir until mixture forms into a soft dough. Knead dough gently on a lightly floured surface about 10 times. On greased baking sheet pat dough into a 15×6-inch oval. Sprinkle dough with the 1 tablespoon of sugar and dot with the softened butter. Bake in a preheated 400 degree oven for 20-25 minutes, or until lightly golden. Place on wire rack to cool. Toss the berries with the remaining 1/2 cup of sugar. Allow to stand 30 minutes. Split the shortcake lengthwise and remove the top. Spoon over the half the berries and replace top of shortcake. Combine the kiwi with the remaining berries.Spoon over the remaining fruit and sprinkle with the nuts. Dot with whipped cream, if desired. Cut in wedges to serve. Serves 8.
Note: you can bake shortcake day ahead and prep the fruit day ahead, keeping it chilled and just assemble when ready to serve.
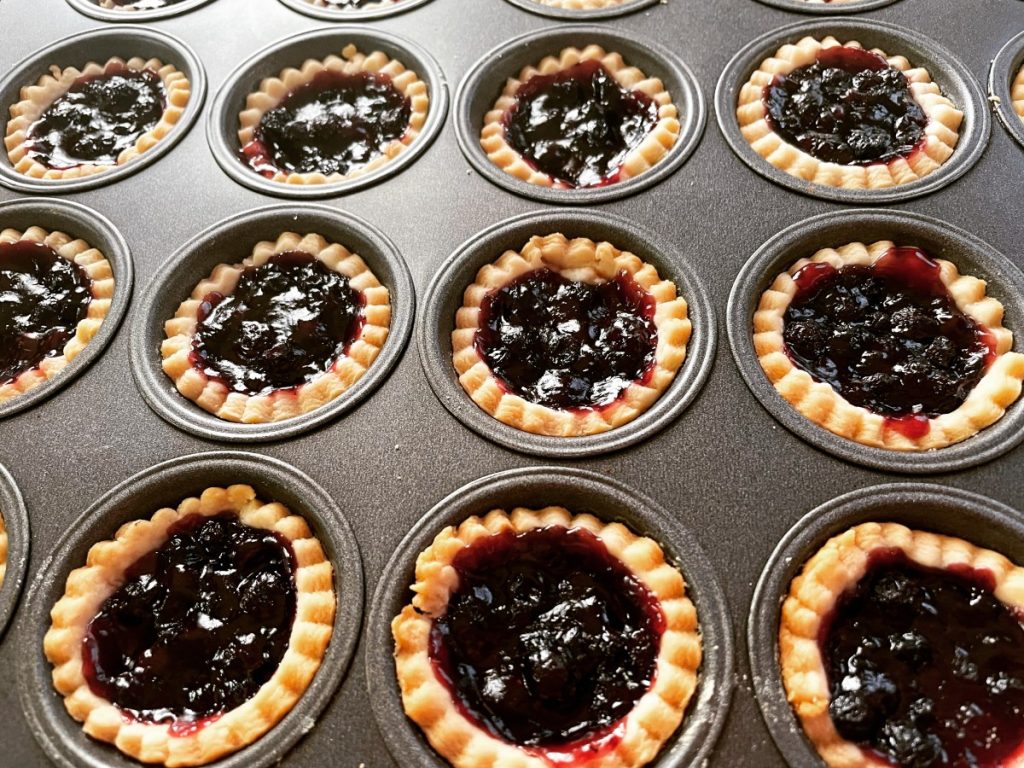
Mini Fruit Tarts
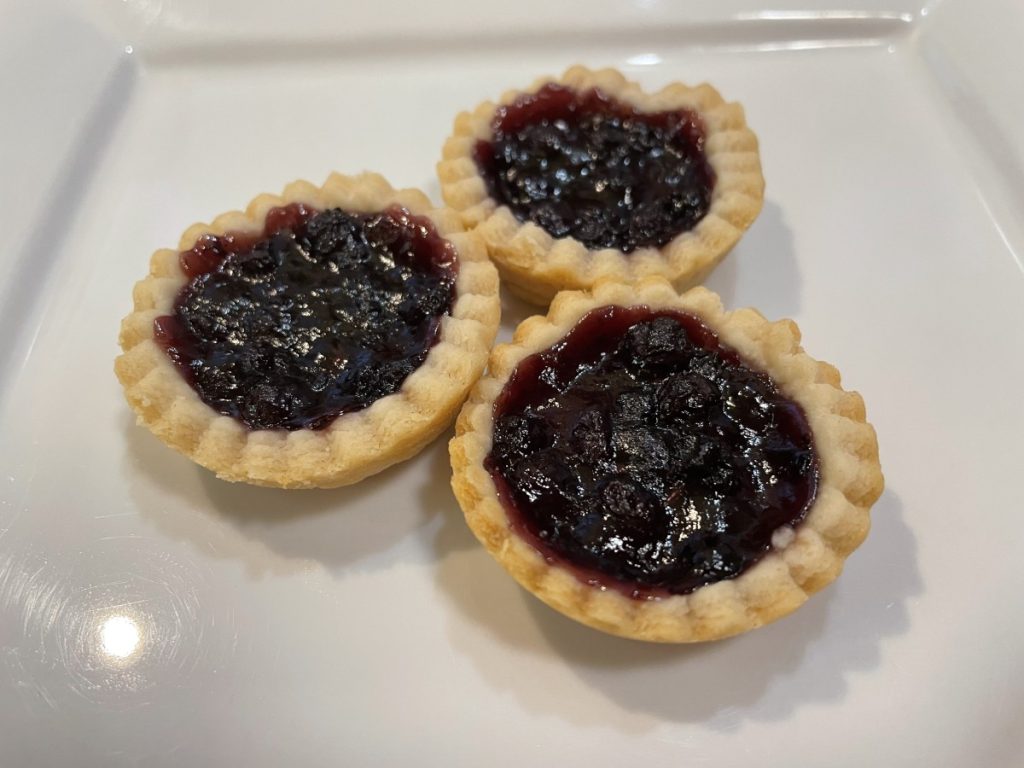
These little tarts are a perfect dessert any time or place. They are a wonderful dessert for picnics. They pack and travel well and make use of seasonal fruit. I used blueberries this time, but cherry or peach pie filling would also work. You can also fill them with jams. I have a nice supply of cherries in the freezer and I think cherry tarts might be next.
I used coconut oil in the crust recipe instead of butter. The crust worked out fine, although it is very crumbly. The texture after baking is amazingly tender, but I found the dough a little harder to handle than when made with butter. It’s a nice choice if you need a vegan dessert.
I used a jar of homemade blueberry pie filling made with wild Maine blueberries. You can use store bought, but I include the recipe at the bottom of the post. The recipe makes 4 cups of filling- you can use all the dough and all the filling and have 48 tarts. I didn’t need that many.
I made 24 and used a little over half of the dough recipe. Had I rolled them out a little thinner, half a recipe would be enough. I had a little blueberry filling left over, too.
Blueberry Mini Tarts
dough for 1 pie crust
About 2 cups blueberry pie filling, room temp or chilled
Flaky Pie Crust
2 c. flour
1 t. salt
3/4 c. coconut oil, chilled – you could use butter, lard or shortening
1 T. cider vinegar
4-5 T. cold water
Combine flour and salt in food processor and add coconut oil. Pulse until mixture resembles coarse crumbs. Toss in vinegar and water, 1 tablespoon at a time, pulsing as you add, until dough just holds together. Remove from processor and press dough together to form a ball. Chill at least 30 minutes before using. Makes enough for 2 pie crusts or up to 48 tarts.
Blueberry Pie Filling
3 1/2 c. blueberries, fresh or frozen
3/4 c. sugar, or to taste
1/4 c. cornstarch
1 c. water
1 T. lemon juice
In saucepan, bring blueberries and sugar to a boil, stirring often. Combine cornstarch with water and lemon juice and add to the blueberry mixture. Return to the boil and cook until thickened and bubbly. Makes 4 cups. You will not need the whole batch for the tarts.
Note: This recipe could also be made with blackberries or raspberries.
To make the tarts: Preheat oven to 400 degrees. Roll out the dough to 1/8 inch thickness on lightly floured board. Cut out with 2-inch round cutter and place dough circles in mini muffin tins or mini tart pans. Re-roll scraps and keep cutting out until you have 24 circles. Save the rest of the dough for another use. It can be frozen. Place a rounded teaspoon of filling in each tart. I used fairly shallow pans, you can add more filling if your pans are deeper. Bake for 10 minutes, then turn down the oven to 350 and bake about 15 minutes longer, or until edges of the tarts are golden brown. Cool a little before you remove from the pans. Makes 24.
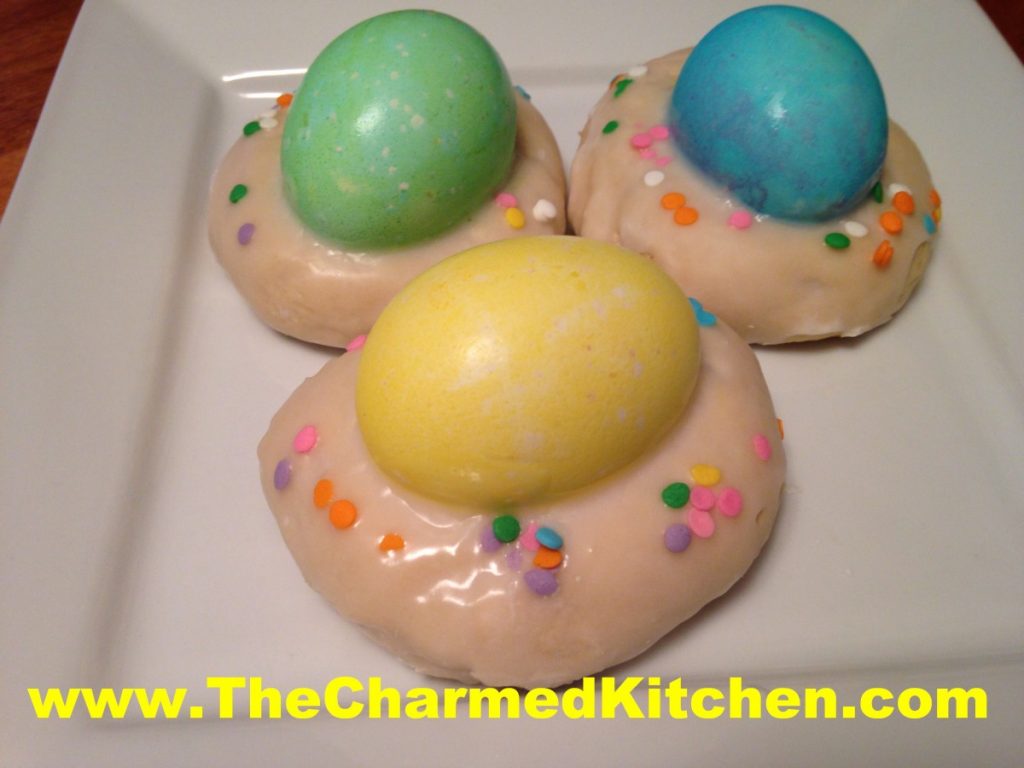
Easter Egg Biscotti
I get so many requests for this recipe, I decided to post it again. This is a treat from my childhood. Rose Dieglio was the mother of my best friend, Debbi. Rose made these every year, and I loved them. Years later, she was kind enough to share her recipe with me. I always make a bunch to hand out to friends and family. It is a tradition I enjoy very much.
The dough is a type of cookie. You roll the dough out in pieces about the size of eggs. Make an indent in the dough and press in a tinted egg. The egg does not have to be cooked- it will cook when the biscotti bakes.
The dough will be a little sticky. Just add some flour to your fingers when shaping the dough, if needed.
The original recipe calls for shortening. I make them with butter, instead. If you use butter in the dough- chill it before baking.
For years I made the biscotti with hard cooked eggs, that I dyed. My mom always asked if I needed to cook the eggs. She wondered if the eggs would cook during the baking process. So I tried it a few years ago. I placed a raw, un-decorated egg on one of the biscotti “nests” and baked it with the rest. What do you know? The egg cooked in the oven when the biscotti baked. The lesson here- always listen to Mom. Saves a whole step in making this recipe. Just be gentle when you press the eggs into the dough. They are raw eggs, after all.
Once baked, the biscotti can be topped with a powdered sugar glaze and sprinkles, if you like. Because they have hard cooked eggs in them, store in fridge after cooking.
Easter Egg Biscotti
1 c. shortening or butter- I use butter*
1 ½ c. sugar
4 eggs
5 t. baking powder
1 t. salt
2 t. vanilla
1 c. milk
6 c. flour
24-30 eggs, plain or dyed
Powdered sugar glaze
Preheat oven to 350 degrees. Cream together butter or shortening and sugar. Beat in eggs. Add next 4 ingredients and blend until smooth. Stir in flour 2 cups at a time. Dough should be pliable. If dough is too sticky add a little more flour. Take a piece of dough about the size of a large egg and place on a greased baking sheet. Indent middle slightly and then place an egg in the center, pressing down slightly. It should look like a nest. Continue with remaining dough allowing about 2-3 inches in between as they spread when baking. You can fit 6-8 on a large baking sheet. Bake 20 –25 minutes or until browned on the bottom. Cool on wire rack before drizzling with frosting. Makes 24-30. Store in fridge.
* If using butter- chill dough a couple of hours before baking.
Sugar glaze
2 c. powdered sugar
2-3 T. milk or orange juice
1 t. vanilla
Food coloring, if desired
Mix together until smooth and of drizzling consistency.

Cooling down
Mom’s Pumpkin Chiffon – Gluten Free
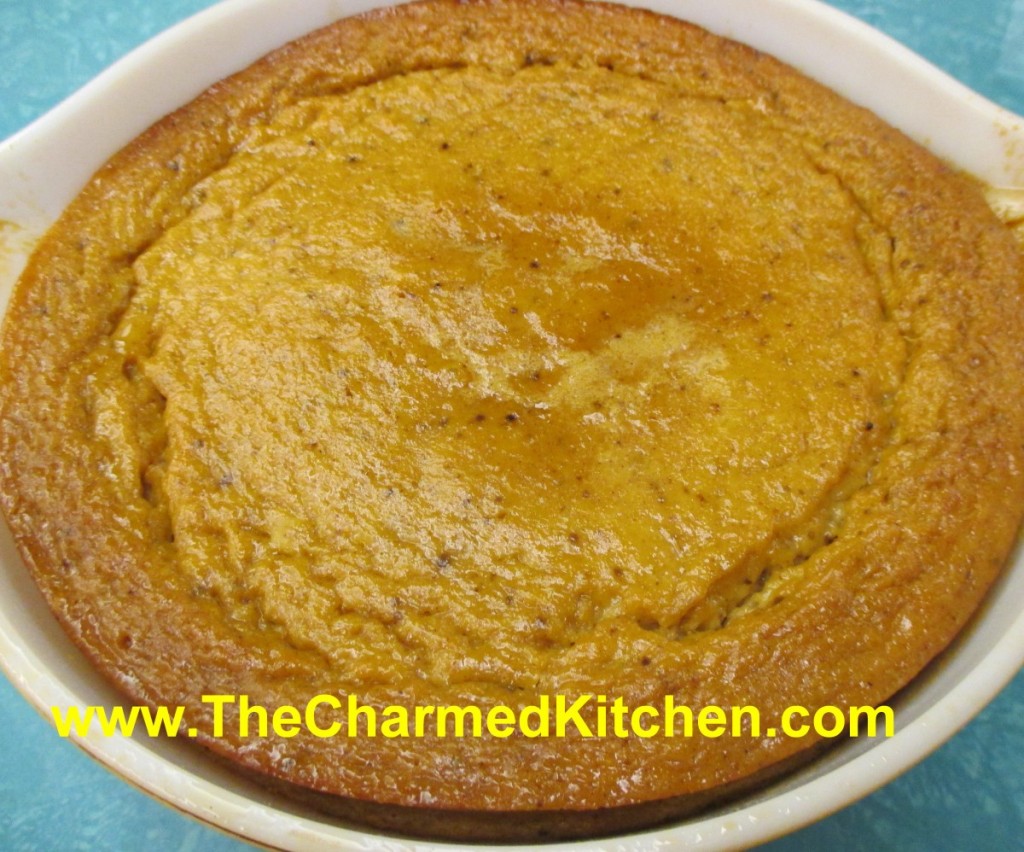
I fondly remember when my Mom used to make this dessert. I think of her whenever I make it. From a technical cooking standpoint, it’s not really a chiffon, but that is what my Mom called it, so I will leave it as Pumpkin Chiffon.
It’s more like a pumpkin pie, without the crust. Super easy to make and quite tasty. I bake it in a casserole dish but you could also make it in individual ramekins. This recipe is always a big hit when I make it for friends.
You could use canned or fresh cooked pumpkin or winter squash, like butternut or Hubbard. I always cook up and freeze pumpkin and squash for later use, so frozen would work, too. Because there is no crust, it is also gluten-free. I sometimes serve it with gingersnaps and whipped cream. It is a lovely Fall dessert. Perfect for Thanksgiving, too.
Mom’s Pumpkin Chiffon
½ c. applesauce
1 c. cooked or canned pumpkin or squash puree
¾ c. brown sugar
1 t. cinnamon
½ t. salt
½ t. nutmeg
1/8 t. cloves
4 eggs, well beaten
1 c. half and half or evaporated milk
Stir together first seven ingredients. Beat in eggs and stir in milk. Place mixture in 1 ½ quart casserole and bake in a 350-degree oven for 1 hour and 15 minutes. Serve alone or with cookies. Serves 6-8.
Spiced Applesauce Cake
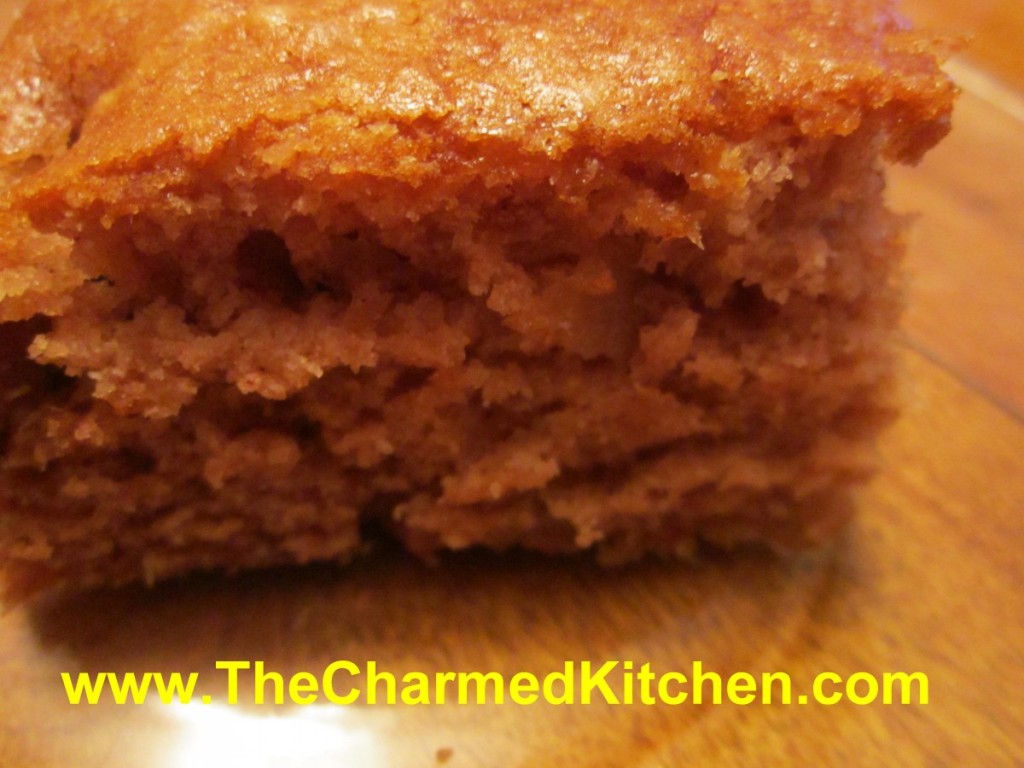
This is a favorite recipe of mine. The cake is moist, lightly spiced and very easy to make. I shared it with a friend and he really enjoyed it. The applesauce adds moisture and flavor.
I used olive oil in the recipe, which makes this cake vegan. You can make this recipe with butter instead. The spices work so well together. Sometimes simple is the best. Before someone asks, it is not a misprint, there are no eggs in the recipe. The cake rises just fine without them.
I wish I remembered where this recipe came from. I have a piece of flowered stationery, a little crinkled around the edges, creased from being folded many times, with the recipe written on it. It is not my handwriting. I would love to credit the source of this wonderful recipe.
Spiced Applesauce Cake
2 c. unsweetened applesauce
½ c. butter, coconut oil, olive oil or avocado oil
2 c. sugar
3 c. flour
1 T. baking soda
½ t. salt
1 t. each cinnamon, allspice, nutmeg and ginger
¼ t. cloves
1 c. raisins or chopped nuts, I used walnuts
Heat together applesauce and butter until butter melts. Cool down a bit. If using coconut oil, also heat up the applesauce. For other oils, just use room temperature applesauce and mix with the oil. Preheat oven 375 and grease 9×13-inch pan. Stir all ingredients together bake 30-35 minutes. Cool in pan.
Pear Coffee Cake
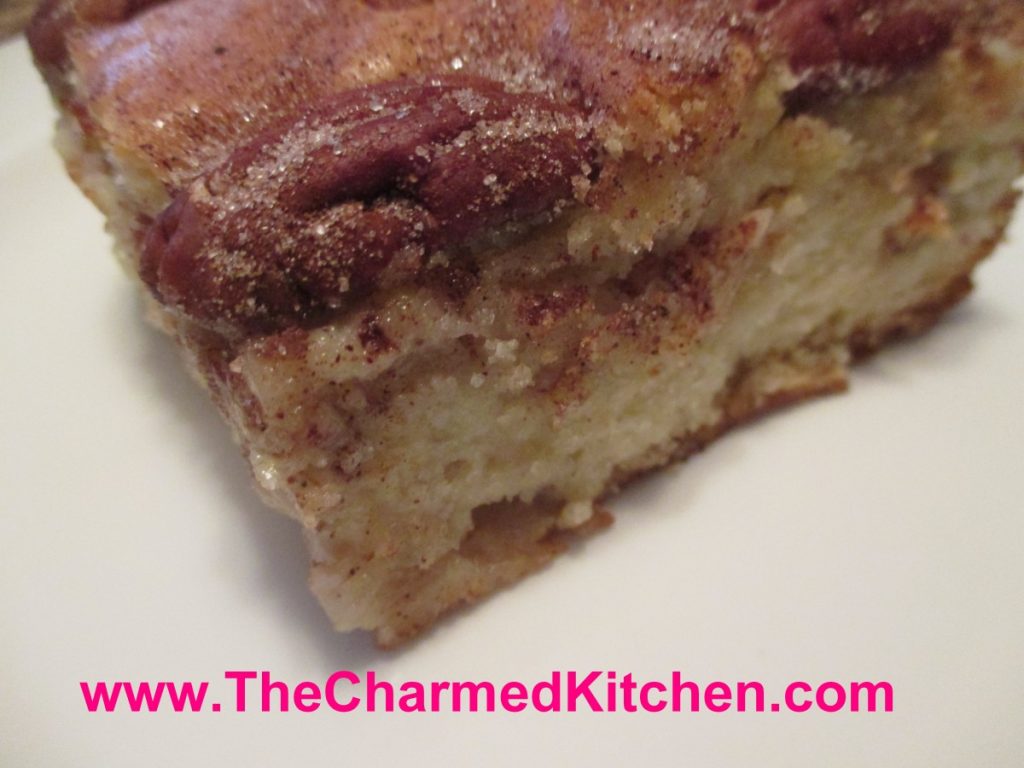
This may be one of my favorite pear desserts. I combined ripe pears with pecans and cinnamon sugar to create this moist and flavorful cake. I had Bartlett pears, but use whatever pears you have on hand. They should be ripe, but still firm. In the recipe directions I say to have the pears peeled and sliced, and ready to go in the cake. I actually made the batter first, then prepped the fruit. Mostly because I was distracted and forgot. It worked out just fine. The upside was that the pears did not have a chance to discolor, and I didn’t have to put them in lemon water until ready to use.
The cake is wonderful served all on its own, but I also enjoy topping it with a scoop of ice cream or whipped cream.
Pear Coffee Cake
1 c. oil- I like to use olive oil or avocado oil
4 eggs
1 t. vanilla
1/3 c. orange or lemon juice
3 c. flour
2 c. sugar
3 t. baking powder
¼ t. salt
3-4 pears, peeled, cored and sliced
½ c. sugar
1 T. cinnamon
¾ c. toasted pecan halves or pieces, optional
Grease a 9×13 inch pan. Preheat oven to 350-degrees. Combine oil with eggs, vanilla and juice until well blended. In a separate bowl, mix dry ingredients and add to egg mixture. Beat together until batter is smooth. Batter will be thick. Combine the ½ cup sugar with the cinnamon. Set aside. Place ½ of batter in prepared pan. Arrange pear slices on batter and sprinkle on ½ of the cinnamon mixture. Pour on remaining batter and top with the pecans, if using. Sprinkle with remaining sugar mixture. Bake 50- 60 minutes or until toothpick inserted in cake comes out clean. Cool before slicing. Serves 10-12.
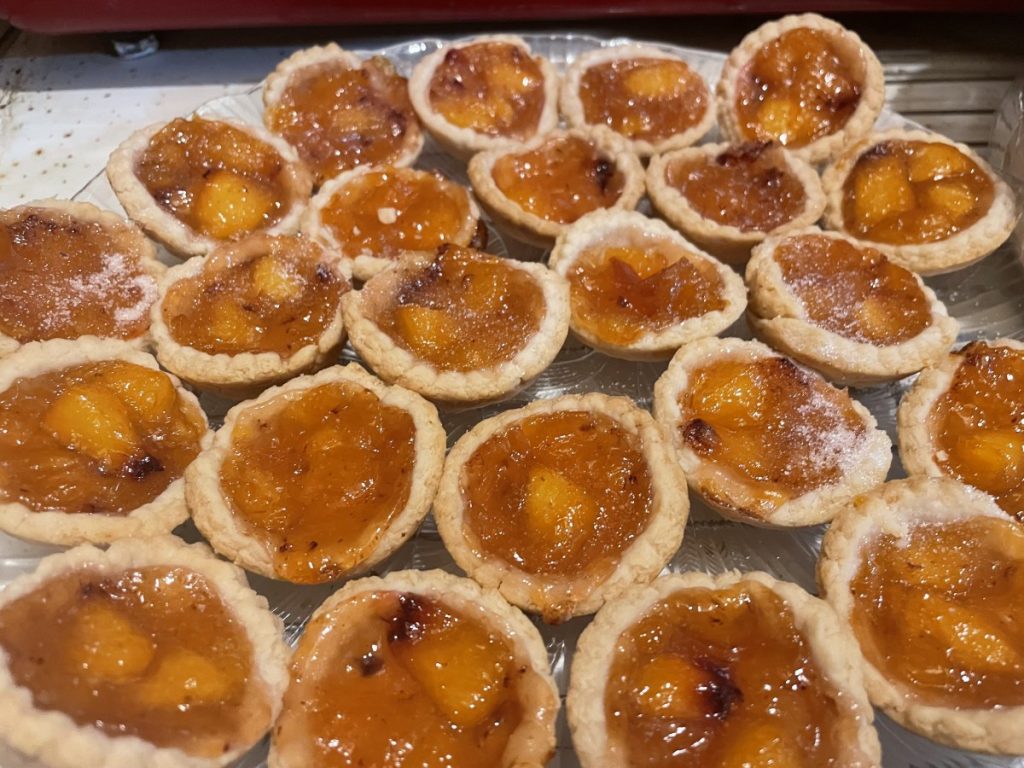
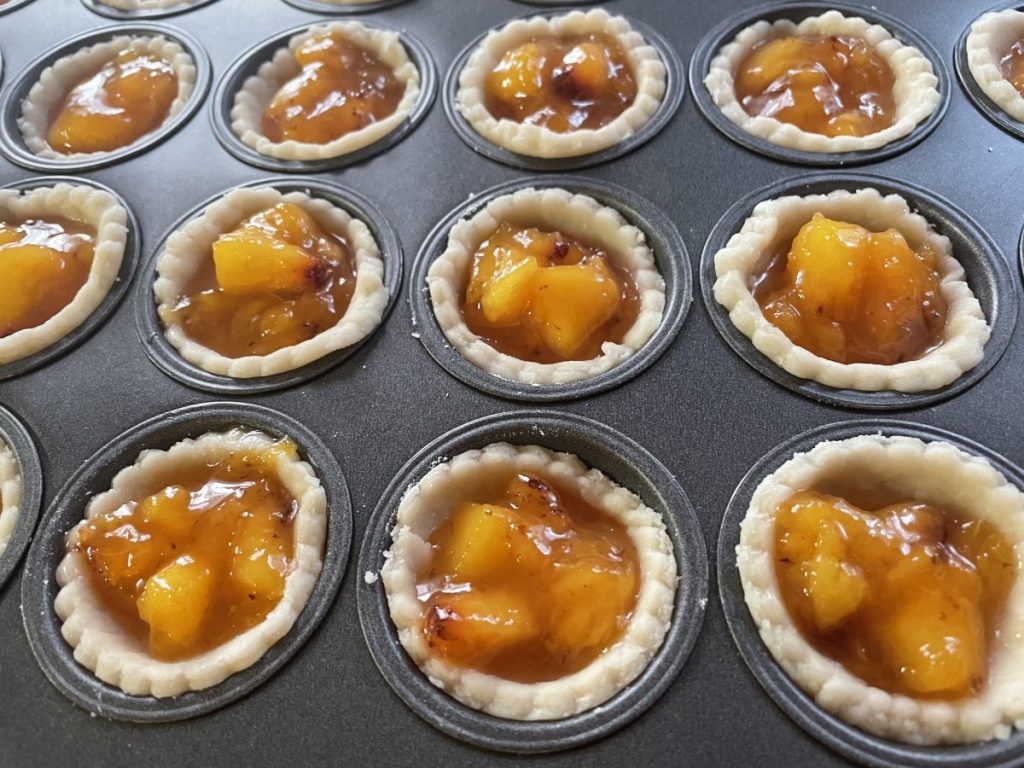
Peach Tartlets – Vegan
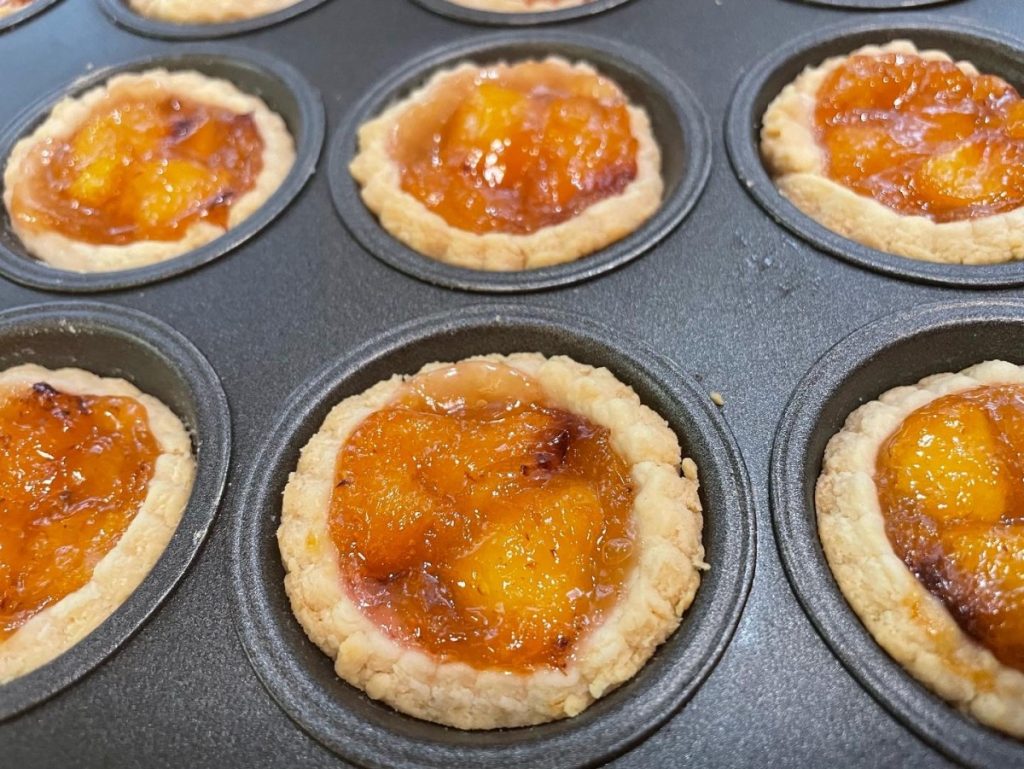
I had friends visiting from out of town and wanted to make them a special dessert. They are vegan. I decided to make these tarts. Making them vegan wasn’t hard at all. I just used coconut oil in the crust recipe instead of butter. The crust worked out fine, although it is very crumbly. The texture after baking is amazingly tender, but I found the dough a little harder to handle than when made with butter. I would make this crust again, even if I didn’t need a vegan version.
I used homemade peach pie filling made with peaches I had. You can use store bought pie filling, but I include the recipe at the bottom of the post. The recipe makes just over 2 cups of filling. I had crust left over.
I made 24 and used a little over half of the dough recipe. Had I rolled them out a little thinner, half a recipe would be enough.
Peach Tartlets
dough for 1 pie crust- recipe follows
About 2 cups peach pie filling, room temp or chilled – recipe follows
Preheat oven to 375 degrees. Roll out dough to 1/8-inch thick. Use a 2 1/2-inch biscuit cutter to cut out circles of dough. Place dough circles in mini muffin or tart pans. Press them in gently being careful not to tear them. Repeat with remaining dough and re-roll scraps. You’ll end up with about 24 dozen in all. If you don’t have enough pans, keep the extra dough circles under a towel or plastic wrap so they don’t dry out until you are ready to use them. Place a rounded teaspoonful of peach pie filling into each of the tartlet shells in the prepared pans. Don’t over fill. Bake for 12-15 minutes or until golden brown on top. Can be served hot, warm or at room temperature. Makes about 2 dozen.
Note: If I rolled the dough thinner I could have made more like 3 dozen.
Can be frozen. To reheat take straight from the freezer and place on a baking sheet. Bake in a preheated 325 degree oven and bake for about 20 minutes, but check after 15 minutes.
Flaky Pie Crust
2 c. flour
1 t. salt
3/4 c. coconut oil, chilled – you could use butter, lard or shortening
1 T. cider vinegar
4-5 T. cold water
Combine flour and salt in food processor and add coconut oil. Pulse until mixture resembles coarse crumbs. Toss in vinegar and water, 1 tablespoon at a time, pulsing as you add, until dough just holds together. Remove from processor and press dough together to form a ball. Chill at least 30 minutes before using. Makes enough for 2 pie crusts or up to 48 tarts.
Peach Pie Filling
3 cups diced peaches
3/4 c. sugar
3 T. water
3 T. cornstarch
2 t. cinnamon
Heat peaches and sugar in a saucepan until bubbly. Stir to prevent sticking. Combine water and cornstarch and add to the peach mixture. Heat until thickened and bubbly. Add the cinnamon, too. If the mixture is too thin, add a little more cornstarch and water. Sometimes the peaches are extra juicy.
Strawberry Waffles
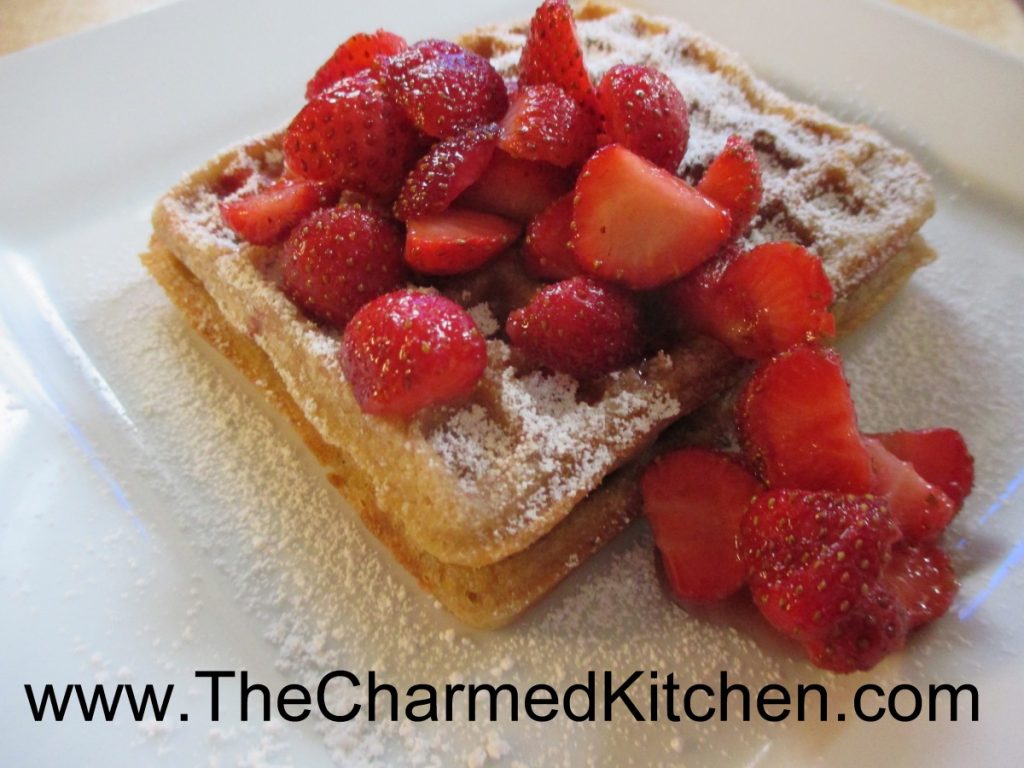
These waffles would make a great breakfast or brunch dish. I have even served them for dessert. That’s the thing about waffles. They can be eaten any time of the day.
This waffle recipe came about because I needed a dessert for dinner with a friend. It was a last minute dinner, so I didn’t have a lot of time. Waffles seemed like a great idea. They don’t take a lot of time to make, and they highlighted the berries. My friend really liked them. I did, too.
I made the waffles with fresh strawberries in the batter. Then, the waffles are served topped with more fresh berries and a dusting of powdered sugar.
They were a perfect dessert. I could see topping them with ice cream or whipped cream, too. Any leftover waffles can be frozen.
For the fresh strawberry topping, you just combine fresh, sliced berries with some sugar. If you can make it ahead of time, the sugar draws juice out of the strawberries, kind of making its own sauce. I made the topping first, then popped in the fridge.
So here is my recipe. Enjoy!!
Strawberry Waffles
1 1/3 c. flour
2 T. sugar
4 teaspoons baking powder
2 t. cinnamon
½ t. salt
2 eggs, separated
½ c. butter, melted
1¾ c. milk
2 t. vanilla
1 c. chopped fresh strawberries
Powdered sugar for topping waffles
Strawberry topping- recipe follows
In a large mixing bowl, whisk together all dry ingredients. Set aside. Separate the eggs. Set aside the yolks. Place the whites in a small mixing bowl. Beat whites until moderately stiff; set aside. Combine milk, melted butter, egg yolks and vanilla in small bowl. Add to dry ingredient mixture and blend. Stir in berries. Fold stiff egg whites into mixture. Ladle mixture into hot waffle iron and bake. To serve, top with powdered sugar and strawberry topping. Makes 10-12 (4-inch) waffles.
Topping
1 qt. strawberries
½ c. sugar- or to taste
Wash and stem berries. Slice berries. Place in bowl and sprinkle on the sugar. Stir to combine and place in fridge until ready to use. Try to do this at least 30 minutes before using. That will give the mixture time for juice to be released from the berries.
Apple Pie “Blintzes”

Apple Pie Blintzes
Since I posted the recipe for making your own apple pie filling recently, I thought I’d share a fun way to use it- other than in a pie. I made blintzes with the pie filling.
I used flour tortillas for the crepes. Don’t get me wrong, I love making real crepes. But, when you don’t have the time, the tortillas are a fun and tasty substitute.
I soaked the tortillas in milk. By soaking the tortillas in milk, they soften up, and can be used like a crepe. Soak them for at least 10 minutes, or up to 30 minutes. I placed the tortillas in a shallow baking pan and made sure to drizzle each one with milk as I added them to the pan.
For the filling, I used some of my homemade apple pie filling. If you have fresh apples, you can just peel and slice the apples, then cook them in a little water and sugar until softened. You can make them as sweet as you like. You made need less sugar if the apples are extra sweet. Add some cinnamon and nutmeg, too. If they are too watery- combine a little cornstarch with cold water and drizzle the mixture in until the apples thicken up. Don’t add too quickly or you might them too thick and gummy.
To assemble the blintzes, place a softened tortilla on your work surface and spoon a little apple filling in the middle. You can do this with hot filling, but cold or room temperature filling is easier to use. Don’t over fill them or you won’t be able to fold them up. I used 8-inch tortillas and used about 1/4 cup of filling for each one. Fold the sides in until they almost meet in the middle and them roll the tortilla up to cover the filling. Place seam side down until ready to fry them.
Heat butter in a skillet, and brown the blintzes over medium heat until lightly toasted on both sides. They will be crispy on the outside, but tender in the middle. Put on a serving plate, sprinkle with powdered sugar and serve while warm. These are fine just as they are, but feel free to add ice cream or whipped cream, too.
My guests really liked them and said they did not realize they were made from tortillas. I have made these before and use different fruit fillings. I’ve even made a cheese filled version a few times. It seems I usually have a package of tortillas, so it is a go-to dessert for me in a pinch.


