Blueberry Cheesecake Pie

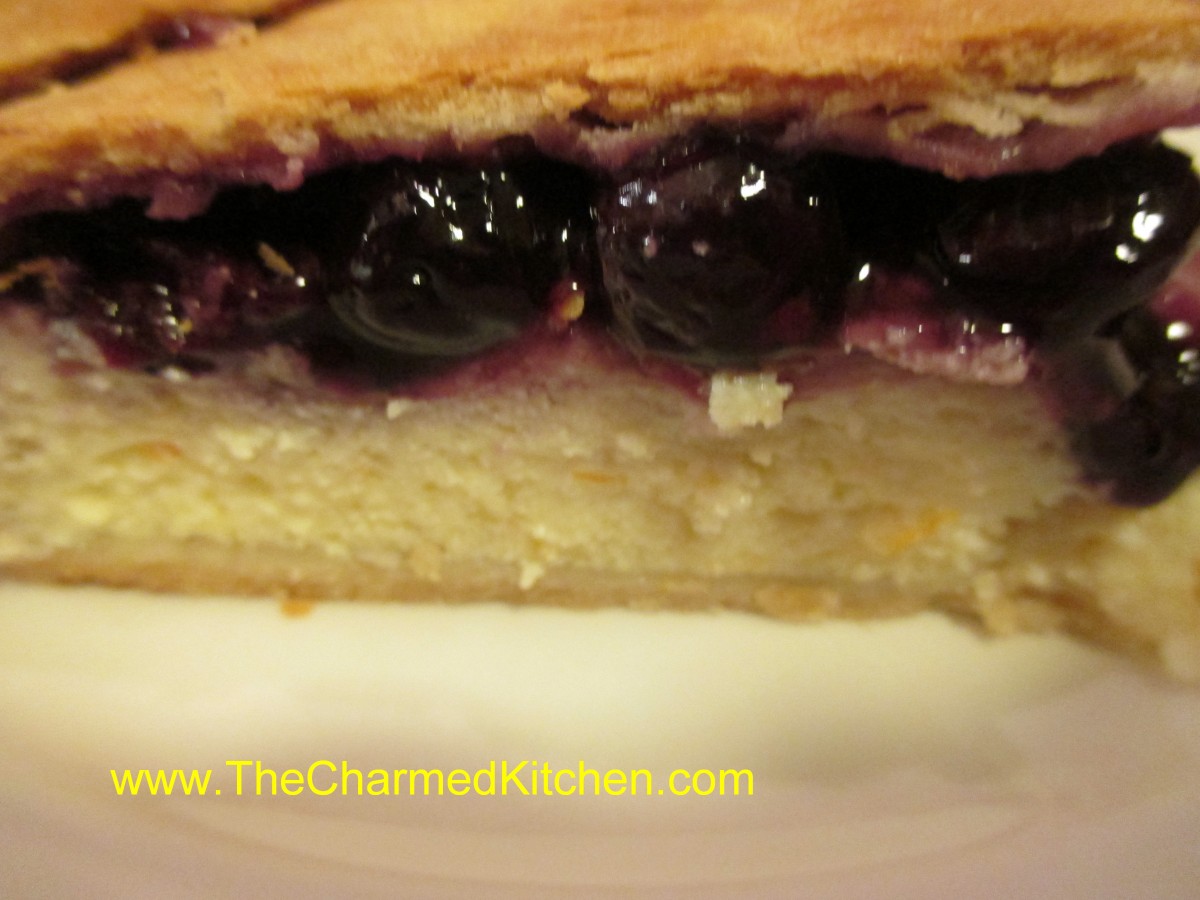
Blueberry Cheesecake Pie
This dessert came about by accident. A very happy accident, indeed. I had been canning blueberry pie filling, and had some left over. It wasn’t quite enough for another jar or a whole pie. A carton of ricotta cheese I had in the fridge, inspired me to combine two of my favorite desserts into one, fruit pie and cheesecake! I used the ricotta to make a cheesecake-like layer and then used the pie filling as a topper. It worked out great. It is perfect just the way it is, or serve with whipped cream or a scoop of ice cream.
Blueberry Cheesecake Pie
Pastry for 2 crust pie- recipe- The crust recipe I used is at the bottom of the page
Cheesecake filling:
1 (15 oz.) carton ricotta cheese, full fat preferred
½ c. sugar
2 eggs
Zest of half an orange
Combine cheese and sugar and mix until smooth. Stir in eggs and zest and set aside.
Blueberry filling:
1½c. blueberry pie filling- I used homemade
Roll out half of the crust and place in 8 or 9-inch pie pan. You can roll out the top crust ahead of time, or even cut into strips for a lattice top. Cover remaining crust to keep it from drying out. Spoon cheese mixture into prepared crust. Spoon the blueberry pie filling over the cheese mixture. Top with the second crust or place strips on in a lattice design. If using a whole crust cut in decorative slits for ventilation. Moisten then crimp edges and shape decoratively or use a fork to seal. Place pie in lower half of hot oven. Bake in a preheated 425-degree oven for 15 minutes. Reduce heat to 375 and bake an additional 40-50 minutes or until crust is brown and juices begin to bubble through the slits. It edges start to brown too quickly, cover them with foil. Cool, then chill, before serving.
Flaky Pie Crust
2 c. flour
1 t. salt
3/4 c. butter, chilled – you could also use chilled coconut oil, lard or shortening
1 T. cider vinegar
4-5 T. cold water
Combine flour and salt and cut in shortening. Toss in vinegar and water 1 tablespoon at a time until dough holds together. Use a fork to toss the ingredients together and as soon as the mixture holds together stop adding water. Makes 2. Chill well before using.
Homemade Blackberry Liqueur

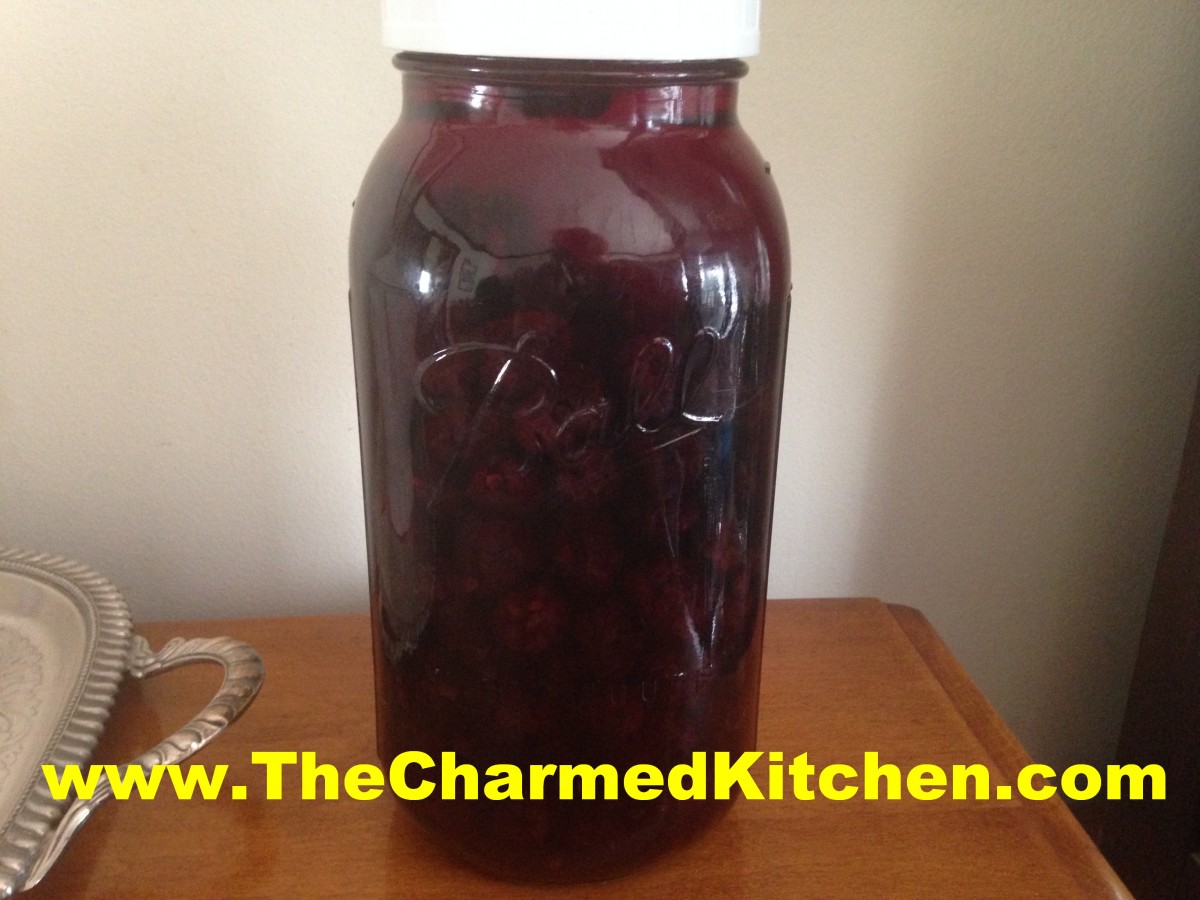
Blackberry Liqueur in the making
Making liqueurs has been a hobby of mine for a long time. The first liqueur I ever made was blackberry liqueur. My friend Dale lived in an apartment building, near a large ravine. The ravine was filled with wild blackberries. Dale asked if we could turn them into a liqueur. He harvested them- and held them in the freezer until we had enough. Once we had plenty, I combined the berries with vodka and let the mixture steep together. After enough time had passed, I strained it, sweetened it and enjoyed it. It is still one of my favorites.
I wasn’t planning on making blackberry liqueur until I got a call from my friend Mari. Her fridge was dying and she had a bunch of stuff from the freezer she didn’t want to go to waste. She asked if I wanted a stash of frozen fruit. I said that I did, so I picked up a rather large bag of assorted, thawing fruit.
Among the bags were two bags of blackberries. I knew what I wanted to do with them. I grabbed a half gallon jar, and filled it with the berries, vodka and lemon zest. Now, it is just a waiting game. The jar will spend the next three months in a dark cabinet. After that, I’ll strain it, filter it and sweeten it. I have already promised some to Mari.
Sweetening is actually optional. For sipping, sweetened is the way to go. While the recipe lists specific amounts, sweeten to your own taste. For using in cocktails, you might want to leave some unsweetened. The unsweetened blackberry liqueur is known as an eau de vie, or water of life. I like that.
So here is the recipe. If you have some extra berries, you might also want to make liqueur with them.
Blackberry Liqueur
4-c. fresh or frozen berries (thawed)
Sliced and scraped peel of one lemon
1 clove, optional
3-c. vodka or 2 c. vodka and 1 c. brandy
1 c. simple syrup- recipe follows
Lightly crush berries with a fork, if using fresh. Combine with peels and clove and vodka and steep 3 months. Strain and filter and add sugar syrup. Mature 4-6 weeks.
Simple Syrup
Simple syrup is made from 1 cup of sugar and ½ cup of water. Bring to a boil, then cool. You will have 1 cup of syrup. You can sweeten with honey, if you prefer. Watch when you substitute honey for sugar, as it is sweeter and stronger flavored. Add a small amount, let it sit for a day or so- and give it a taste. You can always add more sweetener later.
How To Candy Violets- and Other Flowers


Candied Violets
This time of year, I get requests about how to make candied violets. I thought I would share the recipe again.
I make them every year. I gather violets from my yard over several weeks and make several batches each season.
Since my yard is full of violets right now, I decided to candy some today. It’s an easy way to enjoy these delicate flowers throughout the year. I use them to decorate baked goods.
Candied violets are lovely on a cakes or on cupcakes. You can also use them to top homemade chocolates and other candies. They add charm and a festive touch anytime you use them.
Always be sure to pick violets from a location where no pesticides are used.
Candied Violets
Powdered egg whites (see note)
Water
Superfine sugar (see note)
Fresh violet flowers, rinsed and drained on paper toweling- Not African violets
Following package directions reconstitute egg whites to the equivalent of one or two egg whites. You can dilute them a little, to make them easier to brush on. Place sugar in a shallow bowl. With a food-grade fine brush coat a violet with the egg white and press into the sugar. Place on wax paper and repeat with remaining flowers. Allow to dry for about a week. Store in a container with a tight fitting lid in a cool place. I like to store them in the freezer.
You can candy other flowers as well. Be sure that it is an edible flower and that no pesticides were used on them. Rose petals “candy” well. The process is the same for any flowers you want to candy. Thicker, petals will need more time to dry. For roses, separate and dry individual petals, not whole blossoms. I have also had some success with nasturtiums blossoms. Smaller, thinner petals work best. You can also candy small mint leaves.
Violet Jelly

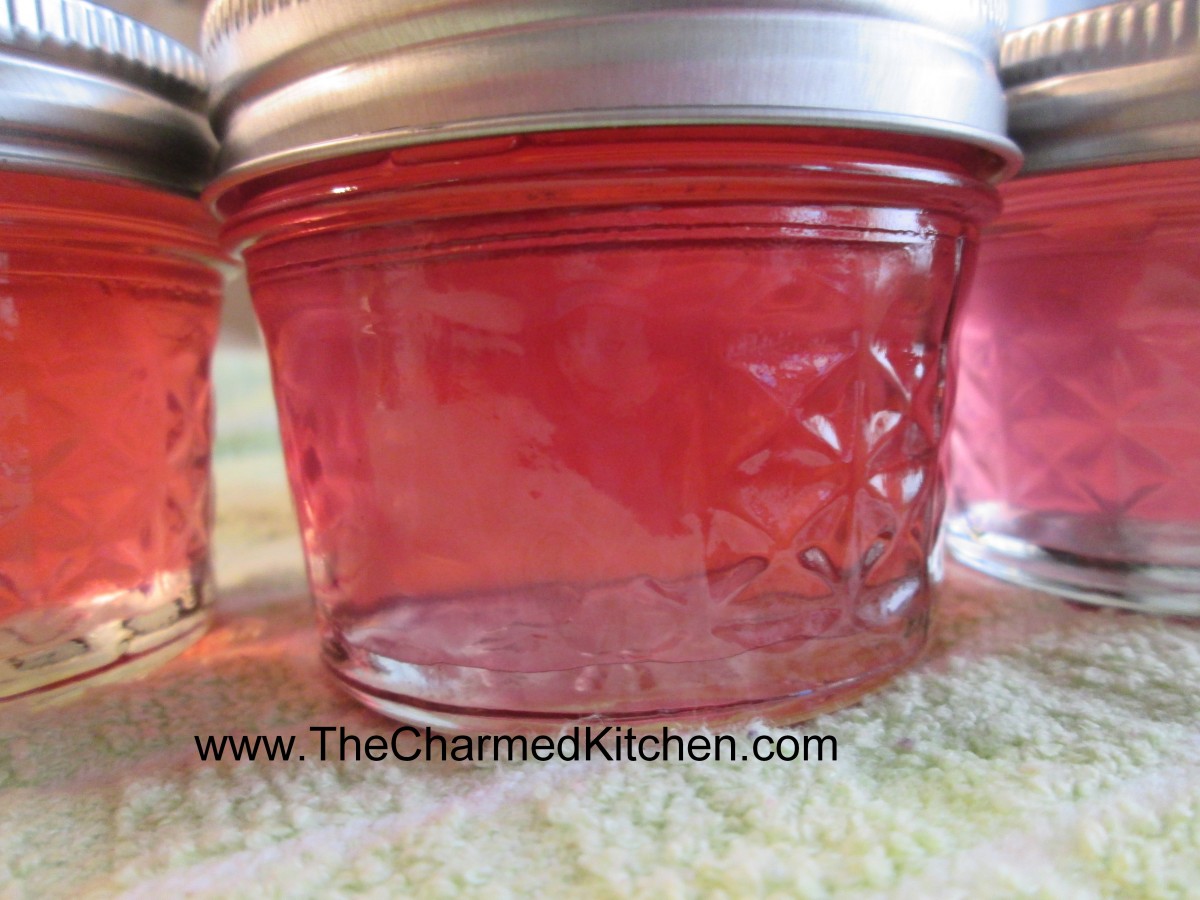
Violet Jelly
I am always interested in new and different ways to use my edible flowers. A few years ago, I started making jelly with my violets. I started by making infused vinegar from some of the violets. I like the vinegar for dressing salads. Any I don’t use for jelly, I save for that.
Later, I decided to use some of the violet vinegar as a base for the jelly. It worked out great. The end product had a sweet taste of violets, but the vinegar added a tartness I really liked. It also came out a stunning pink color.
Since the violets are steeped in vinegar- you can harvest over several weeks- just keep adding blossoms to the vinegar. If you don’t have a lot of blossoms at once, you can harvest a few at a time over a longer period of time. The violets in vinegar will keep, so you don’t have to make the jelly right away.
I like to have equal parts flowers and vinegar for a nice strong floral flavor, but you can get by with fewer blossoms if you need.
Start with a clean jar, and put your violets in it. Pour vinegar over to cover. White vinegar or white wine vinegar can be used. Heck you could probably use red wine vinegar, too. Cider vinegar might affect the color. You can continue to add flowers to the jar as you pick them. I picked 4 cups of violets and put them in a quart mason jar. I added vinegar to fill the jar, closed it up and let the flavors blend for a week. I could have let it sit longer if I was too busy to get to it. If you are in a hurry and want to make the jelly right away just heat up the vinegar and steep the flowers.
After a week, I strained it out then poured the mixture through a coffee filter to get it really clear. I ended up with 3 1/2 cups of violet “vinegar” to use for my violet jelly. I had a basic idea of how much sugar I would need so I went from there. It worked out great and jelled perfectly.
Violet Jelly
3 1/2 cups violet vinegar*
1/2 c. lemon juice
1 box powdered pectin
5 c. sugar
Wash and prep jars and get water bath heating up. Place violet vinegar in pan and add lemon juice and pectin. Bring mixture to a rolling boil over high heat. Add sugar and return to the boil. Stir often. Once mixture gets to a full rolling boil, boil 1 minute. Remove jelly from heat and skim off any foam. Ladle hot liquid into jars leaving 1/4 inch headspace. Wipe rims and adjust lids. Process in a boiling water bath for 10 minutes for 4 oz. and 8 oz. jars. Remove jars to cooling rack and check seals once they have cooled down. Yield: about 7 half pint jars or 13-14 (4 oz.) jars.
*For 3 1/2 cups of violet vinegar you will need 3-4 cups of blossoms and 3 1/2 cups of vinegar.

Why Avocados Should Be Part of Your Diet

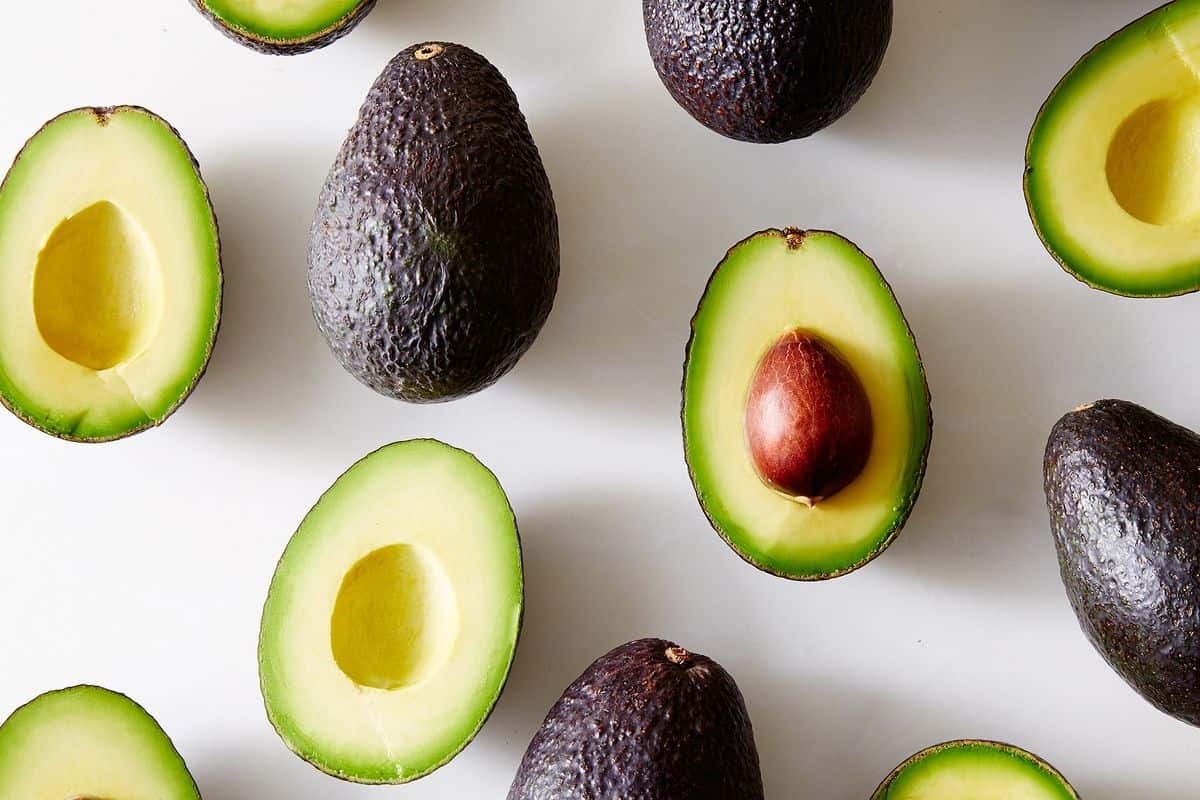 Avocados originally came from Mexico and Central America, but now avocados are grown and enjoyed all around the world. The average yearly consumption of avocados per capita in the US has gone from around 1.1 pounds of avocado per capita per year in 1989 to just over 7 pounds of avocado per capita per year in 2016 (source). The love of avocados continues to grow as we are finding more ways to add the buttery avocado to sweet and savory dishes.
Is this increase of avocado love just a fad or is there nutritional merit for eating more avocados?
Eating avocados as part of a healthy balanced diet can provide many nutritional benefits including: being heart healthy, not increasing risk for weight gain, providing antioxidants, fiber and being a source of almost 20 vitamins and minerals.
Yes avocados are high in fat, but the fat is mainly heart healthy monounsaturated fats. While adding avocado onto everything doesn’t translate into making a diet healthy, switching it for other fat sources can have nutritional benefit.
Avocado is a nutrition power house
Contrary to what many people believe, avocado is a fruit and not a vegetable. A serving is usually defined as 50 grams or about 1/3 of a medium avocado. Here are the nutrients provided from a serving of an avocado and why it could be considered a nutrition power house.
- Blood pressure nutrients. A serving of avocado provides 250mg of potassium (6%DV) and 15mg (4% DV) of magnesium. By providing potassium and magnesium, avocados provide nutrients that promote healthy blood pressure levels, muscle contractions and nerve functioning.
- Antioxidants. A serving of avocados provides 4 mg of vitamin C (4% DV), 1 mg of vitamin E (6% DV) and a source of the antioxidant lutein. In fact, the amount of lutein from avocados is the one of the highest fruit sources. Vitamin C and E are antioxidants that protect cells from damage, and lutein is an antioxidant associated with protecting against cataracts and age related macular degeneration.
- B vitamins. A serving of avocado provides thiamin (B1), Riboflavin (B2), Niacin (B3), vitamin B6, folate and pantothenic acid. B vitamins are needed to make new red blood cells and break down nutrients for energy.
- Mineral source. Besides potassium and magnesium, avocados provide about 2% DV of iron, phosphorus, zinc, 4% DV manganese and 10% DV copper.
- Fiber. A serving of avocado provides 3 grams of fiber (11% DV). Eating more avocados in place of other fats can by a simple way to increase fiber intake. Fiber can help increase satiety after eating, move food along the digestive tract and can help lower blood cholesterol.
Low in sugar and high in heart healthy fats
Unlike other fruits, avocado is naturally low in carbohydrate and sugar. A serving only provides 4 grams of carbohydrate and 3 grams of fiber. Therefore, avocados are low in glycemic load.
They are also a good source of heart healthy monounsaturated fats; a serving provides 8 grams of total fat with 5 grams coming from monounsaturated fat.
Avocado and heart health
Avocados can be beneficial for heart health because they provide nutrients that support healthy blood pressure, provide fiber than can help lower cholesterol and provide heart healthy fats.
A 2018 review of studies with avocado and heart health found avocado intake was associated with increased HDL cholesterol. Having high HDL cholesterol is associated with a lowered risk for heart disease.
A 2015 study concluded eating an avocado per day as part of a heart healthy diet can lower oxidized LDL cholesterol and increase plasma concentrations of the antioxidant lutein. Oxidized LDL is considered pro-inflammatory and can increase damage to blood vessels that may promote cardiovascular disease.
A 2015 review suggests avocado may help improve blood pressure levels due to the potassium and lutein content by controlling oxidative stress and inflammation.
Avocados and weight loss
Since avocados are high in fat and calories, will eating them increase risk for weight gain?
Research results suggest eating avocado as part of a balanced diet won’t increase risk for weight gain and can be part of a weight loss diet.
Like nuts, which are also high in fat, eating avocados in moderation isn’t associated with increased risk for weight gain.
Substituting avocados in place of other fat sources is recommended instead of adding avocado without cutting back on other fat sources.
A 2005 study had study participants on one of either isocaloric diets: one that included 200 grams of avocado (30 grams of fat) in place of other fats or a diet that provided the same amount of fat from other fat sources. At the end of 6 weeks researchers found at the end of 6 weeks both groups lost weight and there was no difference between the groups.
How to get more avocados in your diet
Swapping in more avocados into your diet can be easy. Avocado (or guacamole) can be used as a replacement for:
- Mayo, butter or other cream based spreads for sandwiches or toast
- Bacon or cheese on salads
- Butter or oils when baking
- Sour cream or a baked potato
- Dip for chips, crackers or veggies
Incorporating more avocados into your diet is considered a safe, healthy step for most people. However, if you have latex allergy, use caution and speak with your doctor before eating avocado.
If you are on a renal diet, speak with your health care team before adding avocados to your diet.
Two Avocado Soups


Warm Avocado Soup
I am not sure avocado jumps into most people’s minds when thinking of soup. Maybe it should. The rich, buttery texture of avocados makes for a lovely soup base.
I have two different recipes for avocado soup that I love. One is served warm, the other is served chilled. Either can be a great first course for your Cinco De Mayo dinner.
The warm soup in nice to serve on chilly evenings. It can be a great first course for dinner, and pairs well with grilled cheese for lunch. I topped it with fresh parsley, but a few drops of hot sauce also make for a nice presentation.
The chilled soup is just perfect as a first course on hot days. It is creamy, but not heavy, and quite refreshing. I topped mine with finely chopped pumpkin seeds, for a little added texture, but it could also be topped with fresh snipped chives or croutons.
So here are the recipes for both soups.
Warm Avocado Soup
4 c. chicken stock
2 c. milk
2 t. chili powder
1 t. cumin
1 t. garlic powder
hot pepper sauce to taste
salt to taste
3 ripe avocados
1 c. sour cream or yogurt
fresh parsley leaves for garnish
Heat stock and milk together until just beginning to bubble around edges. Stir in seasonings and keep warm. Peel and seed avocados, and place them in a food processor or blender. Place only what will comfortably fit, and blend in two batches if need be. Combine avocados with the sour cream in a mixing bowl. Stir to blend. Add a ladle of warm stock mixture to avocado mixture. Whisk to prevent lumps. Return warmed avocado/sour cream to the pan and heat through but do not boil. Adjust seasonings. Ladle into bowls and garnish with parsley. Serves 4 – 6.
Chilled Avocado Soup
2 ripe avocados, pitted and peeled
1 t. lemon juice
1 c. cold chicken or vegetable stock
1 c. light cream or evaporated milk
½ c. yogurt
½ c. dry white wine
salt and pepper to taste
½ c. chopped, toasted pumpkin seeds
Combine all ingredients in blender, except pumpkin seeds, until smooth and chill until ready to use. Garnish with pumpkin seeds. Makes 4 cups.

Chilled Avocado Soup
Corn and Bean Wraps


Corn and Bean Wraps
If you are looking for a different filling for your wraps, you should try this recipe. The filling is a combination of cabbage, corn, beans, green onions and Cajun seasoning. The veggies are all mixed together and served warm, wrapped in a tortilla.
Shredded cabbage is wilted down in oil. I just cut up fresh cabbage, but you could use cole slaw mix, if you like. Once the cabbage is tender, the rest of the ingredients are added. It could not be easier.
This also might be a way to get your family to eat more veggies. We do like to eat things that are rolled up, wrapped up or stuffed.
I freeze local sweet corn every year to enjoy throughout the year. That is what I used in this recipe. If you have fresh corn available, even better. It will be a couple of months before the local corn is available. Until then, my frozen corn will do nicely.
So here is the recipe. The ingredients may seem humble, but put together, they really are something special.
Corn and Bean Wraps
1 lb. shredded cabbage or cole slaw mix
oil
1 c. corn, fresh or frozen
1 c. sliced green onions
1 T. Creole seasoning
1 (15 oz.) can beans, drained – I like black beans or kidney beans
1/3 c. mayonnaise
6 (8 inch) flour tortillas
Sauté cabbage, covered, in oil until wilted. Add remaining ingredients (except mayo) and cook until heated through. Remove from heat and stir in mayo. Spoon mixture down center of tortillas and roll up. Serves 6.
Cheesy Cauliflower and Leek Casserole


Cheesy Cauliflower and Leek Casserole
I made this dish over the weekend. I was having a dinner with some friends. I needed a side dish and had a large head of cauliflower that I wanted to use. I decided to turn the cauliflower into something reminiscent of potatoes au gratin. Just lower carb than the potato version. They loved it. I did, too.
I also had some leeks and added them to the dish. That really made it special. Leeks are members of the onion family.They add a wonderful flavor.
Leeks can be full of sand, so they need to be cleaned well. Cut off any of the dark green parts. They are too tough to eat. The only part of the leeks you should use are white or light green. No darker than the color of celery. Wash them, trim off the tops and bottoms. Slice the leeks and place in a large bowl of water. Agitate them in the water. Any remaining sand will sink to the bottom of the bowl. The leeks will float. Lift them out, rinse again for good measure and you will be good to go.
The choice of cheese for this dish is up to you. Just pick a cheese that melts well. Sharp white cheddar is a favorite of mine. If you want a milder flavor, American cheese would work nicely, too. Not the plastic wrapped slices, but the American cheese you get at the deli counter. I have also used Swiss cheese and liked it.
Cheesy Cauliflower and Leek Casserole
4 T. butter
2 large leeks, light part only, sliced and washed well
4 T. flour
2 c. warmed half and half or milk
2 c. shredded cheese- cheddar works well
6-8 cups cauliflower- cut into bite sized pieces and steamed until tender
Salt and pepper to taste
Dash of hot sauce
½ c. bread crumbs
In stock pot, heat the butter until melted and cook the leeks, over medium low heat, until tender. Toss in flour and stir until blended in. Add the half and half and cook, stirring often, until mixture starts to thicken. Add the cheese, stirring constantly until mixture is thickened and bubbly. Add the cauliflower and stir until all the cauliflower is coated with the cheese sauce. Season to taste. Place mixture in a casserole dish. Sprinkle with the bread crumbs and place in a 350 degree oven. Cook until mixture is bubbly and crumbs have browned a little, about 30 minutes. Serves 6.
Homemade Tortillas


Homemade Tortillas
With Cinco de Mayo coming up, I thought it was time to re-post the recipes for homemade tortillas.
If you never made tortillas because you thought they were too hard to make, I hope I can change your mind. Tortillas are pretty easy to make. They only have a few ingredients- although you can get creative and add more stuff. The dough is simple enough. Once made, you just need to roll it out into circles. Heck, you only need to roll them into something resembling a circle. They will taste the same, even if they aren’t perfectly round.
Cooking involves a hot skillet and 30 seconds per side. The flavor and texture are so much fresher than most of what you can buy. Certainly fresher than what is at the local grocery store.
While it is easier if you have a tortilla press, I roll mine out by hand all the time. You could also use a pasta machine for rolling- although that will limit their width.
There is a little fat in most recipes- traditionally lard- but you have wiggle room here, too. I used coconut oil and was very happy with the taste and texture. So here are three recipes for tortillas- corn, wheat and whole wheat.
Corn Tortillas
1 3/4 cups masa harina ( corn flour) it is finer than cornmeal and will give you a nicer end product
1 1/8 cups hot water
In a medium bowl, mix together masa harina and hot water until thoroughly combined. Turn dough onto a clean surface and knead until pliable and smooth. If dough is too sticky, add more masa harina; if it begins to dry out, sprinkle with water. Cover dough tightly with plastic wrap and allow to stand for 30 minutes.
Preheat a cast iron skillet or griddle to medium-high. Divide dough into 15 equal-size balls. Using a tortilla press, a rolling pin, or your hands, press each ball of dough flat between two sheets of plastic wrap. Immediately place tortilla in preheated pan and allow to cook for approximately 30 seconds, or until browned
and slightly puffy. Turn tortilla over to brown on second side for approximately 30 seconds more, then transfer to a plate. Repeat process with each ball of dough. Keep tortillas covered with a towel to stay warm and moist until ready to serve.
Whole Wheat Flour Tortillas
1 cup all-purpose flour
4 cups whole wheat bread flour
1/2 cup fat, you could use lard, shortening or coconut oil – something solid at room temp- not oil
2 tablespoons salt
1 1/2 cups boiling water
flour for rolling
In a large bowl, stir together 1- cup all-purpose flour, whole wheat flour and salt. Rub in the fat by hand until the mixture is the texture of oatmeal. Make a well in the center, and pour in the boiling water. Mix with a fork until all of the water is evenly incorporated. Sprinkle with a bit of additional flour, and knead until the dough does not stick to your fingers. The dough should be smooth. Make balls the size of golf balls, about 2 oz. each. Place them on a tray, and cover with a cloth. Let stand for at least 1 hour, or up to 8 hours. Heat a griddle or large frying pan over high heat. On a lightly floured surface, roll out a tortilla to preferred thinness. Fry one at a time. Place on the griddle for 10 seconds, as soon as you see a bubble on the top, flip the tortilla over. Let it cook for about 30 seconds, then flip and cook the other side for another 30 seconds. Roll out the next tortilla while you wait for that one to cook. Tortillas can be refrigerated or frozen. Makes 18.
Flour Tortillas
2 c. flour
1/4 c. fat, you could use lard, shortening or coconut oil – something solid at room temp- not oil
1 t. salt
2/3 c. warm water
Combine flour and fat by cutting in to resemble coarse crumbs. Dissolve salt in water and stir into flour mixture. Form into a ball and knead on a lightly floured surface 2-3 minutes or until it is smooth. Divide dough into 12 equal pieces and wrap each in plastic wrap. Allow dough to rest 30 – 60 minutes. On lightly floured surface roll out a piece of dough into a 7-inch circle. Cook dough on griddle or in a skillet over medium high heat until puffy and golden on both sides, 1-2 minutes. Wrap in a kitchen towel and repeat process with remaining dough, stacking and wrapping as you go. Makes 12.


