Tiramisu Doughnuts


Tiramisu Doughnut
These doughnuts are inspired by the flavors of tiramisu, a traditional Italian dessert. They are a filled doughnut, like jelly doughnuts. I used the filling that I would normally use for making tiramisu. It is an egg custard, combined with mascarpone cheese and whipped cream. After the doughnuts are filled, they are topped with a mocha ganache. The end result is sublime.
I started making these doughnuts a few years ago. It was Fat Tuesday and I was making jelly doughnuts, a family tradition. Not everybody likes jelly doughnuts and I wanted to switch things up. As a kid, I loved the cream filled doughnuts my folks would make. I decided to use the filling recipe I used for tiramisu. To finish it off, a little coffee is added to the ganache to give it the flavors of classic tiramisu.
You do need to store finished doughnuts in the fridge, assuming any are leftover.
I won’t lie, these doughnuts are a bit of work, but worth the effort. Here is the recipe.
Tiramisu Doughnuts
Filling:
5 egg yolks
1/4 c. sugar
1/2 c. Marsala wine (not cooking wine)
2 c. whipping cream
4 T. sugar
1 lb. mascarpone cheese
Make zabaglione (egg custard). In double boiler, over simmering water, beat together egg yolks and sugar until lemon colored. Stir in Marsala and continue cooking, stirring constantly until mixture thickens and will mound on a spoon. This will take about 10 minutes. Remove from heat and cool down. You can place in bowl in fridge 30 minutes or so. Beat together whipping cream and sugar until stiff peaks form. Beat in mascarpone and chilled zabaglione. Chill 1 hour.
Dough:
4 c. flour
2 T. sugar
1 t. salt
½ c. butter
1 packet yeast
¼ c. warm water
2 t. sugar
1 c. evaporated milk
2 eggs, beaten
Combine flour with sugar and salt. Cut in butter and set aside. Dissolve yeast in warm water and 2 t. sugar and set aside. Combine milk with eggs. Stir in yeast mixture and add to flour mixture stirring well. On lightly floured surface knead dough until dough is smooth, about 5 minutes. Dough will be very sticky. Cover and let rise until doubled, about 1½ hours. Remove dough from bowl and punch down. Using about a third of the dough at a time roll dough out to about an ½ -inch thickness and cut out with a 2½ -inch biscuit cutter. Re-roll scraps and cut out. You should get about 2 dozen. Place dough circles on a floured surface and cover with a towel until doubled, about an hour. Heat oil in a deep pan until it reaches 375 degrees. Cook doughnuts a few at a time until golden on both sides, about 1 minute per side. Drain on paper towels and cool before filling.
Note: You can also refrigerate the dough after kneading it if you would prefer. Just place dough in an oiled bowl, cover with plastic wrap and chill overnight. Roll and cut dough into doughnuts when cold from the fridge. Allow to rise, covered, until doubled in bulk, about 2-3 hours. Fry as directed.
To fill doughnuts use a pastry bag fitted with a long tube tip for filling. I have these handy plastic syringes which are easy to use. Insert tube tip into doughnut and squeeze gently until doughnut is filled with cream (or jelly). Be careful not to overfill or doughnut will split. Once filled doughnuts can be frosted or topped with a sugar glaze. For the Tiramisu Doughnuts I made a mocha ganache.
Mocha Ganache
2 c. chocolate chips
1 c. whipping cream
1 T. instant coffee powder
Combine all ingredients in a microwave safe dish and heat in microwave for 2 minutes. Stir mixture until smooth and return to microwave if chocolate is not fully melted. Heat in microwave for 30 seconds more at a time, stirring after each time until mixture is smooth. For extra smooth mixture strain before using. Dip the top of the filled doughnuts in ganache.
Mom’s Jelly Doughnuts


Jelly Doughnuts
I remember how fun it was to watch my parents making doughnuts. The making of the dough, then cutting the dough into circles. The dough circles would then rise on the counter, under linen towels, until puffed up. Gently they would be fried, then set on paper towels to drain. Once cooled, the filling would be piped into them through a pastry bag filled with some wonderful jelly or jam.
I also remember learning to fill them. Squeezing the jelly from the pastry bag into the doughnut was tricky. You wanted to make sure there was enough filling, but not so much that they split open. After a couple of tries, I realized you could figure it out by the weight of the filled doughnut in your hand.
My parents were both excellent bakers. My father had even been a professional baker at one time. I thought it was normal to have parents who made doughnuts. It was the norm in my family.
My folks only made them for special occasions. Unless my Mom got a taste for homemade jelly doughnuts. Then, my dad would make them for her. She loved jelly doughnuts. More than pretty much anyone else I knew.
You can fill them with any number of jellies, jams and cream fillings. I had fresh strawberries and dried apricots so I used them to make both a strawberry filing and an apricot filling. Once fried and filled, the doughnuts can be eaten plain or topped with a drizzle of powdered sugar glaze or just rolled in powdered sugar. They are a bit of work, but well worth the effort.
Jelly Doughnuts
Dough:
4 c. flour
2 T. sugar
1 t. salt
½ c. butter
1 packet yeast
¼ c. warm water
2 t. sugar
1 c. evaporated milk
2 eggs, beaten
Combine flour with sugar and salt. Cut in butter and set aside. Dissolve yeast in warm water and 2 t. sugar and set aside. Combine milk with eggs. Stir in yeast mixture and add to flour mixture stirring well. On lightly floured surface knead dough until dough is smooth, about 5 minutes. Dough will be very sticky. Cover and let rise until doubled, about 1½ hours. Remove dough from bowl and punch down. Using about a third of the dough at a time roll dough out to about an ½ -inch thickness and cut out with a 2½ -inch biscuit cutter. Re-roll scraps and cut out. You should get about 2 dozen. Place dough circles on a floured surface and cover with a towel until doubled, about an hour. Heat oil in a deep pan until it reaches 375 degrees. Cook doughnuts a few at a time until golden on both sides, about 1 minute per side. Drain on paper towels and cool before filling.
Note: You can also refrigerate the dough after kneading it if you would prefer. Just place dough in an oiled bowl, cover with plastic wrap and chill overnight. Roll and cut dough into doughnuts when cold from the fridge. Allow to rise, covered, until doubled in bulk, about 2-3 hours. Fry as directed.
To fill doughnuts use a pastry bag fitted with a long tube tip for filling. I have these handy plastic syringes which are easy to use. Insert tube tip into doughnut and squeeze gently until doughnut is filled with jam. Be careful not to overfill or doughnut will split. Once filled doughnuts are topped with a powdered sugar glaze or rolled in powdered sugar.
Apricot Filling
12 oz. dried apricots, chopped up
2 c. water
2 c. sugar, or to taste
Combine apricots with water in saucepan and simmer, covered until apricots are really tender. This will take at least an hour- add more water, if needed. Add sugar to taste and cook until thickened. Puree mixture in a blender.
Strawberry Filling
1 lb. strawberries
1½ c. sugar
½ c. water
3 T. cornstarch
Crush berries and place in saucepan with the sugar. Cook until berries are tender, about 10 minutes. Combine water with cornstarch and add to strawberries. Cook until thickened and bubbly. Cool. , Puree. Makes 2 cups.
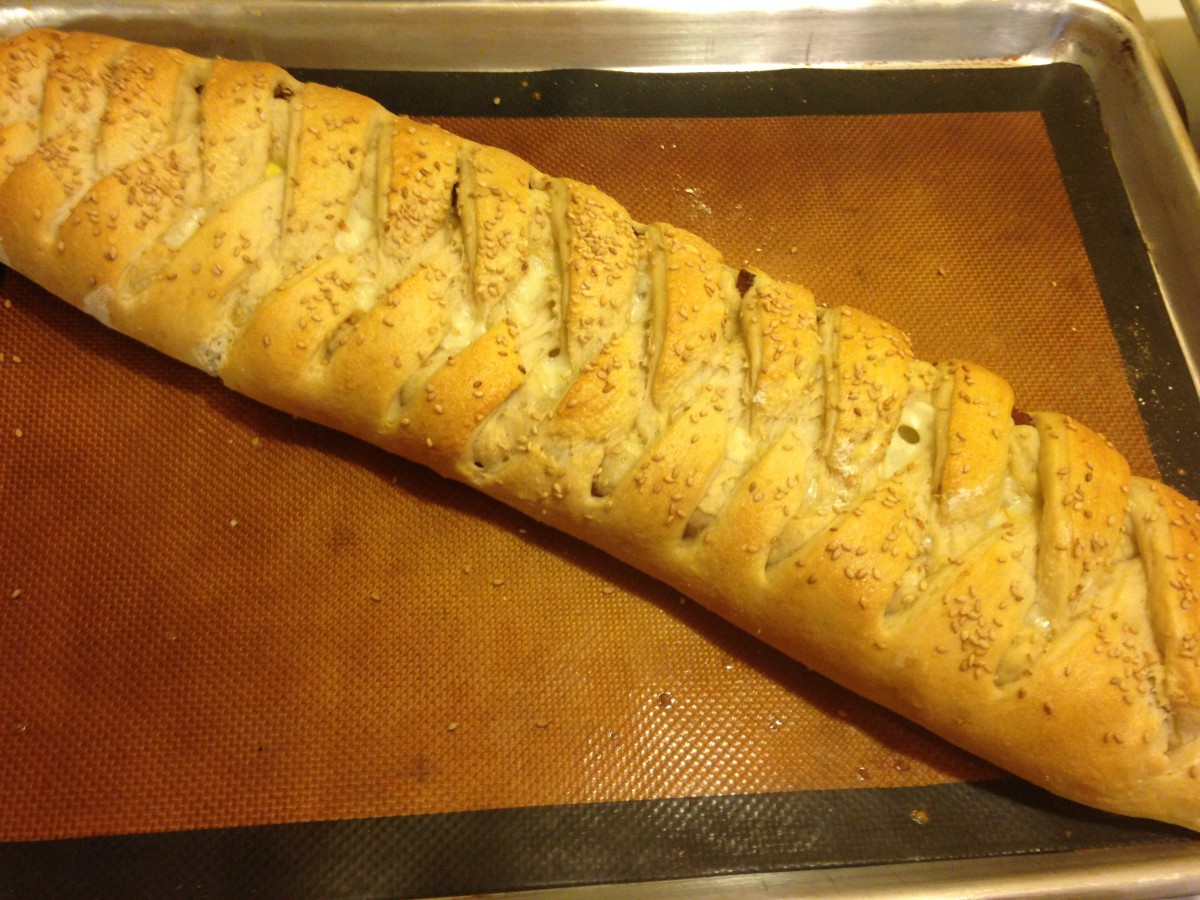
Reuben Bread

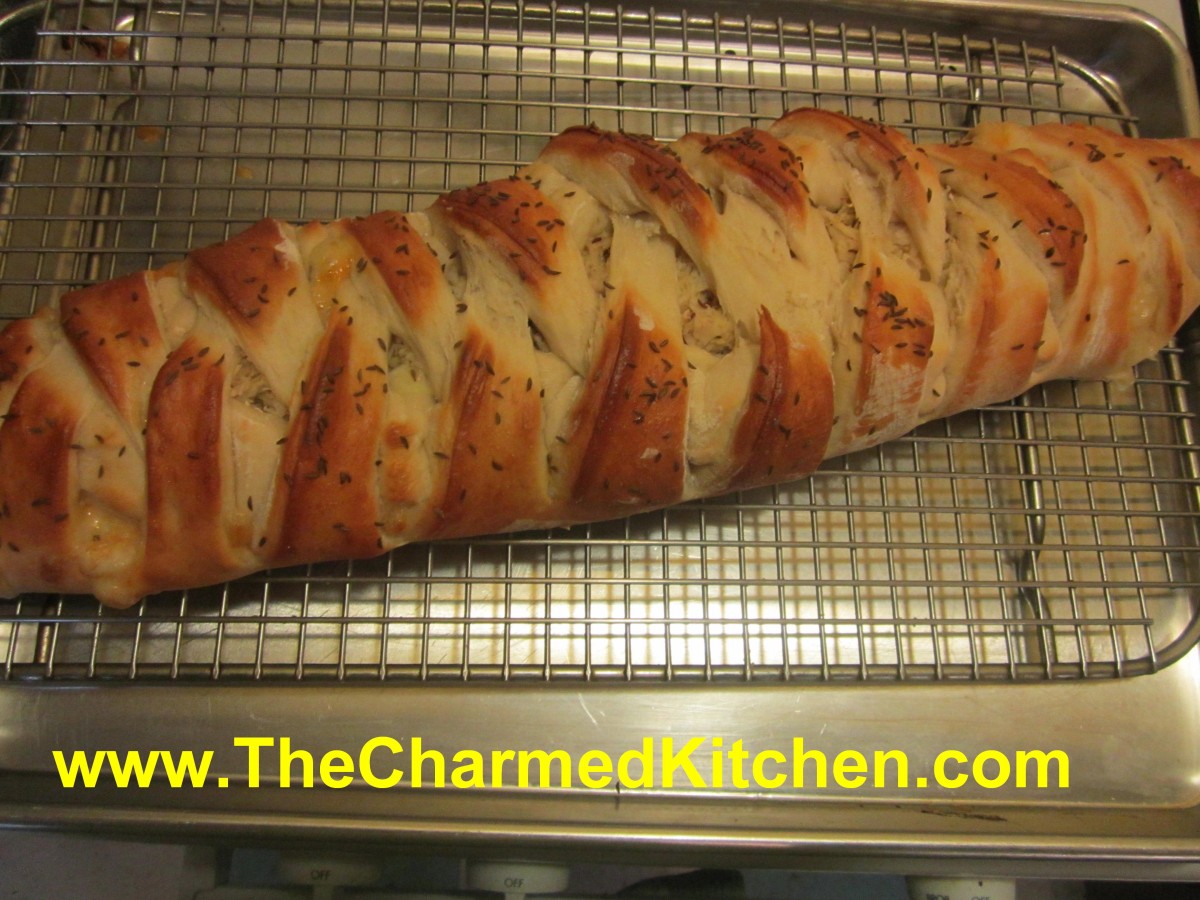
Turkey Reuben
I had a fun time yesterday teaching a friend how to make this bread. We made the Reuben bread, but also made three more breads, switching up the fillings. We ended up with a roast beef/provolone, ham with cheddar and a spinach artichoke bread.
This would make a great bread to serve for your Super Bowl party. If you are looking for a twist on a Reuben sandwich, try baking all the traditional ingredients into a loaf of bread.
By using quick rising yeast, this bread can be ready to eat in right around an hour. It tastes amazing, and looks pretty impressive, too.
Easier than you think, it will look like you spent all day making it. Plus, you can switch out the ingredients in all sorts of fun combinations.
Rueben Bread
3 ¼ c. all purpose or bread flour, you can use a little rye flour, too
1 T. sugar
1 t. salt
1 package quick-rising yeast
1 c. hot water
1 T. oil
¼ c. thousand island dressing*
6-8 oz. thin sliced corned beef
4 oz. sliced Swiss cheese
1 c. sauerkraut, rinsed and squeezed dry
1 egg white, beaten
Caraway seeds
Set aside 1 cup of the flour. Combine remaining flour with the other dry ingredients in a medium bowl. Stir in water and oil and gradually stir in enough flour to make a soft dough. Turn onto lightly floured surface and knead until dough is smooth and elastic, about 5 minutes. Roll dough into a rectangle about 16 x 8. Spread dressing down center middle of dough. Top with meat slices, cheese and sauerkraut. Cut one-inch wide strips of dough from filling to edge on both sides. It will sort of look like fringe. Alternating sides, fold strips up and over the filling at an angle. Carefully lift loaf onto greased baking sheet and place at an angle. Cover with a towel and place sheet on top of a roasting pan half-filled with simmering water for 15 minutes. Brush with egg white and top with seeds. Bake in a preheated 400-degree for 20-25 minutes or until golden brown. Cool slightly before slicing. Serve warm and refrigerate leftovers.
* You can make your own Thousand Island Dressing by combining equal parts of ketchup, mayo and sweet pickle relish.
Note: The variations for this bread are almost endless. Some favorite combinations are ham and Swiss with mustard, roast beef and cheddar, chicken, broccoli and cheese, Spinach with ricotta or feta and onions, pizza, assorted fillings. You get the idea. Use your imagination and have fun. Just be careful not to overfill, or the bread will be hard to move, use fillings that aren’t too runny and always use cold fillings.
If you want to use regular yeast use warm, rather than hot water. Also, don’t let dough rise over boiling water. After kneading cover dough and let rise 45 minutes. Punch down and assemble as in original recipe. Cover with a towel and let rise until dough looks puffy, about 40 minutes. Bake as directed above. These breads can also be frozen.
Here are more pics from yesterday. Great job, Courtney!!!
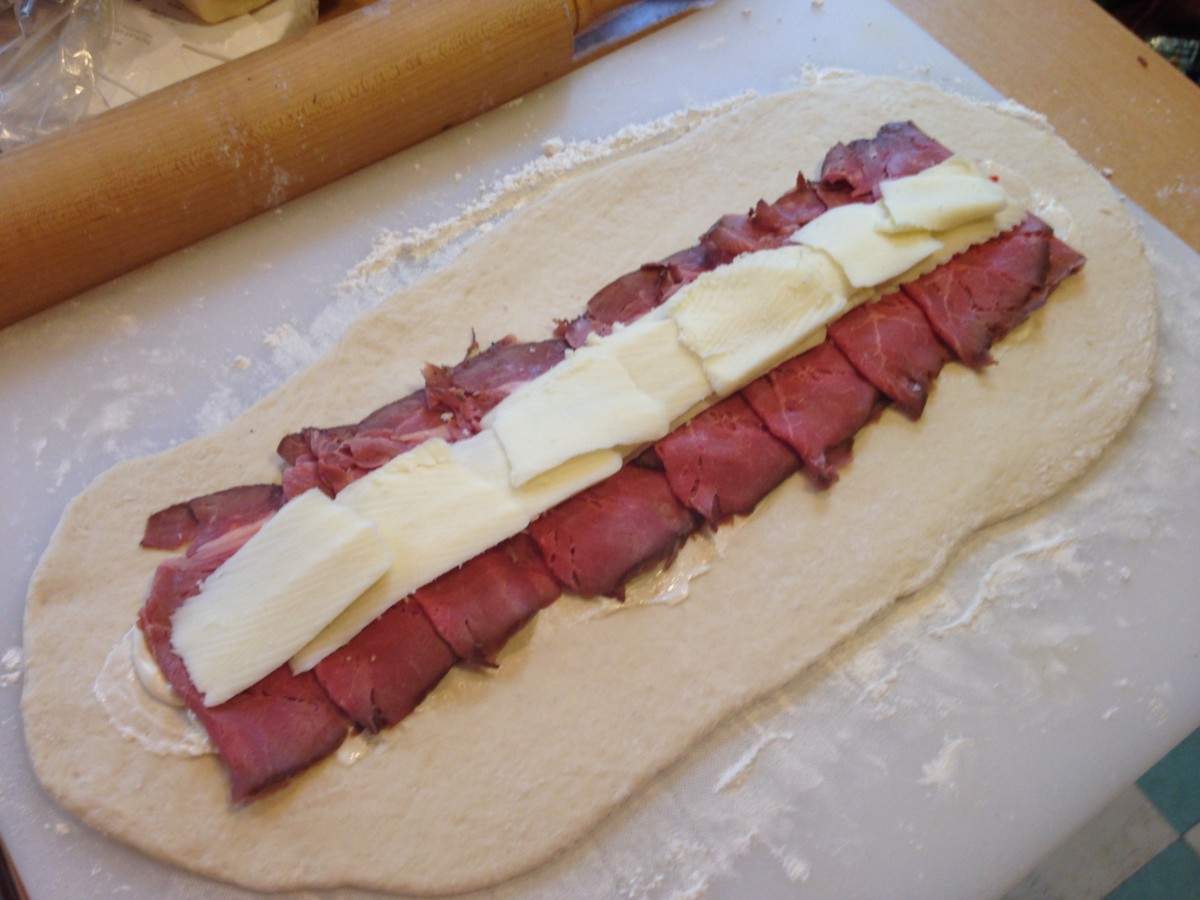
Roast beef and provolone
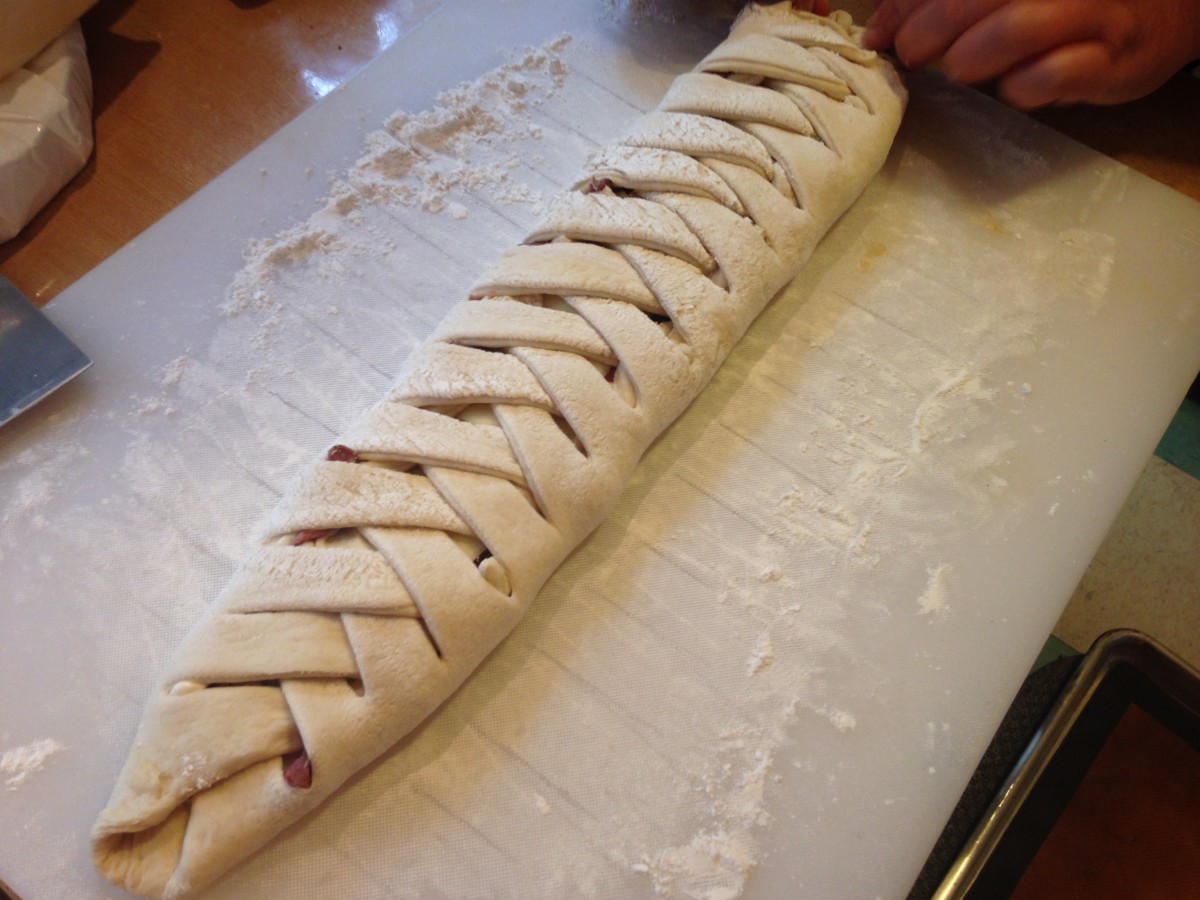
Ready to rise
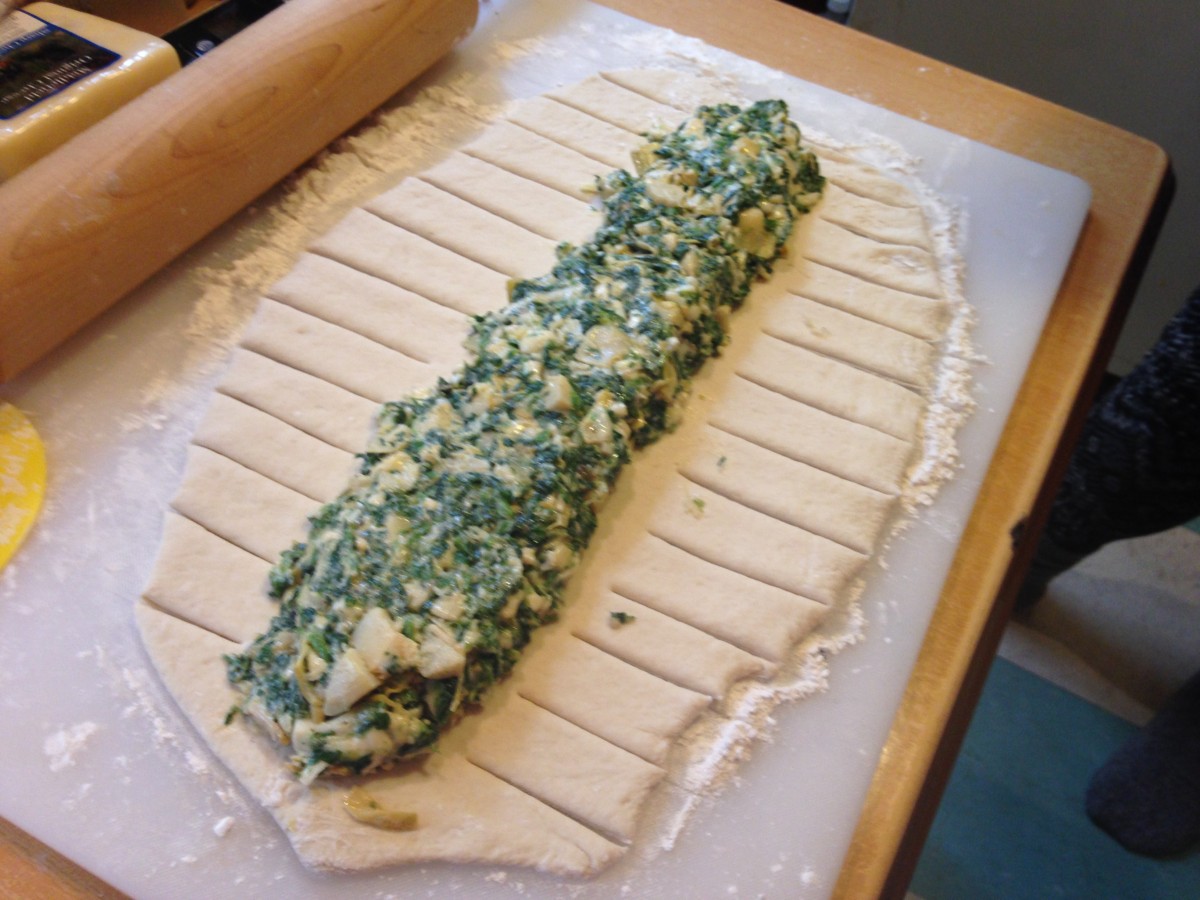
Spinach and Artichoke
All Done!!
“Chili” Stew


Chili Stew
This would be a great dish to serve on Superbowl Sunday. I made this dish the other night. A couple of friends had stopped by, so I invited them to stay for dinner. They liked it a lot. It’s a great option when time is short.
I love this recipe, but didn’t quite know what to call it. It wasn’t quite a traditional chili, so I decided to call it Chili Stew.
It comes together in no time, and still has plenty of flavor. Of course, you can cook it longer, if you have the time. You can also move it to a crock pot, once the meat and veggies have been sauteed and drained.
It can be served as is, or topped with cheese, sour cream or chopped onions. Perfect dinner for a “chili” night.
Chili Stew
1 pound ground beef, pork or turkey – or a combination
1 medium onion, chopped
1 small sweet pepper, chopped
1 (15 ounce) can black beans, rinsed and drained
2 (16 ounce) cans kidney beans, rinsed and drained
2 c. corn, fresh, frozen or canned (drained)
1 (14.5 ounce) can diced tomatoes
1 (8 ounce) can tomato sauce
1 (4 ounce) can chopped green chilies
3 tablespoons chili powder
1 T. minced garlic
1 t. paprika
1 t. cumin
1 t. oregano
1/2 teaspoon salt, or to taste
hot sauce to taste
In a Dutch oven or large saucepan, cook the meat, onion and pepper over medium heat until meat is no longer pink; drain. Stir in remaining ingredients. Bring to a boil. Reduce heat; simmer, uncovered, for at least 15 minutes, stirring occasionally. Serves 4-5.
Super Crispy Chicken Wings


Crispy Chicken Wings
These wings are super crispy, even though they are baked in the oven, not fried. It may have to do with a rather unusual ingredient.
I got this recipe from a local television show and have made it a couple of times now. Thanks, David Moss, for this one. The wings are coated with a little salt and baking powder.
Yes, baking powder. I am not sure how it works, but the combination leaves you with wings that are super crisp on the outside and juicy inside. The only thing I changed from the original recipe, is that I use a little less salt.
Once the wings are done cooking, you can toss them in whatever sauce you like.
Super Crispy Chicken Wings
3-4 lbs. chicken wings
2 T. baking powder
1 t. salt
Hot sauce and butter- or assorted dipping sauces
Cut wings into three pieces- discard tips, or use to make stock. Pat the wings dry. This step is important. The dry skin helps them to get crisp. Place baking powder and salt in a plastic bag and add the wing pieces, a few at a time, shaking to coat evenly. Continue until all the wings are coated. Place wings on a rack that is placed on a baking sheet. Bake wings in a preheated 250 degree oven for 30 minutes. Turn the heat up to 425 and continue cooking 45 minutes more. Remove wings from oven. You can melt butter, mix with some hot sauce and toss the wings in that mixture, or just serve the wings with your favorite sauce.
The Art of Biscuits

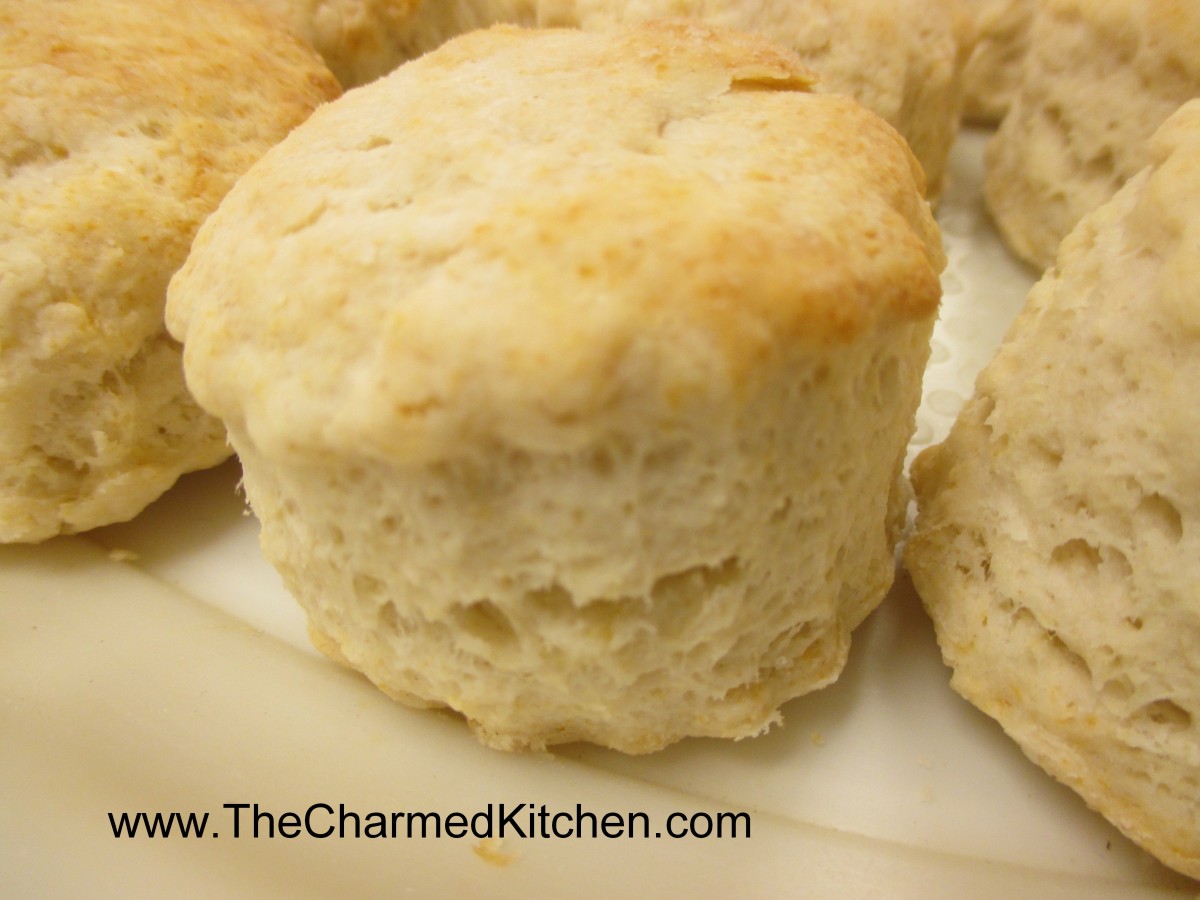
Biscuits Supreme
Biscuits are easy to make. They really are. Fast, too. You can mix up a batch of biscuits in the time it takes the oven to preheat. Yet, I know people who seem to struggle with them. The other night, a friend and I were talking about the secret to a light and flaky biscuit.
So what goes wrong? How do you make light, flaky biscuits every time?
For the moment I’ll assume you have a decent recipe. There are a lot of great biscuit recipes out there. I know people that have treasured family recipes. Biscuits that have been made the same way for generations.
Assuming also, that the baking powder is fresh*, there has to be some other reason that some folks just seem to struggle with biscuits.
The problem is – more than likely- over-mixing the dough. When I talk to someone who tells me that their biscuits are always heavy or tough I first ask about how they are put together.
Once the dry ingredients have been mixed and the fat cut in, there is just liquid to be added. I prefer to chill whatever fat I am using.
At this point the dough should be handled just enough to hold together. A light hand means a light biscuit. The same is true for making scones. The more you knead the dough, handle the dough and roll the dough, the less flaky biscuits become.
Don’t treat biscuit dough the way you would a yeast-based dinner roll. The two are very different in how they are handled. Yeast-based doughs benefit from kneading and “working” the dough. Biscuits are the opposite.
Even when cutting out the biscuits, it will help if you cut them out as close together as you can. That way you have fewer scraps to re-roll. Every time you roll the dough out- it becomes a little tougher.
Here is a recipe for one of my favorite biscuits. They are light and very flaky. Is there anything better than a fresh, warm biscuit with some butter?
Biscuits Supreme
2 c. flour
4 t. baking powder
2 t. sugar
½ t. cream of tartar
½ t. salt
½ c. cold butter, shortening or coconut oil – you can even use lard
2/3 c. milk
Stir together dry ingredients and cut in butter to resemble coarse crumbs. Make a well in the center and add milk all at once. Stir until dough sticks together and knead on lightly floured surface 10-12 strokes. Roll or pat to ½ inch thickness. Cut with 2-21/2 inch biscuit cutter and place on ungreased baking sheet. Bake in 450-degree oven for 10-12 minutes. Serve warm. Makes 10-12.
*If your baking powder might be old, you can test it. Place a couple of tablespoons of boiling water in a cup. Add a teaspoon, or two, of baking powder. The mixture should bubble vigorously. If there are no bubbles, or very few bubbles, you might want to get a new container of baking powder.
Broccoli Rabe with Pasta and Pecans

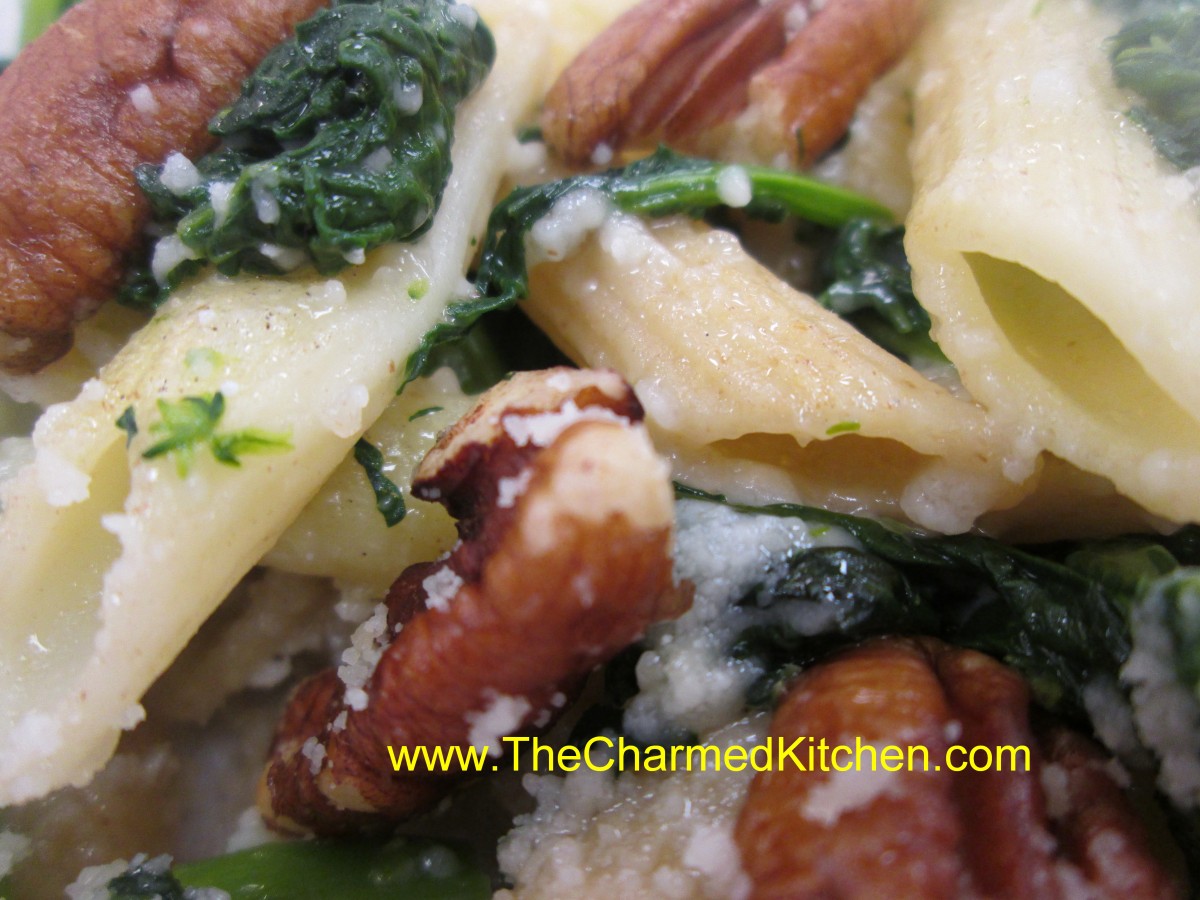
Broccoli Rabe with Pasta and Pecans
If you haven’t had broccoli rabe before, maybe you should give it a try. I am always surprised at how many people have never tried broccoli rabe- also known as rapini.
This versatile vegetable consists of stems, leaves and small florets, with a strong broccoli flavor.
I think perhaps the sometimes strong, even bitter flavor, might turn people away from trying it. I enjoy that bitterness. If you don’t, you can temper it by blanching the broccoli rabe.
That’s what I did with this dish. I also paired the broccoli rabe with pasta and some cheese which also mellows out the flavor.
Broccoli Rabe with Pasta and Pecans
1 bunch broccoli rabe (rapini), trimmed and cut into 1-inch pieces
1 (8 ounce) box uncooked pasta
½ c. pecans
3 tablespoons olive oil
2 large cloves garlic, sliced
salt and black pepper to taste
1/2 cup shredded Parmesan cheese
Fill a large pot with lightly salted water and bring to a rolling boil over high heat. Once the water is boiling, stir in the broccoli rabe, and cook until just tender, about 5 minutes. Remove with a slotted spoon, and set aside. Return the water to a boil, and stir in the pasta. Cook, uncovered, stirring occasionally, until the pasta has cooked through, but is still firm to the bite. Drain well in a colander set in the sink. While the pasta is cooking, cook and stir the pecans in a skillet over medium heat until fragrant, about 5 minutes. Set the nuts aside, add the olive oil, and reduce heat to low. Stir in the garlic, and cook until golden brown, about 3 minutes. Stir in the broccoli rabe, and cook 3 minutes to reheat. Season to taste with salt and black pepper, then stir in the drained pasta and walnuts. Toss with Parmesan cheese before serving. Serves 4.

Broccoli Rabe

Coconut Mango Bubble Tea


Coconut Mango Bubble Tea
In case you didn’t know, bubble tea is a sweetened drink, often made with fruit, fruit juice or tea. At the bottom of the glass are black, pearl tapioca that are sucked up through a large straw. They are the “bubbles” in your tea.
Bubble tea should be a little thicker than plain juice, but not as thick as a milkshake. The coconut milk was thick and gave me perfect texture in the bubble tea.
Bubble tea is one of those foods you either love or hate. I love it. The tapioca has a texture sort of like gummi candies, but a bit softer.
I always order bubble tea at Asian restaurants, so I decided it was time for me to make my own.
I ordered the black tapioca pearls online, along with the straws. You could probably find them at Asian grocery stores.
There were no directions with them, so I hunted online for how long to cook the tapioca. I found a wide range of times, so I used the suggestions from a company that sells tapioca. Worked pretty well.
I decided to make my own concoction for the actual drink. You can buy powders to mix with water to make bubble tea. I preferred to make my own.
So here is what I did.
Coconut Mango Bubble Tea
1 c. tapioca pearls*
6- 8 c. water
sugar syrup -directions follow
2 (12 oz.) cans mango nectar
1 can coconut milk
ice
bubble tea straws
Bring water to a boil- use plenty of water. Add tapioca pearls and stir gently so they don’t stick to the bottom of the pot. Don’t stir constantly, just a few times. Once the water returns to the boil, turn water to a low boil, cover pot, and cook 20 minutes. Turn off heat, leave pot covered and let tapioca sit another 30 minutes in the hot water.
While that is going on- make sugar syrup by boiling together 1 cup of sugar and one cup of water until sugar dissolves. set aside to cool.
Once tapioca are finished cooking and soaking in the water- taste one to make sure they are tender. If they are hard in the middle- turn heat back on and check every 5 minutes for preferred texture.
Drain off extra water in a strainer and rinse tapioca pearls to remove some of the stickiness. Add them to a bowl and cover with the sugar syrup.
This is where I had a problem with my first batch. I made the pearls the night before. They were perfect. I put them in sugar syrup and popped them in the fridge. The next morning they had become hard, chewy creatures that were not what I wanted. I drained off the sugar syrup and cooked them in a fresh batch of boiling water. They softened back up in about 10 minutes. My advice, if you want to make them ahead of time- drain well, rinse and place in fridge. Toss in the sugar syrup right before you are ready to serve them.
For each glass of bubble tea, mix a scoop of pearls with some of the syrup and place in a glass- I like about 1/4 cup of the pearls. Add ice. Combine coconut milk and mango juice in a one to two ratio- one part coconut milk and two parts mango nectar. Pour this in the glass with the pearls. This recipe makes 4 bubble teas.
*They double in size and are best used soon after cooking. Don’t cook more than you want to use in a day or two.

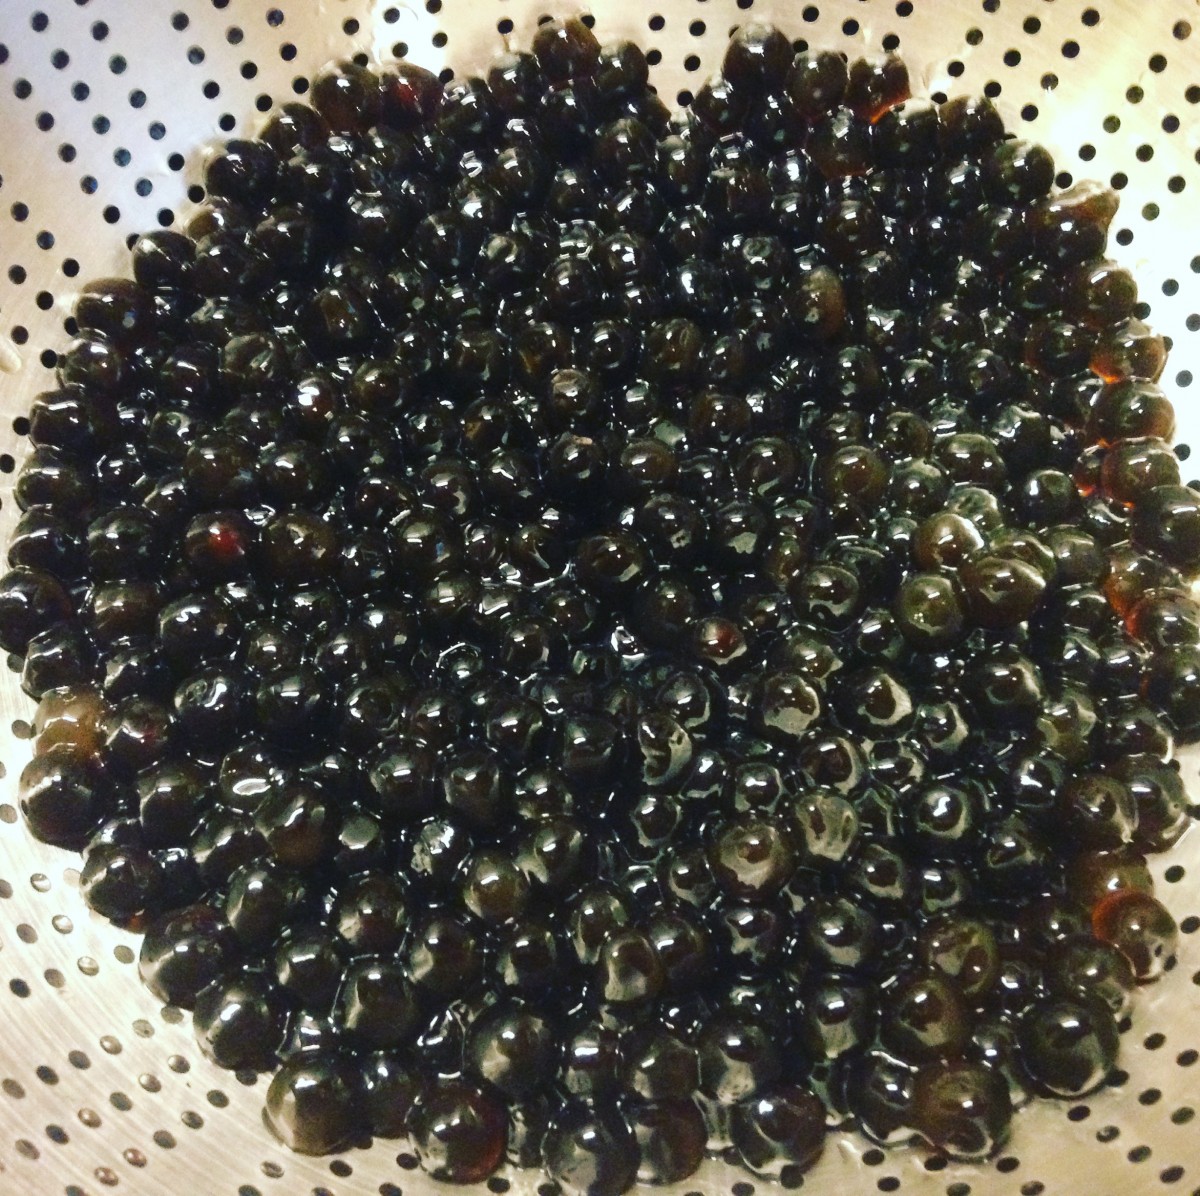
tapioca pearls after cooking
Corn and Bacon Chowder


Corn and Bacon Chowder
I was defrosting my freezer and found local sweet corn I had frozen last summer. I had forgotten all about it. I wanted to make soup for a dinner, so I decided to use the frozen corn to make this chowder. I also had a pound of bacon, which gave the soup a wonderful smoky flavor. I cooked the bacon in the soup pot, allowing it to get pretty crisp. I removed as much of the fat as I could, but left the bacon in the pot. Then, when I cooked the onions and added the stock, all the little brown bits of bacon in the pot added even more flavor. It came out great!! A perfect dish for a chilly evening.
Corn and Bacon Chowder
1 lb. bacon
1 onion, chopped
2 carrots, peeled and sliced
6 c. chicken stock
2 potatoes, peeled and cubed
6 c. corn – I used frozen corn
2 cups half and half or milk
¼ c. flour
Salt and pepper to taste
Hot sauce to taste
Fresh chopped parsley
Cut bacon in 1-inch pieces and fry in a Dutch oven until crisp. Tip pot and spoon out most of the fat. Add the onion and sauté until translucent. Add carrots and stock. Cover and simmer 10 minutes, then add the potatoes and corn. Cover and simmer 15-20 minutes, or until potatoes are tender. In jar with a tight fitting lid, combine 1 cup of the half and half or milk with the flour. Put on the lid and shake until mixture is smooth. Stir into the pot along with the remaining half and half or milk and cook, stirring often until mixture thickens up. Adjust seasoning to taste. Stir in parsley and serve. Serves 6.


