Bacon Waffles

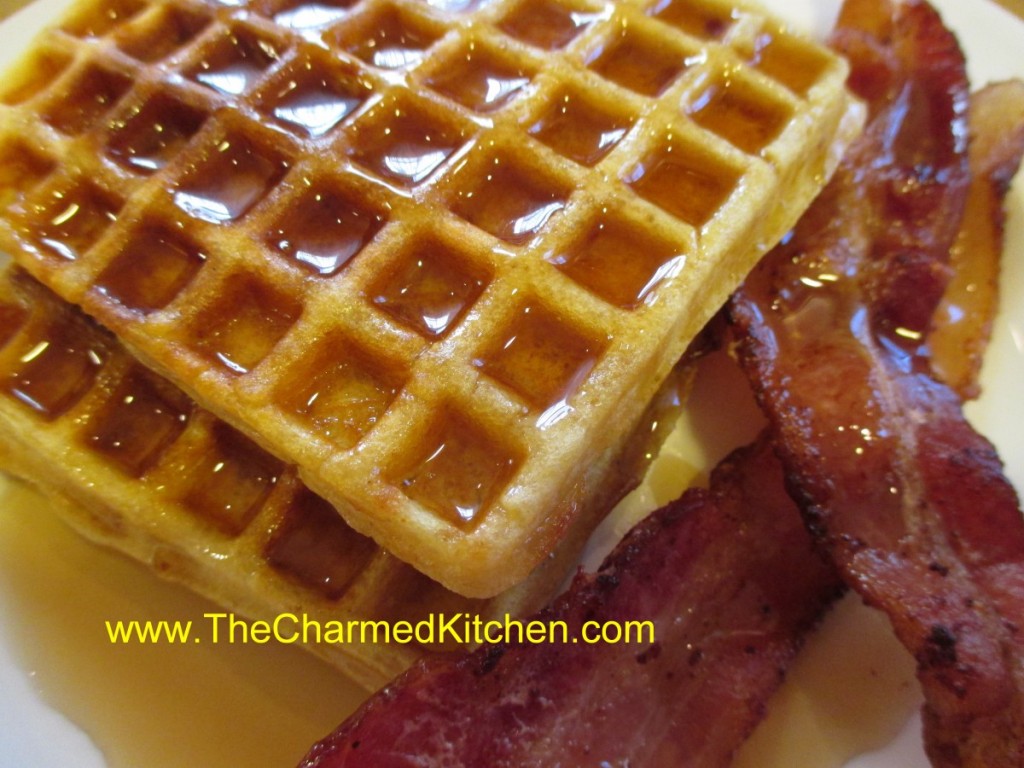
If you are looking for a special breakfast for Father’s Day, maybe dad would like some waffles. Even better, make him waffles with bacon inside them. Then serve your bacon waffles with extra bacon on the side!!!
For me, breakfast doesn’t get much better than waffles. Well, unless maybe you add bacon to the waffle batter.
Truth is, I don’t treat myself to waffles all that often, but if I am going to eat waffles, I go all out.
These are truly wonderful waffles. Light, crispy on the outside and studded with bacon. A drizzle of warm maple syrup and you are good to go.
So, if you are looking for a special treat for dad for breakfast, or lunch, or dinner or a snack… try these bacon waffles. You can thank me later.
Bacon Waffles
1 pound sliced bacon
1 3/4 cups all-purpose flour
1 tablespoon sugar
2 teaspoons baking powder
1/2 teaspoon salt
3 eggs, separated
1½ cups milk
¼ cup butter, melted
In a skillet, cook bacon until crisp. Drain; crumble and set aside. In a mixing bowl, combine the flour, sugar, baking powder and salt. Beat egg yolks, milk and butter; stir into dry ingredients until smooth. Beat egg whites until stiff peaks form; fold into batter. Add bacon. Before making each waffle, stir batter. Bake in a preheated waffle iron according to manufacturer’s directions until golden brown.
Strawberries and Cream Bread

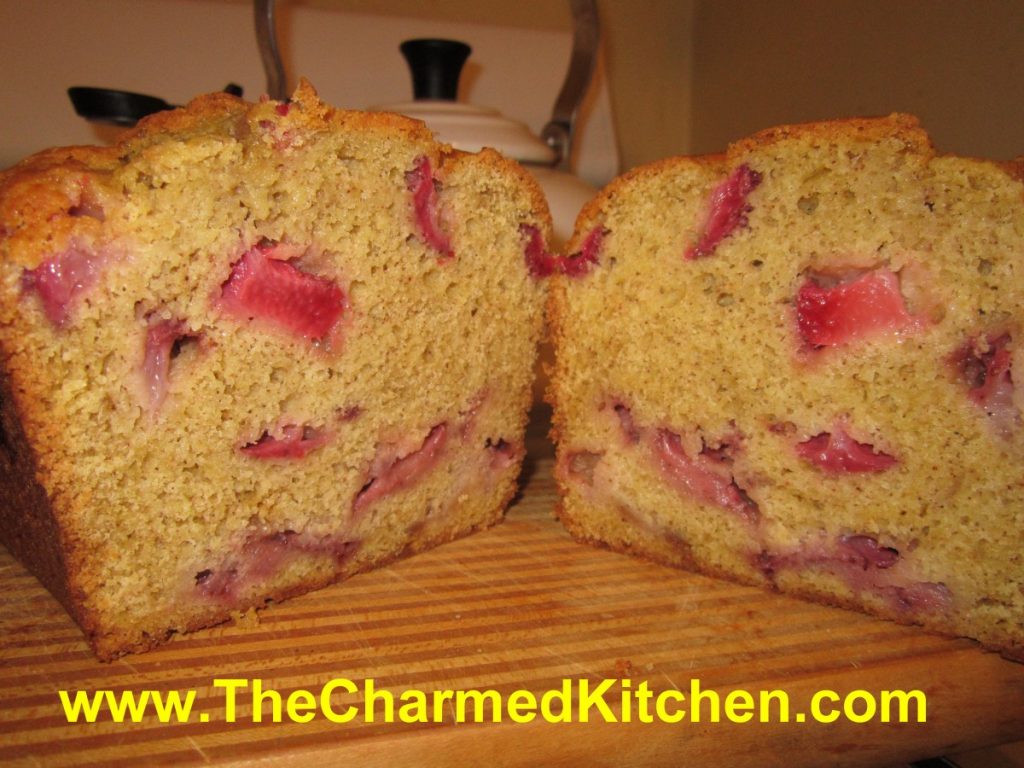
I have posted this recipe before, but have been getting requests for it, so I thought it was worth sharing again. Since strawberries are in season, it seemed like the right time to post this recipe.
This is one of my favorite quick breads. The bread is tender and full of the sweet taste of fresh strawberries.
The batter will be very thick- don’t worry- it is supposed to be that way. When it bakes, the juices from the fresh berries keeps it moist.
I always end up making a double batch, one loaf to eat fresh, and one to give as a gift, or freeze.
This bread is fine just the way it is for dessert, or you can top with sliced strawberries, ice cream, whipped cream or some melted chocolate. Or top it with all of them!!
Here is the recipe. Enjoy!!
Strawberries and Cream Bread
1 ¾ c. flour
½ t. baking powder
½ t. baking soda
½ t. salt
½ t. each cinnamon and nutmeg
½ c. butter, at room temperature
¾ c. sugar
2 eggs, room temperature
½ c. sour cream, room temperature
1 t. vanilla
1 c. fresh strawberries, coarsely chopped*
¾ c. chopped nuts, optional
Grease an 8×4 inch loaf pan and preheat oven to 350 degrees. In a large bowl combine dry ingredients. Set aside. In small bowl beat butter until creamy. Add sugar and beat 1 minute. Beat in eggs one at a time. Beat in sour cream and vanilla. Stir in flour mixture until just moistened. Fold in strawberries and nuts and place batter in prepared pan. Bake 60-65 minutes, or until toothpick inserted in center comes out clean. Let stand in pan 10 minutes. Remove from pan and cool on wire rack. Makes 1 loaf. Freezes well.
* frozen berries are not recommended in this bread
Rainbow Salad

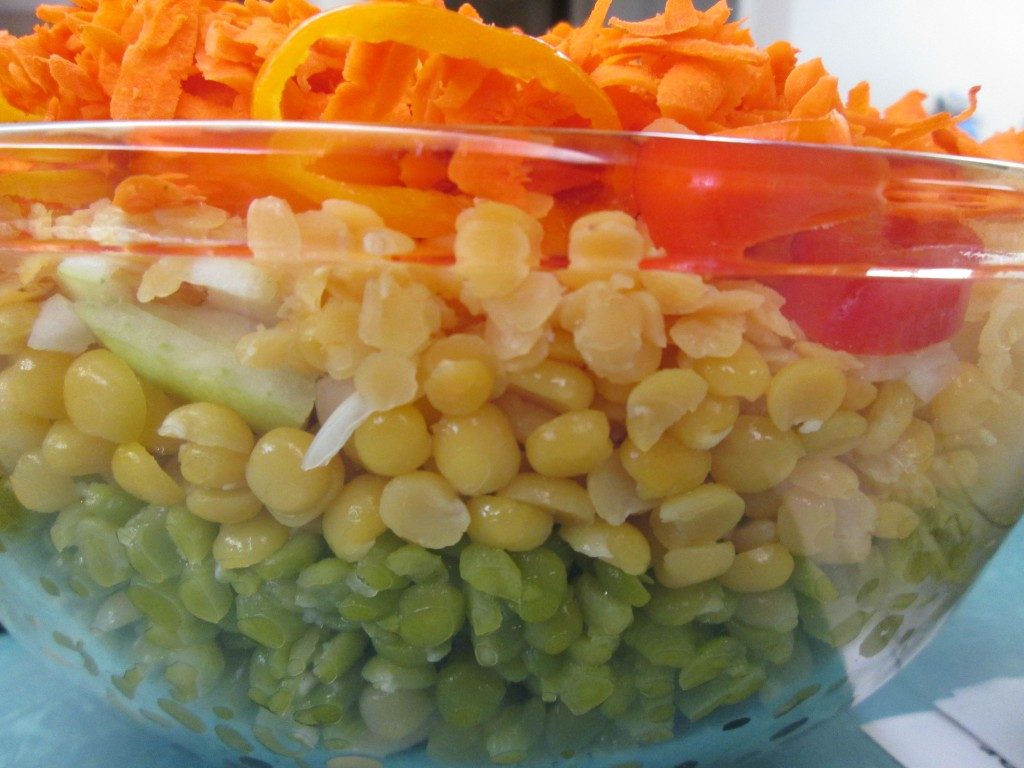
When you hear green or yellow split peas- do you think of soup? You probably do. But when cooked until just tender, split peas make a great salad ingredient. I often just add some cooked split peas to a tossed salad. They add flavor, protein and a nice texture to salads. An added bonus is that split peas can be cooked from dry to tender in about 20 minutes. That makes them a great choice when time is tight.
This is one of my favorite salads using both green and yellow split peas. Fresh and colorful, it is a big hit with vegetarian and non-vegetarian friends. If some of you are looking for new meatless meals ideas, this one is a winner.
The salad uses both green and yellow split peas, along with black beans, butter beans, red lentils and assorted veggies. It is a great combination of colors and textures. It does make a lot, but you can easily cut the recipe in half.
The dish was inspired by my nephew Danny’s love of sand art when he was a kid. The ingredients are layered in the bowl for a pretty presentation. It is also an homage to the layered salads I remember from my youth.
Rainbow Salad
1 c. each green split peas, yellow split peas and red lentils
1 can black beans, rinsed and drained
1 can butter beans, rinsed and drained
1 c. diced sweet onion
1 c. diced sweet pepper
1 c. grated carrot
Cook split peas and lentils separately just until tender. Split peas, both green and yellow will take 20 minutes. Red lentils will take about 8-10 minutes. Drain and rinse each under cold water when done and set aside until ready to use, or you can cook them a day ahead and keep chilled. Each will yield about 2 1/2 c. cooked.
In large glass bowl, place the following ingredients in this order.
Black beans, butter beans, green split peas. yellow split peas. onion, red lentils. carrots and peppers. Pour over dressing and chill several hours or overnight. Serve on a bed of greens. You can also leave the salad plain and serve dressing on the side.
Dressing *
1/2 c. oil
1/2 c. vinegar, I like apple cider vinegar or red wine vinegar
1 (14 oz.) can diced tomatoes, undrained
2-3 T. sugar
1/2 c. parsley or cilantro
1 t. each chili powder, cumin and salt
dash hot sauce
Combine in a blender or food processor until smooth.
*Note: Any fresh or bottled dressing you like can be used. Balsamic works very well. I often serve it with homemade Italian dressing.
Candied Bacon


This candied bacon only has three ingredients- bacon, maple syrup and chopped nuts. The combination in sublime. Salty, sweet, smoky all in one crunchy bite. Friends and family love it!! Nice for dad on Father’s Day.
The bacon is baked, then coated with maple syrup and chopped nuts. It is returned to the oven, where it bakes until the bacon is crisp and the coating it toasted, almost caramelized. It gets crisper once it cools down.
You can make a spicier version by sprinkling with a little cayenne pepper or adding hot sauce to the maple syrup.
Candied Bacon
1 lb. bacon
3/4 c. – 1 c. maple syrup
3/4 c. – 1 c. crushed pecans (or any nuts you like! I like to leave some
larger pieces and then mix in some more finely ground)
Preheat oven to 350. Put bacon in baking pan and bake about halfway through (about 5-7 minutes or so). Drain most of the grease and allow to cool slightly. Coat each piece in syrup, roll in nuts and put back on pan. You may need more nuts as you go along, though it’s up to you how much to cover them. Bake another 7-9 minutes, until desired crispness. If you do like crisper bacon, just be sure to move the cooked bacon quickly off the baking sheet onto parchment paper, since the syrup will harden. Allow longer cooking times with thicker bacon.
Strawberry Waffles

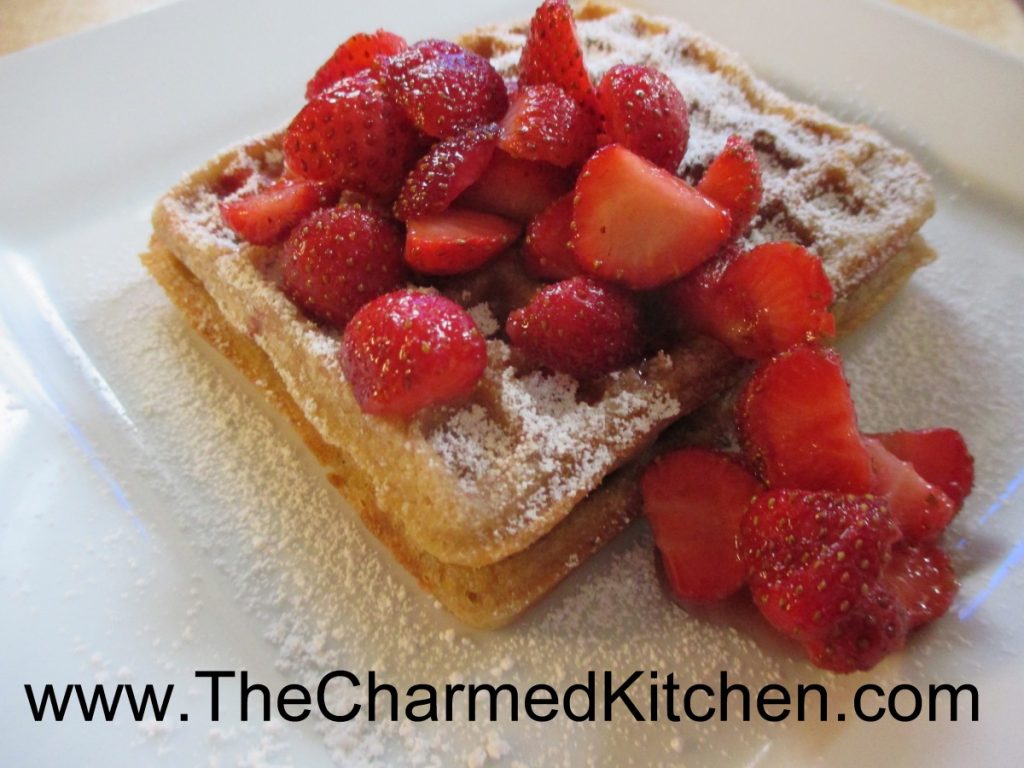
These waffles would make a great breakfast or brunch dish. I have even served them for dessert. That’s the thing about waffles. They can be eaten any time of the day.
This waffle recipe came about because I needed a dessert for dinner with a friend. It was a last minute dinner, so I didn’t have a lot of time. Waffles seemed like a great idea. They don’t take a lot of time to make, and they highlighted the berries. My friend really liked them. I did, too.
I made the waffles with fresh strawberries in the batter. Then, the waffles are served topped with more fresh berries and a dusting of powdered sugar.
They were a perfect dessert. I could see topping them with ice cream or whipped cream, too. Any leftover waffles can be frozen.
For the fresh strawberry topping, you just combine fresh, sliced berries with some sugar. If you can make it ahead of time, the sugar draws juice out of the strawberries, kind of making its own sauce. I made the topping first, then popped in the fridge.
So here is my recipe. Enjoy!!
Strawberry Waffles
1 1/3 c. flour
2 T. sugar
4 teaspoons baking powder
2 t. cinnamon
½ t. salt
2 eggs, separated
½ c. butter, melted
1¾ c. milk
2 t. vanilla
1 c. chopped fresh strawberries
Powdered sugar for topping waffles
Strawberry topping- recipe follows
In a large mixing bowl, whisk together all dry ingredients. Set aside. Separate the eggs. Set aside the yolks. Place the whites in a small mixing bowl. Beat whites until moderately stiff; set aside. Combine milk, melted butter, egg yolks and vanilla in small bowl. Add to dry ingredient mixture and blend. Stir in berries. Fold stiff egg whites into mixture. Ladle mixture into hot waffle iron and bake. To serve, top with powdered sugar and strawberry topping. Makes 10-12 (4-inch) waffles.
Topping
1 qt. strawberries
½ c. sugar- or to taste
Wash and stem berries. Slice berries. Place in bowl and sprinkle on the sugar. Stir to combine and place in fridge until ready to use. Try to do this at least 30 minutes before using. That will give the mixture time for juice to be released from the berries.
English Toffee Crunch

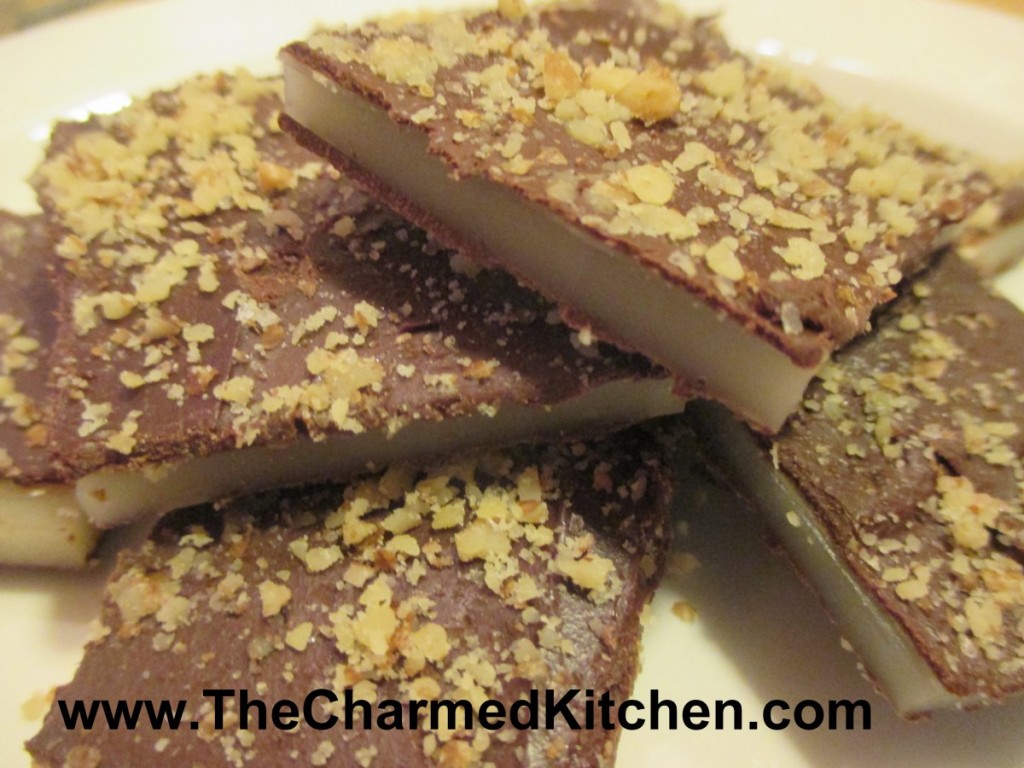
If you are looking to make a special sweet treat, English Toffee Crunch is always a good choice. The crunchy, sweet toffee is coated with chocolate on the top and bottom, along with a sprinkling of fine chopped nuts. A classic, for sure.
I know people are sometimes a little scared about making candy, but this is pretty easy to make, and well worth the effort. The only special piece of equipment you will need is a candy thermometer. Just be careful when handling the hot ingredients. The end result is a special treat. Nice gift for Father’s Day.
English Toffee Crunch
1 1/2 c. sugar
2 sticks butter
3 T. water
1 T. light corn syrup – recipe follows for a substitute
3/4 lb. milk or dark chocolate, or chocolate chips
1/2 c. very finely chopped walnuts or pecans – or even pistachios
Over low heat, stirring constantly, cook sugar, butter, water and corn syrup until mixture reaches hard crack stage (300-310 degrees). You will want to attach a candy thermometer to the pan to monitor the temperature. Pour onto ungreased jellyroll pan tilting quickly in all directions to get toffee as thin as possible. It hardens up unbelievably quickly so work fast. I like to warm the cookie sheet a little in the oven so it buys me a few extra seconds to thin out the toffee. Harden in fridge about five minutes or let stand at room temperature until cooled down. Melt chocolate in double boiler or microwave and spread half of it over toffee, spreading to edges. Sprinkle with half the nuts and return to fridge to harden chocolate. Turn toffee carefully onto another sheet and coat the bottom with the remaining chocolate and nuts. Chill until chocolate hardens then break up into bite sized pieces. Note: you can use even more chocolate if you like a thicker coating. Store in a cool, dry place in an airtight container. Makes 1 1/2 lbs.
Homemade Corn Syrup Substitute
2 cups granulated sugar
3/4 cup Water
1/4 tsp. Cream of Tartar
dash of salt
Combine all in a large, heavy stainless steel pot. Stir and bring to a boil. Reduce heat to a simmer and cover with lid for 3 to 4 minutes to get the sugar crystals off the sides of the pan. Uncover and cook to softball stage, 238 to 240 degree’s F. or when a small amount is dropped into cold water and does not hold its shape; stir constantly. Cook for another minute. Cool and store in covered jar at room temperature, will keep well for 2 months at room temperature.
For dark corn syrup add 1/4 cup molasses
Cinnamon Red Hot Biscotti


When I gifted a very large bag of cinnamon Red Hots- thanks, Laurie – I wanted to come up with some way to use them. I have been making a lot of biscotti lately, so biscotti seemed like a natural way to go. I used a recipe I already had, but tweaked it a bit. I liked the end result. I might even add more cinnamon the next time. I left them plain, but I could see dressing them up with a drizzle of a cinnamon glaze or maybe white chocolate. So here is the recipe.
Cinnamon Red Hot Biscotti
6 tablespoons unsalted butter room temperature
¾ cup granulated sugar
1 t. salt
1 T. vanilla
2 teaspoons baking powder
2 t. cinnamon
2 large eggs
2 cups all-purpose flour
½ cup crushed Red Hots cinnamon candies – I used a food processor to crush them.
Preheat the oven to 350°F. Lightly grease 2 (9×5) loaf pans. Set aside. In a medium bowl, cream the butter, sugar, salt, vanilla extract, baking powder and cinnamon. Beat in the eggs. The batter may look lumpy. Mix in the flour until just combined. Add the crushed Red Hots. Stir just until the dough is pink and speckled with candy pieces. Divide the dough between the two loaf pans, smoothing the tops as best you can. Bake for 25 minutes. Remove from the oven, and cool in the pans about 5-10 minutes. Reduce the oven to 325°F. Remove loaves from the pans. With a serrated knife, cut the log crosswise into ½” – ¾” slices. Get a baking sheet and place a cooling rack on the baking sheet. Place the slices on their sides on the cooling rack. They will bake on both sides at once, no need to turn them hallway through. Bake for 20-25 minutes, until dry and beginning to turn golden around the edges. Remove the biscotti from the oven, and allow them to cool right on the rack. Makes 2-2½ dozen.
Strawberry Sorbet

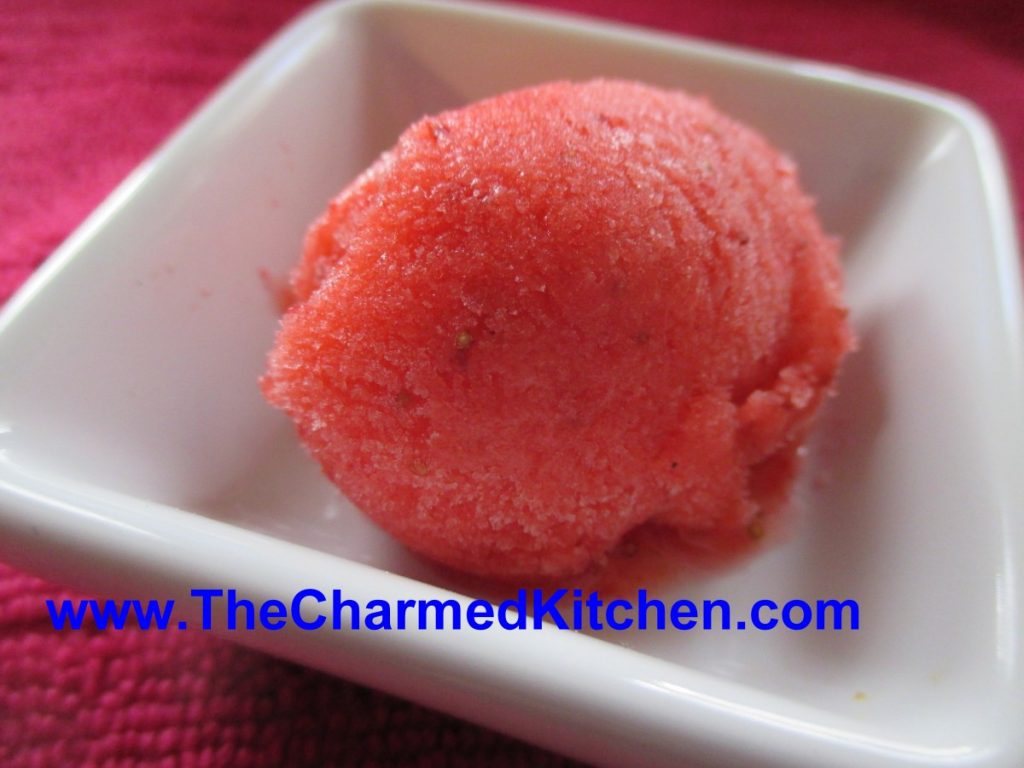
Strawberry sorbet is a wonderful dessert to keep around, especially in summer. It is sweet and a little tart and very refreshing. It is such a pretty color.
You can play around with adding other flavors. I sometimes add fresh herbs, like mint or lavender. Extracts, like vanilla, can be added, too.
Sorbets can be served on their own, with cake, or drizzled with chocolate sauce. I sometimes add a scoop of sorbet to a glass of lemonade or ice tea on a hot day. So refreshing. Sorbet can be a fun topper in cocktails, too.
You can make sorbet in an ice cream machine, if you have one, but you don’t need to. I don’t. It really is simple. As an added bonus, once your sorbet is made, you have it on hand whenever you need a dessert. The secret is to blend the sorbet a couple of times after it is frozen, if you can. Each time, the sorbet gets smoother and creamier. I use my food processor.
Strawberry Sorbet
1 1/2 lbs strawberries, fresh or frozen
1/2 c. sugar, or to taste – you could also sweeten with honey, if you prefer, or use no sweetener
1 T. lime or lemon juice
Wash and stem berries. Place in food processor with juice and blend until smooth. Sweeten to taste, stirring until sugar is dissolved. Place in a container with a lid and freeze. Once frozen, remove strawberry mix from freezer and sit it on the counter to soften a little bit. This is really the important part. You don’t want it to thaw, but you do want it soft just enough to break into chunks. Place chunks in food processor and blend it again. It will actually start to look a little creamy and lighter in color. You can serve it right away- or put it back in the freezer to serve later. At this point the sorbet is ready- but you can repeat the soften/process step once more, if you like, for even creamier sorbet. Makes 3-4 cups.
Strawberry Liqueur


This strawberry liqueur is like summer in a bottle. I make a lot of different liqueurs and strawberry is one of my absolute favorites. It is wonderful for sipping or over ice. It is also a fun addition to any number of cocktails. A friend adds it to ice cream with extra berries and blends it up for an adult strawberry milkshake.
With strawberries in season, this is the time of year to enjoy them. I want to preserve some for later, too. I made strawberry jam and dehydrated some. I will also freeze some.
Another way to preserve strawberries, is by making a liqueur with them. It is pretty simple. Just combine berries with vodka and a small amount of powdered sugar. I use half gallon canning jars for this, but you could use any food safe container with a tight fitting lid.
Let the mixture steep long enough for the berries to infuse the alcohol with their flavor. You can sweeten it later on, or even leave it unsweetened, if you prefer. I like to sip the liqueur as is, or serve on the rocks with a splash of club soda.
Strawberry Liqueur
3 cups fresh or frozen strawberries, sliced
3 T. powdered sugar
3 c. vodka
1 c. simple syrup*
Sprinkle powdered sugar over berries and let dissolve. Pour over vodka and let steep 2 weeks. Crush berries and strain then filter through cheesecloth or coffee filters. Add sugar syrup and mature 1 week. Makes 5 cups.
*Simple syrup is made from 1 cup of sugar and ½ cup of water. Bring to a boil, then cool. You will have 1 cup of syrup. You can sweeten your liqueur with honey, if you prefer. Watch when you substitute honey for sugar, as it is sweeter and stronger flavored. Better to use orange or clover honey. Add to suit your taste.
Minty Butter Cookies


These cookies can be made with fresh or dried mint. You could use frozen mint as well. They have a delicate, almost cake-like texture. The mint adds a subtle flavor. I used a little lemon extract- mint extract would give them a more intense mint flavor.
We made these in an herb cooking class recently. Everyone enjoyed the cookies. It is also a great way to use mint. If you grow mint, you know it can be a bit invasive.
Minty Butter Cookies
1 c. butter
½ c. sugar
½ c. brown sugar
1 egg
1-t. almond or lemon extract – you could also use mint
2 ¼ c. flour
¼ c. dried mint leaves or ¾ c. loosely packed fresh mint leaves, chopped fine
1 t. baking powder
1 t. cream of tartar
¼ t. salt
Cream together butter and sugar. Beat in egg and extract. Stir in dry ingredients until well mixed. Chill dough 30 minutes. Drop by rounded teaspoonfuls on ungreased baking sheet 2- inches apart. Bake at 375 for 7-9 minutes. Makes about 6 dozen.


