Homemade Wonton Soup


Homemade Wonton Soup
For Chinese New Year, why not make your own Wonton Soup? It is one of my childhood favorites. Wonton soup is actually not that hard to make and everyone seems to like it.
For me, Wonton soup always brings back memories of going out for Chinese food with my family, when I was a kid. The restaurant would serve it family style, and my mom or dad would ladle out everyone’s soup. It always looked and smelled wonderful. Tasted wonderful, too. Even more special, because we only had it when we out to dinner.
The one problem I find when trying to make this soup at home is finding wonton wrappers that are thick enough. The square ones I find at the grocery store are OK, but thinner than the ones in Wonton Soup at a restaurant. At a local Asian grocery I have found round wrappers that are labelled for dumplings and are thicker. That is what I used. They worked out better. I normally add strips of roast pork to wonton soup, but one of my friends doesn’t eat pork, so the use of chicken thighs was a great substitute. You can play around with fillings, too. I often add shrimp as both a filling and to the soup itself.
Homemade Wonton Soup
1½ lb. chicken
1 head bok choy
3 T. hoisen sauce
1 clove garlic, minced
24 won ton wrappers
2 qts. chicken stock
1 t. ginger
1 t. hot pepper sauce
Chopped green onions
Sesame oil
Bake the chicken until cooked. I used boneless chicken thighs, but even leftover roasted chicken would work. Once cooled, I minced enough of the chicken to give me 1 cup of meat. The rest I cut into thin strips. I then took stems from the bok choy and minced enough of them to make 1 cup. Combine the minced chicken with minced bok choy, the hoisen and the garlic. This is the filling for your wontons. Slice more of the bok choy- using mainly the leaves, into thin shreds. This will go into the soup later, along with the strips of chicken. You should have at least a couple of cups of the shredded bok choy, but more is OK, too. To make the wontons place one on your work surface and spoon a rounded teaspoon of the filling into the middle of it. Moisten edge with water, fold in half and press to seal. I used round wrappers, but square wrappers are fine, too. Repeat with remaining wontons and fillings until done. Bring stock to a boil and add the ginger and hot sauce. Add the wontons to the simmering stock. Simmer gently for 3-4 minutes, stirring occasionally, then add the strips of chicken and the shredded bok choy greens. Cook about 5-6 minutes longer. Finish soup with chopped green onions and a drizzle of sesame oil. Serves 6-8.
Carrot Oat Bran Muffins


Carrot Oat Bran Muffins
These muffins are really good for you, but they taste like a treat. I was never a big fan of bran muffins made with wheat bran. I didn’t like the flavor. But I love the way these muffins taste.
I prefer the taste of oat bran over wheat bran. I find it has a natural sweetness. With the addition of carrots and raisins these muffins are moist, light and slightly sweet. They remind me of a cross between a muffin and carrot cake. Vanilla and orange zest makes them fragrant and tasty, too. With plenty of oat bran, they also provide healthy dietary fiber. I make these often, then freeze some for later. They make a great breakfast and an easy snack to take with you.
Carrot Oat Bran Muffins
1 c. milk or buttermilk
1 c. oat bran
1 egg
1/3 c. oil
3 T. brown sugar
1 t. vanilla
1 t. orange peel
1 c. shredded carrots
1 c. flour (all purpose or whole wheat pastry flour)
1 t. baking powder
1 t. baking soda
½ t. salt
½ c. raisins
In mixing bowl combine oat bran and milk. Add egg, oil, sugar, vanilla, peel and carrots. Beat well. Combine remaining ingredients in small bowl and mix well. Gently fold into bran mixture. Divide batter in 12 muffin cups that are either greased or lined with paper cups. Bake in a preheated 375-degree oven for 20-25 minutes. Makes 12.
Dessert Focaccia


Dessert Focaccia
Focaccia is a wonderful Italian flat bread. Baked in a jellyroll pan, it is about an inch thick, and is often used in savory dishes with cheese and other toppings- like pizza. It is also sometimes split to make sandwiches. When I make focaccia, I often add sauteed shallots, garlic and fresh rosemary.
This time I made a lightly sweetened version. It only has 1/2 cup of brown sugar in it total- but gets a lot of natural sweetness from the dried fruit and orange juice. Loaded with dry fruits it is a great dessert, but could also be served for breakfast or brunch.
We made it in class last night, and everyone enjoyed it. It is moist, and has a wonderful flavor and texture. You can leave it plain once baked, or add a powdered sugar glaze.
Dessert Focaccia
3 cups assorted dried fruits (cherries, raisins, currants, cranberries, prunes or blueberries)
2 c. orange juice
1 packet yeast
1 t. sugar
3 ½ c. flour
2 t. salt
1/2 c. firmly packed brown sugar
½ t. cinnamon
¼ t. nutmeg
6 T. cold butter, cut into bits
In a bowl combine the fruit and orange juice and let stand 20 minutes. Drain fruit, reserving 1 cup of the liquid. Heat liquid until it is lukewarm. In the bowl of an electric mixture combine yeast with warm juice and sugar and let stand 5 minutes. Add flour, half the brown sugar, seasonings and butter and mix until dough is well-mixed. Knead dough with dough hook for 5 minutes, dough will be sticky. Add fruit and mix until evenly blended. Transfer dough to floured work surface and just roll around to coat with the flour. Place in oiled bowl, turning to oil top. Cover with plastic wrap and place in a warm place to double, about 11/2 hours.
Note: At this point, if you would rather, you can punch the dough down and wrap it, then chill it overnight. Bring to room temperature before continuing.
Press the dough into an oiled 15×10 inch jellyroll pan and let it rise, loosely covered, for about 1 hour. Dimple the dough using your fingertips and sprinkle with the remaining brown sugar. Bake in a preheated 400-degree oven for about 30-35 minutes or until golden brown. Can be served warm or at room temperature.
Note: The focaccia is just fine the way it is, but you can drizzle it with a powdered sugar glaze, or dust with powdered sugar. It makes a great breakfast dish, or the base for fruit shortcake,. If you wish to use large pieces of fruit like apricots, pineapple or mangoes, dip scissors in oil and use them to snip the fruit into smaller pieces. I sometimes also add 1/2 c. chopped nuts to the dough when I add the fruit.
Note: Any focaccia made with fruit, vegetables, meats or cheese should be refrigerated. Also, baked focaccia can be wrapped well and frozen for a couple of months. Just defrost in the wrapping and then warm a little, if desired.
Homemade Pierogi


Pierogi
Pierogi, if you didn’t know, are pasta filled with different fillings, often potato based. They are also sometimes stuffed with prune filling or sauerkraut. Today you can find pierogi filled with all sorts of fillings. There are variations in the dough, too. Some use just eggs, flour, water and salt. Others add some dairy in the form of milk or sour cream. I normally add some milk to my dough.
Once the pierogi are made, you can boil them and just serve them up, or brown the boiled pierogi in butter and serve with caramelized onions and sour cream. My mother used to make sweet and sour cabbage and serve it with the pierogi or sometimes even use it as a filling. I can’t make them without remembering her.
Pierogi
Dough:
2 c. flour
1 t. salt
½ c. water (you can also use half milk and half water)
1 egg
Mix all ingredients together and knead on floured surface until smooth. Cover and let rest at least 15 minutes. Roll out thin and cut into circles. Re-roll scraps. You should get between 20-30. Spoon filling of your choice on center of dough circle. Fold dough in half over filling and press edge with fork to seal. Wetting the edge of the dough will help the dough to stick. Don’t overfill or the pierogi will split. Test a couple first to get the hang of it. Place a few at a time into salted boiling water and cook until they float. You can eat them as is or brown cooked pierogi in butter in a skillet. Serve with grilled onions and/or sour cream. We would often make a larger batch and then freeze them, uncooked on wax paper-lined baking sheets. When frozen they would be transferred to a freezer bag or container. Place right from the freezer into boiling water when ready to use.
Potato filling:
2 lbs. Potatoes, peeled and boiled
½ onion, minced
2-3 T. cottage cheese or farmer’s cheese, optional
salt and pepper to taste
Mash potatoes with other ingredients and season to taste.
Note: you can also add cheddar cheese if you like. In class we had some with cheddar cheese and added ham, too.
Fresh made pierogi
Cabbage and Noodles

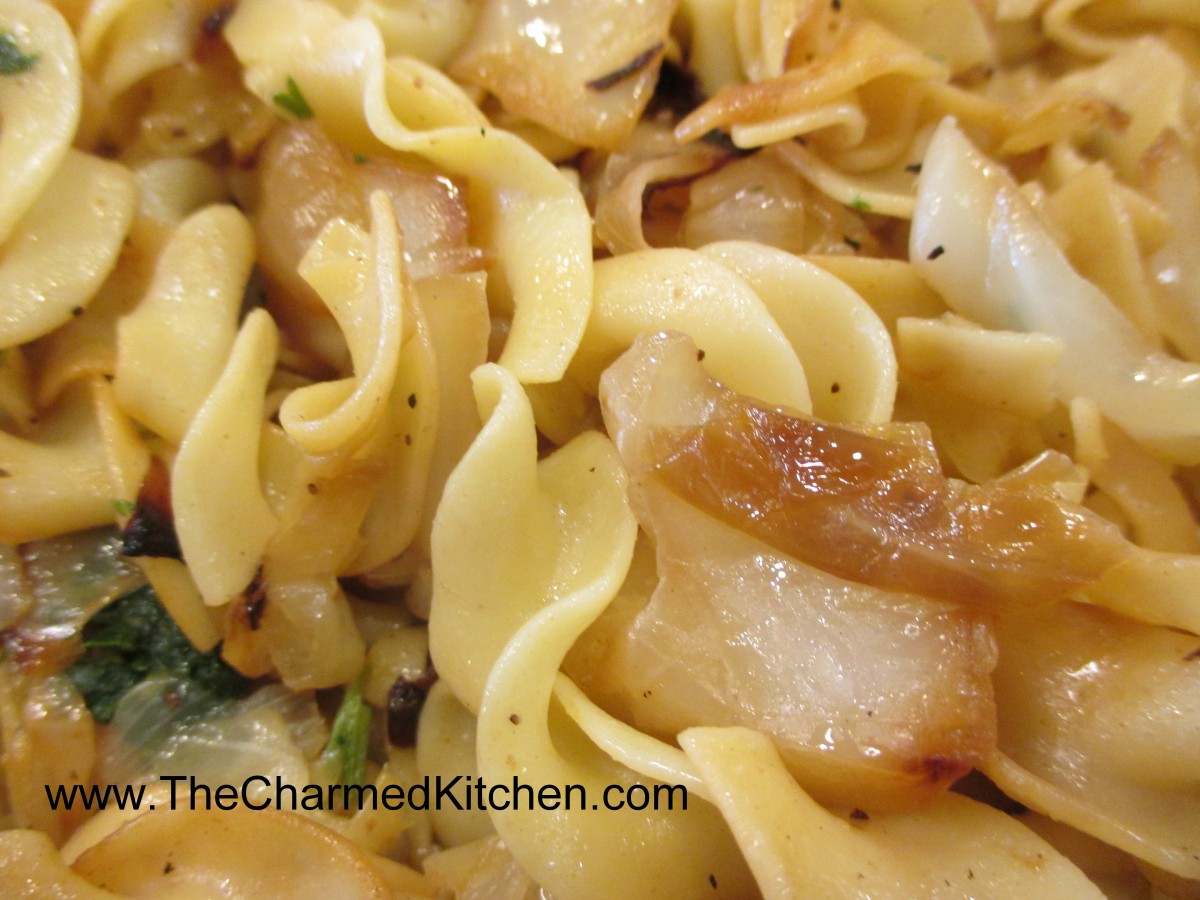
Cabbage and Noodles
Cabbage and noodles is not a glamorous dish and it never will be. That’s fine with me. It is a dish that will always remind me of my childhood. My Mother would make cabbage and noodles as a side dish, at least a couple of times a month. I loved it. I think of her every time I make it. It is, for me, a favorite comfort food.
One reason it tasted so good, is that she took the time to caramelize the onions and to let the cabbage brown some, too. That added another layer of flavor to the dish.Simple and very tasty.
I used green cabbage this time, but you can use red cabbage, or a combination. Cabbage and noodles can be a side dish or even a main dish. You can play around with adding other ingredients. Sometimes I add cooked bacon, or leftover ham.
Cabbage and Noodles
1 onion, chopped
Oil
4-6 cups chopped cabbage
4 c. cooked noodles
Salt and pepper to taste
Fresh or frozen chopped parsley
Heat oil in skillet and cook onion until wilted and a little brown. Add cabbage and stir fry until cabbage in tender and starts to turn a little brown. Stir in noodles and cook until heated through. Season to taste and toss in parsley. Serves 4.
Raspberry Bread

Raspberry Bread
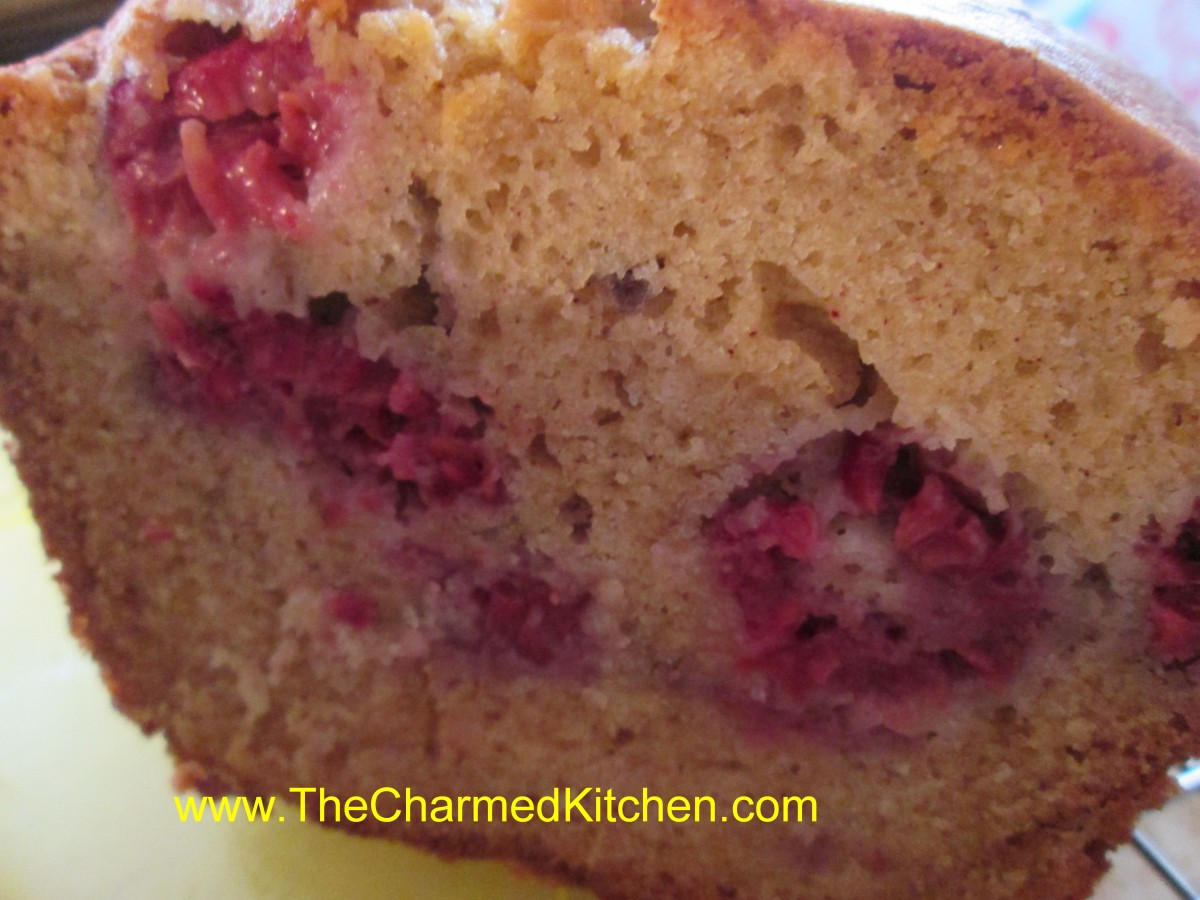
I am so happy I defrosted my freezer. All sorts of treasures have turned up. Among the things I found were a few bags of raspberries. I decided to make this raspberry bread with some of them.
This bread is a favorite of mine. It is not too sweet and pairs nicely with coffee or tea, so it can be a breakfast or brunch dish. It makes a nice dessert, too. The bread is studded with raspberries with hints of cinnamon and vanilla. It can be eaten plain or served up with fruit topping or maybe some whipped cream. I have used it as the base for a pretty good shortcake. I topped slices of the raspberry bread with ice cream, more berries and a dollop of whipped cream. Like most quick breads, it is better if you wrap it up in plastic or foil, once cooled, and eat it the next day, if you can wait that long!!
Raspberry Bread
1 ¾ c. flour
½ t. baking powder
½ t. baking soda
½ t. salt
½ t. cinnamon
½ c. butter, at room temperature
¾ c. sugar
2 eggs, room temperature
½ c. sour cream, room temperature
1 t. vanilla
1 c. raspberries, fresh or frozen
¾ c. chopped nuts, optional
Grease an 8×4 inch loaf pan and preheat oven to 350 degrees. In a large bowl combine dry ingredients. Set aside. In small bowl beat butter until creamy. Add sugar and beat 1 minute. Beat in eggs one at a time. Beat in sour cream and vanilla. Stir in flour mixture until just moistened. Fold in berries and nuts and place batter in prepared pan. Bake 60-65 minutes, or until toothpick inserted in center comes out clean. Let stand in pan 10 minutes. Remove from pan and cool on wire rack. Makes 1 loaf. Freezes well.
Creamy Lemon Tart


Creamy Lemon Tart
I wasn’t sure what to call this dessert. It started out as one thing, but sort of ended up somewhere else. I finally decided to just call it a tart. I’ll explain.
I was leaning towards making a cheesecake. I needed to make dessert for a dinner. Everybody loves cheesecake, right? I already had cookie crumbs, I could use for the crust. Then, I discovered I only had one box of cream cheese. Not enough for a cheesecake.
While searching my fridge for cream cheese, I found a couple of lemons.
I suppose I could have made a lemon pie, but I decided to just make something up with what I had, including the cream cheese. What I ended up with is a sweet/tart lemon dessert. Really nice, actually.
Before I get to the actual recipe, let me talk about the lemons, and including fresh lemon juice in recipe directions.
Recipes will often list the “juice of a lemon” in the ingredients. There is about the same amount of lemon juice in all lemons, so that a little difference, one way or the other, is no big deal. The amount is anywhere from 2-3 tablespoons of juice in a lemon. 4 tablespoons, if the lemon is really big. I have used that phrase in recipes myself.
Sometimes, however, you have to recognize when you have lemons that aren’t “average”.
The two lemons I had on hand were big, really big. When I juiced them, I ended up with 2/3 of a cup of lemon juice. So, in this recipe I used the actual measurement of the juice, rather than saying, “the juice of 2 lemons.” Three or four average sized lemons should give you 2/3 cup of juice.
So here is the recipe for my lemon tart, the happy end result of using what I had, and making it work.
Creamy Lemon Tart
Crust:
1½ c. crushed vanilla cookies
4 T. melted butter
Filling:
1 (8oz.) container cream cheese, softened
½ c. sugar
2/3 c. lemon juice
Zest of two lemons
3 eggs
¼ c. cornstarch
Combine crust ingredients in medium bowl. Press crumb mixture into a 9 –inch springform or tart pan. Bake in a preheated 350-degree oven for 10 minutes. While the crust is baking, make the filling. In mixing bowl combine the cream cheese with the sugar and beat until fluffy. Add the lemon juice and zest and beat well. Add the eggs and cornstarch and beat until smooth. Pour filling over the baked crust and return to oven. Bake for 35 minutes, or until golden on top. Center will be soft, but firms as the tart cools. Cool, then refrigerate until ready to serve. You can dust with powdered sugar, if you like.
Chocolate Beet Cake


Chocolate Beet Cake
I made this cake as part of a class on cooking with root vegetables. I have posted it before, but thought I would post the recipe again. The cake was so enjoyed in class- I wanted to share the recipe.
When I say beet cake, a lot of people give me a funny look. First, there are the beet haters, and you know who you are. The people who just don’t like the taste of beets. I get that, beets are an acquired taste. Then there are the people who like beets, but could never picture them in a cake. I bake cakes with carrots in them, and zucchini and even parsnips. Adding beets to a cake is not so far off. The beets add a subtle red color to the cake, but they also add moistness. The end result is a cake that is full of flavor and has a wonderful, moist texture. Truth is, I don’t really taste the beets in the cake much at all. I taste the chocolate. So here is the chocolate beet cake recipe. I hope you enjoy it.
Chocolate Beet Cake
2 cups all-purpose flour
1½ teaspoons soda
1/2 teaspoon salt
1 1/2 cups sugar
1/2 cup cocoa powder
3 large eggs, beaten
1 cup plus 2 tablespoons oil
1½ cups grated cooked beets
2 teaspoons vanilla
Powdered sugar, optional, or cream cheese frosting- recipe below
Preheat oven to 350°. Combine flour, soda, salt, sugar and cocoa in a bowl; set aside. In a mixing bowl, combine the eggs and oil. Beat in vanilla and continue beating until well blended. Slowly beat in dry ingredients until well mixed; stir in beets. Pour into a greased and floured 9×13-inch baking pan. Bake at 350° for 25 to 35 minutes, or until cake bounces back when touched lightly with finger. Cool in pan on a rack. Frost cooled cake, or dust with powdered sugar.
Frosting recipe:
8 oz. Cream cheese, softened
3/4 c. powdered sugar- or more to taste
1 stick butter, room temperature
Beat all together until fluffy. Frost cake and refrigerate until ready to eat.
Brussels Sprouts and Bacon Salad


Brussels Sprouts and Bacon Salad
I thought about giving the bacon top billing, but truth be told, the Brussels sprouts really are the star of this dish. I know some people don’t like Brussels sprouts. I am not one of them. I have always loved them, even when I was a kid. I like them steamed with butter, roasted, pan fried and even raw.
This salad is a great way to enjoy their crunchiness in raw form. The bacon adds a wonderful smoky flavor. I also added an orange, some dried cranberries and toasted almonds. The dressing, sweetened with maple syrup, rounds out the dish.
An added bonus, it tastes good even the next day. The sprouts are like little cabbages. Unlike lettuce, which wilts quickly once dressed, the sprouts soften some, but retain most of their crunch. I have been known to eat this salad for breakfast the next day.
Brussels Sprouts and Bacon Salad
8- 10 oz. Brussels sprouts
1 large orange, peeled and cubed
4 slices bacon, cooked and crumbled
¾ c. dried cranberries
½ c. toasted slivered almonds*
Dressing:
¼ c. olive oil
¼ c. apple cider vinegar
2 T. maple syrup
1 T. fresh chopped parsley- or 1 t. dried
2 t. hot sauce, or to taste
½ t. dried thyme
½ t. dried basil
Salt and pepper to taste
Trim bottoms off the sprouts, cut in half and slice thin. You should end up with about 4 cups of sliced sprouts. Place in large bowl with the remaining salad ingredients. Place dressing ingredients in a jar with a tight fitting lid and shake well to combine. Toss over Brussels sprout mixture.
Note: The salad ingredients can all be assembled a day ahead, then just dressed when ready to serve. This salad is also good the next day.
*To toast the almonds, place in a skillet over medium low heat and stir occasionally, until toasted. Be careful, once they start to brown, they can burn easily.
Nisu Bread – with Cardamom

Nisu Bread
This wonderful recipe came from the Finn grandmother of two good friends. It is a soft, slightly sweet bread, made special with the addition of cardamom.
Cardamom is a spice that has a rich, sweet flavor and fragrance. You can purchase it ground or whole, in pods. Cardamom is often used in baked goods and adds a nice flavor to frosting and glazes. It is also used to flavor coffee. Cardamom is a little pricey. The good news is a little goes a long way. If you buy ground cardamom, you can store it in the freezer to keep it fresh longer.
This bread is lovely just toasted, and makes great French toast. It is also a nice sandwich bread. The recipe makes three loaves, so you can leave one out and freeze the other two.
Nisu
½ c. warm water
2 packages active dry yeast
2 c. milk
½ c. sugar
2-3 t. ground cardamom
1 t. salt
6 T. butter
6-7 c. flour, preferably bread flour
2 eggs
Dissolve yeast in water and set aside. Place milk in large bowl and add the sugar, cardamom, salt and butter. Heat in microwave until liquid is very warm. Butter might not be completely melted. Stir mixture until sugar is dissolved. Place 2 cups of flour in a mixing bowl and add the milk mixture, eggs and yeast mixture. Beat on medium speed for 3 minutes. Add 1 cup more of the flour and beat 2 minutes more. Stir in enough of the remaining flour to make a soft dough. Turn onto a floured surface and knead until dough is firm and smooth, about 10 minutes. Place in an oiled bowl and turn dough to coat. Cover with a towel and allow to rest until doubled in bulk, about 1 hour. Punch dough down and divide into 3 pieces. Roll each piece into a loaf and place in greased 9×5 inch bread pans. Cover and allow to rise until doubled in bulk, about 45 minutes. Bake in a 375-degree oven for 30 minutes or until golden and loaf sounds hollow when tapped lightly. Makes 3 loaves.


