Spare Rib “Baked” Beans

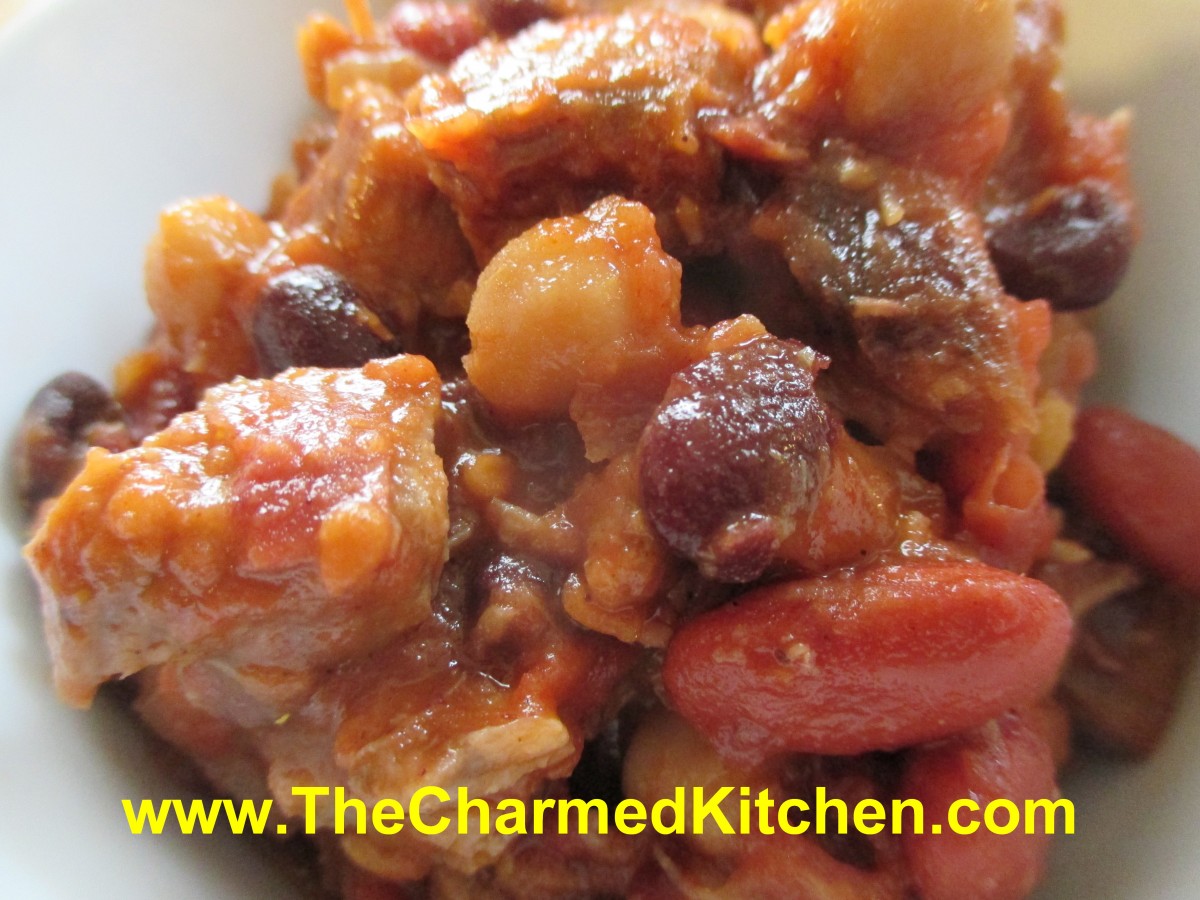
Spare Rib “Baked” Beans
This recipe came about by accident. I was working on menu ideas for a dinner with friends. I had leftover spare ribs, but not really enough to serve on their own. I wanted to use them in something, and decided that the meat would be really good in baked beans. They already had barbecue sauce on them- and those flavors go well with beans. I didn’t have time to start with uncooked beans, so I used canned beans. Even though I think of this dish as baked beans- they were never really baked. I did the whole dish on top of the stove in about an hour. They do taste great. I can’t wait to take them to the party tonight. We are serving them as a side dish, but they could be a meal all on their own.
Spare Rib “Baked” Beans
1 c. sliced onion
2 T. oil or butter
1 qt. tomatoes – I used home canned- you can use 1 (28 oz.) can
1 can garbanzo beans, rinsed and drained
1 can black beans, rinsed and drained
1 can kidney beans, rinsed and drained
¾ c. apple cider vinegar
½ c. brown sugar
¼ c. maple syrup
2 T. molasses
4 c. cubed meat from cooked spare ribs
1 T. minced garlic
1 T. hot sauce, or to taste
1 T. Worcestershire sauce
1 t. ground cinnamon
1 t. ground turmeric
½ t. allspice
Salt and pepper to taste
In pot, add onions to oil or butter and cook over medium heat until tender. Add tomatoes, beans, vinegar, brown sugar, maple syrup and molasses. Cook over medium high heat, stirring occasionally, until mixture thickens. This will take about 30 minutes. Add meat with remaining ingredients and cook over medium low heat about 30 minutes longer. Stir from time to time to prevent sticking. Adjust seasonings and serve. Makes 6-8 servings.
Fresh Raspberry Liqueur

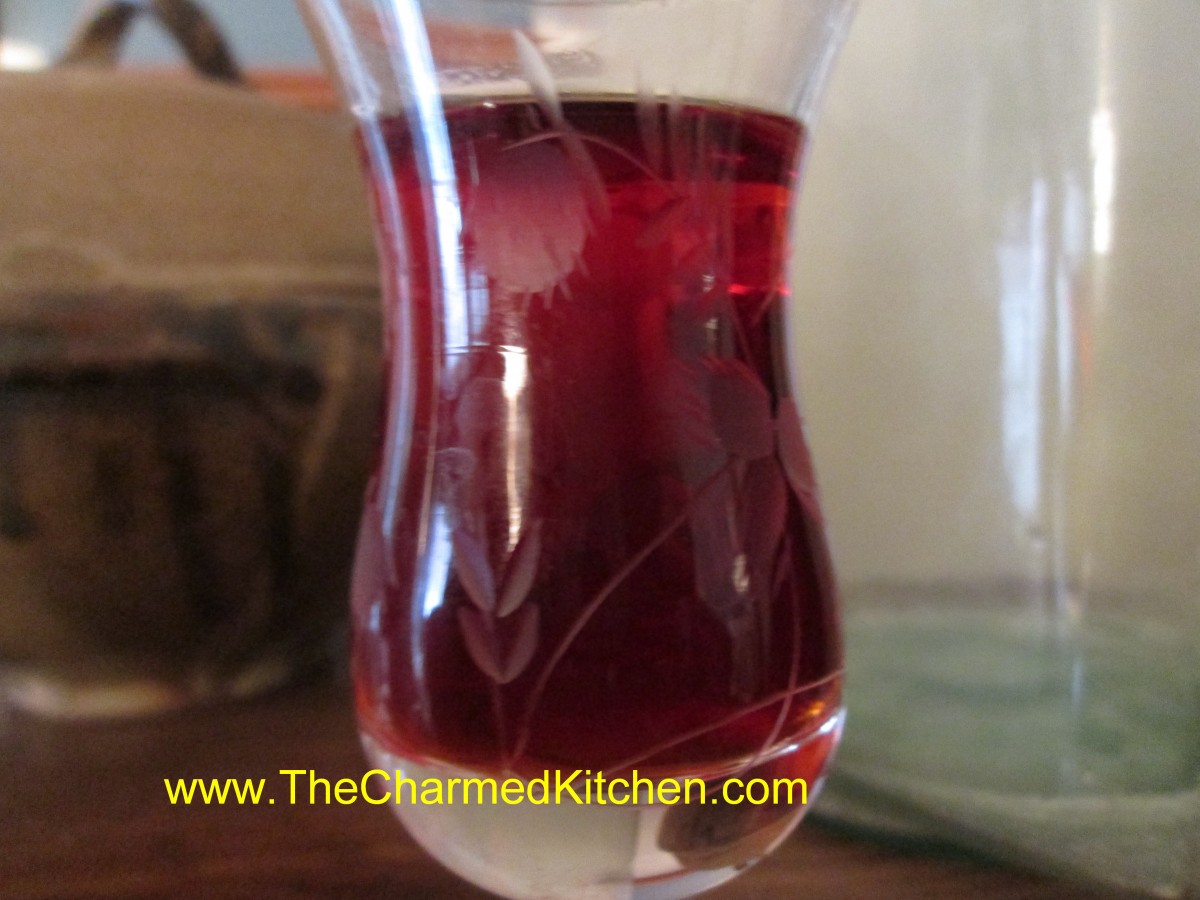
Homemade Raspberry Liqueur
I like to preserve some fresh raspberries to enjoy all year long. There are a number of ways to preserve them. I freeze berries, make jams and jellies and dehydrate some. I also enjoy using some to make homemade raspberry liqueur. You just start with alcohol – I most often use vodka – then you add raspberries. I sweeten it later on, but you can leave it unsweetened, if you prefer. I have made all sorts of liqueurs, and raspberry is one of my all time favorites. Its beautiful color and great flavor make it nice for sipping, or used in mixed drinks. Think of it as just another food preservation method. Here is the recipe, in case you want to make it. Makes a great gift, too.
Homemade Raspberry Liqueur
1 lb. raspberries*
3 c. vodka, you could use brandy
1 ¼ c. sugar
Combine fruit and vodka and let stand 2 -4 weeks. Stir in sugar and age 3 months. Strain and filter. Makes 3-4 cups.
*You can use frozen berries, too.
Chocolate Covered Frozen Bananas Treats

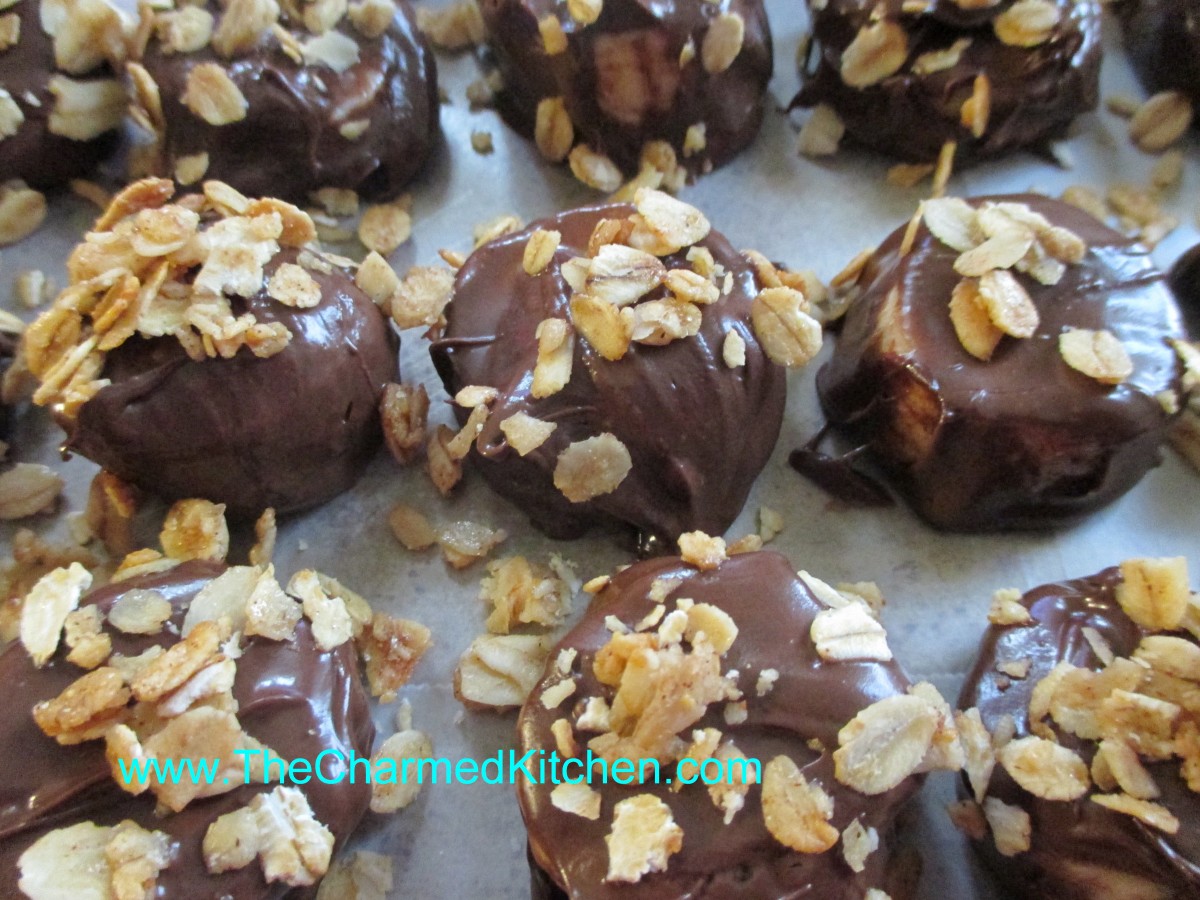
Chocolate Covered Bananas- ready to freeze
After a very warm week in cooking camp today is ice cream day!!!! We will be making an assortment of frozen treats, including frozen bananas. These are a great snack for hot days. It is a nice treat for kids to make- all ages can do it. All you need are ripe bananas, chocolate and some toppings/decorations. Start by melting the chocolate. You can use a double boiler or the microwave. Slice the bananas and dip the slices into the melted chocolate. Place on wax paper and sprinkle with decorations, if you like. Since we made granola yesterday, we will sprinkle our bananas with the granola as a decoration. You can also use sprinkles or nuts. Coconut works well, too. Then just pop them in the freezer to harden. These are great eaten right out of the freezer.
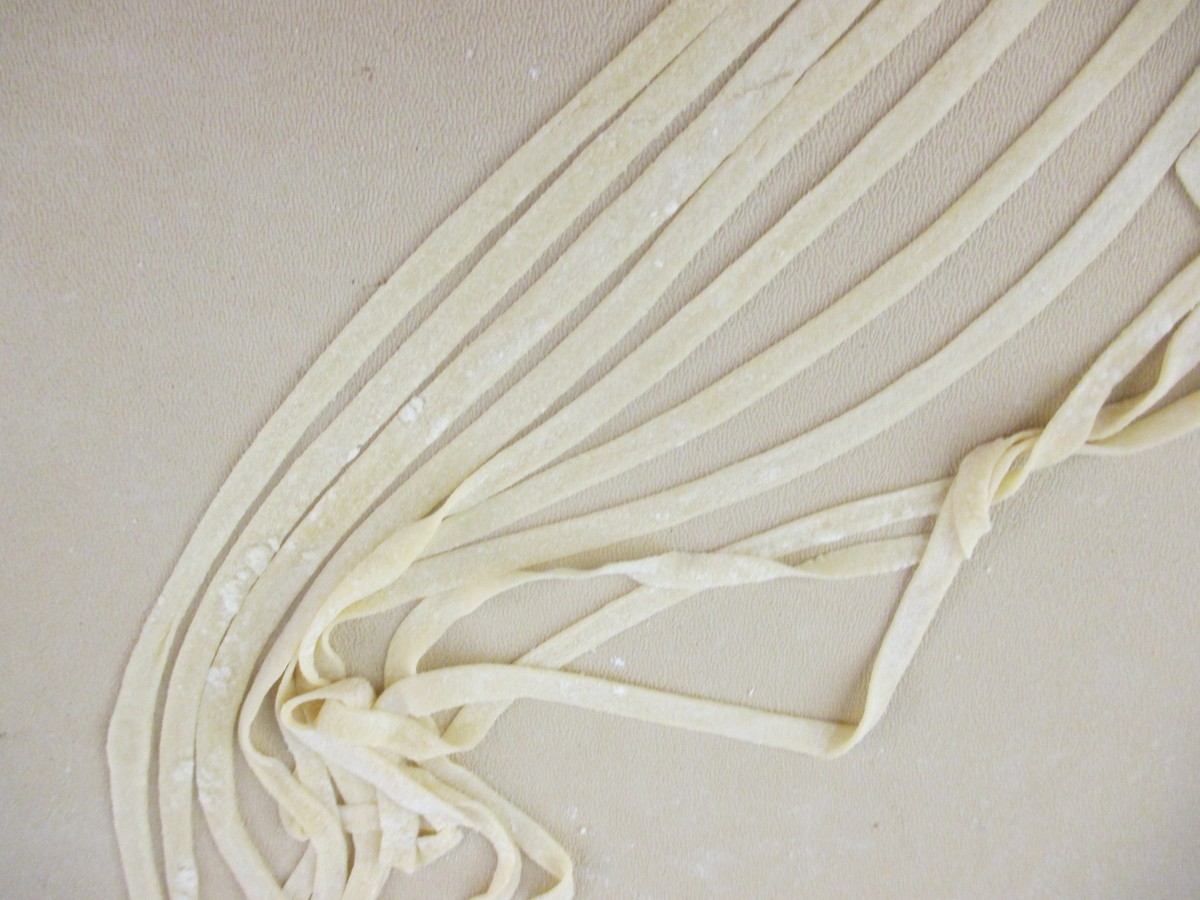
Pasta Making in Mentor Kids’ Camp

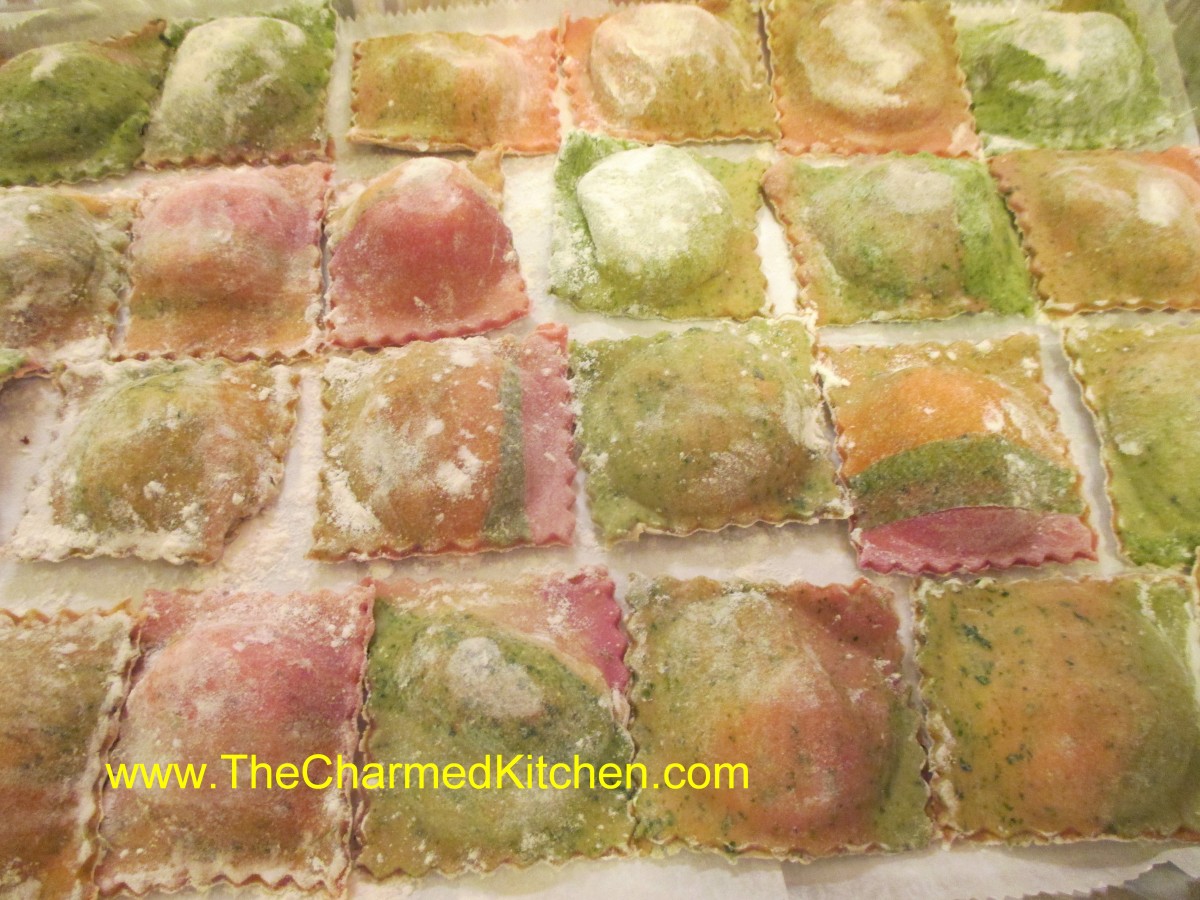
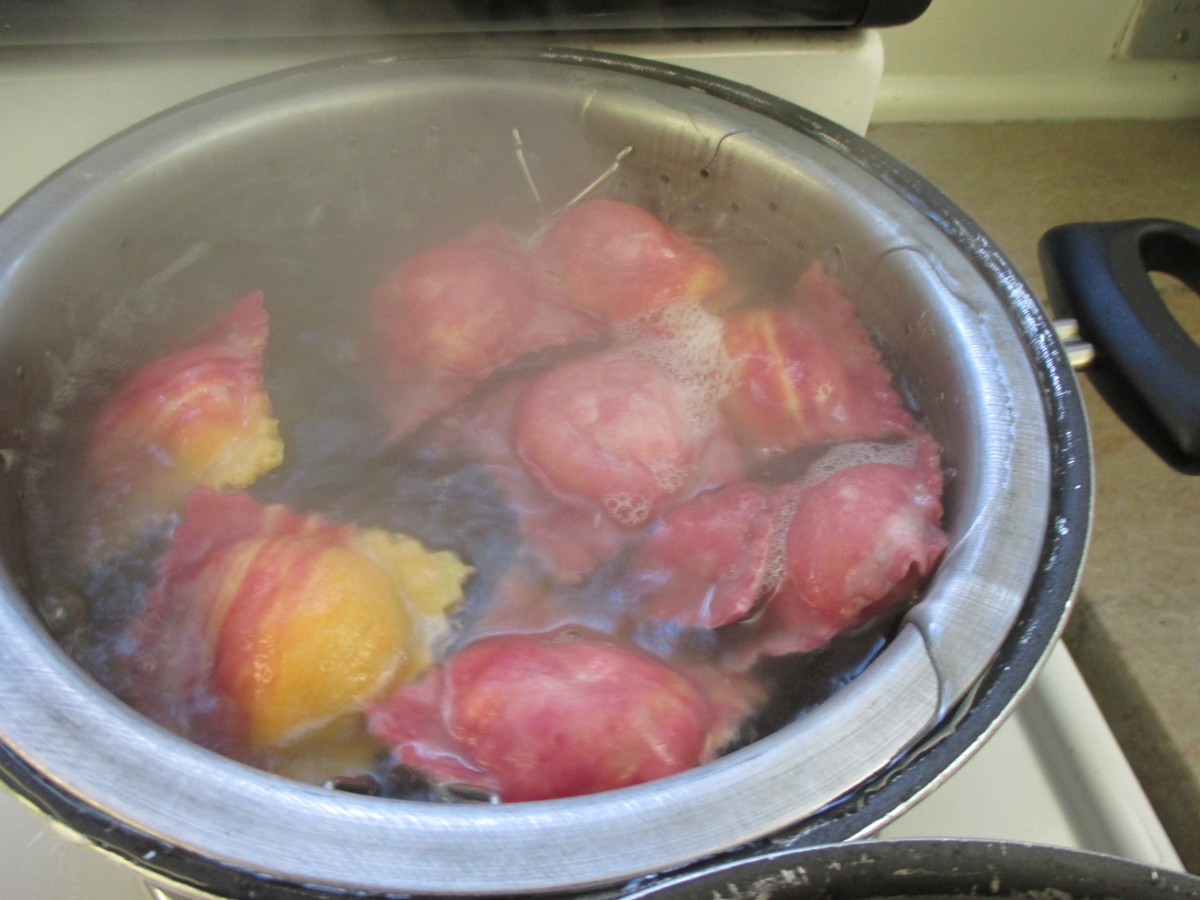
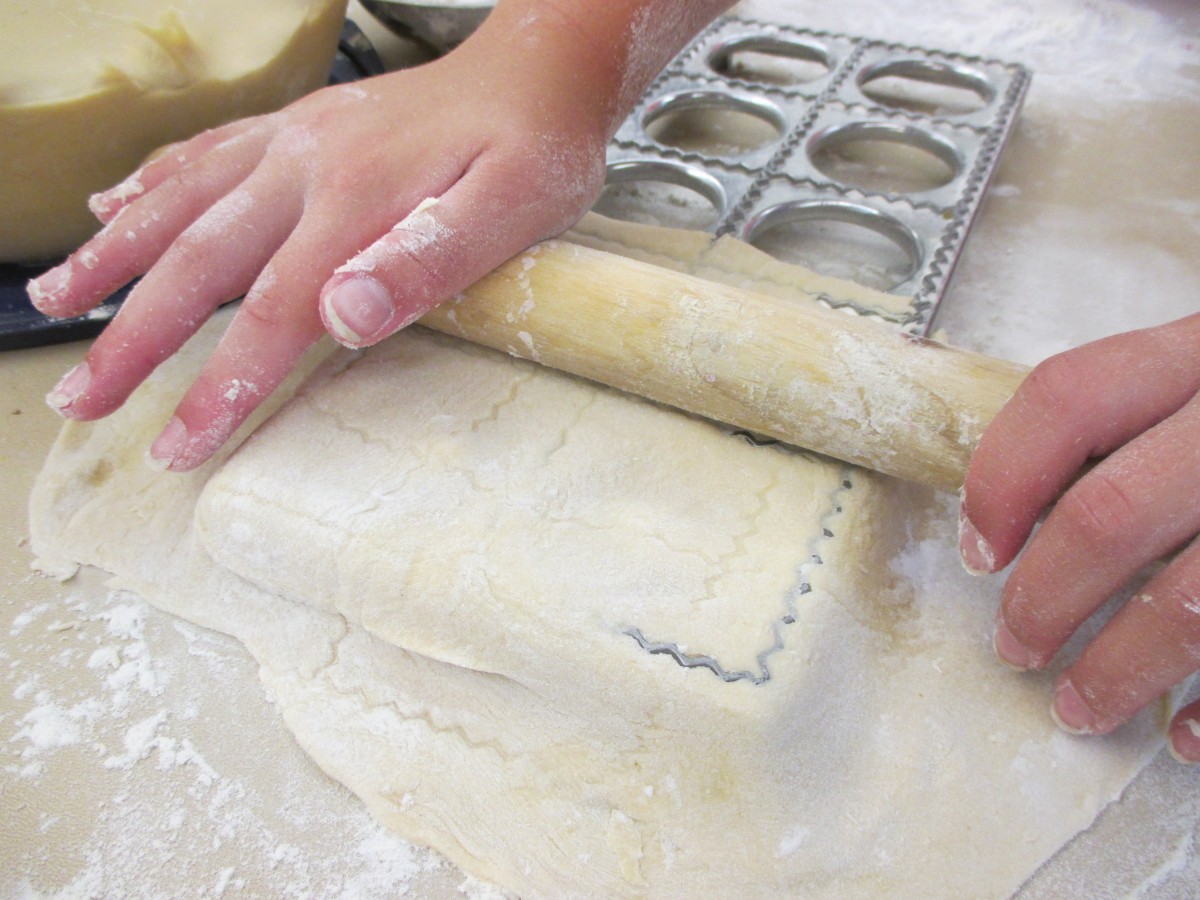
Rainbow Ravioli
It was a hot and very humid day, but the kids were real troopers. They made so much wonderful pasta today. We made a simple egg-based pasta along with spinach, beet and carrot pastas. These were used to make angel hair pasta, linguine and the big hit of the day-Rainbow Ravioli. All of the recipes are listed below, along with pictures of the kids making their pasta creations.
Basic Homemade Pasta
3 c. flour, more if using electric pasta machine. See note.
1 1/2 t. salt
4 eggs
Water, if needed
Mix flour and salt and stir in eggs, kneading until dough is smooth and elastic. Dough will be very stiff. Add a little water if needed to hold dough together. You may wish to mix the dough in a mixer or food processor. Cover dough and let rest 15-20 minutes before rolling. Under kneading your dough will result in coarse, crumbly pasta. This batch makes about 1 pound. Serves 4-6.
Roll dough out on well floured board or in pasta machine (non-electric) until desired thickness in reached. Add flour as needed to prevent sticking. Cut into strips or whatever shapes are desired. You might want to let the noodles dry 1-hour or more before cooking, but this is not necessary. Pasta can be hung to dry or separated and allowed to dry flat on a table. When pasta is not hanging to dry it must be turned occasionally to dry evenly. Although you may hear otherwise, homemade pasta, even when dried, should be frozen for long term storage. Storing at room temperature can lead to spoilage. Fresh pasta can also be stored in the refrigerator for a day or two.
Note: All electric pasta machines vary slightly and you should use their recipes as much as possible. Still, for most models, adding 1/4 c. flour for each cup in a hand rolled recipe works the best. Also recipes that contain seeds and vegetables may clog an electric pasta maker. Follow your manufacturer’s instructions.
These are smaller batches which can be mixed in a processor or by hand. If you want to mix a vegetable based pasta by hand, puree the vegetables first.
Carrot Pasta
1 c. flour
1/2 t. dried dill
1/3 c. carrot puree
1-2 T. water, if needed
Beet Pasta
1 c. flour
1/2 t. dill
1/3 c. beet puree
1-2 T. water, if needed
Spinach Pasta
2 c. flour
1 10 oz. package frozen spinach, cooked, drained, reserving some of the liquid
Mix this dough as for other pastas, but don’t be too quick to add reserved liquid. While kneading you’ll get water out of the spinach. May require more kneading and rolling than other pasta doughs. Be patient, it’s worth the work.
Ravioli Filling
2/3 c. shredded mozzarella cheese
2/3 c. ricotta cheese
1/3 c. grated Parmesan or Romano cheese
Combine all ingredients well and chill until needed.
Roll a batch of dough into a rectangle, 18×12 inches and 1/16 inch thick. Arrange well rounded teaspoonfuls of the cheese filling two inches apart on the pasta sheet. Roll out additional dough into an 18×12 inch rectangle. With a pastry brush moisten bottom sheet of pasta around edges with water. Place second sheet of pasta on top, using fingers to seal the dough around the edges of the filling. With a pastry wheel or sharp knife, cut between the ravioli to separate them. You should have 24 ravioli.
To cook the ravioli- just drop them into simmering water and cook 3-5 minutes. If using frozen ravioli increase cooking time by about 2 minutes. Time will differ depending on how thick you rolled the dough and how many you are cooking at one time.


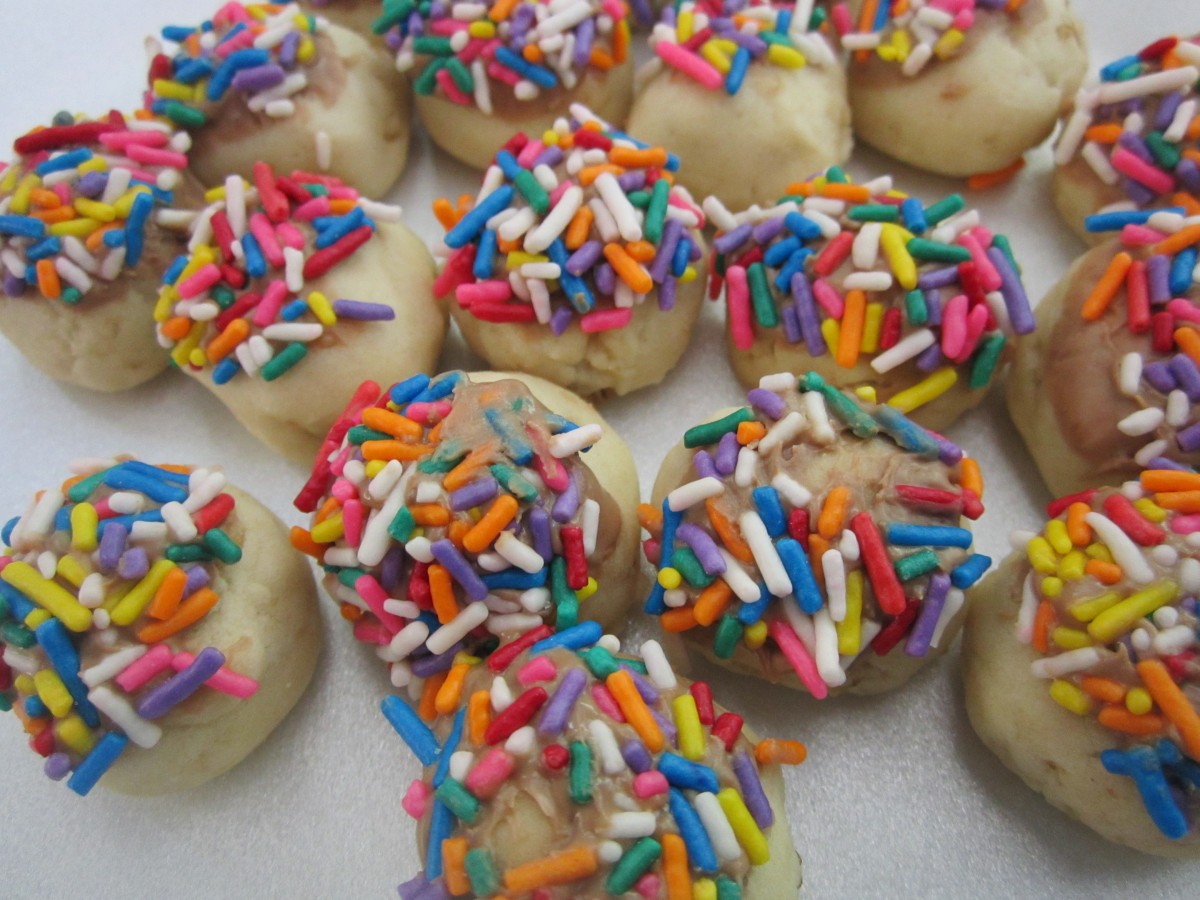
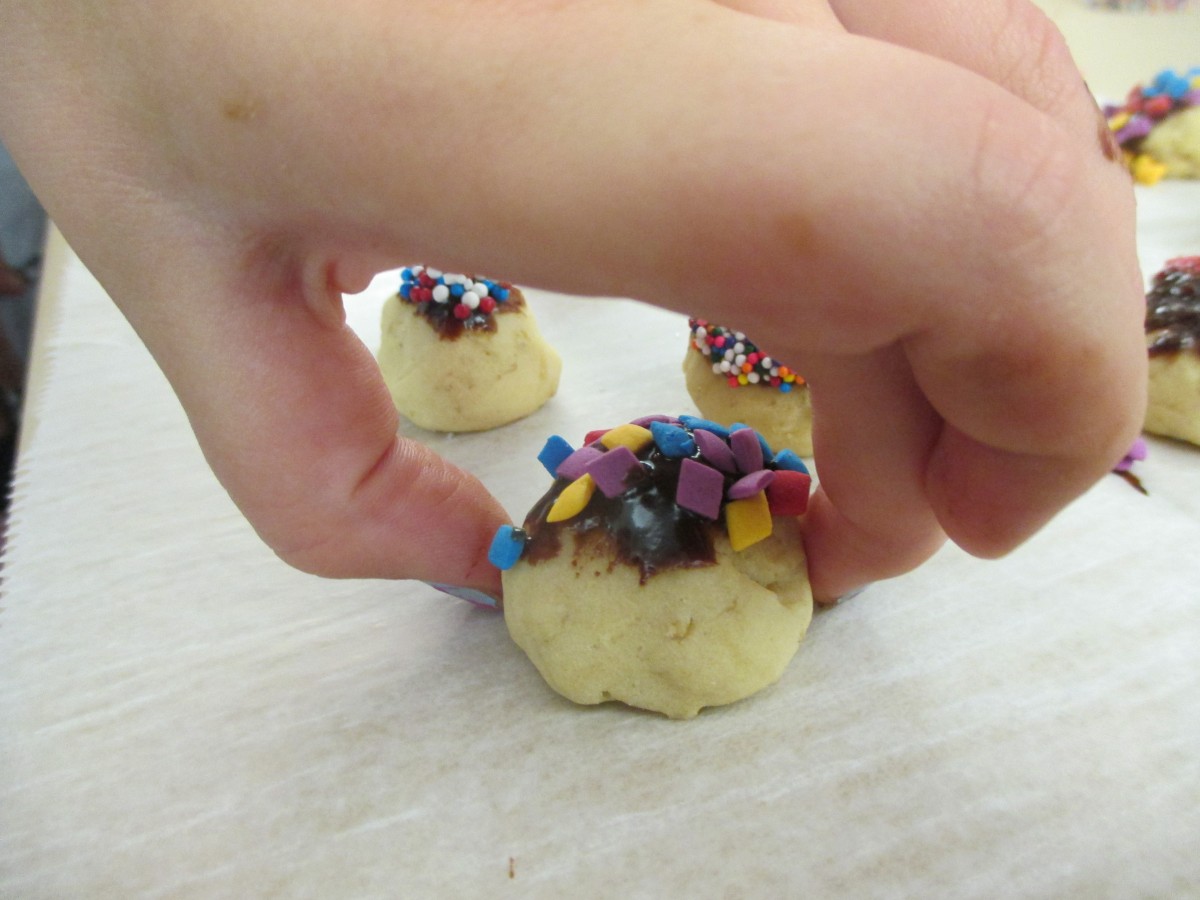
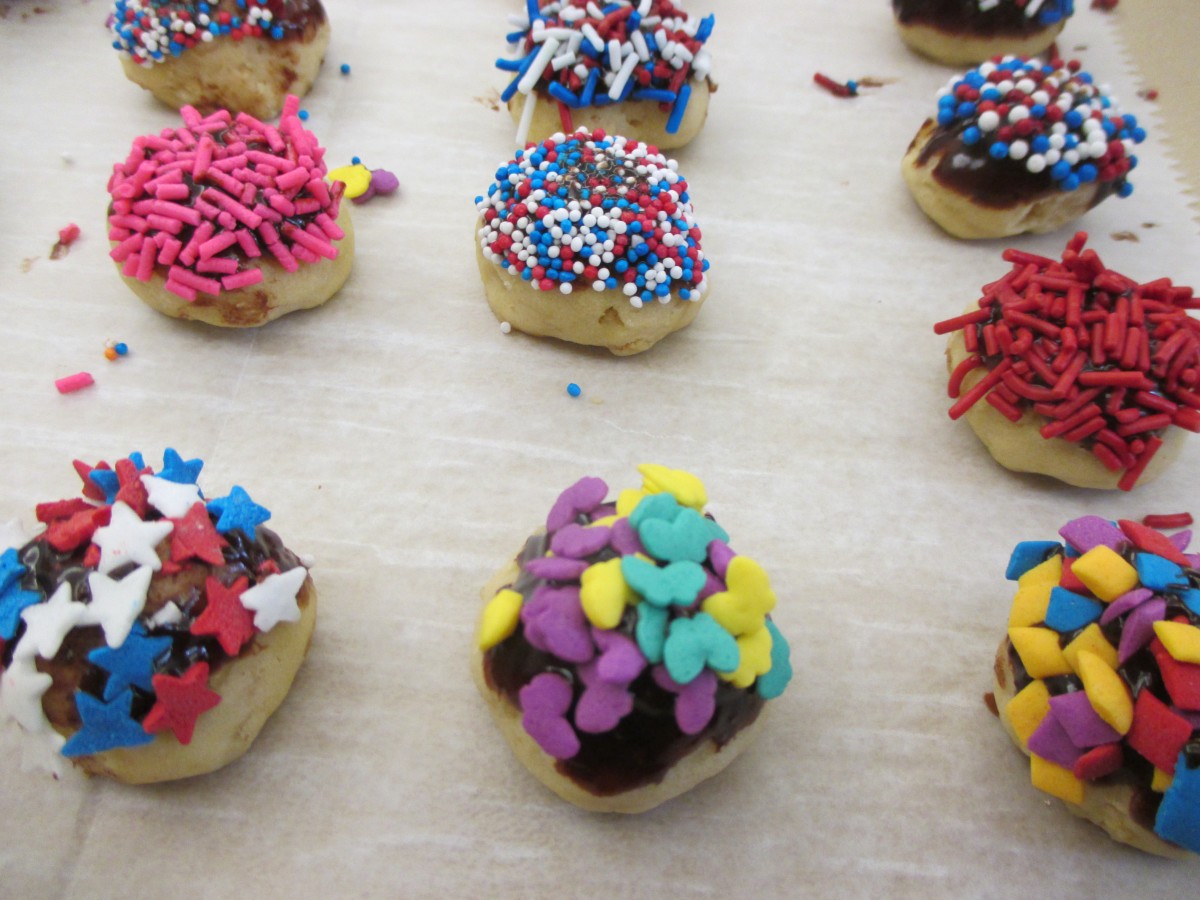
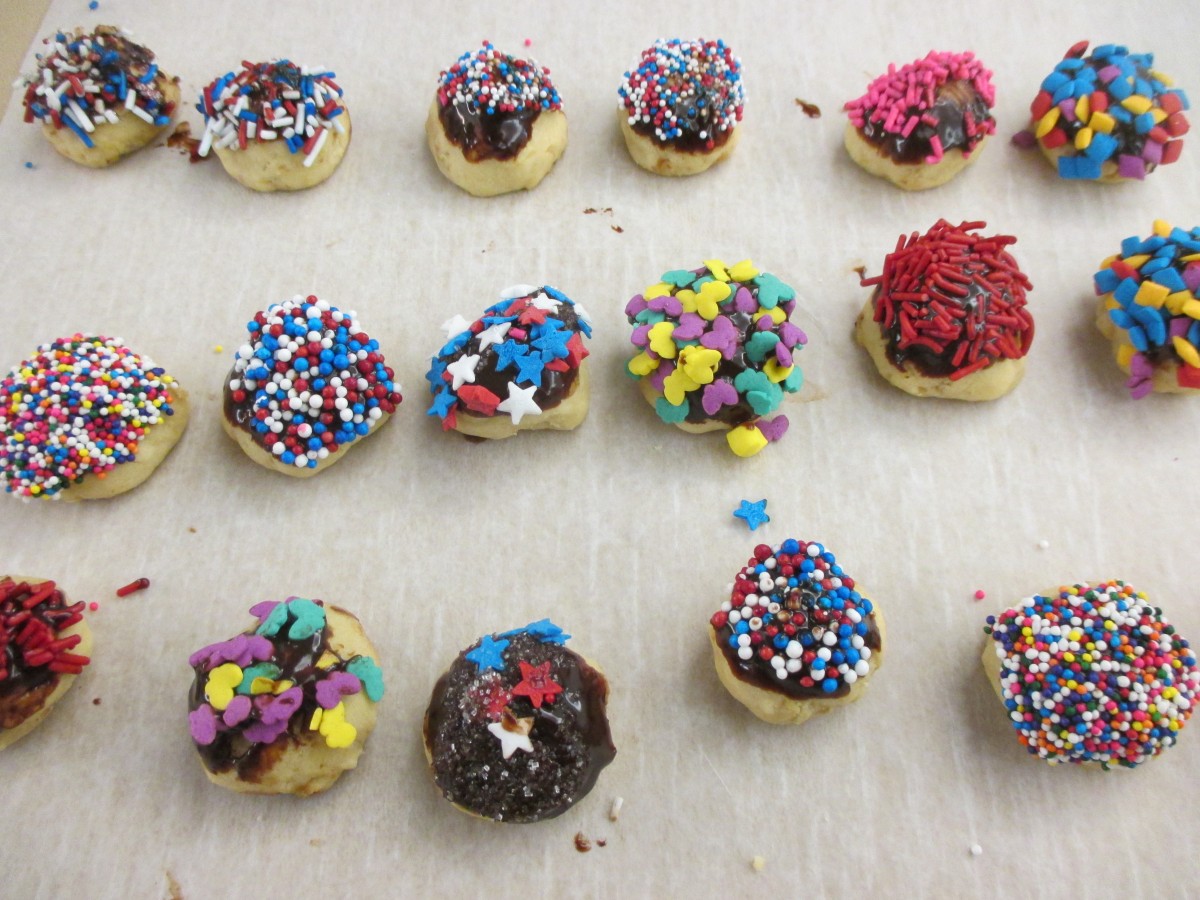
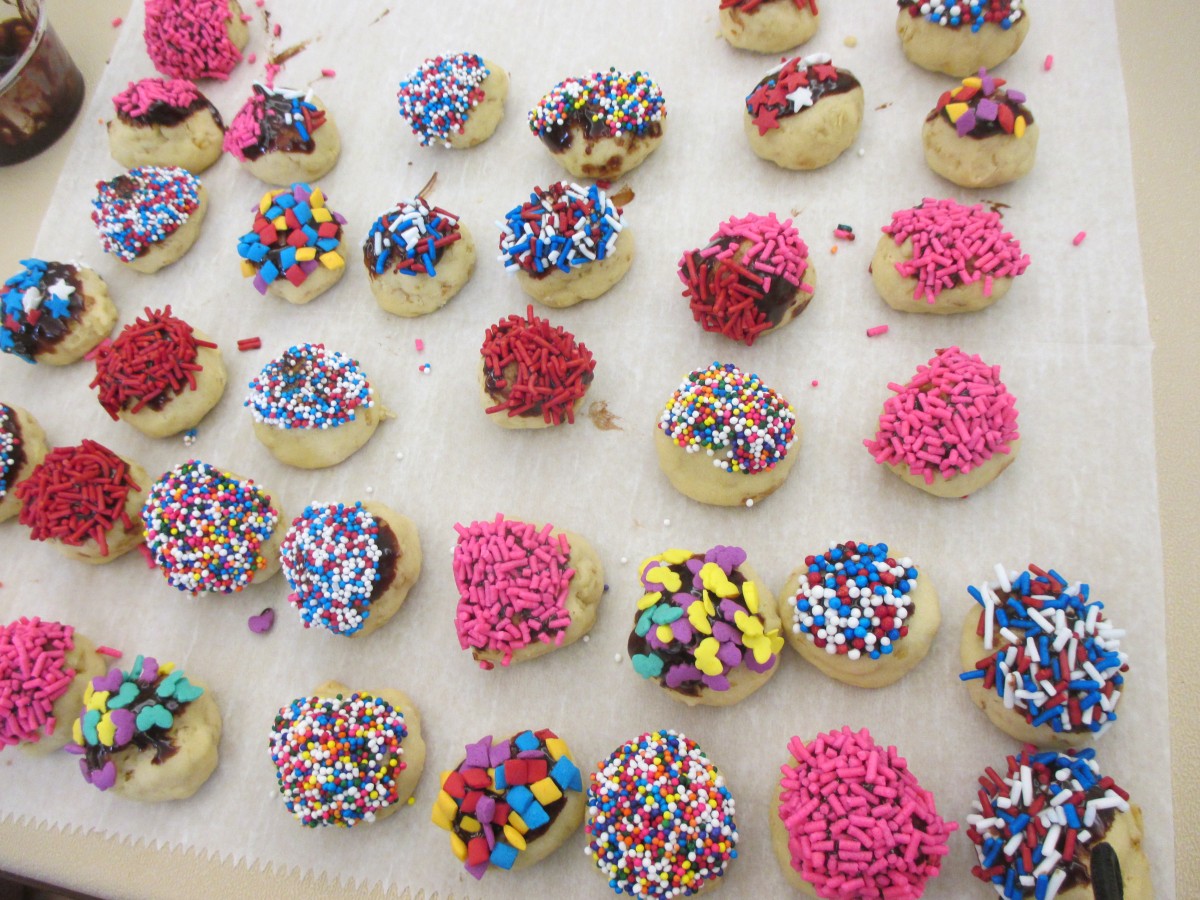
Cookie Baking in Cooking Camp

Cookie- Candies
Summer kid’s camps are underway. We started with cookie baking today. The kids baked 2 different cookies in camp- Snickerdoodles and Chocolate Sparkles. With only 2 ovens we cranked out over 26 dozen cookies. They also decorated a couple hundred additional cookies- a delicate oatmeal shortbread cookie called Cookie Candies, that were dipped in a chocolate ganache and then dipped in sprinkles. Here are some pics of their cookies and recipes for what we made.
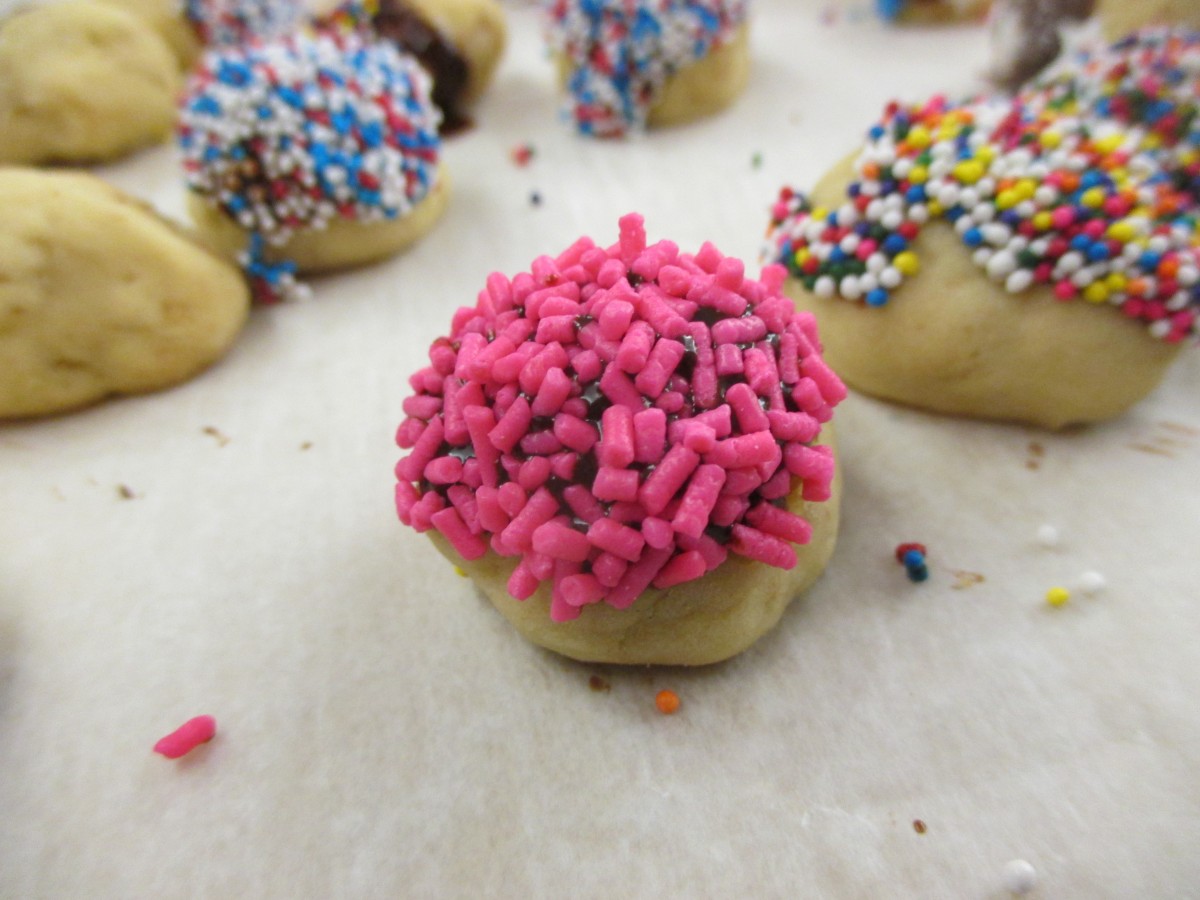
Some of the cookies they made
Cookie-Candies
1 c. butter
¾ c. powdered sugar
1 T. vanilla
2 c. flour
½ c. rolled oats
½ c. chocolate chips
¼ c. milk
finely chopped nuts
assorted sprinkles
shredded coconut
Cream together butter, sugar and vanilla. Stir in flour and oats. Shape teaspoonfuls of the dough into different shapes like rounds, ovals, cones cubes etc. Try to make them look like little candies. They will hold their shape very well while baking. Bake in a 325- degree oven for 20-25 minutes on an ungreased baking sheet. Cool. In microwave safe dish combine chocolate and milk and melt. Dip tops of cookies in chocolate mixture and then in one of the toppings you have. Chocolate topping will harden up after a while. Makes about 4 dozen.
Snickerdoodles
1 c. butter, softened
1 ½ c. sugar
2 eggs
2 ¾ c. flour
2 t. cream of tartar
1 t. baking soda
¼ t. salt
2 T. sugar
2 t. cinnamon
Mix butter, sugar and eggs. Combine next 4 ingredients and add to egg mixture. Chill dough at least a couple of hours. Combine sugar and cinnamon in shallow bowls. Roll dough in 1-inch balls and roll in cinnamon sugar. Place 2-inches apart on ungreased baking sheet and bake in a preheated 375 –degree oven for 9-11 minutes. Makes 6 dozen.
Chocolate Sparkles
1 c. butter, softened
1 ¼ c. sugar
2 eggs
2 oz. unsweetened chocolate, melted
½ t. vanilla
2 2/3 c. flour
2 t. cream of tartar
1 t. baking soda
½ t. salt
¼ c. sugar
Cream together butter and sugar. Beat in eggs, chocolate and vanilla. Stir in next four ingredients. Chill dough. Shape dough into 1” balls and roll in ¼ cup sugar. Place about 2 inches apart on ungreased baking sheet. Bake in a preheated 400- degree oven for 8-10 minutes. Makes 5-6 dozen.

Snickerdoodles
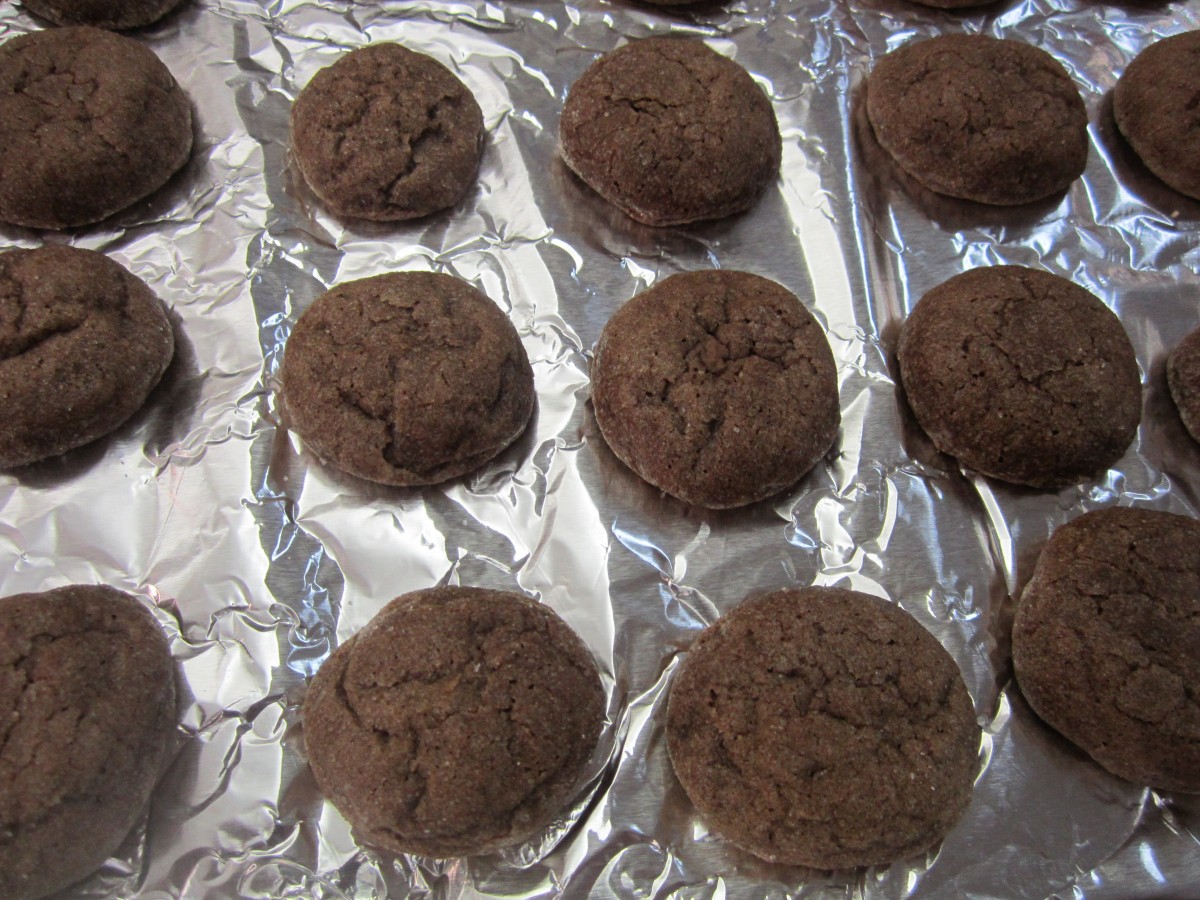
Chocolate Sparkle Cookies
Blueberry Pancakes and Blueberry Syrup

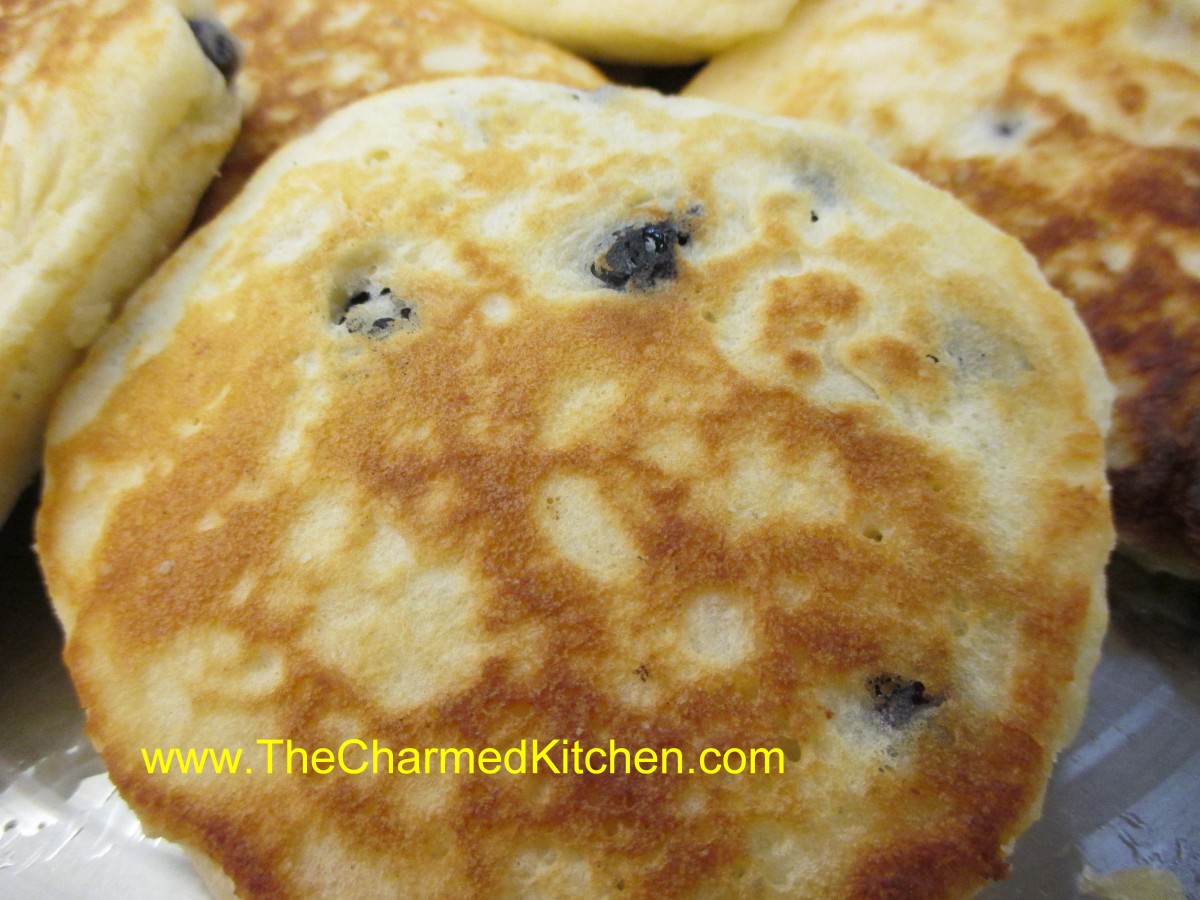 For breakfast I can’t think of a better dish than blueberry pancakes with fresh made blueberry syrup. I treated my self this morning and made both. The pancakes were light and very fluffy. The secret is not to over mix them. The batter was stirred until just mixed. I used a homemade biscuit mix as the base. The recipe follows. The baking mix is normally made with shortening, but I used coconut oil. The syrup is pretty simple. Just three ingredients; blueberries, sugar and a little water. Sometimes I add some vanilla or a little lemon zest. I served it warm over the pancakes.
Blueberry Pancakes
2 c. biscuit mix*
1 c. milk
2 eggs
1 c. fresh or frozen blueberries
Combine mix, milk and eggs until just blended. Fold in berries. Pour batter by scant 1/4 cups in lightly greased griddle or skillet over moderate heat. Turn when pancakes are dry around the edges. Cook until golden brown. Makes about 13.
* Like Bisquick or Jiffy Mix or home made- recipe follows
Biscuit Mix
8 c. flour
1 c. powdered milk
1 c. powdered buttermilk (or 1 more cup powdered milk)
1/4 c. baking powder
1 T. salt
1 1/2 c. shortening* I use coconut oil
Combine dry ingredients and cut in shortening until well mixed. Store in tightly covered container. Makes 10 cups.
* You can substitute coconut oil or butter for the shortening- but mix will have to be kept cool. Refrigerate if using butter and use withing 3 months.
Blueberry Syrup
4 c. blueberries
1 c. water
1½ c. sugar
In saucepan heat berries and water to a boil and boil 2 minutes. Crush berries with a potato masher as they cook. Add sugar and cook for 10- 15 minutes on medium heat until mixture thickens. Process syrup with an immersion blender or in a blender until smooth. Cool, then refrigerate. Keeps a couple of weeks. Makes about 3½ cups.

Blueberry Pancakes with Blueberry Syrup
My Mom’s Macaroni Salad

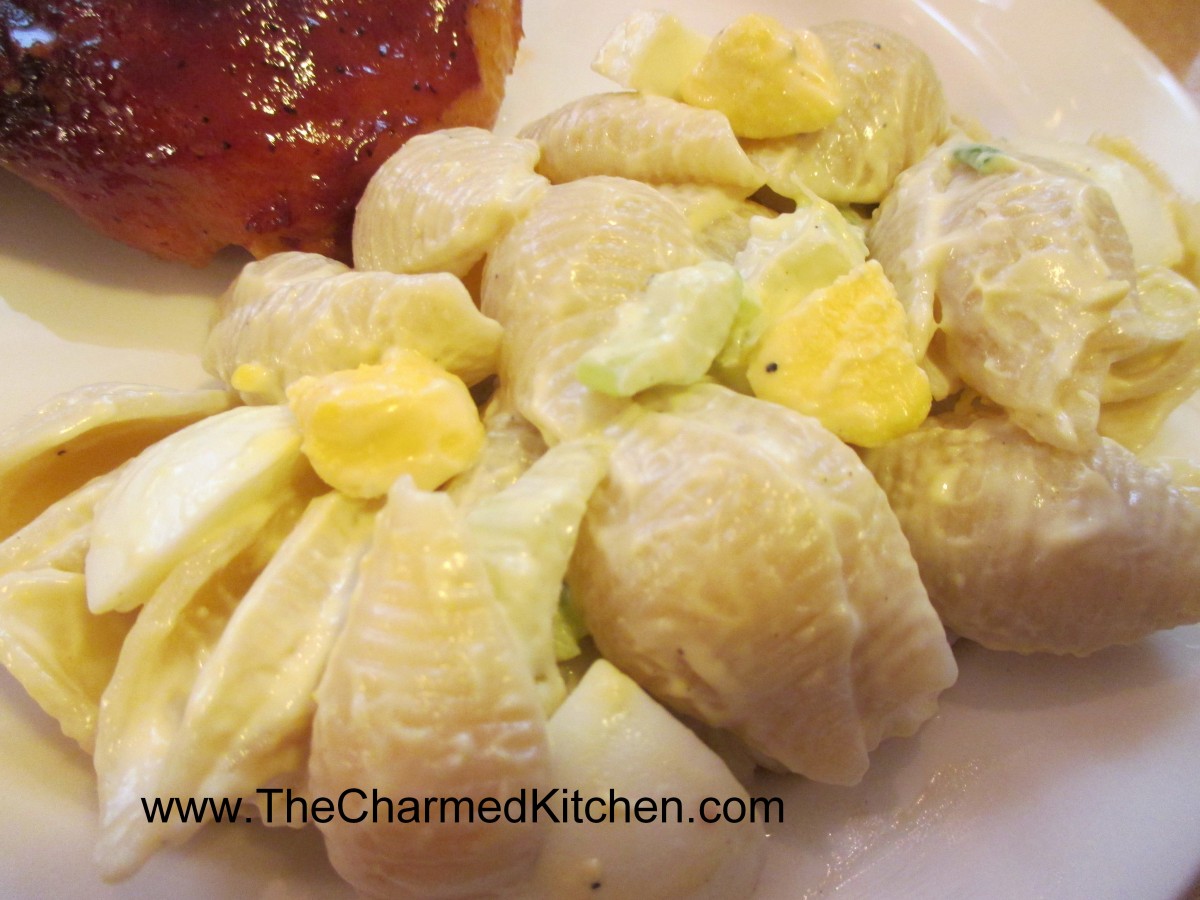
Mom’s Macaroni Salad
I am going to a big family cookout today. When I thought about what dish I would bring, I ended up choosing this salad right away. Feeling nostalgic, I guess. For summer cookouts, we always had this salad. Long enough ago that it was called macaroni, not pasta. I loved it then, and I love it now. I won’t say I don’t make other pasta salads. I do. I make all sorts of combinations, but this is the salad that brings me home. Mom used mostly mayo, with a little salad dressing like Spin Blend. She felt it gave the salad just a little more zing. I use straight mayo, but that part of the recipe is flexible. She added quite a few hard cooked eggs and I think they add a richness to the dish. My dad would cut up the celery and green onions for her. Mom liked the veggies cut into a fairly small dice in this dish, and Dad had great knife skills. I love the image of them cooking together. So here it is- a family recipe wrapped up nicely with some memories, too.
My Mom’s Macaroni Salad
1 lb. uncooked pasta, shells are preferred
Salt and pepper
Mayonnaise, about 1 cup
Salad dressing, like Miracle Whip, about ½ cup or more mayo
3-4 ribs celery, sliced thin
4-5 green onions, trimmed and sliced thin
8-12 hard-cooked eggs, cooled and peeled
Cook pasta according to package directions, but do not overcook. Rinse with cold water and drain well. Place drained pasta in a large bowl and sprinkle with salt and pepper to taste. Add dressings and vegetables and stir until well mixed. You may want to add more dressing to suit your taste. Chop eggs and stir into salad. Adjust seasonings if needed and chill before serving. Serves 8-10.
Cinnamon-Vanilla Peach Preserves

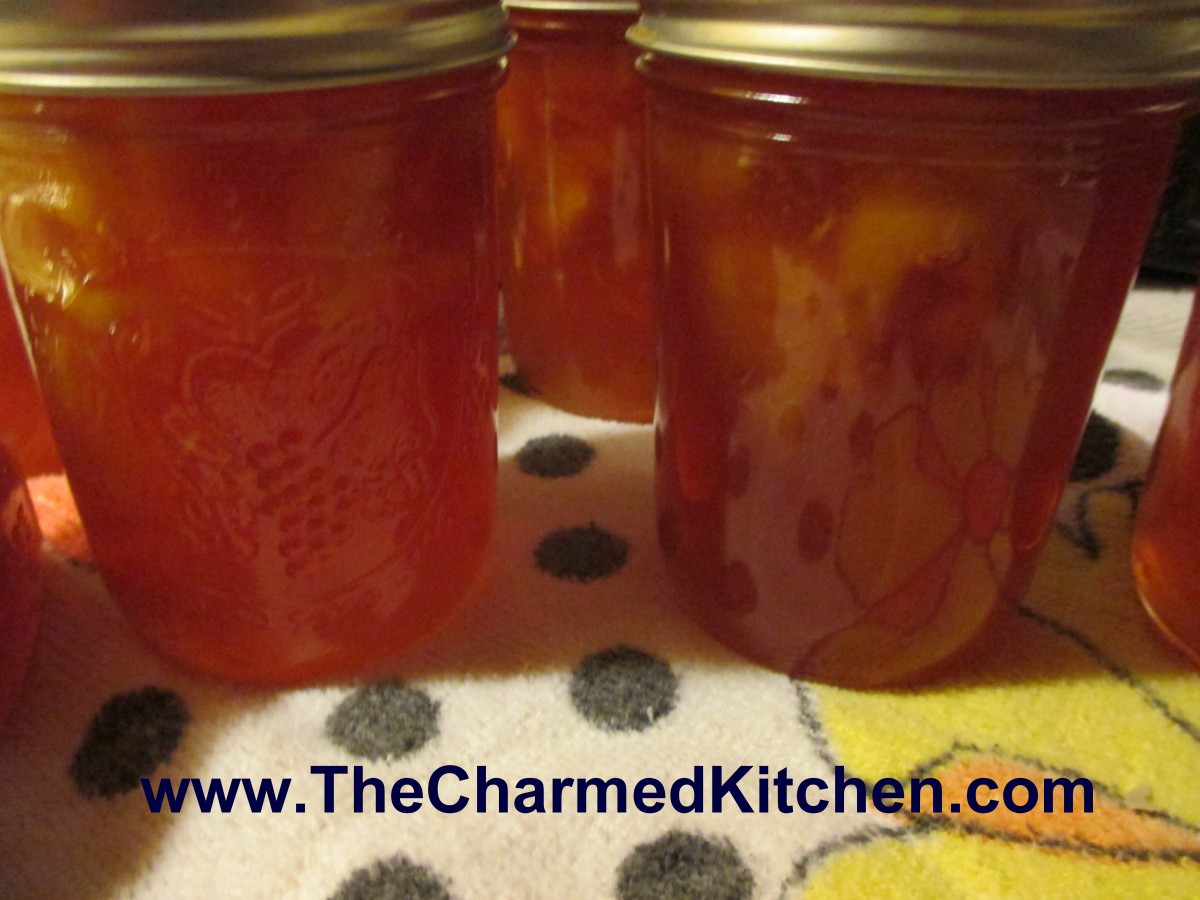
Cinnamon Vanilla Peach Preserves
After getting some peaches from a friend, I decided to make preserves with some of them. The peaches were so juicy and perfectly ripe. They smelled amazing. I knew I would not be able to eat them all. I used a basic preserve recipe, but added some vanilla and cinnamon for added flavor. I also used pectin in this batch. You can make peach preserves without added pectin, but because these were so ripe, I knew they would set better with the pectin. There is less pectin in very ripe fruit. The end result was just what I was going for. Pieces of peach, suspended in a soft gel, lightly flavored with the vanilla and cinnamon. I may have to make another batch.
Cinnamon-Vanilla Peach Preserves
4 c. sliced peaches, about 2-3 lbs. of fresh
6 T. pectin
2 T. lemon juice
1 T. vanilla extract
3-4 (4-inch) cinnamon sticks
7 c. sugar
Note: Before starting the preserves have your canning supplies ready including clean jars, lids, rings, water bath canner, funnel and ladle.
Prepare peaches by scalding in boiling water for a minute. Place in cold water, then slip off the skins. Cut in half and remove the pits and any fibrous parts near the pits. Slice peaches and place peaches and any juices in a large pot. Add the pectin, juice, vanilla and cinnamon sticks and bring to a boil, stirring often. Add the sugar and cook over high heat, stirring often, until mixture comes to a boil that you can’t stir down. Stir constantly for 1 full minute.
Remove from heat and remove the cinnamon sticks. Skim off any foam, if needed. Ladle hot preserves into clean, hot jars, filling to ¼-inch from the top. Wipe rims and screw on lids until comfortably tight. Repeat until the jars are filled. Place jars in water bath canner filled with boiling water. Water must cover the jars by at least an inch or two. Cover pot. Once water returns to the boil, start timing. Process for 10 minutes, turn off heat and leave jars in pot for 5 minutes longer. Remove jars to counter with a towel on it, or a cooling rack. Keep out of drafts. Allow jars to cool, check seals. Makes about 9 half pint jars.
Adapted from Ball Blue Book
Blueberry Cinnamon and Vanilla Jam

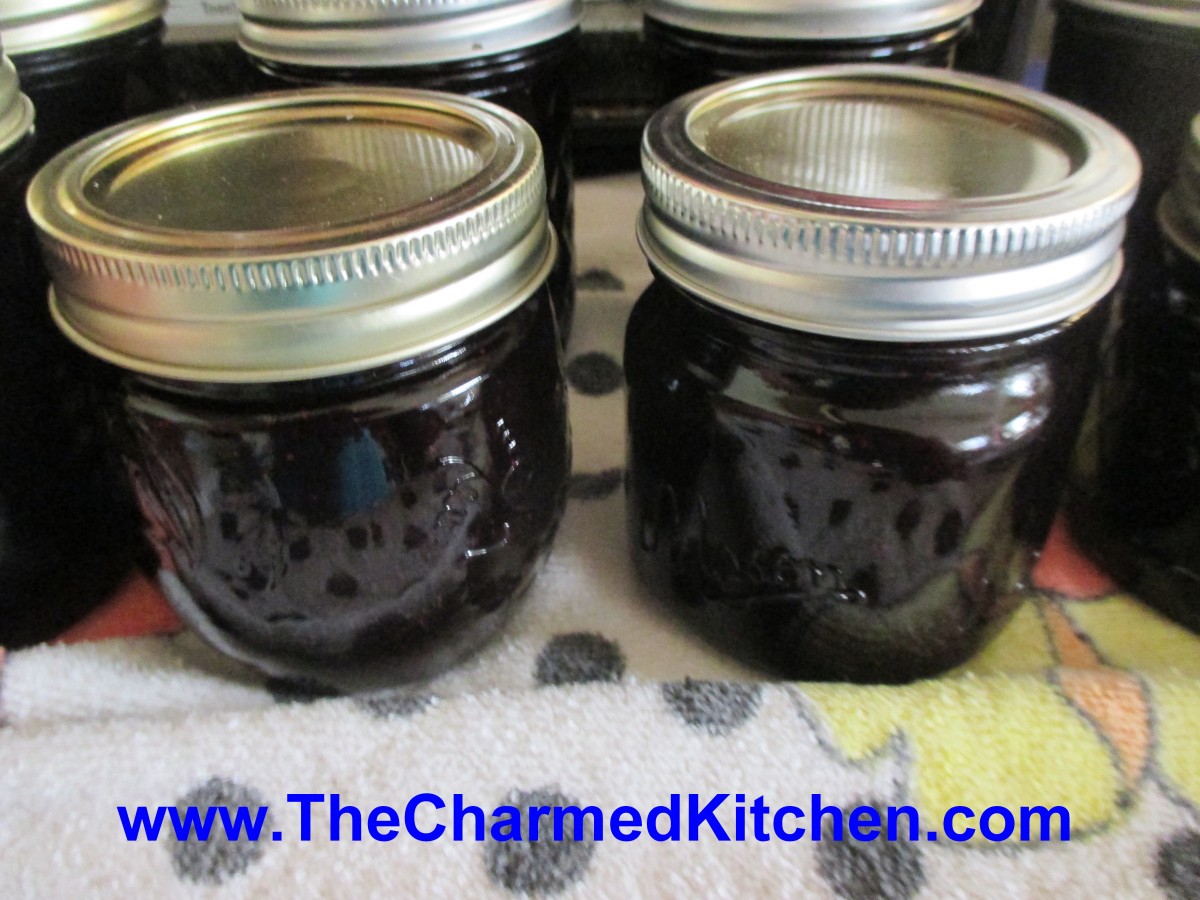
Blueberry Cinnamon Vanilla Jam
With an abundance of fresh berries, I just had to make some blueberry jam. I have added vanilla before, but I decided to add cinnamon to this batch, as well. I love the way berries taste with cinnamon. The new flavor combination was a great choice. So tasty. The recipe is pretty basic- blueberries, sugar and lemon juice. You don’t need pectin in this recipe. The vanilla and cinnamon just add a little something special. So here is the recipe.
Blueberry Cinnamon Vanilla Jam
9 c. crushed blueberries
6 c. sugar
¼ c. lemon juice
3 cinnamon sticks ( 4 inch)
1 T. vanilla
Pick over berries removing any stems. Rinse, drain and crush. Place berries, sugar, lemon juice, cinnamon and vanilla in a large saucepan and heat slowly until sugar has melted. Bring up heat and cook over high heat, stirring often. Stir more as mixture thickens. It will take 20-30 minutes to get to the gel stage. To check for gel stage: dip a metal spoon in blueberry mixture and hold it up sideways. Allow mixture to drip off and when two drops come together to form one larger drop- you are at gel stage. You can also use a candy thermometer. When the jam reaches 220 degrees- or 8 degrees over the temp of boiling water- you are at gel stage. Use a pair of tongs to remove the cinnamon sticks and discard them. Ladle hot jam into clean, hot jelly jars. Fill to within 1/4 inch of the top. Wipe rims and place on lids prepared according to directions on box. Screw lids comfortably tight. Place jars in boiling water bath with water at least 1-2 inches over the tops of the jars. Cover pot and start timing when water returns to the boil. Process 15 minutes. Remove jars to towel, cutting board or cooling rack in a draft-free location. Check seals once jars are cooled. Makes 8-10 jelly jars.
Source: Adapted from Ball Blue Book
A Trio of Sorbets

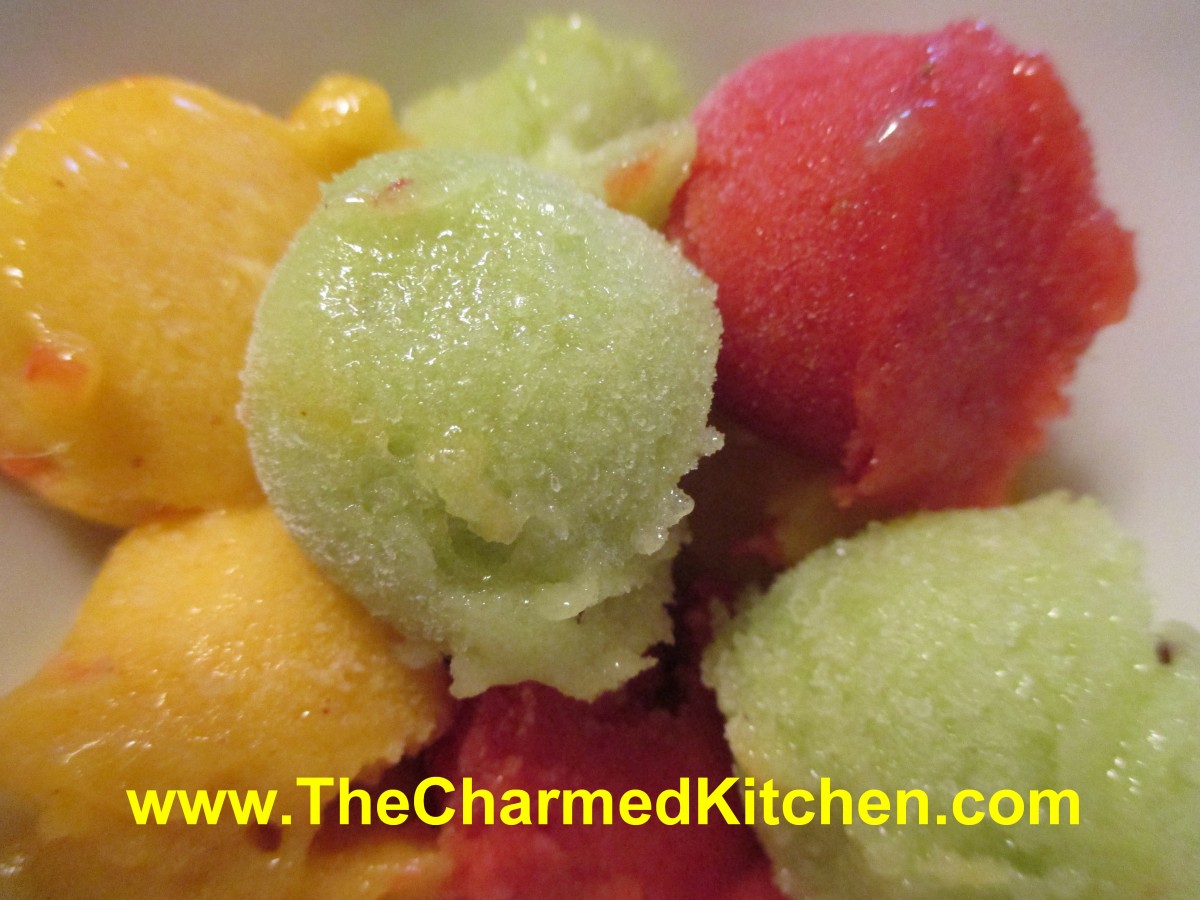
A Trio of Sorbets
I remember making melon balls for fruit salad, when I was a kid. My mom showed me how. It always seemed like a special occasion when we made them. I will admit, I haven’t made melon balls in a long time, but I still like the way they look.
I used melon balls at the inspiration for this dish. Funny thing is- there isn’t any melon in them. I made three different sorbets- strawberry, mango and kiwi. Each one is meant to resemble a different melon. They can be served alone and make a light, wonderful dessert. You can add a scoop of ice cream or whipped cream, if you like. You can also add some to a glass of lemonade or a summer cocktail, just for fun.
This dessert is easy to make and a nice alternative to ice cream. Don’t get me wrong, I love ice cream, but sometimes I want something lighter. Nice for those who are lactose intolerant, too.
Strawberry Vanilla Sorbet
2 c. fresh or frozen strawberries (allow frozen berries to thaw a little first)
1/4 c. sugar, or to taste
3 T. fresh lemon juice
1 t. vanilla
Place ingredients in food processor and process until smooth. Place in shallow pan and freeze. If you are using frozen berries re-freezing will take only about 1 hour. Up to 30 minutes before serving remove sorbet from freezer and allow to soften enough to break into chunks. Place in processor and blend again until very smooth. Return to freezer until needed.
Mango Honey Ginger Sorbet
2-3 large, ripe mangoes, seed and peeled
1/4 c. honey, or to taste
2-3 t. fresh grated ginger
Place ingredients in food processor and process until smooth. Place in shallow pan and freeze. Up to 30 minutes before serving remove sorbet from freezer and allow to soften enough to break into chunks. Place in processor and blend again until very smooth. Return to freezer until needed. For an even smoother sorbet, you can blend it another time.
Kiwi Lime Sorbet
6 kiwi, peeled
juice of 1 lime
1/4 c. sugar, or to taste
Place ingredients in food processor and process until smooth. Place in shallow pan and freeze. Up to 30 minutes before serving remove sorbet from freezer and allow to soften enough to break into chunks. Place in processor and blend again until very smooth. Return to freezer until needed.
To serve the sorbets, use a cookie scoop to make the “melon” balls. I made them as I was serving them, but you can also make the balls and return them to the freezer until ready to serve.


