Sour Cherry and Mustard Glaze

Sour Cherry and Mustard Glaze
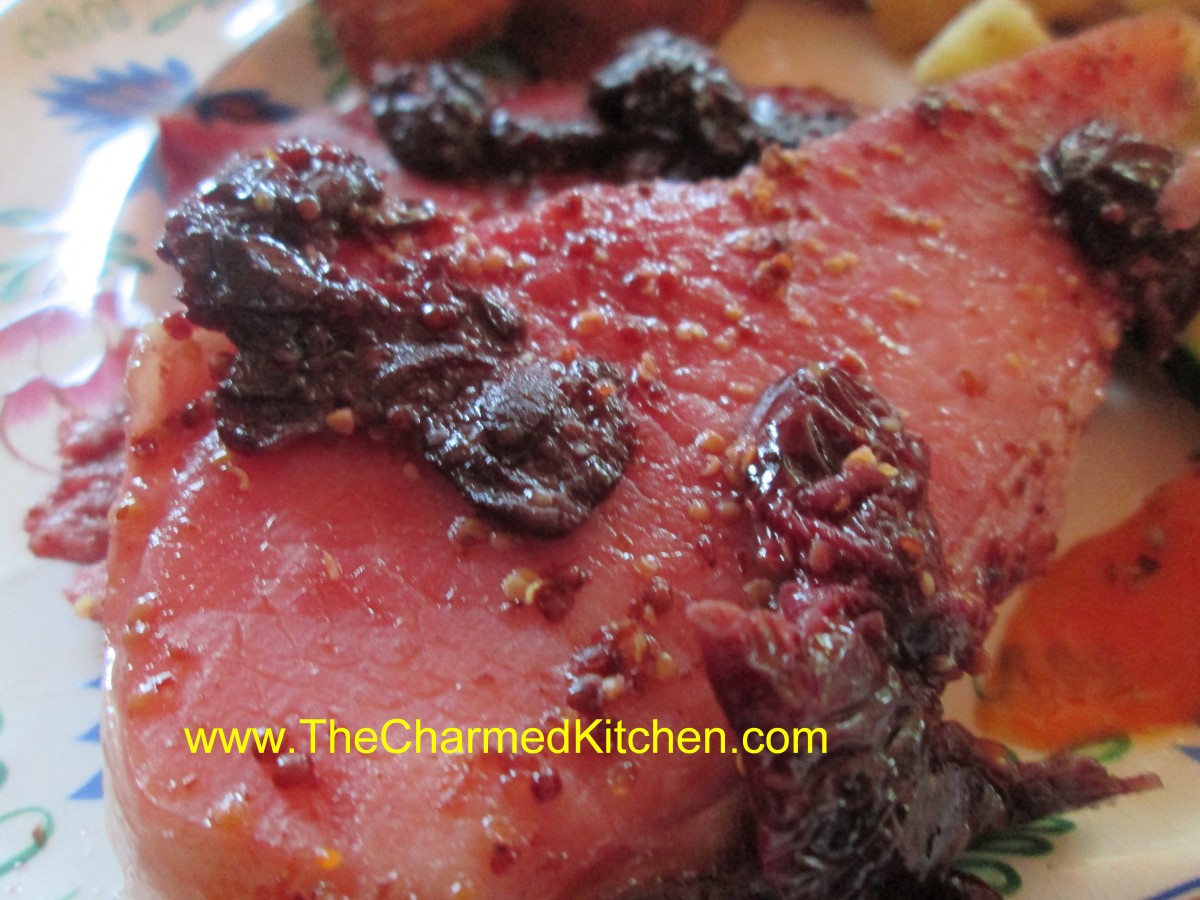
Sour cherries are in season and I am loving it. I decided to use cherries in a glaze for a ham dinner I was having with friends. I often enjoy using various fruits in savory dishes. The cherries paired nicely with the ham, but this glaze would work well on duck or fresh pork, too. The mustard was a last minute addition. It added just the extra kick I was looking for.
Sour Cherry and Mustard Glaze
3-4 cups pitted sour cherries
1/2 c. cider vinegar
1/4 cup honey, or to taste
1/2 c. grainy mustard
1 t. cinnamon
1/2 t. cayenne pepper
salt and pepper to taste
Place the cherries in a saucepan and cook over medium heat until much of the liquid has cooked off. Stir occasionally. Add the rest of the ingredients and cook until mixture has thickened. Stir more often as mixture gets thicker to prevent scorching. Adjust seasonings. I was using this on a ham so I didn’t add much salt, but would add more if I were using it on fresh pork or poultry. Makes about 2 cups.
To use: Spoon mixture over the meat at least 30 minutes before food will be done so sauce can caramelize a bit. Could also be warmed and served on the side as a dipping sauce. I left the cherries whole, but you could puree the mixture for a smoother sauce.
Lambsquarters and Mushroom Quiche


Lambsquarters and Mushroom Quiche
For a weekend away with some friends I made this quiche. I used lambsquarters. Lambsquarters are a plant most people view as a weed. It is, in fact, a plant that seems so pop up almost anywhere ground has been cultivated. It is also very tasty and nutritious. When cooked, the leaves taste a lot like spinach. If you have lambsquarters growing in your yard, rather then tossing them in the compost pile, you might want to eat them, instead. I also added baby portobello mushrooms, caramelized onions, Swiss cheese, fresh basil, parsley and dill and some marsala wine. The end was result was so good.
Lambsquarters and Mushroom Quiche
1 unbaked pie crust – store bought or homemade
1 T. butter
1 onion, chopped
8 oz. baby bella mushrooms, washed and sliced
¼ c. Marsala wine
1 T. each fresh chopped parsley, basil and dill
4-5 c. fresh lambsquarters leaves, washed and steamed until wilted and chopped
8 oz. shredded Swiss cheese
2 T. flour
3 eggs
1 c. milk or half and half
Salt and pepper to taste
Hot sauce to taste
Place crust in a 9-inch deep dish pan. Set aside. Heat oil in skillet and cook onion until golden. Add mushrooms and cook until mushrooms are a little golden, too. Add wine and herbs and cook until liquid is evaporated. Set aside. Preheat oven to 400 degrees. Toss 2 cups of the cheese with the flour and place in pie crust. Add the onion mixture and lambsquarters. Combine eggs with milk and seasonings, beat until smooth and pour over the ingredients in the pie crust. Top with remaining cheese. Place on a baking sheet and bake 45 minutes to an hour. Check quiche for doneness by inserting a knife off center. If it is clean, quiche is done. Makes 1.

Corn and Barley Salad with Basil

Corn and Barley Salad with Basil
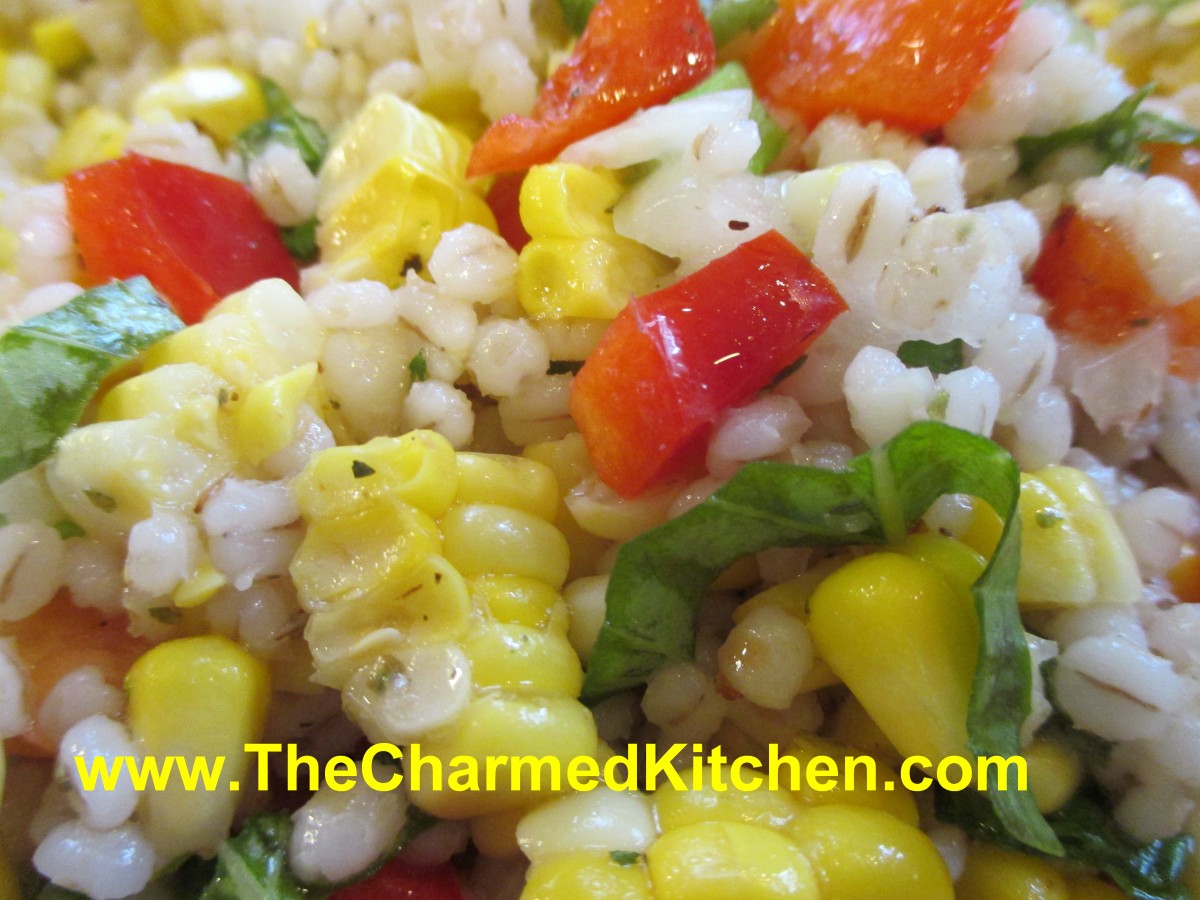
I think most people think of soup, when they think of barley. This versatile grain can also be a nice part of a cold salad. It can be served as a side dish, but I often enjoy this salad for lunch or dinner all on it’s own. The combination of corn and barley makes it pretty hearty, but still not heavy. Nice on a hot day, when you want a lighter meal. I had grilled some corn a few days ago and had some leftover. I think the smokiness of the grilled corn added a nice touch. I had some fresh basil so I added that, too.
Corn and Barley Salad with Basil
½ c. pearl barley
salt
3 T. cider or white wine vinegar
1 t. Dijon mustard
fresh ground pepper
3 T. olive oil
3 T. fresh basil, cut into thin strips
3 c. cooked corn, from six ears
1 c. diced sweet onion
1 c. diced sweet pepper, any color
¼ c. sliced green onions
Combine barley, 2 cups water and ½ t. salt in saucepan and simmer, covered until barley is tender, about 50 minutes. Drain and rinse under cold water. Combine remaining ingredients and toss with barley in large bowl. Makes 6 servings.
Couscous Salad with Shrimp and Dill

Couscous Salad with Shrimp and Dill
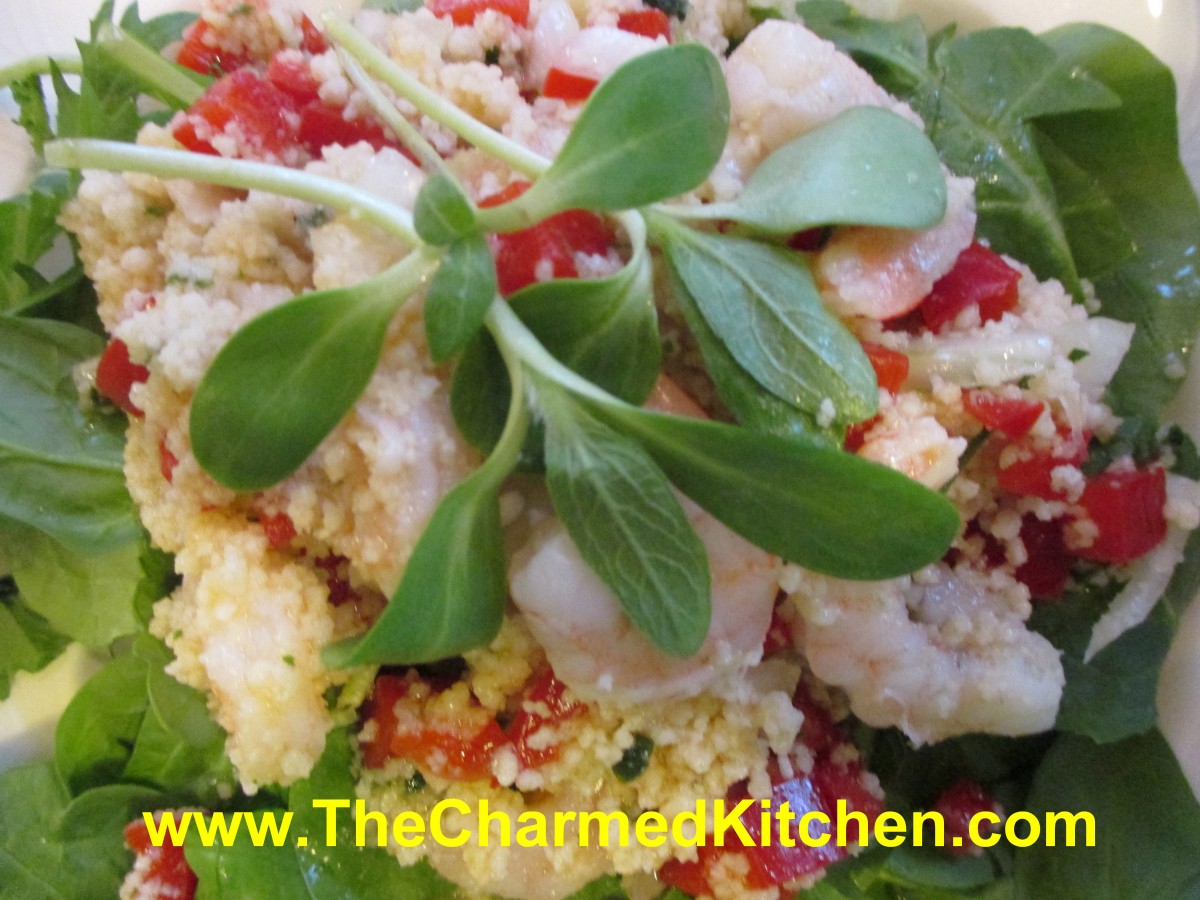
Couscous is one of those foods that is as much fun to say as it is to eat. Couscous is just very tiny pasta. To cook it, you just pour boiling water over it- and give the couscous a few minutes to absorb the water. So easy, and nice on a hot day, when you don’t want to do a lot of cooking. For this salad I combined the couscous with shrimp, some fresh dill and a light dressing. I had some sunflower sprouts, so I added them to the top- just for fun. I also served my salad on a bed of fresh salad greens.
Couscous Salad with Shrimp and Dill
½ c. olive oil
¼ c. fresh lemon juice
1 clove minced garlic
1 t. celery seed
2 c. couscous, about 10 oz.
2 ¼ c. boiling water or vegetable broth
1 lb. peeled cooked shrimp 1 c. diced sweet red pepper
½ c. chopped green onions
2 T. fresh dill weed or 2 t. dried
Whisk first 4 ingredients together for dressing. Place couscous in heat proof bowl and pour over the boiling water. Let stand until water is absorbed, about 10 minutes. Fluff with a fork and add remaining ingredients, stirring to mix well. Pour over dressing and toss to coat. Chill at least 30 minutes or up to 2 hours. 6 Servings.
Vegetable “Roses” Cheese Tart


Vegetable “Roses” Cheese Tart
This tart is sure to get some attention at your next party. It really is easy to make, although a bit time consuming. There are three parts to it. The crust- which I made using a favorite pie crust recipe. The filling- a mix of cheeses, eggs and some herbs. Finally the topper. Various veggies, peeled into thin ribbons, wound into little “roses”, and placed on the cheese layer. My friend, Kat, saw a similar creation and posted it. I loved it, and decided to try and create one of these tarts myself. I switched some things from the one she posted. I made my own crust and used some different veggies. So here is how I did it.
The crust:
This is an old family recipe. Simple and flaky. It makes 2 crusts- so I used the other one for another dish. You could make two tarts or freeze the rest for another time.
Flaky Pie Crust
2 c. flour
1 t. salt
3/4 c. shortening, chilled, or use lard or coconut oil, I used coconut oil
1 T. cider vinegar
4-5 T. cold water
Combine flour and salt and cut in shortening. Toss in vinegar and water, 1 tablespoon at a time, until dough holds together. Use a fork to toss the ingredients together and as soon as the mixture holds together stop adding water. Makes 2. Chill well before using.
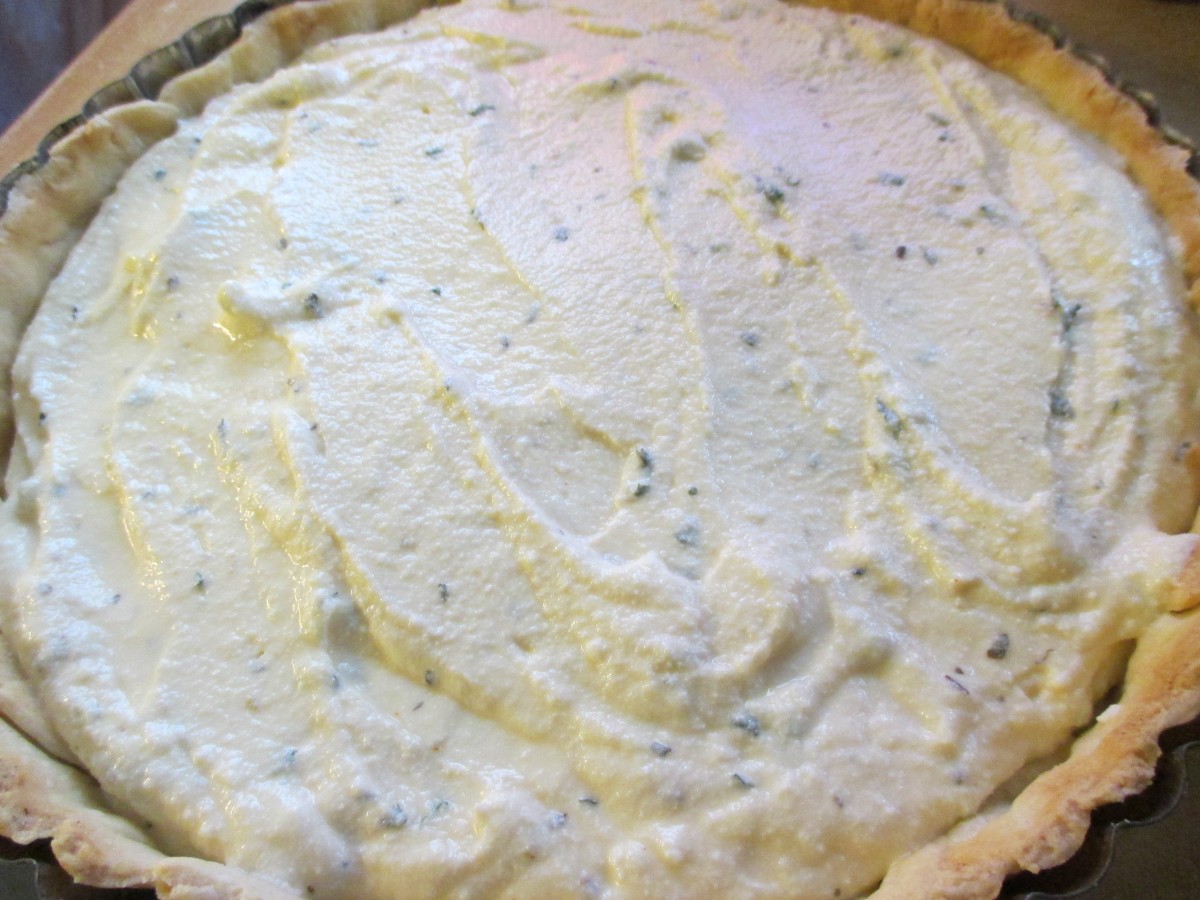
The crust was rolled out, using half the dough, and fitted into a 9-inch tart pan. I blind baked it- to insure it would be cooked through- because the tart doesn’t cook that long. I poked the crust all over with a fork, then I topped the crust with a sheet of foil and then a pound of dry pinto beans. You can use pie weights, if you have them or uncooked rice. I have a jar of pinto beans that I keep just for blind baking. The crust is placed in a 425 degree oven and baked for 15- 20 minutes. It should be taken out of the oven before the edges get too brown. Set aside until you are ready to fill it.
The Filling:
I used a combination of cheeses and eggs, with some seasonings. I am not sure I needed the eggs- but I wanted the cheese to set up.
1 (15 oz.) container ricotta cheese
1/2 c. Parmesan cheese
2 eggs
1 t. salt- or to taste
1 t. dried oregano
1 t. dried basil- or 1 T. fresh basil
healthy dash of hot sauce
Combine all ingredients and spread over the crust.
The veggies:
Even though these are listed last, you might want to get them ready ahead of time. I used a vegetable peeler to make ribbons out of the veggies I used. You could also use a mandolin, if you have one. Some were going to be hard to roll- so I steamed them in the microwave, in batches, for several minutes. That softened them up and partially cooked them. When I was ready to use them- I grabbed a ribbon and rolled it up, adding more ribbons until I had a little “blossom”. As I made them I stuck them in the cheese mixture- already spread over the crust. Sometimes I used 2 veggies in one flower to make it look more interesting. Once the surface was covered, I pressed them down a little so they would all be the same height, roughly.
I used
2 zucchini
2 yellow summer squash
2 really big carrots – made for wider ribbons
1 really big beet*
I had some pieces left over and just made a stir fry with them.
Baking the tart:
Place the tart on a baking sheet and bake in a 350 degree oven for about an hour. Crust should be nice and golden around the edges and the veggies should be tender.
* The beet was the trickiest- but I wanted that pop of red. I peeled the skin off first, then tried to peel the longest pieces I could. Some were a little short, but once steamed, they still worked pretty well. sometimes I’d finish a beet center off with a longer zucchini ribbon to hold it together.
Crust with cheese topping
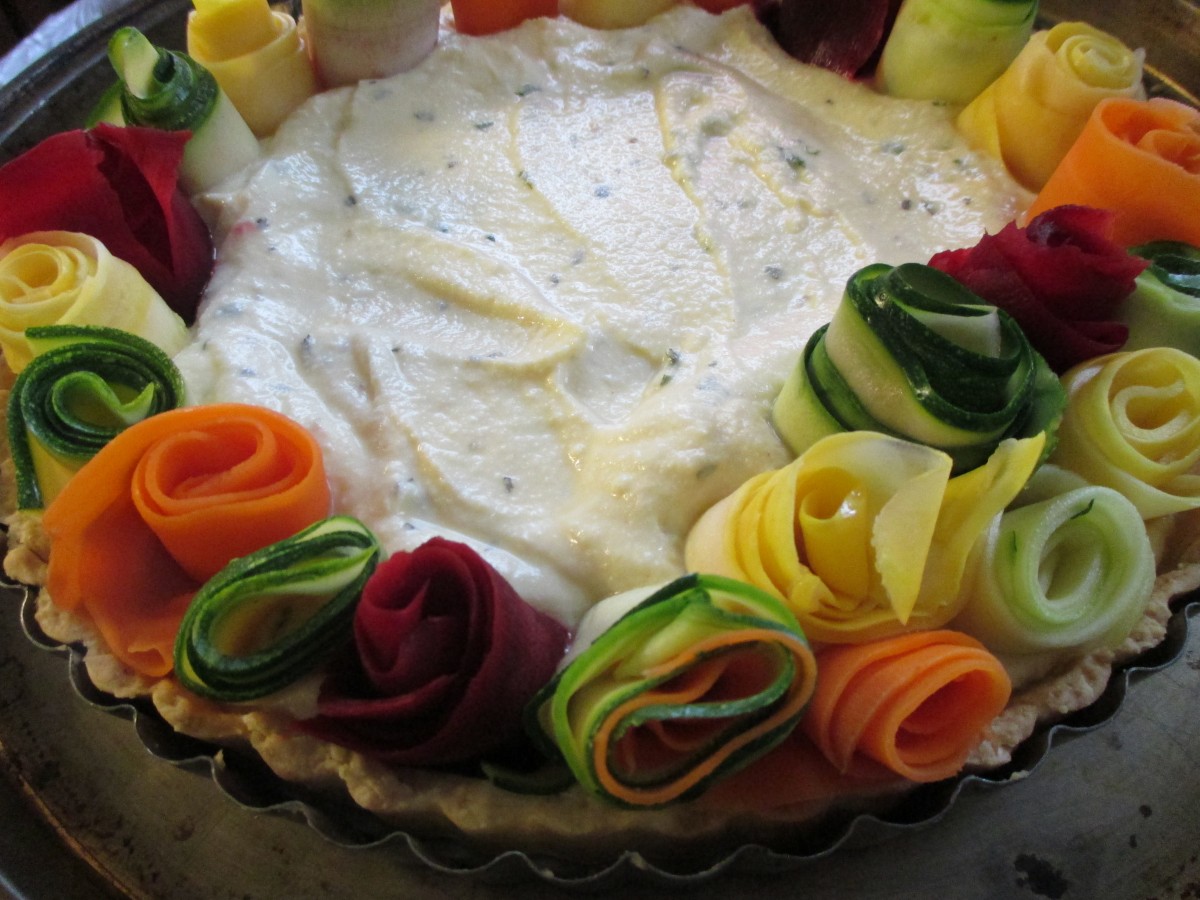
Just kept rolling veggies and filling up the surface
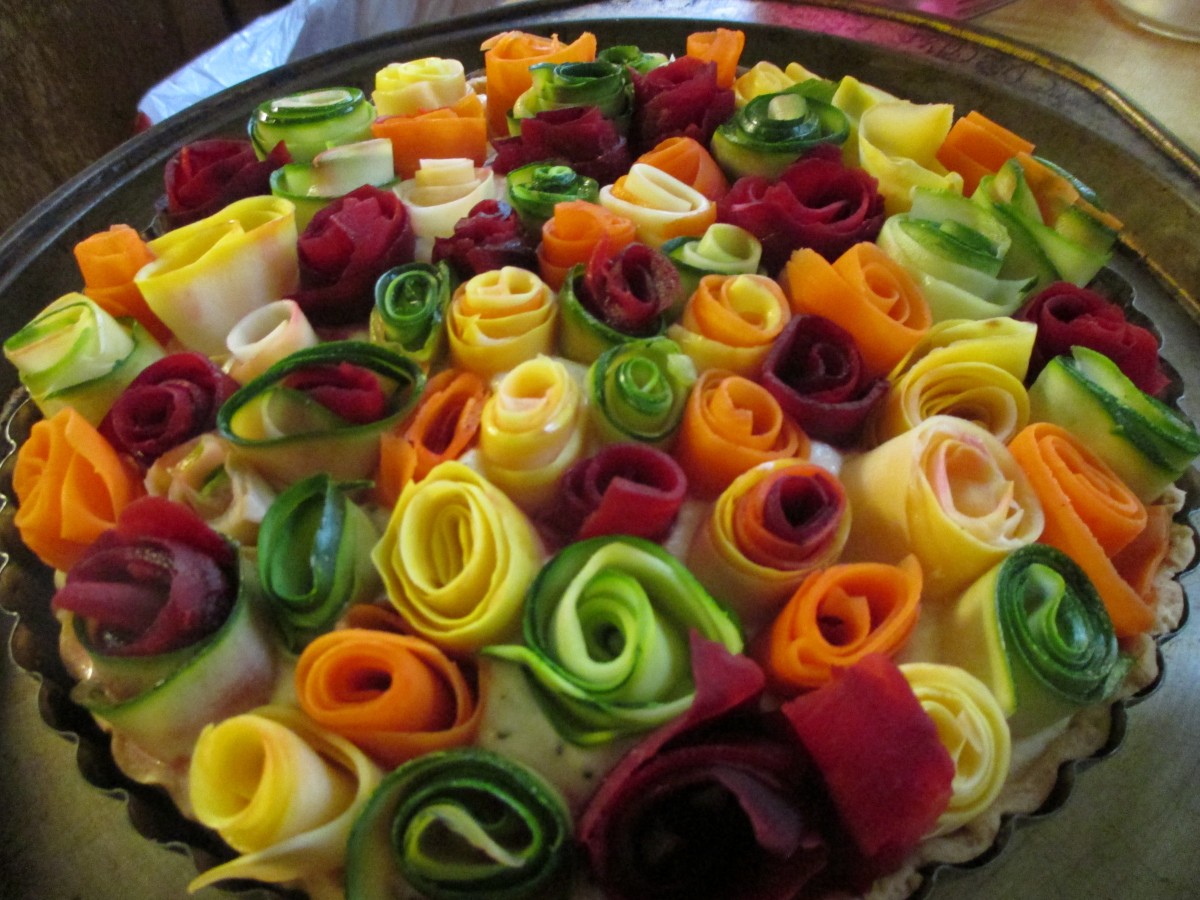
Filled and ready to be baked
Spanish Rice Salad


Spanish Rice Salad
I used to love when my Mom made Spanish Rice. I even loved the way the kitchen smelled when it was cooking. It was a wonderful blend of rice, onions, peppers, tomatoes and often bacon. Since I like those flavors together I decided to combine them in a salad. I had some leftover, cold rice and was looking for a different way to use it. Here is what I came up with.
Spanish Rice Salad
3 c. cooked, cold rice
1 c. diced sweet pepper, any color
½ c. diced sweet onion
¼ c. chopped fresh parsley
Salt and pepper to taste
Dressing:
2/3 c. mayo
1 small tomato, chopped
1 t. cumin
1 t. paprika
8 oz. cooked bacon, drained and crumbled, optional
Combine rice with veggies and seasonings and set aside. In blender or food processor combine dressing ingredients until smooth. Pour over the rice mixture and stir to blend. Adjust seasonings, if needed. Add bacon, if you like. Save a little chopped sweet pepper and bacon to sprinkle on top. Serves 2-3 as a main dish and 5-6 as a side.
Pineapple Rum


Pineapple Rum
Pairing pineapple and rum is such a natural thing to do. Their tropical flavors blend together so well. You can flavor rum with any number of fruits, flowers and spices, and believe me, I have. I think my favorite is still pineapple. So simple to make- just cut up pineapple and put in a jar. Add the rum- light or dark and leave the jar in a cool, dark place long enough for the pineapple to flavor the rum. Strain, filter, if you like and you are ready to go.
Pineapple Rum
½ lb. fresh pineapple
3 c. rum
Cut pineapple into chunks and place in a jar with a tight-fitting lid. Add rum, close jar, and steep for 3 weeks. You can leave it longer, if you like. Strain and filter. Mature at least 1 month. Makes 3 cups.
Homemade Peach Brandy


Homemade Peach Brandy
I like to think of making flavored brandy and other liqueurs as just one more type of food preservation. I make jams and jelly with seasonal fruit, so why not preserve some of Summer’s bounty in alcohol? Peach brandy is one of my favorites. Pretty simple, really. Just combine peaches with brandy and allow the mixture to steep. Once enough time had passed, drain out the fruit. After straining out the fruit I also filter the brandy through either coffee filters or cheesecloth to get it nice and clear. Sweetening is optional. Poured into pretty bottles, they can make fun gifts, too.
Peach Brandy
10 medium sized ripe peaches
3 c. brandy
1 c. sugar syrup – optional – recipe follows*
Peel and pit peaches reserving only the fruit. Place in jar with brandy and steep at least a week, shaking several times. You can leave the fruit in for up to two weeks. Strain, squeezing out as much juice from the fruit as possible. Filter through cheesecloth, fine mesh strainer or coffee filters for a clearer product. Add sugar syrup, if desired, and mature 4-6 weeks. Makes 4 cups.
*Sweetening– Simple syrup is made from 1 cup of sugar and ½ cup of water. Bring to a boil, then cool. You will have 1 cup of syrup. Some recipes call for plain sugar and others for honey. Watch when you substitute honey for sugar, as it is sweeter and stronger flavored. Better to use orange or clover honey.
Homemade Raspberry Liqueur

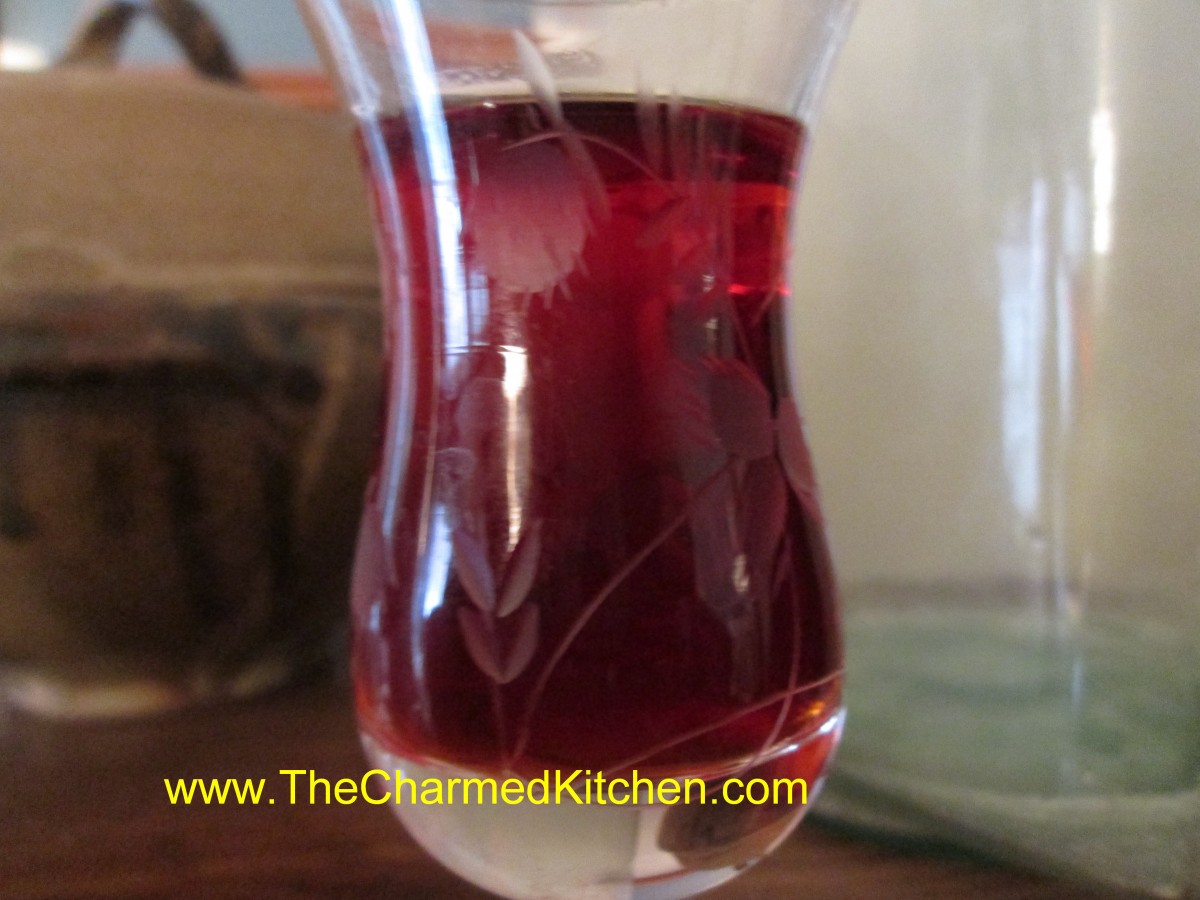
Homemade Raspberry Liqueur
I enjoy making homemade liqueurs. You just start with alcohol- I most often use vodka – then you add ingredients to flavor the alcohol. I have done all sorts over the years and raspberry is one of my all time favorites. Its beautiful color and great flavor make it nice for sipping, or used in mixed drinks. I like to think of it as just another food preservation method!!! Here is the recipe in case you also want to make it. Makes a great gift, too.
Homemade Raspberry Liqueur
1 lb. raspberries
3 c. vodka
1 ¼ c. sugar
Combine fruit and vodka and let stand 2 -4 weeks. Stir in sugar and age 3 months. Strain and filter. Makes 3-4 cups.
Spiced Chocolate Zucchini Cupcakes

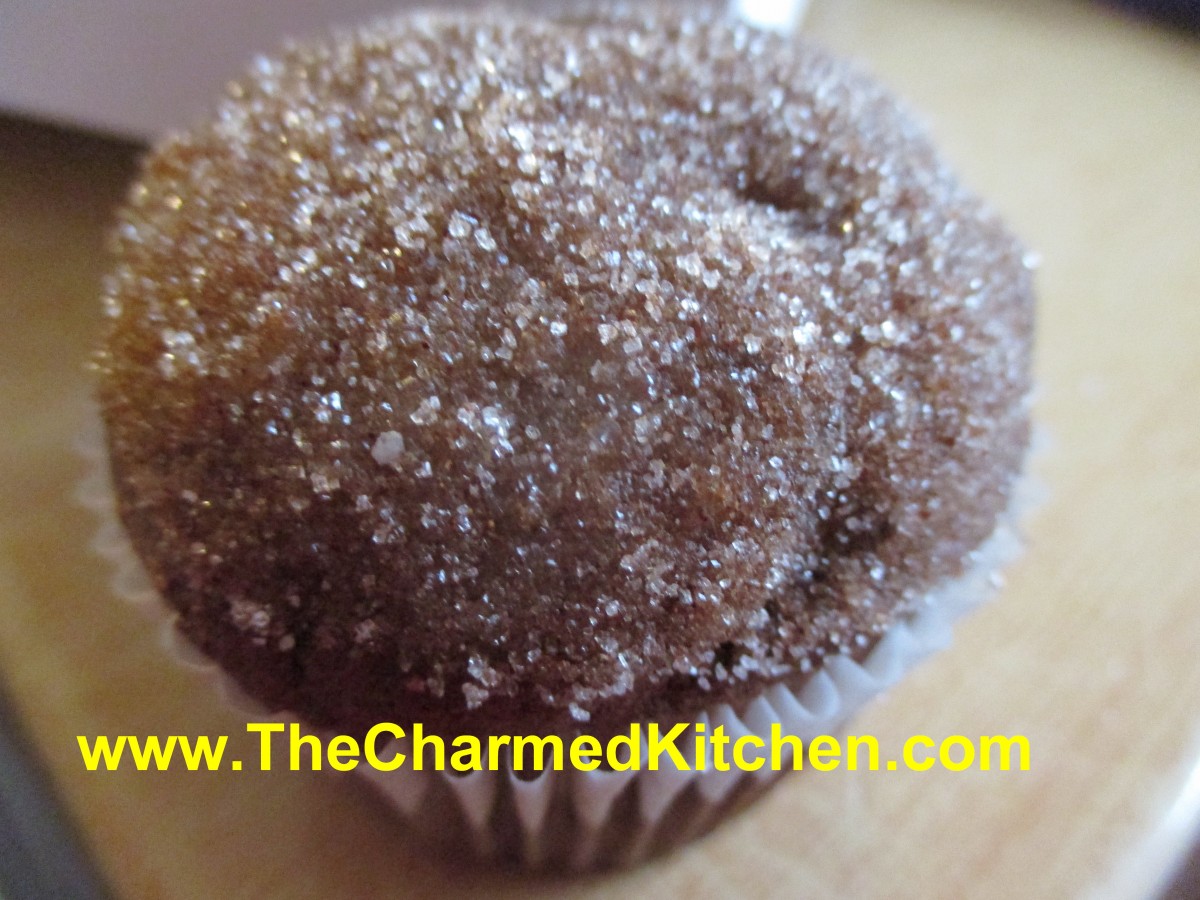
Spiced Chocolate Zucchini Cupcakes
These are wonderfully spicy, moist cupcakes. Instead of frosting them, I decided to top them with melted butter and cinnamon sugar. It’s something I’ve done with muffins, in the past. I just never thought of topping cupcakes that way before. It was a really good idea. The cupcakes were baked for a picnic, and in the heat, frosting would have melted. Besides, not everyone likes frosting. As an added bonus- it is a another recipe using zucchini, and that is never a bad thing.
Spicy Chocolate Zucchini Cupcakes
2 cups all-purpose flour
1 t. baking soda
½ t. salt
1 t. cinnamon
½ t. nutmeg
Pinch of cloves
¼ c. unsweetened cocoa
½ cup butter, softened
½ cup olive oil
1½ c. sugar
2 eggs
½ c. buttermilk
1½ t. vanilla
2½ c. grated zucchini
1 cup chocolate chips
Topping:
½ c. butter, melted
½ c. sugar
2 t. cinnamon
Preheat oven to 325 degrees. Grease and flour 24 muffin cups or use paper liners. Mix together the dry ingredients. Set aside. In a large bowl, cream together the butter, olive oil and sugar until light and fluffy. Beat in the eggs one at a time, then stir in the buttermilk and vanilla. Beat in the flour mixture, just until incorporated. Stir in the grated zucchini and chocolate chips. Pour batter into prepared pans. Bake for 25 to 30 minutes, or until the top of the cupcakes spring back when lightly pressed. Cool in pans over a wire rack for at least 10 minutes or until cool enough to handle. Dip top of cupcakes in melted butter, then dip in the cinnamon sugar. Place on rack to finish cooling off. Makes 24.


