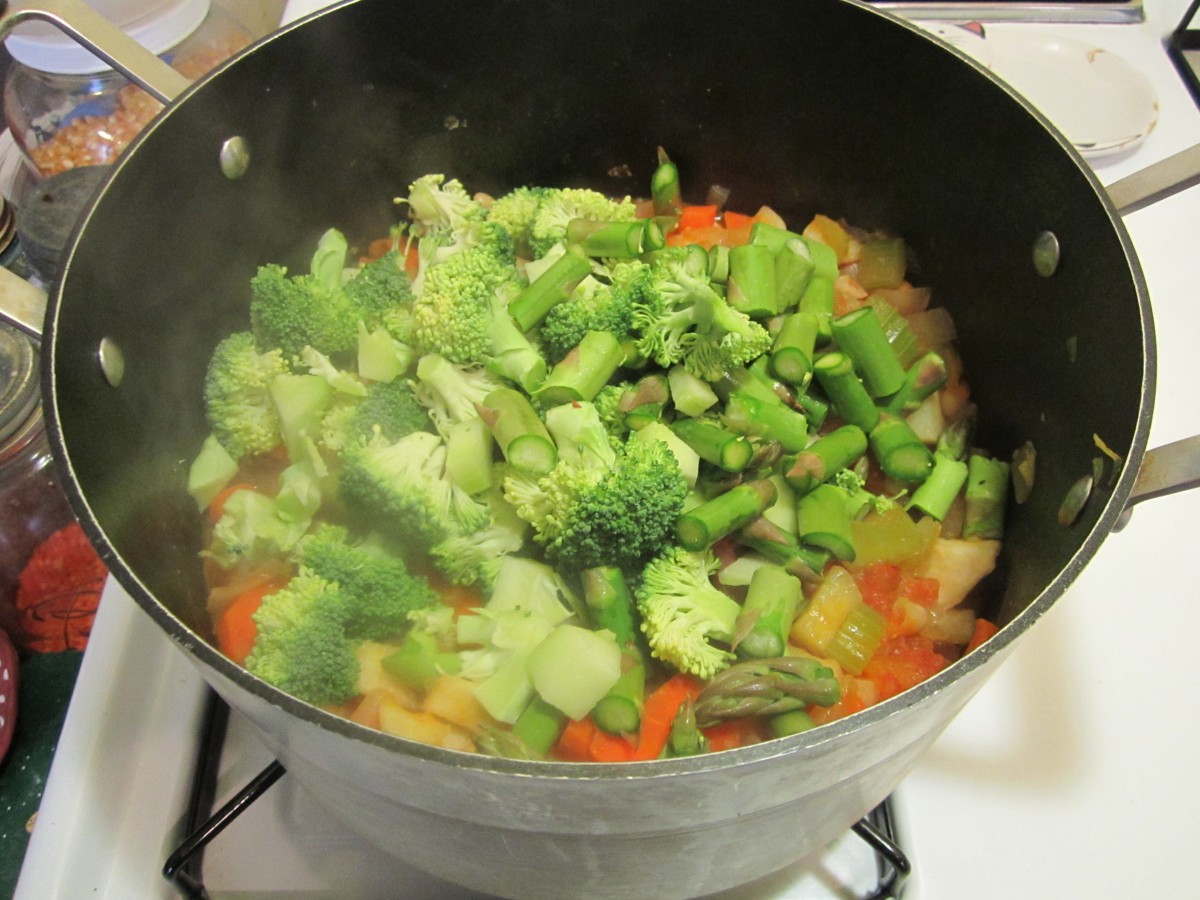
Rustic Veggie Stew

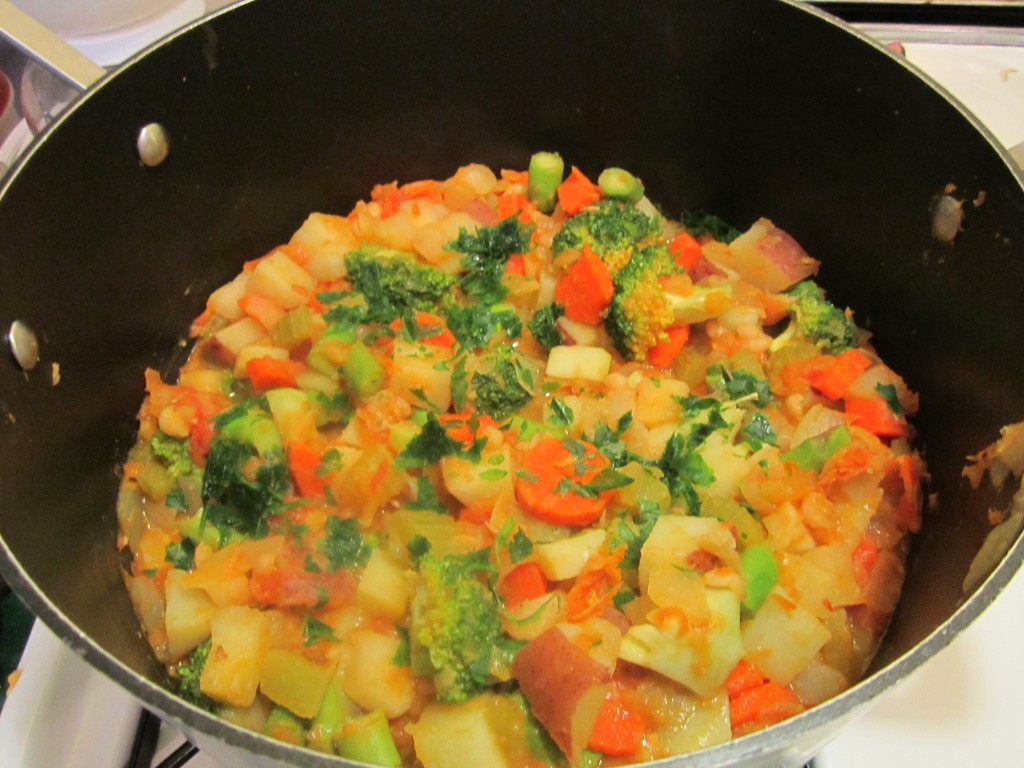
I made a vegan stew for lunch yesterday. A neighbor stopped by and so we got a chance to enjoy it together. I’ll go through what I used to make it- but feel free to sub out veggies you have on hand. Since I was able to get nice asparagus and broccoli I used them. For a non-vegan version you can serve it with fresh grated Parmesan cheese.
Rustic Vegetable Stew
oil
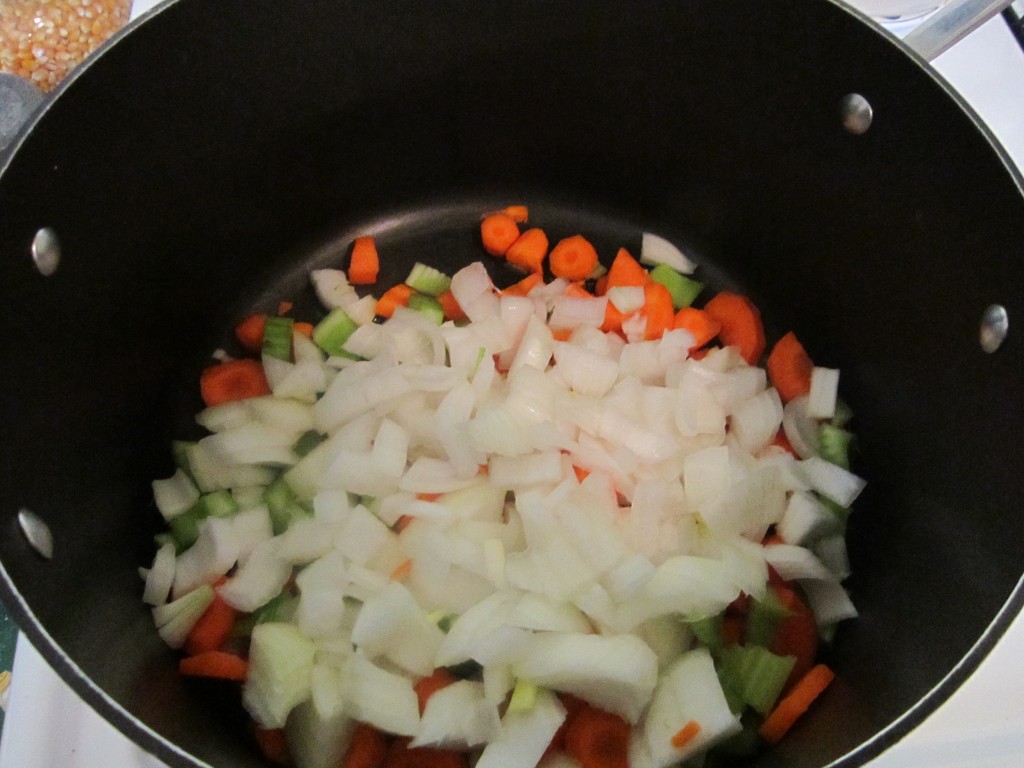
1 large onion, chopped
2 carrots, peeled and chopped
2 ribs celery, chopped
2 turnips, peeled and chopped, optional
2 potatoes, cubed
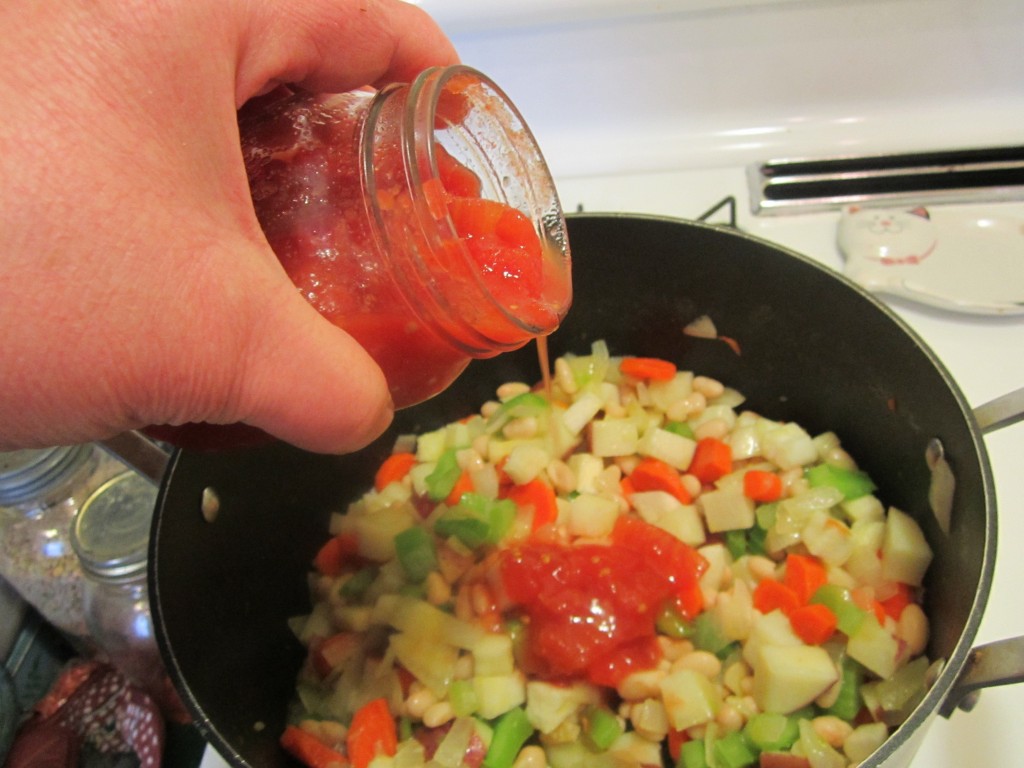
1 can Great Northern beans, rinsed and drained
1 can black beans, rinsed and drained
1 can (14 oz.) tomatoes, undrained – I used a pint jar of home canned tomatoes
4 c. chopped veggies, use what is on hand, I used asparagus and broccoli*
hot sauce to taste
1/4 c. fresh chopped parsley
1 t. fresh chopped rosemary
salt and pepper to taste
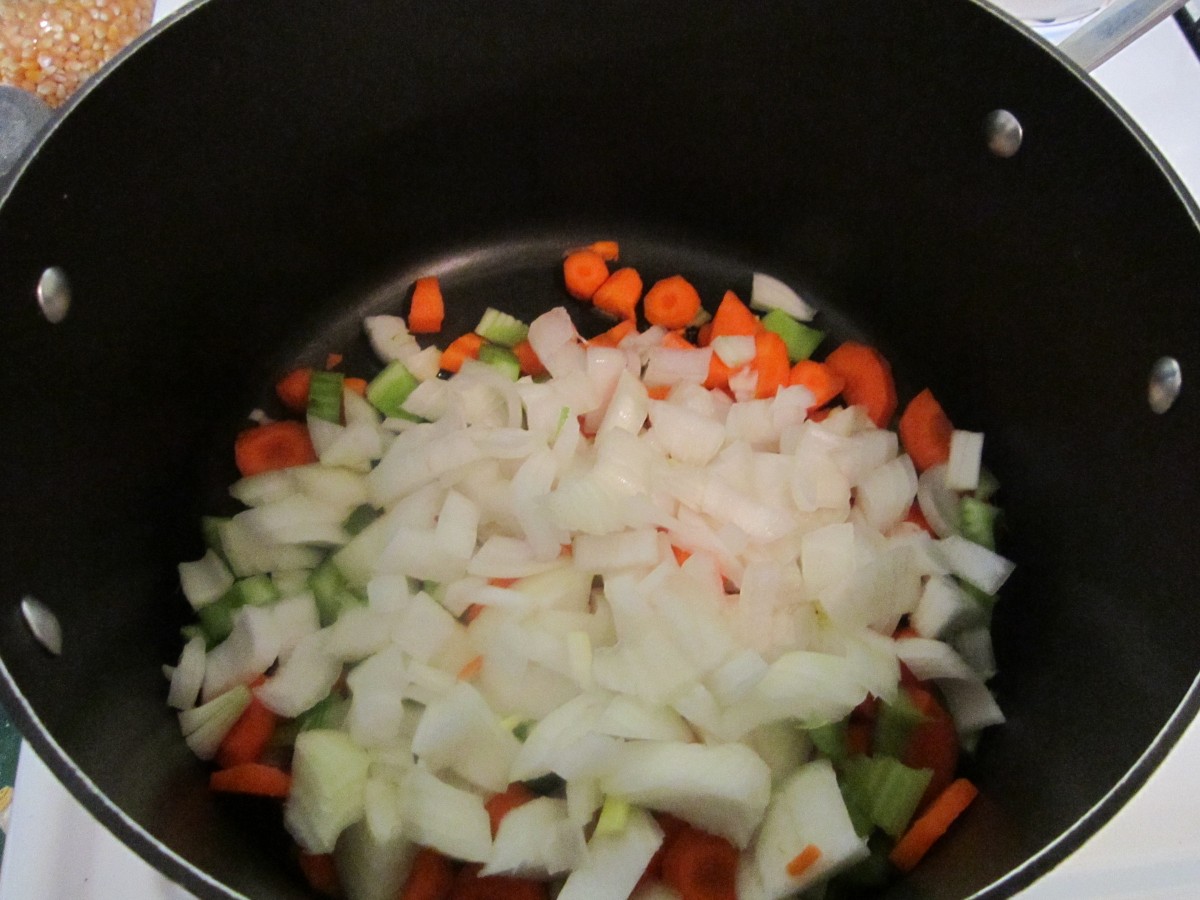
In soup pot, heat oil and saute onions, carrots, celery and turnips for 5-10 minutes or until veggies are wilted. Add potatoes, beans and tomatoes and cook, covered, over medium low heat until veggies are tender. Stir occasionally. Add remaining veggies and cook, covered, another 10 minutes or until they are just tender. Add herbs and adjust seasonings. Serves 6. I served it with a crusty herb bread.
*The last veggies added needed less time to cook so I added them later so they would keep some of their texture. Even frozen veggies could be used.

Cheesy Chocolate Hamantaschen

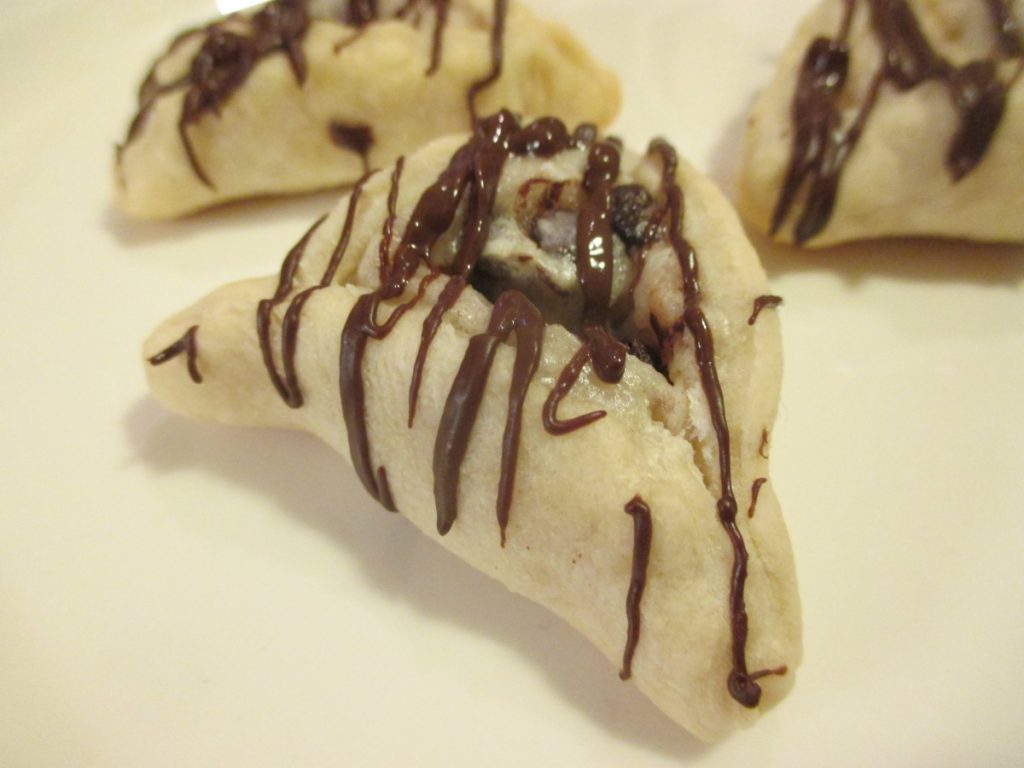
A friend shared this recipe recently, and I was intrigued. I had to try these cookies. The filling for these traditional Jewish cookies is inspired by the filling used in cannoli. I made a few changes from the recipe he shared, and was very happy with how they turned out.
The dough, which contains no sugar, has a wonderful, pastry-like texture. It pairs up well with the filling. The drizzle of chocolate is a perfect finish for them. They aren’t a gooey, overly sweet cookie, which I really like.
They are great served with tea or coffee. I confess, I had a couple for breakfast with my morning tea. I would definitely make these again.
Thanks, Jared, for sharing this recipe.
Cheesy Chocolate Hamantaschen
Filling:
¼ c. ricotta cheese
5 oz. cream cheese
½ c. powdered sugar
1 t. cinnamon
½ c. mini chocolate chips
Dough:
½ c. (1 stick) butter, softened
3 oz. cream cheese
½ c. half and half or milk
1 t. vanilla
½ t. salt
2½ c. flour
Topping:
1 egg white
2 T. water
½ c. chocolate chips
Powdered sugar, optional
Prepare the filling. Beat together the ricotta and cream cheese until smooth. Mix in the milk and cinnamon, then stir in the chips. Chill until ready to use. Make the dough by mixing the cream cheese and butter together. Add the milk, vanilla and salt and mix until smooth. Stir in the flour until a stiff dough forms. Wrap the dough in plastic wrap, or put in a bag and chill at least an hour – or up to a couple of days – before proceeding. On lightly floured surface, roll the dough to a little less than ¼ – inch thickness. Cut dough out into 2-3 inch circles. Place a scant teaspoon of filling in middle of each dough circle. Combine the egg white with water and beat together. Brush a little of the egg white mixture over the edges of the dough circle. Fold the dough up in thirds towards the center, pinching the edges to seal. They should look like little three-corner hats. Repeat with remaining dough, re-rolling the scraps. Brush folded cookies with a little more of the egg white mixture. Place on lightly greased cookie sheets and bake in a 375-degree- oven for 15 minutes, or until golden on the bottom. Remove to cooling rack. Once cooled, melt the chocolate chips and drizzle over the cookies. You can top with some powdered sugar, if you like. Makes 2½-3 dozen.
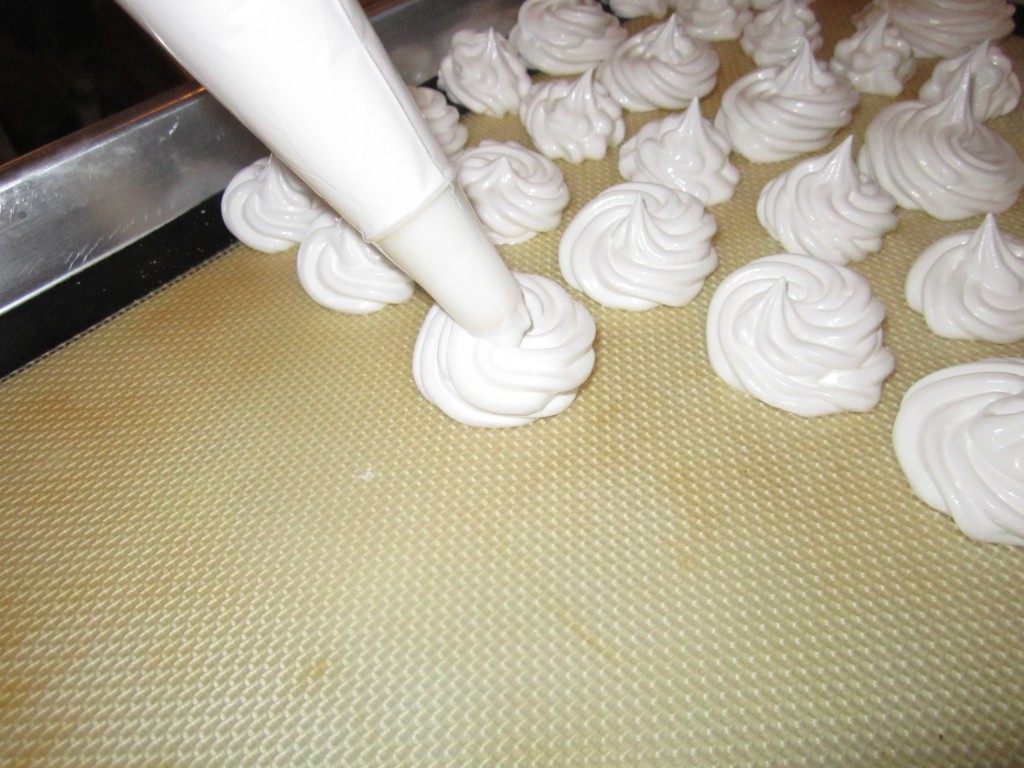
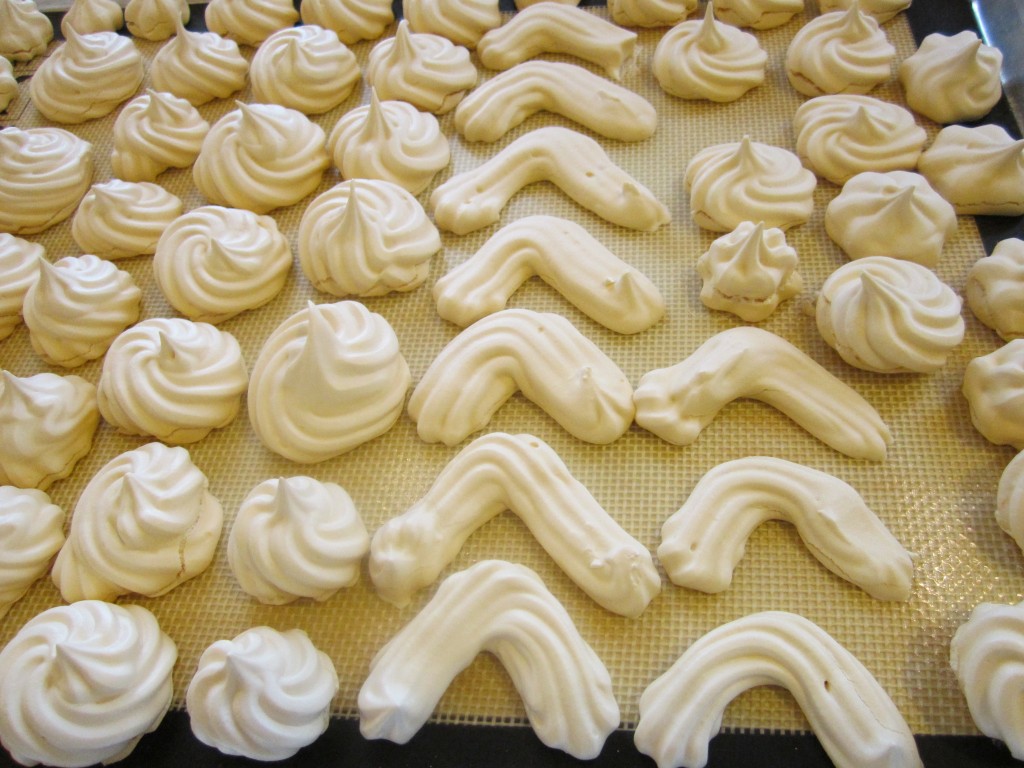
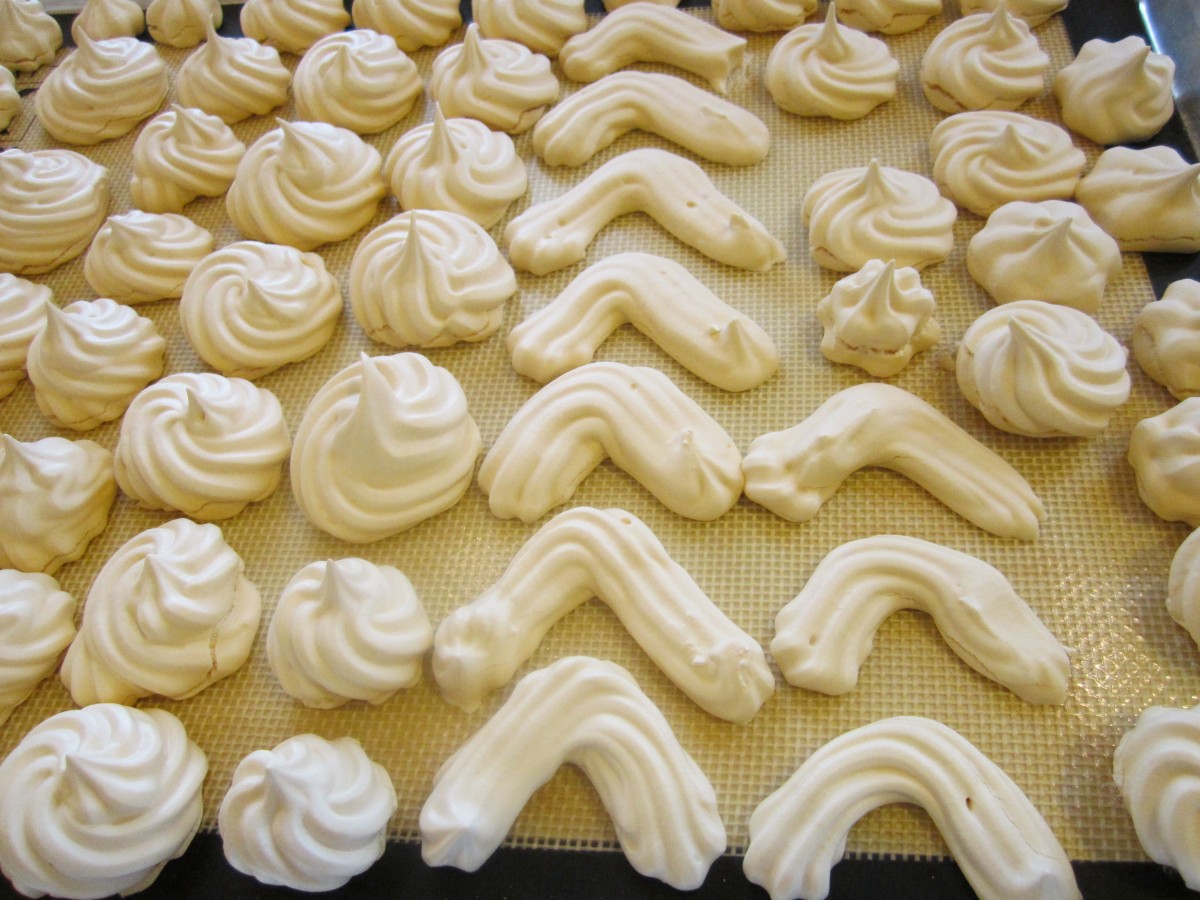
Classic Meringues

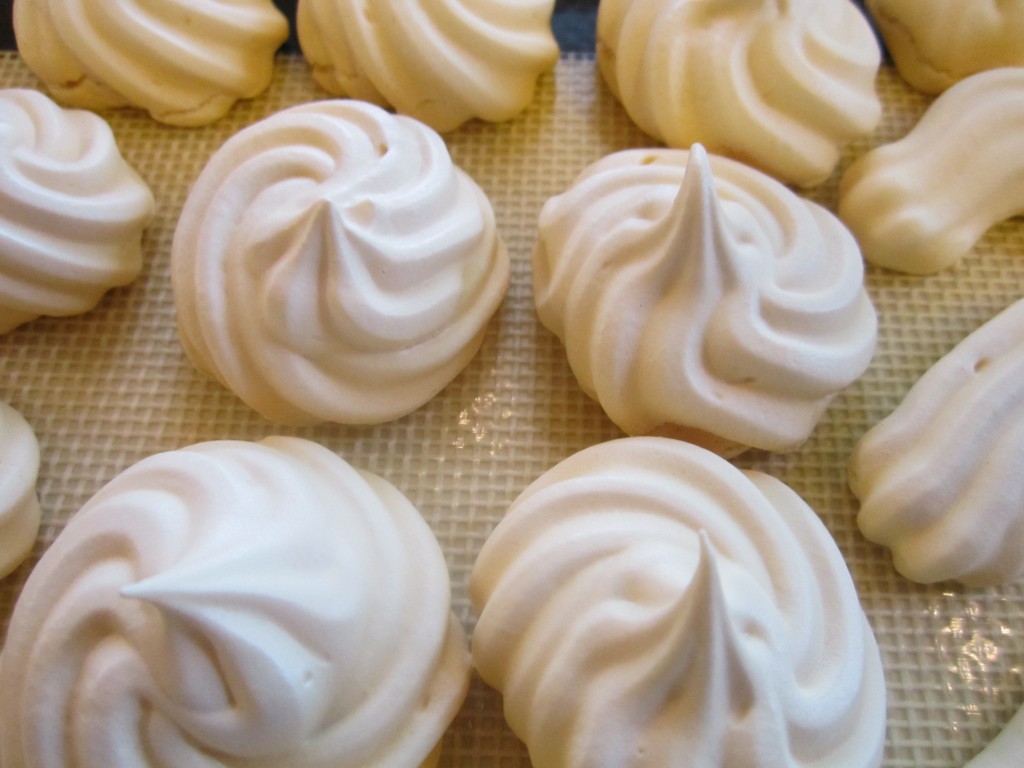
I love meringues. That first crunch followed by a melt in your mouth sweetness. I’ve made meringues in a lot of different flavors, colors and shapes over the years but I seem to gravitate back to basics. egg whites, powdered sugar and cream of tartar. Pretty simple for something that tastes and looks so amazing. I think in the past, people who made meringues must have been pretty strong. Think of having to beat egg whites to stiff peaks before the days of electric mixers. Today with a stand mixer the process is easy.
Classic Meringues
5 egg whites
1 t. cream of tartar
3 c. powdered sugar
Preheat oven to 200 degrees. Line 2 baking sheets with parchment paper or silicone baking sheets. Place eggs in mixing bowl or bowl from stand mixer and start to beat. When whites become foamy add the cream of tartar and beat a couple minutes longer. Add the powdered sugar, about 1/4 cup at a time until it is all mixed in. Continue beating the egg white mixture until it appears glossy and holds a stiff peak. This will take anywhere from 7-12 minutes, depending on your mixer. Place egg white mixture in a piping bag fitted with a star tip and start to form meringues on baking sheet by squeezing some out into desired size and shape. They do not grow at all while baking so you can place them close together on baking sheet. Continue with remaining meringue batter. Place baking sheets in oven. Prop door open a little with a wooden spoon and bake for 90 minutes. Remove wooden spoon so oven door is now closed and bake for 90 minutes longer. Cool a few minutes then remove from the trays. Store cooled meringues in an air-tight container.
Note: You can add flavorings like vanilla, mint or almond with a few drops of extract near the end of the whipping process. You can also add a few drops of food coloring for tinted meringues.

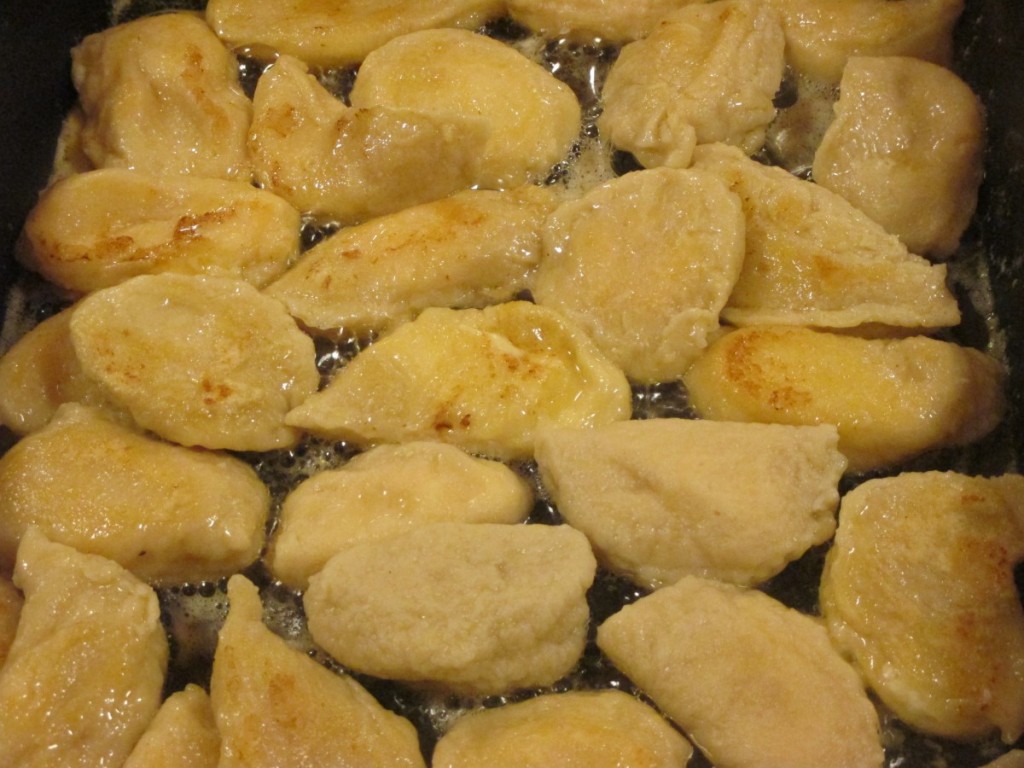
Caramelized Onion Pierogi


I grew up with pierogi. In my family they were usually stuffed with potatoes or prunes. Both are very tasty. Recently a friend asked if I could make them stuffed with something else. I decided to make a caramelized onion filling. I had made something similar recently and used the filing with wonton wrappers. It made sense that it would work. Pierogi are often served with sauteed onions. So that is what i did. I love this new version. The filling can be made day ahead, if that is more convenient. It is best to stuff pierogi with cold filling. So here is the recipe for the dough and the filling. You might want to give them a try.
Caramelized Onion Pierogi
Dough:
2 c. flour
1 t. salt
½ c. water (you can also use half milk and half water)
1 egg
Mix all ingredients together and knead on floured surface until smooth. Cover and let rest at least 15 minutes. Roll out thin and cut into circles. Re-roll scraps. You should get between 15-24. Spoon filling of your choice on center of dough circle. Fold dough in half over filling and press edge with fork to seal. Wetting the edge of the dough will help the dough to stick. Don’t overfill or pierogis will split. Test a couple first to get the hang of it. Place a few at a time into salted boiling water and cook until they float. You can eat them as is or brown cooked pierogi in butter in a skillet. Serve with sour cream. We would often make a larger batch and then freeze them, uncooked on wax paper-lined baking sheets. When frozen they would be transferred to a freezer bag or container. Place right from the freezer into boiling water when ready to use.
Filling:
3-4 medium onions, peeled and chopped fine
1 T. oil
2 T. cider vinegar
2 T. sugar or brown sugar
1 t. paprika
Dash of hot sauce
Salt and pepper to taste
8 oz. cream cheese
4 oz. cheddar cheese, shredded
In medium skillet cook the onions in oil over medium to low heat until onions are tender. Add the sugar, vinegar and seasonings and keep cooking the onions until they are a little golden and most of the liquid has cooked off. Adjust seasonings and stir in the cream cheese. Chill filling until ready to use.

Mom’s City Chicken


If you never had City Chicken, you don’t know what you are missing. Meat on a stick- always a good thing. But not just meat on a stick- breaded meat on a stick! If you like breaded pork chops, you should love City Chicken. This is a dish I grew up with. When my Mom made City Chicken, I knew dinner was going to be special.
There is no chicken in the dish at all. Odd, but well, I didn’t name the dish, I just like eating it.
City Chicken is normally made with chunks of pork- or chunks of pork and veal- skewered on wooden sticks. I used pork. After skewering, the meat is dipped in seasoned flour, egg wash and then bread crumbs- or cracker crumbs.
You can just bake them, or brown in a little oil first, before baking- for a crispier coating. They also can be cooked in an air fryer or convection oven. I served these to friends last night. They really enjoyed them
I didn’t have my Mom’s recipe, so I recreated it as I remembered it. So here is my recipe. A tasty dish, and also a trip down memory lane.
Mom’s City Chicken
2 lbs. boneless pork – I use Western style ribs or pork loin
½ c. sherry – not cooking sherry
2 T. soy sauce
¾ c. flour
Salt and pepper
3 eggs
½ c. milk or half and half
2 T. chopped parsley
Hot sauce
½ t. garlic powder
1-2 c. bread crumbs
2 t. dried basil
2 t. dried oregano
½ t. dried thyme
Oil
6 –inch Wooden sticks or skewers
Cube pork into 1-inch cubes. Place in a bowl and add the sherry and soy sauce. Stir to combine, cover bowl and place in fridge. You can do this a couple of hours ahead or even a day ahead. You might not really need to do this step, but I like the flavor of the sherry, so I chose to marinade my pork in it before breading. Your choice, completely.
Take pork and skewer it onto wooden sticks. I used skewers that were a little thicker than what I normally use. Since they were long, I cut them in half before using. I ended up with 9.
Place flour in a bag with salt and pepper to taste. Add one pork skewer at a time to the flour, shaking to coat evenly. Place floured pork skewers on a tray. Once finished, combine eggs with the milk, parsley, hot sauce, garlic powder and a little more salt and pepper. Place bread crumbs in a bag with the basil, oregano and thyme. Shake to combine. Dip each floured skewer into the egg mixture, remove from egg mix and allow excess to drip off a little. Then place in the bag of bread crumbs, shaking to coat evenly. Repeat until all the city chicken is breaded.
Now I know I already asked you to wait to marinade the pork in the beginning. I am going to ask you to wait again. If you fry up the city chicken right away, the breading is likely to fall off. If you bread the city chicken early in the day- then leave it in the fridge at least a couple of hours before cooking it, the breading will stay on much better. I actually marinade a day ahead, in the morning. Then I bread them in the evening the night before. But even breading them a couple of hours before makes a big difference. Just keep in the fridge until you are ready to cook.
When ready to cook them- I know you were giving up hope we would ever get to this step- heat oil in a large skillet. You don’t need much oil- a few tablespoons, at most. Brown the city chicken on all sides in the hot oil. Transfer them to a baking dish, as you finish browning them. Place in a preheated 350-degree oven for about 30 minutes. Don’t bake them too long- you don’t want them to dry out. Pork has to reach a minimum internal temp of 145 F. Serves 6.
Asian Fish Balls

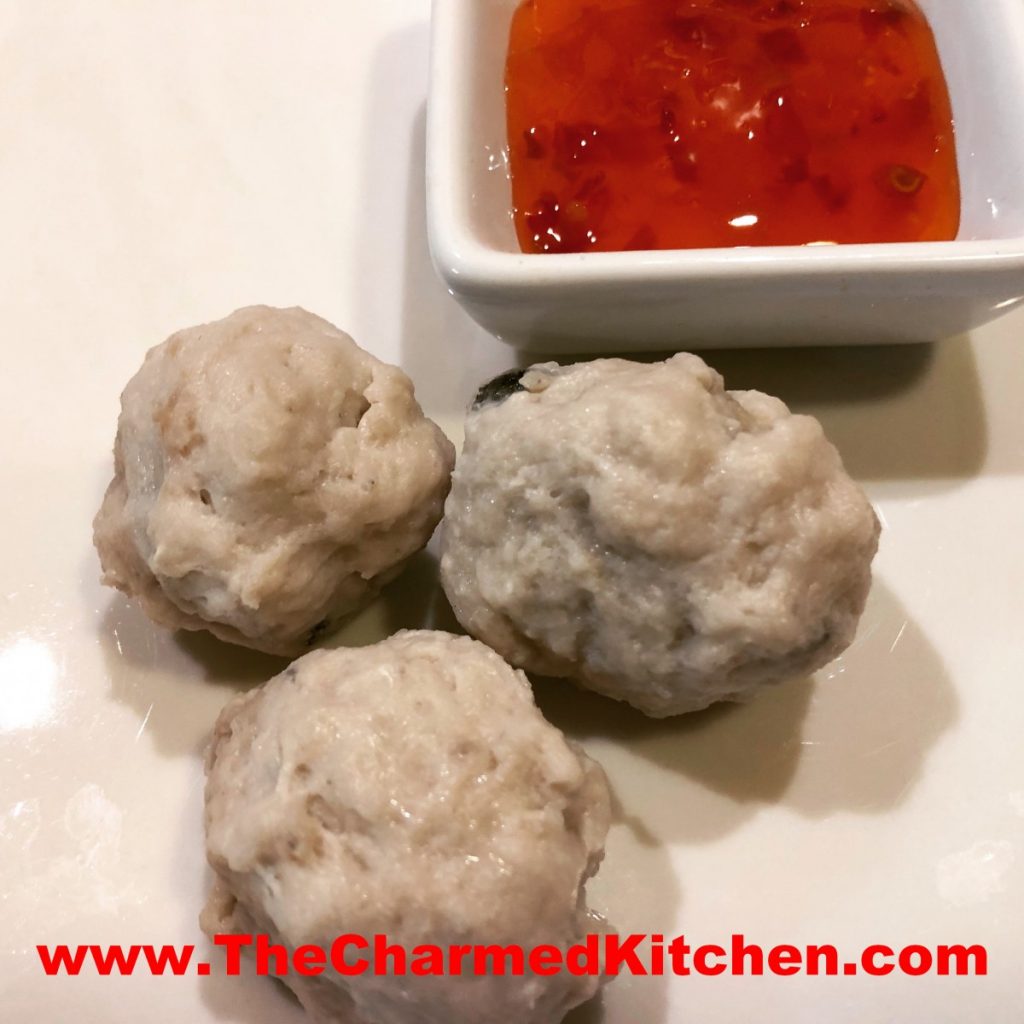
Fish balls are kind of like meat balls, but made with fish. Still, they are different, and it is the texture that makes them so special. I had eaten fish balls at Asian restaurants and always loved them. I was curious as to how they were made.
I looked up several recipes online and watched a few videos. After making them, I added them to simmering stock and served with dipping sauces. These are fun to make and serve at parties.
The big difference in making fish balls, as opposed to a traditional meat ball, is that the fish is pureed into a smooth paste. Combined with a few other ingredients, the mixture is very soft. More like a batter or dough in feeling and appearance. The fish batter is also mixed for a long time. It helps to give you the smooth final product you want in fish balls.
Once you make the base, the balls are shaped and simmered until done. The final texture should be smooth and light. Mine are pretty basic, but you can add all sorts of seasonings for different flavors. Different fish will also give you different flavors. Fish balls are usually served in a soup, but they can be added to all sorts of dishes.
When you read the recipe, it sounds like a lot of work. There is some time in prep, but a lot of that is just letting the mixer do its job. I thought they were well worth the effort. I had plenty for dinner with a friend, and extra to freeze.
I used catfish and I really loved the flavor.
Asian Fish Balls
2½ lbs. of raw fish – I used catfish
1¾ c. ice water, divided
4 T. sugar
2 T. dry sherry – not cooking sherry
3 t. salt
4 eggs whites
4 T. cornstarch
Place the fish in a blender add ¾ cup ice water and puree until smooth. Remove fish puree to a stand mixer and add the sugar, sherry and salt. Use the paddle attachment and blend the fish mixture on high for 12-15 minutes. Add the egg whites, one at a time, while the mixer is running, during the 15 minute blending time. Now, with the mixer still running add ½ cup of the ice water, then 2 tablespoons of the cornstarch, blending well each time. Add the rest of the water, then the rest of the cornstarch. This should take about 5 minutes. The mixture should look really smooth and kind of silky. Turn off the mixer and place a small spoonful of the mixture in water- to be sure it floats. Now, you are supposed to squeeze small amounts of the mixture through your hand as you make a fist to form into 1- inch balls. I just used a tablespoon to spoon out the mixture, then used wet hands to form into balls. They aren’t going to be perfectly smooth and round, but that is fine. Have a big bowl of cold water standing by. As you make the balls drop them in the water. They will keep their shape and not stick together- they are soft, but should hold together. Once you have all the dough in balls, get a big pot of water just barely simmering. You don’t want the water to boil. Drop about half of the fish balls into the water at a time. Cook until they float, 2-3 minutes. Remove with a slotted spoon and set aside to cool. Now you are ready to go. It makes a big batch, so feel free to freeze some. You can add your fish balls to soup, sauté in oil until crisp or warm in broth and serve with dipping sauces.

Ginger Curry Pork Bites


These pork appetizers are sure to please any carnivore at your next party. Cubes of pork are marinated for a day or two, before being sauteed. They are full of flavor and easy to make. You can bake or broil them, if you prefer.
I used cornstarch, soy sauce and sherry to start my marinade. Then I added ginger, garlic and curry powder. You can play around with different spices. Garam Masala would work well, too.
I decided to make a peanut sauce to dip them in.
You can serve them as is, or on small skewers. People always seem to love food on sticks. They can also be cooked ahead of time, then just reheated when ready to serve.
Ginger Curry Pork Bites
1-2 lbs. pork, cubed into 1-inch pieces – I used western ribs
½ c. cornstarch
¼ c. soy sauce
¼ c. dry sherry
1 (2 inch) piece fresh ginger, sliced
2 large cloves garlic, peeled and sliced
1-2 T. curry powder
2 T. oil
Combine pork cubes with cornstarch, soy sauce, sherry, ginger, garlic and curry powder. Mix well and refrigerate overnight or up to two days. Heat oil in skillet and sauté pork until just cooked through. Serve with peanut sauce on skewers.
Peanut Dipping Sauce
1/3 c. peanut butter
1/3 c. milk or coconut milk
1/3 c. chicken or vegetable broth
1/2 t. crushed red pepper
1-2 cloves garlic
1 t. fresh grated ginger
1 t. soy sauce
Dash hot red pepper sauce
Salt and pepper to taste
Combine all ingredients in a blender or food processor until smooth.
Creole Jambalaya

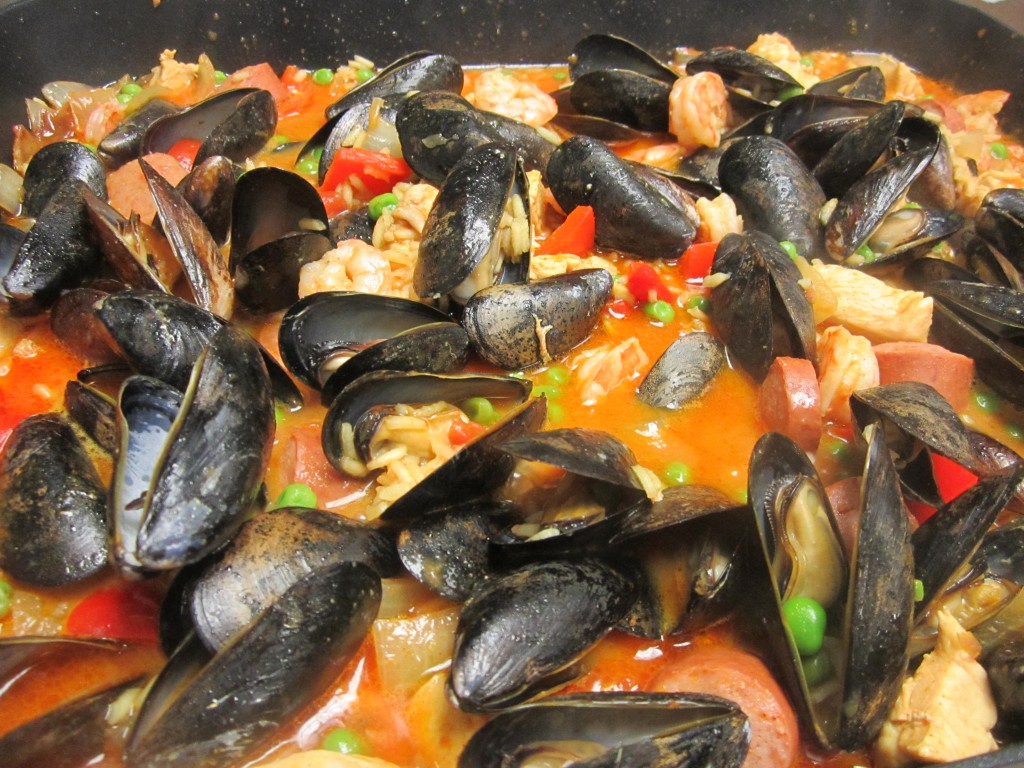
There are so many variations for Jambalaya. I don’t think I ever had a Jambalaya I didn’t like. This Creole dish varies a little with each person who makes it. The assortment of ingredients adds so many layers of flavor.
Traditionally, Jambalaya would include smoked sausage or ham, chicken, shellfish, rice, tomatoes and assorted veggies and seasonings.You can see why there are so many variations. For me, it just isn’t Jambalaya without mussels. Lots and lots of mussels.
It is definitely a great dish for a party. It is impossible to make a small batch of Jambalaya!!!
This recipe is a tweaked version I got from a boss of mine a long time ago. I must say, every time I make this for friends or family it gets rave reviews.
The heat level in this dish is really about personal preference and for the people who are going to be eating it. I like it a bit spicier, so I add more cayenne. If I am making it for friends who like their food less spicy, I use less. Of course, you can always serve it with hot sauce on the side, so people can spice it up a little more.
Creole Jambalaya
1 lb. smoked sausage, sliced into 1-inch pieces
1 c. chopped onions
1 c. chopped celery
2 garlic cloves, chopped
1/4 c. oil
2 c. cubed uncooked chicken
3 c. chicken stock
1 1/2 c. uncooked rice
1 (14.5 oz.) can tomatoes
2-3 t. paprika
Cayenne pepper to taste
Black pepper to taste
1/4 t. ground turmeric
1 lb. medium shrimp, peeled and de-veined, uncooked
1 1/2 c. shelled peas, fresh or frozen
1/2 c. chopped red pepper
1-2 lb. mussels, scrubbed
In Dutch oven cook sausage, onion, celery and garlic in oil until onion is tender. Add remaining ingredients, except shrimp, peas, sweet red peppers and mussels. Bring to a boil, turn down to simmer and cook 20 minutes. Stir in shrimp, and peppers, cover and cook 10 minutes. Stir in peas and stick in mussels. Cover and cook 5 more minutes. Discard any mussels which have not opened in 5 minutes. Serves 8.
Mardi Gras King Cake

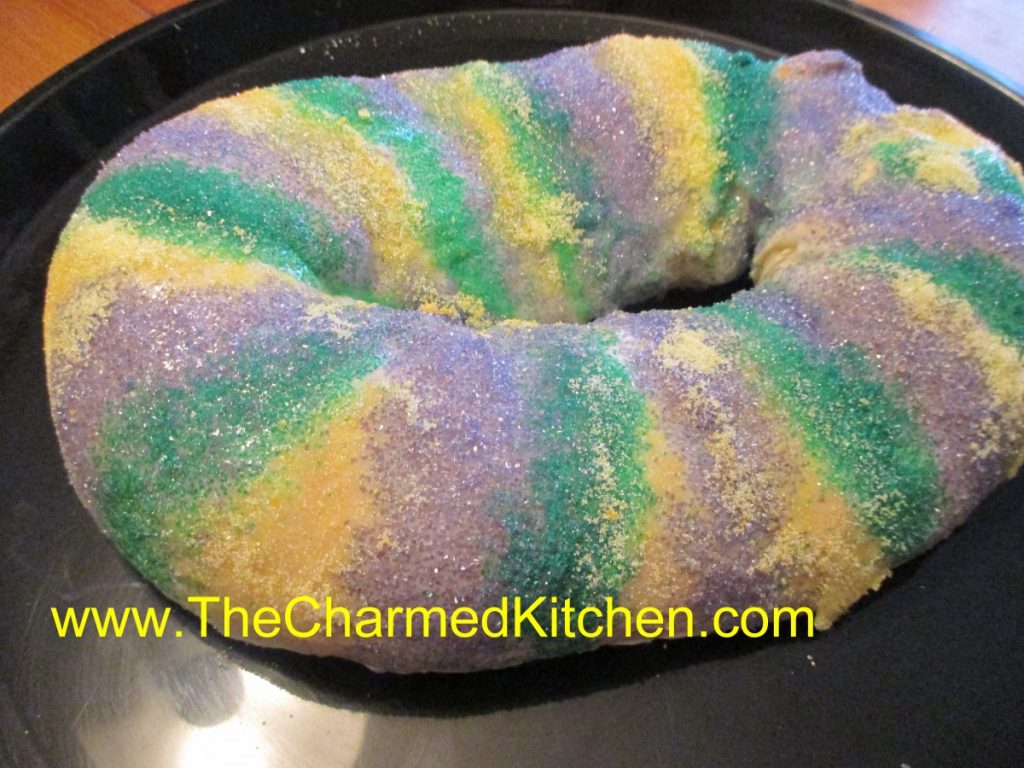
If you are planning a Mardi Gras party, you will want a King Cake. King Cakes are a long-standing tradition in New Orleans at Mardi Gras. A small plastic baby is often hidden in the cake, although you can use a bean or even a whole pecan or almond.
Tradition has it that the guest who finds the “surprise” in their piece of cake will host next year’s party. Be careful to warn guest so they don’t break a tooth or swallow the “prize”. You can also use a whole nut inside the cake and just set the baby on top of the cake when serving.
The “cake” is really a sweet cinnamon swirl bread. This recipe, with a whole pint of sour cream in the dough, is both rich and tender. The yeast dough is rolled out, spread with butter and cinnamon sugar, and rolled up. Then the dough is shaped into an oval shape.
After it is baked, the king cake is decorated with colorful frostings, sugars or both. Traditionally the colors used are yellow, green and purple, but, hey it’s your cake have fun with it.
If you want just the sugars, and no frosting, then brush the king cake with a beaten egg before baking and sprinkle with the sugar then. Otherwise, you’ll decorate the cake once baked and cooled.
King Cake
1/4 c. butter
16 oz. container sour cream
1/3 c. sugar
1 t. salt
2 packages active dry yeast
1 T. sugar
1/2 c. warm water
2 eggs
6 1/2 c. flour
1/2 c. white sugar
2 T. cinnamon
1/2 c. butter, softened
Colored sugars and frostings (recipes follow)
Heat together the first 4 ingredient to about 100 degrees. Dissolve yeast and sugar in warm water in large bowl and let stand 5 minutes. Add butter mixture, eggs and 2 cups of the flour. Beat 2 minutes at medium speed and gradually work in enough flour to form a soft dough. Knead until smooth and elastic, about ten minutes. Place dough in a greased bowl, turning to grease top and cover. Allow to rise in a warm place until doubled, about 1 hour. Stir together 1/2 c. sugar with cinnamon and set aside. Punch dough down and divide in half. Roll out one piece of dough into a 28×10-inch rectangle. Spread dough with half of the butter and sprinkle with half of the sugar mixture. Starting at long end roll up jelly roll fashion and pinch seam to seal. Shape dough into an oval shape and pinch ends together. Place seam side down on a greased baking sheet. Repeat with remaining piece of dough except remember to add the toy baby, nut or bean if you want the “surprise”. Cover and let rise about 20 minutes. Bake in a preheated 375-degree oven for 15-20 minutes, or until golden brown. Cool before decorating with tinted frostings and colored sugars. Makes 2, serving 24.
Frostings
3 c. powdered sugar
3 T. melted butter
3 t. milk
1/2 t. vanilla
Green, yellow, red and blue food coloring
Combine sugar and butter and add enough milk to make the glaze a drizzling consistency. Add vanilla and divide mixture in three small bowls. Tint one bowl yellow, one green and one purple, using both the red and blue food coloring. I often don’t bother to tint the frostings, but rely on the tinted sugars for color.
Tinted sugars
1 1/2 c. granulated sugar
Food coloring
Place 1/2 c. sugar in each of three small bags and add a couple of drops of food coloring to each. One use yellow, one green and one both the red and blue for purple. Shake the bags to distribute the color. You should only need a couple of drops of each.
Decorate the cake by making bands of the colored frostings and then sprinkling on the sugars.
Wonton Soup

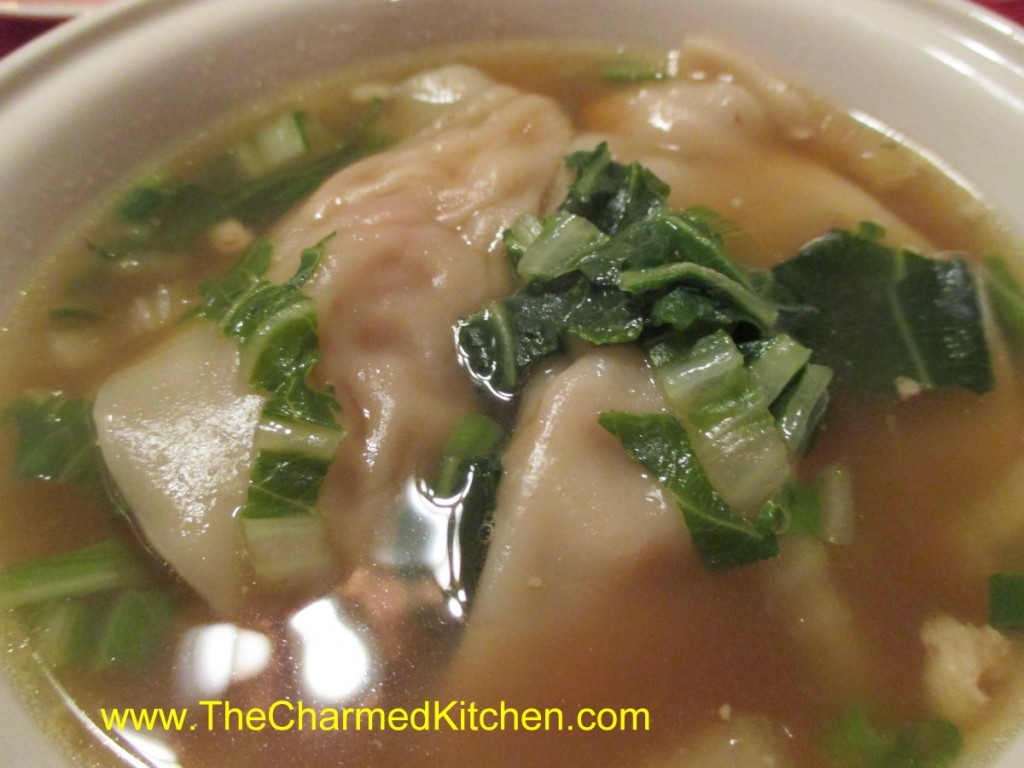
For me, Wonton soup always brings back memories of going out for Chinese food with my family, when I was a kid. The restaurant would serve it family style, and my mom or dad would ladle out everyone’s soup. It always looked and smelled wonderful. Tasted wonderful, too. Even more special, because we only had it when we out to dinner.
The one problem I find when trying to make this soup at home is finding wonton wrappers that are thick enough. The square ones I find at the neighborhood grocery store are OK, but thinner than the ones in Wonton Soup at a restaurant. At a local Asian grocery I have found round wrappers that are labelled for dumplings and are thicker. That is what I used. They worked out better. You can play around with fillings. I often add shrimp as both a filling, and to the soup itself.
Wonton Soup
1½ lb. chicken
1 head bok choy, or 4-5 baby bok choy
3 T. hoisen sauce
1 clove garlic, minced
24 won ton wrappers
2 qts. chicken stock
1 t. ginger
1 t. hot pepper sauce
Chopped green onions
Sesame oil
Bake the chicken until cooked. I used boneless chicken thighs, but even leftover roasted chicken would work. You can also used pork. Once cooled, I minced enough of the chicken to give me 1 cup of meat. The rest I cut into thin strips. I then took stems from the bok choy and minced enough of them to make 1 cup. Combine the minced chicken with minced bok choy, the hoisen and the garlic. This is the filling for your wontons. Slice more of the bok choy- using mainly the leaves, into thin shreds. This will go into the soup later, along with the strips of chicken. You should have at least a couple of cups of the shredded bok choy, but more is OK, too. To make the wontons place one on your work surface and spoon a rounded teaspoon of the filling into the middle of it. Moisten edge with water, fold in half and press to seal. I used round wrappers, but square wrappers are fine, too. Repeat with remaining wontons and fillings until done. Bring stock to a boil and add the ginger and hot sauce. Add the wontons to the simmering stock. Simmer gently for 3-4 minutes, stirring occasionally, then add the strips of chicken and the shredded bok choy greens. Cook about 5-6 minutes longer. Finish soup with chopped green onions and a drizzle of sesame oil. Serves 6-8


