Scavenger Stir Fry


Scavenger Stir Fry
When I got a call from my Godson last night, asking if he could stop in for a visit, I was delighted. He lives in another town and we don’t see each other that often. He wasn’t going to get here until 9 pm, so I wasn’t sure if he would want dinner. I decided to cook some rice and then I could make a stir fry, if needed. As it turned out, he did come hungry. When people ask me about favorite meals, I must admit I often go to a stir fry. I usually have a decent array of veggies and all I needed to do was figure out a protein to add. It really turned into a scavenger hunt for ingredients. What I found was onions, cabbage, pea pods and a red sweet pepper for the veggies. For the protein, I really didn’t have much, but I remembered I had some ham. Great, something easy to add that was already cooked. For extra crunch, I also added a generous handful of cashews. Dinner was ready in no time at all, and it was well received. When making a stir fry add the vegetables that require longer cooking first.
Scavenger Stir Fry
oil
1 onion, sliced
2 c. shredded cabbage
8 oz. fresh pea pods
1 sweet red pepper, seeded and chopped
2 c. cubed ham
handful of cashews- 2 handfuls if you have small hands
vegetarian oyster sauce
soy sauce
sesame oil
Heat oil in skillet or wok and add the onions, stirring often until they are wilted. Add the cabbage and stir fry a few more minutes. Add pea pods and peppers and stir fry until veggies are tender crisp. Add ham, cashews and seasonings, to taste. Heat through and serve over rice or hot cooked pasta. Serves 2-3.
Asparagus Irene

Asparagus Irene
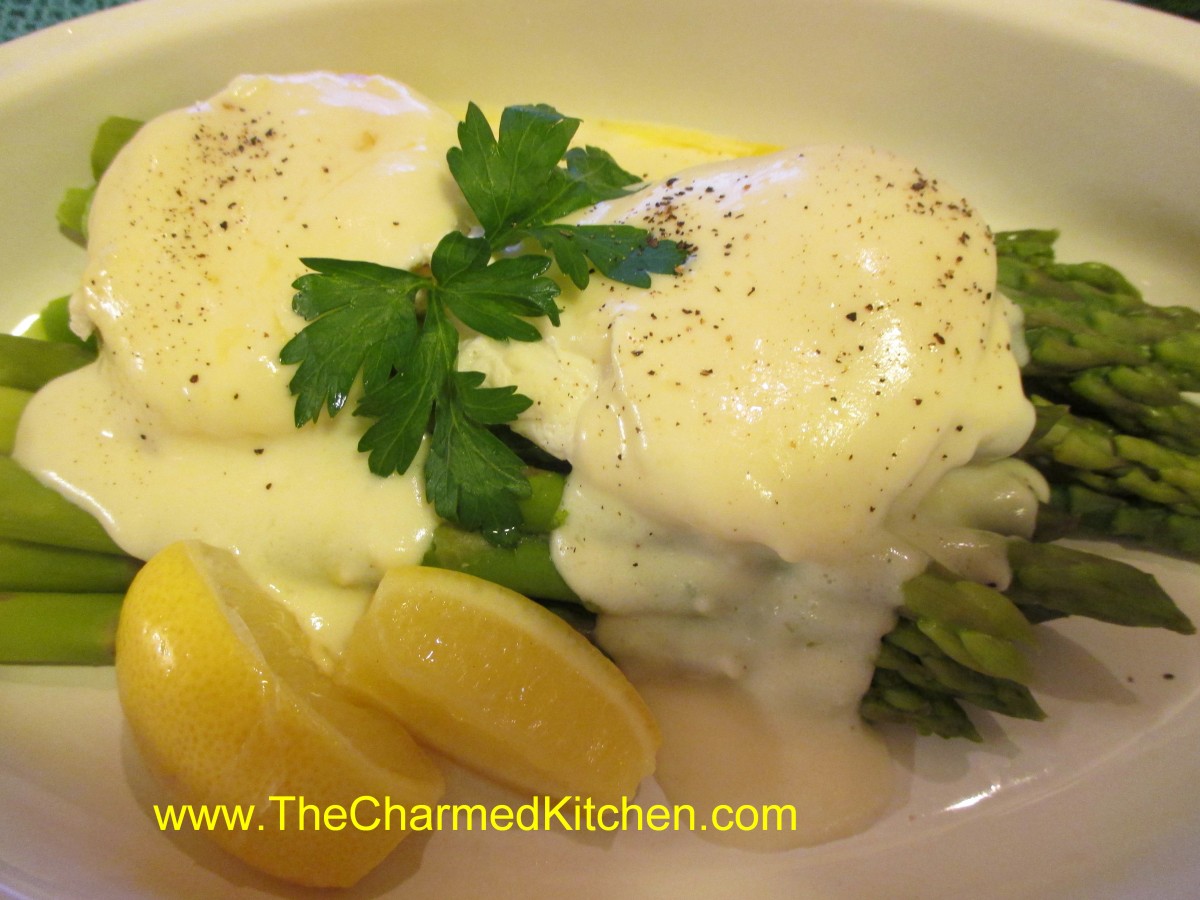
Naming a recipe can be tricky. Sometimes I just list the ingredients in the dish- like chicken with pineapple and honey. That works, but feels a little like cheating to me. I started out calling this Asparagus with Eggs, which was fine. As I started writing out the description I was thinking about my Mom and how she loved asparagus. She always wanted the bigger ones- she said they had more flavor. I remember her showing me how to break the bottom of the stalks off and how she would cook them until they were just done- not mushy. She wouldn’t consider eating canned asparagus- only fresh- so the season was short. It was something to be savored while it lasted. Most times we just placed the stalks on a plate, topped them with a pat of butter and a sprinkle of salt. One time, though, she made a white sauce and poured it over the asparagus. It was bliss. So in her memory- I named the dish after her.
For this version I used a white sauce, but topped the asparagus with 2 poached eggs first. It was a lovely dish and made for a great dinner. Here is the recipe.
Asparagus Irene
1 lb. fresh asparagus, washed and stems trimmed
white sauce- recipe follows
fresh lemon, cut in wedges
2 eggs
vinegar- for the poaching water
salt and pepper to taste
Put the asparagus in a steamer and cook for about 5 minutes- or until almost done. Set aside. Make white sauce, but add some lemon juice to it. I just kept squeezing lemon wedges in until it tasted right to me. Set sauce aside. Boil some water in a shallow pan and add a tablespoon of vinegar to the water. Drop the two eggs in and simmer, covered until the whites are opaque and the yolks are still runny. While the eggs are cooking return the asparagus to the heat and cook until just tender. Place asparagus on a serving dish. Sprinkle with a little salt. Gently place the eggs on top of the asparagus. Spoon some of the white sauce over the eggs. You will have more sauce than you need. Save it for another use. Garnish with lemon wedges and parsley, if you like. Finish with some salt and fresh ground pepper. Serves 2.
Basic White Sauce (Bechamel)
The start of many a classic dish.
2 T. butter or oil
2 T. flour
1 1/4 c. warmed milk
salt and pepper to taste
In saucepan melt butter or heat oil and add flour, stirring until smooth. Slowly whisk in milk, stirring constantly until thickened and bubbly. Turn heat down and continue to cook, stirring constantly for a couple minutes longer. Season to taste. If you are going to store the sauce for later use place a layer of wax paper on top, store in a container with a lid or pour a little milk over the top to prevent a skin from forming. Makes about 1 c.
Lemon: Add zest of a lemon, 2 T. lemon juice and 2 T. butter just before serving.
Peanut Butter and Jelly Mini “Pies”


Peanut Butter and Jelly “Pies”
These are a great way to take peanut butter and jelly on the road. These little “pies” are just cut out circles of pie crust, filled with peanut butter and jelly, sealed, then baked. Very easy and a fun cooking project for kids as well as adults. I prefer home made pie crust, but use store bought , if you like. A nice treat in a lunchbox, for picnics and road trips.
Peanut Butter & Jelly “Pies”
1 (15 oz.) package pie crusts or homemade crust for 2 pies. I prefer homemade
¼ c. flour
1 egg
1 T. water
½ c. peanut butter
½ c. preserves, any flavor
Powdered sugar, optional
Preheat oven to 400-degrees. On lightly floured surface roll out one of the crusts into a 12-inch circle. Using a 2½-inch round cookie cutter cut out about 12-14 circles, re-rolling scraps and set aside. Roll out second piece of dough so you will have about 24-28 circles altogether. Beat together water and egg and set aside. Place a circle on work surface and place 1 teaspoon each of peanut butter and preserves in the center. Brush edges of the circle with egg wash. Place second circle on top and press edges together to seal. Repeat with remaining circles. Place “pies” on lightly greased baking sheets and bake for 12-15 minutes or until golden brown. Cool on wire rack and dust with powdered sugar, if desired.
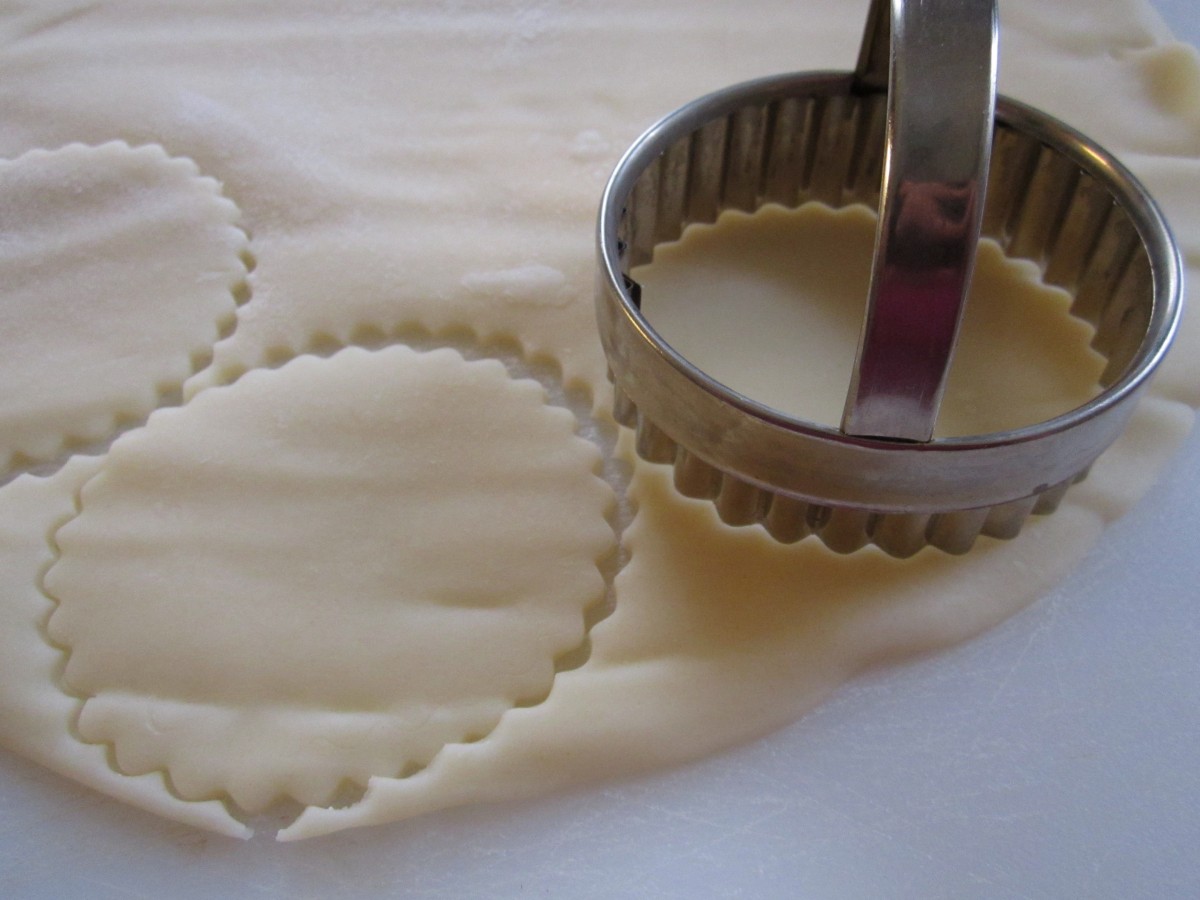
Cut out pie dough
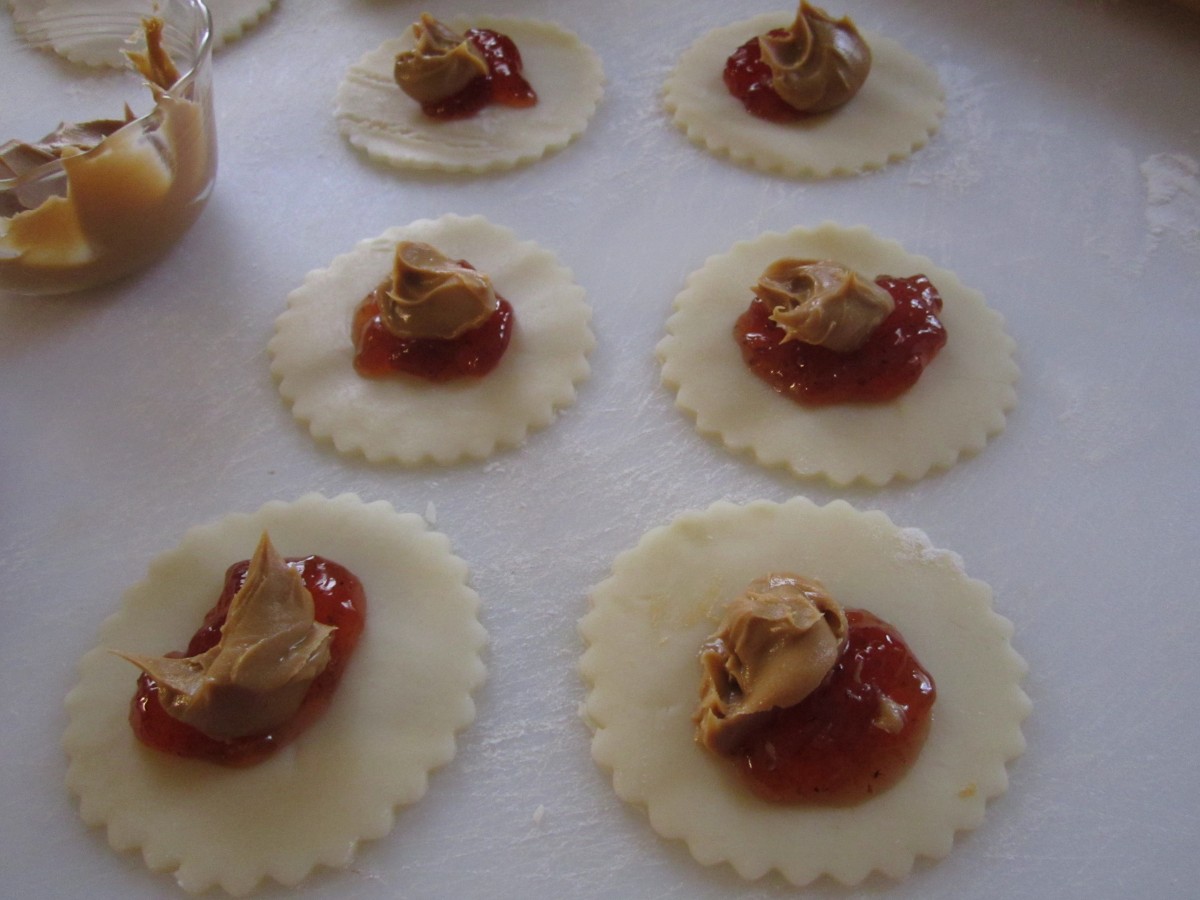
Top dough with peanut butter and jelly
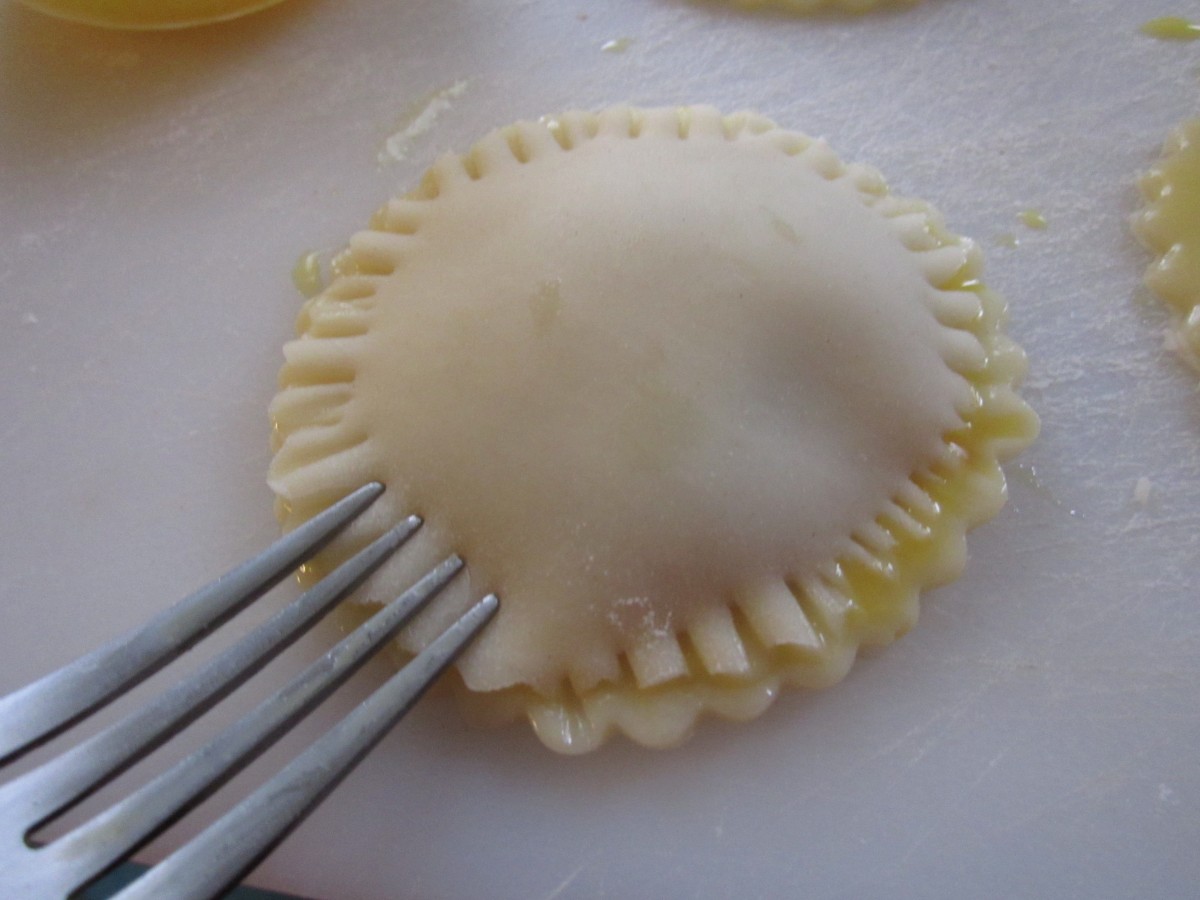
Seal edges

Dust cooled pies with powdered sugar, if you like
Cabbage and Noodles

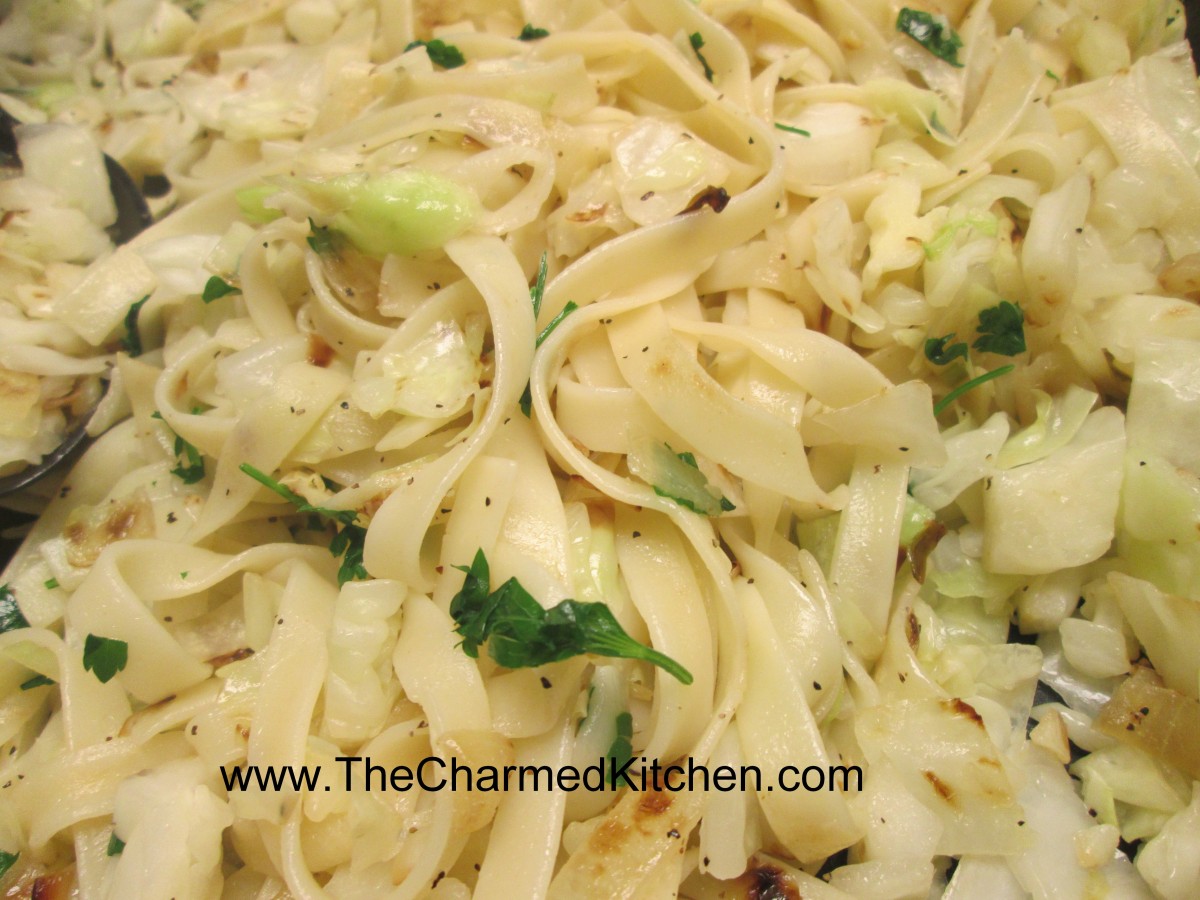
Cabbage and Noodles
Cabbage and noodles is not a glamorous dish and it never will be. That’s fine with me. It is a dish that will always remind me of my childhood. My Mother would make cabbage and noodles as a side dish at least a few times a year. I loved it. I think the reason it tasted so good is that she took the time to caramelize the onions and to let the cabbage brown some, too. That added another layer of flavor to the dish. I was having friends over for a Friday fish fry. One of my friends had mentioned, a few days before, that she loved cabbage and noodles, but hadn’t made it in awhile. I decided to surprise her and made it to have with our catfish. As always, a simple dish that didn’t disappoint.
Cabbage and Noodles
1 onion, chopped
Oil
4-6 cups chopped cabbage
4 c. cooked noodles
Salt and pepper to taste
Fresh or frozen chopped parsley
Heat oil in skillet and cook onion until wilted and a little brown. Add cabbage and stir fry until cabbage in tender and starts to turn a little brown. Stir in noodles and cook until heated through. Season to taste and toss in parsley. Serves 4.
Foods You Might Not Think of Freezing


Waffles
People always seem surprised at some of the foods that I freeze. I’ve been getting more questions lately so I made a list of some things you can freeze- but maybe didn’t know you can freeze. If you find something in the frozen food section at the store remember- if they can freeze it- you can freeze it.
So here is a quick list that I came up with, in no particular order.
1. Eggs: While they keep for a pretty long time you can find yourself with more eggs than you can use. Crack the eggs and place them in ice cube trays or small containers- and freeze. No special requirements. Some people prefer to add a tablespoon of water to each egg. I have tried with and without water and both seemed fine. You can also freeze the yolks and whites separately. Add a little water to yolks when freezing them on their own. don’t freeze eggs in their shells.
2. Avocados: This really prompted my topic today. I had posted a recipe for guacamole recently and mentioned that you could freeze avocados. I got a lot of response to that. They freeze great to use in dips later. Just cut in half, remove the pit and scoop out the flesh. Dip in lemon juice and place in a freezer bag. Squeeze out any air and seal. You can also just mash them up before freezing. The lemon juice keeps their color better.
3. Pasta and Rice: Decided to lump these together since the information for both is about the same. Easiest way is to just freeze the pasta or rice in portion sized baggies. Thaw in fridge or microwave when ready to use. This is a great way to eat more brown rice, at least it works for me. Rice takes 15-20 minutes to cook. Brown rice takes double that amount of time, at least. I cook up a big batch of brown rice, portion it out and freeze it. Now I can grab a baggie whenever I want. Same for pasta. Not so much the time it takes to cook as getting out that water and getting it boiling. Or sometimes I just cook too much pasta. Freezing the extra means I can have pasta when ever I want.

4. Milk: There are some problems with freezing milk. It will separate so it won’t be quite like the fresh stuff you pour on your cereal, but milk that was frozen is perfect for baking and cooking. I don’t drink much milk. This way, rather than tossing milk, I can freeze the extra and use it for cooking later on. Also easier than me trying to keep milk on hand, when I rarely drink it.
5. Whole Grains/ Whole Grain Flours: This isn’t so much about whether you can freeze them, but rather, why you should. All whole grains contain the germ and bran, which contain fat. Over time, they can become rancid. Don’t panic, doesn’t happen all that quickly, but if whole grains are stored in a hot kitchen they will develop an off taste. Also depends on how much you buy and how quickly you go through it. The last few bags of brown rice I brought suggested refrigerating after opening the package. If you don’t have the freezer space- store them as cool and dry as you can and don’t buy more that you can use in 6-9 months, or so.
6. Cheeses: Yes, you can freeze cheese. Harder cheeses seem to hold up better. There will be textural changes, more noticeable in some cheeses. If you have more cheese than you can use, freezing will extend its shelf life.
7. Crackers: Some of you are wondering- why freeze crackers? The answer – to keep them fresh and crisp long past the expiration date. I was at a bakery outlet store one time and one of the employees shared that tip with me. There was a great sale on crackers but I was worried they would get stale. She told me to freeze them, in the package. She also said to leave them in the package until they came up to room temp when I wanted to use them. I left one pack out and froze the rest. Several months later opened the pack I had left out of the freezer- the crackers were stale. All of the packs I had frozen stayed crisp.
8. Cheesecake: Not sure why so many people ask me about cheesecake. Does Sara Lee sound familiar? Yes, you can freeze cheesecake. I like to freeze slices on a baking sheet, then wrap in plastic wrap after they are frozen solid. Defrost with the wrapping loosened, but still on. Best defrosted in the fridge for a few hours.
9. Grapes : A lot of people don’t realize that grapes can be frozen. In fact, frozen grapes are one of my favorite hot weather snack foods. Grapes, like berries, can be frozen by just placing clean fruit on a baking sheet until they are solid. Then transfer to a freezer container or freezer bag. You can eat them right out of the freezer- or use them in cooking. I often make cobbler out of frozen grapes.
10. Baked Goods: Most baked goods freeze great. Cookies, cakes, pies. I prefer to freeze pies unbaked- then bake when ready to use. Again, think about some of the stuff you see in the freezer section at the store. I like to take my cookie dough and shape it into balls. Freeze the balls of dough on a baking sheet- then transfer to a freezer bag. When I need a few cookies I take them right out of the freezer- place on a baking sheet and bake- just add a few minutes to the baking time.
11. Soups, T.V.Dinners etc: Freezing meals is one of the best ways to use your freezer. For one thing, you can freeze stuff before you get sick of it. I know you LOVE your chili- but do you really want to eat it all week? I bet not. By freezing it in portions that are practical for you and your family, you can have chili when you want, without having to make a fresh batch every time. Again, if Stouffer’s can freeze it, you can freeze it. Mac and cheese, stuffed peppers, sliced turkey with gravy and mashed potatoes. Have fun with it. A lot of people save take out containers and use those. You can also buy containers that are used over and over- so the cost isn’t so much over time. I make big batches of vegetable soup- then puree it. I freeze it in both pint and quart containers. Great for a quick lunch or if friends stop by. It can be eaten as is, or you can add rice or pasta- you already have some in the freezer!! I will sometimes use this soup as a of pasta sauce.
12. Breakfast Foods: Really this is a continuation of number 11. You can freeze waffles, pancakes, breakfast sandwiches, smoothies etc. Makes breakfast time a little easier and you will probably like your waffles better than most of what you can buy at the store. Will save you a lot of money, too.
When it comes to vegetables a general rule is that if it is a vegetable that you cook- then it is a vegetable you can freeze. Works most of the time- we don’t normally cook lettuce and it doesn’t freeze well. Most vegetable are blanched before freezing- that means stuck in boiling water then put in ice water, drained then frozen. This stops certain enzymes from working and keeps the veggies tasting fresher. Some veggies, like onions or peppers- don’t need blanching. You just cut them up- place on a baking sheet and place in freezer until solid, then transfer to a freezer container or bag.
Most fruits don’t get blanched- just washed, cut up if bigger fruits, and frozen. Some in syrup and some frozen “dry”.
High salt foods are not great for freezing. Think about it, we use salt to melt ice. Salty foods, like cured meats, don’t freeze well and will get an off flavor if frozen more than a few weeks. Freeze them if you must- but use as soon as you can.
Calzones


Ham and Swiss Calzones
Calzones are traditionally made with Italian/pizza type fillings, but you can fill them with all sorts of other ingredients. They are kind of a cross between a sandwich and a pizza. Because the fillings are baked inside, calzones are wonderfully portable and great to pack for lunch. I like to make a batch and freeze some of them. I use one of three recipes for dough, listed below, then swap out fillings depending on what I am in the mood for. Get creative and have fun.
Basic Homemade Dough
This recipe is enough for 8 large calzones, more if you make them smaller.
1 packet active dry yeast
1 t. sugar
1 2/3 c. warm water
4-4½ c. flour
2 t. salt
In mixing bowl combine yeast with 3 cups of flour, sugar and the salt. Add the warm water and stir together, mixing well. Gradually add more flour until soft dough forms. Place dough on floured surface and knead until stretchy and smooth, about 10 minutes. Allow dough to rest 3 minutes and knead a few more times. Place in bowl and cover. Let rise until doubled in bulk, about 45 minutes. Punch dough down.
Assembly: Divide into 8 or more pieces. Cover pieces until ready to roll out. Roll out a piece of dough into an 8-inch circle. Add fillings to half of the dough and wet edges with water. Fold over and press edges firmly to seal. Cut a couple of slits in top of calzone to allow steam to vent. Repeat with remaining dough.
Finishing /Baking: Place calzones on greased baking sheets. Cover calzones and allow to rise 30 minutes or so. Bake in a 400-degree oven for 20-25 minutes or until golden brown.
Variations:
Whole Wheat: You can add 1-2 cups whole wheat or spelt flour to replace the same amount of white flour for a whole grain calzone.
Rye: Add 1-2 cups of rye flour to replace the same amount of white flour. This is great for the Reuben calzones.
Fillings: Traditional fillings could include shredded mozzarella cheese, mushrooms, pepperoni, cooked sausage, chopped onions or peppers, pizza sauce (some prefer to serve sauce on the side) olives or anything you might top a pizza with.
Note: For any filling use ingredients that are cold or at room temperature. Vegetables should be cooked as raw veggies will give off water and may make your calzone soggy. If using a sauce make sure it is on the thick side. Sometimes I brush the dough with a little oil first to keep the dough from getting soggy.
Toppings: You can brush the top of the calzones with an egg wash if you like for a shinier top. Apply just before baking. If you want you can also sprinkle the tops with seeds- but use an egg wash to make sure the seeds will stick.
Ham and Swiss Calzones
1 recipe calzone dough, rye variation preferred
1 1/2 -2 lb. thin sliced ham- more or less
3/4 lb. sliced Swiss cheese
Thousand island dressing- recipe follows
1 egg , beaten
In the middle of the dough place 1 1/2 ounces of the Swiss cheese, a spoonful of the dressing and 2-3 ounces of the ham. Brush the edge of the dough with water. Fold over the dough in half and press the edges to seal. Brush the edge again with water and roll the edge over again. It will give you a prettier look and seal the calzone better. Repeat with remaining dough and fillings. Place calzones on greased baking sheets- or on a baking sheet with a silicone liner or parchment paper liner. You will end up with 8 calzones in all. Only put 4 on one baking sheet. Cover and let rest 15 minutes while preheating the oven to 400 degrees. Before placing calzones in the oven brush with beaten egg and make a few slashes with a knife to help steam to escape while baking. I put 2 baking sheets in the oven at the same time and switch them halfway through baking. Bake in a preheated 400-degree for 20-25 minutes or until golden brown. If baking 2 at once switch them after 10 minutes or so. Cool slightly before eating. Serve warm and refrigerate leftovers. Makes 8.
Thousand Island Dressing
Combine equal parts of ketchup, mayo and sweet pickle relish. You likely need at least a cup for this recipe. I made extra so the sandwiches could be dipped in extra dressing, if desired.
Reuben Calzones
1 recipe homemade dough, rye version
1½ -2 lbs. sliced corned beef
½ lb. sliced Swiss cheese
2 c. rinsed and drained sauerkraut
Thousand Island dressing
Caraway seeds, optional
Make dough and assemble 8 calzones dividing the ingredients among them. Dressing can be added in the calzones or served on the side. Use an egg wash and sprinkle on a few caraway seeds , if desired. Makes 8.
Curried Vegetable Calzones
1 recipe calzone dough
2 T. oil
1 onion, sliced
1 c. sliced carrots
1c. chopped cauliflower
1 c. green beans, sliced
1-2 T. curry powder, or to taste
Salt and pepper to taste
Heat oil in skillet and sauté onion until tender. Add the rest of the veggies and cook until tender. Sometimes I cover the pan and turn down the heat to steam them. Once veggies are tender drain and set aside to cool. Season to taste with curry powder and salt and pepper. Divide mixture among 8 calzones. Makes 8.
Spinach and Artichoke Calzones
1 recipe calzone dough, whole wheat works well in this recipe.
1 can (about 15 oz.) artichoke hearts, drained well and chopped
1 package (10 oz.) frozen spinach, thawed, and drained well
2 c. shredded mild cheese or 1c. crumbled feta cheese
1 T. lemon juice
Salt and hot pepper sauce to taste
Combine ingredients and mix well. Divide among 8 calzones. Makes 8.
Freezing Calzones: Note: you can freeze them baked or unbaked. Just place calzones on wax paper on a baking sheet and place in the freezer until frozen. Remove from baking sheet and wrap in plastic wrap, foil or wax paper and place in freezer bags. Label and place back in the freezer.
If you froze them unbaked- thaw in fridge overnight- unwrap but cover loosely with plastic wrap and a towel. Thaw in fridge at least 8- 12 hours. Place on greased baking sheet and place on counter at room temperature for another hour or two, covered with a towel. Bake in oven as normal.
If you froze them baked- you can heat up in a microwave- about 3 minutes per calzone. You can also warm them in a conventional oven. Place on baking sheet and bake in a preheated 350 degree oven for 20-25 minutes. Cover with foil if it starts to get too brown.

Reuben Calzones
Oatmeal Raisin Squares

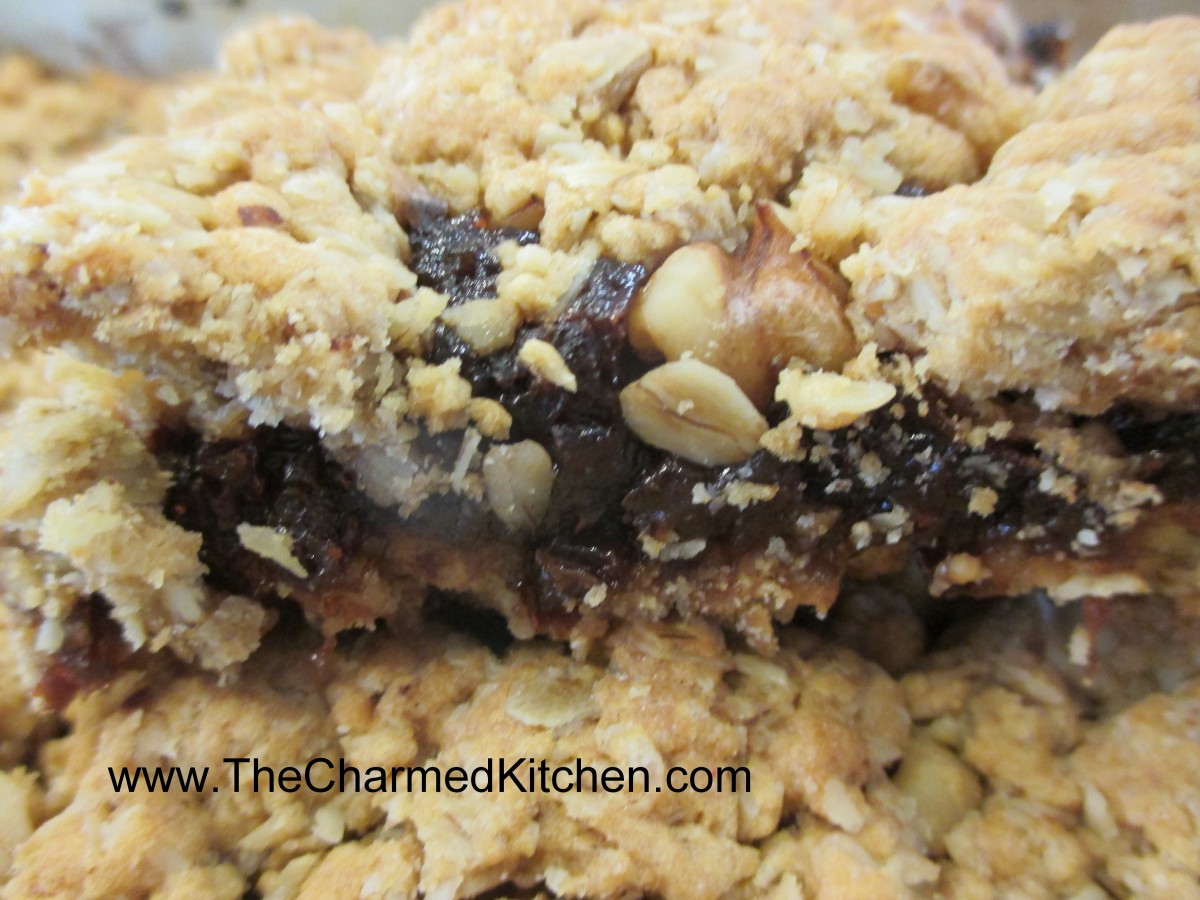
Oatmeal Raisin Squares
I wouldn’t go so far as to call these granola bars, but they are pretty similar. The dough is made from oats, flour, nuts, brown sugar and butter. There is also the option of making a vegan version with applesauce and olive oil in place of the butter. Both variations are good. Between the dough you add a layer of raisins, although you can use any dried fruit you like or happen to have on hand. I have made these with fig jam, cooked dates and dried cranberries. Once cooked and cooled you cut them into squares. They keep for days, but can also be frozen. Great for road trips, picnics, boxed lunches, breakfast or just snacking.
Oatmeal Raisin Squares
4 c. oats
2 c. flour ( you can use whole wheat pastry flour)
½ c. brown sugar or ¼ c. honey
1 c. pecans, chopped
1 t. baking soda
1 t. salt
1 ½ c. butter, melted or 1 c. applesauce and ½ c. olive oil
2 t. vanilla
½ c. water
2 c. raisins- or 2 c. any dried fruit
Zest of 1 lemon
½ t. cinnamon
Non-stick cooking spray
Heat oven to 350. Spray a 9×13-inch pan, set aside. Combine oats, flour, sugar, nuts, soda, salt. Pour in butter and vanilla, stir until well mixed and set aside. Heat together water with raisins, zest and cinnamon and bring to a boil. Simmer two minutes and remove from heat to cool a little. Process until almost smooth. Press half of the oatmeal mixture in bottom of pan. Spread the raisin mixture over the oatmeal mix and then top with the remaining oat mix. Press down firmly. Bake until golden on the top, 35-45 minutes. Cut once cool. Makes 24 squares.
Banana Oatmeal Bread

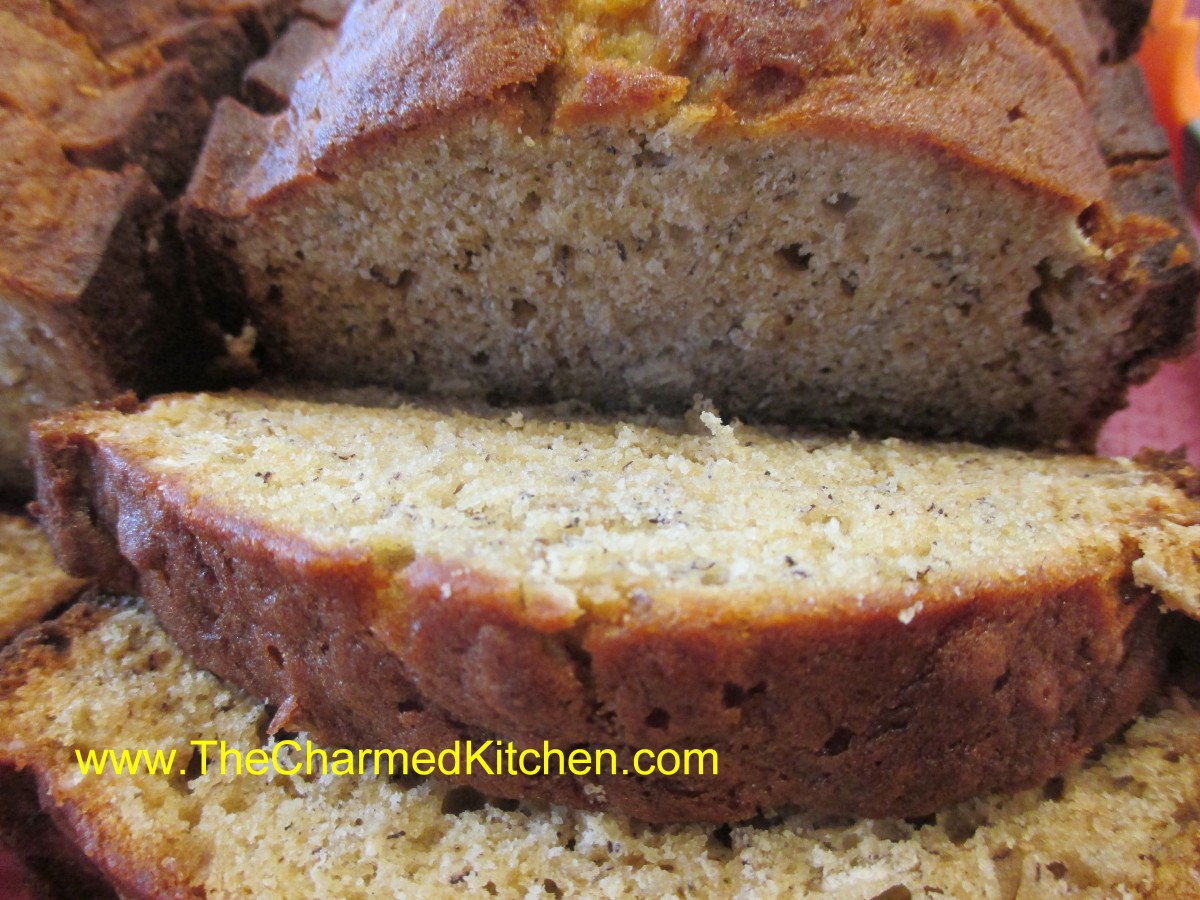
Banana Oatmeal Bread
I really enjoy a nice loaf of banana bread. It can be a fast and easy breakfast, a portable snack when I am running around all day, or even topped with fruit and ice cream for dessert. This recipe has the added bonus of oatmeal, which gives the bread a great texture and some extra fiber. I usually make a double batch and freeze one for later.
Banana Oatmeal Bread
½ c. butter, softened
¾ c. sugar
2 eggs
1 c. mashed bananas
1 t. vanilla extract
1½ c. flour
½ t. baking soda
½ t. salt
½ c. oats, regular or quick cooking
½ c. chopped nuts, optional
Preheat oven to 350-degrees and grease a 9×5-inch loaf pan. Cream together butter and sugar until light and fluffy. Beat in eggs, one at a time until well mixed. Stir in bananas and vanilla. Combine dry ingredients and add to banana mixture. Beat well and stir in oats and nuts. Place batter in prepared pan and bake for 50-55 minutes, test for doneness with a toothpick. Cool 10 minutes and remove to cooling rack. Makes 1 loaf.
“Lobster” Rolls


Langostino rolls
I really had a taste for lobster rolls, but sadly I didn’t have any lobster. What I did have were langostinos. Langostinos are a smaller version of lobster. I had a bag of frozen langostino tails and used them for my “lobster” rolls instead. I don’t think anyone could tell the difference, although I did tell them it wasn’t really lobster. They are less expensive so it might be a way of enjoying the flavor of lobster for less money. I think a chowder might be the next thing I make.
Langostino Rolls
The filling:
2 lbs. frozen, cooked langostino, thawed and squeezed dry
3/4 c. mayo- or a little more to taste
3 ribs celery, minced
1/2 c. parsley
juice of 1 lemon
3 T. capers
salt and pepper to taste
dash of hot sauce
Combine filling ingredients and chill well before using.
To assemble the rolls split rolls most of the way through and open gently. Place in a skillet, cut side down, with some melted butter and cook over medium heat until bread is toasted. Place a generous scoop of the filling in each roll. Makes 12.
Fresh baked Shallot/Garlic Rolls
Shallot/Garlic Rolls
3 ½ -4 ½ c. flour
2 c. whole wheat flour
2 packages yeast
½ c. sautéed minced shallots- I cooked them in a little oil and let them cool down before using
1 T. minced garlic
1 T. honey
2 t. salt
¼ c. olive oil
2 ¼ c. warm water
In a mixing bowl combine 2 c. of flour with the rest of the ingredients and mix until smooth. Beat with electric mixer 4 minutes then add 1-cup additional flour and beat 1 minute longer. Stir in whole wheat flour ½ cup at a time until soft dough forms. Turn onto surface and knead, adding flour gradually until dough is smooth and elastic. Place dough in lightly greased bowl and turn to cover. Cover with a towel and let rise until doubled, about 50 minutes. Turn dough onto surface and cut in half. Divide each half into 8 pieces and roll into 6-7 inch log rolls. Place on greased baking sheet a few inches apart. Repeat with remaining dough. You’ll end up with 16 rolls in all. Cover until doubled in size, about 40 minutes.
Bake in a preheated 375-degree oven for 20 minutes, or until rolls sounds hollow when tapped lightly. Makes 16.
Note: For the recipe you’ll need about 12 of the rolls. Use the rest for other sandwiches.
Asparagus and Sausage Soup

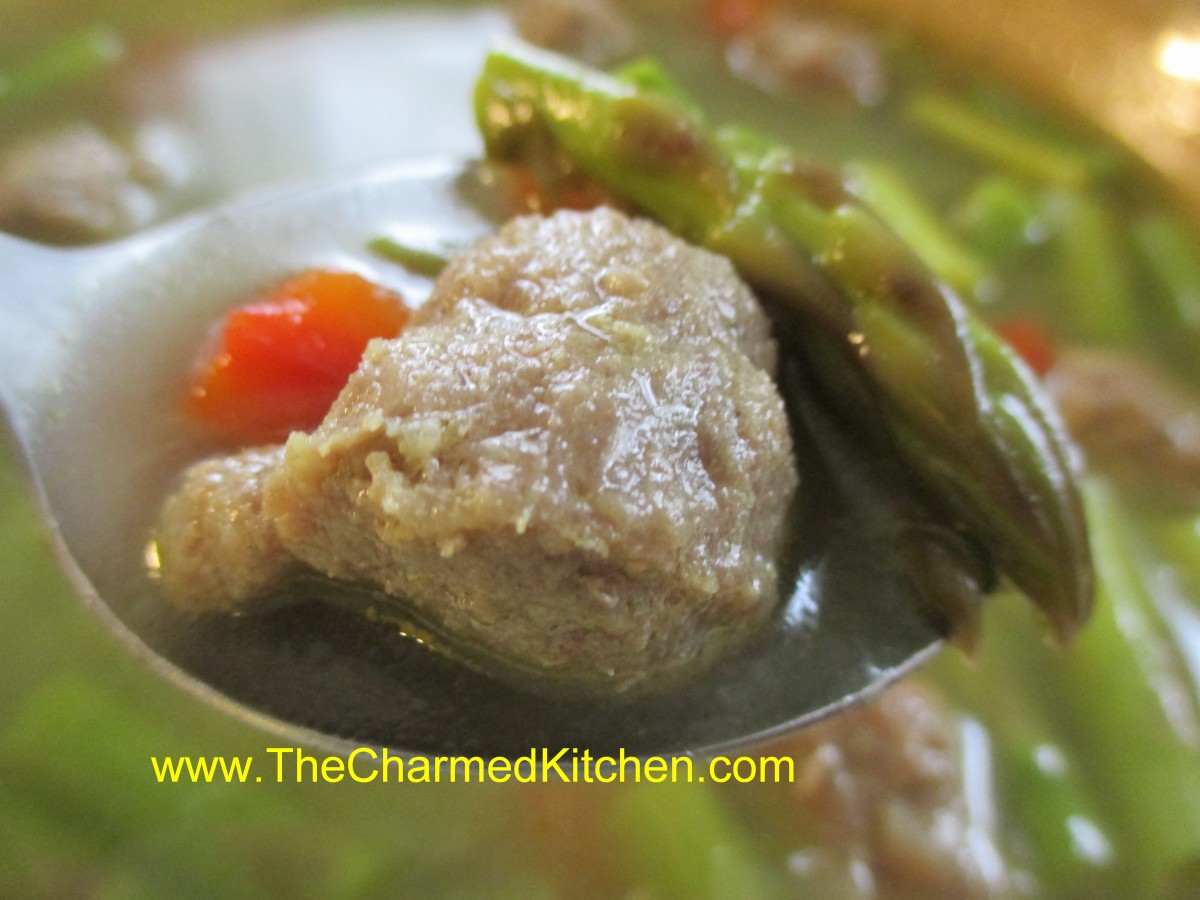
Asparagus and Sausage Soup
I had just picked up some beautiful asparagus and decided to use it in a soup. It was a chilly day and the thought of a nice, hot bowl of soup really appealed to me. I did my usual scouting around and found some sausage in the freezer. I thought it would go well with the asparagus. Added just a few other ingredients and had a great pot of soup in no time. That is the beauty of soup. You can toss all sorts of things together in a pinch and often come up with something quite wonderful. This combination is one I would most certainly make again.
Asparagus and Sausage Soup
2 T. oil
1 medium onion, chopped
1 lb. breakfast sausage links, uncooked, sliced into ¾ -inch pieces
3 cloves garlic, minced
6 c. chicken stock
1 lb. trimmed and washed asparagus- sliced into 1-inch pieces
1 sweet pepper, seeded and diced
2 T. chopped fresh parsley
2 t. ginger
Salt and pepper to taste
Dash of hot sauce
Drizzle of sesame oil
Heat oil in soup pot and cook onion until tender. Add sausage and cook 5 minutes, stirring often. Add garlic and cook a couple of minutes longer. Add stock and cook, covered until carrots are tender, about 10 minutes. Add asparagus, peppers and seasonings and cook until asparagus is tender, about 5 minutes. Drizzle with sesame oil and serve. Serves 4-6.


