Three Fruit Crumble


Three Fruit Crumble
This time of year I am always looking to empty my freezer out a little. I find it also helps me to be more creative. For a recent dinner with friends I needed a dessert. I decided to make some sort of fruit crumble/ cobbler thing. I thought it would go well with the meal we were having. Plus, when it’s cold outside fruit desserts always make me think about summer. I decided the first three fruits I found were the ones I would use. Turned out to be blackberries, blueberries and red grapes. Pretty nice mix. I thawed out the fruit and tossed them with some sugar and a little cornstarch and a squeeze of lemon juice. I had about 7 or 8 cups of fruit, but I knew they would cook down. I put them in a 9-inch glass baking dish and made the topping next. Baked it until the top was golden and the fruit was all bubbly. It was a big hit and if I hadn’t admitted that it was just a matter of what I found first I think my guests would have though I’d planned it from the beginning.
Three Fruit Crumble
The filling
7-8 cups mixed fruit- I used blueberries, blackberries and red grapes, too
1/2 c. brown sugar
3 T. cornstarch
2 T. lemon juice
The topping
2 c. rolled oats
1 c. flour
1/3 c. brown sugar
2 t. cinnamon
1 t. nutmeg
1 stick butter
Combine the fruit with the other filling ingredients and place in a baking dish. I used a 9×9 inch glass baking dish but use whatever casserole you like. Place all the topping ingredients, except the butter, in a mixing bowl and stir to combine. Cut in butter to resemble coarse crumbs. Mixture will be crumbly. Sprinkle over the fruit mixture and bake in a preheated 350 degree oven for 35-40 minutes, or until topping is golden and fruit is bubbly. Serves 6.
Duck Won Tons

Duck Won Tons
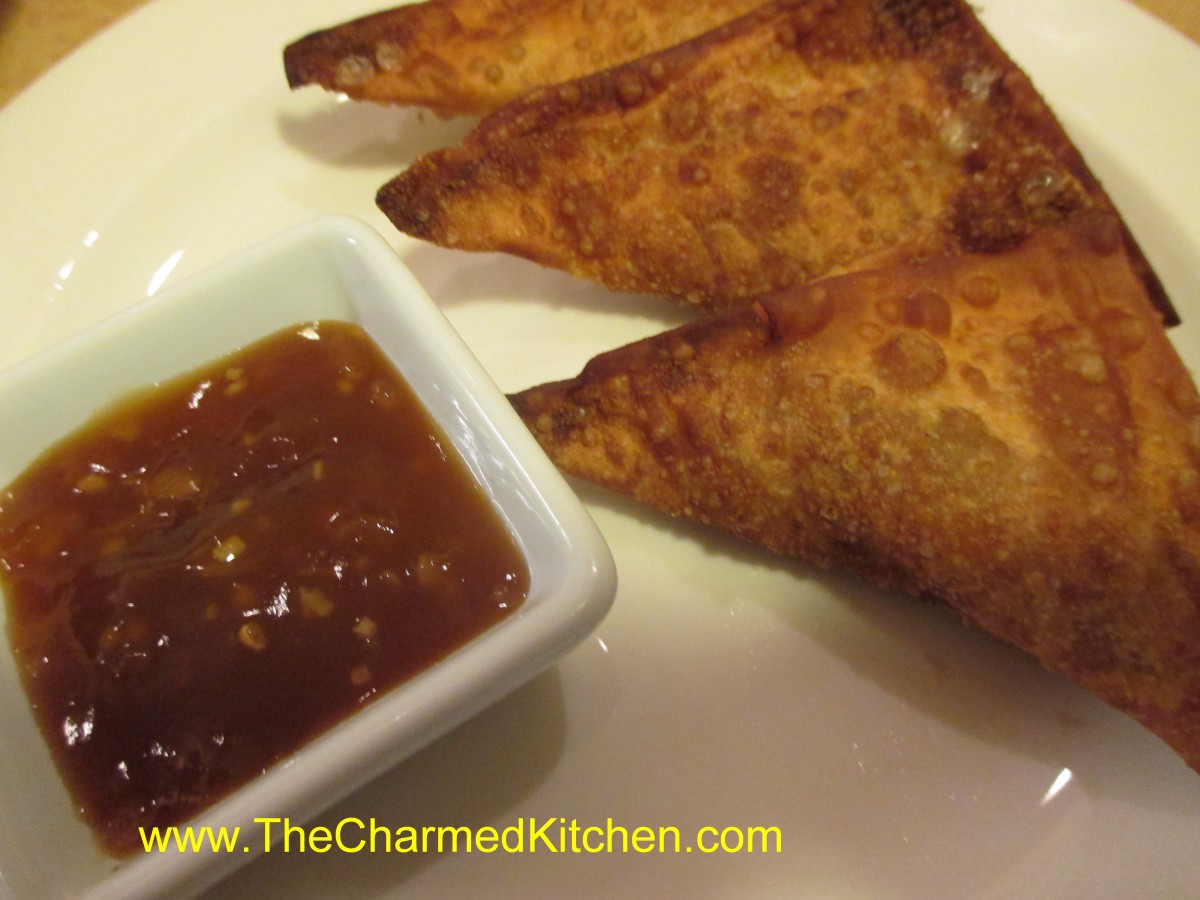
I had made duck a couple of days ago and had a small amount of the meat left over. Not a lot, so I wanted to make the most of it. I decided to use the meat in wontons. I cubed up the meat I had and ended up with a little over half a cup. I added some finely chopped cabbage- about the same amount as the meat. I also added a spoonful of oyster sauce- for saltiness and moisture and a couple of tablespoons of minced green onion. I had an open package of wonton wrappers in the freezer. About 12 were left in the package. I spooned about a tablespoonful into each one and folded them in half diagonally to form a little triangle. I moistened the edge of the wrapper with a little water and pressed the edges to seal. In a medium skillet I heated up a half inch of oil to about 350 degrees and fried the wontons for a little under a minute per side. I had leftover orange glaze from the duck so used that as a dipping sauce. It was a nice and easy appetizer for dinner with a friend.
Very Pink Soup

Very Pink Soup
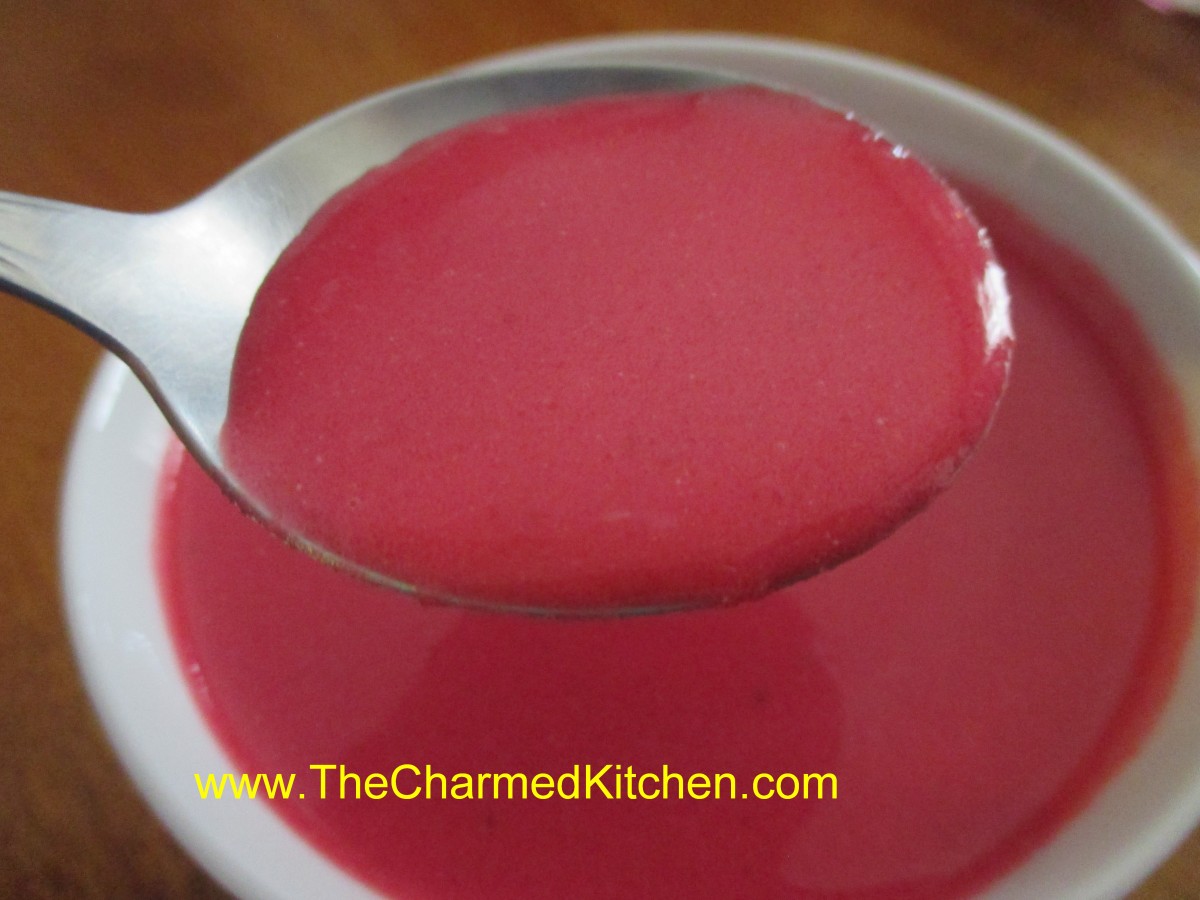
I had planned on just calling this recipe beet soup or maybe pureed beet soup. Then a friend came over and I offered her a bowl. When I set it down in front of her she said, “Wow, this is really pink soup.” After that I couldn’t name it anything else. People seem to have strong opinions about beets. They either love them or hate them. I love them and I enjoy them in soups, salads, relishes, casseroles and more. The earthy flavor really appeals to me and the color is a delightful bonus. I made this soup using a large bunch of beets I picked up at a produce market. I used the beets in the soup and I used the greens in the little dumplings. The result is a very tasty dish that is also sort of striking to look at.
Very Pink Soup
1 bunch beets- mine had 3 large beets
2 T. olive oil
1 large onion, chopped
2 carrots, peeled and chopped
1 rib celery, chopped
3 medium potatoes, peeled and chopped
6 cups stock- I used chicken but vegetable stock or beef stock would also work
2 t. dill weed
salt and pepper to taste
1 c. sour cream- or a little more if you like
Cut beets off of their stems- leaving about 2 inches attached- this will reduce bleeding and retain more color in the beets. Reserve greens for the dumplings. Place beets in a pot of water deep enough to cover them and cook until the beets are just getting tender, about 30 minutes. Remove and place in cold water. Once the beets are cool enough to handle trim off the stems and slip off the skins. Cut the beets into chunks and set aside. In soup pot heat the oil and cook the onion until tender. Add the carrots and beets and cook a few minutes longer. Add the rest of the vegetables, stock, dill and simmer, covered, until vegetables are very tender. This will take at least 30 minutes- but cooking longer is better- around an hour. Puree the soup. To add the sour cream place sour cream in a bowl and add a ladle full of the hot soup to the sour cream, whisking until smooth. Add another ladle or two of the soup and whisk again. Return sour cream mixture to the soup. By warming the sour cream gently you prevent it curdling. Adjust seasonings and serve as is or with the beet green dumplings. Serves 6-8. Freezes well.
While the soup is cooking prepare dumplings.
Beet Green Dumplings
1 bunch of beet greens
2 eggs
1/4 c. milk, cream or half and half
2 t. baking powder
1 t. salt
1 t. hot sauce
1/2 t. nutmeg
1 1/2 c. flour- may need a little more or less depending on how many greens you start with.
Rinse greens and chop off the stems. Place stems in a pot of boiling water for 3-4 minutes. add the greens and cook 3 minutes longer.. Drain greens and stems let them cool down. I didn’t squeeze all the liquid out of them, I just let them drain well. Place greens and stems in a food processor and process until very fine. Add the eggs and the rest of the ingredients, except the flour and process until pretty smooth. Add the flour and pulse until blended. Mixture should be a thick batter. It will be a pretty pink color with flecks of green in it- but it cooks to a paler lilac sort of color.
To cook the dumplings- bring a large pot of water to a boil. I wanted small dumplings so I placed the batter in a sturdy plastic bag and cut the tip off one corner. The hole was the diameter of a pencil. Holding the bag over the pot of boiling water I squeezed the batter into the boiling water. I did it in batches- only cooking about a third of the batter at a time. They will come to the surface and need about 3 minutes to cook in all. Remove with a slotted spoon and continue to cook the rest of the batter. So they wouldn’t get sticky I put them in a colander and rinsed them in cool water. If I were going to use them right away I would just have drizzled a little olive oil over them.
Sweet Potato Fritters

Sweet Potato Fritters
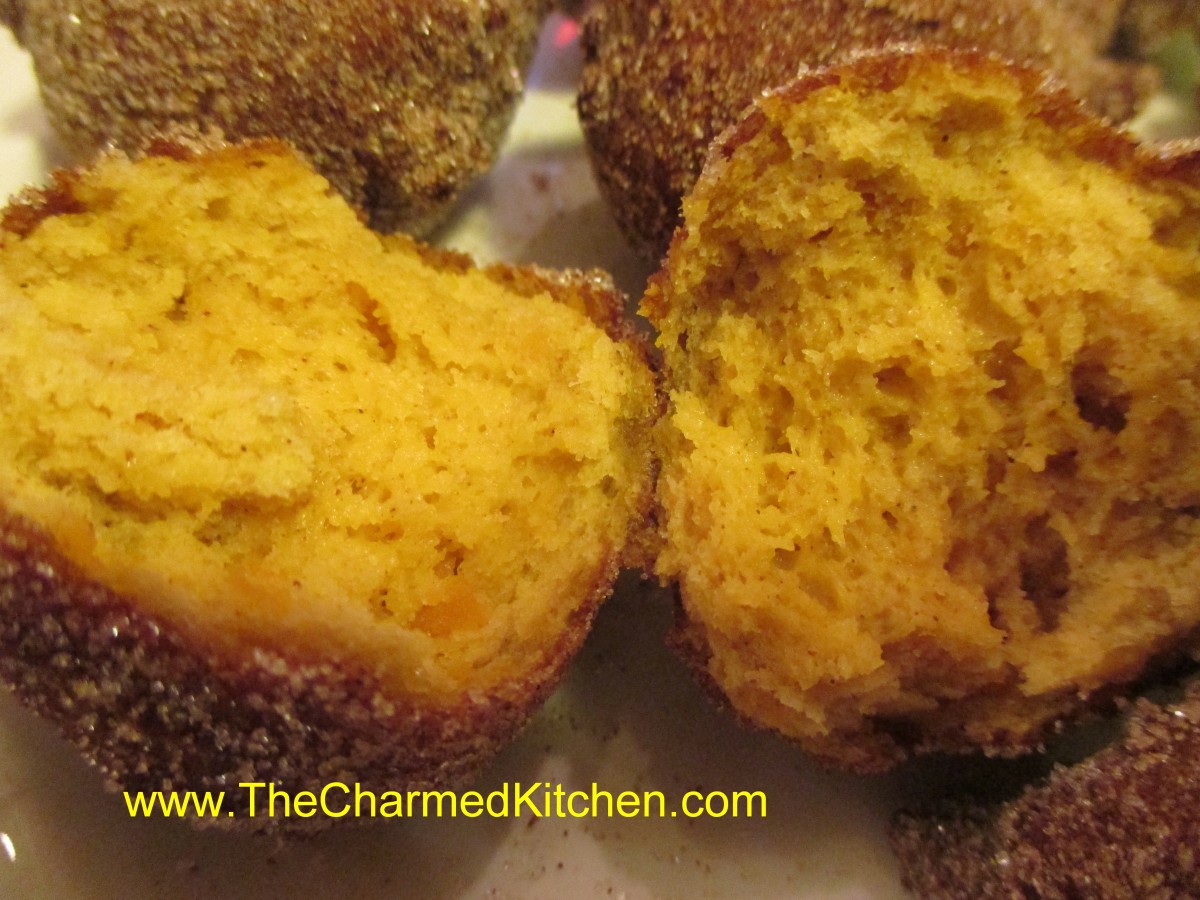
I found myself with a cup of leftover mashed sweet potatoes. I decided to play around and see if I could turn them into a dessert. I added eggs, flour, baking powder and a few other things, fried them up in oil, and ended up with a pretty decent fritter. I drained them on paper towels and then rolled them in cinnamon sugar while still warm. If you ever find yourself with some leftover sweet potatoes – now you have a fun way to use them.
Sweet Potato Fritters
1 c. cooked, mashed sweet potatoes
2 eggs
2 T. brown sugar
2 t. baking powder
1 t. cinnamon
1/2 t. baking soda
1/2 t. nutmeg
1/2 t. salt
1 1/2 c. flour
oil for frying
cinnamon sugar for rolling- powdered sugar would work, too
In mixing bowl combine all ingredients, except the flour and beat until smooth. Stir in flour. Batter will be thick. Heat oil to 350 degrees.* There should be enough oil in the pan top be at least 1 inch deep- or deeper. To save oil I used a smallish pan and cooked 3-4 fritters at a time. Drop dough by rounded teaspoonfuls into hot oil and cook, turning once until golden brown on both sides. This will take about 3 minutes. Drain on paper towels then roll in cinnamon sugar while warm. Makes 24-30. Best served warm.
* Fun way to know when your oil has hit 350 degrees. Place an un-popped popcorn kernel in the oil. Popcorn pops at 350 degrees.
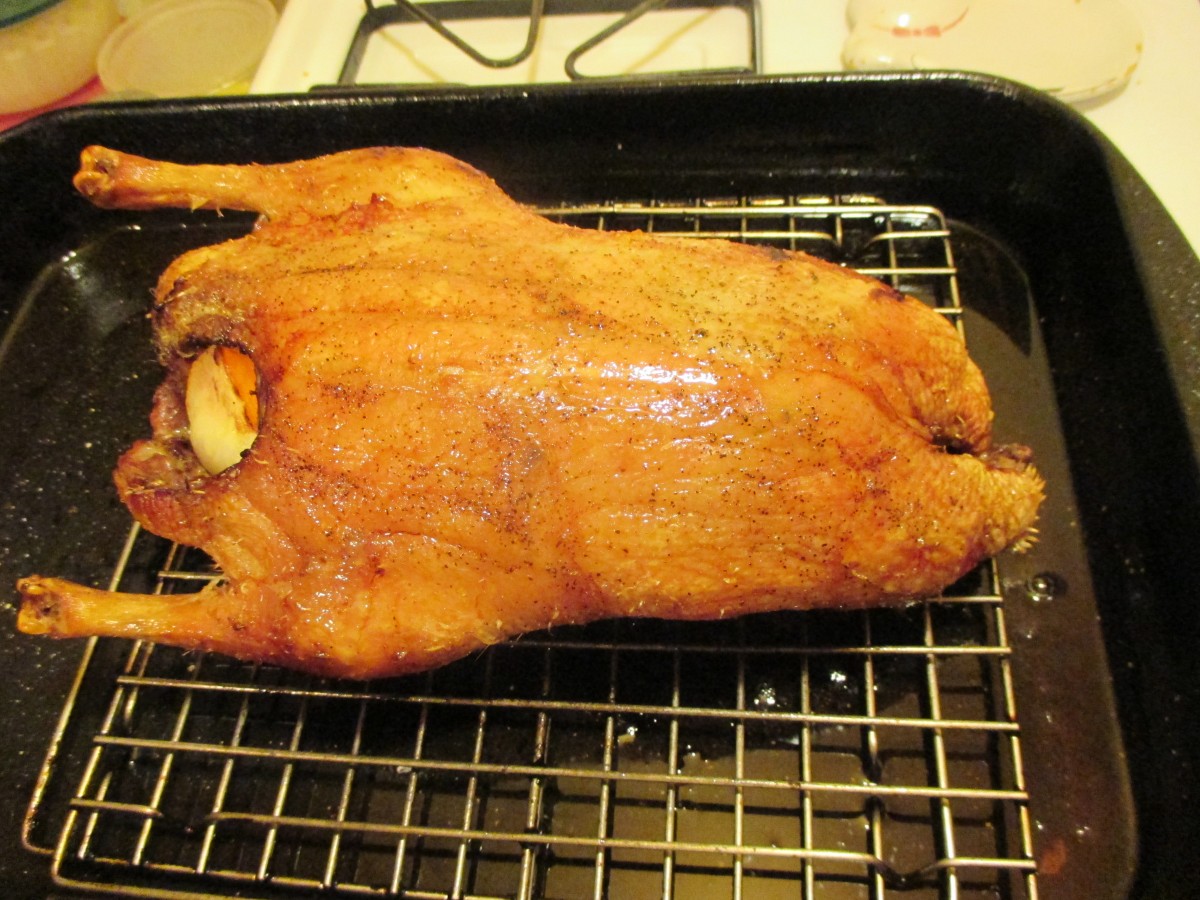
Orange Glazed Duck

Orange Glazed Duck
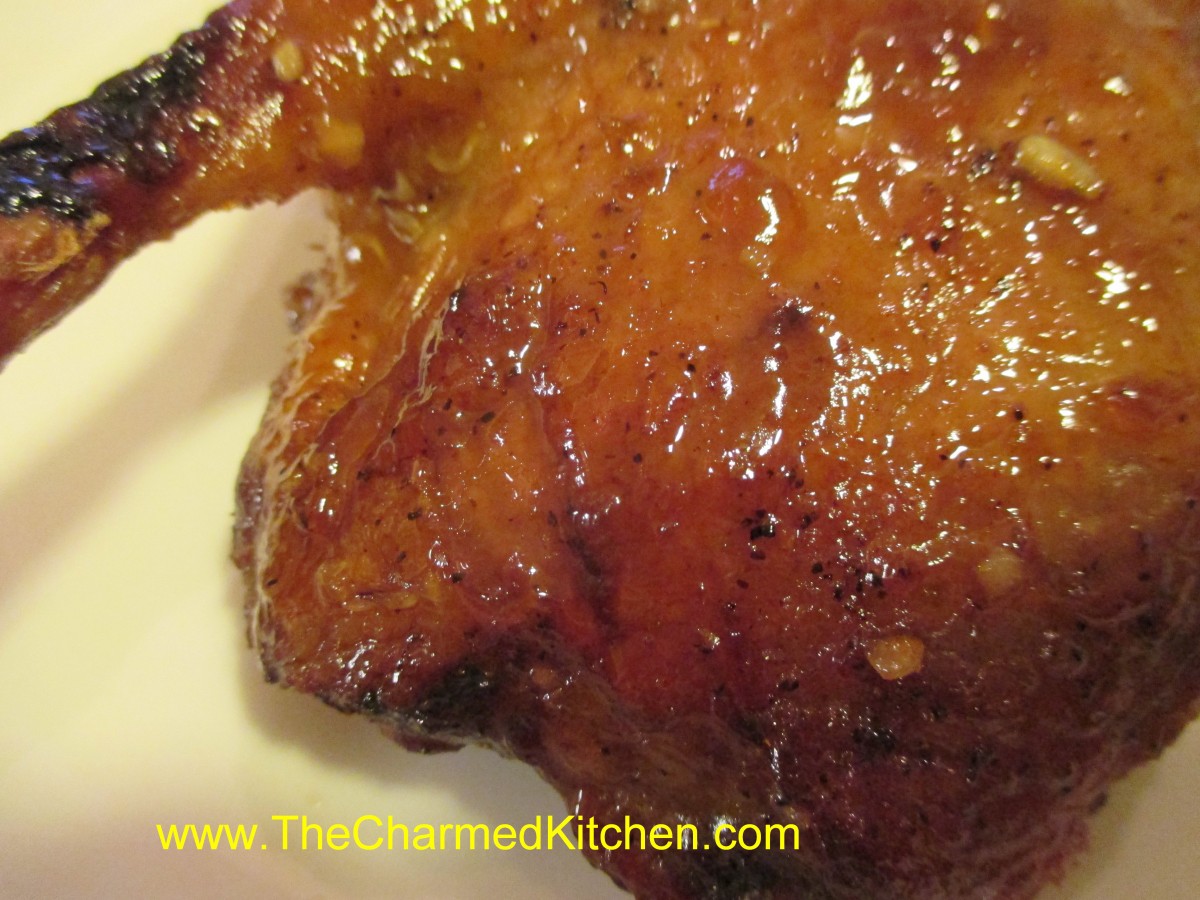
Duck has traditionally been paired with oranges forever. I remember getting a frozen duck at the grocery store years ago and it came with a packet of orange sauce.You were supposed to boil it up and serve it over the duck. I wasn’t real happy with the resulting sauce and wondered what the fuss was about duck with orange sauce. Since I was roasting a duck the other day I decided to try to make an orange sauce that I did like and see if it helped. The end result was a wonderful. I started by splitting the duck in half and sprinkling it generously with salt and fresh ground pepper. It was a local duck so not as fatty as other ducks I had gotten at the store before. If your duck is fatty- trim off some of the extra fat ( you can render it later) and score the skin. I put it on a rack, roasting it at 425 degrees for just under an hour. Then I brushed the orange glaze (recipe follows) all over the duck and placed it under the broiler for a few minutes to brown up. The result was a duck with crispy skin, sticky from the glaze. I get it now. Orange and duck, done right, is a great combination.
Orange Glaze
1 T. oil
1 shallot, minced
2 cloves of garlic, minced
1 c. orange juice
1/4 c. vinegar- I used cider vinegar
2 T. honey
2 T. brown sugar
2 T. sherry
1 T. soy sauce
2 t. hot sauce
2 t. orange zest
2 T. cornstarch
2 T. cold water
In small pan heat oil and saute the shallot until tender. Add garlic and cook a minute or two longer. Add the remaining ingredients, except the cornstarch and water, and simmer for about 10 minutes, so mixtures reduces a little. Combine the cornstarch and water and pour into the sauce, stirring, until mixture in thickened and bubbly. Makes a little over a cup. Great on duck or as a dipping sauce for other meats or egg rolls. Keeps in fridge a couple of weeks.
Duck Fat Bread

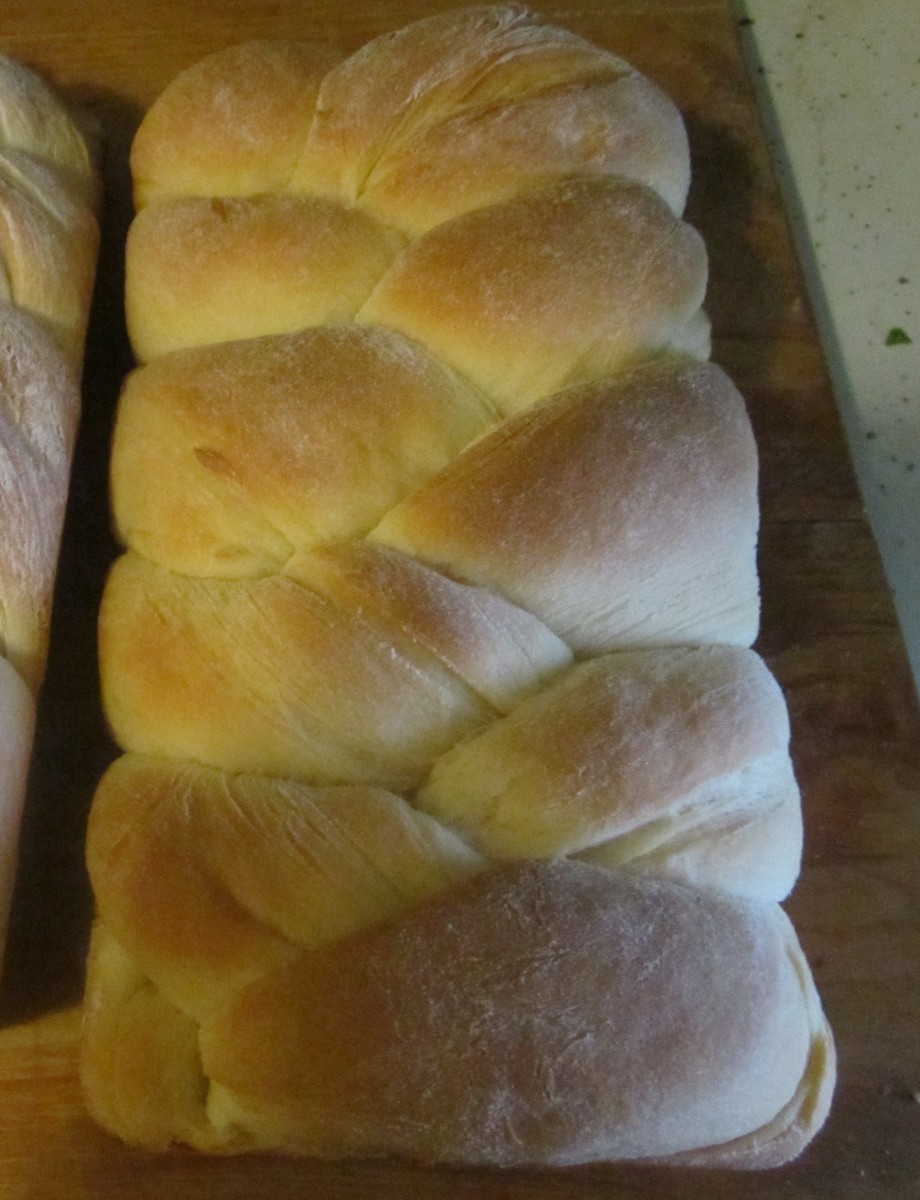
Duck Fat Bread
My Mom used to make this wonderful sweet bread. Made it for every family occasion. She was also a very frugal person and decided rather that toss duck skin she had removed from a duck she was using in soup she rendered the fat. Once it was cooled it looked like butter. She was making her bread and substituted the duck fat for the butter in the recipe. When my brother-in-law, Bob, tasted it he declared it was the best yet. My Mom told him what the secret ingredient was and from that day on we always called it duck fat bread- even when it was made with butter. Here is the recipe- wonderful even made with plain old butter.
Butter Coffeecake Braids aka Duck Fat Bread
4 1/2 c. flour
2 T. sugar
1 t. salt
½ c. butter or 1/2 c. cooled rendered duck fat
1 packet yeast
¼ c. warm water
2 t. sugar
1 c. evaporated milk
2 eggs, beaten
Combine flour with sugar and salt. Cut in butter or duck fat and set aside. Dissolve 2 teaspoons sugar in warm water. Dissolve yeast in warm water mixture and set aside. Allow to become bubbly, about 5 minutes. Combine milk with eggs. Stir in yeast mixture and add to flour mixture stirring well. Knead dough in bowl until smooth, about 10 minutes. Place on lightly floured surface and knead until smooth. Cover and let rise until doubled, about 1½ hours. Divide dough in half and then each half into thirds. Roll dough into ropes and braid three ropes together. Repeat with remaining 3 ropes. Place braids in 9×5 inch greased bread pans and cover with a towel. Place in a warm, draft-free place and allow to rise until doubled, about 1½ hours. Bake in a preheated 350 degree oven for 25 minutes. If you like glaze loaves while warm with a mix of powdered sugar, a little milk, butter, and vanilla. Toasted almonds or walnuts can be added, if desired. Makes 2 loaves.
Note: You can also refrigerate the dough after kneading it if you would prefer. Just place dough in an oiled bowl, cover with plastic wrap and chill overnight. Roll and shape dough into braids when cold from the fridge. Rise, covered, until doubled in bulk, about 2-3 hours. Bake as directed.
Note: You can also place loaves on a greased baking sheet for a longer, flatter bread rather than in loaf pan.
Pumpernickel Bread


Pumpernickel Bread
If you never made your own Pumpernickel bread you might be surprised at some of the ingredients. Besides the rye flour the dark color and unique flavor are from the addition of molasses, cocoa powder and coffee. The sad fact is that much of the Pumpernickel bread you see in stores doesn’t have most of these ingredients, but artificial color and flavor. Real pumpernickel bread is a little dense, chewy and very flavorful. Well worth the effort to make it.
Pumpernickel Bread
2 Packages active dry yeast
½ c. warm water
2 c. lukewarm strong coffee
¼ c. each molasses and unsweetened cocoa
2T. Caraway seeds
2 t. salt
5-6 c. flour
2 c. rye flour
Cornmeal
1 egg white, slightly beaten
In large bowl dissolve yeast in warm water. Stir in coffee, molasses, cocoa, seeds, salt and 3 cups of flour. Beat with wooden spoon about 2 minutes. Stir in rye flour and enough of the remaining regular flour to make soft dough. Turn onto floured surface and knead until dough is smooth, about 10 minutes. Place in greased bowl, turning to grease top, cover and let rest until doubled, about 1 hour. Grease large baking sheet and sprinkle with cornmeal. Set aside.
Punch down dough, divide in 2, and form into balls. Place on baking sheet and cover. Let rise until double, brush with egg whites, slash tops and bake at 375 for 35-40 minutes. Makes 2 loaves.
Pumpkin Bisque

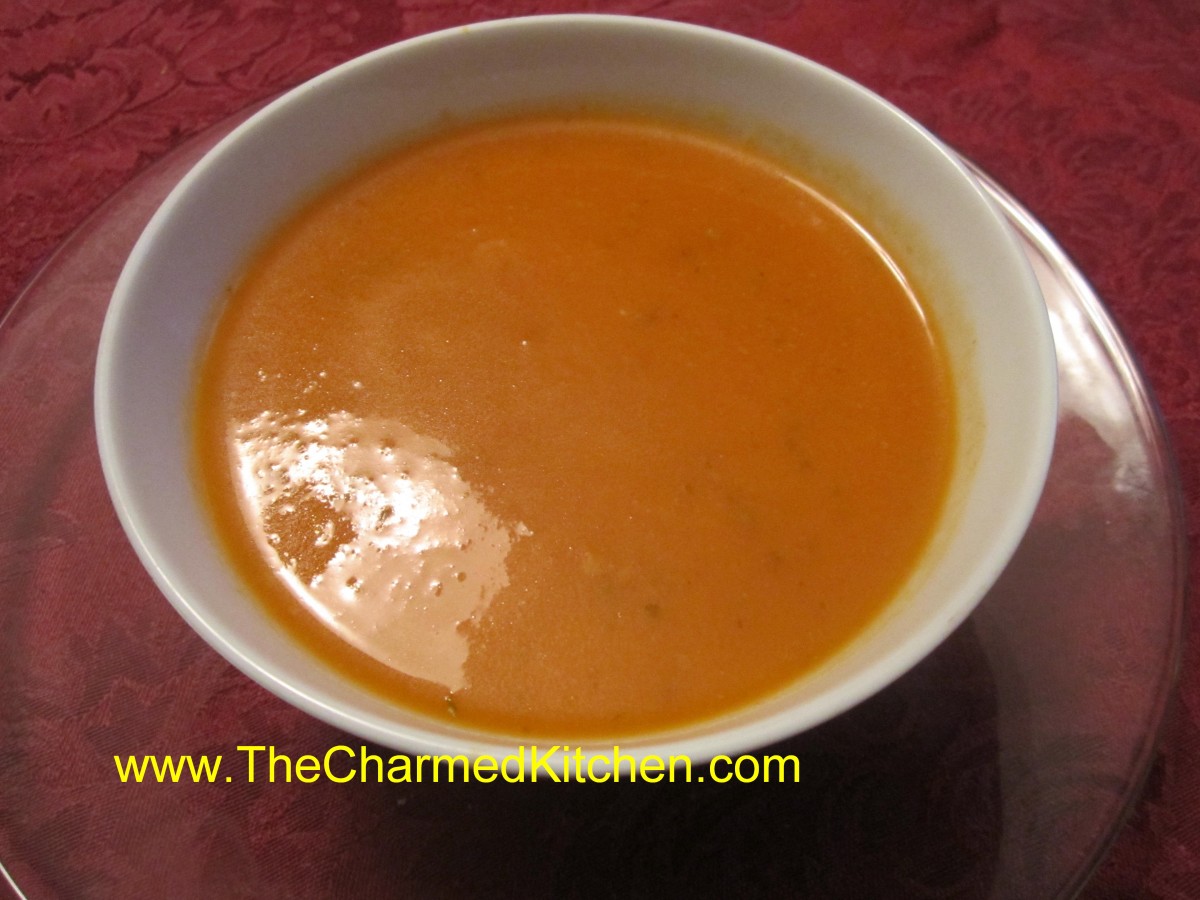
Pumpkin Bisque
What’s in a name? When I make this soup I actually almost never use pumpkin. Every Fall I stock up on Winter squashes like butternut, acorn, Hubbard and more. A few pumpkins, too. Eventually I cut them up and roast them. Once cooled they are pureed and frozen to use throughout the year. Pretty much any package I pull out of the freezer is as likely squash as pumpkin. I am not sure it really matters. I love butternut and Hubbard the most of the winter squashes, but in this soup any of the squash or pumpkins add a similar sweetness that works. The soup is easy to make and takes almost no time at all. Great for when you need something to warm you up – fast.
Pumpkin Bisque
2 T. butter
¼ c. chopped onion
½ t. ginger
1 T. flour
2 c. cooked pumpkin
2 c. chicken broth
2 c. milk
salt and pepper to taste
Sauté butter, onion and ginger. Stir in flour. Add pumpkin and cook 5 minutes. Add broth and milk and stir often until heated through. Adjust seasonings. Serves 4-6.
Baking and Canning in Jars

 I have seen a post coming up a lot lately about cooking foods in canning jars in the oven. They are all over the internet. Mostly cakes or other sweets. Trust me, there are plenty of sites that will tell you it is OK to bake or can in jars. There are also sites that tell you it is safe to water bath green beans. Just because it is on some website does not make it true or safe. Every time I see a post I let people know it isn’t safe. After a conversation with a friend last night I decided it was time to do a post on the subject. There are really three different reasons not to put your canning jars in the oven.
The first reason is that heat penetration in ovens can vary and it is not the same as heat penetration in water. For that reason it is not considered safe by the USDA for us to can in the oven. There is a link posted below with this information.
The second reason is that cakes made in the oven pose the risk of giving you botulism poisoning. The link from Penn State explaining why is also listed below.
The third reason is that the Company that makes the jars, Bernardin, (they make Ball jars) says not to put any canning jars in ovens because they could shatter. The link from the company is also listed below.
I hope this clears the matter up. Don’t want to sound preachy, just want people to be safe.
http://extension.psu.edu/food/preservation/faq/canned-breads-and-cakes
http://nchfp.uga.edu/questions/FAQ_canning.html#7
http://www.bernardin.ca/pages/faq/33.php
Duck with Pear Ginger Sauce


Duck with Pear Ginger Sauce
I love the way duck tastes when served with pears. Duck, with its dark, rich meat really works well with all sorts of fruit. I’ve made sauces and glazes for duck from cherries, prunes, mangoes, peaches and of course, oranges. Since I had several very ripe pears and a duck I was roasting I thought I’d try them together. Oh yum!!
I made a simple sauce out of the pears. I peeled them and diced them and put them in a small saucepan with a couple of tablespoons of brown sugar, about 1/4 cup of cider vinegar, some salt and pepper and a healthy splash of hot sauce. It needed something so I added about a teaspoon and half of grated ginger. That was the missing ingredient. It gave the sauce a nice bite. I simmered the sauce for about 10 minutes, stirring from time to time to prevent sticking. The pears were just starting to fall apart. When the duck was ready to serve I warmed up the sauce and spooned some on the plate.
To roast the duck: Let me say this was a locally grown duck so not as fatty as ducks I get at the grocery store. For the very fatty ducks you need to score the skin and trim off extra fat. If you don’t the skin won’t get crispy and isn’t very appetizing. Still, I wanted a nice high heat to crisp up the skin. I placed it on a rack in a roasting pan. I did cut up an onion and a small orange and placed them in the cavity. Sprinkled generously with salt and pepper and placed the duck in a preheated 450 degree oven for 15 minutes. Then I turned the heat down to 425 until the duck was done. In this case, it was a smallish duck and cooked in about 65 minutes. It is OK if the duck meat is a little pink. Kind of preferred a little pink by most, but cook it to your own comfort level. Let duck rest 10-15 minutes before cutting into serving pieces.
Right out of the oven


