Canning Chickpeas and Other Dry Beans

I always get a lot of questions when I tell people I can dry beans. They ask if it is worth the effort. I find I like the flavor better than canned beans. Plus, I don’t have to cook from dry every time I want some. So for me, it is worth the effort.
It isn’t hard to do, but there are rules.
Because beans are a low acid food, they must be pressure canned. They also are precooked a little before they are canned. They don’t overcook when you do that. It just helps them to cook evenly and to get proper heat penetration.
Salt is optional, so you can leave it out, if you like.
Make sure you pick over the beans and toss any that are discolored.
They expand a lot when cooking. I started out with 2 pounds of dry garbanzo beans and ended up with 8 pints!!! Always use a bigger pot than you think you will need.
So here are the directions.
Canning Dry Beans- Chickpeas, kidney, black beans etc.
Rinse beans and place in a large pot. Cover with plenty of cold water and bring to a boil. Boil two minutes. Let stand 1 hour. Drain beans and return to pot. Cover with cold water- at least two inches over the beans. Bring to a simmer and simmer 30 minutes. Meanwhile, wash jars and get the pressure canner ready. Follow your manufacturer’s recommendations for how much water to place in your canner. Some say 2 or 3 inches of water. Mine says to add three quarts of water. I also add a little vinegar to my water to reduce mineral build up inside my canner. Not a safety issue, more cosmetic. A few tablespoons is plenty.
Ladle beans and water into canning jars, leaving 1 inch of headspace. Add non-iodized salt, if you like. 1/2 teaspoon per pint and 1 teaspoon per quart. Beans will still expand, so make sure the water covers them. Tighten lids to fingertip tight. Place jars in canner, on a rack, where water should just be simmering. Secure lid and turn up the heat. Once a steady stream of heat comes out of the vent, start timing it. Steam must vent for ten minutes. Place weighted or dial gauge over the vent and watch while canner comes up to pressure. Once canner reaches 10 pounds pressure, start timing. You will gradually be able to turn the heat down, but do it slowly, so you don’t go below 10 pounds pressure. Pints are processed for 75 minutes, quarts for 90 minutes.
Once the time is up- turn off the heat and allow the canner to go down to zero pounds pressure. Don’t rush this step by trying to cool the canner. The cooling down time is part of the process. Remove the gauge carefully at this point. Wait another 10 minutes before removing the lid of the canner. Remove lid, facing away from you- there is still plenty of hot steam in the canner. Remove jars to a counter covered with a towel or cooling rack. Allow jars to cool before checking seals.
Sources NCHFP, Ball
Canning Chickpeas-and Other Dry Beans
I always get a lot of questions when I tell people I can dry beans. They ask if it is worth the effort. I find I like the flavor better than canned beans. Plus, I don’t have to cook from dry every time I want some. So for me, it is worth the effort.
It isn’t hard to do, but there are rules.
Because beans are a low acid food, they must be pressure canned. They also are precooked a little before they are canned. They don’t overcook when you do that. It just helps them to cook evenly and to get proper heat penetration.
Salt is optional, so you can leave it out, if you like.
Make sure you pick over the beans and toss any that are discolored.
They expand a lot when cooking. I started out with 2 pounds of dry garbanzo beans and ended up with 8 pints!!! Always use a bigger pot than you think you will need.
So here are the directions.
Canning Dry Beans- Chickpeas, kidney, black beans etc.
Rinse beans and place in a large pot. Cover with plenty of cold water and bring to a boil. Boil two minutes. Let stand 1 hour. Drain beans and return to pot. Cover with cold water- at least two inches over the beans. Bring to a simmer and simmer 30 minutes. Meanwhile, wash jars and get the pressure canner ready. Follow your manufacturer’s recommendations for how much water to place in your canner. Some say 2 or 3 inches of water. Mine says to add three quarts of water. I also add a little vinegar to my water to reduce mineral build up inside my canner. Not a safety issue, more cosmetic. A few tablespoons is plenty.
Ladle beans and water into canning jars, leaving 1 inch of headspace. Add non-iodized salt, if you like. 1/2 teaspoon per pint and 1 teaspoon per quart. Beans will still expand, so make sure the water covers them. Tighten lids to fingertip tight. Place jars in canner, on a rack, where water should just be simmering. Secure lid and turn up the heat. Once a steady stream of heat comes out of the vent, start timing it. Steam must vent for ten minutes. Place weighted or dial gauge over the vent and watch while canner comes up to pressure. Once canner reaches 10 pounds pressure, start timing. You will gradually be able to turn the heat down, but do it slowly, so you don’t go below 10 pounds pressure. Pints are processed for 75 minutes, quarts for 90 minutes.
Once the time is up- turn off the heat and allow the canner to go down to zero pounds pressure. Don’t rush this step by trying to cool the canner. The cooling down time is part of the process. Remove the gauge carefully at this point. Wait another 10 minutes before removing the lid of the canner. Remove lid, facing away from you- there is still plenty of hot steam in the canner. Remove jars to a counter covered with a towel or cooling rack. Allow jars to cool before checking seals.
Sources NCHFP, Ball
Canning Chickpeas
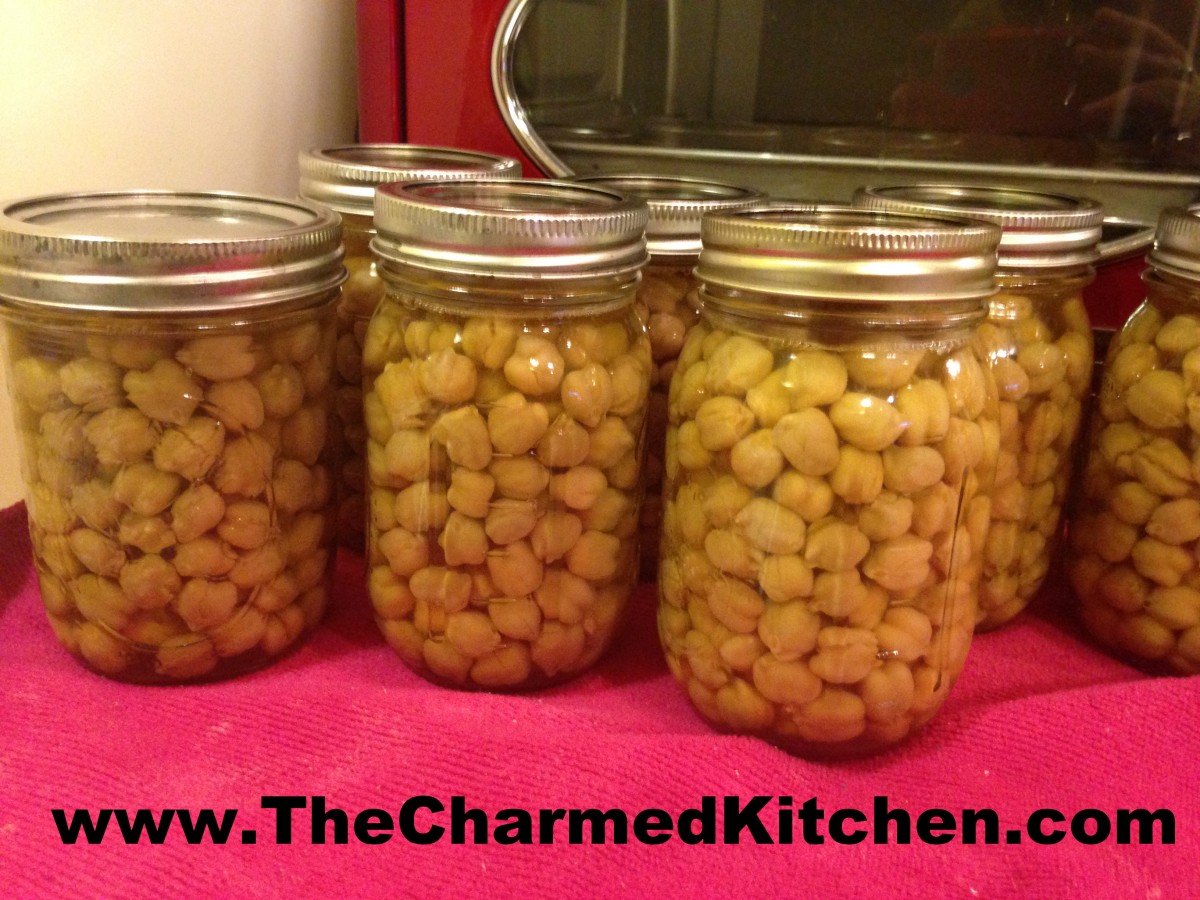
Chickpeas Cooling Down
I always get a lot of questions when I tell people I can dry beans. They ask if it is worth the effort. I find I like the flavor better than canned beans. Plus, I don’t have to cook from dry every time I want some. So for me, it is worth the effort.
It isn’t hard to do, but there are rules.
Because beans are a low acid food, they must be pressure canned. They also are precooked a little before they are canned. They don’t overcook when you do that. It just helps them to cook evenly and to get proper heat penetration.
Salt is optional, so you can leave it out, if you like.
Make sure you pick over the beans and toss any that are discolored.
They expand a lot when cooking. I started out with 2 quarts of dry garbanzo beans and ended up with 12 pints!!! Always use a bigger pot than you think you will need.
Canning Dry Beans- Chickpeas, kidney, black beans etc.
Rinse beans and place in a large pot. Cover with plenty of cold water and bring to a boil. Boil two minutes. Let stand 1 hour. Drain beans and return to pot. Cover with cold water- at least two inches over the beans. Bring to a simmer and simmer 30 minutes. Meanwhile, wash jars and get the pressure canner ready. Follow your manufacturer’s recommendations for how much water to place in your canner. Some say 2 or 3 inches of water. Mine says to add three quarts of water. I also add a little vinegar to my water to reduce mineral build up inside my canner. Not a safety issue, more cosmetic. A few tablespoons is plenty.
Ladle beans and water into canning jars, leaving 1 inch of headspace. Add non-iodized salt, if you like. 1/2 teaspoon per pint and 1 teaspoon per quart. Beans will still expand, so make sure the water covers them. Tighten lids to fingertip tight. Place jars in canner, on a rack, where water should just be simmering. Secure lid and turn up the heat. Once a steady stream of heat comes out of the vent, start timing it. Steam must vent for ten minutes. Place weighted or dial gauge over the vent and watch while canner comes up to pressure. Once canner reaches 10 pounds pressure, start timing. You will gradually be able to turn the heat down, but do it slowly, so you don’t go below 10 pounds pressure. Pints are processed for 75 minutes, quarts for 90 minutes.
Once the time is up- turn off the heat and allow the canner to go down to zero pounds pressure. Don’t rush this step by trying to cool the canner. The cooling down time is part of the process. Remove the gauge carefully at this point. Wait another 10 minutes before removing the lid of the canner. Remove lid, facing away from you- there is still plenty of hot steam in the canner. Remove jars to a counter covered with a towel or cooling rack. Allow jars to cool before checking seals.
Sources NCHFP, Ball


