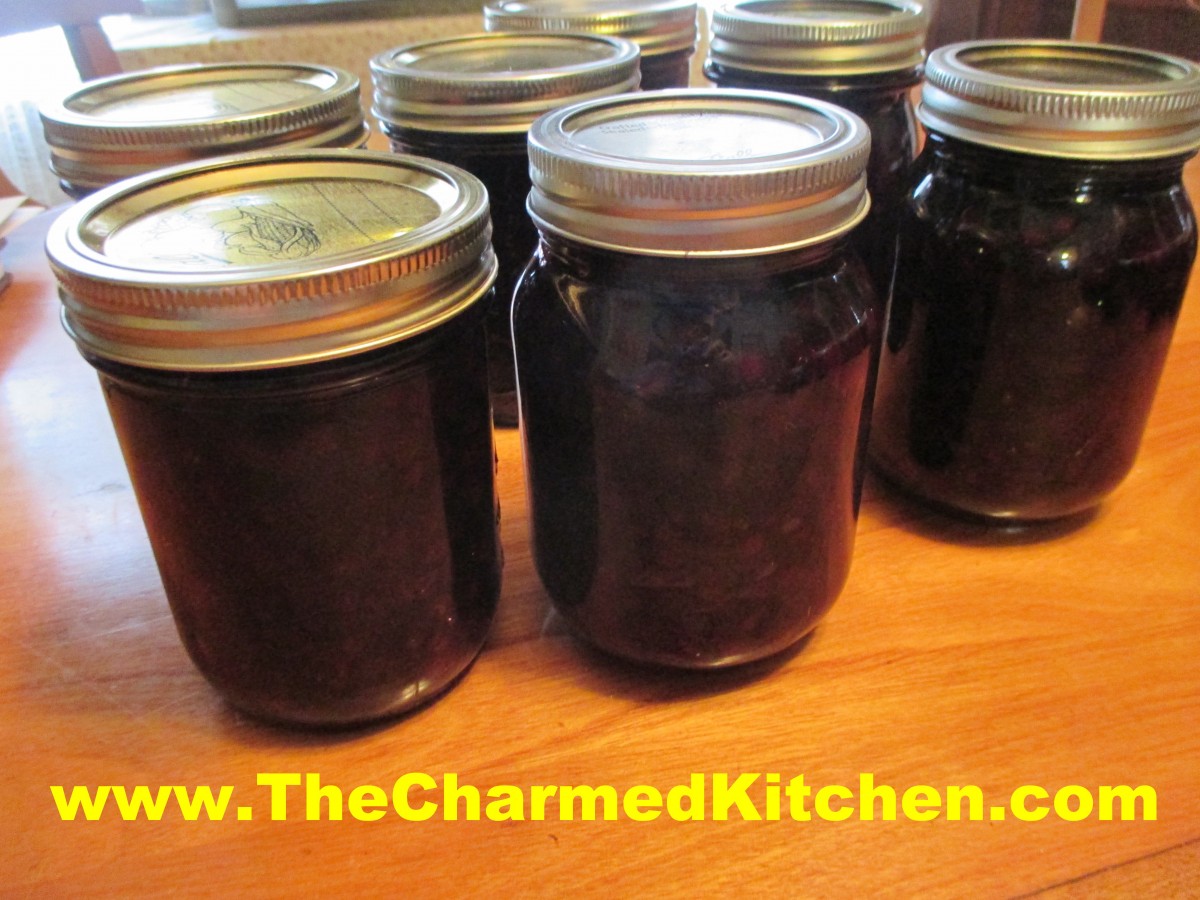
Sweet Cherry Jam

Sweet Cherry Jam
This must be a great year for cherries. They seem bigger than usual, and very sweet. I had picked up a lot of sweet cherries at the local market, more than I could eat fresh. I knew I wanted to do something to preserve some.
I combined some of the cherries with vodka to make a liqueur. I dehydrated a bunch, and I made another batch of spiced cherries. I also decided to use some of them to make jam.
While I normally make jam from sour cherries, I knew the sweet ones would work. Besides the cherries, sugar and pectin, this jam also contains lemon juice, vanilla and cinnamon. Those extra ingredients give the jam a more complex flavor and a little bit of a tang.
This may be one of my favorite jams ever!!! I was worried it would be too sweet, but it isn’t. The flavor of the cherries comes through as well at the flavor of the vanilla and cinnamon. Thinking I made need to buy more cherries and make another batch….
Here is the recipe. Enjoy.
Sweet Cherry Jam
4 c. chopped pitted sweet cherries, about 2 lbs.
6 T. powdered pectin
6 T. lemon juice
2 T. pure vanilla extract
1 t. cinnamon
4½ c. sugar
Wash jelly jars and lids and keep warm until ready to use. Place a large pot of water, with a rack, on to boil for the water bath. In large saucepan combine cherries with pectin, lemon juice, vanilla and cinnamon. Bring to a rolling boil, stirring often. Add the sugar and bring mixture back to a rolling boil, stirring often. Once the mixture gets to a full, rolling boil, cook for one minute longer, stirring constantly. Remove jam from heat and skim off any foam. Ladle hot jam into hot jars, filling to about 1/4 inch from the top. Wipe off rim and screw on the lids. Repeat with remaining jam. Process in a hot water bath for 10 minutes. Turn off heat and let jar sit in canner 5 minutes before removing. Remove from water bath and allow jars to cool. Yield: about 6 half pint jars of jam.
Adapted from The Ball Blue Book
Homemade Dill Pickles
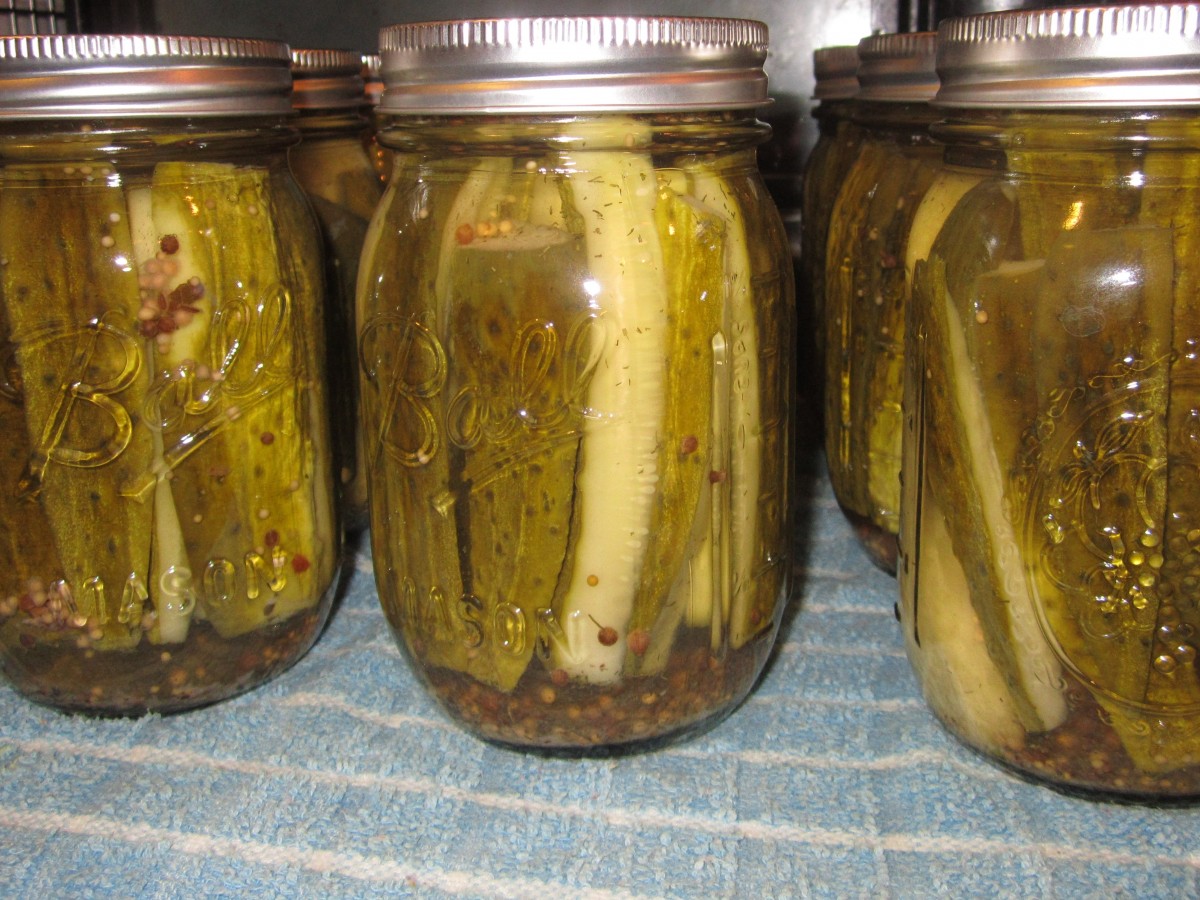
Dill Pickles
People think homemade pickles are difficult to make. They really aren’t. These dill pickles are easier than most.
To make them, you start by putting dill and garlic in clean jars. Then you add the cukes, cover them with the brine, and process. Can’t get much simpler.
You can play around with the seasonings a bit. To make the dill pickles a little more fun, I added 1 teaspoon of red pepper flakes to about half of the jars, for a spicy version.
To make the pickles crisper, you can add a fresh grape leaf to each jar with the spices. For best results, use really fresh cucumbers. Pickle them as soon after harvest as possible.
Easy Dill Pickles
30-40 pickling cucumbers, 5 inches long, scrubbed and ends trimmed off
¾ c. sugar
¾ c. canning or pickling salt (non-iodized)
1 quart vinegar
1 quart water
7 fresh dill heads
3 T. pickling spice
7 garlic cloves, peeled, optional
Mix together the sugar, salt, vinegar, water and pickling spices and bring to a boil. Cook 10 minutes. Place a dill head in the bottom of seven clean, hot pint jars. Add the garlic, if using. Meanwhile cut trimmed and washed cucumbers into halves or quarters lengthwise and pack upright into the jars. Trim the length, if needed to fit no higher than to the shoulder of the jar. Pour over the hot brine leaving ½ -inch of headspace. Wipe rims and screw on lids. Place in a simmering water bath and bring to a boil. Process for 10 minutes. Remove and cool. Makes 7 pints.
Spiced Bread and Butter Pickles
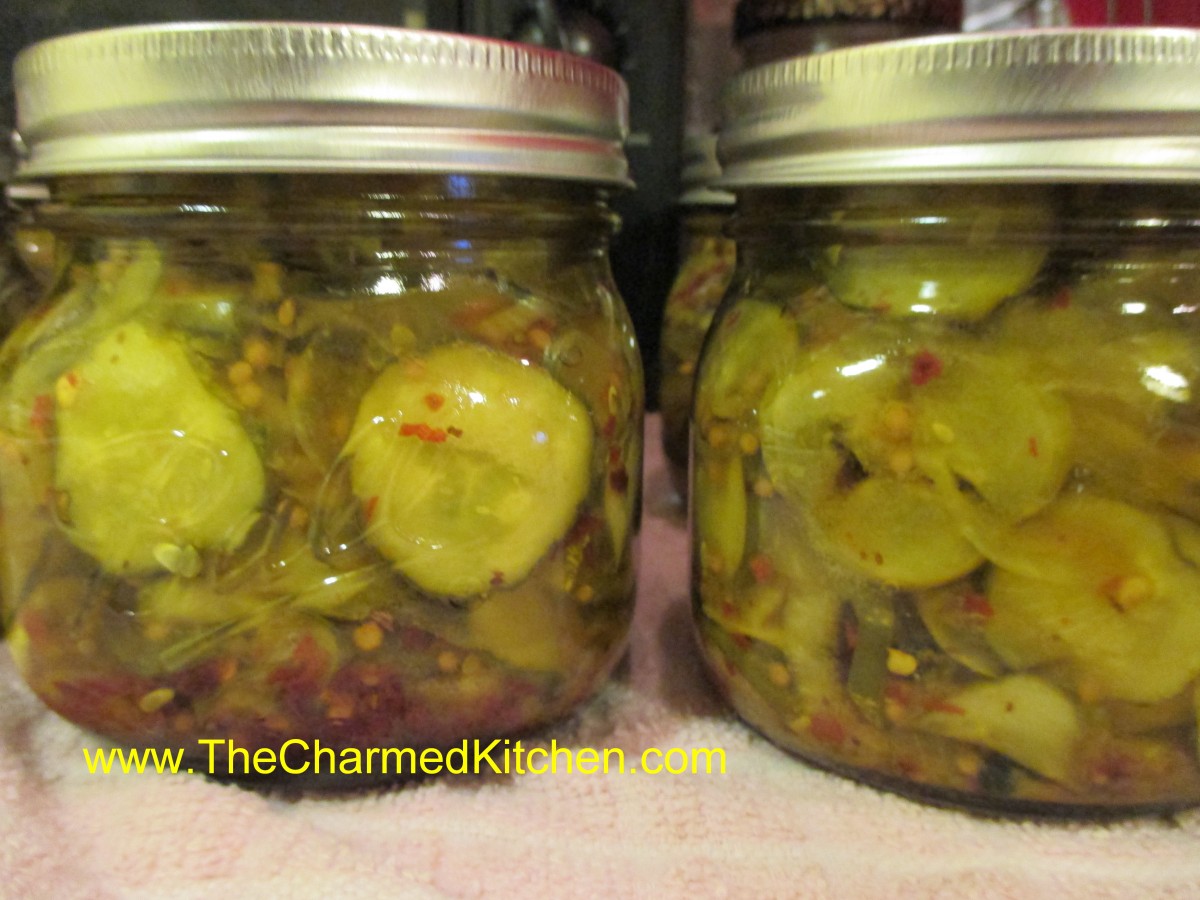
Spiced Bread and Butter Pickles
I am a big fan of homemade bread and butter pickles. I make several batches every year. Friends and family really like them, too. I get requests, every year, for these Spiced Bread and Butter Pickles.
While you should follow recipes for pickles carefully- those amounts of vinegar, salt, sugar etc., all are important for safety and a good end product, you can play around with seasonings a little.
In this case, I just add a teaspoon of red pepper flakes to each pint jar for the spicy version. Just enough of a kick. You might want to add a little more or less, according to your taste.
So here is the recipe for classic Bread and Butter Pickles- with the variation for Spiced included.
Bread and Butter Pickles*
6 quarts thinly sliced pickling cucumbers
6 medium onions, peeled and sliced thin
½ c. pickling salt
1½ quarts vinegar
4½ c. sugar
½ c. whole mustard seed
1 T. Pickling spice
1 T. celery seeds
Wash cucumbers and trim off ends before slicing. Place in non-reactive bowl
(stainless steel, enamel, plastic) add the onions and then salt and stir. Allow cucumbers and onions to sit in the salt for 3 hours. After 3 hours drain well, but do not rinse. Meanwhile combine remaining ingredients and bring to a boil. Add cucumbers and onions and return to the boil. As soon as the mixture is boiling ladle into clean, hot pints jars, leaving a good ½ -inch of headspace. Wipe rims and screw on lids firmly. Place in boiling water bath and process for 10 minutes. Remove to counter and allow to cool naturally. Makes 12 pints.
* For Spiced Bread and Butter Pickles add 1 teaspoon of red pepper flakes to each pint jar just before filling.
Note: These need a couple of weeks for the flavors to develop. They can also be made with firm, small zucchini.
Source: Putting Food By
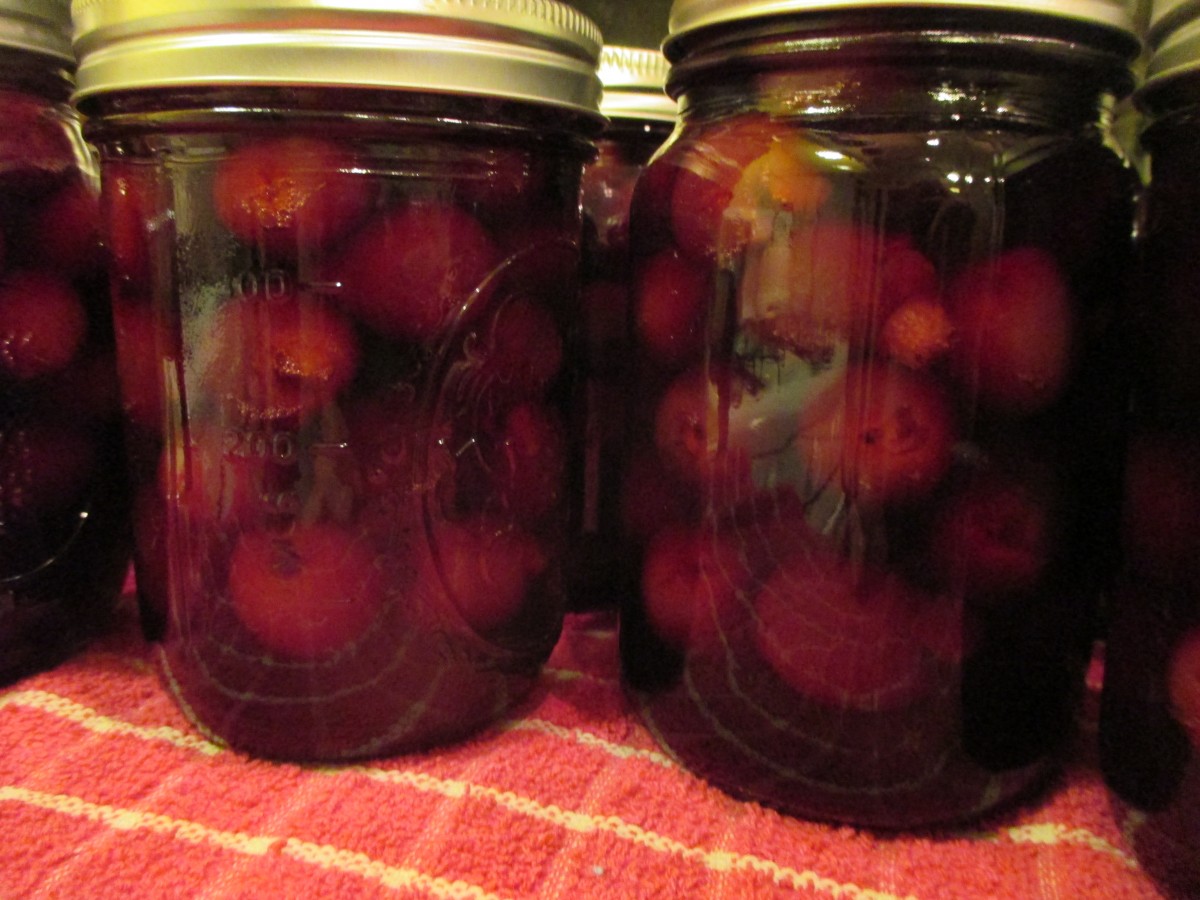
Spicy Pickled Beets

Spicy Pickled Beets
Beets are just one of those foods. People seem to love them, or hate them. I am a beet lover. I enjoy them in all sorts of dishes. The nice thing about making a batch of pickled beets is being able to open up a jar whenever you want.
This recipe is a pretty classic way to preserve beets. The brine is a sweet and sour mixture with pickling spice, salt and red pepper flakes for added flavor. You could play around with the seasonings a little. Maybe adding more heat.
Pickled beets are great served as a side dish with all sorts of foods. I like them served with cheeses, crackers and other pickled foods as an appetizer. If you don’t want to can them- you can store them in the fridge for up to a couple of months.
Spicy Pickled Beets
4 lbs. beets, smaller sizes preferred
3 c. thin sliced onions
2 c. sugar
2 T. Pickling spice
1 T. canning salt
2 t. red pepper flakes
2½ c. cider vinegar- 5% acidity
1½ c. water
Wash and trim beets, leaving a couple inches of stem attached. Cook in boiling water until tender. Cool beets down so you can handle them. Peel beets and cut into 1½- 2-inch diameter pieces, if beets are large. Leave whole if beets are small. Set aside. Combine the rest of the ingredients in a pot and bring to a boil. Reduce to simmer and simmer 5 more minutes. Add beets and cook a few minutes, until beets are warmed through. Ladle hot beets into clean pint jars, leaving ½ inch headspace. Ladle in hot liquid, leaving ½-inch headspace. Remove air bubbles, wipe off rim, screw on lid to finger-tip tightness. Repeat with remaining beets and liquid. You should fill about 5 pint jars. Process in a boiling water bath for 30 minutes. Turn off the heat and leave jars in water bath 5 minutes before removing to counter to cool. Yield: 5 pints.
Adapted from The Ball Blue Book
Canning Yellow and Orange Tomatoes

Crushed Tomatoes
I have been asked several times in canning classes, if it is safe to can yellow or orange tomatoes. We have all heard that yellow and orange tomatoes are lower in acid, so are they still safe to can? The answer is yes, they are safe to can.
Why?
Truth is, that yellow and orange tomatoes have just as much acid as red tomatoes.
Well, for the most part at least. In terms of acidity or Ph, yellow and orange tomatoes are about average. Some cultivars have more, some less. Bottom line is that all tomatoes are safe to can- as long as you acidify them.
Adding salt is optional and is for flavor only. Use canning/pickling salt or non-iodized salt when canning.
Here are some popular canning recipes to get you started. All follow the NCHFP (National Center for Home Food Preservation) recommended procedures.
Crushed Tomatoes
Peel and core tomatoes , trim off any bad spots and quarter. Place about 1/4 of your prepared tomatoes in the kettle and cook, stirring constantly over high heat. Use a potato masher to crush tomatoes and extract juices. Once they are boiling add remaining tomatoes, stirring constantly. You don’t need to crush these tomatoes. Bring to a boil and boil for 5 minutes. In clean, hot jars add needed acidity listed below. You can also add 1 teaspoon of canning salt per quart if desired. Ladle in hot tomatoes, leaving 1/2-inch headspace. Wipe jar rims clean and adjust lids. Process in boiling water bath. Pints 35 minutes, quarts, 45 minutes. 1,000-3000 ft over sea level add 5 minutes. Twenty-two pounds of tomatoes will yield about 7 quarts of tomatoes.
Whole Tomatoes in Juice
Use any extra tomatoes to make juice. I use tomatoes that are too big to can whole, or those that have blemishes that need to be trimmed. Cut up clean, unpeeled tomatoes in a kettle and cook, stirring often until tomatoes are mushy. Strain mixture, pressing on solids or run through a food mill or tomato juice extractor. Set aside,. Place peeled, whole tomatoes in kettle and add enough tomato juice to cover them. Heat to a simmer and simmer gently 5 minutes. Add lemon juice or citric acid to jars, using amounts listed below. Add salt, if desired. Add tomatoes and cover with hot juice, leaving 1/2 -inch headspace. Wipe rims and adjust lids. Process both pints and quarts 85 minutes in a boiling water bath.
Tomato Juice
Wash, stem and trim bruises off tomatoes. Cut into chunks. Add about 1 pound of tomatoes to kettle and bring to a boil while crushing. Continue to add additional cut up tomatoes slowly, keeping mixture boiling. This will keep the juice from separating later. Simmer an additional 5 minutes once the tomatoes have all been added. Press mixture through a strainer , sieve or food mill to remove seeds and skins. Add lemon juice or citric acid to jars according to directions listed below. Add salt if desired. Return juice to boil and add to prepared jars leaving 1/2-inch headspace. Wipe rims and adjust lids. Process n a boiling water bath pints 35 minutes and quarts 40 minutes. Add 5 minutes processing time at elevations between 1,001 and 3,000 ft.
Tomato Sauce
Prepare as for juice. After juice is made return to pot and start cooking down to desired thickness. You’ll lose about 1/3 of the volume for thin sauce and 1/2 of the volume for thick. Add lemon juice or citric acid to prepared jars as described below. Add salt if desired. Add boiling sauce leaving 1/4 -inch headspace. Wipe rims and adjust lids. Process in a boiling water bath 35 minutes for pints and 40 minutes for quarts. Add five minutes at 1,001-3,000 ft. elevation.
Acidity and Tomatoes
Tomatoes must be acidified before canning. When canning either whole, crushed or juiced tomatoes you must add either 2 T. bottled lemon juice per quart or 1/2 t. citric acid . For pint use 1 T. lemon juice or 1/4 t. citric acid. You can also use 4 T. (5%) vinegar per quart, but it will alter the flavor and is not recommended. You can add a little sugar to offset the flavor, if you like.
Dilly Beans

Dilly Green Beans
In a pickle making cooking class last night, we made dilly green beans. These are one of my favorite pickles. I like pretty much any type of pickle, and I love green beans, so no surprises there. If you have an abundance of green beans, you might consider making a batch of these to enjoy year round.
These are great just eaten like other pickles, as a side. But they are also great added to a Bloody Mary- or so I am told. I also like to serve them as an appetizer with cheeses, crackers and olives.
While the recipe calls for 1/4 teaspoon of red pepper flakes per jar- feel free to add more, for a spicier version.
Dilly Green Beans
4 lbs. table‑perfect whole green beans
1 3/4 t. crushed dried hot red pepper
3 1/2 t. dried dill seed or seven fresh dill heads
7 cloves of fresh garlic, peeled
5 c. vinegar
5 c. water
1/2 c. less 1 T. pickling salt
Wash beans thoroughly. Remove stems and tips, and cut them as much as possible in uniform lengths to allow them to stand upright in canning jar, coming to the shoulder of the jar. have jars clean and very hot, and lids and sealers ready in scalding water. In each jar place one dill head or 1/2 t. dill seed, add one garlic clove, and 1/4 t. crushed hot red pepper. Pack beans upright in jars, leaving 1 inch of head room. Heat together the water, vinegar and salt. When the mixture boils, pour it over the beans, filling each jar to 1/2 inch from the top. Run a plastic knife down and around to remove trapped air. Adjust lids, and process in a boiling water bath for 10 minutes, start timing after the water in the canner returns to a boil. Remove jars. …Wait at least 2 weeks for these beans to develop their flavor. Yield: 7 pints
Source: Putting Food By
Spiced Cherries

Spiced Cherries
These cherries are so good, I am already wishing I had canned more of them. I was inspired by my cousin, Laurie, who needed spiced cherries for a recipe she wants to make.
I first thought about the spices I wanted to use. I didn’t want to overpower the cherries, but I wanted the spices to complement the flavor of the fruit. In the end I used cinnamon sticks, fennel seeds, fenugreek, cloves and some cracked black pepper.
Once I decided which spices I wanted to use, I steeped them in boiling water. Kind of like making tea. Then I strained out the spices and used the spiced water in the syrup for the cherries. I could just have added spices to the cherries when I canned them, but I didn’t want stuff in the jars I would need to strain out later. I also knew the spices would get more intense over time, if left in the jars. By making a tea and tasting it, I knew what level of spice I would have in the final product.
The spiced cherries can just be eaten, right out of the jar. They can also be drained and added to fruit salads or used to top desserts. You can also use them to bake with. They aren’t overly sweet.
Laurie is using them in some sort of chocolate cherry martini. Now that sounds good!!!
They would make nice gifts, too.
So here is my recipe for spiced cherries.
Spiced Cherries
7 (3-4 inch) cinnamon sticks
2 T. fennel seeds
2 T. fenugreek seeds
1 T. whole cloves
1 T. cracked black pepper
5 c. water
11 lbs. sweet cherries
3¼ c. sugar
Zest of 2 limes
Juice of 2 limes
Place spices in a large pot and turn heat on to medium. Toast spices in pot for about 4-5 minutes, stirring occasionally. You should be able to smell them. Watch so they don’t burn. Add the water to the spices, bring to a boil, and simmer for at least 15 minutes. Longer cooking is fine. Fill water bath canner with water and heat up water to a simmer. In the meantime, pit the cherries. You should end up with about 4½-5 quarts of pitted fruit. You can hold pitted cherries in a bowl of water with a little ascorbic acid in it, to prevent browning. Set aside. Remove the spiced water from the heat. Strain out the spices and discard them. Measure the spiced water and add enough fresh water to equal 5 cups. Return water to pot with the cherries (drained if they were in water), sugar, zest and lime juice. Bring mixture to a boil. Fill pint jars with cherries and cooking liquid, leaving ½-inch headspace. Wipe rims and screw on lids until fingertip tight. Place jars in water bath canner. Make sure the water covers the jars by 1-2 inches. Place lid on canner, and start timing when water returns to the boil. Process for 15 minutes. Remove jars from canner and place on a cooling rack or towel, in a draft free area. Once cooled, check the lids to make sure they are sealed. Remove bands and wipe down jars. Label and store. Makes about 9 pints.
Times and procedures all used NCHFP guidelines.
Jars cooling down
Lilac Jelly
Lilac Jelly
This time of year, I always gather lilacs and make lilac vinegar with them. It’s easy to do. You just put lilac blossoms in a jar and cover them with vinegar. I use a cup of vinegar for every cup of flowers. I let the mixture steep for a week or longer and then strain out the blossoms. Any 5% strength vinegar works fine. I kind of like apple cider vinegar.
I decided to use some of this mixture to make jelly this year. The color of the vinegar is a light pink color. The cooking process changed it somewhat and it came out a light honey color. Very pretty. By using vinegar as the base, the jelly has a nice combination of tartness with the sweet. I could see using it on toast or as a glaze for meats.
You can use the same recipe for violets and roses.
Lilac Jelly
3 1/2 cups lilac vinegar
1/2 c. lemon juice
1 package powdered pectin
5 c. sugar
Wash and prep jars and get water bath heating up. Place violet vinegar in pan and add lemon juice and pectin. Bring mixture to a rolling boil over high heat. Add sugar and return to the boil. Stir often. Once mixture gets to a full rolling boil, boil 1 minute. Remove jelly from heat and skim off any foam. Ladle hot liquid into jars leaving 1/4 inch headspace. Wipe rims and adjust lids. Process in a boiling water bath for 10 minutes for 4 oz. and 8 oz. jars. Remove jars to cooling rack and check seals once they have cooled down. Yield: about 7 half pint jars or 13-14 (4 oz.) jars.
Blueberry Pie Filling
Blueberry Pie Filling
I don’t normally find myself making blueberry pie filling in March, but stuff happens. Sometimes really good stuff. After being gifted a large quantity of blueberries. I had to figure out what to do with them. My friend Mari, needed to free up some space in her freezer. She offered me some frozen blueberries. I didn’t ask her how many. I was delighted to find 5 (2 quart) bags of wild Maine blueberries!!! I didn’t have freezer space, either, so I knew I was going to can them. I made blueberry jam. I also decided to make pie filling.
There is something very satisfying in making your own pie filling. It is so much better than anything you would find in a can. It is a convenient ingredient to have on hand, too. A good quality pie filling can be turned into any number of desserts in no time- even pie!!
You do need to have Clear Gel to can pie filling. It is modified cornstarch. You can’t use regular cornstarch and you can’t use other thickeners. You could just can the berries, then thicken them later, but the Clear Gel makes it so much more convenient to use. I just order mine online, but it is available in some stores- primarily in Amish communities.
I opted to can my filling in pints. I find that size more convenient for me. Let the jars stay in the canner 5 or 10 minutes after they finish processing. It will reduce siphoning. Some foods, hot in the jars- will leak out of removed from the heat too quickly. Pie fillings are known for issues with siphoning.
Blueberry Pie Filling
6 qts. Blueberries
6 c. sugar
2 1/4 c. Clear Gel (modified cornstarch, not regular cornstarch)
7 c. water
1/2 c. lemon juice
Wash and drain berries. In large sauce pot combine sugar and Clear Gel. Stir in water and cook on high heat until mixtures bubbles and thickens. It is going to be really thick- don’t panic, just keep stirring so it won’t stick. Add lemon juice and boil 1 minute, stirring constantly. Fold in berries and ladle in hot, clean canning jars immediately. Leave 1/2 -inch headspace and remove any air bubbles with a knife. Wipe rims clean and put on lids. Place jars in boiling water bath and process for 30 minutes. Start timing when water returns to the boil. Turn off heat and let jars sit in the water bath 5-10 minutes before removing to counter to cool. Cool jars on counter on rack or towel, free from drafts. Check seals next day. remove rings and wipe down jars with a soft, damp cloth before storing. Makes 14 pints or 7 quarts.
Source NCHFP
Canning Pineapple
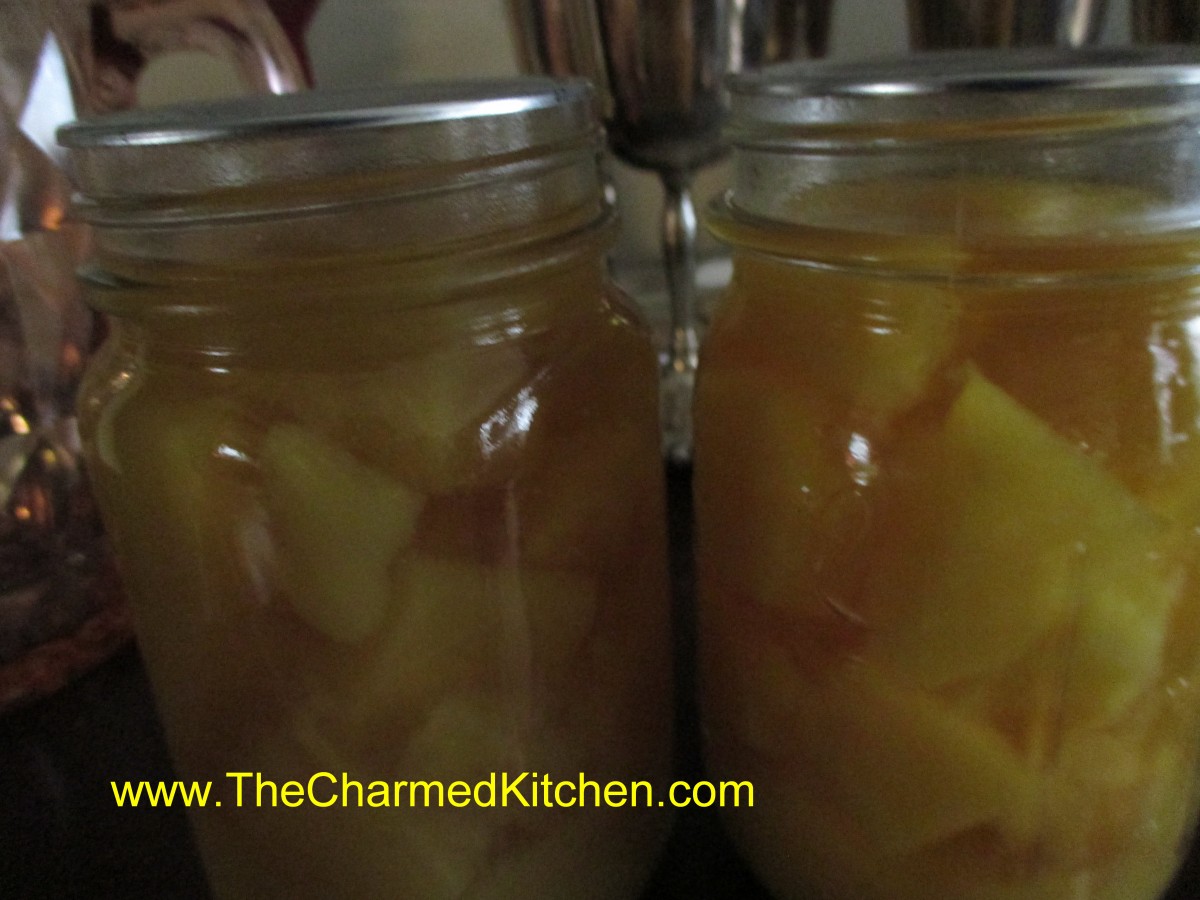
Canned Pineapple
In a canning class a few weeks ago I shared some home canned pineapple with the students. I had promised to share the recipe. It is really simple to do and a great way to take advantage of a good sale. I found pineapples on sale for a dollar and grabbed quite a few. I canned them in juice although you can use a light sugar syrup, if you prefer. I think they look and taste great. Here is the recipe.
Canning Pineapple
Wash pineapple. Peel and remove eyes and tough fiber. Slice or cube. Pineapple
may be packed in water, apple juice, white grape juice, or in very light, light, or medium syrup. In a large saucepan, add pineapple to syrup, water, or juice, and simmer 10
minutes. Fill hot jars with hot pieces and cooking liquid, leaving 1/2-inch headspace. Remove air bubbles and adjust headspace. Wipe rime with dampened paper towel and apply lids and bands. Process in a boiling water bath. Pints 15 minutes, quarts 20 minutes.
Altitude adjustment- 1,001-6,000 ft. pints 20 minutes, above 6.000 ft. 25 minutes. Quarts 1,001-3,000 ft. 25 minutes, 3,001-6,000 ft. 30 minutes. Above 6,000 ft. 35 minutes.
Source. NCHFP


