Strawberry Chocolate Crepes
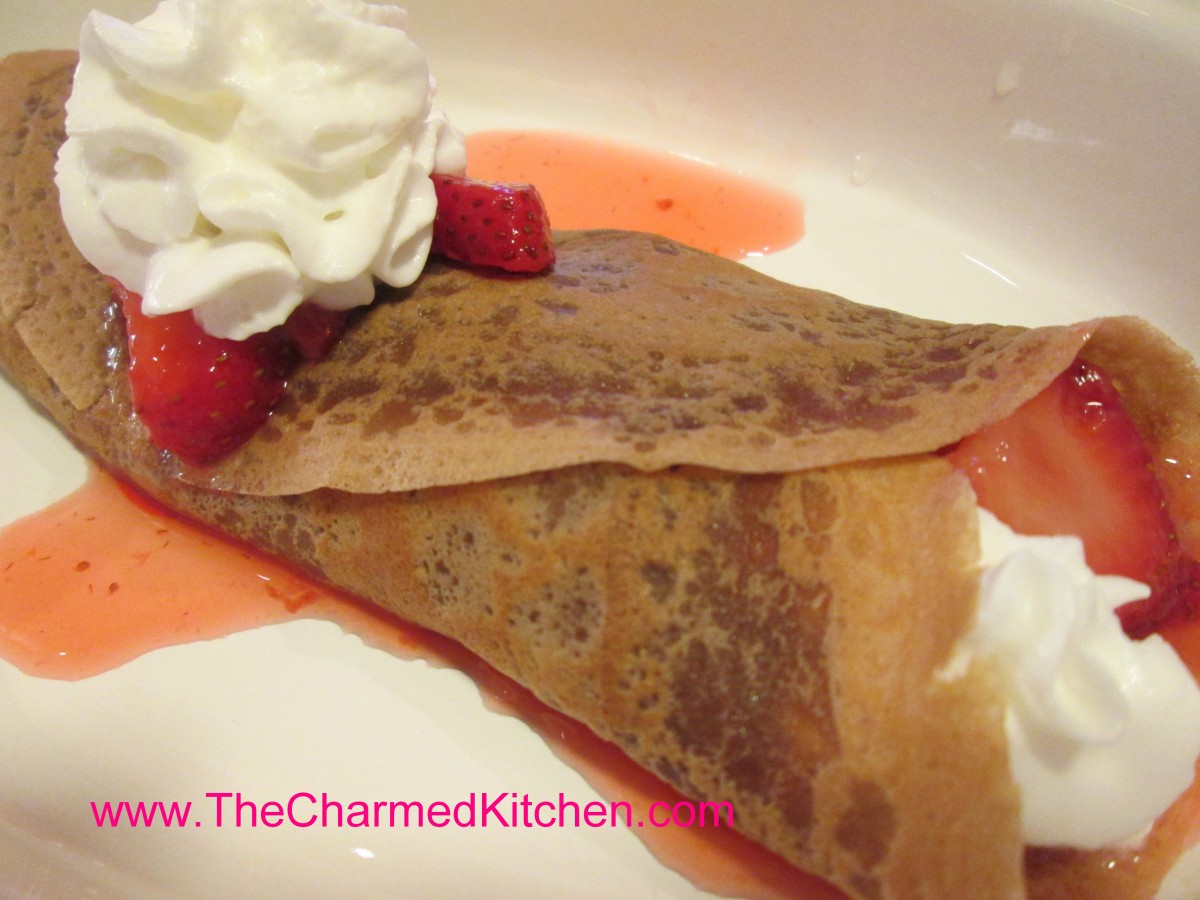
Chocolate Crepes with Strawberries
Since strawberries are in season, I am sharing a lot of my favorite strawberry recipes. This is one of my favorites. The chocolate crepes pair so nicely with the fresh berries.
If you haven’t made crepes, this might be just the reason to start. I often make a double batch of the crepes, then freeze some, between layers of wax paper. That way I can have crepes whenever I want.
Truth is, you can fill these crepes with all sorts of stuff. I had fresh berries, so that is what I used. I added some Kahlua to the batter for a little extra flavor and it worked out just great.
You can have all the components ready, then just assemble when ready to serve. Such a lovely dessert.
Here is the recipe.
Chocolate Crepes
1 c. flour
4 eggs
1 1/2 c. milk
¼ c. cocoa
3 T. sugar
¼ c. Kahlua or other coffee flavored liqueur or ¼ c. strong coffee
1/4 c. butter, melted and cooled
Mix all ingredients in blender (except butter) until smooth, scraping sides often. Add butter and blend well. Let stand for 30 minutes before using, or batter can be refrigerated, covered, overnight. Beat again, just before using.
Heat 6 or 7 inch skillet. Brush with butter or oil and pour in about 1 tablespoon of batter, tipping pan to cover bottom of pan completely with batter. Cook until edges start to brown, turn over and cook until lightly browned (about 2 minutes per side.)
Crepes can be made day ahead or even frozen between sheets of waxed paper and frozen. Makes 18.
Strawberry filling: I just sliced a couple of pounds of berries and added a little sugar- about ½ cup- a tablespoon of vanilla and a healthy dash of cinnamon.
When filling the crepes I spooned some berries down the center of the crepe and added some whipped cream. Folded over, topped with a few berries and another bit of whipped cream.
Homemade Chocolate Eclairs
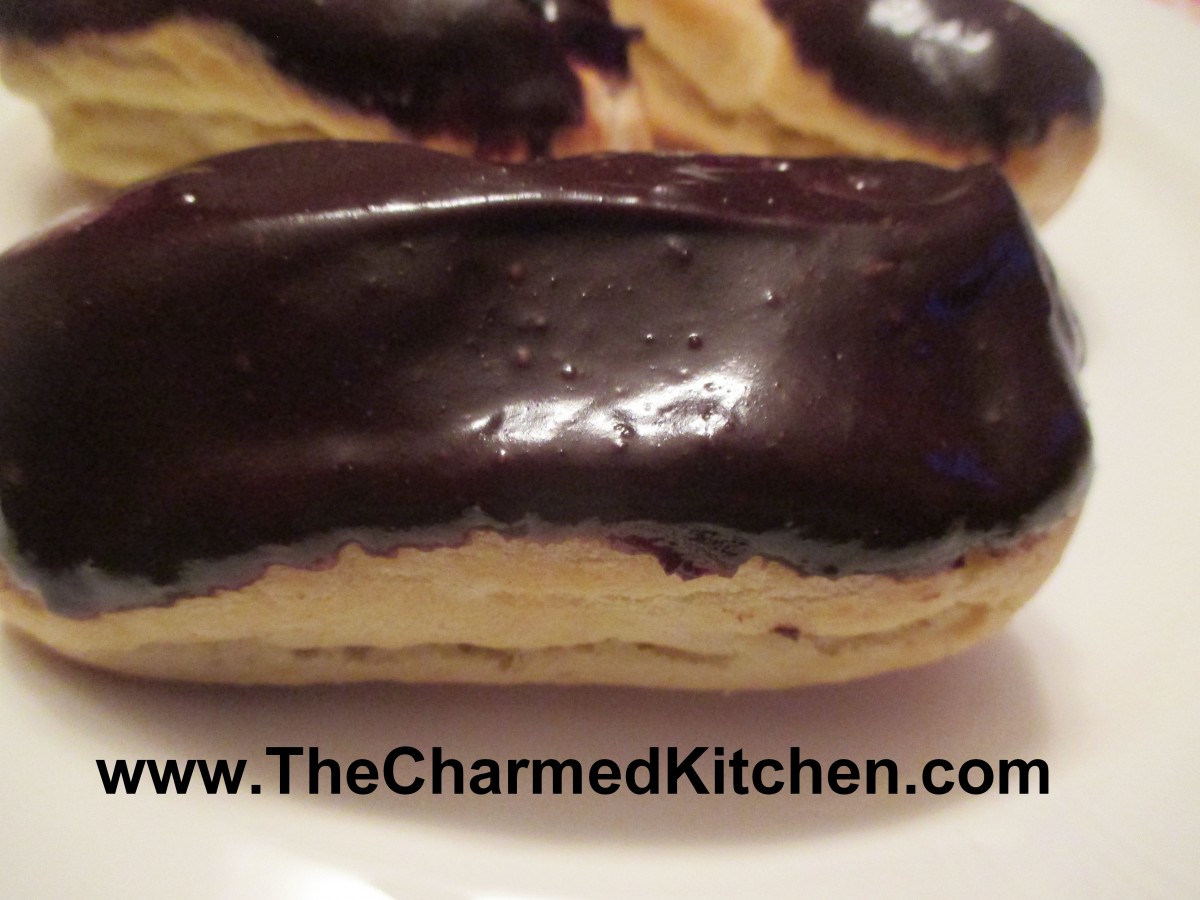
Homemade Mini Chocolate Eclairs
If you want to surprise someone with a very special sweet treat, you could make eclairs. These are a bit or work, but the end result is so wonderful. I think they are worth the effort, especially for special occasions.
I decided to make a mini version this time. Not everyone wants to eat a full size eclair, especially after a big meal.
You start by make a pate a chou, or cream puff pastry. This is the same dough used to make cream puffs. It is a combination of water, butter, milk and flour- cooked on top of the stove, then enriched with the addition of eggs. The dough is piped onto baking sheets and baked until puffed, golden and crisp. Once cooled, they are filled with sweetened whipped cream or, more traditionally, a custard filling, then topped with chocolate ganache.
Homemade Mini Eclairs
1 recipe Cream Puff Pastry (Pate a Chou)- recipe follows
Egg custard- for filling, or sweetened whipped cream- recipe follows
Chocolate Ganache- for topping- recipe follows
Start by making the dough. This recipe will make 12-18 medium eclairs or 3 dozen of the mini ones.
Cream Puff Pastry
¾ c. water
¼ c. milk
¼ t. salt
½ c. (1 stick) unsalted butter
1¼ c. flour – unbleached or bread flour preferred
4 large eggs
Extra milk for brushing
In saucepan, heat together water, milk butter and salt into a full boil. Butter has to be melted. While stirring, dump flour into saucepan, stirring constantly. Mixture will form into a ball. Reduce heat to medium and continue cooking dough, while stirring, for another minute or two. Place dough in an electric mixer and allow it to cool down a little before adding the eggs. Mixture has to be at 140 degrees F, or below, before you start adding the eggs. I use the paddle attachment and beat the dough before adding the eggs. This cools the dough down faster. Beat in eggs, one at a time, until each is fully incorporated. Beat until dough is shiny. A spoon, lifted out of the batter, should leave a peak that does not fall down.
Preheat oven to 425. Line a baking sheet with foil or parchment. I used a silicone liner and was happy with the result. Don’t grease the pan. Using a piping bag, squeeze the dough into 2-3-inch strips on the baking sheet- leaving a little room in between. Strips should be about ¾ -inch in diameter. Using a little milk on your finger, smooth down any peaks on the puffs. They should resemble miniature hot dog buns. Bake at 425 for 10 minutes, then turn oven down to 375. Bake eclairs 10 more minutes, or until golden brown. Tap the shells. They should sound hollow. Turn off the heat and leave oven door open a crack, allowing them to dry completely. Cool before filling. Makes about 36.
Custard Filling
2 cups milk
2 tablespoons cornstarch
1⁄3 cup sugar
2 eggs, lightly beaten
1 teaspoon vanilla
Using a whisk, combine milk, sugar and cornstarch in a medium saucepan over medium heat on stove top. Allow milk to scald (heat to the point when tiny bubbles form around edges of pan). Whisk occasionally to prevent cornstarch from clumping on bottom edges of pan. Remove milk mixture from heat, preferably to a burner that’s turned off.
Mix about 2 tablespoons of scalded milk mixture into eggs using whisk, then introduce eggs into milk mixture in a slow stream, whisking milk mixture constantly. Immediately return pan to heat and whisk gently until custard thickens, another two or three minutes. Do not allow to boil. (If you find that you have egg white strands in custard, feel free to pass it through a fine-mesh sieve into a different bowl now.) Remove pan from heat and stir in vanilla. Cool before using. Makes 3 cups.
To fill the eclairs, using a small piping tip with a pastry bag, filled with the custard. Squeeze filling in on one end, on through the bottom, squeezing until it seems full.
Once eclairs are filled, top with a chocolate ganache. I just dip the tops of the eclairs in the warm ganache and chill until chocolate sets. Filled eclairs should be stored i8n fridge until ready to serve. They can be frozen.
Chocolate Ganache
4- 6 oz. dark chocolate, chopped- or 1 cup chocolate chips
2 oz. heavy whipping cream
In saucepan, heat chocolate and cream together until just heated through. Remove from heat and stir until smooth. You can also do this in a microwave safe bowl, in the microwave for about a minute. Remove and stir until smooth. Makes 1 cup.
Chocolate Crepes
Chocolate Crepes with Strawberries
If you are looking for a special dessert for Valentine’s Day, you might want to make these chocolate crepes. I love crepes and this recipe is one of my favorites. The chocolate crepes pair nicely with fresh berries.
If you haven’t made crepes, this might be just the reason to start.
I often make a double batch of the crepes, then freeze some, between layers of wax paper. That way I can have crepes whenever I want.
Truth is, you can fill these crepes with all sorts of stuff. I had fresh strawberries, so that is what I used. Ice cream would make a nice filling, too. A mix of berries would also be fun.
I added some Kahlua to the batter for a little extra flavor and it worked out just great.
Here is the recipe.
Chocolate Crepes
1 c. flour
4 eggs
1 1/2 c. milk
¼ c. cocoa
3 T. sugar
¼ c. Kahlua or other coffee flavored liqueur or ¼ c. strong coffee
1/4 c. butter, melted and cooled
Mix all ingredients in blender (except butter) until smooth, scraping sides often. Add butter and blend well. Let stand for 30 minutes before using, or batter can be refrigerated, covered, overnight. Beat again, just before using.
Heat 6 or 7 inch skillet. Brush with butter or oil and pour in about 1 tablespoon of batter, tipping pan to cover bottom of pan completely with batter. Cook until edges start to brown, turn over and cook until lightly browned (about 2 minutes per side.)
Crepes can be made day ahead or even frozen between sheets of waxed paper and frozen. Makes 18.
Strawberry filling: I just sliced a couple of cups of strawberries and added a little sugar- about 1/4 cup, a teaspoon of vanilla plus a dash of cinnamon.
When filling the crepes, I spooned some berries down the center of the crepe and added some whipped cream. Folded over, topped with a few berries and another bit of whipped cream.
Giant Peanut Butter Cup
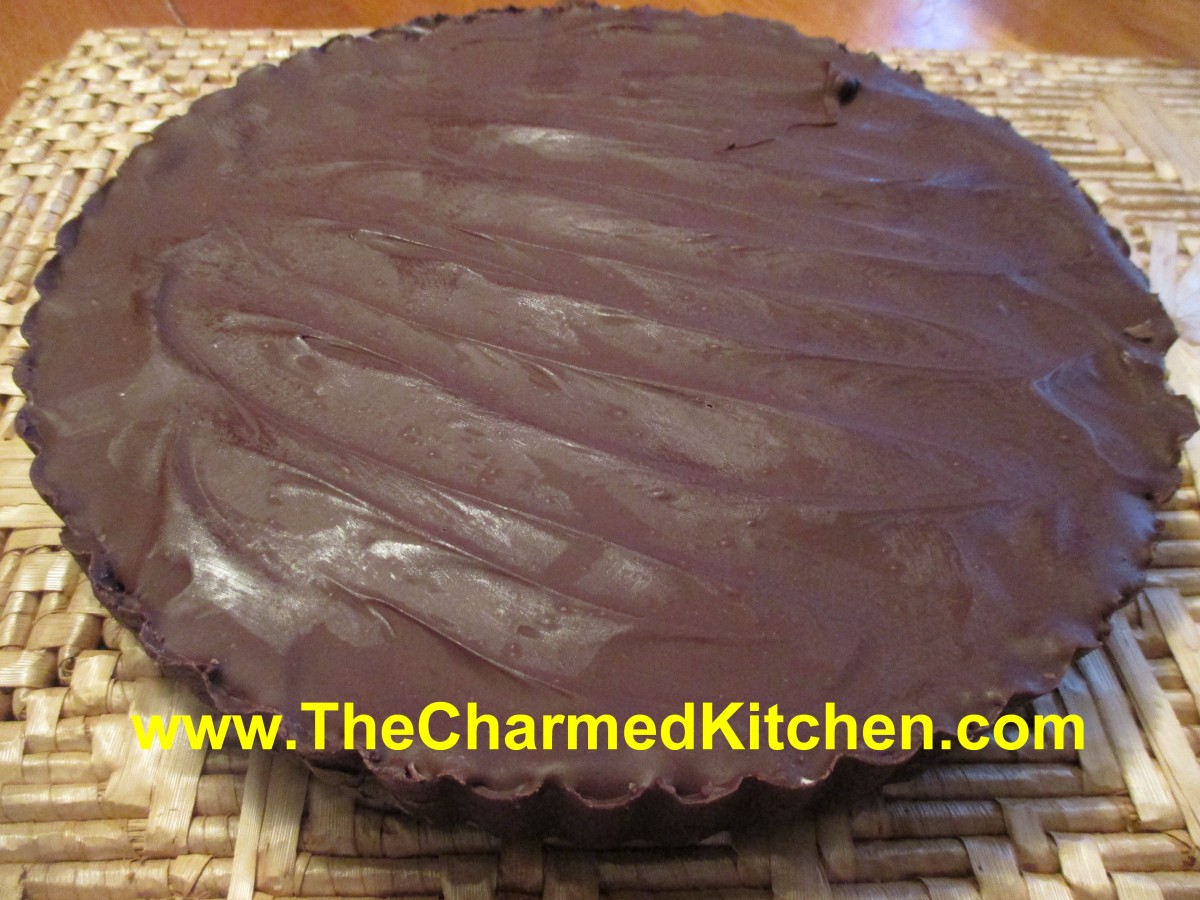
Giant Peanut Butter Cup
If you are looking to make something special for Valentine’s Day this year, you might want to try your hand at making a giant peanut butter cup. It takes a bit of effort, but is not really hard to make.
I’ve made small ones in the past, so I knew the basic structure. Using a 10-inch tart pan offered different challenges, but I went ahead and gave it a try. I wasn’t worried about the components. I had good quality dark chocolate and peanut butter. I knew it would taste good. I wasn’t sure it would stay in one piece.
It worked, and here is the result. I used a pretty good amount of chocolate. You could probably use less, but I wanted the chocolate thick enough on the bottom the make it sturdy. I also used a slightly altered version of the filling I use when I make buckeyes. I am pleased with how it came out.
Here is how I did it.
Giant Peanut Butter Cup
1- 1½ lbs. chocolate – I used a nice quality dark chocolate
1½ c. peanut butter
1 stick (½ cup ) butter, softened
2 ½ c. powdered sugar
2 t. vanilla
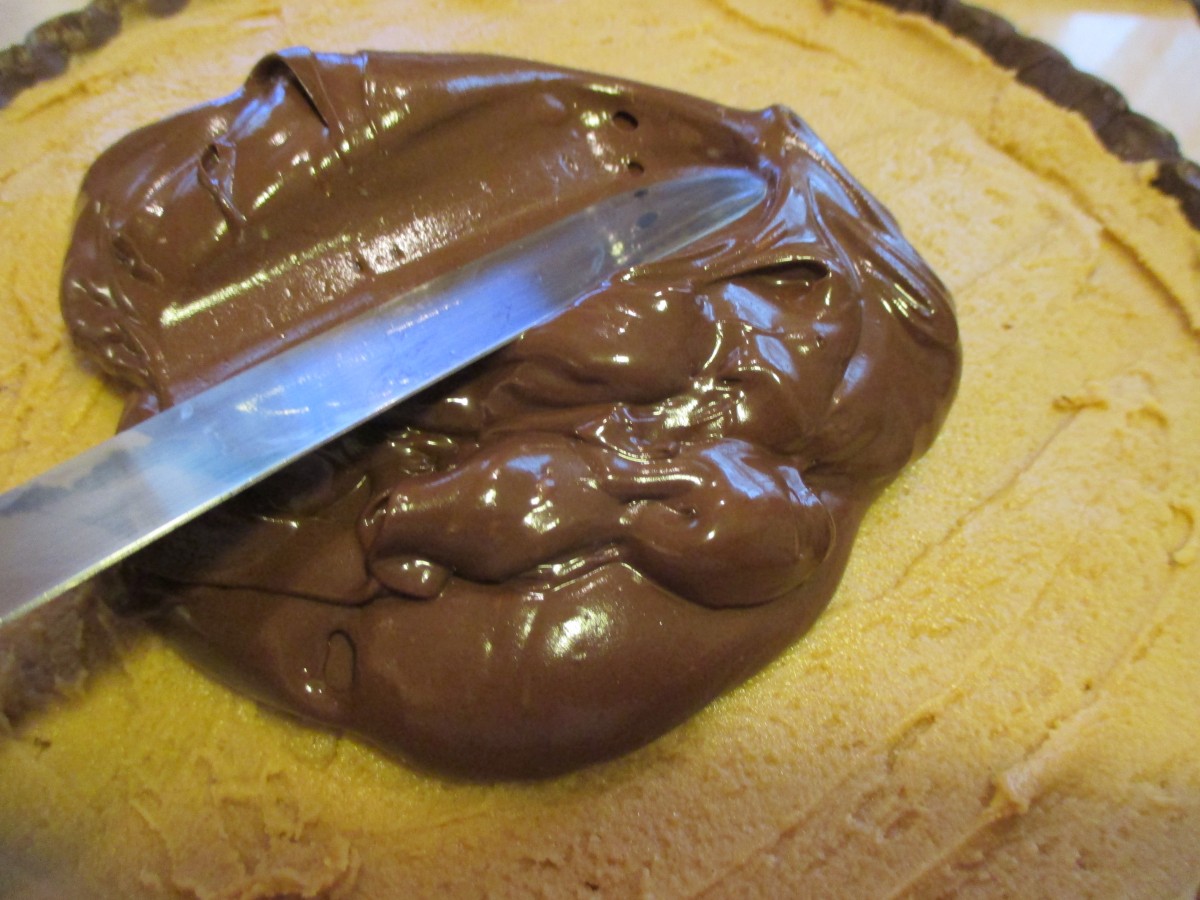
You will need a tart pan with a removable bottom. I used a 10-inch pan, but a 9- inch pan would work, too. Cover the removable bottom of the tart pan with wax paper. It will make it easier to get the thing out in one piece later. I cut out a square and just folded the extra wax paper under the pan and taped it down. Melt the chocolate and pour enough of it into the bottom of the tart pan that you can cover the bottom generously. Use a small spoon to push chocolate up the sides of the pan.
Now at this point you could just keep tipping the pan to get the chocolate evenly coated inside. I know my limitations. I just pictured myself dropping the pan of melted chocolate, so I used the spoon method instead. The important thing is that the entire inside gets a coating of chocolate. Place pan in fridge to cool and chocolate to set up. Meanwhile, in medium bowl mix peanut butter and butter together until well mixed. Stir in sugar and vanilla and mix until smooth. Spread this mixture over the chocolate shell. Don’t press too hard. You don’t want to break the shell. I will confess that before I added the peanut butter, I played around with loosening the chocolate shell. I was worried it would not come out later. After I added the peanut butter mixture, I put it back in the fridge to firm up. Once the peanut butter mixture was chilled, I melted the rest of the chocolate and poured it over the top.
I used a lot of chocolate in the base and needed to melt more chocolate than I originally planned on. I do think the thicker shell helped when it came time to get it out of the tart pan.
To remove the peanut butter cup- make sure it is completely hardened. I gently pulled at the sides all around the edges of the tart pan, to loosen it. Then I pushed up on the removable bottom of the pan. After a few gentle pushes, it came out. I had to trim a little chocolate off the bottom when removing the wax paper, but it helped in getting the peanut butter cup out in one piece.
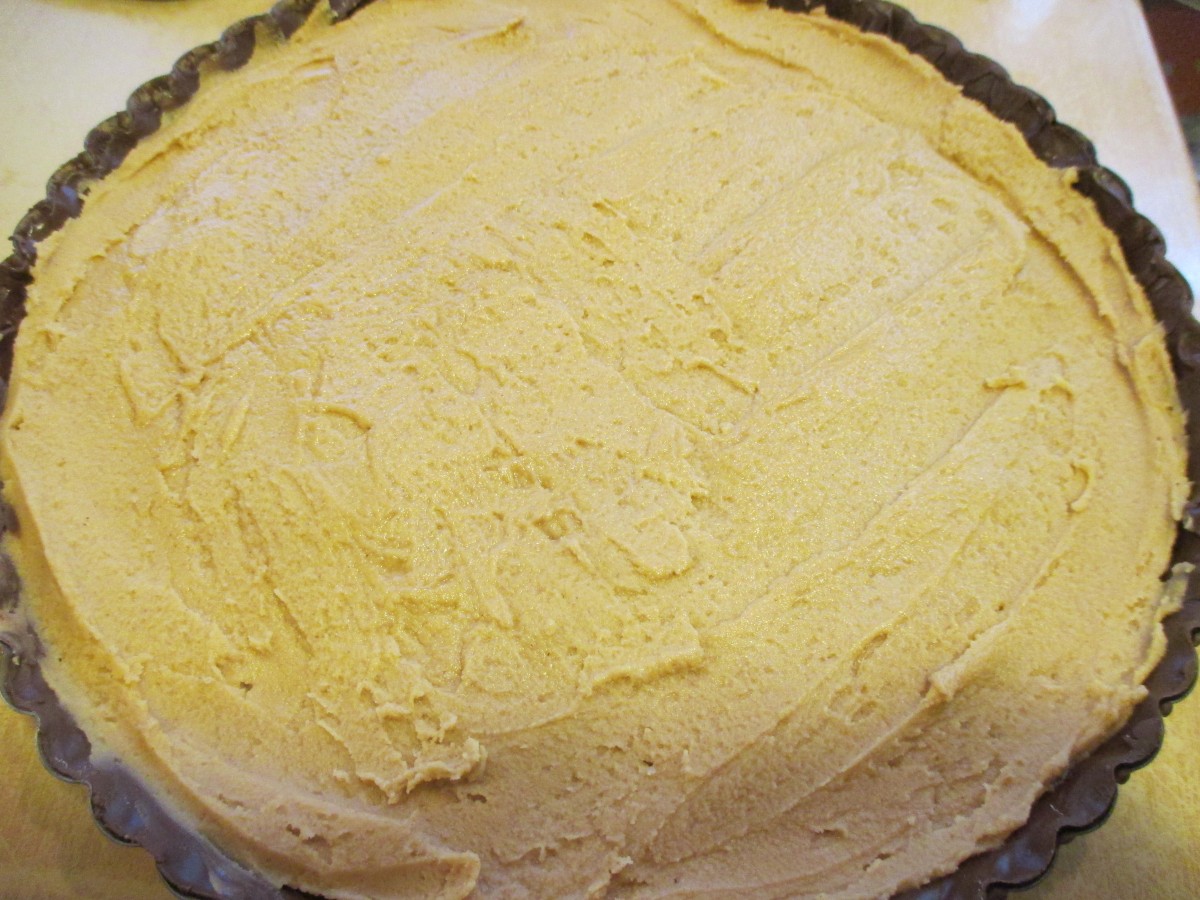
Spread peanut butter mixture over chocolate shell
Spread melted chocolate over peanut butter filling
Tiramisu Doughnuts

Tiramisu Doughnut
These doughnuts are inspired by the flavors of tiramisu, a traditional Italian dessert. They are a filled doughnut, like jelly doughnuts. I used the filling that I would normally use for making tiramisu. It is an egg custard, combined with mascarpone cheese and whipped cream. After the doughnuts are filled, they are topped with a mocha ganache. The end result is sublime.
I started making these doughnuts a few years ago. It was Fat Tuesday and I was making jelly doughnuts, a family tradition. Not everybody likes jelly doughnuts and I wanted to switch things up. As a kid, I loved the cream filled doughnuts my folks would make. I decided to use the filling recipe I used for tiramisu. To finish it off, a little coffee is added to the ganache to give it the flavors of classic tiramisu.
You do need to store finished doughnuts in the fridge, assuming any are leftover.
I won’t lie, these doughnuts are a bit of work, but worth the effort. Here is the recipe.
Tiramisu Doughnuts
Filling:
5 egg yolks
1/4 c. sugar
1/2 c. Marsala wine (not cooking wine)
2 c. whipping cream
4 T. sugar
1 lb. mascarpone cheese
Make zabaglione (egg custard). In double boiler, over simmering water, beat together egg yolks and sugar until lemon colored. Stir in Marsala and continue cooking, stirring constantly until mixture thickens and will mound on a spoon. This will take about 10 minutes. Remove from heat and cool down. You can place in bowl in fridge 30 minutes or so. Beat together whipping cream and sugar until stiff peaks form. Beat in mascarpone and chilled zabaglione. Chill 1 hour.
Dough:
4 c. flour
2 T. sugar
1 t. salt
½ c. butter
1 packet yeast
¼ c. warm water
2 t. sugar
1 c. evaporated milk
2 eggs, beaten
Combine flour with sugar and salt. Cut in butter and set aside. Dissolve yeast in warm water and 2 t. sugar and set aside. Combine milk with eggs. Stir in yeast mixture and add to flour mixture stirring well. On lightly floured surface knead dough until dough is smooth, about 5 minutes. Dough will be very sticky. Cover and let rise until doubled, about 1½ hours. Remove dough from bowl and punch down. Using about a third of the dough at a time roll dough out to about an ½ -inch thickness and cut out with a 2½ -inch biscuit cutter. Re-roll scraps and cut out. You should get about 2 dozen. Place dough circles on a floured surface and cover with a towel until doubled, about an hour. Heat oil in a deep pan until it reaches 375 degrees. Cook doughnuts a few at a time until golden on both sides, about 1 minute per side. Drain on paper towels and cool before filling.
Note: You can also refrigerate the dough after kneading it if you would prefer. Just place dough in an oiled bowl, cover with plastic wrap and chill overnight. Roll and cut dough into doughnuts when cold from the fridge. Allow to rise, covered, until doubled in bulk, about 2-3 hours. Fry as directed.
To fill doughnuts use a pastry bag fitted with a long tube tip for filling. I have these handy plastic syringes which are easy to use. Insert tube tip into doughnut and squeeze gently until doughnut is filled with cream (or jelly). Be careful not to overfill or doughnut will split. Once filled doughnuts can be frosted or topped with a sugar glaze. For the Tiramisu Doughnuts I made a mocha ganache.
Mocha Ganache
2 c. chocolate chips
1 c. whipping cream
1 T. instant coffee powder
Combine all ingredients in a microwave safe dish and heat in microwave for 2 minutes. Stir mixture until smooth and return to microwave if chocolate is not fully melted. Heat in microwave for 30 seconds more at a time, stirring after each time until mixture is smooth. For extra smooth mixture strain before using. Dip the top of the filled doughnuts in ganache.
Eva’s Kolachy
Eva’s Kolachy
Over the years, I have shared many of my family recipes. This is another family recipe- but not my family. Tia Houpt found this recipe when going through her Grandmother’s recipe collection. She was kind enough to share the recipe- and gave me permission to share it with you. Her grandmother was Eva Skero- so I have named the kolachy in Eva’s honor.
There is something special in having old family recipes. We find so many recipes online these days, we sometimes forget there was a time when recipes were handwritten. Often, they were stored in a drawer or in a shoe box. There is usually a mix of handwritten recipes and recipes cut out of newspapers and magazines.
Sometimes you just find a list of ingredients. Measurements aren’t always precise. A handful of this a pinch of that. The phrase moderately hot oven doesn’t real help, does it? And what exactly is a number 2 can? Still, there are some real gems in those collections.
This is one of those recipes.
I have made kolachy for years and have used the recipe for the crust that my mom used. I love my mom’s recipe. I love this recipe even more.
I was intrigued that the dough contains both baking powder and yeast. I had to make it, just to see what it was like.
The dough is tender and very easy to work with. It doesn’t get chilled. You just make the dough, then roll it out and make the cookies. I did let my butter soften a little before cutting it into the flour. I could see using cold butter instead.
The dough rolled out beautifully and baked up a perfect golden brown. I had to let them cool a bit before I could taste one. I am not kidding- they were heavenly. Tender and so flaky. Tia and I both see this as a very nice tart dough, too.
So here is Eva’s recipe. I hope you will give it a try. Thanks, Tia, for sharing it.
Eva’s Kolachy
Dough:
3 c. flour
1 t. baking powder
½ t. salt
1 c. butter*
3 eggs
2 pkts. Yeast
½ c. warm milk
Filling:
Assorted pie fillings, jams, sweetened cream cheese or ricotta cheese You will need about three cups of filling.
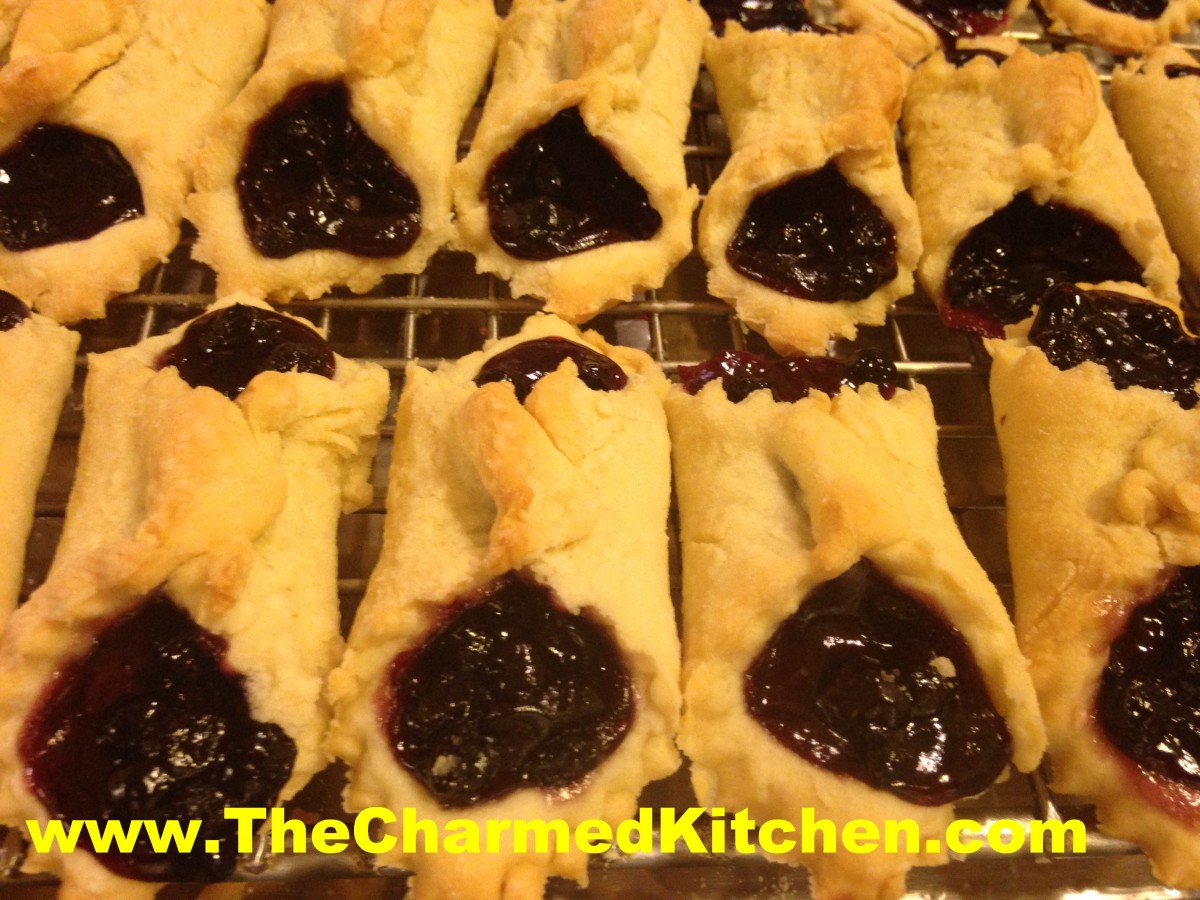
In mixing bowl, combine flour with baking powder and salt. Cut butter into flour until mixture looks like coarse crumbs. Set aside. Place eggs in a small bowl and beat until smooth. In small bowl, dissolve yeast in warm milk. Add to egg mixture and stir to combine. Add egg mixture to flour mixture and stir until combined. If mixture is sticky add a small amount of flour. Roll dough out on floured board. Thinner the better, as this dough will puff some when baked. Cut into squares- or whatever shape you like. I did 2-inch squares. Place a spoonful of filling into center of each cookie. Fold up two of the corners and press firmly to seal. Fold over and press seam again. These like to pop open when baking, so the second fold over and pressing helps them to stay closed. Some people like to add a bit of egg wash or milk to the tops to help them seal better. I just squeeze together and fold twice. Place cookies on an ungreased baking sheet, about an inch apart. Bake in a preheated 350 degree oven for 20 minutes, or until golden brown. Cook on a rack. Dust cooled cookies with powdered sugar or with a powdered sugar glaze. Makes about 5-6 dozen.
*The original recipe called for shortening. Tia and I both decided butter was better!! That is the only change we made to Eva’s original recipe.
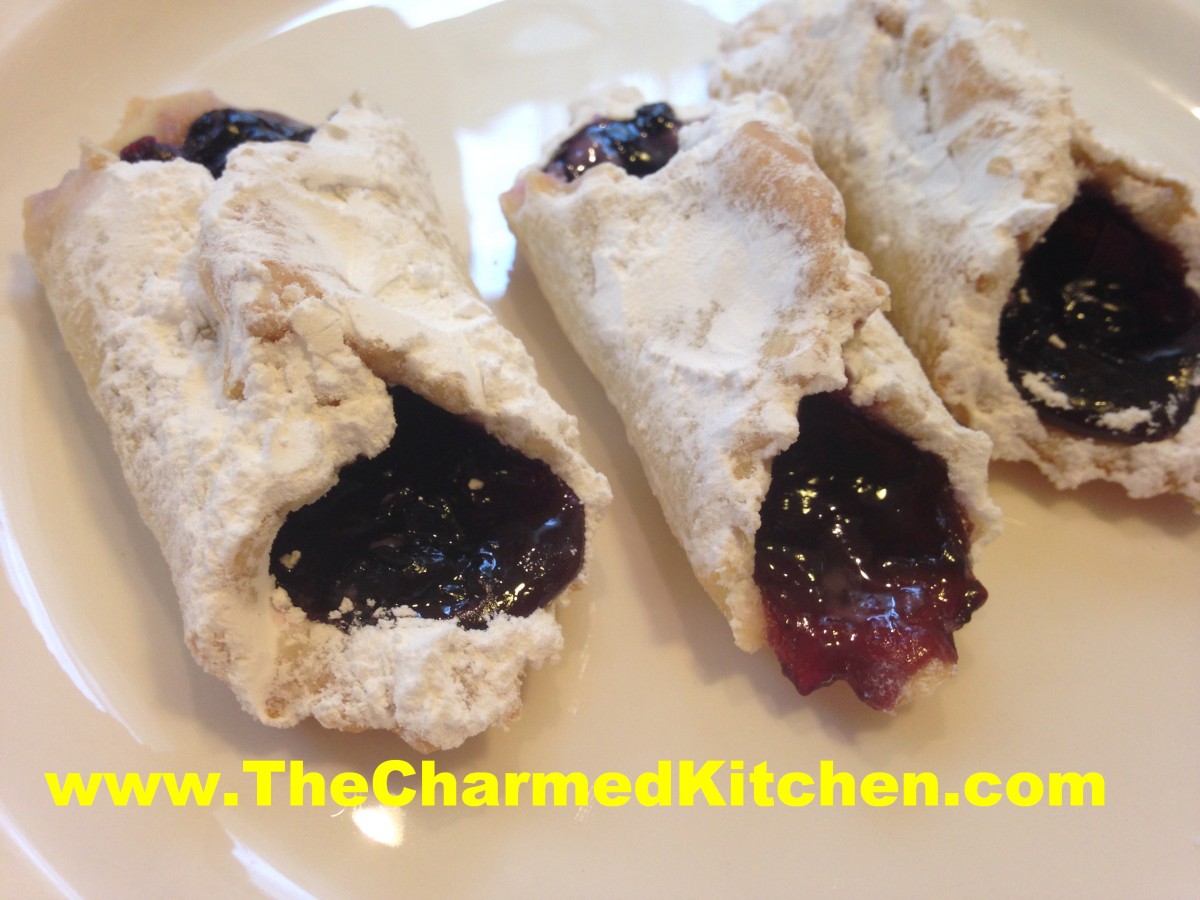
Cooled and dusted with powdered sugar
This post is dedicated to Eva Skero and all the home cooks out there who lovingly kept their recipes for us to find.
Lemon Tart

Lemon Tart
I wasn’t sure what to call this dessert. It started out as one thing, but sort of ended up somewhere else. I finally decided to just call it a tart. I’ll explain.
I was leaning towards making a cheesecake. I needed to make dessert for a dinner. Everybody loves cheesecake, right? I already had cookie crumbs, I could use for the crust. Then, I discovered I only had one box of cream cheese. Not enough for a cheesecake.
While searching my fridge for cream cheese, I found a couple of lemons.
I suppose I could have made a lemon pie, but I decided to just make something up with what I had, including the cream cheese. What I ended up with is a sweet/tart lemon dessert. Really nice, actually.
Before I get to the actual recipe, let me talk about the lemons, and including fresh lemon juice in recipe directions.
Recipes will often list the “juice of a lemon” in the ingredients. There is about the same amount of lemon juice in all lemons, so that a little difference, one way or the other, is no big deal. The amount is anywhere from 2-3 tablespoons of juice in a lemon. You might get 4 tablespoons, if the lemon is really big. I have used that phrase in recipes myself.
Sometimes, however, you have to recognize when you have lemons that aren’t “average”.
The two lemons I had on hand were big, really big. When I juiced them, I ended up with 2/3 of a cup of lemon juice. So, in this recipe I used the actual measurement of the juice, rather than saying, “the juice of 2 lemons.” Three or four average sized lemons should give you 2/3 cup of juice.
So here is the recipe for my lemon tart, the happy end result of using what I had, and making it work.
Lemon Tart
Crust:
1½ c. crushed vanilla cookies
4 T. melted butter
Filling:
1 (8oz.) container cream cheese, softened
½ c. sugar
2/3 c. lemon juice
Zest of two lemons
3 eggs
¼ c. cornstarch
Combine crust ingredients in medium bowl. Press crumb mixture into a 9 –inch springform or tart pan. Bake in a preheated 350-degree oven for 10 minutes. While the crust is baking, make the filling. In mixing bowl combine the cream cheese with the sugar and beat until fluffy. Add the lemon juice and zest and beat well. Add the eggs and cornstarch and beat until smooth. Pour filling over the baked crust and return to oven. Bake for 35 minutes, or until golden on top. Center will be soft, but firms as the tart cools. Cool, then refrigerate until ready to serve. You can dust with powdered sugar, if you like.
Christmas Tree Coffee Cake
Christmas Tree Coffee Cake
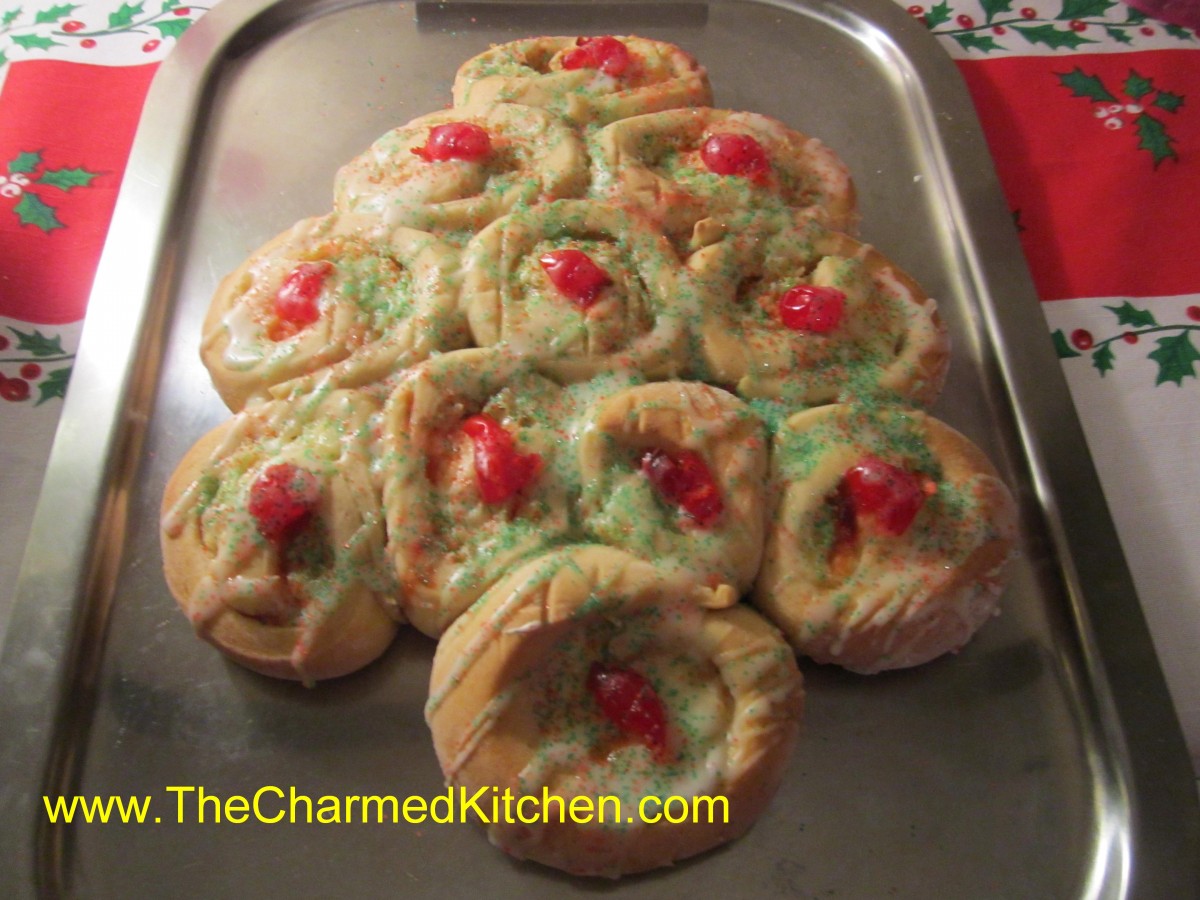
This Christmas “tree” has become a tradition around here. I make one as a gift for a dear friend every year. If you are looking for something to serve for Christmas morning, or even as a dessert option, I suggest you make this coffee cake. The recipe actually makes 2 “trees,” so you can have one to give- and one to keep. Or perhaps, one for Christmas Eve and one for Christmas Day.
The dough is prepared, then chilled before rolling. You can do that a day, or even two days, ahead of time. The rolls are filled with a pineapple and cream cheese mixture and are very tasty.
The rolls are arranged in a tree pattern before baking. Then, after baking, the “tree” is topped with a light glaze and gently sprinkled with red and green sugars. So pretty, and not that hard to make.
Here is the recipe.
Christmas Tree Coffee Cake
Dough:
4-4 1/2 c. bread flour
1/2 c. sugar
1 1/2 t. salt
2 packages active dry yeast
3/4 c. milk
1/2 c. water
1/2 c. butter
1 egg
Filling:
1 lb. Cream cheese, softened
1/2 c. sugar
1/4 t. nutmeg
dash salt
1/4 t. vanilla
1 (20 oz.) can pineapple in its own juice drained and squeezed dry
Topping:
11 Maraschino cherries, halved
2 c. powdered sugar
3 T. milk
red and green sugars
For dough in large mixing bowl combine 2 cups of the flour with the sugar, salt and yeast. Heat together the milk, water and butter until very warm. Add to flour mixture and beat 2 minutes. Add egg and 1 more cup of flour and beat 2 more minutes. Stir in enough of the remaining dough to make a stiff batter, about 1 cup. Cover bowl tightly with foil or plastic wrap and refrigerate for at least 2 hours or up to 3 days before using. For filling combine all ingredients for the filling except the pineapple and beat until smooth. Stir in pineapple and set aside until ready to use. Remove dough from fridge cut in half. Roll out one piece on lightly floured surface into a 10×11- inch rectangle. Spread with half the filling, leaving an inch at the end of 11-inch side. Roll up from eleven- inch side. Use thread or dental floss to cut through dough in 1-inch pieces by placing thread under roll and crossing ends. Pull outward and thread should cut through dough. If you aren’t having any luck you can always use a knife, but they tend to flatten the rolls. On a greased baking sheet arrange the slices (you should have 11) into a tree shape. Start with one on the top and then a row of 2 below then 3 and then 4. The last roll will serve as the trunk. Cover dough with plastic wrap and set in a warm place to rise. Repeat with the remaining dough and filling. When dough is risen, about 1-2 hours bake in a 375- degree oven for 15 minutes then cover edges with foil to prevent over browning and return to oven for 10 minutes more. Cool on wire rack. Place half a cherry in the middle of each roll. Make a glaze with powdered sugar and milk and drizzle over. Sprinkle with the sugars. Makes 2 trees, 11 rolls each. Can be frozen up to a month ahead . defrost in a 350 -degree oven for 10 minutes and apply toppings.
Mom’s Pumpkin Squares
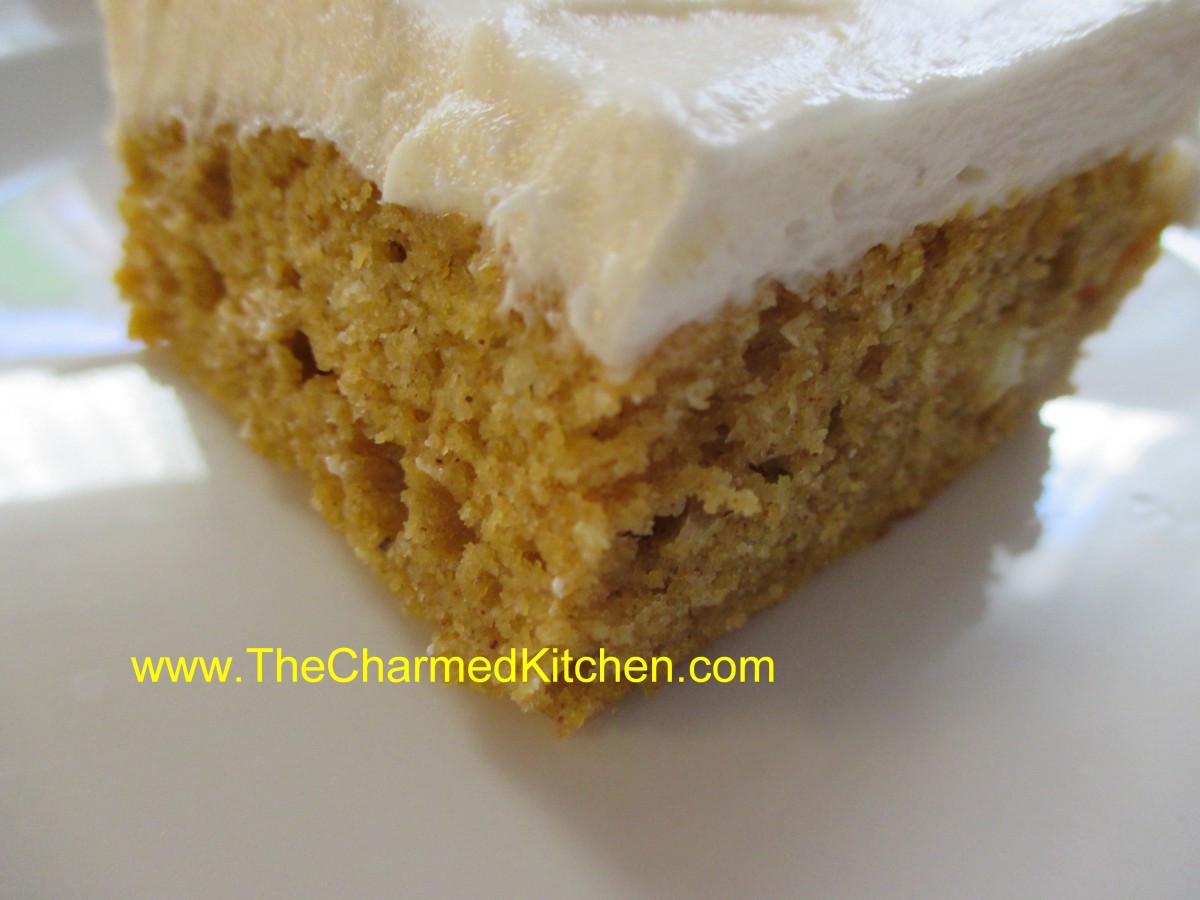
Pumpkin Squares
This recipe has been part of our family for years now. My mom made them for Thanksgiving every year- and I continue that tradition. Like my mom, I use fresh (or frozen) cooked pumpkin or winter squash. My mom didn’t care much for the taste of canned pumpkin. She would cut up the Halloween pumpkin, cook it, puree it and freeze it- so she could make pumpkin squares anytime she wanted.
The original recipe came from Bisquick, but it had 2 cups of sugar in it. My Mother’s sensibilities kicked in and she cut the sugar down to one cup. Great move on her part. The cake is still plenty sweet with less sugar.
It mixes and bakes up in no time. I normally top it with cream cheese frosting, but it would be good with a simple powdered sugar glaze, a buttercream frosting, or even just a dusting of powdered sugar mixed with a little cinnamon. The texture is moist and tender and I think you’ll enjoy it as much as I do.
Pumpkin Squares
1 c. sugar
½ c. oil
16 oz. cooked pumpkin, canned, fresh (preferred) or frozen
4 eggs, beaten
2 c. biscuit mix (homemade or Bisquick or Jiffy Mix)
2 t. cinnamon
½ c. raisins, optional
Grease a jelly roll pan and set aside. Preheat oven to 350 degrees. Beat first 4 ingredients for 1 minute. Stir in mix, cinnamon and raisins. Pour in prepared pan and bake 25-30 minutes. Test for doneness with a toothpick. Cool and frost. Frosted cake must be kept refrigerated between servings.
Frosting:
8 oz. cream cheese
2/3 c. butter
2 T. milk
2 t. vanilla
3 c. powdered sugar, or more
Beat together until smooth.
Apple Cider Sorbet

Apple Cider Sorbet
I’ve had my share of warm apple cider, but I never froze it before. This sorbet is such a nice dessert option. Light and naturally sweet, it is the perfect finish for any meal.
The cider is boiled down, to concentrate the sweetness. Then fresh apples are added and pureed. The mixture gets frozen, then pureed one more time- to really smooth out the texture. Cinnamon sticks impart their flavor when boiled in the cider. You could certainly used ground cinnamon, if you don’t have cinnamon sticks. Feel free to add other spices, too, like allspice, cloves or ginger.
Over the years, I have made all sorts of sorbets. I love the light, creamy texture. I am not sure why I never tried to make an apple sorbet before. I am so glad I finally did. So many holiday meals are heavy. This is a nice, lighter option for dessert. It is also a nice dairy-free option, for those who can’t have ice cream.
Apple Cider Sorbet
6 c. apple cider
2 (4-inch) cinnamon sticks
3 apples, peeled, cored and diced
In saucepan place cider and cinnamon sticks. Cook over medium high heat, uncovered, until cider has cooked down to 2 cups. Remove cinnamon sticks and discard them. Cool cider and combine in food processor with the apples. Puree until smooth. Transfer mixture to a container with a lid. Freeze until solid. Remove from freezer and allow to soften for a few minutes. Break into chunks and puree in processor, until smooth and creamy in texture. You can serve it right away, or return to freezer to enjoy later. Makes 1 quart of sorbet.


