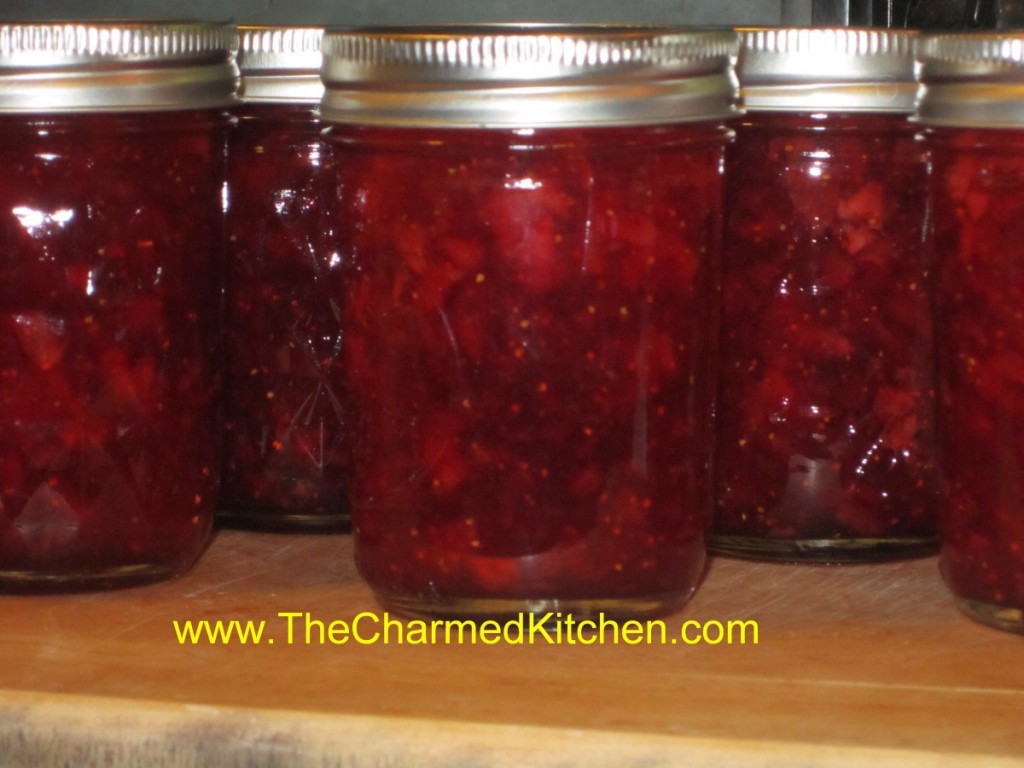
Spiced Cherries

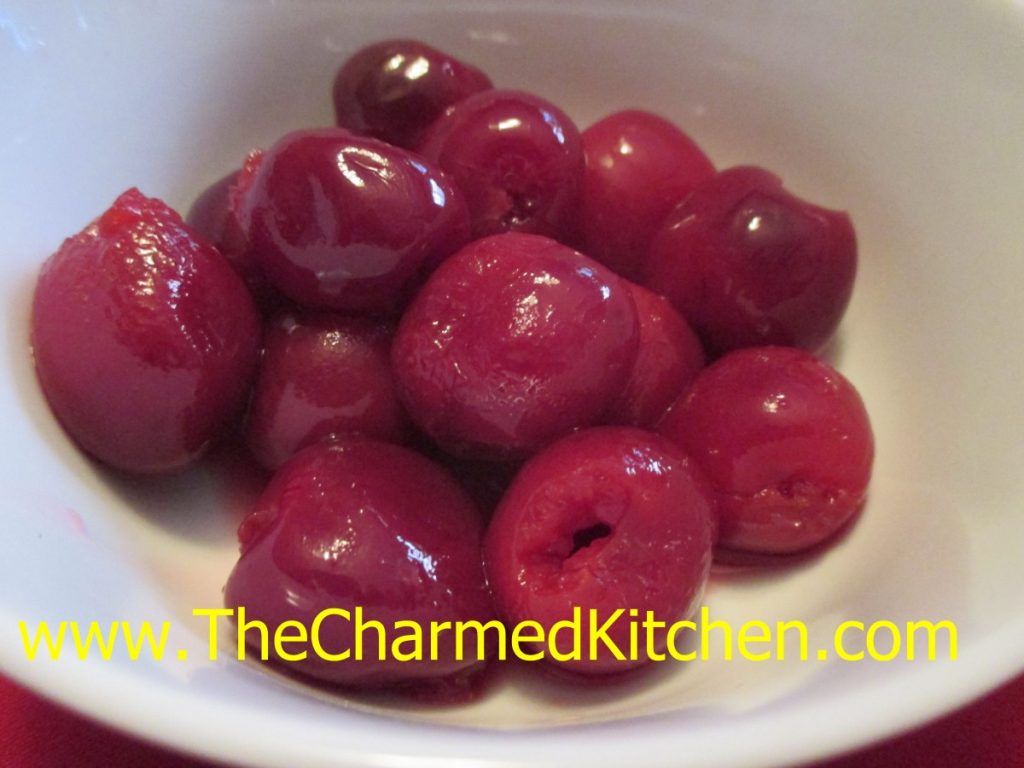
These cherries are so good, I am already wishing I had canned more of them. I was inspired by my cousin, Laurie, who needed spiced cherries for a recipe she wants to make. She’s making a cherry chocolate martini, in case you were curious.
I first thought about the spices I wanted to use. I didn’t want to overpower the cherries, but I wanted the spices to complement the flavor of the fruit. In the end I used cinnamon sticks, fennel seeds, fenugreek, cloves and some cracked black pepper. You certainly can play around with spices you use.
Once I decided which spices I wanted to use, I steeped them in boiling water. Kind of like making tea. Then I strained out the spices and used the spiced water in the syrup for the cherries. I could just have added spices to the cherries when I canned them, but I didn’t want stuff in the jars I would need to strain out later. I also knew the spices would get more intense over time, if left in the jars. By making a tea and tasting it, I knew what level of spice I would have in the final product.
The spiced cherries can just be eaten, right out of the jar. They can also be drained and added to fruit salads or used to top desserts. You can also use them to bake with. They aren’t overly sweet.
They would make nice gifts, too.
So here is my recipe for spiced cherries.
Spiced Cherries
7 (3-4 inch) cinnamon sticks
2 T. fennel seeds or 2 star anise
2 T. fenugreek seeds
1 T. whole cloves
1 T. cracked black pepper
5 c. water
11 lbs. sweet cherries, but sour cherries can be used
3¼ c. sugar
Zest of 2 limes or lemons
Juice of 2 limes or lemons
Place spices in a large pot and turn heat on to medium. Toast spices in pot for about 4-5 minutes, stirring occasionally. You should be able to smell them. Watch so they don’t burn. Add the water to the spices, bring to a boil, and simmer for at least 15 minutes. Longer cooking is fine. Fill water bath canner with water and heat up water to a simmer. In the meantime, pit the cherries. You should end up with about 4½-5 quarts of pitted fruit. You can hold pitted cherries in a bowl of water with a little ascorbic acid in it, to prevent browning. Set aside. Remove the spiced water from the heat. Strain out the spices and discard them. Measure the spiced water and add enough fresh water to equal 5 cups. Return water to pot with the cherries (drained if they were in water), sugar, zest and lime juice. Bring mixture to a boil. Fill pint jars with cherries and cooking liquid, leaving ½-inch headspace. Wipe rims and screw on lids until fingertip tight. Place jars in water bath canner. Make sure the water covers the jars by 1-2 inches. Place lid on canner, and start timing when water returns to the boil. Process for 15 minutes. Remove jars from canner and place on a cooling rack or towel, in a draft free area. Once cooled, check the lids to make sure they are sealed. Remove bands and wipe down jars. Label and store. Makes about 9 pints.
Times and procedures all used NCHFP guidelines.
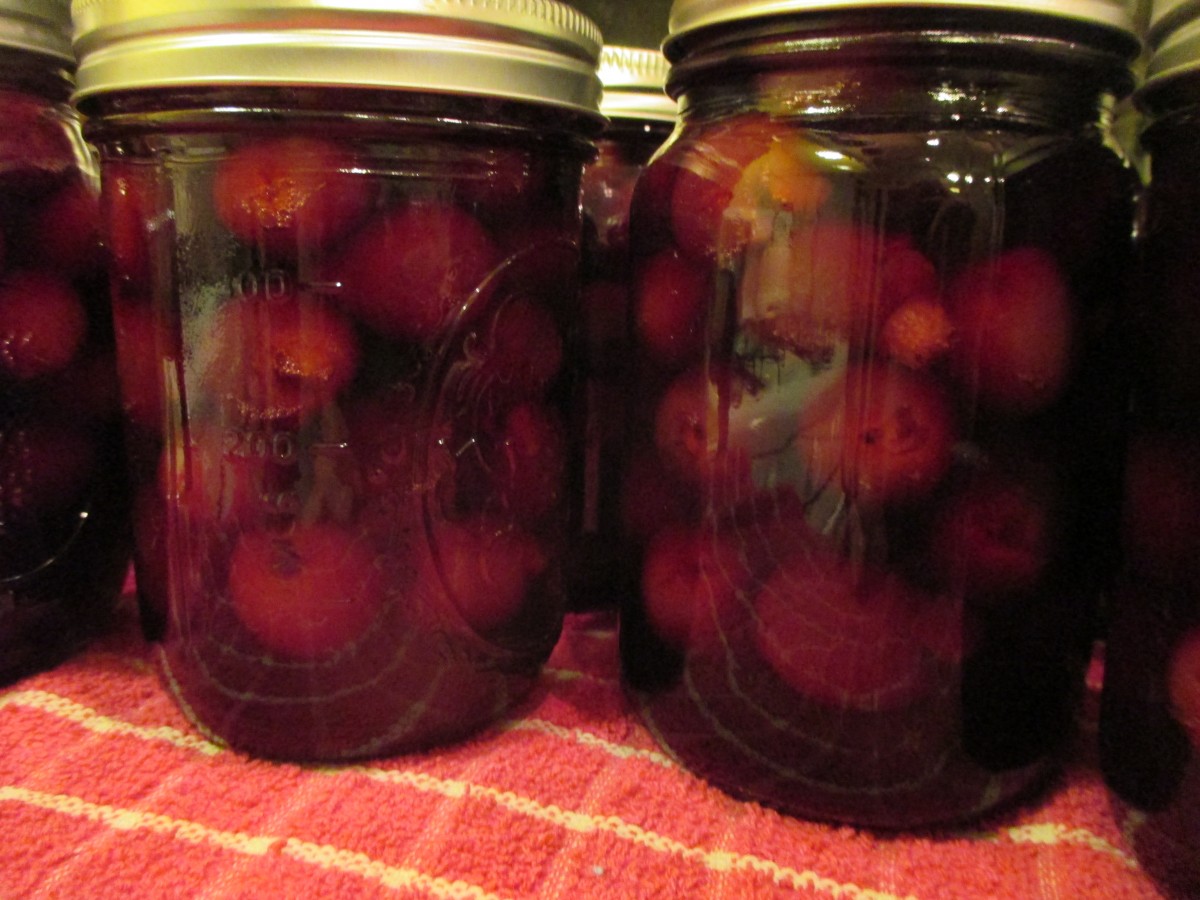
Jars cooling down
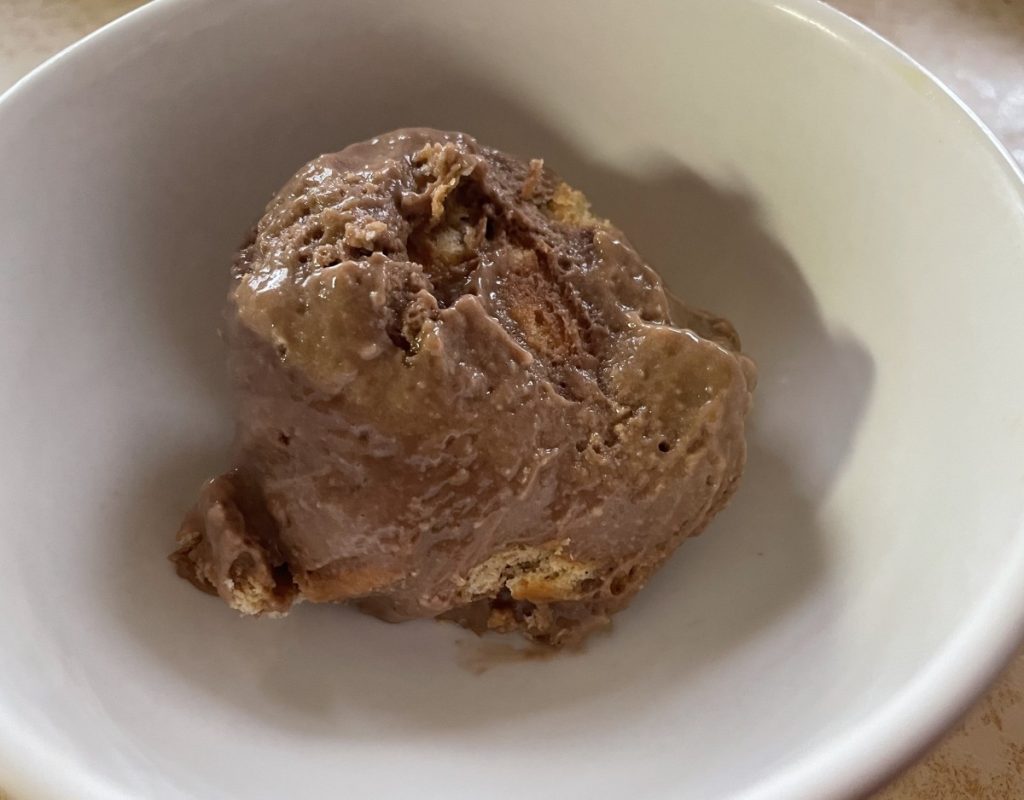
Chocolate “Magic” Shell

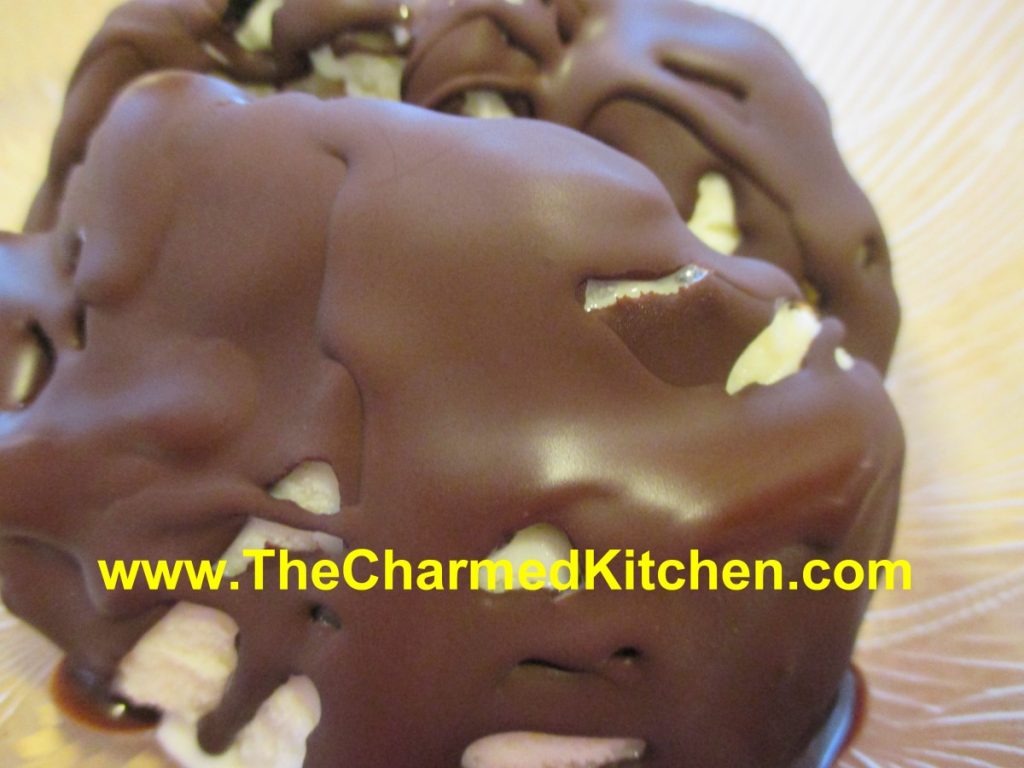
I used to love getting a chocolate-dipped ice cream cone when I was a kid. I still do.
The ice cream shop near my house had them. I watched as the soft serve was swirled onto the cone, then turned upside down and dipped into a vat of melted chocolate goodness. Like magic, the chocolate hardened, and made this lovely, crisp shell.
Then they came out with the squeeze bottles of the stuff. Just a drizzle onto your ice cream and the chocolate hardened like, well, magic.
There are a lot of recipes out there for “magic” shell. I tried a few. All tasted fine, but some just worked better than others. I played around and found the mix that worked best for me.
You store it at room temp, then drizzle on ice cream. In a few seconds, it hardens up.
It is very easy to make- just three ingredients. So easy- so good.
Homemade Chocolate Magic Shell
1 c. chocolate chips- I used dark chocolate chips
3/4 c. coconut oil- I used the unrefined
1/2 c. powdered sugar
Heat all together until melted. I melted mine in a microwave for 1 minute, but you could also melt over a double boiler. Stir until smooth. Store at room temp. To use, drizzle over ice cream, wait about 10-20 seconds- and it will harden.
Compound Butters

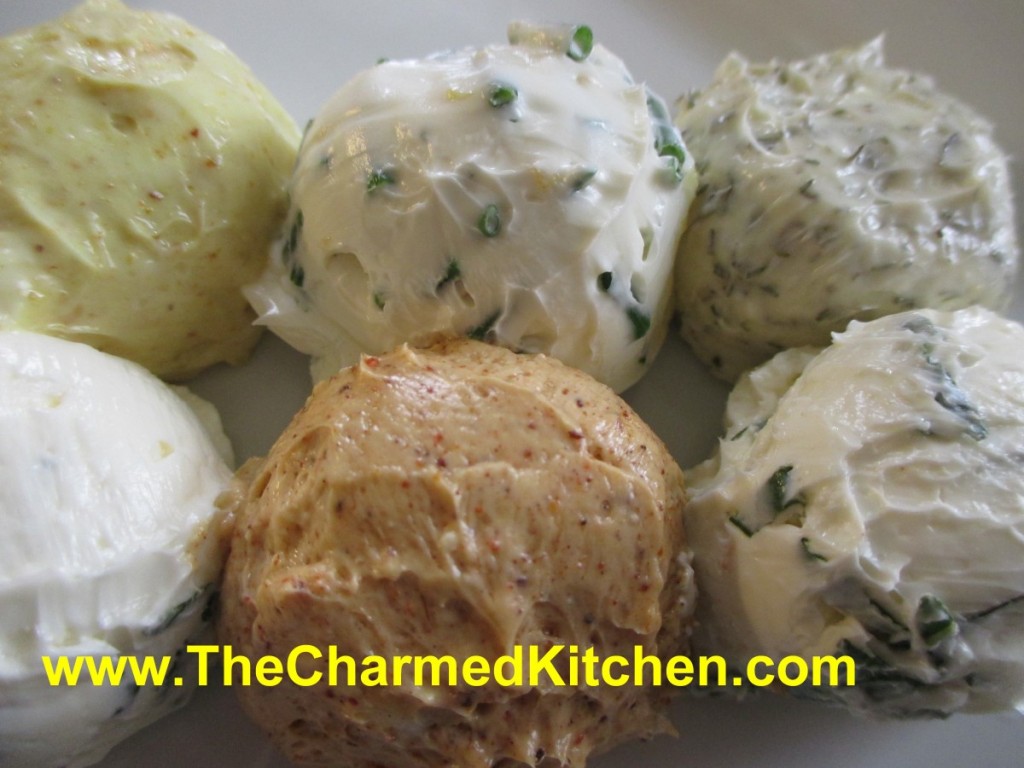
I enjoy making flavored, or compound butters, all the time. But even more so this time of year. My herb garden is growing wildly and there really is nothing better than the flavor of herbs, picked fresh out of the garden. Chop them up, add to some butter and you have a great spread for all sorts of foods. Now that local veggies are here, I have even more reason to make some herb and butter blends.
I like to make several batches, shape into rolls and wrap in plastic wrap. Now I can freeze them and just cut off a piece whenever I want. This is also a nice way to preserve some of this summer freshness for the cooler days ahead.
Herbal or spicy butters can add flavor to any meal. They can be used on breads, crackers, veggies, meats, or fish. Flavored butters can also be molded into shapes for special occasions. Here are the recipes for the butters in the picture.
Compound Butters
All recipes are for use with one stick (½ cup) butter.
Soften butter slightly to make mixing easier. Roll into logs, balls, or press into molds. Finished butters can be rolled in herbs, spices, or nuts for a decorative appearance. Chill several hours or overnight before using. Keep butter wrapped tightly in waxed paper for freshness. Let stand at room temperature 30 minutes before serving. Flavored butter keeps in the fridge for 1 – 2 weeks. Makes ½ cup.
Basil Butter: 3.T. finely chopped fresh basil leaves, 1 t. lemon zest, Excellent on pasta, bread and veggies.
Chive Butter: 3 T. snipped chives, ½ t. lemon zest. Good with fish, poultry, carrots, and potatoes.
Chili Butter: 1½ t. chili powder, ½ t. cumin, ½ t. garlic powder. This is good on breads, beans, grilled chicken, or popcorn.
Curry Butter: 1 t. curry powder, 1 t. fresh lime juice. Use on lamb, poultry, rice, and veggies.
Dill Butter: 2 T. fresh snipped dill, 1 – 2 t. fresh lemon juice. Good with chicken, potatoes, carrots, seafood, or rice.
Mint Butter: 2 – 3 T. fresh chopped mint leaves, 1 t. fresh lemon juice, ½ t. lemon zest. This is great with lamb, peas, chicken, or vegetables.
Parsley Butter: 2-3 T. chopped parsley, 2 t. lemon juice. Lovely on breads, veggies, seafood and chicken.
Sage Butter: 1 T. fresh sage leaves, chopped very fine, or 1 t. dried sage, 1 t. each lemon juice and lemon zest. This is excellent with chicken or pork dinners. Great on breads and rolls, too.
Thyme Butter: 2T. fresh thyme leaves, 1 t. lemon zest. For veggies, meats breads.
Firecracker Chicken

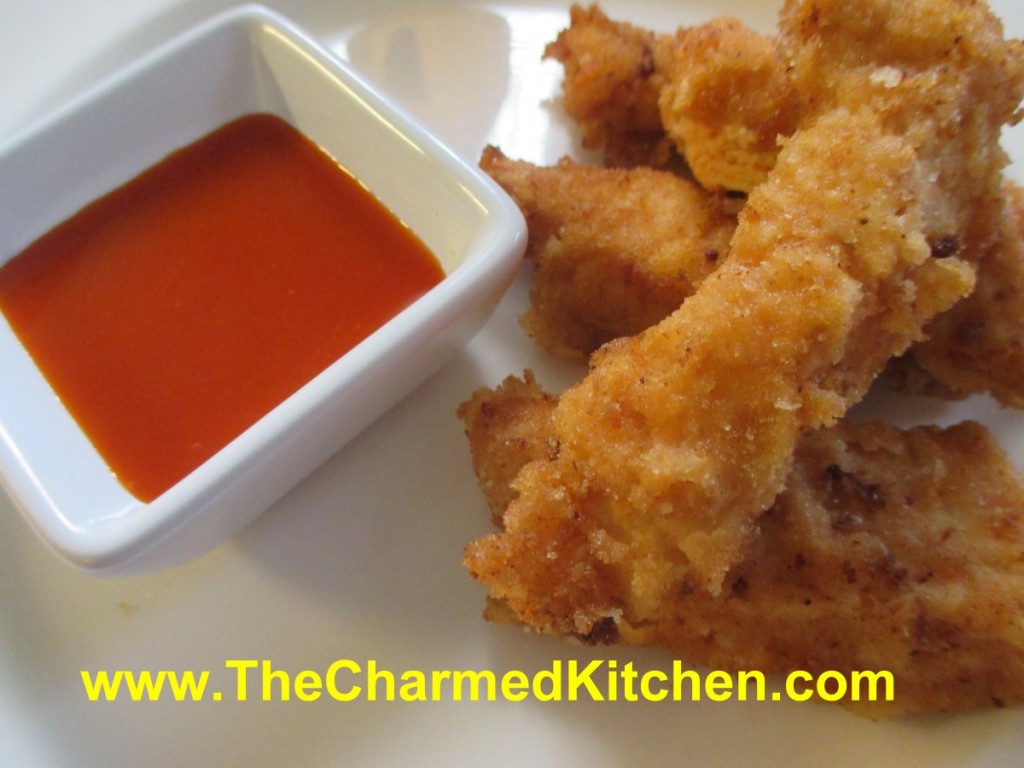
Sometimes the best recipes happen when you don’t have time to plan. This is one of those recipes. Even better because it only uses 4 ingredients. Fun for the 4th of July, too.
I needed an appetizer, but didn’t have extra time for prep. I also did not have time to go to the store, so I used what I had on hand. I had some boneless chicken breasts. I could also have used boneless thighs or even chicken wings. I used what I had.
I cut them into strips and poured a bunch of hot sauce over them. Put them in the fridge to marinade overnight. The next day I just tossed the chicken strips in breadcrumbs and fried them in a little oil. Served with extra hot sauce on the side, they were a big hit.
Firecracker Chicken
2 lbs. boneless chicken
3/4 c. hot sauce, plus extra when serving
2 c. bread crumbs
2 c. oil, for pan frying
Cut chicken into strips and place in a bowl. Pour over the hot sauce and stir to coat evenly. Cover and chill overnight, or even for a couple of days. Place bread crumbs in a plastic bag. Place a small handful of chicken in the bag and shake to coat. Place on a plate and continue with the rest of the chicken. Heat oil in skillet to 350- 375 degrees. Fry chicken in several batches- you don’t want to crowd them in the skillet- that will make the oil cool down too much. Fry for a minute or two per side. Remove to platter lined with paper towels and cook the rest of the chicken. Keep chicken warm until ready to serve. Serve with extra hot sauce on the side. Serves 8 or more as an appetizer, but can be served as a main dish, too.
Blueberry Lime Cheesecake

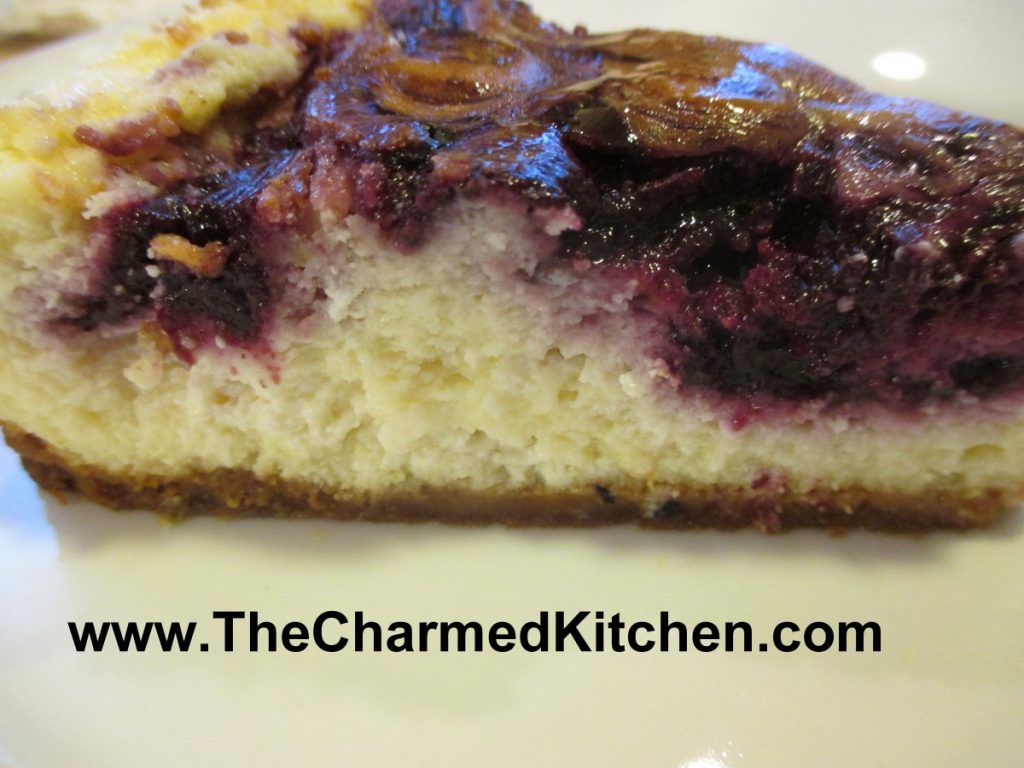
This recipe combines limes and blueberries for a cheesecake that is perfect for summer. The citrus pairs well with the berries. I had made this cheesecake before, with the blueberry puree swirled into it, but without the lime. I have often used lemons and blueberries together, but not limes so much.
I had a few extra limes in the fridge that I had picked up at a local market, so I decided to try them out in this cheesecake. I thought the limes would be a nice addition this time.
I must say, I really like the flavor the lime zest and juice adds to this dessert. Adds a nice zippy flavor. Leftovers can be frozen. But let’s be honest, there aren’t going to be any leftovers!!!
Blueberry Lime Cheesecake
Blueberry Puree
1 ½ c. blueberries
¼ c. sugar
2 t. cornstarch
1T. fresh lime juice
Crust
1c. graham cracker crumbs
2 T. sugar
2 T. melted butter
Filling
3 (8oz.) packages cream cheese, softened
1 c. sugar
8 oz. sour cream
Zest from 2 limes
Juice from 1 lime
2 t. vanilla
4 eggs, at room temperature
2 T. flour
For puree, combine berries, sugar and cornstarch in saucepan and bring to a boil. Cook 5 minutes, stirring constantly. Puree in blender with lime juice and cool completely. For crust, combine crumbs, sugar and butter and set aside. Preheat oven to 350-degrees. Press crumb mixture firmly into bottom of 9 or 10-inch springform pan and bake 10 minutes. For filling, beat cream cheese until fluffy and beat in sugar until smooth. Beat in sour cream and vanilla, zest and lime juice. Beat in eggs, one at a time. Stir in flour and pour batter into springform pan. Drizzle blueberry puree over batter and use a knife to swirl it around. Place a roasting pan on lower rack of oven and fill with one inch of boiling water. Place springform pan on upper oven rack. Bake 1¼ hour or until just set. Turn oven off and let cake stand in oven 1 hour more. Remove pan from oven. Cool down and refrigerate overnight. Remove pan side before serving. Serves 12.
Honey Glazed Western Ribs


Western ribs are one of my favorite cuts of pork. They are meaty and have just enough fat to be tender. They are easy to cook, too. You can grill, broil, bake, saute or braise them. I am sure I am leaving a few methods out.
This time I decided to pickle mine, in a way. I brined the ribs in pickle juice. The vinegar and salt flavor the meat and make it more tender. When I say pickle juice, I mean just that. I save the brine from jars of pickles and store them in the fridge until ready to use. The pickle juice has so many uses. You can use it as a base for salad dressings, sauces, dips and marinades. You can add pickle juice to Bloody Marys, too. For this recipe I used dill (sour) pickle brine.
I placed the ribs in a container and poured pickle juice over them. I poked them with a fork and kept them, covered, in the fridge for 3 days. They were sauteed in a pan and finished with honey and seasonings. They were really good. Here is a more exact recipe. Enjoy!!
Honey Glazed Western Ribs
4 Western ribs, about 2 lbs.
1 c. pickle juice -from dill pickles, not sweet pickles
2 T. oil
salt and pepper
2-3 T. honey
1 t. hot sauce, optional, to taste
At least 2 days and up to 4 days before cooking the ribs place them in a bowl or dish and pour over the pickle juice. Pierce the ribs with a fork to help get the bring inside the meat. Try to pierce all over the ribs. Cover and store in fridge until ready to cook. Drain the ribs, pat dry and heat oil in a skillet. Season the ribs and saute in the pan. They are pretty thick cuts of meat. You want them to get some color on them and cook through. I started them on high heat and cooked them on each side 4-5 minutes, or until they were getting nice and golden. Then I turned the heat down and let them cook through, turning a time or two. I would say this took another 10 minutes total. I added the honey and hot sauce to the pan. Then I spooned the honey over them and turned the heat up to medium. I spooned the honey and pan juices over the ribs until they looked nice and glazed and the glaze was starting to brown without burning. I spooned some of the glaze over them, being careful to drain the fat out of the pan first. Serve with whatever sides you like. These are great with coleslaw. Serves 2-4.
Lemon Italian Ice

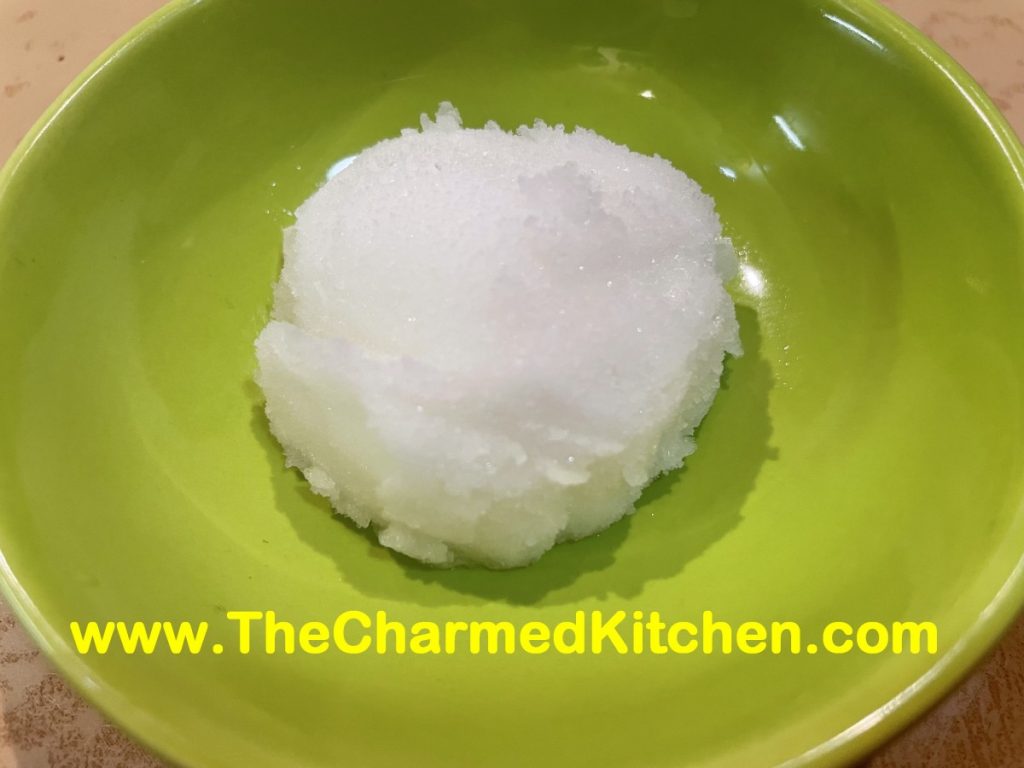
I hadn’t made Italian ice in a long time. As a kid, I remember getting little cups of this treat in the summer and I loved it. I decided it was time to make some again.
The recipe couldn’t be simpler. Just water, sugar and juice. You can also add zest. You don’t even need any special equipment. Lemon is more traditional, but lime works great, too. You can add more juice or less or more sugar to suit your own taste. I like my lemon ice to have a nice strong lemon flavor. Taste it before you freeze it to make it to suit your taste.
Italian ice is a great, light dessert or it can be served as a palate cleanser. Make more than you think- it goes fast. A friend stopped over last night and we added scoops to our vodka cocktails. Very tasty!!
Enjoy!!
Lemon Italian Ice
2½ c. water
1½ c. sugar
1¼ c. lemon juice*
Zest of 2 lemons, optional
Combine water and sugar in bowl and stir until sugar dissolves. Add lemon juice and zest, if adding, and stir until well combined. Freeze.
You have options here. You can place the mixture in a shallow tray- preferably one with a tight lid- and place in the freezer. Or you can put the mixture in any shape container with a tight lid and freeze. It kind of depends on how you plan to serve your ice, once it is frozen. Some recipes call for stirring the mixture every 30 minutes as it freezes. Then to serve it, you just scrape over the surface with a heavy spoon for a grainy ice- a granita. This is one option and a tasty one. Works best in the flatter, longer container.
Another option is to just freeze it. Once frozen, allow the lemon ice to soften a few minutes, then break into chunks and place in a food processor. Run the processor until the mixture is smooth- then serve or put back in the freezer until you want to serve it. You can even repeat the food processing part another time for a smoother end product. This is what I did with this batch. I wanted a sorbet – like texture.
If you didn’t have enough choices already, you can also put the lemon juice mixture in an ice cream machine to freeze. This method will also give you a sorbet like final product.
No one way is best- it is just what you like. Makes about a quart.
* you can use lime juice and zest instead, for lime ice- or even use them together.
S’Mores Ice Cream Sandwiches

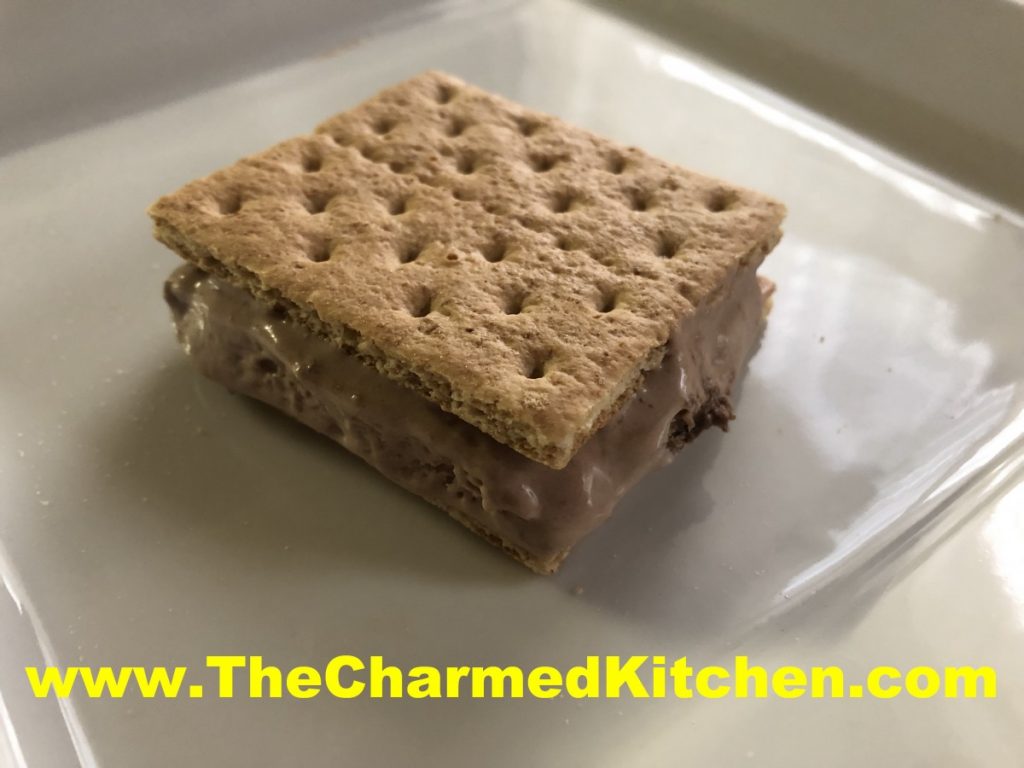
Summer is the time for picnics, campfires and S’mores. Summer is also the time of year to eat lots of ice cream and other frozen treats.
This dessert combines the ingredients of S’mores in a frozen treat. How fun is that?
They aren’t hard to make, but you need to allow time for ingredients to freeze. The mixture is frozen, then cut into squares and sandwiched between Graham crackers. They get returned to the freezer to harden up. It is a nice treat to have on hand.
We make these in cooking camp every year. The kids love them!!
So here is the recipe.
S’mores Ice Cream Sandwiches
1 (14 oz.) can sweetened condensed milk
2/3 c. chocolate syrup
1 c. coarsely crushed graham crackers
1 c. mini marshmallows
2 c. whipping cream, whipped
72 graham cracker square halves
In large mixing bowl combine sweetened condensed milk and syrup. Fold in crackers, marshmallows and whipping cream. Pour in foil lined 9×5-inch loaf pan and freeze until firm, about 6 hours, or longer. Remove from pan and peel off foil. Slice loaf in half lengthwise and then each half into 18 (½ inch) slices. Place one slice between two crackers and repeat with rest. Wrap and freeze until ready to eat. Makes 36. Note: You can slice the filling thicker. You’ll have fewer “sandwiches”, but they will have more filling. I usually get about 2 dozen.
Strawberry Vanilla Jam

Once you taste homemade jam, you will understand why it is worth the effort to make your own. Homemade jams, preserves and jellies are a great way to save seasonal fruits to enjoy all year. They also make nice gifts.
One of my favorite homemade jams is strawberry. I like the addition of a little vanilla to my strawberry jam. I think it adds an additional layer of flavor, without covering up the natural beauty of the berries. Of course, you can omit the vanilla, if you prefer.
I try to make enough to last all year, but I end up running out quickly. This jam is great on toast, but also a nice addition to several desserts I make.
We made this jam in class the other night. The picture does not do it justice. The color is so beautiful.
In grocery stores, berries are often sold in one pound packages, not in quarts. A quart of strawberries should weigh 1 1/4 pounds. That should help you figure out how many berries you will need.
Here is the recipe.
Strawberry-Vanilla Jam
2 qts. strawberries, stemmed, washed and crushed (2 1/2 lbs.)
2 T. pure vanilla
1 package powdered pectin, (1.75 oz.)
1/4 c. lemon juice
7 cups sugar
Combine berries, vanilla, pectin and lemon juice in large saucepan and bring to a boil over medium heat, stirring often. Add sugar and turn heat up to high. Stir often until mixture comes to a boil. Boil hard one minute stirring constantly. Ladle hot jam in to jars leaving 1/4 inch headspace. Wipe rims and screw on lids comfortably tight. Place in boiling water bath and process 10 minutes. Remove to cooling rack, towel or wooden surface to cool. Makes 8-9 half pints.
New Day Cleveland- Frozen Cheesecakes

Here is my latest appearance. Thanks to David, Natalie and the whole crew for making it so much fun.
https://fox8.com/on-air/new-day-cleveland/frozen-cheesecake/
Frozen Chocolate Malted Cheesecake
1 (28 oz.) carton of cottage cheese
¾ c. chocolate syrup
¾ c. malted milk powder
Sugar to taste, I used about ½ cup
1 T. vanilla extract
5-9 graham crackers, crumbled depending on your preference
Combine first 5 ingredients in a food processor or blender until very smooth. Taste to see if you want to add more sugar. Pour into a 2 quart bowl and stir in the crushed crackers. Place mixture in a freezer safe container that has a lid. Affix the lid and freeze. Makes 5-6 cups.
Note: I could see a lot of possible variations for this recipe. I used cinnamon graham crackers, but it might be fun to use chocolate graham crackers or crushed up chocolate sandwich cookies. You could add some instant coffee powder or mint extract. Perhaps some chopped chocolate. Have some fun with this recipe.
Frozen Lemon Cheesecake
1 (28 oz.) carton of cottage cheese
Sugar to taste, I used about ½ cup
1 recipe lemon curd- recipe follows, or 2 cups store bought lemon curd
2-4 T. lemon juice
1 T. vanilla extract
6-9 graham crackers, crumbled
Combine first 5 ingredients in a food processor or blender until very smooth. Taste to see if you want to add more sugar or lemon juice. Pour into a 2 quart bowl and stir in the crushed crackers. Place mixture in a freezer safe container that has a lid. Affix the lid and freeze. Makes 5-6 cups.
Lemon Curd
1/2 c. lemon juice
zest from one good sized lemon- you should have 2-3 teaspoons
1/2 c. sugar
3 eggs
6 T. unsalted butter- cut into little cubes
In medium saucepan, combine all ingredients. Whisk the mixture until the eggs are well blended. Cook over medium low heat, whisking often, until the mixture thickens. This will take 5-7 minutes. Whisk more often as mixtures warms and starts to thicken. Better to heat over lower heat and take longer than cook over too high a heat. You don’t want the eggs to scramble. Once the mixture is thickened , transfer to a bowl or jar. Cover the surface with a piece of plastic wrap to keep the surface from developing a skin- like any pudding will do. Chill until ready to use. Makes about 2 cups. Will keep in fridge a week or two.


