Sweet Potato and Herb Biscuits


These biscuits are a favorite of mine. They go great with a bowl of chili. They also make a nice side for chowders.
I like sweet potatoes cooked any number of ways. Steamed, roasted, mashed. In this biscuit recipe, raw sweet potatoes are grated and added to the dough, along with some herbs. The biscuits come out tender, with great flavor and texture.
I enjoy them with a bit of butter, warm from the oven.
When you mix the dough, don’t be worried if it seems too dry. It takes a little bit of kneading to get the moisture out of the potatoes. The extra effort is worth it.
I cut them into triangles, but you can also just form the dough into a log shape. Then, slice the dough for round biscuits. They taste wonderful, no matter the shape.
Sweet Potato and Herb Biscuits
2 1/4 c. flour
1 T. baking powder
1/2 t. grated lemon peel
1/4 t. each baking soda, dried basil and dried thyme
1 egg, beaten
1 1/2 c. shredded sweet potato, about 1 large
1/2 c. fine chopped green onions
1/2 c. sour cream
2T. butter, melted or olive oil
Stir together dry ingredients in large bowl and set aside. Combine remaining ingredients and add to flour mixture mixing until just blended. Turn onto lightly floured surface and knead a few times until dough just stays together. Dough will look too dry- but it will come together after you knead it. Press into an 8-inch square and cut into four squares.* Cross cut each square into four triangles. Place on greased baking sheet and bake in a preheated 425 degree oven for 20 minutes. Makes 16.
* I press the dough into a lightly floured 8×8-inch baking pan and then flip it out onto the work surface, before cutting. That way you’ll get nice, even edges.
Asian Fish Balls

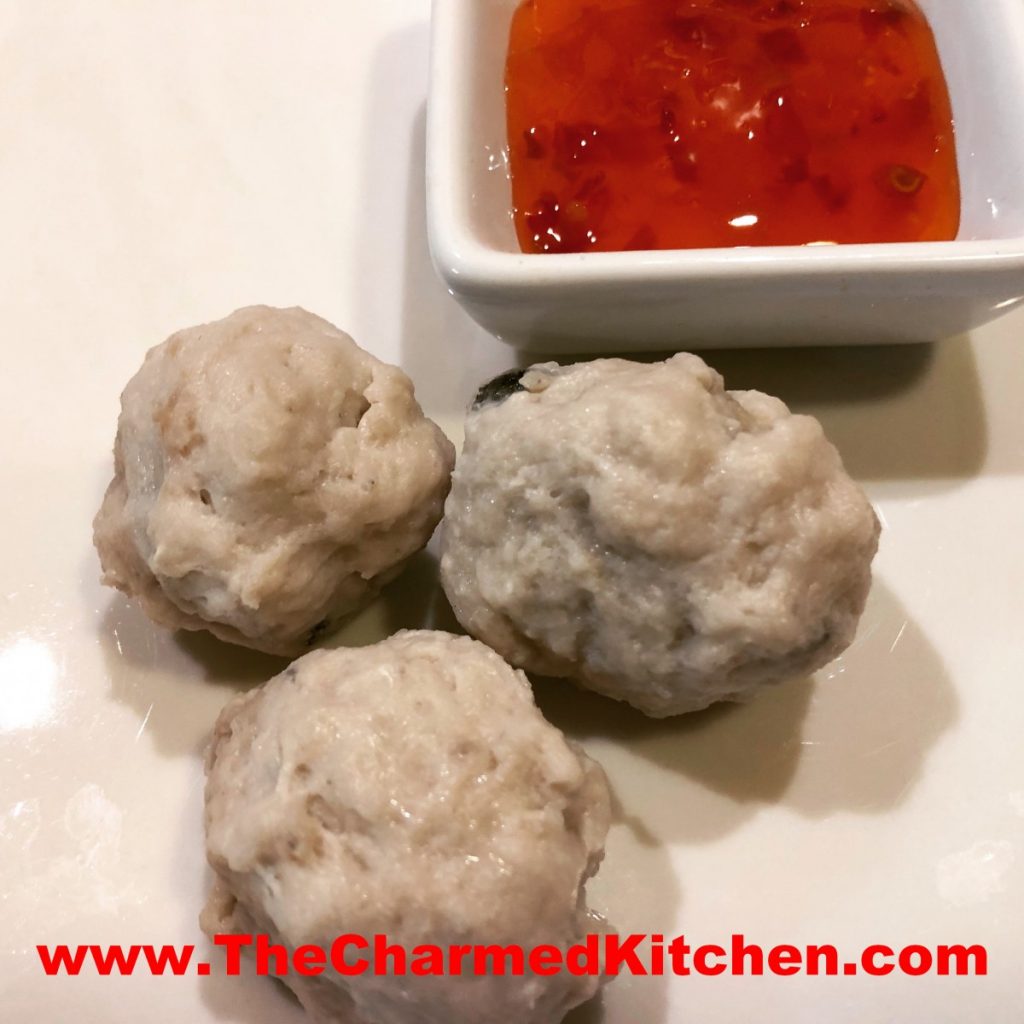
Fish balls are kind of like meat balls, but made with fish. Still, they are different, and it is the texture that makes them so special. I had eaten fish balls at Asian restaurants and always loved them. I was curious as to how they were made.
I looked up several recipes online and watched a few videos. After making them, I added them to simmering stock and served with dipping sauces. These are fun to make and serve at parties.
The big difference in making fish balls, as opposed to a traditional meat ball, is that the fish is pureed into a smooth paste. Combined with a few other ingredients, the mixture is very soft. More like a batter or dough in feeling and appearance. The fish batter is also mixed for a long time. It helps to give you the smooth final product you want in fish balls.
Once you make the base, the balls are shaped and simmered until done. The final texture should be smooth and light. Mine are pretty basic, but you can add all sorts of seasonings for different flavors. Different fish will also give you different flavors. Fish balls are usually served in a soup, but they can be added to all sorts of dishes.
When you read the recipe, it sounds like a lot of work. There is some time in prep, but a lot of that is just letting the mixer do its job. I thought they were well worth the effort. I had plenty for dinner with a friend, and extra to freeze.
I used catfish and I really loved the flavor.
Fish Balls
2½ lbs. of raw fish – I used catfish
1¾ c. ice water, divided
4 T. sugar
2 T. dry sherry – not cooking sherry
3 t. salt
4 eggs whites
4 T. cornstarch
Place the fish in a blender add ¾ cup ice water and puree until smooth. Remove fish puree to a stand mixer and add the sugar, sherry and salt. Use the paddle attachment and blend the fish mixture on high for 12-15 minutes. Add the egg whites, one at a time, while the mixer is running, during the 15 minute blending time. Now, with the mixer still running add ½ cup of the ice water, then 2 tablespoons of the cornstarch, blending well each time. Add the rest of the water, then the rest of the cornstarch. This should take about 5 minutes. The mixture should look really smooth and kind of silky. Turn off the mixer and place a small spoonful of the mixture in water- to be sure it floats. Now, you are supposed to squeeze small amounts of the mixture through your hand as you make a fist to form into 1- inch balls. I just used a tablespoon to spoon out the mixture, then used wet hands to form into balls. They aren’t going to be perfectly smooth and round, but that is fine. Have a big bowl of cold water standing by. As you make the balls drop them in the water. They will keep their shape and not stick together- they are soft, but should hold together. Once you have all the dough in balls, get a big pot of water just barely simmering. You don’t want the water to boil. Drop about half of the fish balls into the water at a time. Cook until they float, 2-3 minutes. Remove with a slotted spoon and set aside to cool. Now you are ready to go. It makes a big batch, so feel free to freeze some. You can add your fish balls to soup, sauté in oil until crisp or warm in broth and serve with dipping sauces.

Bacon, Shrimp and Corn Chowder


I love the combination of shrimp and bacon. When I was looking for a quick dinner for today, I knew I would be using them together. It is a chilly day, so I decided to go with a chowder.
I rooted around my fridge and pantry for the ingredients and ended up with a very satisfying meal.
Some of my favorite dinners have happened by accident. Just looking at what I have on hand, and creating something tasty with it.
Bacon, Shrimp and Corn Chowder
6 thick slices bacon, cut into 1-inch pieces
1 onion, sliced
2 carrots, peeled and sliced
2 medium potatoes, peeled and cubed
1½ c. chicken stock
1 can cream corn*
½ c. corn- fresh or frozen_ I had sweet corn frozen from last summer
1½ c. half and half
½ c. chopped fresh parsley
12 oz. raw shrimp, peeled and de-veined
Salt and fresh ground pepper to taste
Dash of hot sauce
In soup pot, cook bacon until almost done. Add onion and continue cooking until onion is cooked. Spoon out most of the bacon fat. Add the carrots, potatoes and stock and simmer, covered, until the veggies are tender, about 15 minutes. Add cream corn, corn and half and half and bring up to a simmer. Add parsley and simmer, covered, 10 minutes. Add shrimp and cook another 5 minutes or until shrimp is just cooked. Adjust seasonings and serve. Serves 3-4.
*I decided to use a can of cream corn as the base. When I was a kid my Mother would make me something she called cream corn soup. She rarely used prepackaged foods and made wonderful homemade soups all the time. I think it was on one of those days when she was just really busy. To make her cream corn soup she would empty the can of corn into a saucepan. Then she filled the can with milk and added that, too. A little salt and pepper and the soup was done. Just before serving she’d put a small pat of butter in the soup. As a kid I just loved it. I must admit I don’t eat cream corn soup anymore, but as a base, the cream corn can really make a nice chowder.
Chocolate Shortbread Cookies

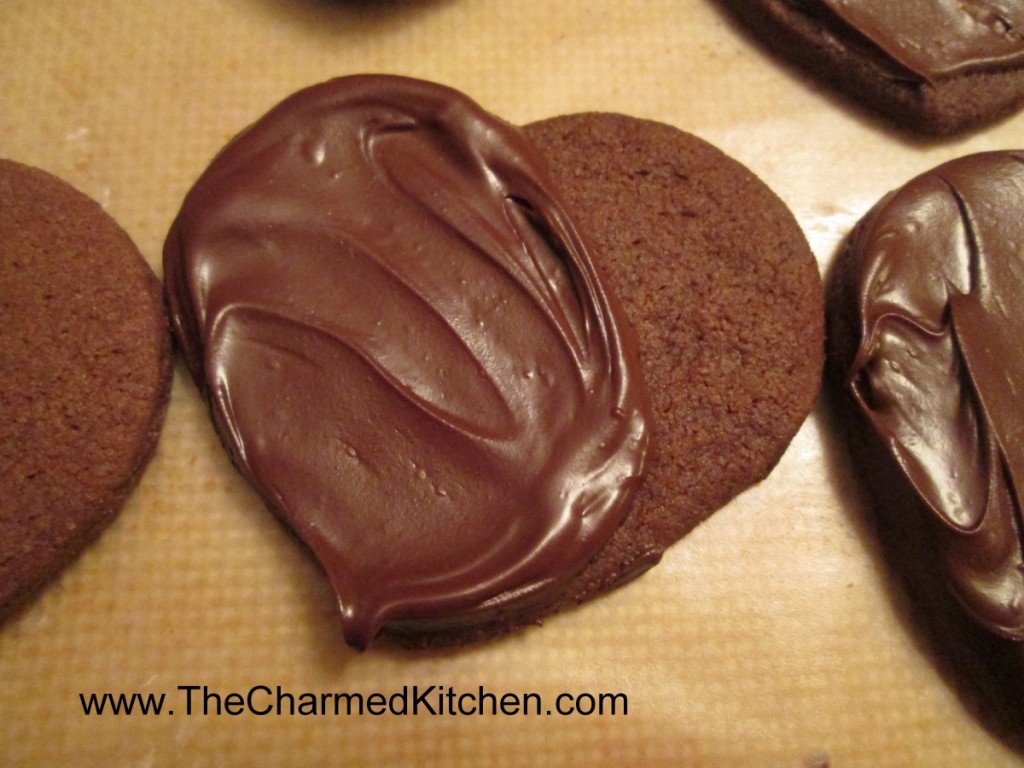
I never met a shortbread cookie I didn’t like. These are no exception. With the addition of cocoa, you end up with a cookie that has the traditional delicate texture of shortbread, with the added bonus of a rich, chocolate flavor.
They are great just plain, dusted with powdered sugar or, my favorite way, brushed with a little melted bittersweet chocolate.
Simple, tasty and a nice treat for the chocolate lovers you love.
Chocolate Shortbread
1 c. butter, room temperature
3/4 c. sugar
2 c. flour
1/3 c. cocoa
1/4 t. salt
8 oz. semi-sweet chocolate
Beat together butter and sugar until well blended. Mix together dry ingredients and slowly beat into butter mixture, stirring it in at the end. Roll out dough about 1/4 inch thick and cut out with cookie cutters. Re-roll scraps and cut out the remaining dough. Place on an un-greased baking sheet and bake at 325 degrees until cookies are firm around the edges, about 20 minutes. Cool on baking sheet 5 minutes before transferring to a rack to cool. Melt chocolate and dip cookies in it or use chocolate to hold 2 cookies together. I just spread a small amount on the cookies. You can also use a buttercream frosting to make them sandwich cookies. Makes 2-3 dozen, depending on the size.
Minty Cocoa Hearts


If you are looking for a simple chocolate treat- that requires no cooking – try Minty Cocoa Hearts. They are tiny, but pack a lot of flavor.
This easy to make candy is made with just a few ingredients. The “dough” is mixed and rolled out. Then you just cut them out into little hearts.
They taste great and they are also a nice project for kids. There is no special equipment needed other than a tiny heart-shaped cookie cutter.
Once they have time to set up- they can be boxed up- or wrapped in individual foils.
So if time is short, and you really want to make something homemade this Valentine’s Day- these could be the answer.
Minty Cocoa Hearts
9 c. powdered sugar
1 c. cocoa
1/2 c. butter, softened
1/2 c. water
2 t. peppermint extract
In large bowl combine ingredients until well blended. You can add more water, if needed, 1 teaspoon at a time. Divide mixture into 2 pieces and shape in balls. Place each between sheets of wax paper and roll out to 1/4 -inch thickness. Cut out with tiny cutters and place on foil-lined tray. Chill several hours, then wrap up in colored foil or place in tiny candy bags. Makes 80 (1-inch) candies.
I do love the mint flavor of these, but you can play around with other flavors like almond, anise, cherry or orange, to name a few.

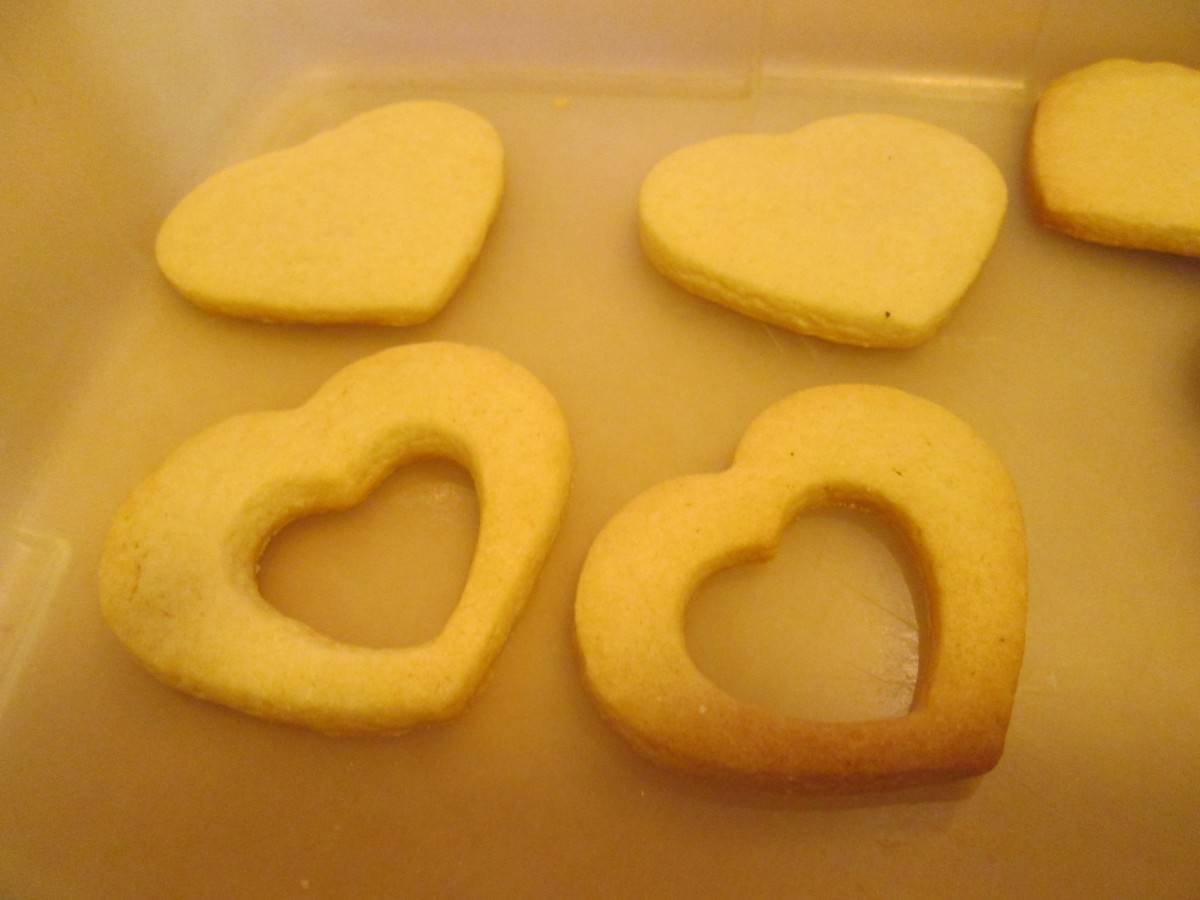
Cut out with heart-shaped cookie cutters
Creole Jambalaya

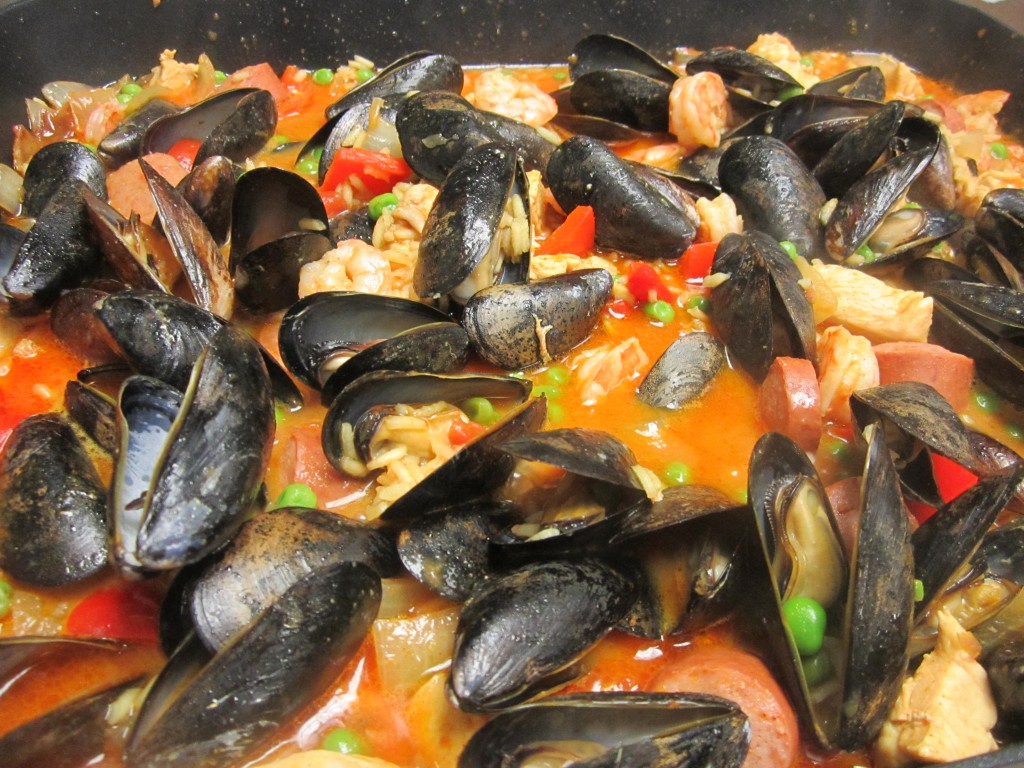
There are so many variations for Jambalaya. I don’t think I ever had a Jambalaya I didn’t like. This Creole dish varies a little with each person who makes it. The assortment of ingredients adds so many layers of flavor.
Traditionally, Jambalaya would include smoked sausage or ham, chicken, shellfish, rice, tomatoes and assorted veggies and seasonings.You can see why there are so many variations. For me, it just isn’t Jambalaya without mussels. Lots and lots of mussels.
It is definitely a great dish for a party. It is impossible to make a small batch of Jambalaya!!!
This recipe is a tweaked version I got from a boss of mine a long time ago. I must say, every time I make this for friends or family it gets rave reviews.
The heat level in this dish is really about personal preference and for the people who are going to be eating it. I like it a bit spicier, so I add more cayenne. If I am making it for friends who like their food less spicy, I use less. Of course, you can always serve it with hot sauce on the side, so people can spice it up a little more.
Creole Jambalaya
1 lb. smoked sausage, sliced into 1-inch pieces
1 c. chopped onions
1 c. chopped celery
2 garlic cloves, chopped
1/4 c. oil
2 c. cubed uncooked chicken
3 c. chicken stock
1 1/2 c. uncooked rice
1 (14.5 oz.) can tomatoes
2-3 t. paprika
Cayenne pepper to taste
Black pepper to taste
1/4 t. ground turmeric
1 lb. medium shrimp, peeled and de-veined, uncooked
1 1/2 c. shelled peas, fresh or frozen
1/2 c. chopped red pepper
1-2 lb. mussels, scrubbed
In Dutch oven cook sausage, onion, celery and garlic in oil until onion is tender. Add remaining ingredients, except shrimp, peas, sweet red peppers and mussels. Bring to a boil, turn down to simmer and cook 20 minutes. Stir in shrimp, and peppers, cover and cook 10 minutes. Stir in peas and stick in mussels. Cover and cook 5 more minutes. Discard any mussels which have not opened in 5 minutes. Serves 8.
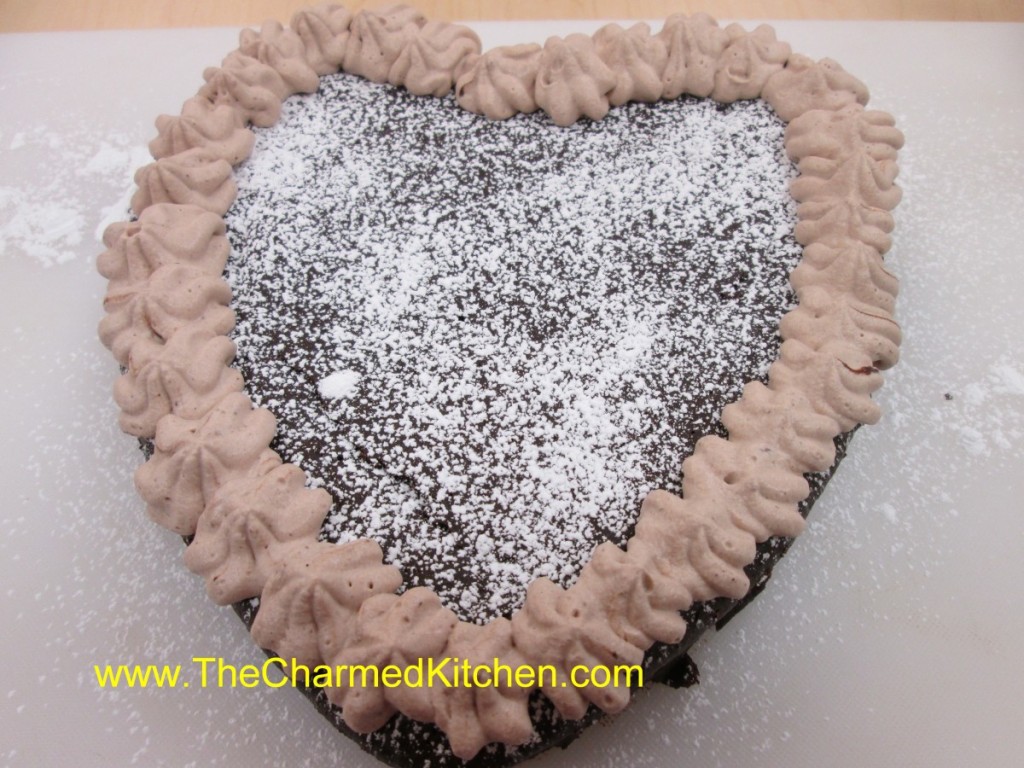
Flourless Chocolate Cake

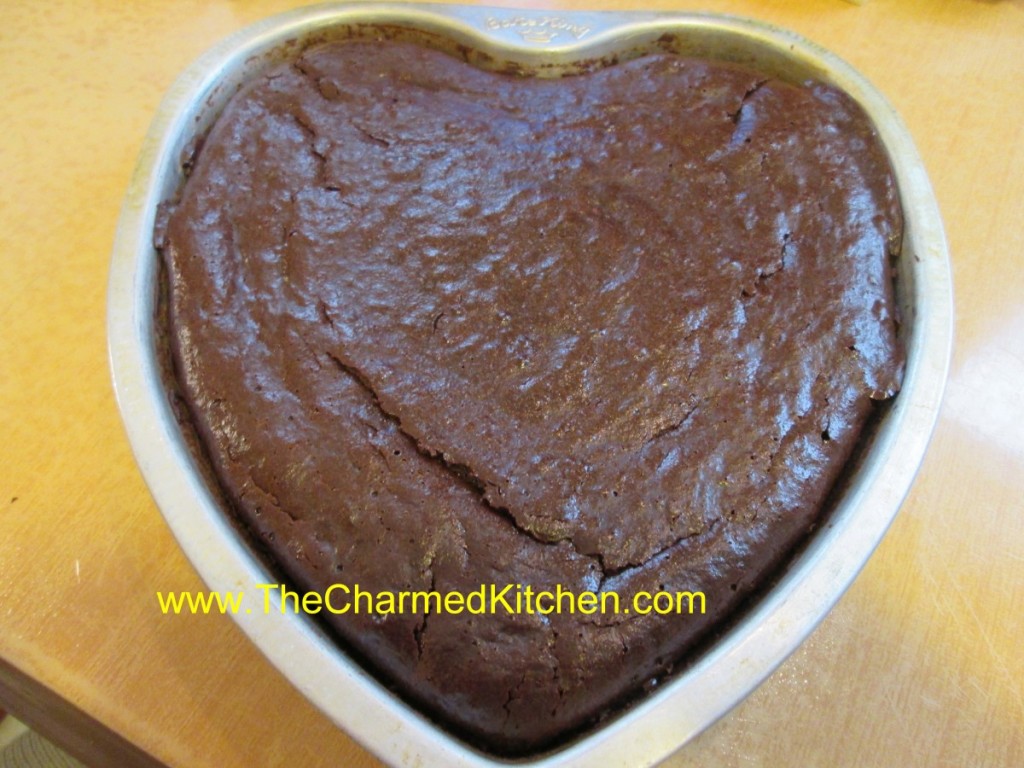
If you are looking for a dessert for your Valentine, you might want to make this cake. The cake is made without any flour and trust me, you will never miss it.
This is a dessert everyone seems to love whenever I make it. This is also a great dessert option for those who can’t tolerate gluten. The texture is dense, but not heavy. With only 5 ingredients, it is also pretty simple to make. While it can be baked in any cake pan, I chose a heart shaped pan this time.
Once baked and cooled, the cake can be served as is, or garnished with any number of things. Fresh berries are always a nice touch, or a light dusting of powdered sugar. Sometimes I’ll pipe some whipped cream around the edges.
Flourless Chocolate Cake
½ c. each sugar and water
1 stick butter
12 oz. semi sweet chocolate
6 eggs
¼ dark rum or other liqueur
Butter an eight inch cake pan and line with parchment. In saucepan heat together water and sugar until they boil. Stir in butter and bring to boil. Remove from heat and stir in chocolate until melted. Beat in eggs until smooth and stir in rum. Pour batter into prepared pan and place pan in a roasting pan. Pour boiling water into roaster to come up sides of pan 1 inch. Bake in a preheated 325 degree oven for 45 minutes. Cool, invert onto plate.
Serve cake topped with whipped cream and decorate with raspberries, other fresh fruit or even toasted nuts. Dense and rich this cake serves 8-10.
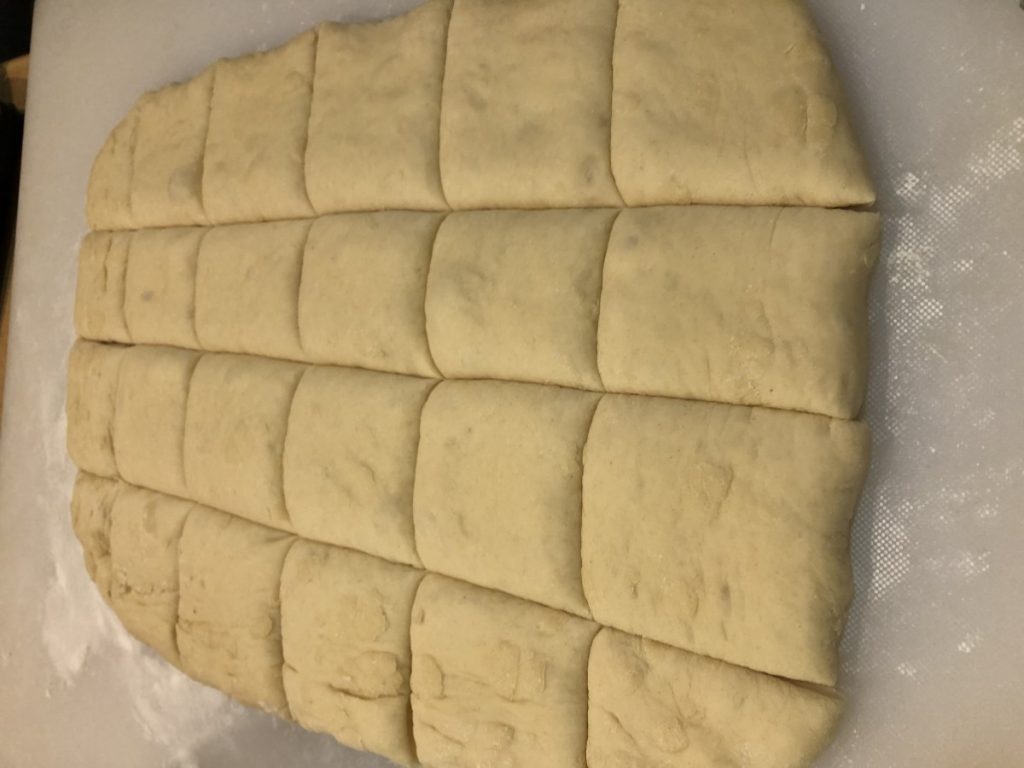
Beignets


Beignets are a fun addition to any Fat Tuesday/ Mardi Gras celebration. Beignets are the official fried dough of New Orleans. These squares of fried dough are often referred to as a fritter or doughnut.
Beignets can be made with a choux pastry- like the type of dough used for cream puffs. They can also be made from a yeast raised dough. I made mine with a yeast dough.
Once fried, beignets are drained on paper towels and then tossed in a bag with powdered sugar. They are served hot, or at least warm. The fresher the better.
They really aren’t that difficult to make. The dough is soft and pliable. Very easy to handle. When you roll the dough into a rectangle to cut into squares, do your best to get the corners squared off. But don’t get too concerned. I always end up with the four corners a little misshapen. They still taste good. I use a pizza cutter to cut the dough into squares.
Beignets
1 1/2 cups lukewarm water
1/2 cup granulated sugar
1 envelope active dry yeast
2 eggs, slightly beaten
1 1/4 teaspoons salt
1 cup evaporated milk
7 cups bread flour
1/4 cup shortening, softened butter or oil
Oil, for deep-frying
3 cups confectioners’ sugar
Mix water, sugar, and yeast in a large bowl and let sit for 10 minutes. In another bowl, beat the eggs, salt and evaporated milk together. Mix egg mixture to the yeast mixture. In a separate bowl, measure out the bread flour. Add 3 cups of the flour to the yeast mixture and stir to combine. Add the shortening and continue to stir while adding the remaining flour. Remove dough from the bowl, place onto a lightly floured surface and knead until smooth. Brush a large bowl with a little oil. Put dough into the bowl and cover with plastic wrap or a towel. Let rise in a warm place for at least 2 hours. Preheat oil in a deep-fryer to 350 degrees. Add the confectioners’ sugar to a paper or plastic bag and set aside. Roll the dough out to about 1/4-inch thickness and cut into 1-inch or 2- inch squares. Deep-fry, flipping constantly, until they become a golden color. After beignets are fried, drain them for a few seconds on paper towels, and then toss them into the bag of confectioners’ sugar. Hold bag closed and shake to coat evenly. Makes about 4 dozen, when cut in 2-inch squares, 8 dozen when cut in 1-inch squares.
Note: This recipe makes a lot. I cut the recipe in half when I don’t need so many. You can cut them a little smaller, if you prefer. They puff up a lot when fried.

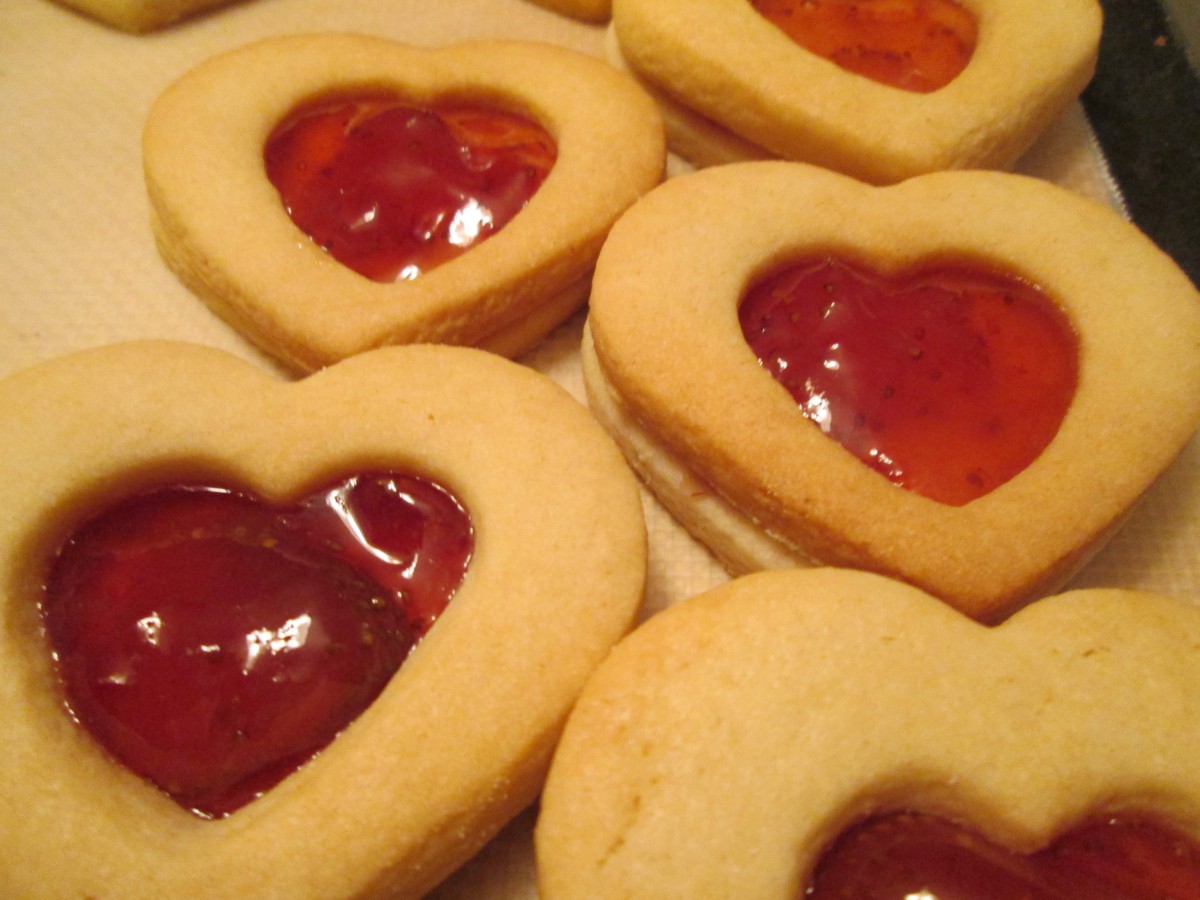
Sweetheart Sugar Cookies


For Valentine’s Day, not every dessert has to be chocolate. These sugar cookies would be a great way to share the love.
I used my favorite sugar cookie recipe and cut out hearts. Then used a smaller heart cookie cutter and cut out smaller hearts from the center of half of the cookies.
Sandwich the baked cookies together with homemade strawberry preserves. Use one of the “cutout” cookies on top. It gives a pretty effect to the finished cookies. I used strawberry jam, but any red jelly or jam could be used.
Since I also had a bunch of tiny heart cookies from the cut outs, I used melted chocolate to turn them into tiny heart shaped sandwich cookies.
Sweetheart Sugar Cookies
1 c. butter
1 c. sugar
1 egg
1 t. vanilla
3 c. flour
2 t. baking powder
3 T. milk
Extra sugar for sprinkling, if desired
strawberry preserves or jam
Beat butter and sugar until fluffy. Beat in egg and vanilla. Combine dry ingredients and add to butter mixture. Beat in milk. Heat oven to 375-degrees. Roll dough on lightly floured surface to about 1/3- inch thickness. Cut out with lightly floured cutters and sprinkle with sugar or colored sugar if you like and if you are not going to frost them. Bake on an ungreased baking sheet for 10-12 minutes. Cool on baking sheet 3 minutes before placing on wire rack to cool completely. Sandwich together with jam when cooled. Makes about 4 dozen.
Sweetheart Sugar Cookies
Chocolate Crepes


These chocolate crepes make a great dessert, or breakfast, for Valentine’s Day. The crepes pair nicely with fresh berries, but you could add any number of fillings. Ice cream, jam, pudding, custard or whipped cream all work well.
I topped mine with berries and whipped cream. You could also add some shaved chocolate as a topping.
If you haven’t made crepes, this might be just the recipe to convince you. They aren’t that hard to make. It just takes a little practice.
I often make a double batch of the crepes, then freeze some, between layers of wax paper. That way I can have crepes whenever I want.
You can fill these crepes with all sorts of stuff. I had fresh berries, so that is what I used. I added some Kahlua to the batter for a little extra flavor and it worked out just great.
You can have all the components ready, then just assemble when ready to serve. Such a lovely dessert.
Here is the recipe.
Chocolate Crepes
1 c. flour
4 eggs
1 1/2 c. milk
¼ c. cocoa
3 T. sugar
¼ c. Kahlua or other coffee flavored liqueur or ¼ c. strong coffee
1/4 c. butter, melted and cooled
Mix all ingredients in blender (except butter) until smooth, scraping sides often. Add butter and blend well. Let stand for 30 minutes before using, or batter can be refrigerated, covered, overnight. Beat again, just before using.
Heat 6 or 7 inch skillet. Brush with butter or oil and pour in about 1 tablespoon of batter, tipping pan to cover bottom of pan completely with batter. Cook until edges start to brown, turn over and cook until lightly browned (about 2 minutes per side.)
Crepes can be made day ahead or even frozen between sheets of waxed paper and frozen. Makes 18.
Strawberry filling: I just sliced a couple of pounds of berries and added a little sugar- about ½ cup- a tablespoon of vanilla and a healthy dash of cinnamon.
When filling the crepes I spooned some berries down the center of the crepe and added some whipped cream. Folded over, topped with a few berries and another bit of whipped cream.


