Sweet Potato Puffs
Sweet Potato Puffs
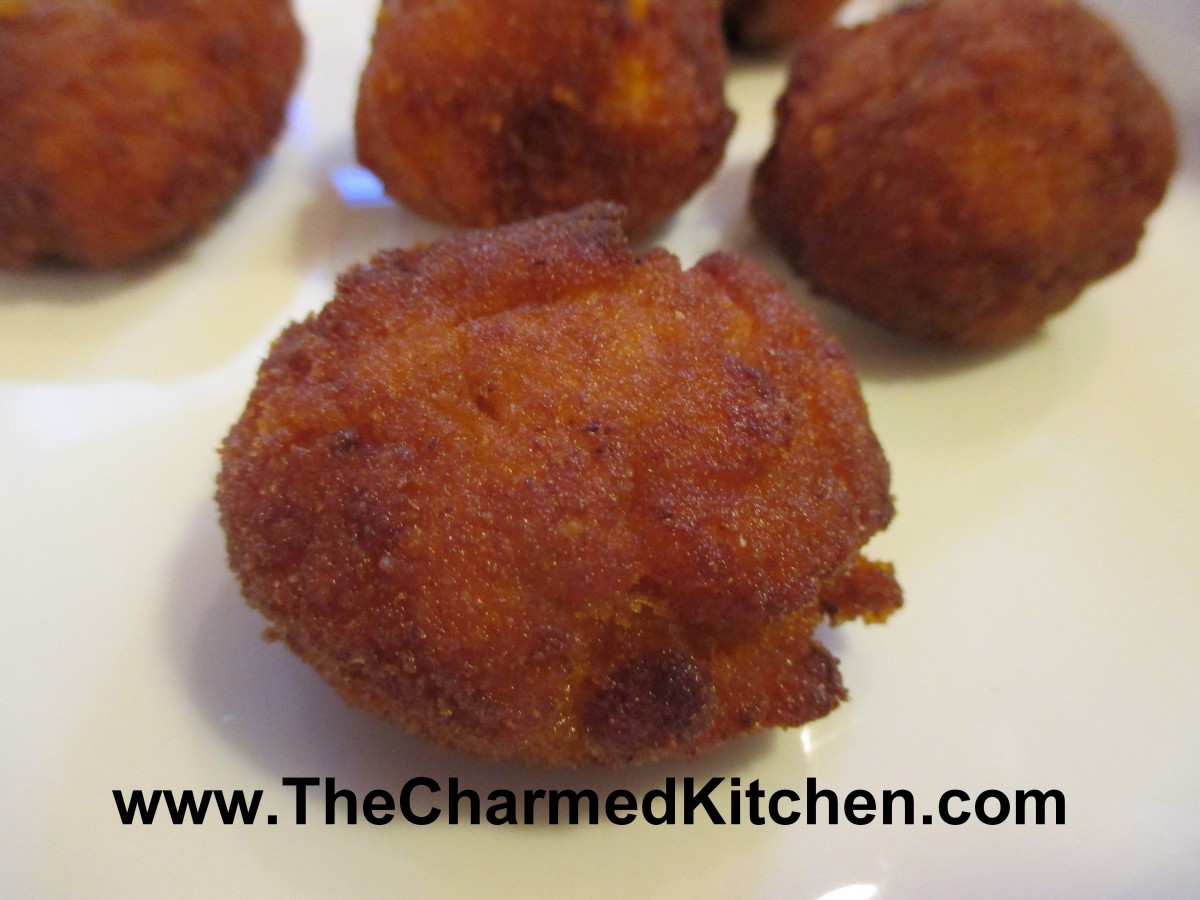
If you are looking for a new way to serve sweet potatoes, you might just want to try this recipe. Sweet potatoes are mashed, mixed with butter, eggs and spices, rolled in bread crumbs and fried. The end result is a delicate morsel that has a crunch on the outside- and creamy mashed sweet potatoes on the inside. They are addictive!!! They make a great side dish, or can be served as an appetizer. While they are good hot, they maintain their crunch even after cooling down.
I first had a version of this recipe many years a go when a coworker made them and brought them to work. I found her original recipe and added more seasonings to it. I love them as much now as I did then.
The mixture, even after chilling, is soft. I placed spoonfuls of the mix in the breadcrumbs and rolled them gently into balls. The puffs are soft, even after frying, so remove carefully from the oil. You can fry up a batch in a few minutes, and serve right away. You can also cook them ahead of time, then reheat them before serving.
So here is the recipe.
Sweet Potato Puffs
2 c. mashed, cooked sweet potatoes
3 T. softened butter
1 egg
3 T. chopped parsley, or 1 T. dried
½ t. salt
½ t. paprika
½ t. cumin
½ t. nutmeg
Hot sauce to taste
Dash of fresh ground pepper
Bread crumbs for rolling
Oil for frying
Combine sweet potatoes with butter and egg, stirring to mix well. Add seasonings and stir well. Chill mixture at least a couple of hours. Heat oil to 350 degrees. You should have at least a couple of inches of oil in the pan. Shape sweet potato mixture into 1-inch balls. Roll in crumbs and fry until golden brown. Drain on paper towels and serve. You can make a head of time, then just warm in the oven when ready to serve. They can also be fried and frozen for later use. These make a nice side dish or even can be served as an appetizer. They are very soft, even after frying, so remove from hot oil carefully.

Crunchy outside, soft and creamy inside
Sweet Potato Pound Cake
Sweet Potato Pound Cake
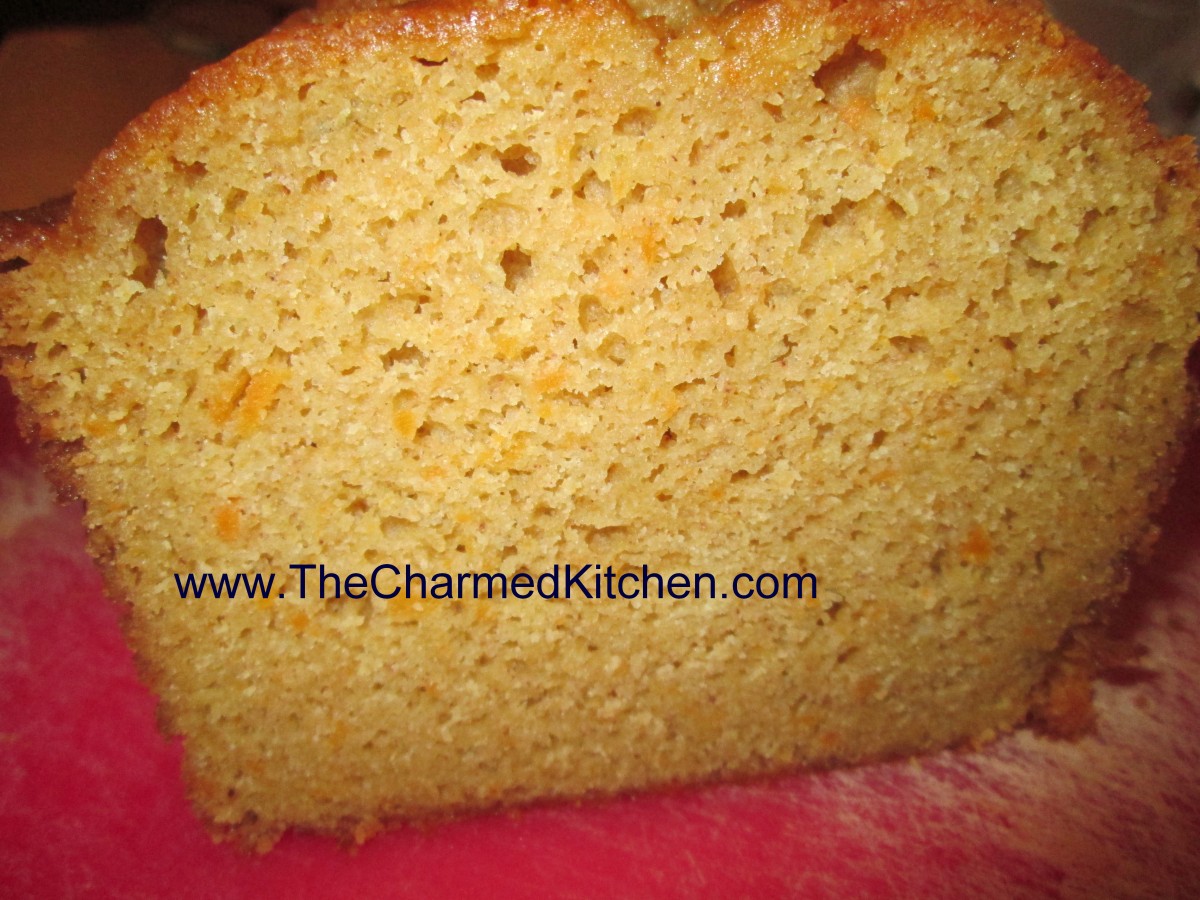
I have posted this recipe before, but I think it is worth posting again. If the only way you enjoy sweet potatoes is as a side at the holidays, or in pie, it is time to expand your thinking about them. In this recipe, the mashed sweet potatoes add both sweetness and moistness to the finished cake. Great plain, or with a dollop of whipped cream and some fresh berries. This cake makes a great dessert or a nice addition to a brunch menu. Also a nice way to use up leftover mashed sweet potatoes, if you find yourself with leftovers.
Sweet Potato Pound Cake
1 1/2 c. cake flour*
1/2 t. each baking soda, salt, cinnamon and nutmeg
1/2 c. unsalted butter, room temperature
1/2 c. sour cream, room temperature
1 1/3 c. sugar
3 eggs, room temperature
1/2 c. mashed sweet potato
1 t. vanilla
Preheat oven to 300 degrees. Lightly oil an 8×4-inch loaf pan. Mix flour with next 4 ingredients and set aside. In large mixing bowl beat together butter and sour cream. Beat in sugar and then beat in eggs 1 at a time, beating well after each addition. Stir in mashed sweet potato and vanilla. Stir in dry ingredients and pour batter into prepared pan. Bake until tester comes out clean, about 1 hour and 15 minutes. Cool in pan 30 minutes before loosening cake sides from pan and removing. After cake has cooled wrap in foil and store at room temperature. Serves 8.
* If you don’t have cake flour you can make your own. Simply measure out a cup of all purpose flour and remove 2 tablespoons of the flour. That is now the same as a cup of cake flour OR remove the 2 tablespoons of flour and replace them with 2 tablespoons of cornstarch and sift together to combine. I do the flour/cornstarch mix and keep a batch on hand for when I need it in baking.
Hawaiian Wedding Cake
Hawaiian Wedding Cake
I get a little nostalgic when I make Hawaiian Wedding Cake. This recipe was very popular when I was a kid. I don’t know a lot of people making it anymore- and that is a shame. The cake is very tasty and quite easy to make.
This recipe proves that you don’t always need a lot of time, to bake a homemade dessert. You can make this moist and tasty cake in less time than it takes to make a box mix cake. Really. The ingredients are all combined at once in a mixing bowl, and stirred by hand until mixed.
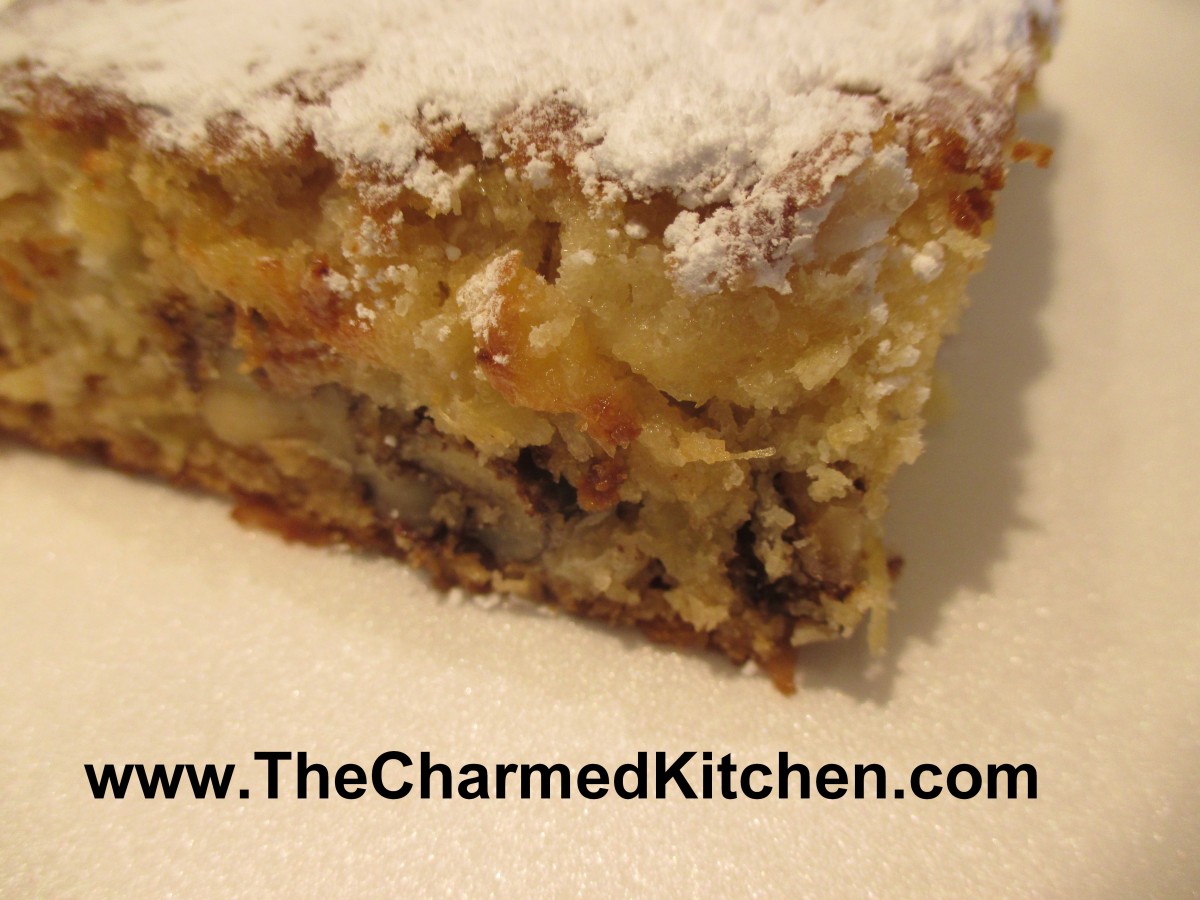
Of course, time saving means nothing if the dessert doesn’t taste good. The cake is really good. It is studded with nuts, coconut and has plenty of pineapple in it, too. Once baked and cooled, it can be topped with cream cheese frosting, powdered sugar or cinnamon sugar. You can even leave it plain.
The cake can make a nice gift, too. Use small foil loaf pans- and divide the batter among them, filling half way. Bake at the same temperature, but for a shorter time.
The mix of tropical ingredients certainly inspired the name of this cake. I don’t really know if people in Hawaii actually ever serve this cake at weddings. I like to think that they did. I do know how much I like it. I think you will, too.
Hawaiian Wedding Cake
2 c. flour
2 eggs
1 (20oz.) can crushed pineapple in its own juice, undrained
1 c. shredded coconut
1 c. sugar
1 c. chopped walnuts
2 t. baking soda
Preheat oven to 350 degrees. Grease a 9×13 inch pan. Combine all ingredients in a bowl and mix well. Pour into prepared pan and bake 35 minutes or until golden brown on top. Cool and dust with cinnamon sugar, powdered sugar, or frost. Serves 12.
Frosting recipe:
8 oz. Cream cheese, softened
3/4 c. powdered sugar
1 stick butter, room temperature
Beat all together until fluffy. Frost cake and refrigerate until ready to eat.

Cake should be golden brown on top when baked
Maple-Glazed Apple Bacon Fritters

Maple-Glazed Apple and Bacon Fritters
This time of year, with apples in season, it is fun to use them in all sorts of recipes. I’ve made an assortment of both sweet and savory dishes with them. This is one of my favorites. What could be better than combining apples with bacon in a sweet treat? The sweetness of the apples pairs so well with the smoky/saltiness of the bacon.
Fritters aren’t difficult to make. They really don’t take that long to make, either. I prefer to make them close to when I am serving them- so my guests can enjoy them warm.
They make a wonderful dessert, or a fun addition to a breakfast or brunch menu. I dipped them in the maple glaze, which also went well with the apples and bacon.
I must warn you, they are addictive.
Apple and Bacon Fritters
2 c. flour
2 T. sugar
2 T. baking powder
1/2 t. salt
1 c. milk
2 eggs, beaten
2 T. melted butter
1 c. diced apples
1 c. cooked, crumbled bacon
oil for frying- I used coconut oil
Combine dry ingredients and set aside. Mix together milk with the eggs and butter. Stir in dry ingredients until just moistened and add the apples and bacon. Heat oil to 375. If using gluten free flour, heat oil to 350. Drop dough by tablespoonfuls into the hot oil and fry until golden brown. Don’t do more than 4-5 at a time. It will take about 4 minutes in total but you need to turn them to brown evenly so 2 minutes per side. Drain on paper towels. Dip in maple glaze (recipe follows) while warm. Makes about 32.
Maple Glaze
1 c. Powdered sugar
1/2 c. maple syrup
a little water if mixture gets too thick
Combine all ingredients and set aside until ready to use.
Winter Squash Ravioli Soup

Squash Ravioli Soup
After cooking up a Hubbard squash, I was looking for a way to use some of it in a soup. It is chilly here and I was in the mood for soup, but I wasn’t in the mood for a pureed soup. I found inspiration in my freezer. I was putting some of the squash in the freezer, when I noticed a package of won ton wrappers. I decided to use the squash as a filling for ravioli, then just put the ravioli in the soup. I played with the spices and added some butter to the filling, too. It needed that extra bit of fat for flavor. It worked well. I just cooked the ravioli right in the soup, but you could also enjoy them without soup at all. You can just cook the ravioli in water. Once they are tender, drain and top with the sauce of your choice. I like brown butter with a little sage, but even a red sauce would be nice with the ravioli. Here is the recipe- for both the ravioli and the soup. Almost any winter squash or pumpkin could work in the filling, too.
Squash Ravioli Soup
Ravioli:
24 round won ton/dumpling wrappers
Filling:
1 cup cooked winter squash or pumpkin
2 T. softened butter
1 T. chopped parsley
1 t. paprika
1 t. nutmeg
½ t. garlic powder
Salt and pepper to taste
Pinch of cayenne
Soup:
2 T. oil or butter
2 onions, peeled and sliced
6 c. stock- chicken or veggie
3-4 carrots, peeled and sliced
2-3 c. thinly sliced collard greens
Salt and pepper
Dash of hot sauce
Fresh chopped parsley
Combine ravioli filling. Adjust seasonings. Place a rounded tablespoonful of filling on one of the wrappers. Dampen edges with water and place another wrapper on top. Seal, pressing out as much air as possible. Continue with remaining filling and wrappers- you should have 12 raviolis in all. Set aside while making the soup.
Heat oil or butter in a pot and add the onions. Cook until onions are tender. Add stock and bring to a boil. Add carrots and collards and cook until veggies are tender. Add seasonings and bring soup to a boil. Add the raviolis and let the soup simmer gently until they are cooked- about 4 minutes. Stir a little to keep them from sticking, but gently. They get a lot bigger and are sort of delicate. Transfer gently with a large spoon to soup bowls and ladle over the soup. Serves 4- 6.

Autumn Cabbage with Apples
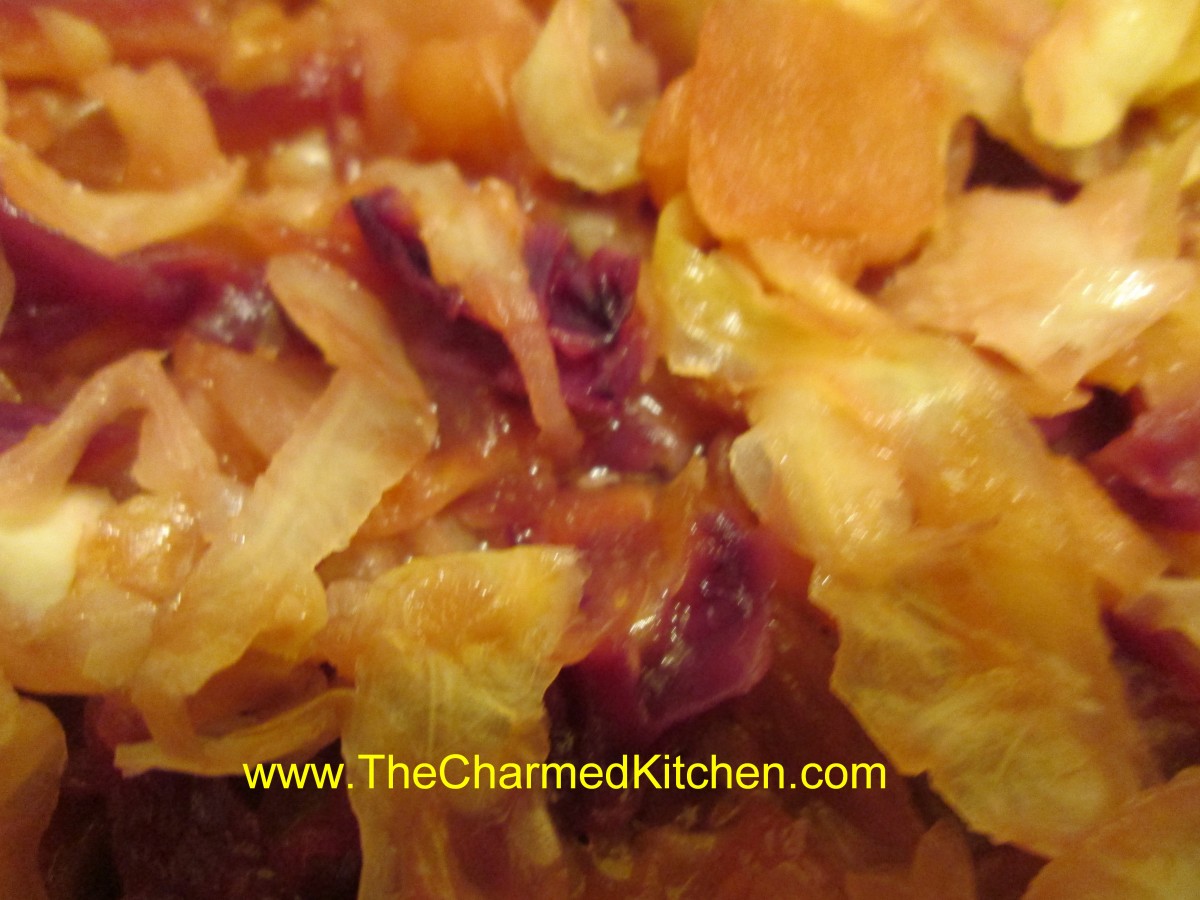
Autumn Cabbage with Apples
I think cabbage is underrated. It is such a versatile vegetable. Cabbage is good in both hot and cold dishes, it isn’t expensive, and cabbage is good for you. I was looking for a side dish for a duck dinner the other night and I decided to start with cabbage. Since I had a pretty good sized head of green cabbage and just a small piece of red cabbage, I mixed the two together. I added cider vinegar, sugar and seasonings. Then I added apples to round out the dish. It had a sweet and sour flavor that went well with the duck. I’d also serve this as a side dish with ham, pork or even a lamb roast. It would go well with any of them. You could use any color cabbage for this dish- or combine colors, as I did. Perfect for a Fall dinner.
Autumn Cabbage with Apples
2-3 T. oil
2-3 onions, sliced thin
8 c. chopped cabbage, any color
1 c. stock- chicken or vegetable stock
1/2 c. apple cider vinegar
1/4 c. sugar
1 t. celery seeds
3 apples, peeled , cored and diced
salt and hot pepper sauce to taste
Heat oil in skillet and cook onion until tender and a little wilted. Add cabbage, stock, vinegar, sugar and celery seeds and cook until cabbage is tender. Most of the liquid will evaporate. Add the apples and cook until apples are just heated through. Season with salt and hot sauce and serve. Serves 5-6.
Apple Pie Blintzes

Apple Pie Blintzes
Since I posted the recipe for making your own apple pie filling yesterday, I thought I’d share a fun way to use it- other than in a pie. I made blintzes with the pie filling. I used flour tortillas for the crepes.
I soaked the tortillas in milk – actually I soaked them in almond milk because that is what I had- but you could use regular milk if you prefer. By soaking the tortillas in milk, they soften up and can be used like a crepe. Soak them for at least 10 minutes, or up to 30 minutes. I placed the tortillas in a shallow baking pan and made sure to drizzle each one with almond milk as I added them to the pan.
For the filling, I used some of my homemade apple pie filling. If you have fresh apples, you can just peel and slice the apples, then cook them in a little water and sugar until softened. You can make them as sweet as you like. You made need less sugar if the apples are extra sweet. Add some cinnamon and nutmeg, too. If they are too watery- combine a little cornstarch with cold water and drizzle the mixture in until the apples thicken up. Don’t add too quickly or you might them too thick and gummy.
To assemble the blintzes, place a softened tortilla on your work surface and spoon a little apple filling in the middle. You can do this with hot filling, or even make the filling ahead of time and use it cold. Don’t over fill them or you won’t be able to fold them up. I used 8-inch tortillas and used about 1/4 cup of filling for each one. Fold the sides in until they almost meet in the middle and them roll the tortilla up to cover the filling. Place seam side down until ready to fry them.
Heat butter in a skillet, and brown the blintzes over medium heat until lightly toasted on both sides. They will be crispy on the outside, but tender in the middle. Put on a serving plate, sprinkle with powdered sugar and serve while warm. These are fine just as they are, but feel free to add ice cream or whipped cream, too.
My guests really liked them and said they did not realize they were made from tortillas. I have made these before and use different fruit fillings. I’ve even made a cheese filled version a few times. It seems I usually have a package of tortillas, so it is a go-to dessert for me in a pinch.
Canned Apple Pie Filling
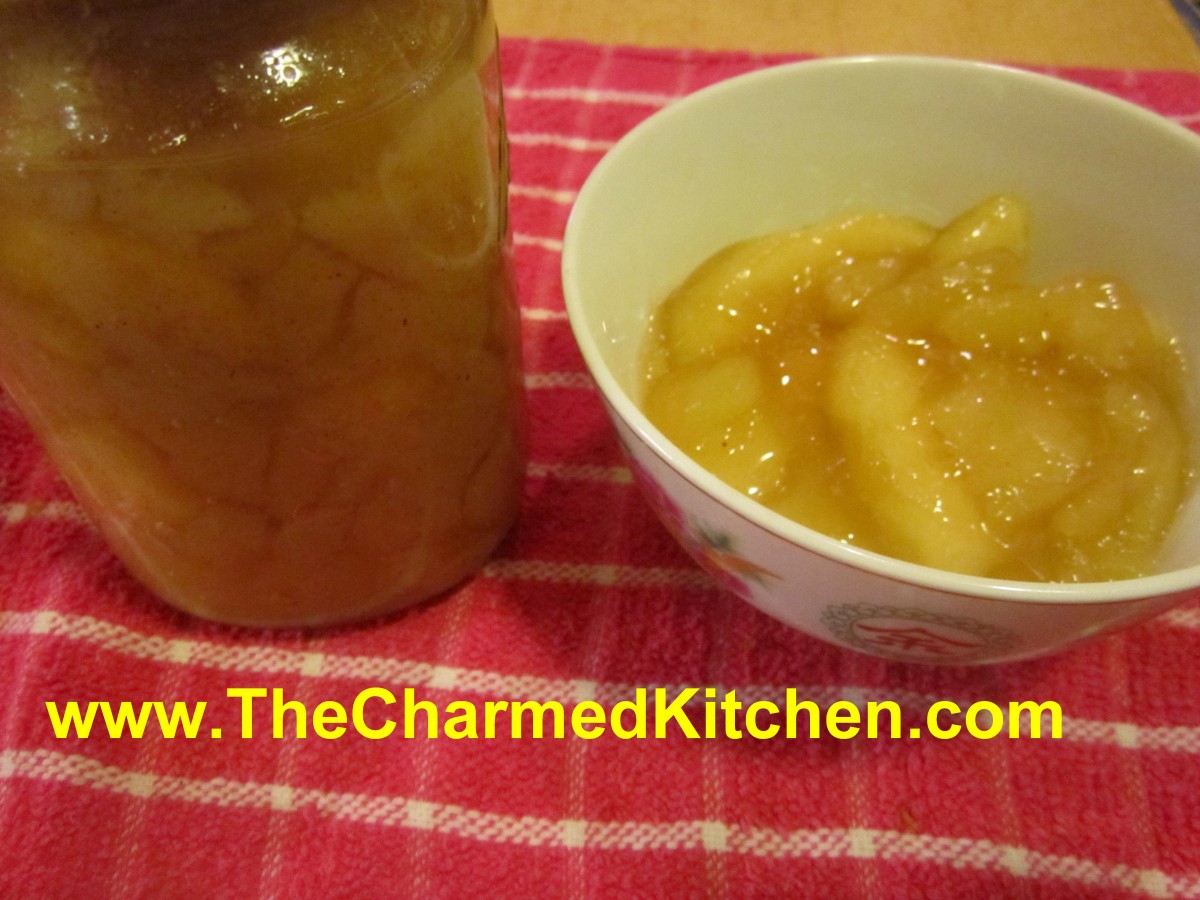
Apple Pie Filling
While I think the best pie is made with fresh apples, I also like making and canning my own apple pie filling. It is a handy way for me to enjoy local apples throughout the year. It is also a whole lot better than any commercial pie filling I have tried. Loaded with plenty of big chunks of apples and seasoned with cinnamon and nutmeg- I think it the next best thing to fresh apples for baking.
I use my canned filling to make pies, but I also use it for kolachy, blintzes, cakes and more.
The hard part, for some, is getting a hold of Clear Gel. It is a special type of cornstarch. I buy mine on line, but you can find it in stores where the Amish shop. Clear Gel stays thick, even if it is reheated. Regular cornstarch will not.
Here is the recipe I use. You can tweak the seasonings to suit your own taste, but keep in mind that spices sometimes get stronger when canned, so don’t go too crazy!!
Apple Pie Filling
6 qts. apples, sliced and blanched
5 1/2 c. sugar
1 1/2 c. Clear Gel- modified cornstarch available on line and in Amish stores
1 T. cinnamon
1 t. nutmeg
2 1/2 c. cold water
5 c. apple juice
3/4 c. lemon juice
If apples lack tartness use an additional 1/4 cup of lemon juice. Wash, peel and core apples and cut into 1/2 thick slices. Place in water treated with either lemon juice, citric acid or ascorbic acid to prevent darkening. Remove from solution and drain well. Blanch in boiling water- 2 quarts at a time- for 1 minute. As you finish each batch place in a bowl and cover to keep warm. In large pot combine sugar, Clear Gel, cinnamon, nutmeg, water and apple juice. Stir over medium heat until mixture begins to bubble and thicken. Add lemon juice and boil 1 minute. Add drained apples and stir gently to combine. Ladle into hot, clean jars leaving 1 1/2 inches of headspace. Remove air bubbles. Wipe rims and adjust lids. Process in a boiling water bath- pints or quarts for 25 minutes. After the time is up, turn off canner and let jars sit in water bath for 5 minutes before removing. This will reduce the chance of siphoning. Makes 7 quarts or 14 pints.
For only 1 quart
3 1/2 c.apples
3/4 plus 2 T. sugar
1/4 c. Clear Gel
1/2 t. cinnamon
1/8 t. nutmeg
1/2 c. cold water
3/4 c. apple juice
2 T. lemon juice
Chocolate Biscotti
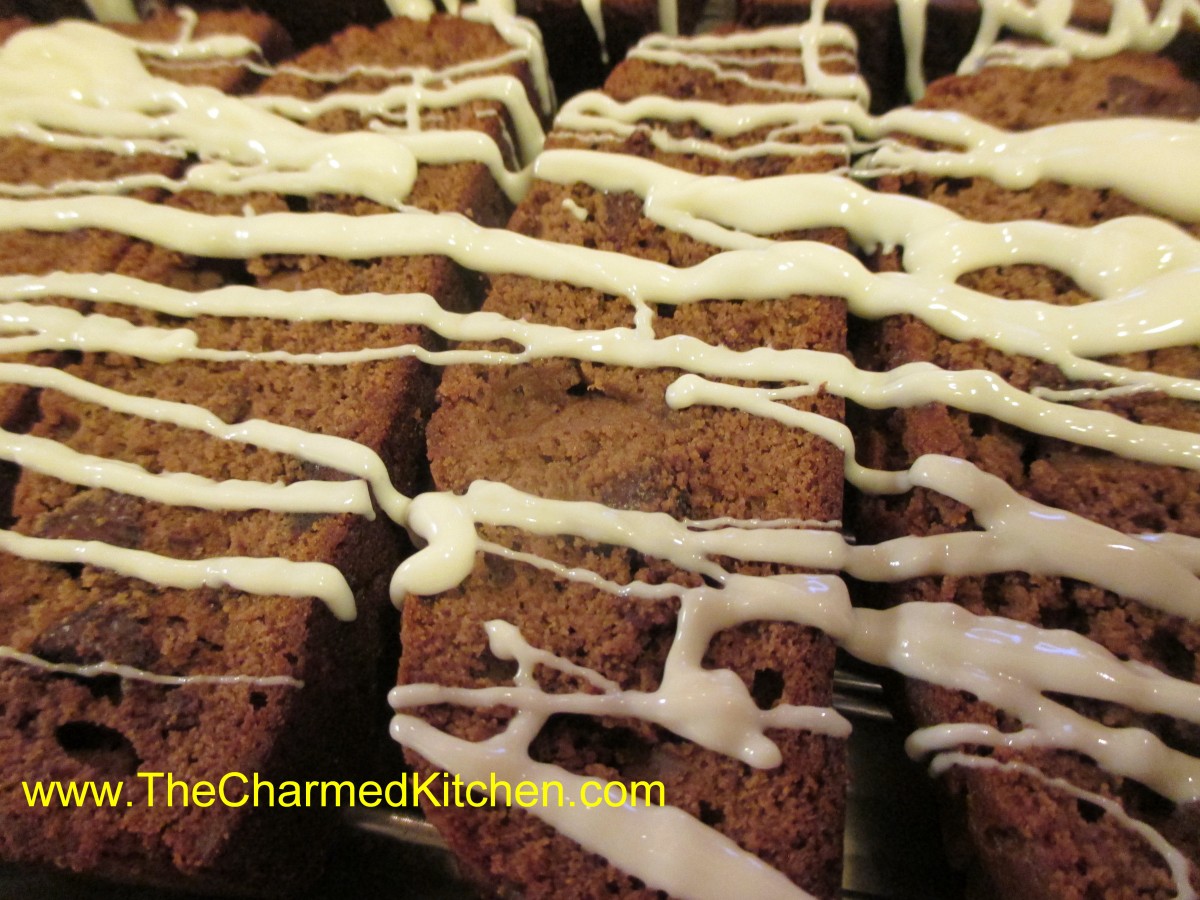
Chocolate Biscotti
These Chocolate Biscotti are a favorite of mine. They are not too sweet and have plenty of chocolate flavor. If you haven’t made your own biscotti before, you should. These crisp, twice baked cookies, are easy to make. The second bake is where biscotti get their famous crunch. They are baked until they have this lovely crisp texture, meant to be dipped in coffee.
Handy tip: Once biscotti are baked the first time, they are sliced and baked a second time. Most recipes call for you to turn the biscotti over half way through the second bake- to get them crisp/dried evenly. To save time, I just place a cooling rack on my baking sheet before the second bake. I then lay the sliced biscotti on the cooling rack. Now, during baking, air flows under the biscotti and there is no need to turn them over while baking. Saves time.
Chocolate Biscotti
3/4 c. brown sugar
1/2 c. butter, room temperature
2 eggs
3/4 c. chocolate syrup
2 1/2 c. flour
2 t. baking powder
1/2 t. salt
1 c. chocolate chips (mini, regular or flavored)
1 c. chopped nuts, optional
3 oz. white chocolate
Grease 2 9×5-inch loaf pans and set aside. Beat sugar and butter together than beat in eggs and syrup. Beat in dry ingredients. Dough will be soft. Stir in chips and nuts. Divide batter in prepared pans and use spatula to spread evenly. Bake in a 350-degree oven for about 35 minutes. Tester inserted in center should come out clean. Turn loaves onto rack and cool 15 minutes. Reduce oven temperature to 300-degrees. Using a serrated knife cut loaves into 3/4 -inch slices. Place cooling rack on a baking sheet. Place biscotti slices cut side down on cooling rack and bake about 18-19 minutes. Cookies will become harder/crisper as they cool. Cool completely. Melt white chocolate and drizzle over biscotti. Allow to set up. Makes about 2 dozen.
Homemade Pumpernickel Bread

Pumpernickel Bread
There are few aromas I like more than freshly baked bread. I don’t bake much during the hot summer months and look forward to cool Autumn days and fresh baked bread. I enjoy baking all sorts of breads. Today I made Pumpernickel Bread. The dark color comes from a mixture of rye flour, strong coffee, cocoa powder and molasses. These ingredients also give this bread a richness and texture I adore. It’s hard for me to find a store bought Pumpernickel bread that comes close to this one. Some store bakeries rely on caramel coloring for the color in the bread. For real flavor you need the real ingredients.
Pumpernickel Bread
2 Packages active dry yeast
½ c. warm water
2 c. lukewarm strong coffee
¼ c. each molasses and unsweetened cocoa
2 T. Caraway seeds
2 t. salt
5-6 c. flour- I use bread flour
2 c. rye flour
Cornmeal
1 egg white, slightly beaten
In large bowl dissolve yeast in warm water. Stir in coffee, molasses, cocoa, seeds, salt and 3 cups of flour. Beat with wooden spoon about 2 minutes. Stir in rye flour and enough of the remaining regular flour to make soft dough. Turn onto floured surface and knead until dough is smooth, about 10 minutes. Place in greased bowl, turning to grease top, cover and let rest until doubled, about 1 hour. Grease large baking sheet and sprinkle with cornmeal. Set aside.
Punch down dough, divide in 2, and form into balls. Place on baking sheet and cover. Let rise until double, brush with egg whites, slash tops and bake at 375 for 35-40 minutes. Makes 2 loaves.


