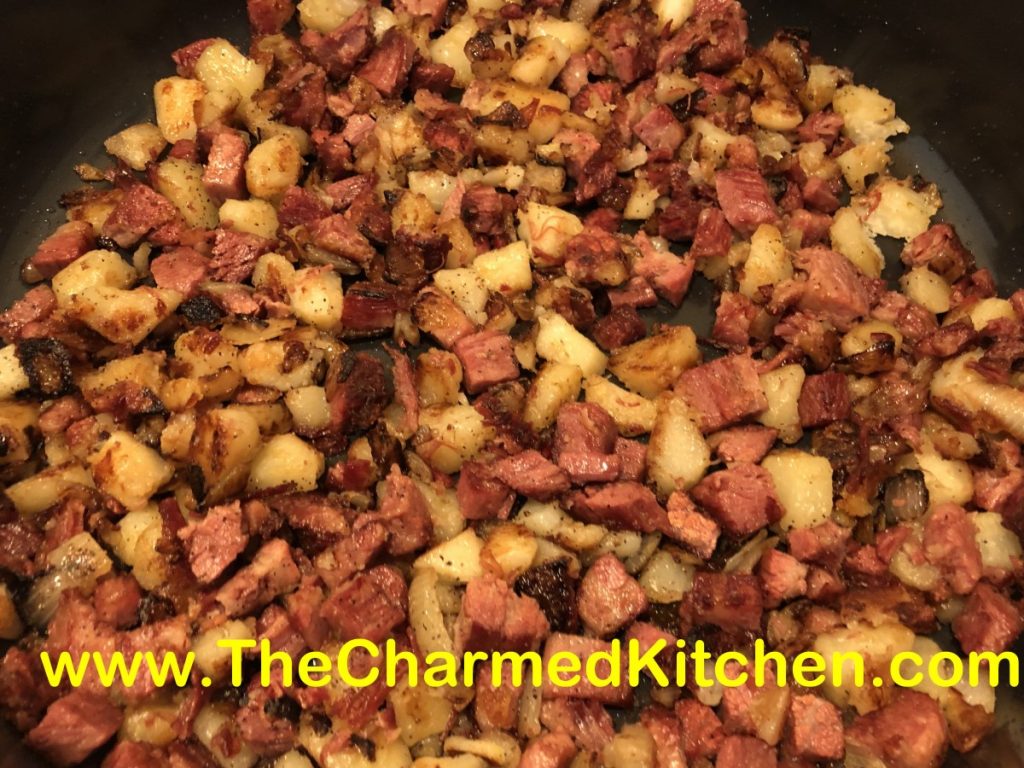
Mom’s Corned Beef Hash

My mom used to make the best hash. Making hash yesterday, gave me a chance to think about her. She taught me so much about cooking- and life.
I didn’t have any specific recipe for hash, so I made a point of writing down what I did, and measuring ingredients, so I could share the recipe with you. The hash tasted a lot like my mom’s. That made me smile. Here is the recipe. Hope you give it a try.
Corned Beef Hash
4 T. oil, butter or bacon fat
2-3 medium onions, peeled and chopped
1-1½ lbs. potatoes, 4-5 medium, cut in cubes, peeling optional
1 lb. corned beef, cut into ½- inch cubes
Salt and pepper
Eggs, optional
In skillet, heat up your fat of choice. Cook onions over medium heat until translucent. Add cubed potatoes and cook until potatoes and onions are starting to brown. Rather than constantly stirring, I let the potato and onion mixture cook a few minutes, then turn over sections with a spatula. It seems to get them brown faster. Check a few random potatoes to make sure they are tender. Add the corned beef and continue cooking until everything is starting to get a little crispy. Season to taste with salt and pepper. At this point you can serve it. I like to add the eggs. To add the eggs, crack and add eggs, one at a time, to the pan. Keep some space between the eggs, if you can. Turn heat down to medium low and cover the pan. It should take about 5 minutes for the eggs to cook, with the whites firm and the yolks runny. Try not to keep peeking. I know you want to, but every time you remove the lid, the heat dissipates. Wait 3 minutes to check the first time, if you can. Don’t set the heat too high, or you will burn the bottom of the hash while the eggs cook. I usually add one egg for each person I am serving. Feel free to allow more eggs per person, depending on your guests. Serves about 4.
Note: If you want to save yourself from dicing potatoes, you can use frozen hash browns. I prefer diced fresh potatoes, but the hash browns will save you time.

Cream Scones

I must admit that for me, the difference between a scone and a biscuit is sometimes hard to see. Both use the same ingredients, for the most part. They can be rolled and cut out the same way, too. I often say that scones are like biscuits, but with more stuff in them. Scones are often sweeter, too.
This recipe is a tough call for me. I was given the recipe by a friend a long time ago. She called them Cream Scones. I could easily see calling them Cream Biscuits, instead. Whatever you call them, these little gems are tender, flaky and super easy to make. You can make variations with all sorts add ins. I recently made some with mini chocolate chips and orange zest.
Cream Scones
2 c. flour
1 T. sugar
½ t. salt
1 T. baking powder
1 c. heavy cream
Preheat oven to 425 degrees. Sift together dry ingredients and gradually add cream to form soft dough. Knead lightly on a floured board until dough sticks together. Roll to ½ – ¾ –inch thickness and cut with 2-inch biscuit cutter. Re-roll scraps and continue cutting, handling dough as little as possible.* Place on baking sheet and bake 10-12 minutes or until golden. Makes 8-10.
* Instead of rolling them out and cutting into rounds, I pressed the dough into an 8-inch square. I cut the square into 4 smaller squares. I then cut and “x” across each of the four squares, making 4 triangles (16 in all). Bake as directed above.
Basque Soup

I taught a class a few days ago on vegetarian cooking. This one was one of the dishes we made. It is a favorite of mine. It was enjoyed by the class, too. The soup is hearty and rich flavored. We used oil and almond milk, so the soup was vegan. You could use milk and butter, if you prefer. It tastes great, either way. It also comes together quickly, with ingredients you can keep on hand, so it is a great homemade soup when you don’t have a lot of time. The combination of milk, tomatoes and corn also makes it a pretty dish to serve. We used a jar of my home canned tomatoes and corn I had frozen last summer.
Basque Soup
1 c. chopped onions
1 1/2 c. chopped celery
1/4 c. oil or butter – we used oil in class
1/4 c. flour
3 c. milk*
1 (16 oz.) jar stewed tomatoes, undrained
1 can whole kernel corn, undrained- we used frozen corn
3-4 cans butter beans, drained and rinsed
3-4 cups water and 1T. paste-type vegetable soup base
or 3-4 cups vegetable broth
pepper to taste
hot pepper sauce to taste
shredded mild cheese, optional
Sauté onions and celery in oil until tender. Stir in flour until smooth and add milk, stirring to keep lumps from forming. Stir over medium heat until milk has thickened and begins to boil. Stir constantly as mixture simmers for an additional minute or two. Add remaining ingredients, except cheese and bring up to a simmer. Adjust seasonings. Ladle into bowls and top with cheese, if desired. Serves 8-10.
Note: You can use almond, rice, oat or soy milk in place of the dairy milk, if you like.
Cheesy Chocolate Hamantaschen

A friend shared this recipe recently, and I was intrigued. I had to try these cookies. The filling for these traditional Jewish cookies is inspired by the filling used in cannoli. I made a few changes from the recipe he shared, and was very happy with how they turned out.
The dough, which contains no sugar, has a wonderful, pastry-like texture. It pairs up well with the filling. The drizzle of chocolate is a perfect finish for them. They aren’t a gooey, overly sweet cookie, which I really like.
They pair up nicely with tea or coffee. I confess, I had a couple for breakfast with my morning tea. I would definitely make these again.
Thanks, Jared, for sharing this recipe.
Cheesy Chocolate Hamantaschen
Filling:
¼ c. ricotta cheese
5 oz. cream cheese
½ c. powdered sugar
1 t. cinnamon
½ c. mini chocolate chips
Dough:
½ c. (1 stick) butter, softened
3 oz. cream cheese
½ c. half and half or milk
1 t. vanilla
½ t. salt
2½ c. flour
Topping:
1 egg white
2 T. water
½ c. chocolate chips
Powdered sugar, optional
Prepare the filling. Beat together the ricotta and cream cheese until smooth. Mix in the milk and cinnamon, then stir in the chips. Chill until ready to use. Make the dough by mixing the cream cheese and butter together. Add the milk, vanilla and salt and mix until smooth. Stir in the flour until a stiff dough forms. Wrap the dough in plastic wrap, or put in a bag and chill at least an hour – or up to a couple of days – before proceeding. On lightly floured surface, roll the dough to a little less than ¼ – inch thickness. Cut dough out into 2-3 inch circles. Place a scant teaspoon of filling in middle of each dough circle. Combine the egg white with water and beat together. Brush a little of the egg white mixture over the edges of the dough circle. Fold the dough up in thirds towards the center, pinching the edges to seal. They should look like little three-corner hats. Repeat with remaining dough, re-rolling the scraps. Brush folded cookies with a little more of the egg white mixture. Place on lightly greased cookie sheets and bake in a 375-degree- oven for 15 minutes, or until golden on the bottom. Remove to cooling rack. Once cooled, melt the chocolate chips and drizzle over the cookies. You can top with some powdered sugar, if you like. Makes 2½-3 dozen.
Chili Bean Spoon Bread

This is a great dish when you want to go meat free, but still have a hearty meal. It combines the flavors of chili with a cornbread topper. A classic combination, for sure.
The base is a lentil chili that you place in a casserole dish, then top with a cornbread batter. The dish is finished off in the oven until the cornbread is baked.
To serve, spoon some of the cornbread onto your plate and top with the lentil chili. I have made it for friends and it is always a big hit, even for the meat eaters. Perfect to warm you up on a chilly day.
You can serve this as a vegetarian main dish, or as a side dish.
Chili Bean Spoon Bread
1/2 lb. lentils
pinch of ground cloves
2 c. milk
1/2 t. salt
2/3 c. cornmeal
4 T. butter
4 eggs
4 T. oil
2 large onions, chopped
1 clove minced garlic
1 T. chopped parsley or 1 t. parsley flakes
1 T. chili powder
1 t. ground cumin
1 (14 oz.) can diced tomatoes, undrained
salt and pepper to taste
In saucepan cover lentils with about 2 cups water and add cloves. Bring to a boil, turn down to a simmer and cook, covered, until lentils are tender, about 20 minutes. You may need to add a little more water. Meanwhile in another saucepan heat milk and salt almost to boiling. Stir in cornmeal and continue cooking, stirring constantly until thickened. Remove from heat. Stir in butter and eggs and set aside. In oil sauté onions and garlic until tender. Add seasonings, tomatoes and lentils and heat until bubbly. Adjust seasonings. Pour lentil mixture into greased 2-quart casserole dish. Spoon over the cornmeal mixture. Set casserole dish in larger pan and add 1 inch of hot water to larger pan. Bake in a 350-degree oven for 30-40 minutes, or until bread is firm and golden. Serves 4-6.
Bean and Veggie “Burgers”

We made these in a vegetarian cooking class last night. I have mixed feelings about calling them veggie or bean “burgers”. We started with a basic bean “burger” recipe then made the veggie variation below by adding grated raw veggies to the mix and some extra bread crumbs to hold it all together. They are best when browned and crispy on the outside. The middle with be tender and moist.
Basic Bean “Burgers”
2 c. cooked beans, drained and mashed
1 c. cooked rice
1 medium onion, chopped
2 eggs or egg substitute
1/2 c. breadcrumbs, plus extra for coating
salt and pepper to taste
oil for frying
Combine all ingredients, except oil, in a bowl and mix well. Add more breadcrumbs, if needed, to make the mixture thick enough to shape into patties. Shape into patties and roll in extra crumbs. Heat small amount of oil in skillet and cook until browned on both sides and cooked through. Makes 6-8, depending on the size.
Variations: Just start with the recipe above
Chili Bean : Use kidney beans or black beans and season with chili powder and oregano, maybe even cilantro. You can also roll them in cornmeal, rather than the breadcrumbs. Top with salsa.
Veggie : Add 1 or 2 grated carrots, 1 chopped and seeded sweet pepper and 2 ribs of celery, minced. You’ll likely need extra breadcrumbs. Add some herbs for extra flavor or some hot sauce.
Taco Bean : Use pinto beans or kidney beans, season with taco seasoning and add a small can of diced green chilies, drained. You can also add minced black olives, if you like. Mix flour and cornmeal together for coating.
Mushroom: Add 1 c. fine chopped fresh mushrooms that have been sautéed a little and drained. Increase bread crumbs a little and season with parsley and basil.
The variations are really endless. Use your imagination and what is on hand. I like to use cooked lentils, too. Just make sure to finely dice any vegetable so that they will mix well and keep the patties from falling apart. To test seasonings either taste before you add the eggs, or cook a small amount if the eggs are already in.
Broccoli with Hummus
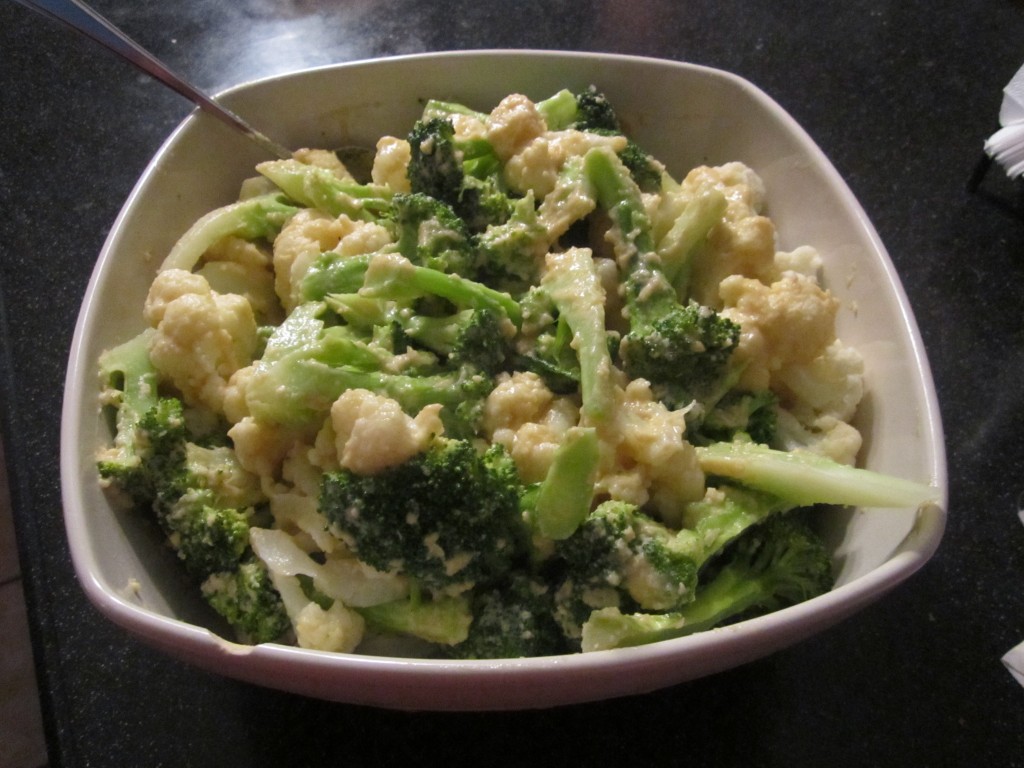
When you think of hummus, I bet you think of it as a dip. It is a great dip, paired with some pita bread or fresh veggies. But hummus can be more than a dip. I love to toss hot veggies with hummus. I especially like to do this with broccoli. I started doing this years ago for a friend who was vegan. The hummus was a nice substitute for butter or a cheese sauce.
You can use homemade hummus, but store bought is fine, too. Hummus is made from chickpeas, olive oil, tahini, lemon juice, garlic and a few seasonings. Of course, you can make all sorts of variations. You just combine the ingredients in a food processor or blender until smooth. Doesn’t get much simpler. I prefer to make my own, so I can flavor it the way I want.
One of my favorite combinations is hummus with broccoli. The flavors work great together. You just toss hummus with hot, freshly cooked broccoli. So yummy.
Since I had some cauliflower, I added some of it to the dish as well.
So the next time you have some hummus around, try tossing it with hot, cooked veggies for a fun side dish or an easy vegetarian main dish.
Steamed Broccoli with Hummus
1 lb. fresh broccoli, you can also use cauliflower or a combination
1/2 c. hummus, homemade or store bought, recipe follows
Cut broccoli into long spears, peeling and trimming tough stems. Steam until just tender. Warm hummus over low heat or in a microwave and spoon over the cooked broccoli. Toss to coat evenly. Serves 4 as a side dish, 2 as a main course.
Hummus
1 can garbanzo beans, drained- or about 2 cups cooked chick peas
1/4 c. olive oil
2 T. lemon juice
2 T. tahini (sesame seed paste)
2 cloves garlic
salt and hot pepper sauce to taste
Combine all ingredients in a blender or food processor until smooth. Adjust seasonings. Chill. Serve with pita bread, crackers or fresh vegetables. Also nice spread in a pita bread with sliced tomatoes, cucumbers and lettuce. Freezes well.
Lemon Tea Cake
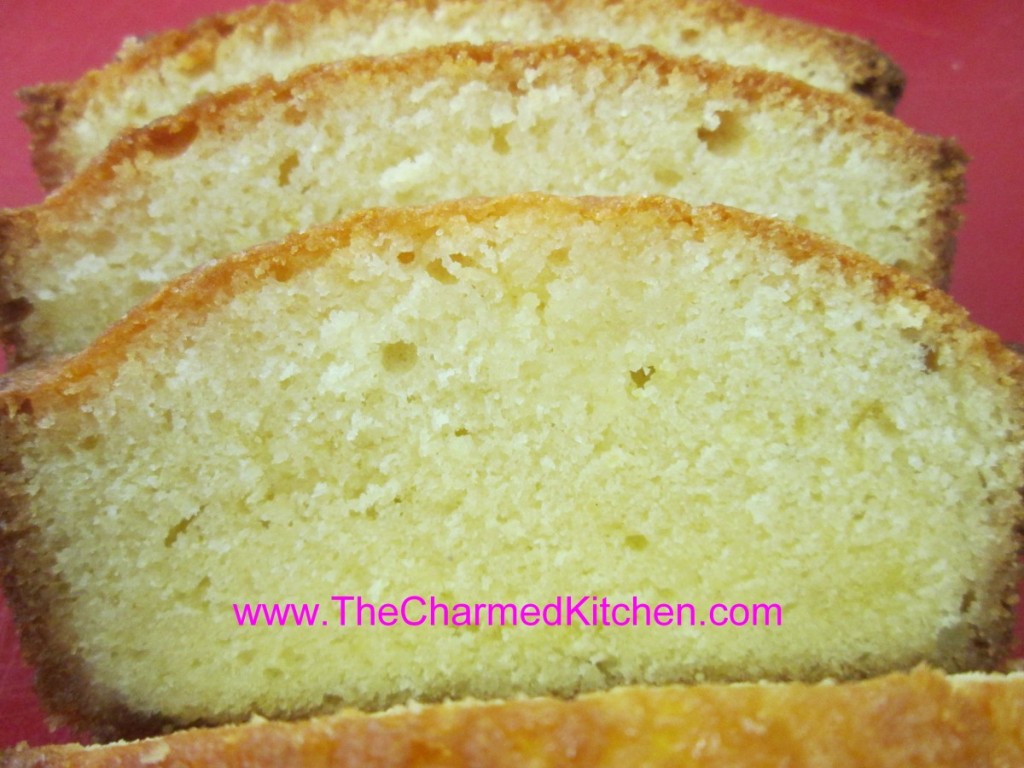
This is one of my favorite cakes of all time. It is a simple cake, enhanced with the flavor of lemon juice and lemon zest. Once out of the oven, you poke the hot cake with a large fork or a skewer, and pour a lemon syrup over it. The syrup gives the cake an extra lemony tang.
It is a perfect addition to afternoon tea.
Great all on its own, this cake is also wonderful served with fresh berries and whipped cream for a Spring dessert. On a hot day, I have been known to top it with a scoop of ice cream.
Before you ask, the measurements are correct- only 3/4 cup of flour. No leaveners like baking powder or baking soda, either. The cake does not rise a whole bunch, but the texture is still very nice. The texture of the cake helps it to stand up to the lemon syrup.
I hope you will give it a try. I made it for a family baby shower over the weekend and it was a hit.
Lemon Tea Cake
2 lemons
3 T. sugar for topping
½ c. butter, softened
¾ c. sugar
2 eggs, beaten
3/4 c. flour
6 T. milk or half and half
Preheat oven to 375 degrees. Grease an 8- inch loaf pan and line with wax or parchment paper. Grate the lemon rinds and set aside. Combine the juice of 1 of the lemons with the 3 tablespoons of sugar, stirring to dissolve sugar. Set aside.
Cream together the butter with the rest of the sugar and beat until fluffy. Beat in the eggs, a little at a time until well mixed. Stir in the flour and lemon peel and beat well. Add the milk and beat well. Pour batter into prepared pan and bake at least an hour. The cake should spring back when touched lightly. As soon as you remove the cake from the oven pierce it all over with a long-tined fork or a skewer. Pour over the reserved lemon juice mixture. Cool cake in pan before serving. Cake will be moist and tangy.
Banana Fritters

I had a class recently and we had made doughnuts. We also made fritters. We made two different fritters, including these banana fritters. These are a fun and easy dessert to make if you find yourself with some ripe bananas. Simple to make and a nice change from banana bread. Fresh or frozen bananas work fine. You can experiment with other fruit, too.
The fritters puffed up beautifully when fried. They were just a little crisp on the outside, tender and light in the middle. There is almost no sugar in the batter. The sweetness comes from the bananas and the powdered sugar or cinnamon sugar they are rolled in. I think they would be great with a powdered sugar glaze, too.
So here is the recipe. A fun way to use ripe bananas.
Banana Fritters
2 large ripe bananas- you want 1 cup diced banana
2 eggs, beaten
1 c. milk or half and half
2 T. melted butter or oil
2 c. flour
2 T. baking powder
2 T. sugar
1 T. cinnamon
1/2 t. salt
Oil for frying
powdered sugar or cinnamon sugar
Peel bananas. Cut up into small pieces. You should end up with about a cup of prepared bananas. Combine in a small bowl with the eggs, milk and oil. Combine flour with the baking powder, sugar, cinnamon and salt. Stir into the banana mixture. Heat oil in a pot to 350 degrees. Oil should be at least a couple of inches deep. By rounded tablespoonfuls, drop batter into the hot oil to fry. Only do a few at a time, so you don’t overcrowd them, or bring the temperature of the oil down too much. Fry until golden brown. It will take several minutes. Remove with slotted spoon and drain on paper towels. Repeat with all the batter. You will end up with 2-3 dozen fritters.
Once the fritters are cooled down a little, you can roll them in powdered sugar, cinnamon sugar or even make a powdered sugar glaze.
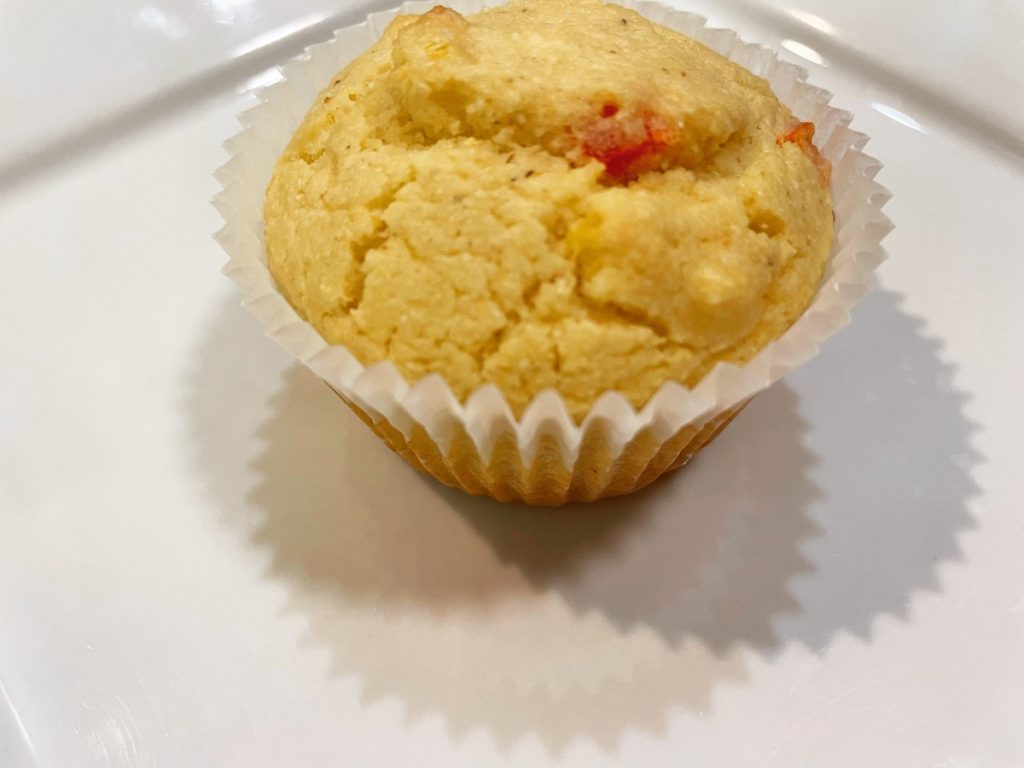
Classic Corn Muffins
Corn muffins are a classic, old fashioned recipe. I love them, but I like to shake things up a little, too. Below is my recipe for corn muffins with eight recipe variations.
Pictured: Confetti Corn Muffins are a great side dish for chili or stew. I like them with melted butter and a little honey. They make a nice addition to breakfast. For this variation I added corn, sweet peppers and pepper flakes to the batter. It makes them just a little special. The recipe follows along with the classic version and the other variations.
Corn Muffins
1 c. flour
¾ c. cornmeal
3 T. sugar
4 t. baking powder
½ t. salt
¼ c. butter
1 c. milk
2 eggs, beaten
Preheat oven to 400 degrees. Grease or paper line 12 muffin cups. In medium bowl combine dry ingredients. Cut in butter to resemble coarse crumbs. Combine milk and eggs and add all at once to dry mixture, stirring until flour is just moistened. Spoon batter into prepared pans and bake 20-25 minutes or until golden brown. Serve warm. Makes 12.
Variations
Bacon, Pepper and Tomato
Add ½ teaspoon fresh ground pepper to dry ingredients. Add ½ cup cooked, crumbled bacon (regular or turkey bacon) and 8 oz. can tomatoes, well drained and chopped to milk mixture.
Confetti
Add ½ cup whole kernel corn, ¼ cup minced green or red sweet pepper and ¼ teaspoon crushed red pepper to milk mixture.
Ham and Swiss
Add 1 cup fine chopped Swiss cheese and ½ cup ham or turkey ham to milk mixture.
New England
Add 2 tablespoons molasses to milk mixture.
Sausage
Add ½ pound cooked, crumbled bulk sausage to milk mixture.
Sesame
Add 3 tablespoons toasted sesame seeds to dry ingredients.
Southland
Add 1 cup cooked rice and 1 t. hot sauce to milk mixture.
Chilies and Cheese
Add 1 C. shredded Cheddar cheese and 1 (4 oz.) can chilies, chopped and drained to milk mixture.


