Pear Sweet and Sour Sauce

I love sweet and sour sauce. I have made many versions over the years and have used different fruits in them. I decided to try to make sweet and sour sauce with a ripe pear. It worked out wonderfully. Even better than I expected, actually. The sweetness of the pear was a great addition to the sauce. It came out a rich, mahogany color and is full of flavor. I will make a double batch the next time. I have already enjoyed it with egg rolls. Thinking of making sweet and sour chicken next.
I try to be as exact in measuring as I can. I had a pretty big Bartlett pear, but use 2 small pears, if that is what you have. Any pear will work in this recipe- just be sure it is ripe. As the sauce cooks the pear pretty much falls apart and disappears into the sauce. I also used Sriracha sauce, which is hot, but not as hot as some other hot sauces. Depending on the brand of hot sauce you are using, you might want to add less. Then again, heat is a matter of personal preference. Spice it up according to your own taste. That is one of the perks of making it yourself.
When I make a sweet and sour sauce- I use Clear Gel, instead of traditional corn starch. It is modified cornstarch (non-waxy) and when you reheat the sauce, it will stay thick. Regular cornstarch will often thin out when reheated. Clear Gel is used in pie fillings and a lot of frozen foods and condiments. Often listed on the label as modified food starch. It looks just like regular cornstarch. I buy mine online or when I am in stores in Amish communities.
So here is the recipe for a sweet and sour sauce I will surely make again. Planning on making some to freeze, too.
Pear Sweet and Sour Sauce
1 large pear, (about 8 oz.) peeled and diced fine
½ c. cider vinegar
½ c. sugar
3 T. soy sauce
1 T. minced garlic
1 T. Sriracha sauce- or other hot sauce- add to suit your taste
2 t. grated ginger
3 T. water
2 T. cornstarch or Clear Gel*
2 t. sesame oil
In medium saucepan, combine all ingredients, except the water, cornstarch and sesame oil . Simmer mixture, covered about 5-7 minutes, or until pear becomes tender. Stir occasionally. Combine cornstarch with water and stir until smooth. Pour slowly into simmering pear sauce, stirring to prevent sticking. Sauce with thicken. Stir in sesame oil. Makes about 2 cups. Keeps in fridge for weeks.
* If you use a type of cornstarch called Clear Gel, you can reheat the sauce without it becoming runny. Clear Gel, also called modified food starch, or modified cornstarch, is available online and at some specialty food stores. I find it in Amish communities.
Halloween Sushi
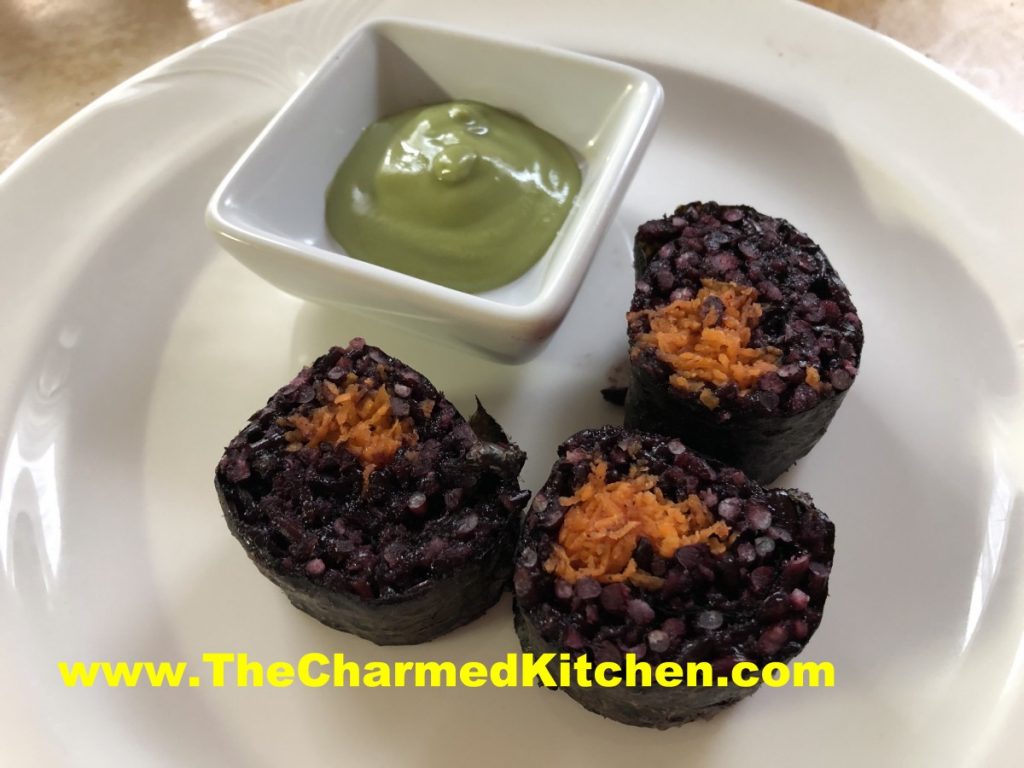
When I make sushi, I often use brown or black sticky (sweet) rice. I actually prefer the texture over the white rice. It occurred to me that the black sticky rice might make fun sushi for Halloween. I find black sweet rice at my local Asian grocery store. That is also where I get nori, rolling mats and wasabi.
To add a pop of color, I finely shredded carrots and added them to the sushi roll, too. The black rice actually cooks to a dark purple color. The color combination is fun for Halloween.
You’ll need a rolling mat, but beyond that, not a lot of special equipment is needed. I served my sushi with wasabi. You could serve with pickled ginger, too. Here is the recipe and directions.
“Spooky” Sushi
To make the rice:
4 c. black sweet rice, uncooked
4 c. water, or a little more
1 recipe Sushi Su, recipe follows
finely shredded carrots
In strainer, rinse the rice repeatedly with cold water until the water runs clear. Place rice in microwave safe container with the 4 cups of cold water. Cover container with a lid and place in microwave. I use a large Pyrex casserole dish that has a lid. Cook 20 minutes. Check for doneness and add a little more water, if needed. Cook another 10-15 minutes. Don’t stir the rice. Black rice takes longer to cook than white sushi rice. You want it to be cooked, but not mushy. Cooking times vary by microwave. Remove from the microwave once cooked and let stand, covered, for 10 minutes. Place rice in a large, cool bowl and pour on the Sushi Su, tossing in. Fan rice while tossing to give it a shiny look. Makes enough for 8 rolls.
Sushi Su:
1/2 cup rice vinegar
4 T. sugar
1/2 t. salt
msg, optional
Combine all and set aside until ready to use. You can also buy a dry powder of Sushi Su and you can use that instead. It is a 2.65 oz. packet.
Assembling Sushi
Place a sheet of nori ( dried seaweed sheets) on mat and spread about 1 cup of the rice over the nori, leaving about 1-2 inches empty on the far side. Place fillings in a strip a little off center away from the side with no rice. Start rolling up the mat using it to press the sushi roll and keeping the fillings in the nori. Once rolled, press the mat once more to seal and make the fillings stick together. Wetting the edge of the nori with a little water can also make the sushi stick better. Slice each piece using a sharp knife dipped in water.
Wrapping the sushi takes practice. Don’t be discouraged if the first few are a little less that perfect, Still, with a little practice it gets pretty easy. Just be careful not to overfill the rolls as it makes the job harder
Apple Pie “Blintzes”

Since I posted the recipe for making your own apple pie filling, I thought I’d share a fun way to use it- other than in a pie.
These aren’t traditional blintzes. I used flour tortillas for the crepes. Don’t get me wrong, I love making real crepes. But, when you don’t have the time, the tortillas are a fun and tasty substitute. I soaked the tortillas in milk. By soaking the tortillas in milk, they soften up, and can be used like a crepe. Soak them for about 10 minutes. If you soak them longer, put a piece of wax paper between them so they don’t stick together. If you don’t want to soak them in milk, you can use a milk substitute or even juice or water.
After they are filled, the blintzes are browned in a pan with butter, than dusted with powdered sugar. They are so tasty. Like a warm apple pie. These were a big hit with friends.
They make a nice dessert, but they can be served for breakfast or at brunch.
Apple Pie Blintzes
10-12 flour tortillas
1/2 c. milk
2 c. apple pie filling
3-4 T. butter
Powdered sugar or cinnamon sugar, for topping the blintzes
For the filling, I used some of my homemade apple pie filling. If you have fresh apples, you can just peel and slice the apples, then cook them in a little water and sugar until softened. You can make them as sweet as you like. You made need less sugar if the apples are extra sweet. Add some cinnamon and nutmeg, too. If they are too watery- combine a little cornstarch with cold water and drizzle the mixture in until the apples thicken up. Don’t add too quickly or you might them too thick and gummy.
Place tortillas in a shallow pan, drizzling with a little milk as you go. Set aside for a few minutes, so the tortillas will soften.
To assemble the blintzes, place a softened tortilla on your work surface and spoon a little apple filling in the middle. You can do this with hot filling, but cold or room temperature filling is easier to use. Don’t over fill them or you won’t be able to fold them up. I used 8-inch tortillas and used about 1/3 cup of filling for each one. Fold the sides in until they almost meet in the middle and them roll the tortilla up to cover the filling. Place seam side down until ready to fry them.
Heat butter in a skillet, and brown the blintzes over medium heat until lightly toasted on both sides. They will be crispy on the outside, but tender in the middle. Put on a serving plate, sprinkle with powdered sugar and serve while warm. These are fine just as they are, but feel free to add ice cream or whipped cream, too.
I have made these before and use different fruit fillings. I’ve even made a cheese filled version a few times. It seems I usually have a package of tortillas, so it is a go-to dessert for me in a pinch.
Bat Wings
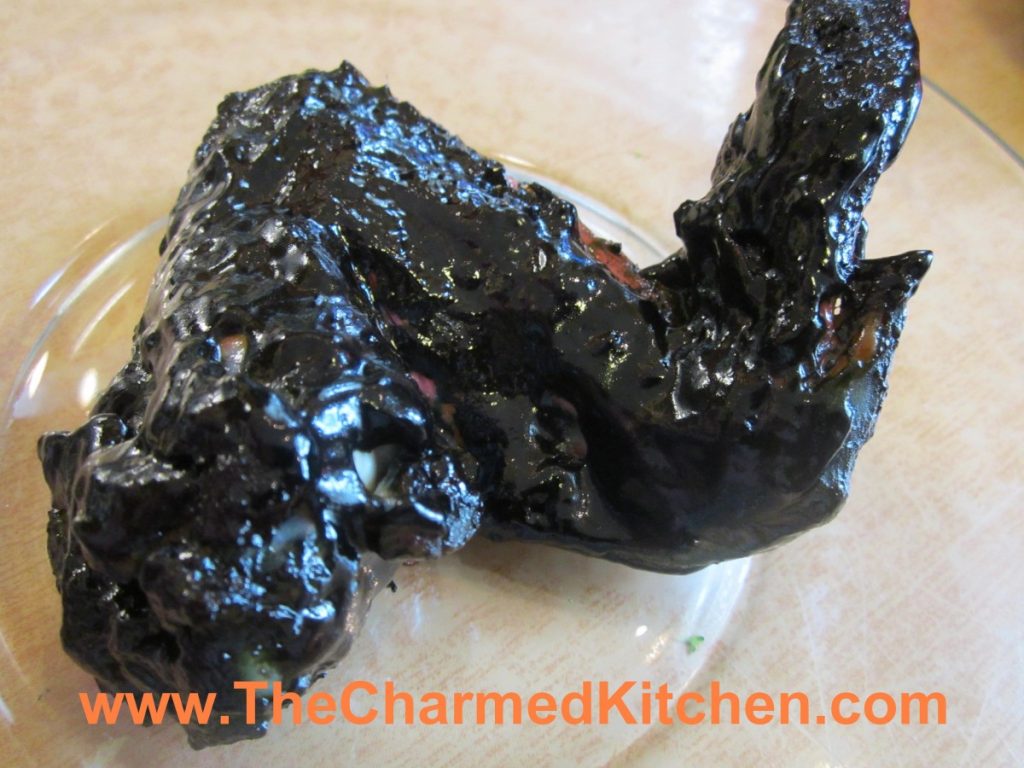
With Halloween fast approaching I thought I’d share this recipe for bat wings. OK, not really bat wings, but you already knew that. I just add black food coloring to barbecue sauce and use it to color chicken wings. You could also use black cocoa powder to make the sauce black.
I made a batch for a Halloween party a few years ago and someone actually asked if they were real bat wings.
A word of warning- when you use black food coloring it will transfer to you. No matter how careful you are when you eat the wings, you’ll end up with purple fingers. Also, for the best effect, keep the wings intact- no trimming off of the tips. You can separate the drums before serving, if you like. Makes eating a little easier. They look pretty cool when set out on the table. Creepy- but very tasty.
Bat Wings
2-3 lbs. whole chicken wings
salt and pepper
1 c. barbecue sauce- store bought or home made
black food coloring- handle carefully- it stains
Place chicken wings in a roasting pan, season with salt and pepper and bake in a preheated 400 degree oven for 30 minutes. Meanwhile in medium bowl combine sauce with food coloring. Add just a little black food coloring at a time. Too much will alter the flavor of the food. Remove wings from the oven and dip them in the bowl of sauce. Turn to coat. Place wings on a clean baking sheet and return to the oven. Bake an addition 45 minutes. You can baste them with additional sauce during the baking, if you like. Place on a serving platter and provide plenty of napkins.
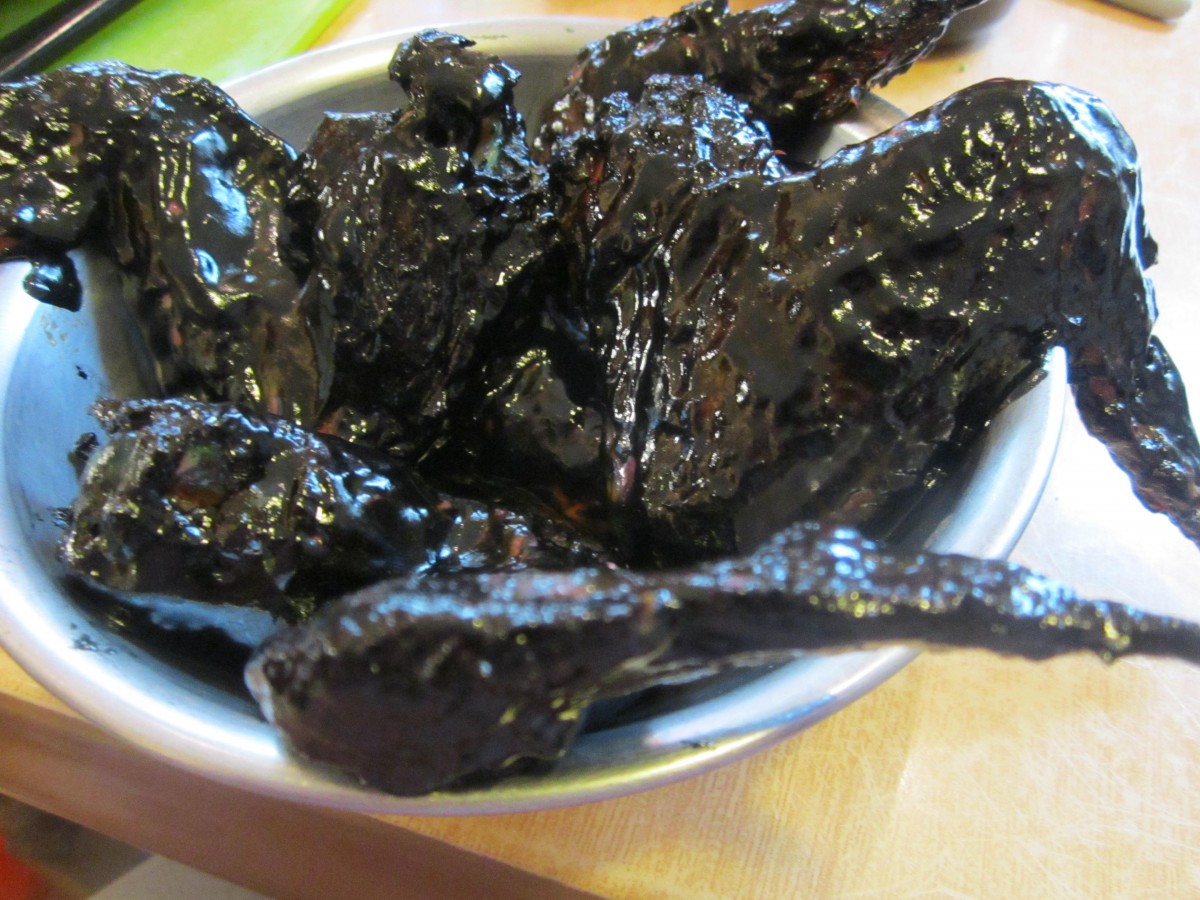
A pile of “bat” wings
Canning Applesauce
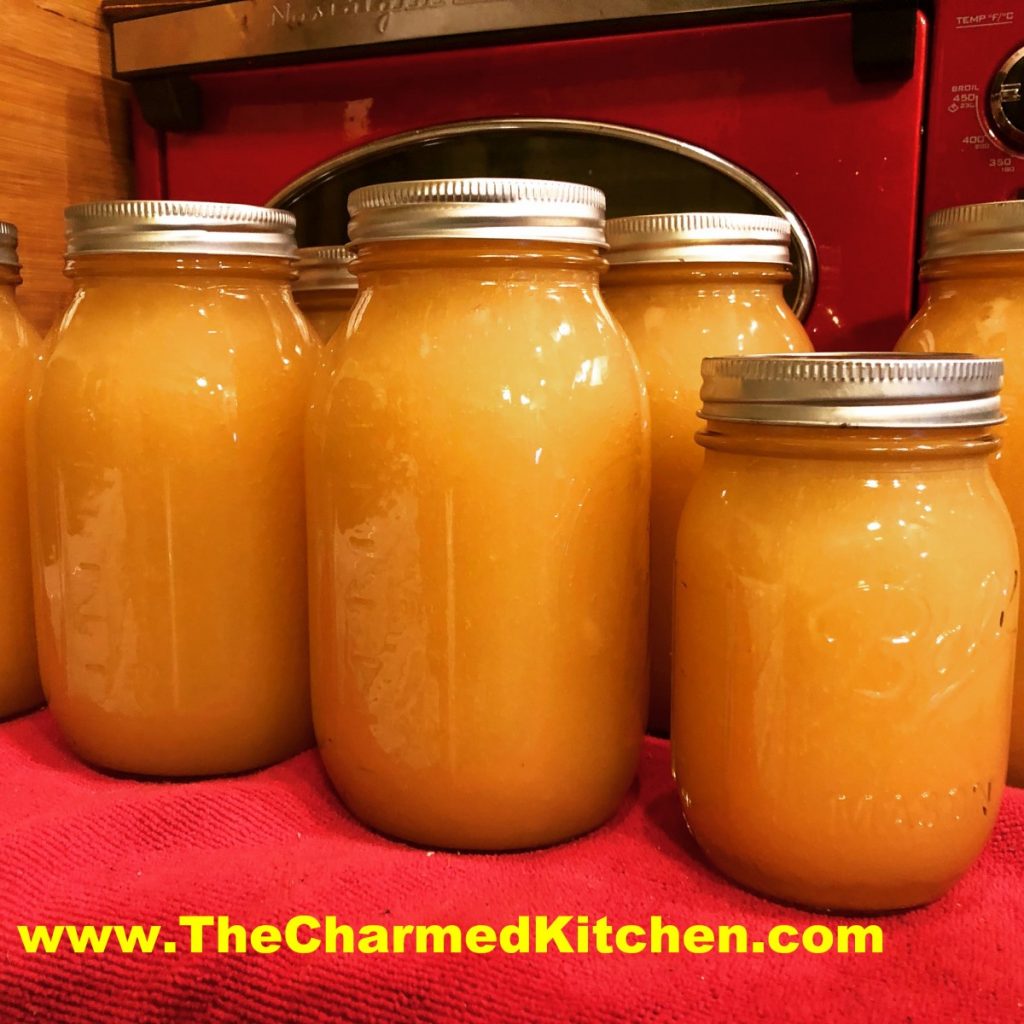
I love homemade applesauce so much better than anything I can buy at the store. It really is easy to make.
There is some disagreement about whether or not you have to peel your apples before making applesauce. It is a personal choice. You can cut up your apples without peeling them, if you are running them through a food mill. The food mill will remove the skins. If you use red-skinned apples, the skins will give your sauce a rosy tint.
I actually peeled my apples, mostly because I knew I was not using a food mill, but was using an immersion blender to make my sauce smooth. Either method is fine.
Sweetening is also a personal choice. You can leave your applesauce unsweetened, if you like. I normally use sweet apples for my sauce, so I don’t need a lot, or any, sugar. Plus, I’ll let you in on a little secret. You need some water to help cook down the apples and keep them from sticking to the pot. Instead of water, I use apple juice or cider. It adds natural sweetness to the applesauce and a more intense apple flavor.
You can also add a couple of cinnamon sticks to the batch- don’t forget to remove them before processing.
Home Canned Applesauce
12 lbs. apples, I used Melrose and Gala, but use the apples you like
Water*
2-3 cinnamon sticks, optional
4 T. lemon juice
sugar to taste
Peel and core apples. Put in water with some ascorbic acid, citric acid or lemon juice to prevent discoloration. Place apples in a pot with enough water* to prevent sticking. Add the cinnamon sticks, if using, and lemon juice. Cook over medium high heat until soft. Time will vary depending on the type of apples you are using, and how large the apples are. Turn off the heat and remove cinnamon sticks. I wanted smooth applesauce, so I used an immersion blender. Return apple mixture to a boil. Sweeten with sugar, if you like, or leave unsweetened. Have water bath full of boiling water and have hot, clean canning jars and lids and rings ready. Ladle hot applesauce into hot jars, leaving 1/2 inch of headspace. Wipe rims and apply lids. Process in a boiling water bath for 20 minutes for pints or quarts. Turn off heat and let jars stand in water bath 5 minutes before removing. Set in a draft free area to cool down. Yield: 4 quarts or 8 pints.
*rather than add water, to prevent the apples from sticking, you can use cider or apple juice instead. I prefer that as it gives a more intense apple flavor to the sauce.
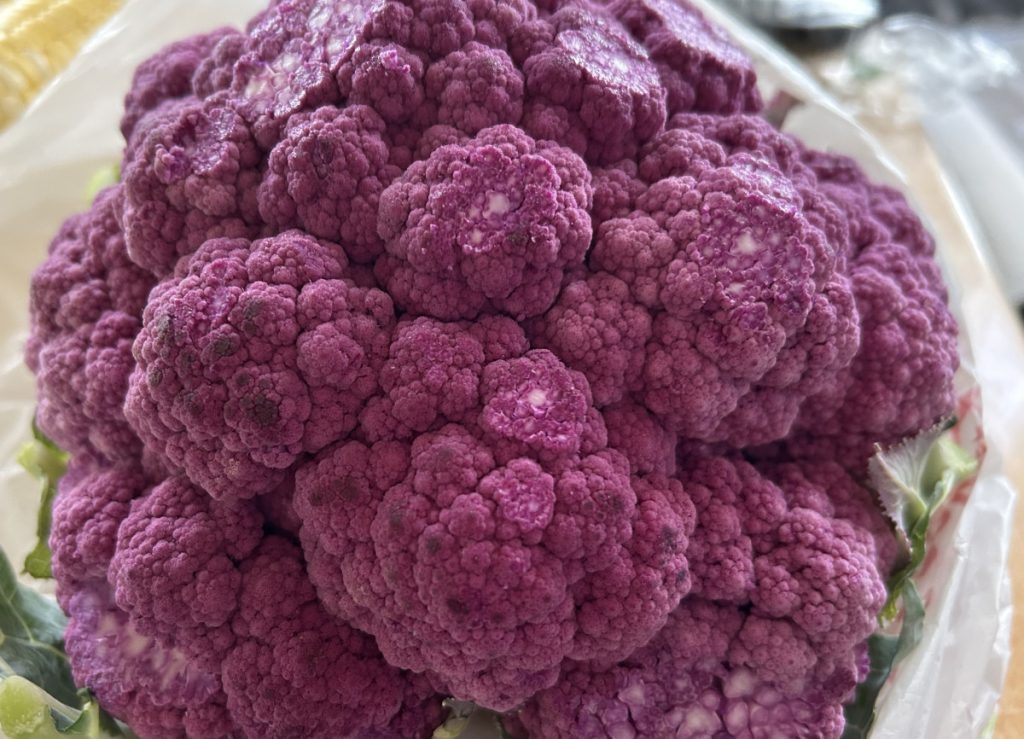
Purple Cauliflower Soup
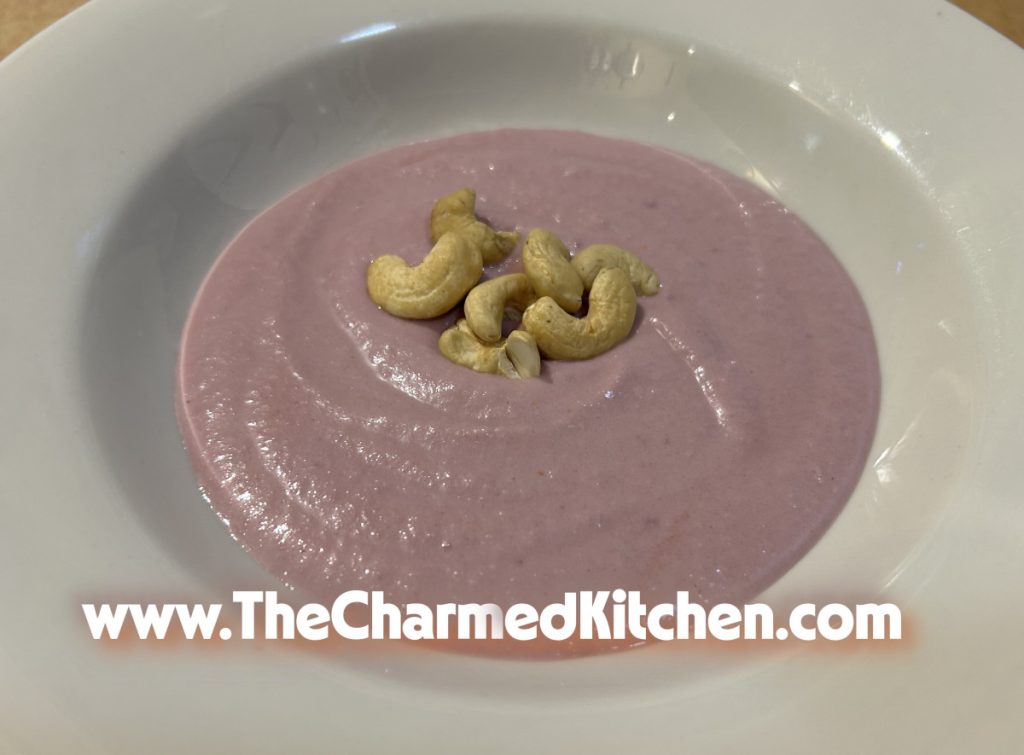
I found myself with an extremely large head of purple cauliflower. It was at a local produce store and it was so pretty I could not resist. I had already eaten some in a mix of roasted vegetables. Since it was a little chilly I thought soup might be fun. So that is what I did with it. I made sure to add some vinegar to the soup to help keep the soup a bright color. I was worried it might go a bit grey, if I didn’t. I do the same thing with purple cabbage and it seems to work.
I am usually good about writing down what I do, but I confess I was visiting with a friend while making the soup so I was a bit distracted. As with most soups, there is room to change things up a bit anyway. I know I used about half of the head of the cauliflower, coarsely chopped. I know I started with a quart of broth and added a bit more. I served mine with a few cashews on top for texture. I would have added croutons if I had some.
So the recipe below is as close as I can get. I hope you try it and I hope it turns out for you and nicely as it turned out for me. My friend and I both enjoyed it.
Purple Cauliflower Soup
3 T. oil
1 medium onion, peeled and chopped
2 ribs celery, sliced
2 c. chopped cabbage
4-6 c. purple cauliflower, chopped
4-6 c. stock, chicken or vegetable
¼ c. red wine vinegar
1 T. hot sauce, or to taste
Salt and pepper to taste
½ c, half and half, optional
In a soup pot cook the onions in oil until tender. Add the celery and cabbage and cook about 5 minutes, or until tender. Add the cauliflower, 4 cups of the stock and the vinegar and simmer until cauliflower is tender, about 10-15 minutes. The smaller you chop the cauliflower the quicker it will get tender. Use an immersion blender to puree the soup. Or you can puree the soup in a blender in batches. Add the hot sauce. Adjust the seasonings and add more stock if you like a thinner soup. Add the half and half if you want a creamier texture. Served 6. The soup freezes well.
Note: Any color cauliflower works in this recipe. I had the purple cauliflower and I love the way the finished soup looked. The vinegar was added to set the color and keep the cauliflower soup bright purple. You might not need to add it to a white cauliflower soup, but I also like the zip it added to the soup.
Homemade Apple Pie Filling
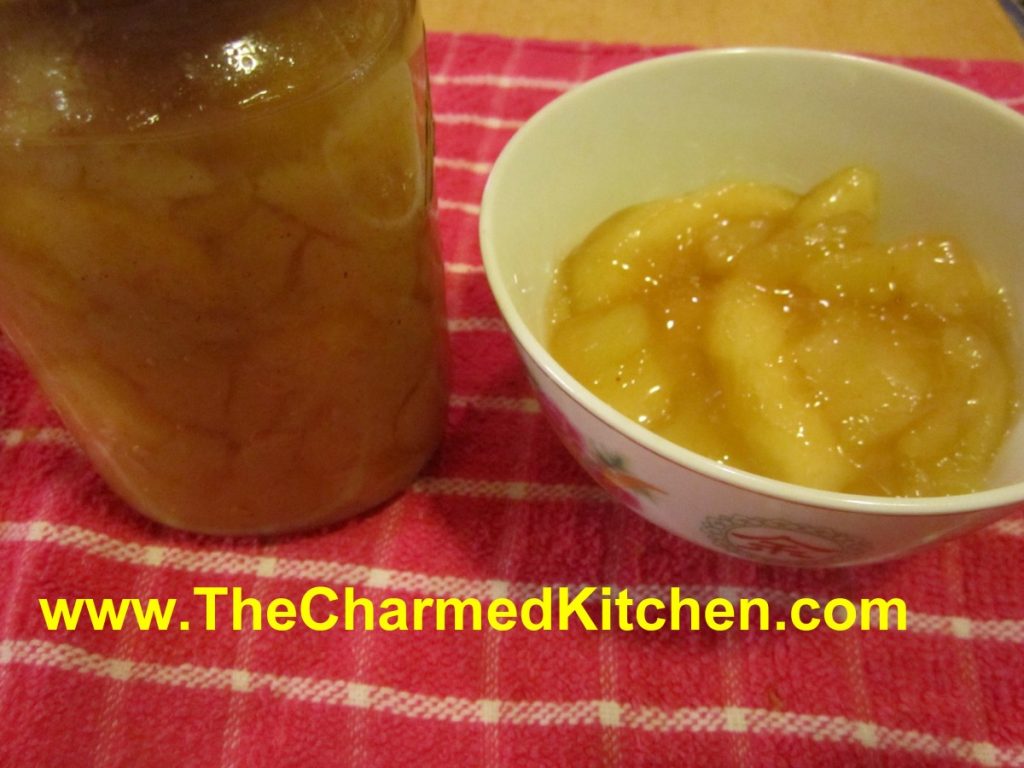
While I think the best pie is made with fresh apples, I also like making and canning my own apple pie filling. It is a handy way for me to enjoy local apples throughout the year. It is also a whole lot better than any commercial pie filling I have tried. Loaded with plenty of big chunks of apples and seasoned with cinnamon and nutmeg- I think it the next best thing to fresh apples for baking.
I use my canned pie filling to make pies, but I also use it for kolachy, blintzes, cakes, turnovers and more.
The hard part, for some, is getting a hold of Clear Gel. It is a special type of modified cornstarch. I buy mine online, but you can find it in stores where the Amish shop. Clear Gel stays thick, even if it is reheated. Regular cornstarch will not. Don’t use Instant Clear Gel, either.
Here is the recipe I use. You can tweak the seasonings to suit your own taste, but keep in mind that spices sometimes get stronger when canned, so don’t go too crazy!! You can always add more spices when you use your pie filling.
Apple Pie Filling
6 qts. apples, sliced and blanched
5 1/2 c. sugar
1 1/2 c. Clear Gel- modified cornstarch available on line and in Amish stores
1 T. cinnamon
1 t. nutmeg
2 1/2 c. cold water
5 c. apple juice
3/4 c. lemon juice
If apples lack tartness, use an additional 1/4 cup of lemon juice. Wash, peel and core apples and cut into 1/2 thick slices. Place in water treated with either lemon juice, citric acid or ascorbic acid to prevent darkening. Remove from solution and drain well. Blanch in boiling water- 2 quarts at a time- for 1 minute. As you finish each batch place in a bowl and cover to keep warm. In large pot combine sugar, Clear Gel, cinnamon, nutmeg, water and apple juice. Stir over medium heat until mixture begins to bubble and thicken. Add lemon juice and boil 1 minute. Add drained apples and stir gently to combine. Ladle into hot, clean jars leaving 1 1/2 inches of headspace. Remove air bubbles. Wipe rims and adjust lids. Process in a boiling water bath- pints or quarts for 25 minutes. After the time is up, turn off canner and let jars sit in water bath for 5 minutes before removing. This will reduce the chance of siphoning. Makes 7 quarts or 14 pints.
For only 1 quart
3 1/2 c. apples
3/4 plus 2 T. sugar
1/4 c. Clear Gel
1/2 t. cinnamon
1/8 t. nutmeg
1/2 c. cold water
3/4 c. apple juice
2 T. lemon juice
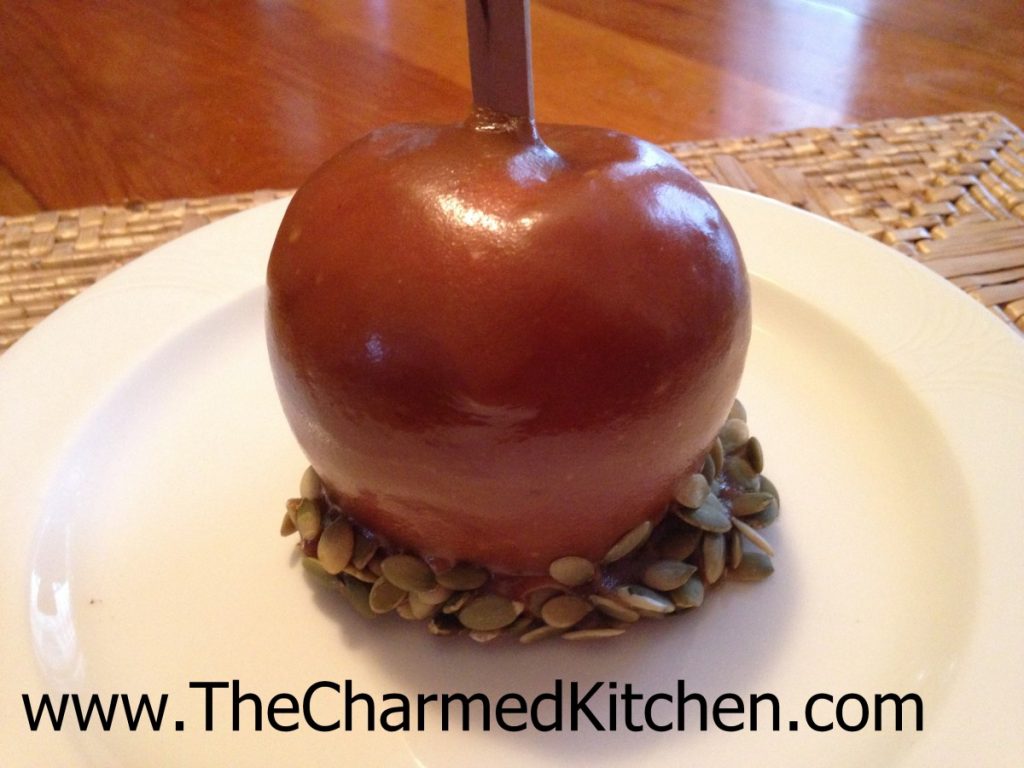
Homemade Caramel Apples
Making caramel apples is a wonderful childhood memory for me. Every Autumn, we would make a batch. We used those little store-bought caramels. I was often the one tasked with unwrapping them. I can remember unwrapping one after the other. It seemed to take forever.
I wanted to make my own caramel, so that is what I did. It is so much better than the store-bought version. Still, in the end, use what works for you.
Caramel is not that hard to make. You do need to keep an eye on it. Stir constantly. Just a hint, be sure your candy thermometer is really secure. Mine was a little slippy on the pan I was using. At one point the thermometer slid into the caramel. Not what you want to have happen!!!
Once dipped in the caramel, you can dip the bottom of the apples in nuts, pumpkin seeds, sprinkles, cereal, or even popcorn.
Homemade Caramel Apples
1/2 c. butter, cut in cubes
2 c. packed brown sugar
1 c. corn syrup*
pinch of salt
1 can sweetened condensed milk
2 t. vanilla
8-12 apples
chopped nuts, pumpkin seeds, cereal, sprinkles, popcorn for dipping the bottoms of the caramel apples, optional
In heavy saucepan, combine the butter, sugar, syrup and salt. Bring mixture to a boil, stirring constantly. This will take about 10 minutes. Add milk and bring mixture up to 248 degrees. Remove from heat. Stir in vanilla. Place a Popsicle stick, skewer or chopstick down the center of each apple. Dip apples in the caramel, allowing excess to drip off- or not. Dip bottoms of apples into nuts, seeds, sprinkles or whatever ingredient you picked. Place on wax paper and allow to set up. If you don’t want to dip the bottoms in anything, place the dipped apples on lightly buttered wax paper. Cool before serving. Makes 8-12 caramel apples.
Note: You could also use pears in the recipe.
*If you don’t have corn syrup- or don’t want to use it here is a way to make a substitute for it.
Sugar Syrup- corn syrup substitute
3 cups granulated sugar
1 cup Water
1/2 tsp. Cream of Tartar
1/4 t. salt
Combine ingredients in a large saucepan. Bring to a boil and cover the pot. Reduce to a simmer and cook covered for 5 minutes. Uncover and cook to soft-ball stage. Stir frequently.
Soft ball stage occurs at 235-245 degrees. This stage can be determined by dropping a spoonful of hot syrup into a bowl of very cold water. In the water, use your fingers to gather the cooled syrup into a ball. If it has reached soft-ball stage, the syrup easily forms a ball while in the cold water, but flattens once removed from the water.
Remove from heat. Cool and store at room temperature. It will keep well for a month or two.
Amaretto Pear Blintzes with Candied Almonds

Sometimes you can start with the simplest ingredients and end up with something special. This recipe is a perfect example. I had fresh pears and flour tortillas. I wanted to make a brunch dish for a friend so I added a few more ingredients and ended up with these pear blintzes. I make fruit blintzes with tortillas pretty often. I wanted these to be different. I added Amaretto to the pears and made candied almonds as a topper.
They look like a lot more work than they are. They were simple to make.
My friend said they reminded her of apple pie. In fact, she didn’t believe me at first, when I said they were pears. If you like the taste of homemade fruit pie, but don’t have the time to bake, these are a nice option. Because they are barely cooked, the pears retain some shape. In a pie, pears tend to fall apart.
Since we had them for brunch, I left them plain, but these would make a great dessert topped with whipped cream or ice cream. Even a dusting of powdered sugar or a drizzle of caramel. Simple and quite flavorful.
Amaretto Pear Blintzes with Candied Almonds
Blintzes:
4 (8-inch) flour tortillas, I used whole wheat
2 oz. milk
2 T. butter
Filling:
4 pears, peeled, cored and sliced
½ c. brown sugar
2 T. butter
2 T. Amaretto
1 t. cinnamon
1 t. vanilla
Pinch of salt
Candied Almonds
¾ c. sliced almonds
½ c. sugar
¼ c. water
½ t. cinnamon
Place tortillas in shallow dish and drizzle the milk over them. Try to get some milk on each of the tortillas to soften them. While the tortillas are softening, prepare the filling. In medium skillet, combine pears with the rest of the filling ingredients and bring to a simmer. Cook on low heat for 3-4 minutes. Set aside. Combine almonds with the sugar, water and cinnamon in medium skillet. Bring mixture to a boil, stirring often. Cook until liquid is evaporated, about 5 minutes. Pour almonds onto a baking sheet lined with a silicone baking sheet or foil. Spread out and allow nuts to cool.
Place butter in skillet and start to heat up the pan. While pan is heating, divide pear filling among the 4 tortillas. Place filling along center of tortilla and roll up. Heat the tortillas, seam side down, in the pan until golden, turning to toast evenly on both sides. Remove from pan and place on serving plate. Top with some of the candied almonds. Serves 4.
Candy Spiders
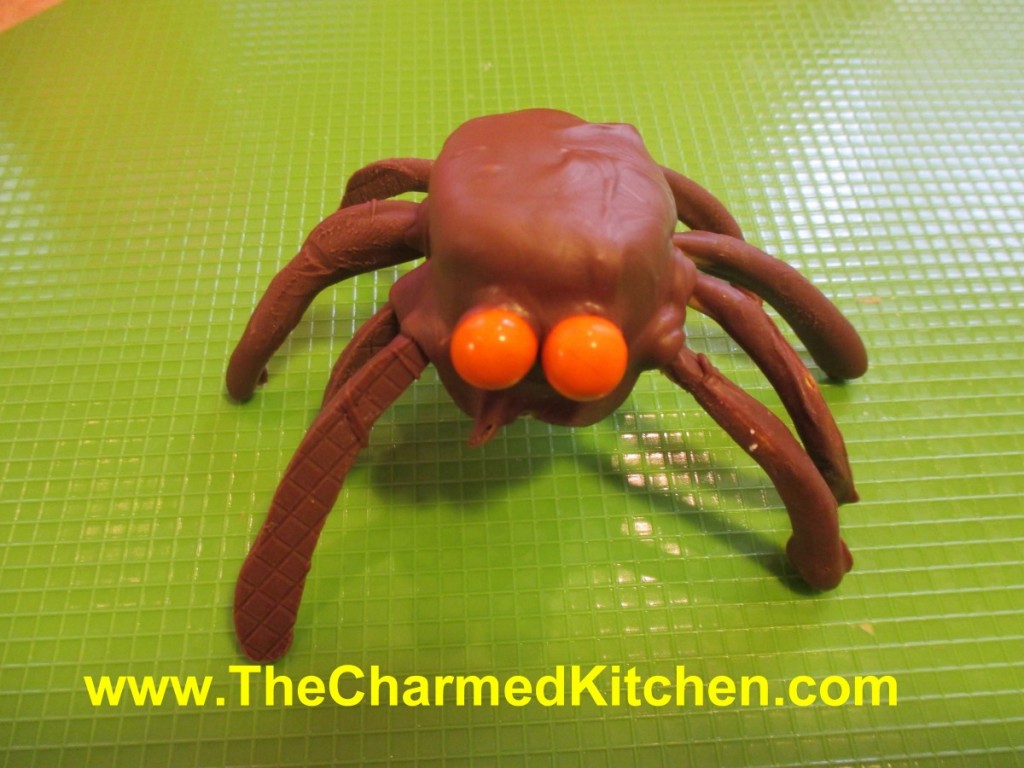
If you are looking for a quick spooky decoration/treat idea, you might want to make some candy spiders. These are about the size of a tarantula. Super simple, and kids can make them, too. You only need a few ingredients.
The body is made from marshmallows, the legs are chow mein noodles and the eyes are small candies. Sixlets work well. You can also use candy eyes. I kind of like the way the Sixlets look.
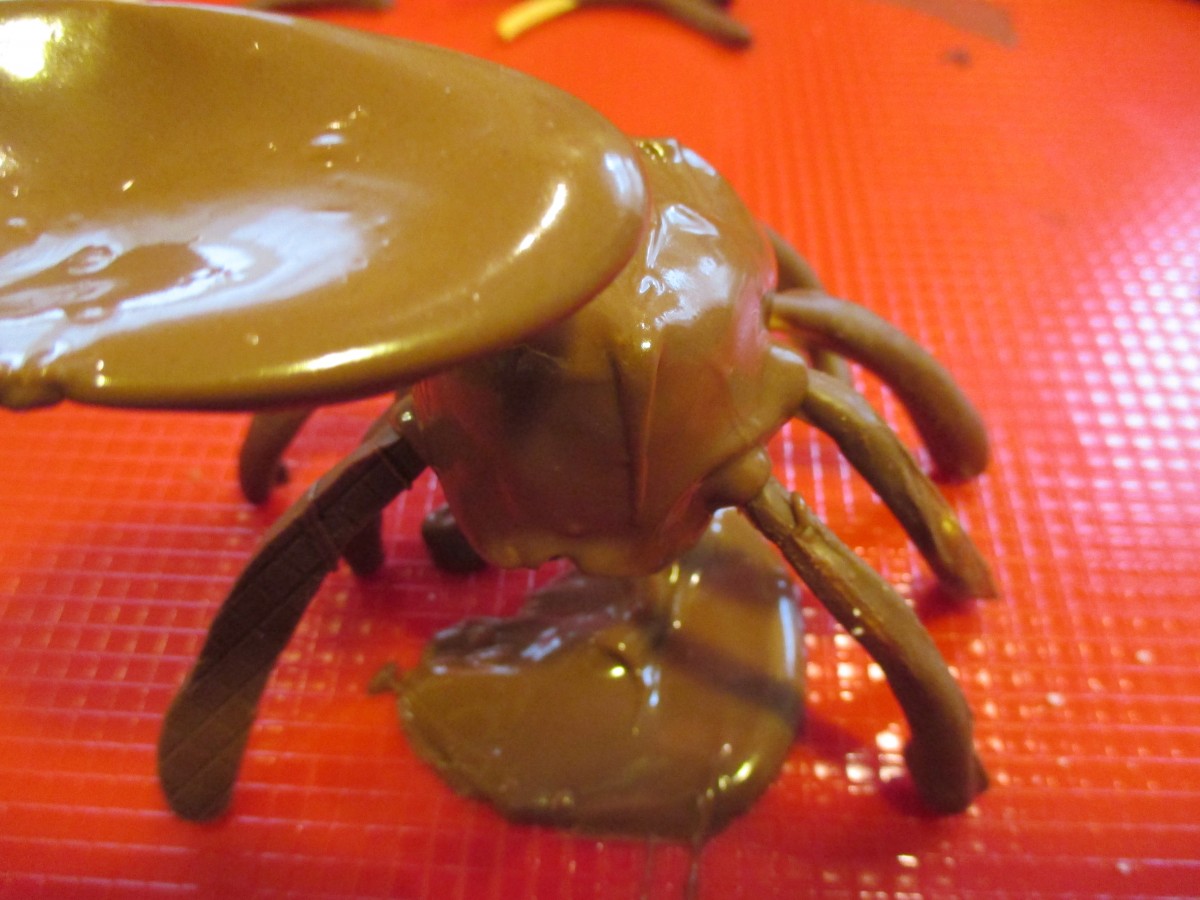
I used melting chocolate, but you can use any kind of chocolate you like. To start, melt some chocolate. Dip the chow mein noodles in the chocolate and tap gently to remove excess. I leave one end un-dipped to make it easier to stick in the marshmallow later. Allow to harden up before going to the next step. I set them on a flexible cutting board, but wax paper is good, too. You have to peel them off later, a flexible surface is best. You’ll need 8 for each spider- so be sure to make enough. Allow for breakage. Set a marshmallow flat side down and poke 4 holes in each side, 8 total. I used a bamboo skewer. Stick a noodle “leg” in each hole. Spoon chocolate over the marshmallow until coated. Whatever drips off can be re-melted and used again. While the chocolate is still soft, press 2 candy eyes into place. Hold them for a minute to be sure they are secure. Now, you can decorate cakes with them, use them on a dessert tray- or just eat them.
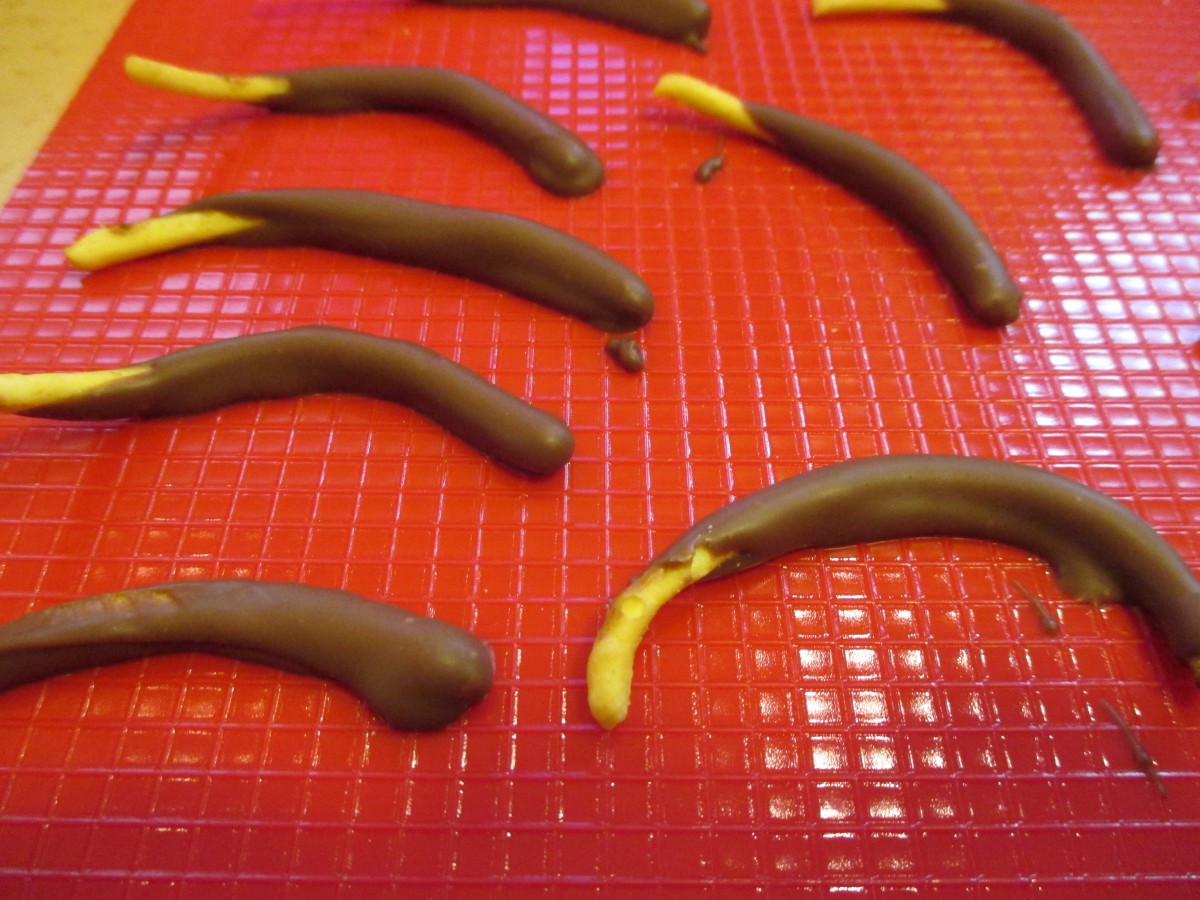
Chow mein noodle legs

Insert legs into marshmallow
Spoon chocolate over the marshmallow to cover it.


