Smoky Tomato Soup

This tomato soup is easy to make and tastes wonderful. The use of a ham bone gives the soup a smoky flavor. If you don’t have a ham bone, you could use other smoked meats or even liquid smoke.
I wanted to make tomato soup, but also wanted something different. I used what was in my pantry, fridge and freezer for inspiration. The flavors worked well together. I really like what the cinnamon did for the soup, too.
At the end, almost as an afterthought, I added the half and half. It added just a little extra richness to the soup. It was a good decision.
So here is the recipe. I served it with quiche, but it would go well with a grilled cheese sandwich.
Smoky Tomato Soup
3 T. oil or butter
1 c. chopped onion
1 (28 oz.) can crushed tomatoes
1 or 2 medium carrots, peeled and sliced
1 c. chopped celery, some leaves included, if possible
3 c. water or stock (low sodium)
1 ham bone
2-3 T. parsley
1 t. cinnamon
1 c. half and half
Salt and pepper to taste
In soup pot, heat oil or butter and saute onions until tender. Add the rest of the ingredients, except the half and half, salt and pepper. Bring to a boil, then turn down to a simmer. Simmer for at least an hour- even a couple of hours. I partially covered the pot while the soup simmered. Remove ham bone. Add the half and half. Puree soup until smooth. I use an immersion blender so I can puree in the soup pot. If pureeing in a blender, do the soup in batches. Better if you cool the soup a little first. When you put the hot liquid in the blender, remove the middle part of the blender lid and cover with a folded towel. The liquid will splash up a little and the towel keeps you from getting splashed/burned. Once the soup is nice and smooth, adjust seasonings to taste. Depending on how large the ham bone is, you might not need salt at all. The soups will serve about 6-8. I like to serve it with croutons.
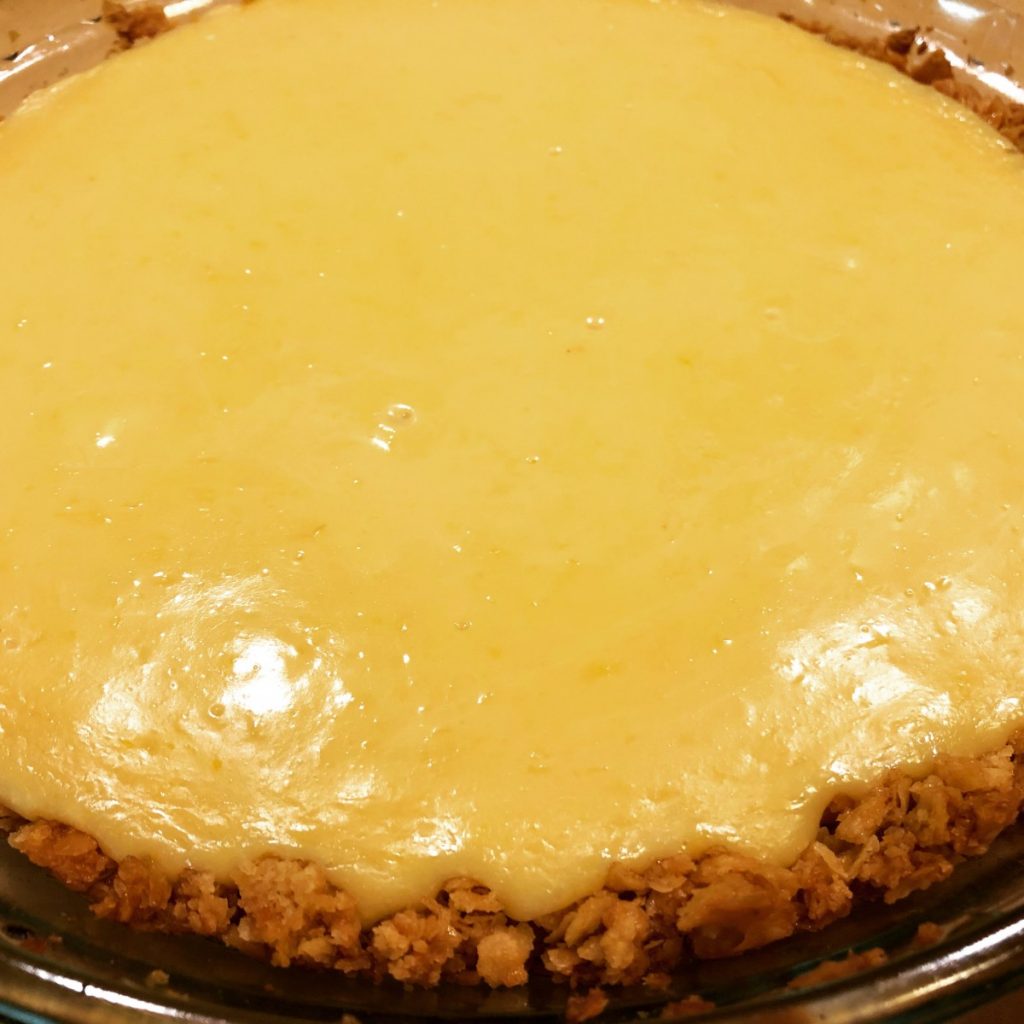
North Carolina Lemon Pie

This might be one of the best lemon pies I have ever had. It was simple to make, with a surprise ingredient in the crust. That ingredient is saltine crackers! They work so well in this crunchy and slightly salty/slightly sweet crust. Perfect with the lemon filling.
I first heard about this pie in one of my cooking classes. A woman mentioned it to me after class. Said she saw it on a TV show. I looked for it online. Odd thing was that every recipe was exactly the same. Even down to the wording in the directions.
I found one reference to the recipe first showing up in Cook’s Country Magazine about 6 years ago. I prefer to credit the source of a recipe, when possible.
I did change a couple of things from the original recipe. I added more lemon zest- from 1 tablespoon to 2. What can I say? I like a zesty pie.
I also thought it was odd to make so little whipped cream for the topping. Assuming you had a cup of whipping cream to start with, you use 1/4 cup in the pie filling. That leaves you with 3/4 cup of whipping cream. The recipe only calls for whipping up 1/2 a cup of whipping cream. I rounded it up in the recipe to 3/4 cup. Honestly, I would make even more topping the next time.
I really enjoyed the pie. I think you will, too.
North Carolina Lemon Pie
Crust
6 oz. saltine crackers (about 1½ sleeves)
1/8 teaspoon salt
10 tablespoons unsalted butter, melted
1/4 cup light corn syrup
Filling
1 can sweetened condensed milk (14-ounce)
4 large egg yolks
¼ cup heavy cream
1-2 T. grated lemon zest- I used 2 tablespoons
½ cup lemon juice
Topping
¾ c. heavy cream, chilled- increase from original recipe. I think even more whipped cream would be better. Just my preference.
1 T. sugar
1 t. vanilla extract
Preheat your oven to 350 degrees. Add the saltines and salt to the food processor and pulse until you have coarse crumbs (about 15 pulses). Add the melted butter and corn syrup and pulse until the crumbs are well combined.* Add the cracker mixture to a greased 9-inch pie plate. Use the bottom of a dry measuring cup or glass and press the crumbs into an even layer on the bottom and up the sides of the dish. Place the pie plate on a baking sheet and bake until light golden brown, 17 to 19 minutes. Prepare filling while the crust is baking. Whisk the sweetened condensed milk, egg yolks, cream, and lemon zest together in a bowl, add the lemon juice and whisk until well combined. With the pie plate on the baking sheet, remove it from the oven and pour in the filling (the crust does not need to be cooled) and place it back in the hot oven. Bake until the edges of the pie are set but the center still jiggles, 15 to 17 minutes. Place the pie on a wire rack and let it cool completely. Refrigerate the pie until completely chilled.
For the topping, use a stand mixer fitted with a whisk and whipped the cream, sugar, and vanilla on medium low until foamy (about a minute). Increase the mixer speed to high and whip until stiff peaks form, 1 to 3 minutes. Spread the whipped cream over the top of the pie and serve cold.
*Note: I will admit to just crushing up the crackers by putting them in a bag and using a rolling pin. I had a few larger pieces. Still worked. I think it gave the crust a crunchier texture. Although it sank down into the pie pan when I baked it- so maybe next time I will crush the crackers a little more.
Orange Tea Bread
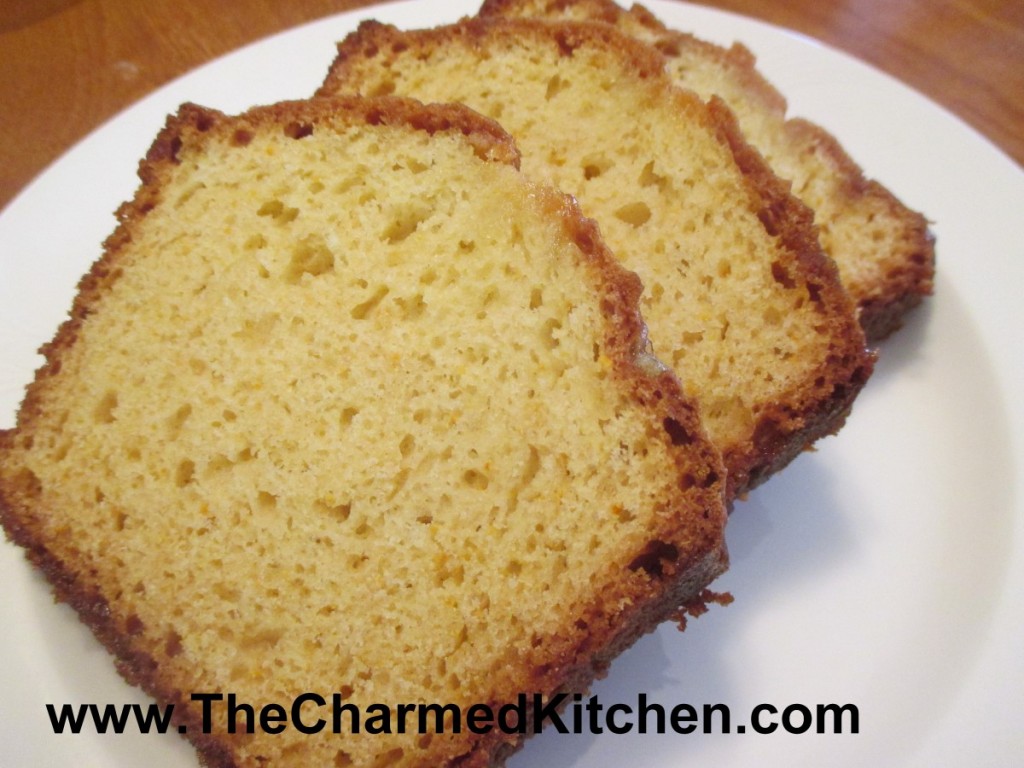
Winter is citrus season and I have been eating a lot of oranges lately. Besides eating them fresh, I also like to cook with oranges. If you are looking for a new recipe for a quick bread, I would recommend trying this one.
The bread is flavored with orange zest in the batter, then a warm orange syrup is drizzled over the bread, right out of the oven. This makes for a bread that is flavorful and moist. It can be breakfast, a brunch dish or even a dessert, when topped with ice cream or whipped cream. The recipe makes one loaf, but I often double the recipe and make two. It seems to disappear around here pretty quickly. The bread freezes well, too.
Orange Tea Bread
2 cups all-purpose flour
1-1/2 teaspoons baking powder
1 teaspoon baking soda
1/2 teaspoon salt
2/3 cup Greek yogurt or sour cream
2/3 cup sugar
2 large eggs
3 tablespoons melted unsalted butter
1 tablespoon grated orange zest
Syrup:
1/2 cup orange juice
1/4 cup sugar
Preheat oven to 350 degrees. Grease an 8×4″ loaf pan. Line pan with wax paper or parchment and set aside. Sift flour, baking powder, baking soda and salt into a bowl. In a separate bowl, whisk together yogurt, sugar, eggs, butter and orange zest. Add liquid ingredients to dry ingredients, and stir mixture until well combined. Transfer batter to loaf pan, smoothing top, and bake in oven for 45 to 50 minutes, or until skewer inserted in middle comes out clean. While the bread is baking, combine orange juice and sugar in a saucepan. Bring mixture to a boil over moderate heat while stirring, and simmer for 1 minute. Keep syrup warm. Make holes in top of bread with a thin wooden skewer and drizzle with syrup. Let stand in pan until cool. Makes 1 loaf.
Bacon, Corn and Shrimp Chowder

I love the combination of shrimp and bacon. When I was looking for a quick dinner the other night, I knew I would be using them together. It was a cold night so I decided to go with a chowder.
I rooted around my fridge and pantry for the ingredients and ended up with a very satisfying dinner.
Some of my favorite dinners have happened by accident. Just looking at what I have on hand, and creating something tasty with it.
Bacon, Corn and Shrimp Chowder
6 thick slices bacon, cut into 1-inch pieces
1 onion, sliced
2 carrots, peeled and sliced
2 medium potatoes, peeled and cubed
1½ c. chicken stock
1 can cream corn*
½ c. corn- fresh or frozen
1½ c. half and half
½ c. chopped fresh parsley
12 oz. raw shrimp, peeled and deveined
Salt and fresh ground pepper to taste
Dash of hot sauce
In soup pot, cook bacon until almost done. Add onion and continue cooking until onion is cooked. Spoon out most of the bacon fat. Add the carrots, potatoes and stock and simmer, covered, until the veggies are tender. Add cream corn, corn and half and half and bring up to a simmer. Add parsley and simmer, covered, 10 minutes. Add shrimp and cook another 5 minutes or until shrimp is just cooked. Adjust seasonings and serve. Serves 3-4.
*I decided to use a can of cream corn as the base. When I was a kid my Mother would make me something she called cream corn soup. She rarely used prepackaged foods and made wonderful homemade soups all the time. I think it was on one of those days when she was just really busy. To make her cream corn soup she would empty the can of corn into a saucepan. Then she filled the can with milk and added that, too. A little salt and pepper and the soup was done. Just before serving she’d put a small pat of butter in the soup. As a kid I just loved it. I must admit I don’t eat cream corn soup anymore, but as a base, the cream corn can really make a nice chowder.
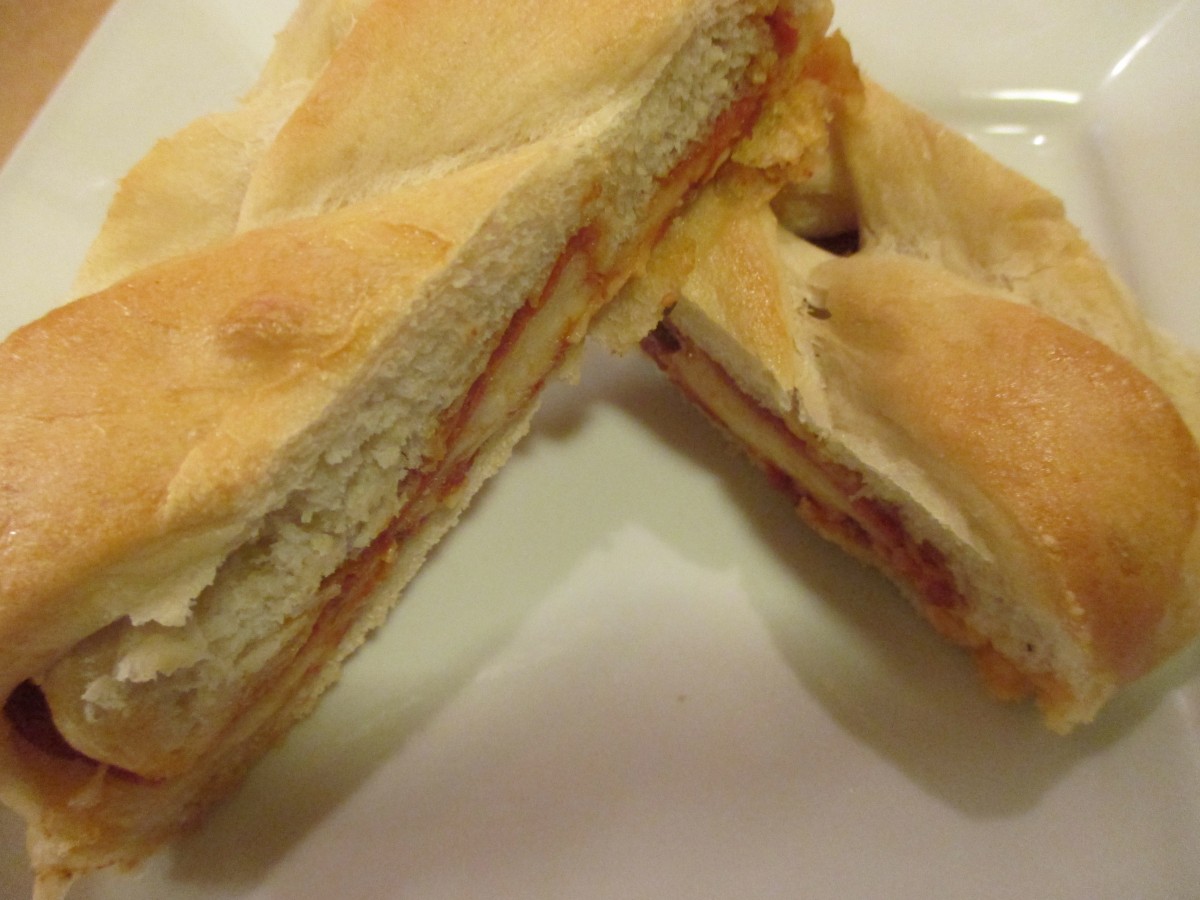
Pepperoni Pizza Bread

If you are still looking for food to serve for your favorite football game, you can make these filled breads in no time at all. They might look difficult, but they are pretty easy to make. They are similar to Stromboli. You can fill them with all sorts of ingredients.
I have made them with Reuben sandwich fillings, spinach with cheese, and have even made a breakfast version with scrambled eggs, cheese and sausage.
The pizza fillings are always popular with my friends and family. Pictured is a double batch- which made two loaves. The recipe below makes one bread, but feel free to double the recipe.
Here is the recipe for one loaf.
Pepperoni Pizza Bread
3 ¼ c. flour
1 T. sugar
1 t. salt
1 package quick-rising yeast
1 c. hot water
1 T. oil
Extra oil for brushing on the dough
1/2 c. marinara sauce
6 oz. mozzarella or provolone cheese
2 oz. sliced pepperoni, about
Set aside 1 cup of the flour. Combine remaining flour with the other dry ingredients in a medium bowl. Stir in water and oil and gradually stir in enough flour to make a soft dough. Turn onto lightly floured surface and knead until dough is smooth and elastic, about 5 minutes. Roll dough into a rectangle about 16 x 8. Brush with oil down center middle of dough. Top with sauce, cheese and pepperoni. Cut one-inch wide strips of dough from filling to edge on both sides. It will sort of look like fringe. Alternating sides, fold strips up and over the filling at an angle. Carefully lift loaf onto greased baking sheet and place at an angle. Cover with a towel and place sheet on top of a roasting pan half-filled with simmering water for 15 minutes. Bake in a preheated 400-degree for 20-25 minutes or until golden brown. Cool slightly before slicing. Serve warm and refrigerate leftovers. Makes one loaf.
Note: The variations for this bread are almost endless. Some favorite combinations are ham and Swiss with mustard, roast beef and cheddar, chicken, broccoli and cheese, spinach with ricotta or feta and onions, curried veggies. You get the idea. Use your imagination and have fun. Just be careful not to overfill, or the bread will be hard to move, use fillings that aren’t too runny and always use cold fillings.
If you want to use regular yeast, use warm, rather than hot water. After kneading cover dough and let rise 45 minutes. Punch down and assemble as in original recipe. Cover with a towel and let rise until dough looks puffy, about 40 minutes. Bake as directed above. These breads can also be frozen.
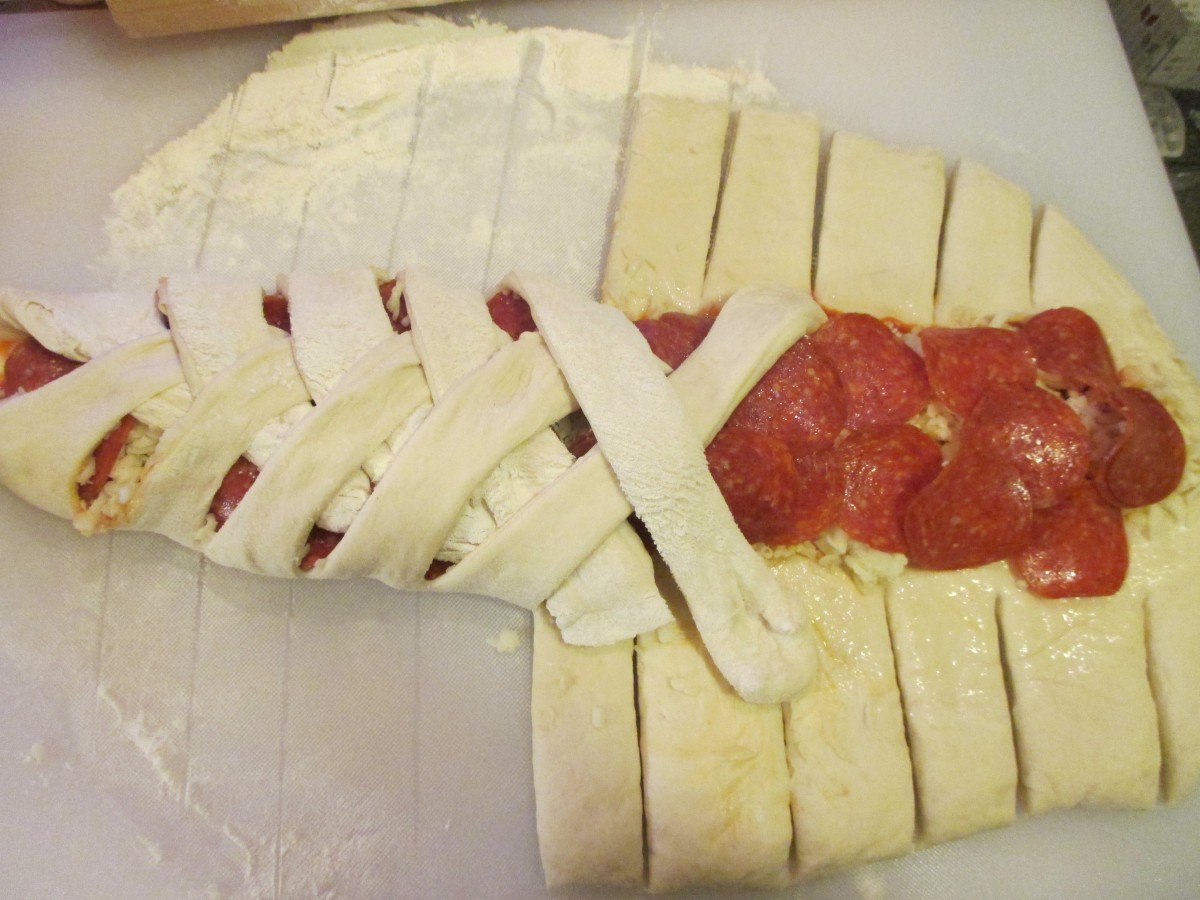
Cut strips of dough and fold over the filling
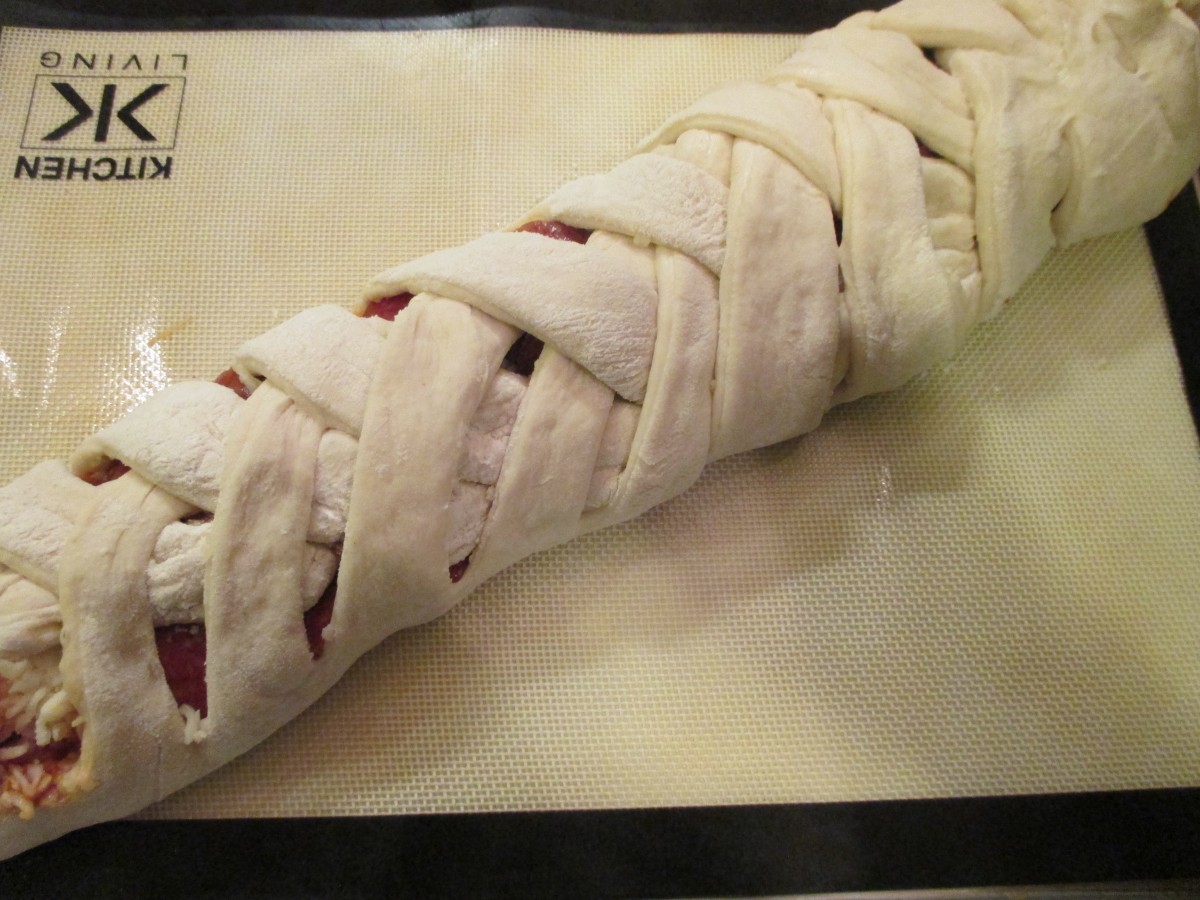
Transfer to baking sheet to rise.
Cool a few minutes before slicing
Cauliflower Gratin
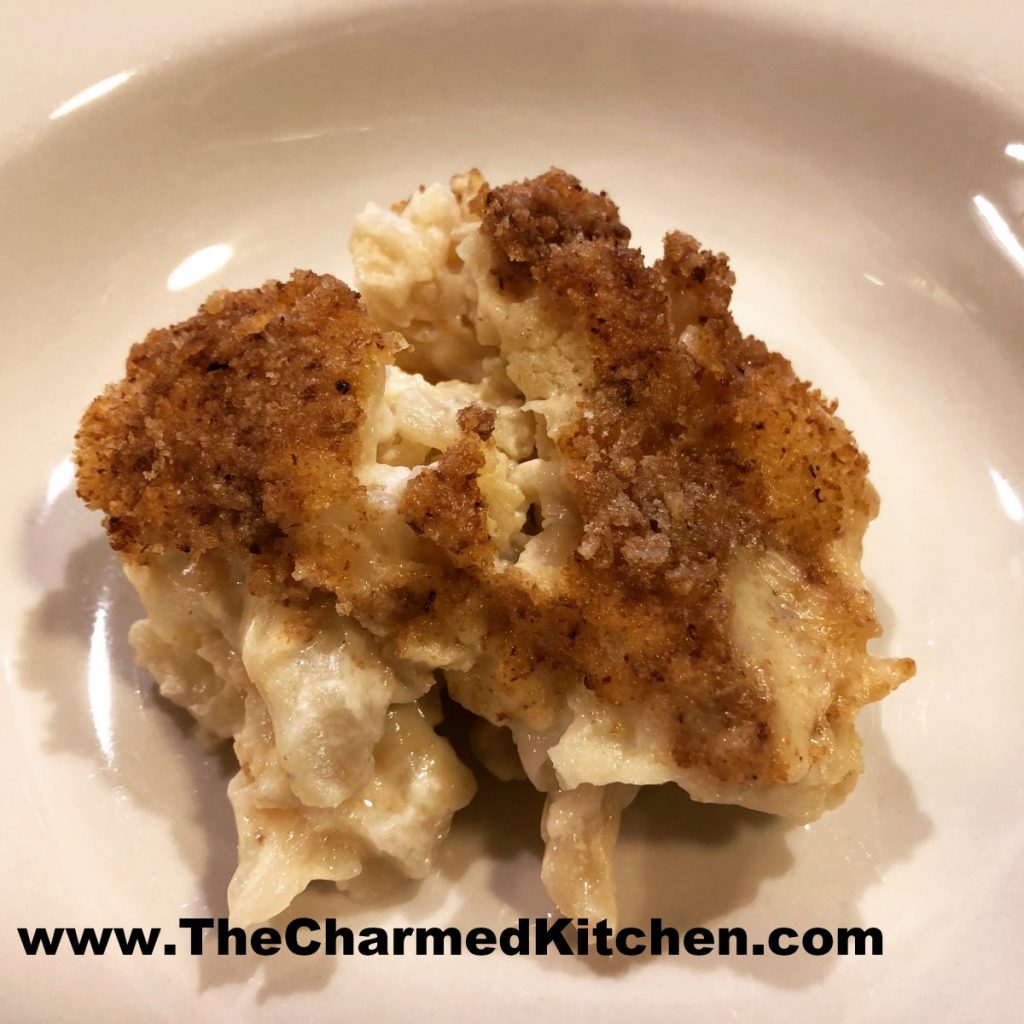
Gratin is just another way of saying cheesy cauliflower. I love cauliflower. I also love cheese. Bringing the two of them together is a classic combination.
I decided to make a cauliflower gratin for lunch today. When I started, I remembered one I had made a few weeks ago. It tasted great, but was a little too watery.
The problem is, I wanted the cauliflower to be cooked, but not cooked to mush. I just steamed it for a few minutes. It was tender, but still pretty firm. When it cooked in the cheese sauce, it cooked a little more and became more tender. This is a good thing. Unfortunately, it gave off water as it cooked and thinned the sauce too much.
I wanted to try again, with a thicker base sauce, to offset the water in the cauliflower. We were so pleased with the final dish. Creamy, cheesy and not watery at all.
I have to admit, I almost chickened out when I saw how thick the base sauce was. But, I figured if it was too thick, it would still taste good.
I forgot to measure the cauliflower before and after steaming. I had to take a good guess at how much chopped up cauliflower there was. A little more or less won’t matter that much. I had a pretty good size head of cauliflower. I guessed at 8 cups raw, but it could have been 10 cups.
So here is the recipe- I hope you give it a try.
Cauliflower Gratin
1 medium head of cauliflower, stems trimmed off and cut into bite sized pieces- you should have about 8 cups
6 T. butter
6 T. flour
1 c. half and half- you could use cream or milk, if you prefer
6-8 oz. cheese- cubed, shredded or sliced- any cheese that melts will work. I used a combination of cheddar and Muenster
Salt and pepper to taste
Hot sauce to taste
½ c. bread crumbs
2 T. butter
Steam the cauliflower until just tender. I steamed mine in the microwave for 6 minutes. It took me two batches to steam it all. Place cauliflower in a mixing bowl and set aside. In pot, heat the butter until melted and stir in the flour until smooth. Add the half and half and cook, over medium heat, stirring often, until mixture thickens. It is going to get REALLY thick. Don’t freak out. When the mixture cooks with the cauliflower, the cauliflower will give off more liquid which will thin out the sauce. Once the mixture gets bubbly, cook over very low heat another couple of minutes, stirring constantly. Turn off the heat and add the cheese. Stir occasionally, until the cheese has melted. You can turn the heat on if you need to for a minute or so. Trust me, be patient, the cheese will melt. Spoon the cheese sauce over the cauliflower and mix it together as best you can. Add seasonings, if you like. Place cauliflower mixture in a baking dish. I used a deep dish pie pan- and it fit, but I had to push it down a little. Sprinkle with the bread crumbs and dot with the 2 tablespoons of butter. Bake in a preheated 350 degree oven until it gets all bubbly and starts to brown a little. This takes about 25-30 minutes.
Let it sit a few minutes before you try to eat it. It is really hot.
Grapefruit Scones

I wanted something to serve with tea and decided to make scones. I am not sure why I decided to use grapefruit in the recipe. It might have been that big bowl of organic pink grapefruit sitting on the counter.
I started with a scone recipe I had used before, then tweaked it by adding grapefruit zest and juice. I added grapefruit juice and zest every where I could think of.
They came out great. You could even see little flecks of pink here and there.
Scones, done right, are very tender. These scones came out just perfect. A little crispy on the outside, tender on the inside. Not too sweet and the delicate flavor of grapefruit. So here is the recipe.
Grapefruit Scones
2 c. flour
½ c. sugar
1 T. baking powder
1 t. baking soda
½ t. salt
Zest of 1 grapefruit
½ c. cold butter
1 egg, beaten
¼ c. half and half
¼ c. grapefruit juice
Topping:
2-3 T. half and half
4 T. sugar
1 T. grapefruit zest
Glaze:
1½ powdered sugar
1 T. grapefruit zest
3-4 T. grapefruit juice
Preheat oven to 375. Line a baking sheet with parchment paper or silicone liner- or grease lightly. Set aside. In medium bowl, combine flour with sugar, baking powder, baking soda, salt and zest. Cut in cold butter until mixture looks like coarse crumbs. In small bowl, combine egg with half and half and grapefruit juice. Add to flour mixture and stir until mixture forms into a soft dough. Mix until combined, but don’t overmix. On lightly floured surface, divide dough in half. Dust an 8-inch round cake pan. Add half of the dough and press in until dough is evenly spread in the pan. Turn the pan over, quickly onto the prepared baking sheet to get the dough out. Note: this part seems a little tricky, but it gives you a perfect 8-inch circle of dough. Don’t under-flour the pan and the dough will come right out. Also, be sure to flip the dough near one corner of the baking sheet, so you will have room for the other half of the dough. Re-flour the cake pan, press in the rest of the dough and flip it onto the baking sheet. Now you have 2 ( 8-inch) circles of dough on the baking sheet- hopefully. Don’t sweat this part. If the dough doesn’t come out easily, just scrape it out of the cake pan, add more flour, return the dough to the cake pan, and try it again. And when you are flipping it out of the pan- do it quickly. If you prefer, you can place the dough on the baking sheet, in two piles, and shape it into 2 ( 8-inch) circles. Using a dough cutter or a spatula, cut each circle of dough into 8 wedges. For the topping, brush the scones with half and half. Combine the sugar and zest and sprinkle over the dough. Bake for 20-22 minutes, or until golden brown. Re-cut the scones where you cut them before, and place the scones on a cooling rack. Let them cool a few minutes. Meanwhile, make the glaze. Combine the powdered sugar and zest, then add enough grapefruit juice to make a glaze you can drizzle. Using a small spoon or even a fork, drizzle the tops of the scones with the glaze. Make a pot of tea and eat your scones. Makes 16.
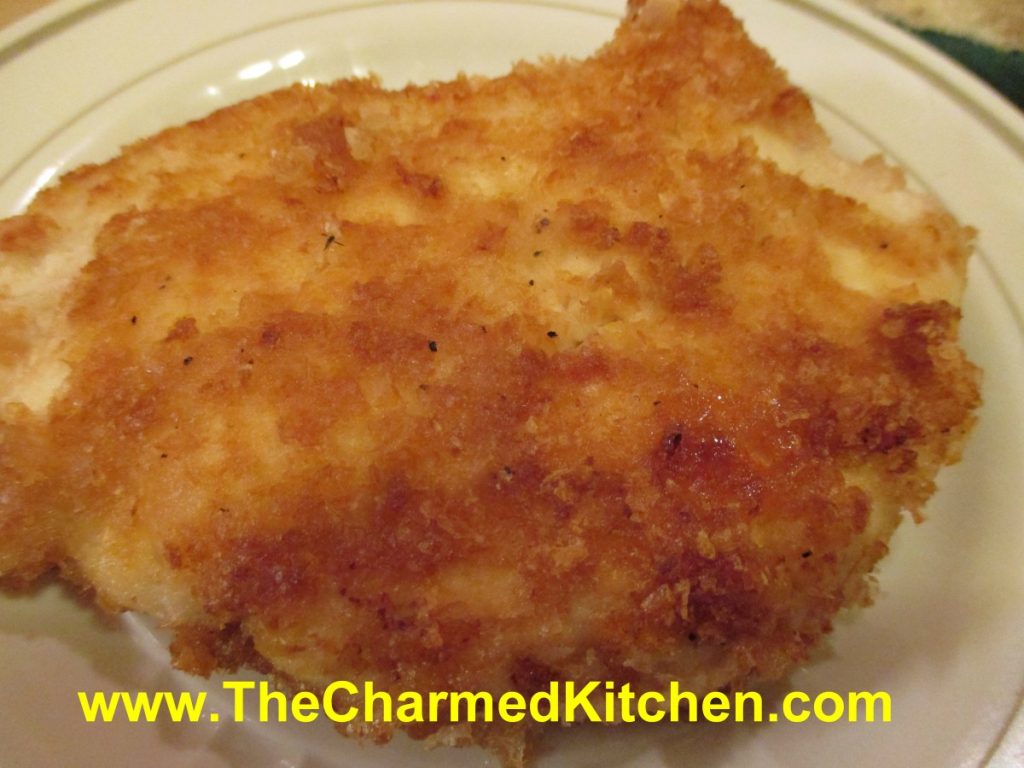
Potato “Breaded” Chicken- Gluten Free
I love my Mom’s breaded chicken. It was a staple at summer outings. I still make it. Pretty classic, with a flour dredge, egg dip and bread crumbs.
Sometimes, bread crumbs are not an option. If you, or someone you love, can’t have gluten, this recipe for “breaded” chicken really works. It is also very simple to make. Perfect for a weeknight, when you might not have a lot of time to cook.
I just “breaded” the chicken with potato flakes. Yes, the same potato flakes used to make instant mashed potatoes. First, I spread some mayo on the chicken, then a quick coating of the potato flakes. I pan fried the chicken, but you could bake them or even use an air fryer.
I sometimes use potato flakes as a gluten-free thickener for veggie soups and the like. I have also used them as a coating for fish.
Even if you can have bread crumbs, the potato flakes are a fun way to coat chicken, fish or pork. They give you a nice, crispy crust.
The chicken breasts I had were pretty thick, so I cut them into thinner pieces to help them cook faster, and more evenly. You could also cut them into nuggets, if you prefer. I pan fried, but you can also brown them a little, and finish in the oven. If using bone-in chicken, increase baking times.
Potato “Breaded” Chicken
½ mayo
1 c. potato flakes
Salt and pepper
4 chicken breasts, boneless or 6 boneless chicken thighs
Oil
Spread chicken pieces with the mayo. Season the potato flakes with a little salt and pepper. Place potato flakes on a plate or in a shallow dish. Coat the chicken pieces with the potato flakes, pressing a little to cover well. Heat oil in skillet until really hot. Cook chicken pieces in skillet, on both sides, until golden brown. Turn heat down to medium and continue cooking until chicken is cooked. Serves 3-4.
Applesauce and Oatmeal Muffins- Vegan

I had a request from a friend, for more vegan baking recipes. I came up with these muffins, and thought I would share it.
The muffins came out moist and light. Baking powder and baking soda gave them plenty of “lift”. They rose beautifully.
I also have a lot of applesauce that I canned, so I am interested in recipes using applesauce. I was happy to use some of it in these muffins.
I added both raisins and walnuts for more texture and flavor. You could omit them, or add different dried fruit or nuts. You can also sprinkle a little cinnamon sugar on top of the muffins before baking, if you like.
I used olive oil in this recipe. I like the way olive oil tastes in baked goods. It almost tastes like I used butter. The secret is to use a mild flavored olive oil. A strong olive oil will over power the muffins. Sometimes I use avocado oil, which has a very neutral flavor.
The recipe makes a lot of muffins. They freeze well.
Here is the recipe. Enjoy!!
Applesauce Oatmeal Muffins
2 c. applesauce- I used homemade with cinnamon in it
1/2 c. oil
1 c. sugar
1 t. vanilla
2 c. flour Note: You can use all purpose, I used whole wheat pastry flour.
1 c. rolled oats
2 t. baking soda
2 t. cinnamon
1/2 t. baking powder
1 c. dried cranberries or raisins
1 c. chopped nuts
Preheat oven to 375 degrees. Line 24 muffin cups with paper liners or grease lightly. Set aside. Combine applesauce with the oil and stir in sugar and vanilla. Add flour, oats, soda, cinnamon and baking powder. Stir to mix well. Stir in fruit and nuts. Spoon batter in to muffin cups, filling just over half-full. Bake for 18-20 minutes or until golden brown on top. Makes 24.
Almond Biscotti
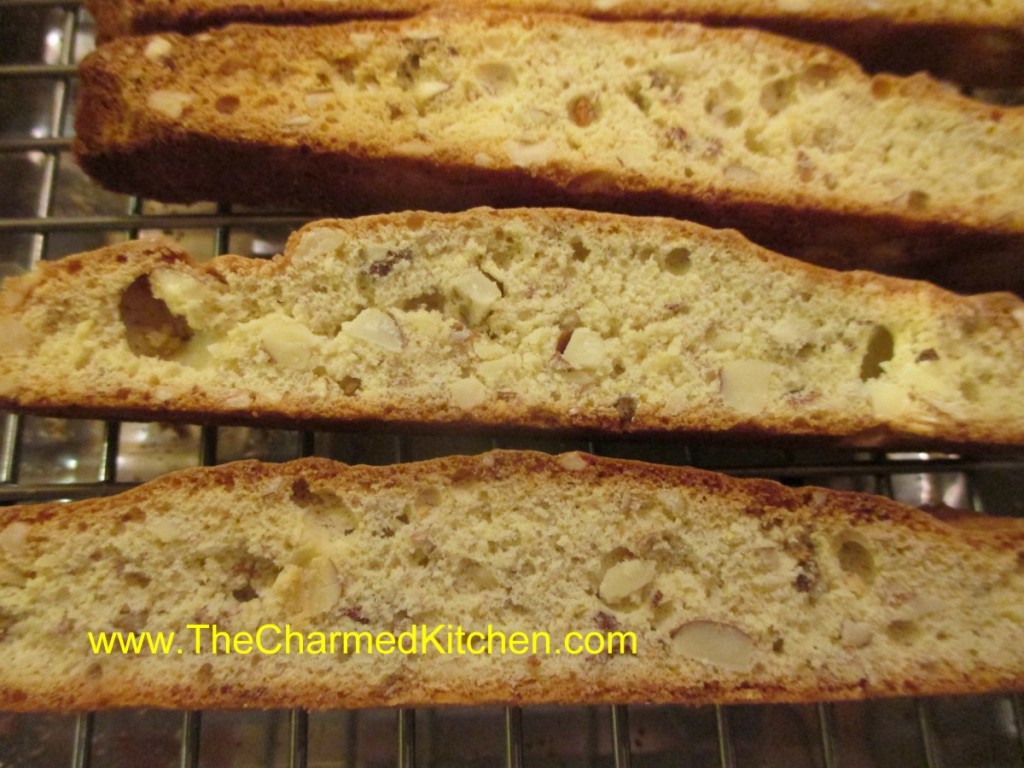
I love these biscotti. They are just the thing to dunk in a cup of hot coffee or tea on a chilly morning. Besides chopped almonds, they are flavored with Amaretto, lemon zest and lemon juice. The almonds and lemon work really well together.
The hard texture of biscotti comes from twice baking them. First the dough is formed into a log and partially baked. Then the “log” of dough is sliced- and the slices are baked a second time. For the second baking, most recipes tell you to turn the biscotti halfway through the baking process. This is so they dry and crisp up on both sides evenly.
I have a much easier way to handle the second bake. Just place a cooling rack on your baking sheet. Then arrange the slices on top of the cooling rack. Now, when you bake the slices- the heat dries them out and crisps them up on both sides. No need for turning them over mid-bake.
Biscotti are so easy to make, I wonder why more people don’t make their own. The ones from the store are never as good.
So here is the recipe. I hope you try to make your own biscotti, if you haven’t before.
Almond Biscotti
2 c. flour
1 t. baking powder
1/4 t. salt
1 c. sugar
3 eggs
2 T. Amaretto liqueur
1 T. lemon juice
2 t. grated lemon peel
2 c. coarsely chopped almonds, about 9 oz.
Combine dry ingredients and set aside. Beat sugar and eggs together until light and lemon colored, about 3 minutes. Mix in liqueur, juice and peel. Beat in dry ingredients and stir in almonds. Mixture will be very sticky. Spray large baking sheet with non-stick coating. By spoonfuls transfer dough to baking sheet forming 2 14-inch long strips. Using floured hands shape each strip into 2 1/2 inch wide log. Bake in a 350-degree oven for about 30 minutes. Logs should be light golden and firm to touch. Transfer to cutting board and using a serrated knife, cut into 3/4-inch thick slices. Place a cooling rack on your baking sheet and arrange slices on top of the cooling rack, cut side down. Bake 11-12 minutes. Remove from oven and cool completely. Can be stored in airtight container for a week. Makes about 40.


