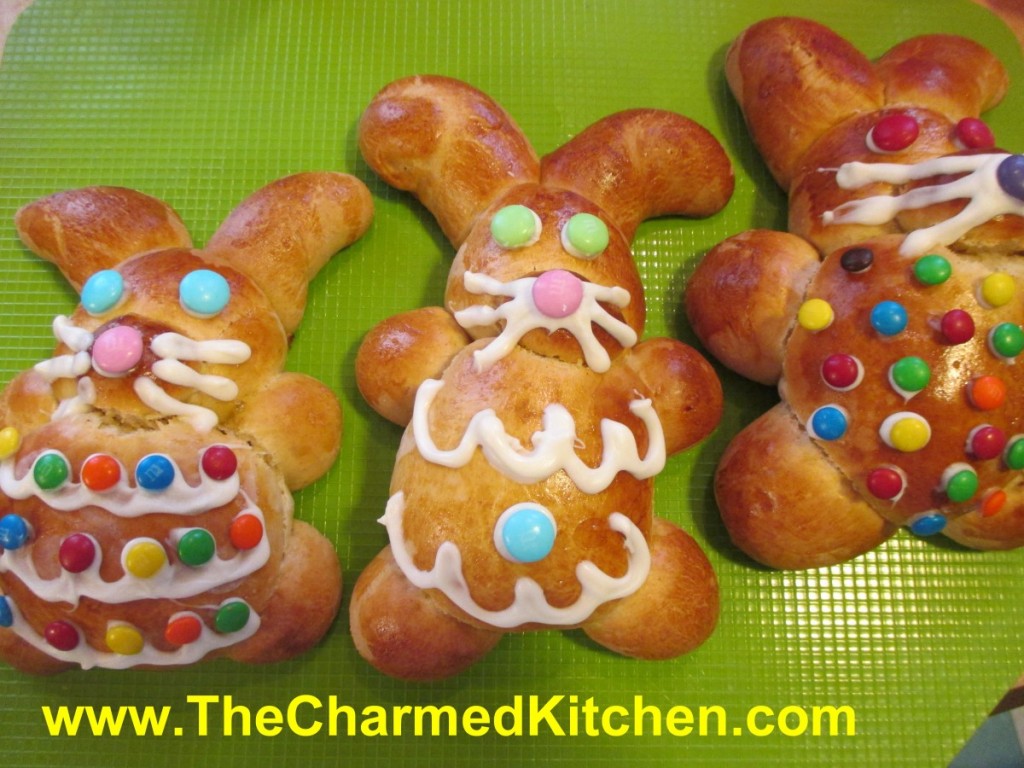
Honey Bunny Rolls
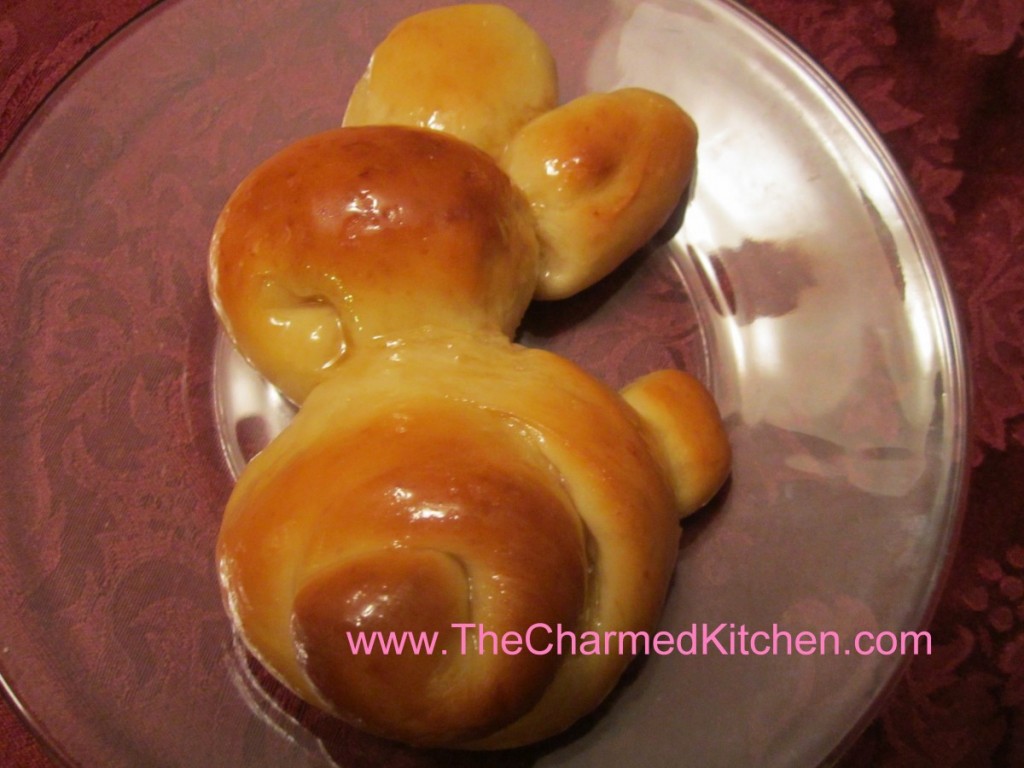
If you are looking for a fun dish to serve for Easter, you might want to bake a batch of bunnies. These rolls can be served with Easter dinner, or with breakfast or brunch.
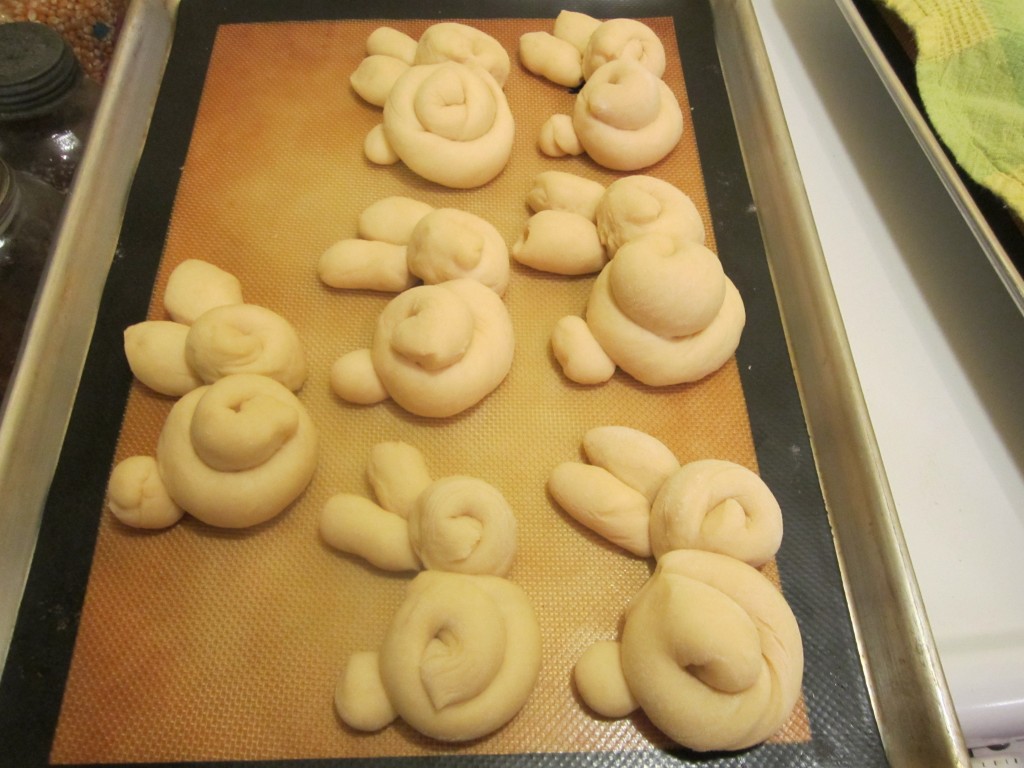
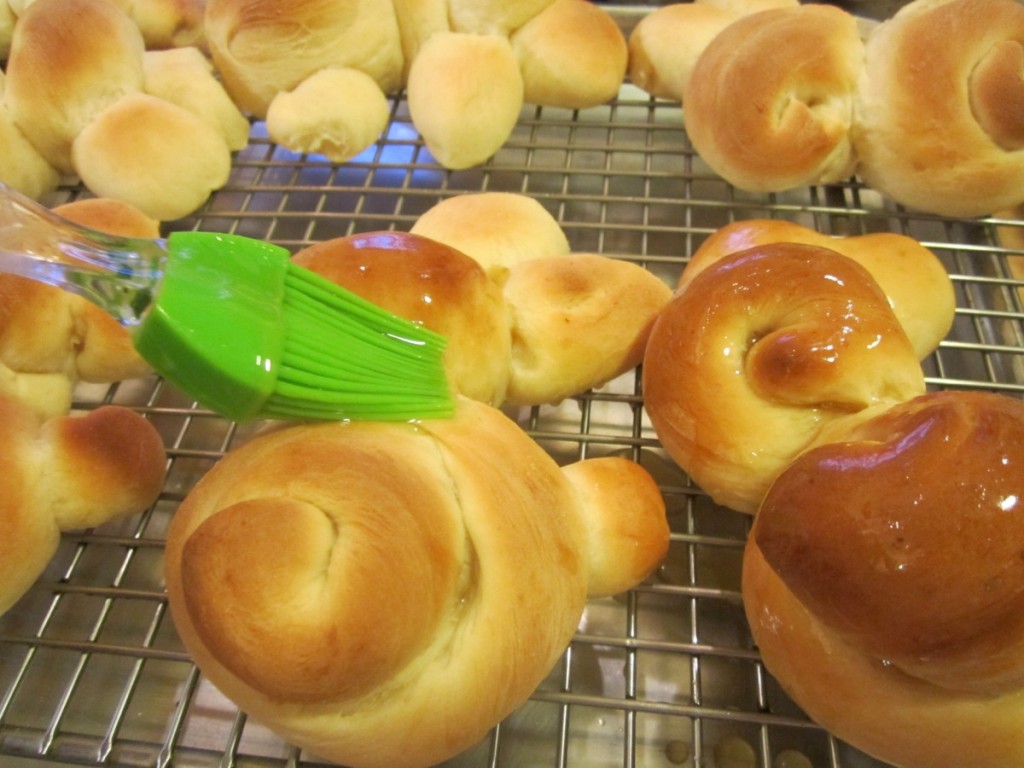
The honey-sweetened yeast dough is rolled into ropes, and then the ropes are formed into these bunny shapes. Once the rolls are baked, they are brushed with a mixture of warm honey and melted butter. This is a fun recipe to make with kids. I make them every Easter. Sweet and so cute, they are sure to be a hit when you make them.
The dough is chilled before rolling, so you can mix up the dough in the evening- put in the fridge- then roll them out the next day. They are actually pretty easy to make.
You can add raisin “eyes”, if you like. It is an option.
Honey Bunnies
4-5 c. flour
2 packages yeast
1 t. salt
2/3 c. evaporated milk
½ c. each water, honey and butter
2 eggs
Raisins, optional
Honey glaze
1/2 c. honey and 1/4 c. butter heated together until warm.
In bowl combine 1 c. flour, yeast and salt. Heat together milk, water, honey and butter until very warm and beat into the flour mixture. Beat 2 minutes on high speed. Beat in 1 cup flour and eggs. Beat 2 more minutes, until batter thickens. Stir in enough flour to make a stiff batter and chill, covered with plastic wrap for 2-24 hours.
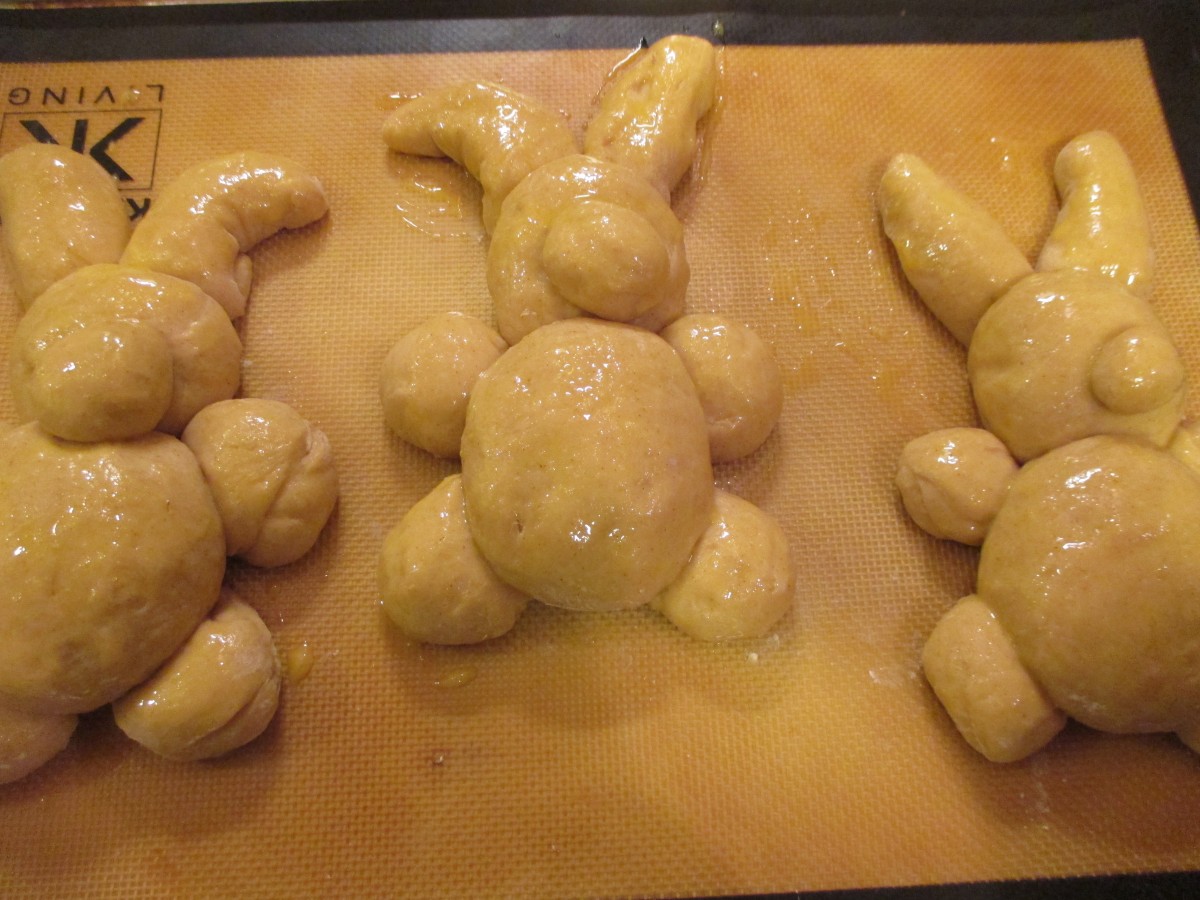
Place dough on lightly floured surface and divide into 15 equal pieces. Roll one piece of dough into a 20- inch rope. Cut rope into a 12- inch piece, a 5-inch piece and 3 one-inch pieces. Coil 12- inch piece to form body, five inch piece to form head and one inch pieces to form ears and tail. Place the body on greased cookie sheet and then place the head next to the body, making sure they are touching. Place ears and tail on the bunny, making sure they make good contact with the rest of the “bunny”. I tuck them under a little. Repeat with the remaining dough. Let rise, covered until doubled, about 25 minutes. Bake in a 375-degree oven for 12-15 minutes. Remove to cooling rack and brush with honey glaze. Place raisins on each to make eyes, if you like. Brush with additional glaze before serving, if desired. Makes 15 bunnies.
Amy’s Easter Hummus
Hummus is always a favorite at parties around here. I’ve made classic hummus and have made variations with roasted peppers, black olives and garlic scapes.
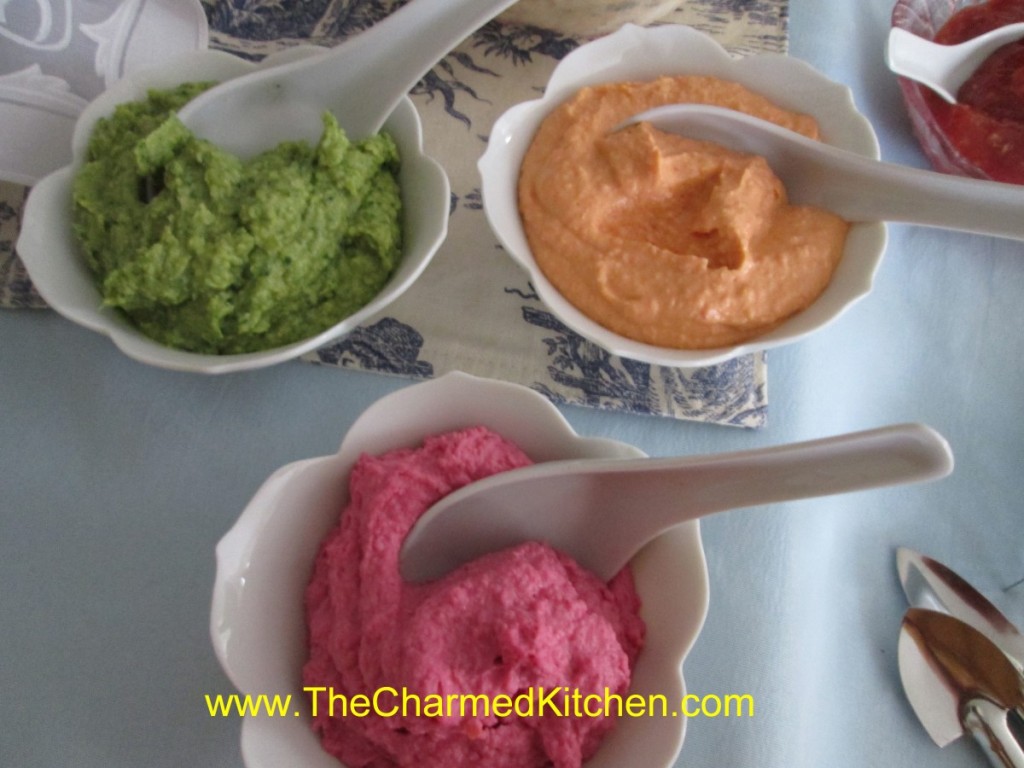
I always remember the time my dear friend, Amy, wanted her hummus to be really colorful. It was for her Easter dinner. I believe that was the same year she dyed the egg whites for the deviled eggs. Amy really knew how to get the details right.
She and I had talked about how best to make tasty, colorful hummus. She decided to make spinach hummus and beet hummus in addition to her classic hummus. She wanted something that tasted good, but looked like Spring. She ended up with a beautiful array for Easter dinner that year. Tasty, too.
Here are the directions for making them.
Hummus
1 can garbanzo beans, drained, or about 2 cups cooked garbanzos
1/4 c. olive oil
2 T. lemon juice
2 T. tahini (sesame seed paste)
2 cloves garlic
salt and hot pepper sauce to taste
Combine all ingredients in a blender or food processor until smooth. Adjust seasonings. Chill. Serve with pita bread, crackers or fresh vegetables. Also nice spread in a pita bread with sliced tomatoes, cucumbers and lettuce. Freezes well.
Green Hummus (Spinach)
Make the original hummus recipe from above but add 2 c. fresh spinach and ½ c. chopped parsley, optional.
Pink Hummus (Beet)
Make the original hummus recipe from above but add 2-3 small cooked beets, about 2/3 cup.
Note: You might want a little more salt in either of these recipes or a bit more lemon juice.
Miss you, Amy.
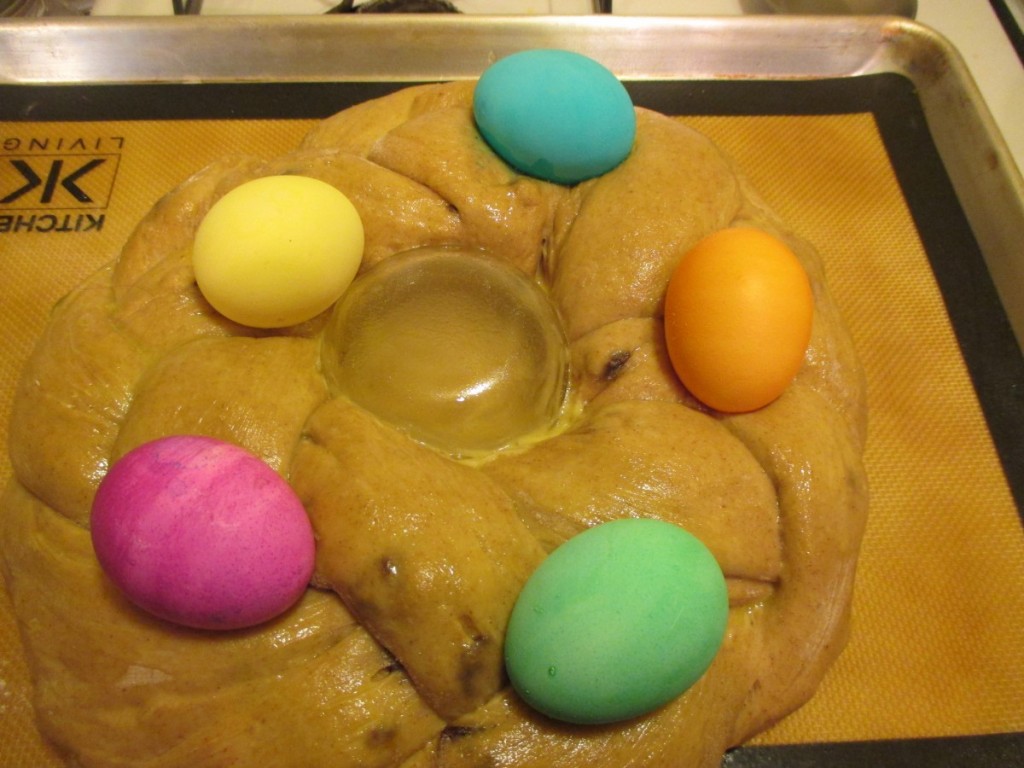
Easter Bread Wreath

This Easter bread wreath, with eggs baked on top, is a fun bread to make for the holiday. It is a tradition in many families.
I hadn’t made one in a long time, and when I went to find my recipe, I couldn’t locate it. I decided to make a new recipe. I wanted it to have a lot of flavor- something that would be fun served at a breakfast, brunch or with dinner, but not too sweet. I added spices and raisins, but I could see using other dried fruits. I left it plain on top – but you could easily add a powdered sugar glaze. No, I did not hard cook the eggs first. They cook while the bread is baking. Saves a step, for sure.
I tested the bread out with friends. Almost half was eaten before dinner, so I am confident to say, that this recipe is a winner. The texture of the bread is really nice and the dough is richly spiced. I added mace, but if you don’t have any mace, add a little more nutmeg or allspice. Mace is a spice I would encourage you to try sometime. So here is the recipe. Hope you like it as much as we did.
Cinnamon Raisin Easter Wreath Bread
4½ -5 c. flour
1 pkt. yeast
½ c. brown sugar
2 t. cinnamon
1 t. salt
½ t. allspice
½ t. nutmeg
½ t. mace
1 c. warm water
½ c. butter, melted
2 eggs
½ c. raisins
5-6 uncooked eggs, dyed if you like
Combine 2 cups flour, yeast, sugar, seasonings and salt in large bowl. Heat together water and butter until warm and add to flour mixture. Beat 2-3 minutes. Beat eggs and reserve 1 tablespoon of the eggs for brushing the top of the bread later. Add remaining eggs and another cup of flour to the bowl. Beat 4 minutes. Add the raisins and enough of the remaining flour to make a soft dough. Knead on a floured surface until smooth and elastic, but still soft. Place in oiled bowl turning to oil top. Note: I actually used my stand mixer, and just left the dough in the bowl to knead, and then covered it to rise. I was able to leave the dough a little sticky this way, using less flour. Cover and let rise until doubled, about 45 minutes. While dough is rising, prepare a pan. Grease a large baking sheet- or use a silicone baking mat. Grease a one cup oven-proof custard cup and place it upside down on the middle of the baking sheet. This will keep a “hole” in the middle of your wreath. If you don’t have a custard cup, you can use a metal one-cup measure instead. Punch dough down and divide in three pieces. Roll each piece into a 20-inch long rope. Braid the ropes together. Wrap the braid around the custard cup on the baking sheet and pinch ends together to keep the braid from coming apart. Cover and allow to rise until doubled (50-60 minutes). Just before baking, combine reserved egg with a little water and brush the wreath with the egg wash. Place 5 or 6 eggs on the top of the braid- being careful not to press down too hard. Bake in preheated 350-degree oven for 25 minutes. Cover bread with foil and bake 10-15 minutes longer, or until bread sounds hollow when tapped lightly. Here is the only tricky part. You have to remove the wreath, but not drop the glass custard cup in the middle. You can let the bread cool a few minutes before moving. I use a silicone baking sheet so I slide the whole thing off the baking sheet and onto a cooling rack. I use two large spatulas to lift the wreath up and leave the custard cup behind. If it doesn’t come right out, use a knife to loosen. Lift the wreath up enough to slide the custard cup out. Let cool before serving- store leftovers in fridge, because of the eggs on top. Makes 1.
Lamb in Greek Lemon Egg Sauce
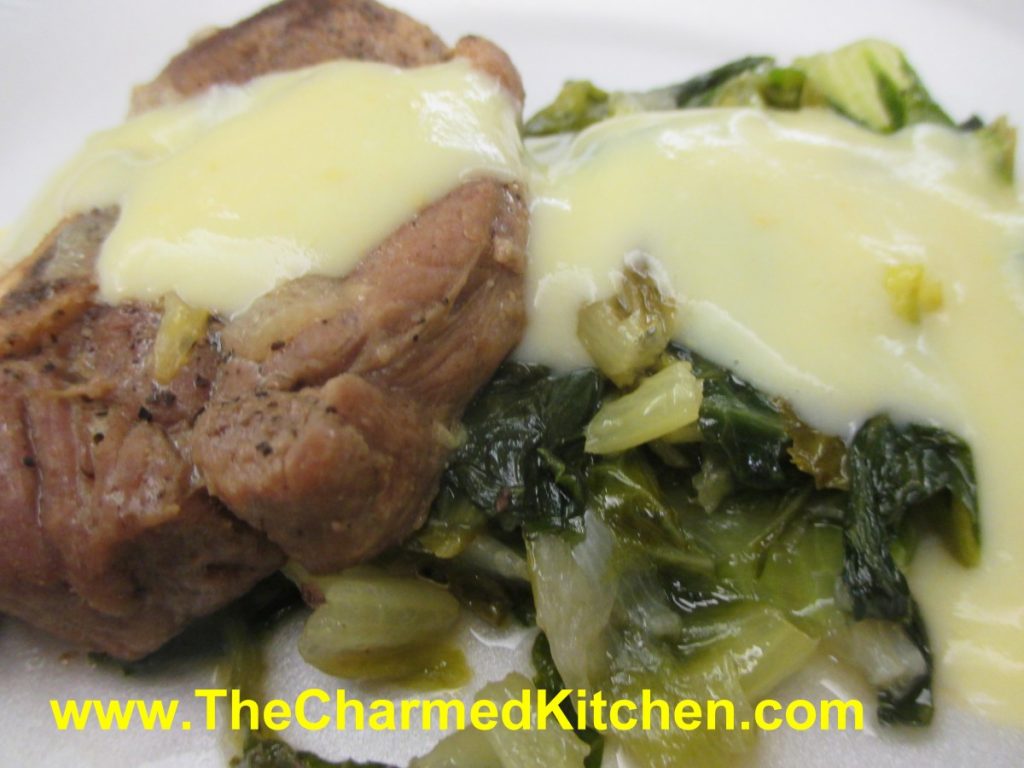
I am not sure which I love more in this recipe- the lamb that is cooked to tender perfection- or the Greek lemon egg sauce. Both are very special. I love lamb and have cooked it lots of different ways. This preparation will always be a favorite. This a great dish to serve for Easter dinner.
The recipe uses lamb shoulder, cooked with onions and Romaine lettuce- yes lettuce. The lamb is browned and then cooks gently until tender. The lettuce also cooks down and adds a nice “green” flavor to the dish. I have used lamb shoulder chops, and cooked them bone in. You could certainly use lamb shanks, if you prefer. Just allow enough time for the shanks to get tender.
The real magic is the lemon egg sauce, used to top the lamb once finished. It is creamy and has just the right amount of tang from the lemon juice.
If you are thinking of serving lamb for Easter, this would be a lovely recipe to use.
You can make this dish with pork or even chicken, but my favorite version is with lamb. I also use the lemon sauce with meat and rice stuffed zucchini. My dear friend Amy, had the dish on a trip to Greece and we made it often.
Fricassee of Lamb with Lemon Egg Sauce
2 1/2-3 lbs. lamb shoulder, or use pork
3 medium onions, chopped
2-3 heads romaine lettuce, washed and sliced thin
1/2 c. olive oil
Egg and Lemon Sauce -recipe follows
Cut the meat into serving pieces. Heat the oil in a pot and sauté the meat. Add salt, pepper, the onions, lettuce and a small amount of water. Cover the pot and let the fricassee simmer for about an hour. Prepare the egg and lemon sauce, pour it over the fricassee and serve.
Lemon and Egg Sauce
1-2 c. stock
2 eggs
juice of 1 lemon
flour, about 1-2 tablespoons, depending on how thick you want the sauce
Bring stock to the simmer. Beat eggs well. Mix the flour with the lemon juice.
Add to the eggs and keep beating. Add the hot broth slowly while you keep beating. Pour the egg and lemon sauce in the pot and bring to a simmer, stirring constantly. Makes 1-2 cups. For a thinner sauce eliminate the flour.
Easter Egg Biscotti
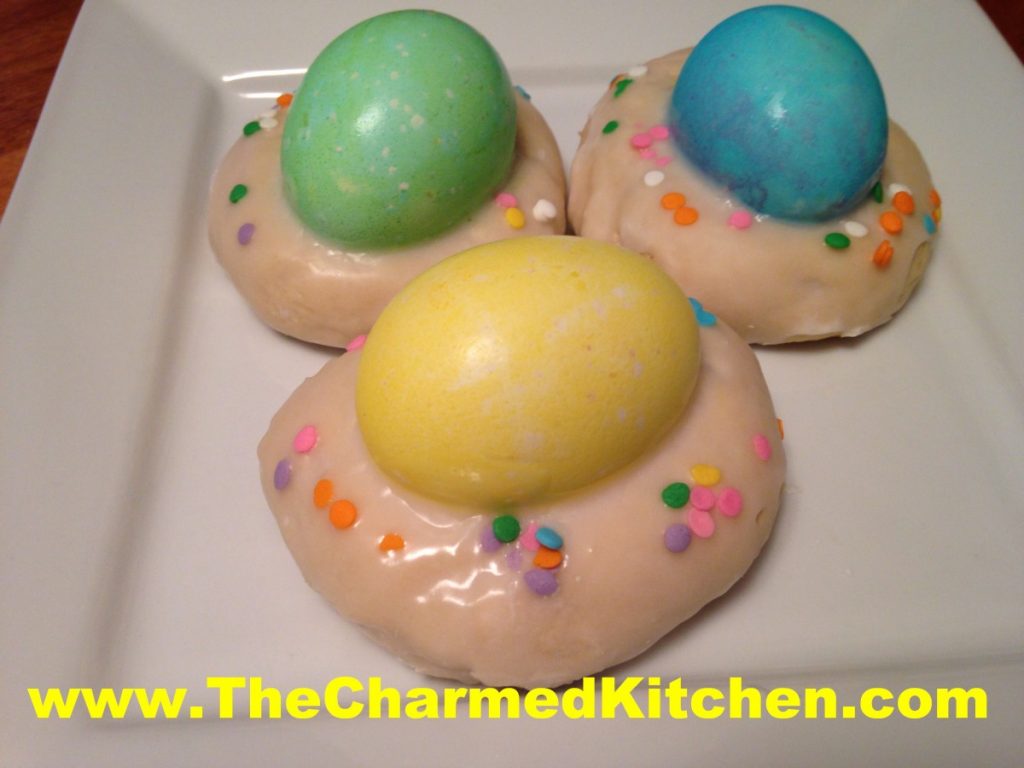
I get so many requests for this recipe, I decided to post it again. This is a treat from my childhood. Rose Dieglio was the mother of my best friend, Debbi. Rose made these every year, and I loved them. Years later, she was kind enough to share her recipe with me. I always make a bunch to hand out to friends and family. It is a tradition I enjoy very much.
The dough is a type of cookie. You roll the dough out in pieces about the size of eggs. Make an indent in the dough and press in a tinted egg. The egg does not have to be cooked- it will cook when the biscotti bakes.
The dough will be a little sticky. Just add some flour to your fingers when shaping the dough, if needed.
The original recipe calls for shortening. I make them with butter, instead. If you use butter in the dough- chill it before baking.
For years I made the biscotti with hard cooked eggs that I dyed. My mom always asked if I needed to cook the eggs. She wondered if the eggs would cook during the baking process. So I tried it a few years ago. I placed a raw, un-decorated egg on one of the biscotti “nests” and baked it with the rest. What do you know? The egg cooked in the oven when the biscotti baked. The lesson here- always listen to Mom. Saves a whole step in making this recipe. Just be gentle when you press the eggs into the dough. They are raw eggs, after all.
Once baked, the biscotti can be topped with a powdered sugar glaze and sprinkles, if you like. Because they have hard cooked eggs in them, store in fridge after cooking.
Easter Egg Biscotti
1 c. shortening or butter- I use butter*
1 ½ c. sugar
4 eggs
5 t. baking powder
1 t. salt
2 t. vanilla
1 c. milk
6 c. flour
24-30 eggs, plain or dyed
Powdered sugar glaze
Preheat oven to 350 degrees. Cream together butter or shortening and sugar. Beat in eggs. Add next 4 ingredients and blend until smooth. Stir in flour 2 cups at a time. Dough should be pliable. If dough is too sticky add a little more flour. Take a piece of dough about the size of a large egg and place on a greased baking sheet. Indent middle slightly and then place an egg in the center, pressing down slightly. It should look like a nest. Continue with remaining dough allowing about 2-3 inches in between as they spread when baking. You can fit 6-8 on a large baking sheet. Bake 20 –25 minutes or until browned on the bottom. Cool on wire rack before drizzling with frosting. Makes 24-30. Store in fridge.
* If using butter- chill dough a couple of hours before baking.
Sugar glaze
2 c. powdered sugar
2-3 T. milk or orange juice
1 t. vanilla
Food coloring, if desired
Mix together until smooth and of drizzling consistency.

Cooling down
Easter Cupcakes
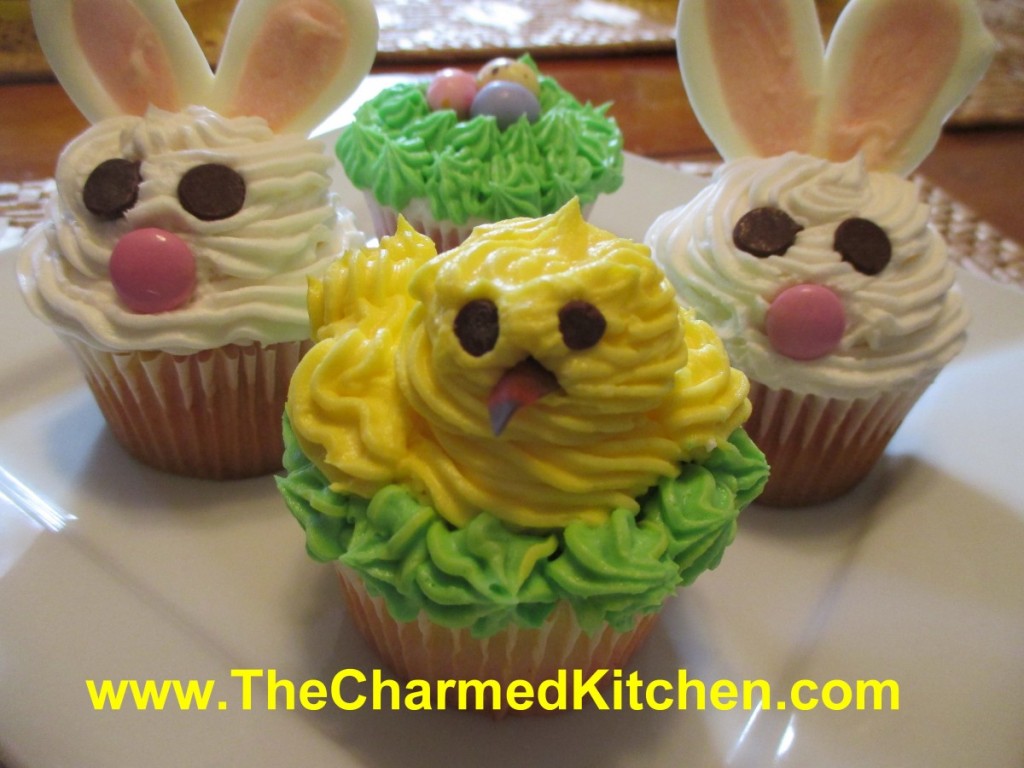
These cupcakes would make a great dessert for Easter- or any time. They are also a fun dessert for kids to make.
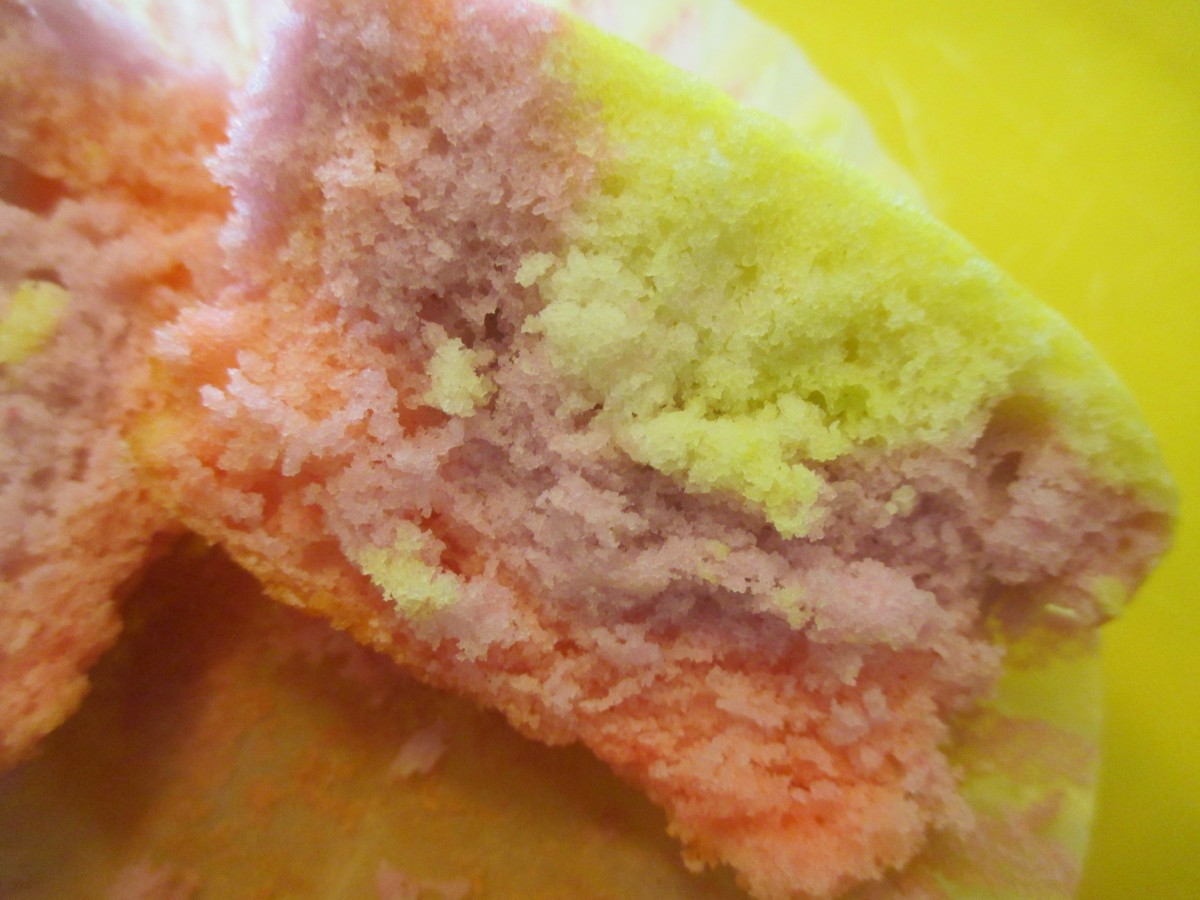
I started out by making a double batch of my classic white cupcakes- recipe follows. To add a little color to the cupcakes, I divided the batter into three bowls and tinted each of them a different pastel color. You can leave them white.
As I filled the pans, I just added a spoonful of each of the tinted batters in them. They came out really nice.
I made three different cupcakes: bunnies, chicks and nests.
I also made a double batch of white chocolate frosting. You could certainly make a vanilla buttercream, if you prefer.
Details on how to make each of them are listed below.
Classic White (Vanilla) Cupcakes
1 cup sugar
1/2 cup butter
2 eggs
2 teaspoons vanilla extract
1 1/2 cups all-purpose flour
1 3/4 teaspoons baking powder
1/2 cup milk
Preheat oven to 350 degrees. Line a muffin pan with 12 paper liners. In a medium bowl, cream together the sugar and butter. Beat in the eggs, one at a time, then stir in the vanilla. Combine flour and baking powder, add to the creamed mixture and mix well. Finally stir in the milk until batter is smooth. Pour or spoon batter into the prepared pan. Bake 20 to 25 minutes. Cupcakes are done when they springs back to the touch. Makes 12.
White Chocolate Frosting
6 oz. white chocolate – if using bars, chop before melting
1 stick (4 oz.) cold butter, cut into cubes
1-2 c. powdered sugar
1 t. vanilla
Melt chocolate. I just melt mine in a microwave safe dish, but you can use a double boiler. Let chocolate cool down a little. Beat butter into the melted chocolate. Beat until smooth and then beat in the powdered sugar and vanilla. Whip until frosting is smooth and fluffy. I normally beat for 5 minutes or longer. If too thick, add a few drops of water or milk. For this recipe, I made a double batch of frosting.
Bunnies
extra white chocolate
food coloring- pink or red
chocolate chips
pastel ( pink) M&M’s
Make bunny ears by melting some white chocolate and putting it in a piping bag or bottle. On wax paper, make outline of the ears in white chocolate and allow to cool/harden. Place a drop or two of pink or red food coloring in a microwave safe bowl and add some white chocolate. Melt in microwave, being careful not to burn the chocolate and stir until it turns pink. Pipe the pink chocolate into the middle of the ears. Allow to harden before peeling off of the was paper. Using a star tip, pipe frosting on cupcake. I made three layers – to add height to the cupcake. place ears on cupcake and add chips/candy for eyes and mouth.
Chicks
Frosting tinted yellow and green
mini chocolate chips
fruit roll up
Using star tip, pipe the chick’s body onto the cupcake in yellow frosting. Pipe on head and wings. Pipe green frosting around chick to form a nest. Use mini chips for eyes and cut fruit roll up for beak.
Nests
Frosting tinted green
egg shapes malted milk balls- or you could use jelly beans
Pipe green frosting on cupcakes to make nests. Add three, or more, candies in the middle for eggs.

Piping pink filling in ears
rainbow cupcake
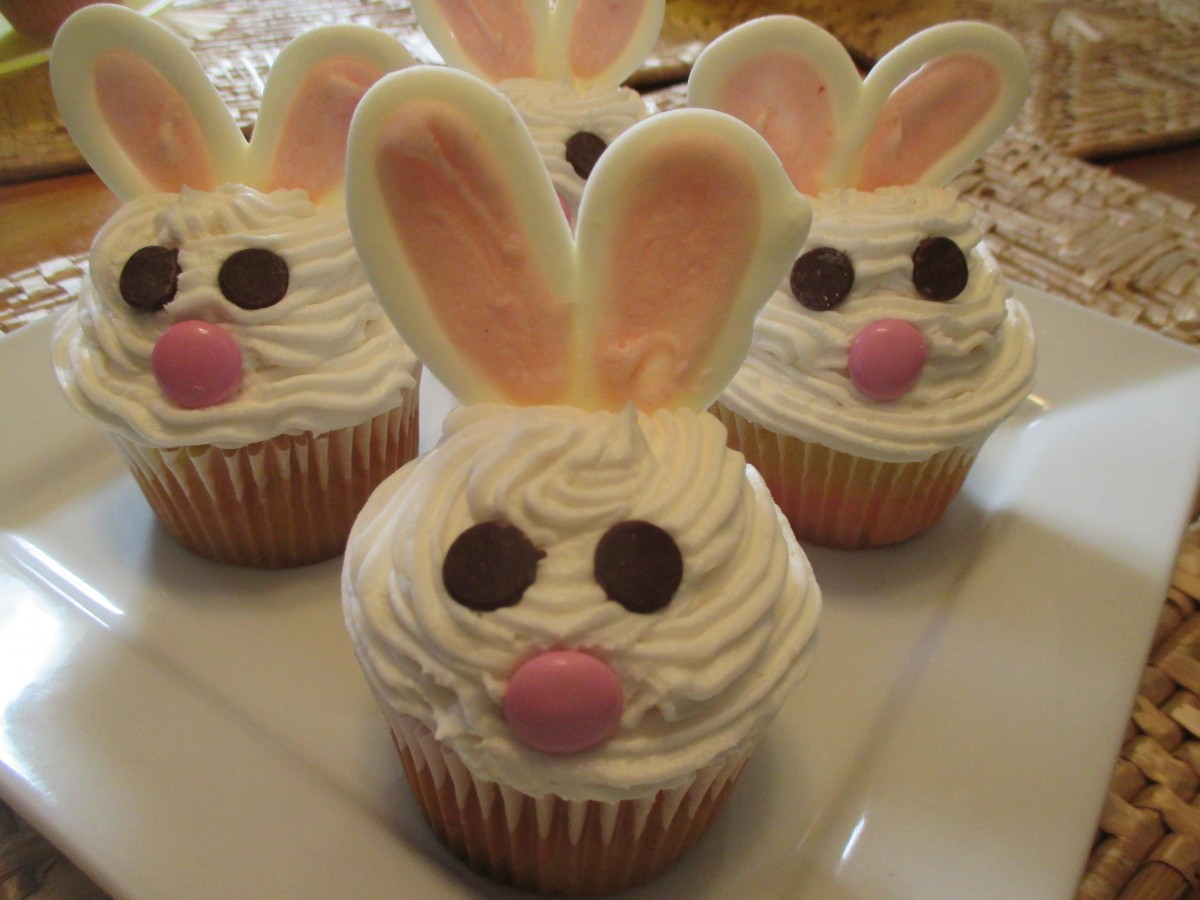
bunnies
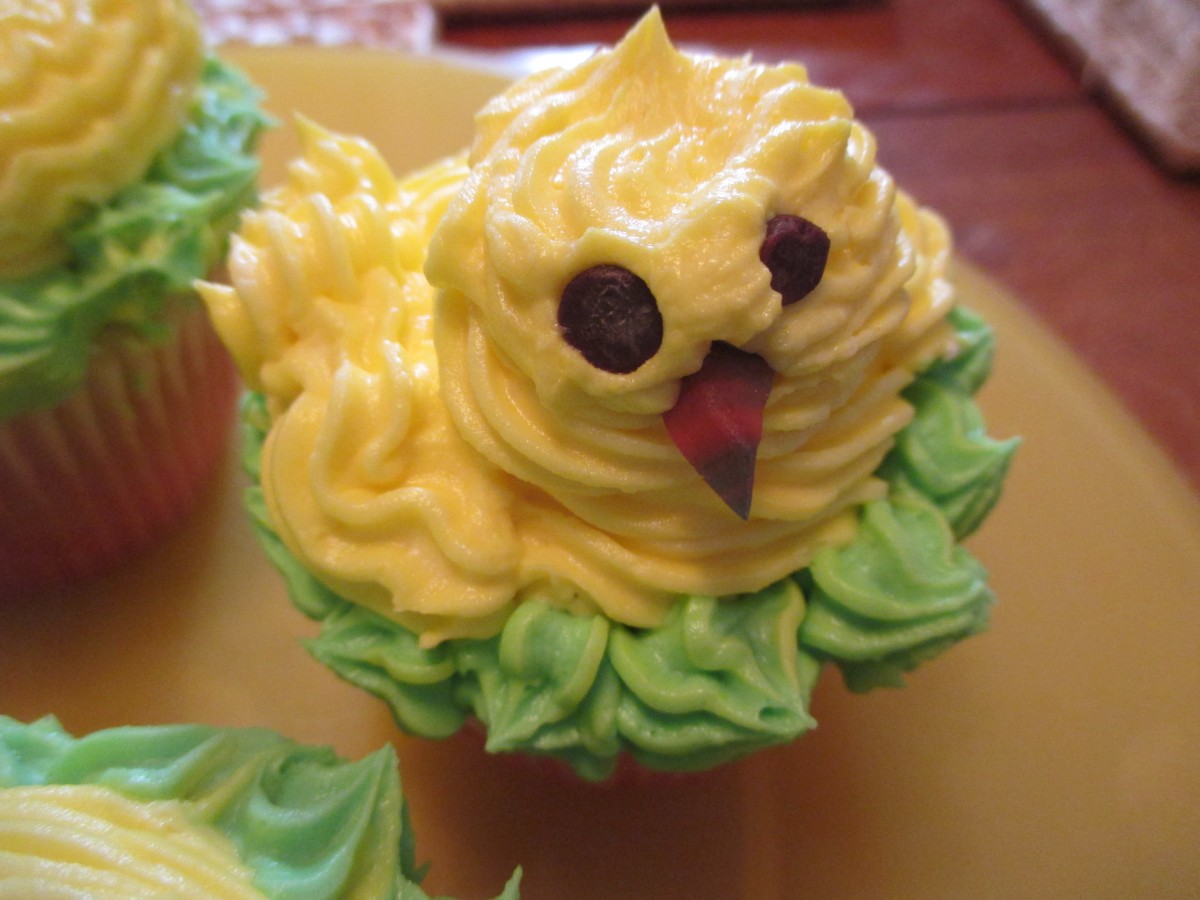
Chick cupcake
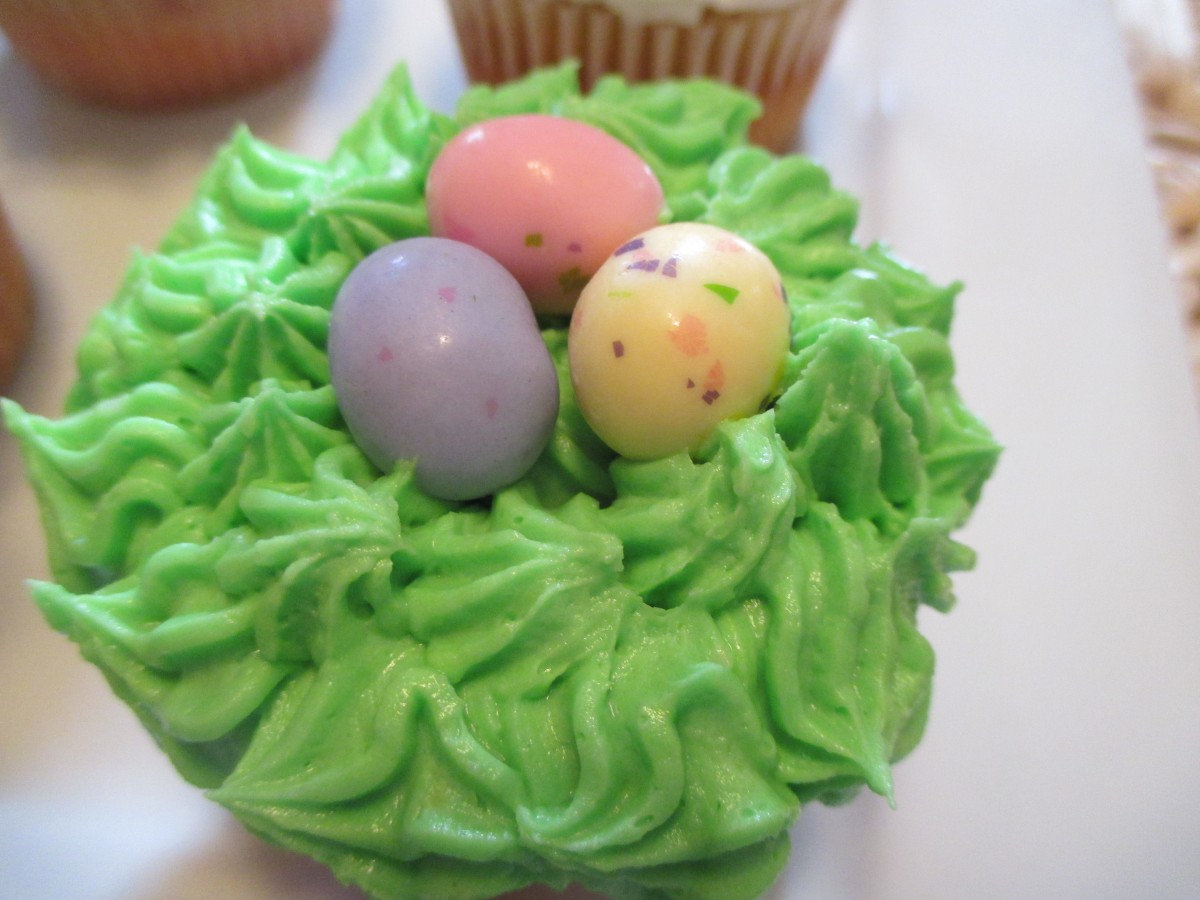
The nest cupcake
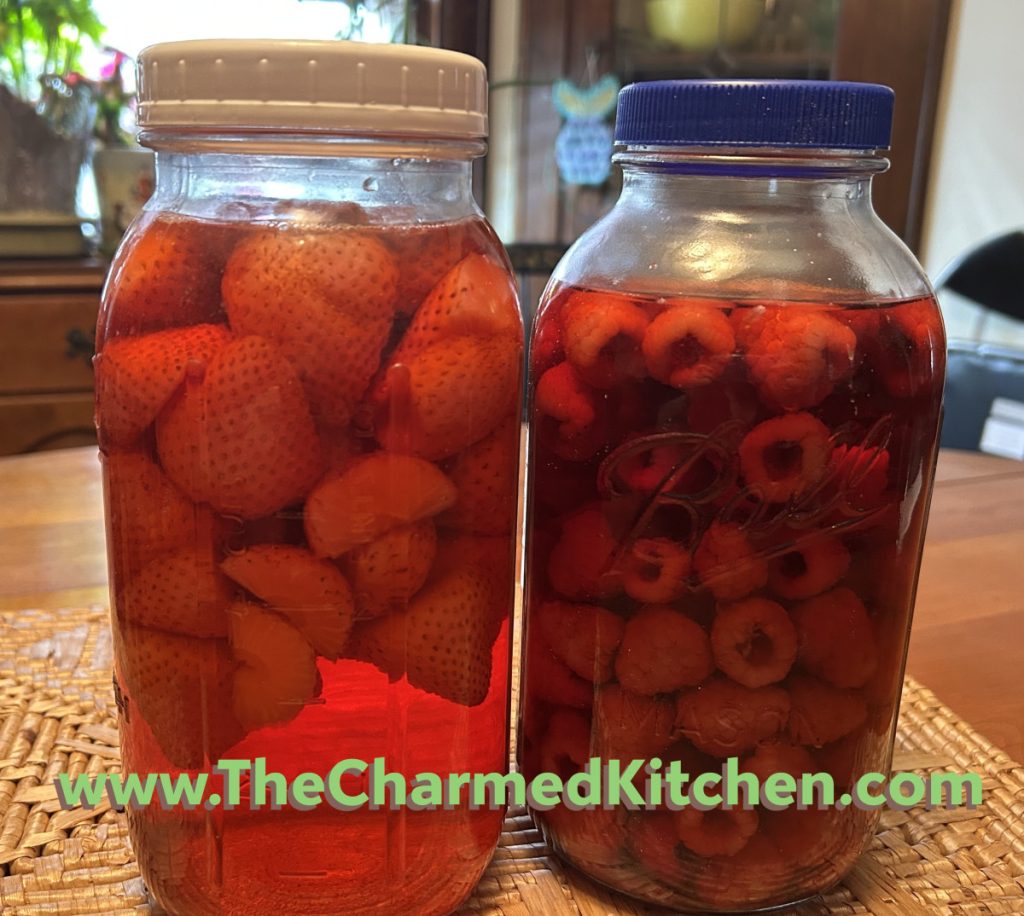
Fruit Vinegars and Shrubs
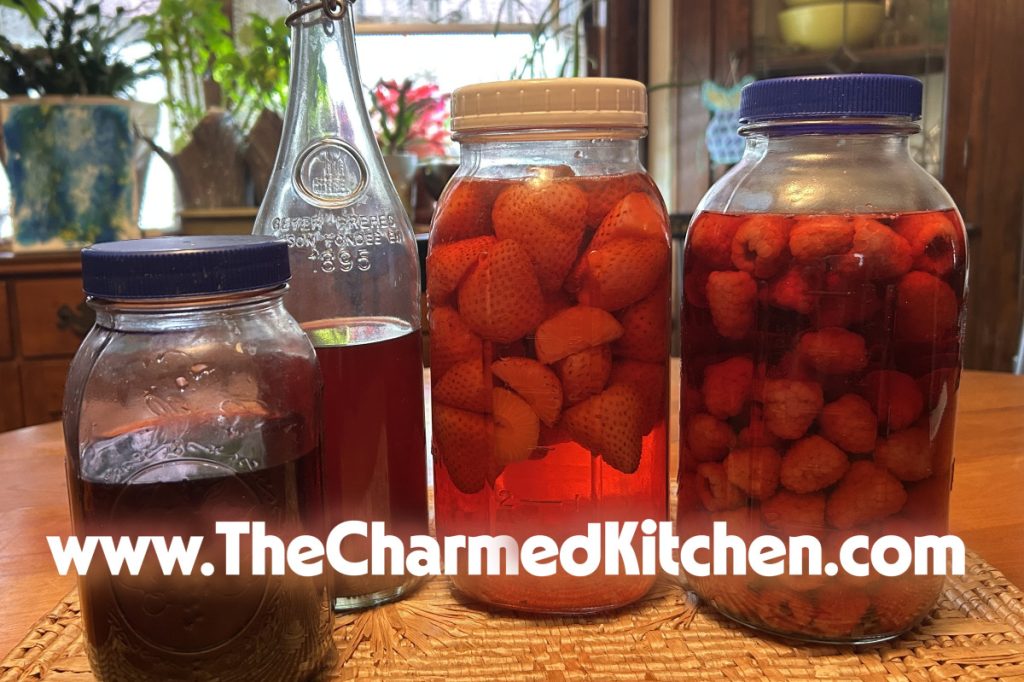
If you want a different addition to your salads and dressings, you might want to make fruit infused vinegars. They are super easy to make and can be used in all sorts of dishes. If you find yourself with more fruit or berries than you can use, it’s also a handy way to preserve their flavor. I use them as the base for dressings and marinades. I’ll often add a splash to soups or other hot dishes for a little bit of zing.
You can also make shrubs, which are used in cocktails and mocktails and are essentially fruit vinegars with added sugar. So let me give you the directions for making both. They are so much fun to cook with and so easy to make. Well worth the time.
Fruit Infused Vinegar
The formula is easy. Just put fruit in a jar and cover with vinegar. Well, that may be an oversimplification, but it’s not much more than that.
For every cup of berries, or other fruit, you add 1-2 cups of vinegar. Large pieces of fruit need to be cut up. I like to use white vinegar with 5% acidity. You could use white wine vinegar or red wine vinegar. While I love cider vinegar, it seems a little strong for most berries or cherries, but peaches, plums and pineapple would stand up to it. Once your fruit and vinegar are combined, you can add other spices or herbs, if you like. Or not. Then just close the jar and set it aside in a cool, dark place for a week or two. Longer if you forget about it. The longer time won’t hurt it. Then you just strain out the fruit and discard it. I’m sure someone has figured out a way to use the fruit. I haven’t come up with anything yet. You can just use a fine strainer. If you want the vinegar to be crystal clear, then strain it a second time through layers of cheesecloth or coffee filters. Store at room temperature, in the dark, or you can store in the fridge. They keep for a year or more, but might lose some color over time. They hold their color better when stored in the fridge.
Shrubs
Shrubs are fruit, vinegar and sugar syrups used to flavor drinks. They are traditionally made with berries and herbs, but other fruits work, too. Have some fun with it. They can be a nice addition to drinks of all sorts. I like a splash of shrub in iced tea or lemonade. They can really brighten up cocktails, too. The main difference in shrubs over the infused fruit vinegars is the addition of sugar or another sweetener. The ratio is 1:1:1. Equal parts fruit, vinegar and sugar, but you have some wiggle room there. The procedure is a bit different from fruit vinegars. In a glass jar, you start by crushing berries- or other fruit. If you want to add some herbs, this is the time. Sage, basil and rosemary are often used. Perhaps a cinnamon stick or a piece of vanilla bean. Go with something you like, or nothing at all. Totally up to you. Then add an equal amount of sugar. Stir to combine and let sit on the counter for a day or in the fridge for 1-2 days. At this point most recipes suggest you strain out the fruit, extracting as much juice as you can. I prefer to add an equal amount of vinegar and place the mixture in the fridge for a day or two. I find when you add the vinegar first, it is easier to strain later and you get more fruit flavor. Strain as you did for the fruit vinegar, using cheesecloth or coffee filters for a clear shrub. Taste it and see if you want to add more sugar, more vinegar or leave it as is. Store in the fridge. Shrubs keep for weeks and weeks.
Baby Clams with Pasta
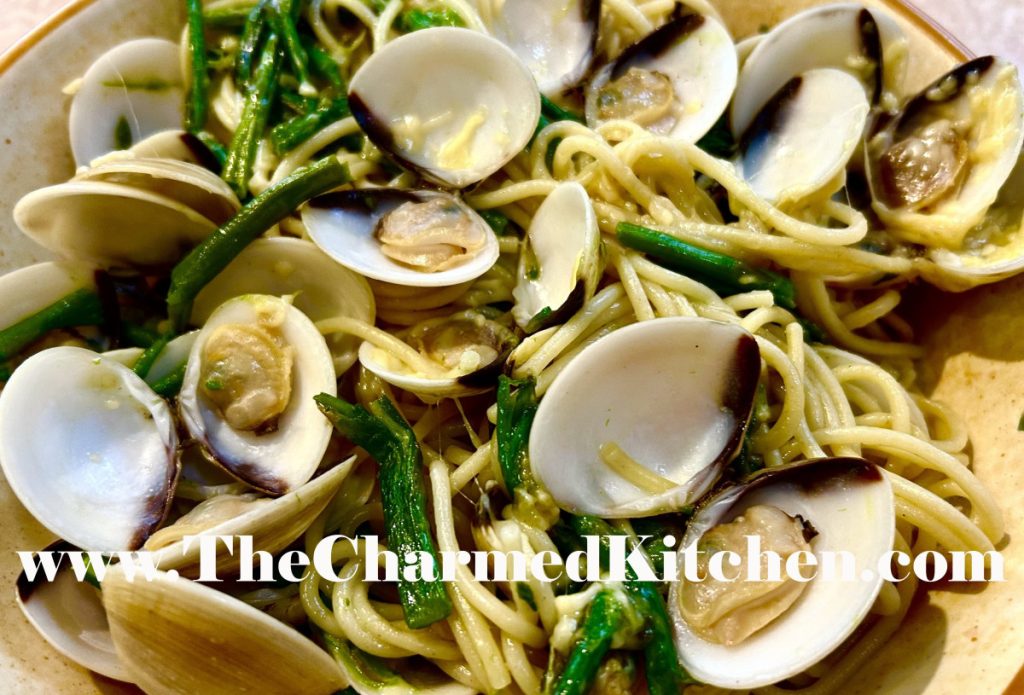
A store near me sells these adorable baby clams in their freezer section. I’m sure they can be found in lots of stores. When I am pressed to make a quick dinner, they work out so well. Let’s be honest. A pound of baby clams aren’t going to have a lot of meat in them. But they bring so much flavor in a small package.
You don’t need to defrost them ahead of time. The package has several methods to cook them. I like to cook them, out of any packaging they came in, right in the pan, then add pasta or rice to soak up any juices in the pan. Yum. This time I used pasta. I had some cooked asparagus from the night before , so I cut it into 1-inch pieces, give or take, and added them at the last minute. It worked out great. I had leftovers, but it would make a nice appetizer for two people.
Baby Clams with Pasta and Asparagus
1 small onion, diced
2 T. butter
1 (1 lb.) package frozen baby clams
4 oz. fettuccine, cooked al dente
1 cup chopped cooked asparagus
Salt and pepper to taste
Hot sauce
½ c. shredded Parmesan cheese, optional
In medium skillet heat butter and cook onion until translucent. Remove clams from packaging and add them to the skillet. In a few minutes the clams will open up. Add the pasta and heat through. Then add the asparagus- it was already cooked. If your asparagus is raw, add it with the clams. Adjust seasonings and add a few dashes of hot sauce to suit your taste. Add cheese, if adding and serve.
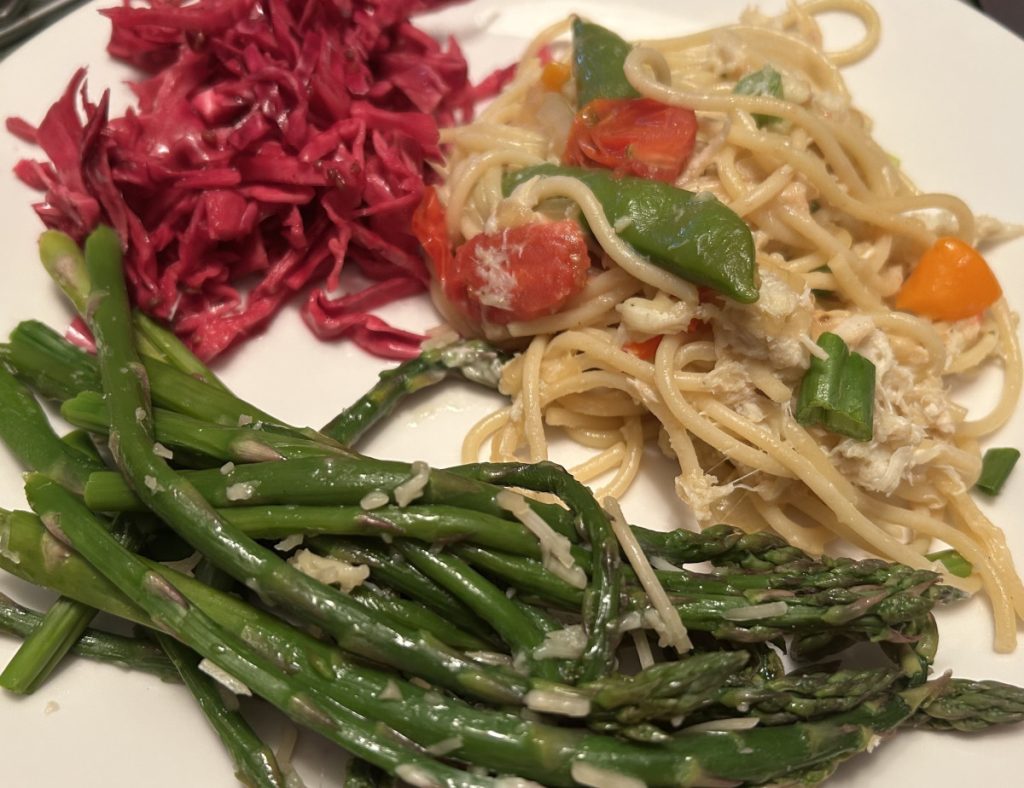
Spring Pasta with Crab
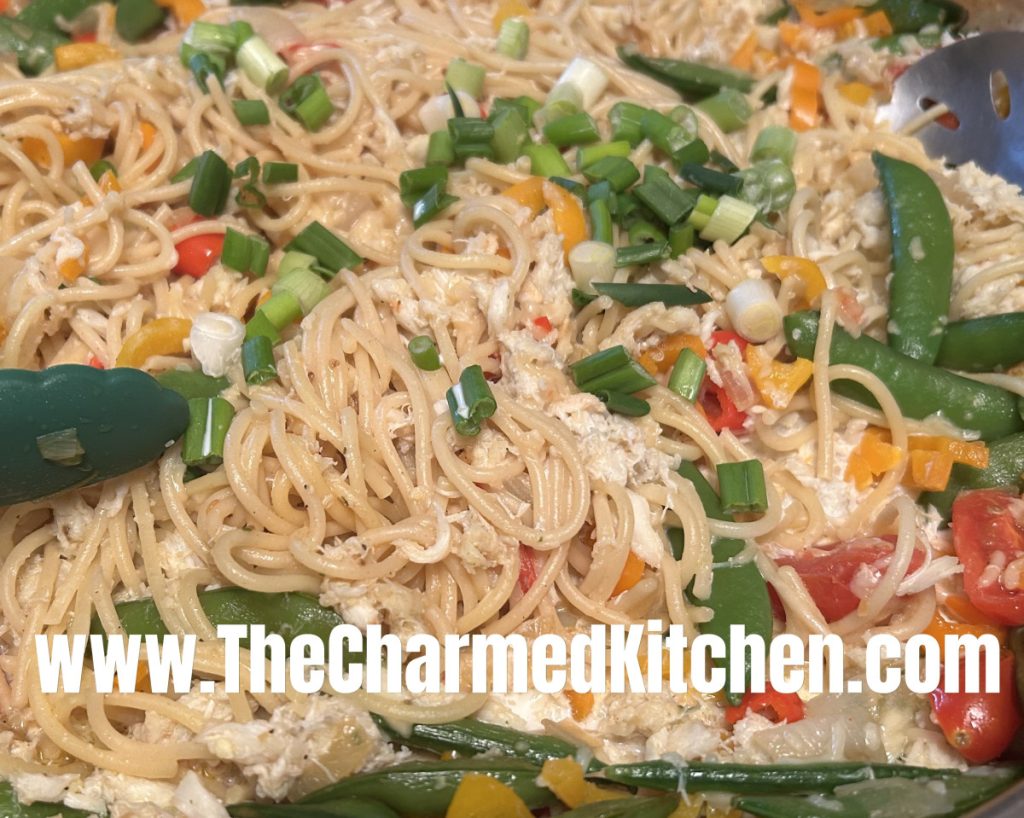
This recipe was inspired by the classic dish Pasta Primavera. Not only was I serving this for a friend’s birthday but it was also the first day of Spring. It’s the sort of dish you can adapt to suit your taste and what veggies you have on hand. This time I used onions, sugar snap peas, cherry tomatoes, sweet peppers and green onions. Asparagus would also work well in this dish, but I served asparagus as a side dish.
I had all the veggies cut up ahead of time. The pasta was cooked before my guests arrived, so the dish could be put together in no time. I just had to saute them, add the pasta and then the crab. I used one of those big cans of pasteurized crab meat. It was very solid, so when I talk about breaking up the big clumps, its more about getting the crab distributed through the whole dish. I tried not to break up individual pieces of crab, but rather to take a can- shaped hunk of crab and get it broken down. I hope that makes sense.
Its a dish that is great for any special occasion. Enjoy. Happy birthday, Lyn.
Spring Pasta with Crab
12 oz. fettuccine
3-4 T. oil- I used avocado oil
1 medium onion, chopped
1 cup cherry tomatoes, halved
2 c. sugar snap peas, washed
¾ c. sliced sweet pepper I used several baby sweet peppers
1 lemon, halved
½ c. dry sherry
2 T. butter
½ c. half and half
Salt and pepper to taste
1 can (16 oz.) lump or claw crab meat
1 c. shredded Parmesan cheese
½ c. chopped green onions
Cook pasta according to package directions, al dente. Drain and set aside. In large skillet heat oil and cook onion until tender. Add the tomatoes, peas and peppers and cook about 3 more minutes. Juice the lemon into the pan. Add the pasta, sherry, butter and half and half. Heat through and adjust seasonings. Once its heated through, add the crab, breaking up bigger pieces. Season with more salt and pepper, if needed. Add the Parmesan cheese, remove from heat and toss gently and sprinkle with the green onions before serving. Serves 6.
Cinnamon Bunny Breads
These slightly sweet bunny breads are a great addition to your Easter table. They can be used for breakfast or brunch. They could also be served with dinner, minus the candies!! The dough itself has plenty of cinnamon flavor and a slightly dense texture.
They are moist enough to eat just the way they are, or spread with butter. My favorite parts are the feet- which are a little crunchy. The recipe makes 6 bunnies. I chose to decorate mine with melted white chocolate and candies, but they are also pretty when left un-decorated. This would be a fun decorating activity for kids, too.
Cinnamon “Bunny” Breads
6-6½ c. flour
¾ c. sugar
2 pkts. Active dry yeast
1 T. cinnamon
1 t. salt
1 c. milk
½ c. water
¼ c. butter – half a stick
5 eggs – save one for brushing the breads
White chocolate and tiny candies for decorating
In mixing bowl place 2 cups of the flour with the other dry ingredients. Heat milk, water and butter together until very warm. Butter does have to melt completely. Place milk mixture in bowl with flour mixture and beat for 3 minutes. Add another cup of flour and beat another 2 minutes. Beat in 4 eggs and gradually add enough flour to make a soft dough. Place dough on a floured surface. Knead until smooth. Return dough to bowl and cover, allowing to rise until doubled, about an hour. Grease two large baking sheets, or cover in parchment or use a silicone liner. You will put 3 bunnies on each sheet. Place dough on floured surface. Divide into 6 pieces. Each piece will be a bunny. To form a bunny, take about a third of one of the pieces of dough. Shape into a round and place on a greased baking sheet. This is the body. Use about ¼ cup of the dough to form the head. Flatten the head a little on one edge and tuck the flattened part under the body. Pinch off a tiny piece for the nose and place on the head. Divide the rest of the piece of dough into 6 pieces. Use 4 pieces to form the feet. Shape into balls and tuck one edge under the body, like you did with the head. Use the last two pieces for the ears. Roll each into a tube, shape a little to look like ears, and stick one edge under the head. Repeat with the rest of the dough pieces. You’ll end up with 6 bunnies. Cover with plastic wrap, then a towel, and allow to rise in a warm place until doubled, 30-60 minutes. Preheat oven to 350 degrees. Combine remaining egg with a tablespoon of water and beat to combine. Remove the plastic wrap from the bunnies. Brush the bunnies with the egg mixture, covering completely. Bake for 20-25 minutes, or until golden brown and bread sounds hollow when tapped lightly. I switched the baking sheets in the oven after 10 minutes, so the bunnies bake evenly. Cool on rack. Once cool, decorate with melted chocolate, piped on to make whiskers. You can also use the melted chocolate to affix candies. Makes 6 bunnies.
ready to bake


