Surprise Ingredient Whoopie Pies

Whoopie Pies
I always get a smile when I offer someone a Whoopie Pie. Although baked liked cookies, Whoopie Pies are really more like small cakes, held together with a soft and creamy filling.
I added an unexpected ingredient to these, but it worked out pretty well. I added cooked, shredded beets. I make a chocolate beet cake, so adding beets to baked goods is something I have done before.
I had been given a large quantity of beets a while back. I canned, dried and froze a lot of them. I decided to use one of the frozen beets to make these Whoopie Pies. I just thawed it out- it was cooked before freezing- and shredded it up.
It worked out well. They are really moist. They really aren’t much different from the original recipe, except moister and with a slight reddish hue. I am surprising my neighbor with them later. She did something really nice for me, and I wanted to thank her. She loves beets and chocolate- so it seemed like a good idea.
Here is the recipe for my beet version, and the original recipe, too. Just in case you don’t have cooked shredded beets laying around.
Chocolate Beet Whoopie Pies
Cookies:
2 c. flour
2 t. baking soda
2 t. baking powder
1/2 t. salt
1 stick unsalted butter, at room temp.
1 c. packed brown sugar
1 t. vanilla
2 eggs
½ c. cocoa
2/3 c. half and half or milk
½ c. cooked shredded beets
Cream filling
3 T. flour
1 c. milk
1 stick unsalted butter, at room temp.
2 t. vanilla
2 1/4 c. powdered sugar
Heat oven to 375-degrees. Line baking sheets with foil and coat with non-stick spray. Combine dry ingredients and set aside. Beat butter and sugar together until creamy. Beat in vanilla and eggs then beat in cocoa. Beat in beets. Alternately beat in flour mixture and milk. Drop 2 tablespoons of dough on prepared sheets for each cookie, spacing 3 inches apart. Shape into 2 1/4-inch rounds, trying to keep them even as they will be sandwich cookies later. Bake 12-14 minutes, cookies should spring back when touched lightly. Let sit on baking sheet 5 minutes then transfer to rack to cool. Prepare filling: Combine flour and milk in saucepan until smooth. Heat over medium, stirring until thickened and bubbly. Cook 1 minute. Remove from heat and whisk in 2 tablespoons of the butter. Place wax paper directly on surface of the mixture and let sit until cool to the touch about 45 minutes. Beat in remaining butter, vanilla and powdered sugar until smooth and fluffy. Sandwich cookies together in pairs with about 2 tablespoons of the filling. Store between wax paper in airtight container. Makes 15.
Whoopie Pies
Cookies:
2 c. flour
2 t. baking soda
2 t. baking powder
1/2 t. salt
1 stick unsalted butter, at room temp.
1 c. packed brown sugar
1 t. vanilla
2 eggs
1/3 c. cocoa
3/4 c. milk
Cream filling
3 T. flour
1 c. milk
1 stick unsalted butter, at room temp.
2 t. vanilla
2 1/4 c. powdered sugar
Heat oven to 375-degrees. Line baking sheets with foil and coat with non-stick spray. Combine dry ingredients and set aside. Beat butter and sugar together until creamy. Beat in vanilla and eggs then beat in cocoa. Alternately beat in flour mixture and milk. Drop 2 tablespoons of dough on prepared sheets for each cookie, spacing 3 inches apart. Shape into 2 1/4-inch rounds, trying to keep them even as they will be sandwich cookies later. Bake 12-14 minutes, cookies should spring back when touched lightly. Let sit on baking sheet 5 minutes then transfer to rack to cool. Prepare filling: Combine flour and milk in saucepan until smooth. Heat over medium, stirring until thickened and bubbly. Cook 1 minute. Remove from heat and whisk in 2 tablespoons of the butter. Place wax paper directly on surface of the mixture and let sit until cool to the touch about 45 minutes. Beat in remaining butter, vanilla and powdered sugar until smooth and fluffy. Sandwich cookies together in pairs with about 2 tablespoons of the filling. Store between wax paper in airtight container. Makes 15.
Cinnamon-Vanilla Belgian Waffles

Cinnamon-Vanilla Belgian Waffles
When I want a special breakfast, I make waffles. No one ever complains when you make waffles for breakfast. Or if you make waffles for lunch or dinner, for that matter.
The response is even better when you make Belgian waffles. At least that has been my experience. My theory is, that because Belgian waffles are bigger, people love them even more.
These waffles are light and rich at the same time.
Belgian waffles can be used as a dessert, too. For dessert, just top them with ice cream, chocolate sauce or whipped cream – or all three.
You can even freeze any extras. Oh, who are we kidding? There aren’t going to be leftovers. But if there were, you could freeze them.
Cinnamon-Vanilla Belgian Waffles
2 c. all-purpose flour
3/4 cup sugar
3-1/2 teaspoons baking powder
2 t. cinnamon
2 eggs, separated
1-1/2 cups half and half- or milk
1 cup butter, melted
2 t. vanilla extract
Sliced fresh strawberries, powdered sugar or syrup
In a bowl, combine dry ingredients. In another bowl, lightly beat egg yolks. Add milk, butter and vanilla; mix well. Stir into dry ingredients just until combined. Beat egg whites until stiff peaks form; fold into batter. Bake in a preheated waffle iron according to manufacturer’s directions until golden brown. Serve with strawberries, powdered sugar or syrup. Yield: 10 waffles (about 4-1/2 inches).
Gluten- Free Potato “Breaded” Chicken
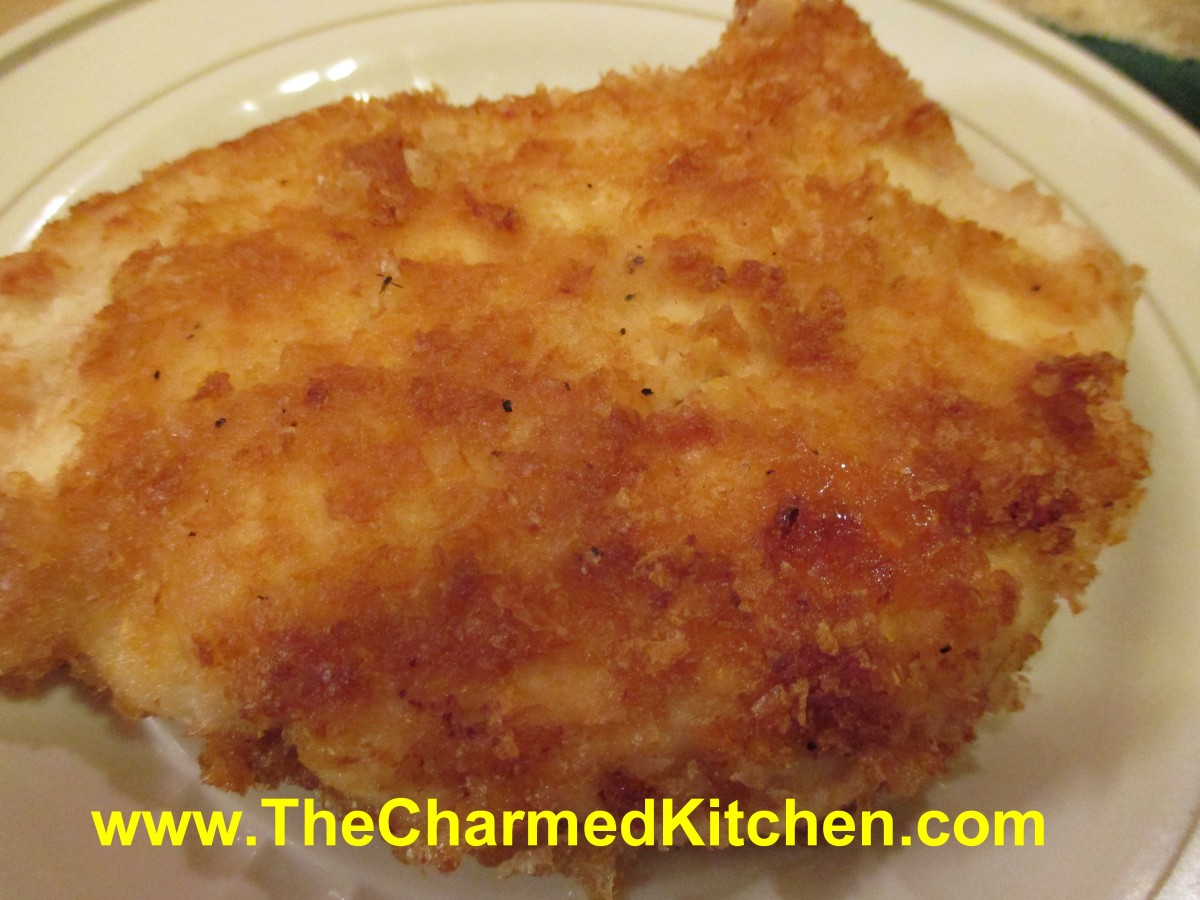
Potato “Breaded” Chicken
I love my Mom’s breaded chicken. It was a staple at summer outings. I still make it. Pretty classic, with a flour dredge, egg dip and bread crumbs.
I needed a different option the other day, when making lunch for a friend who can’t eat gluten. I just “breaded” the chicken with potato flakes.
I sometimes use potato flakes as a gluten free thickener for veggie soups and the like. I have also used them as a coating for chicken and fish before.
Even if you can have bread crumbs, the potato flakes are a fun way to coat chicken, fish or pork. They give you a nice, crispy crust.
The chicken breasts I had were pretty thick, so I cut them into thinner pieces to help them cook faster, and more evenly. You could also cut them into nuggets, if you prefer. I pan fried, but you can also brown them a little, and finish in the oven, if you prefer.
Potato “Breaded” Chicken
½ mayo
1 c. potato flakes
Salt and pepper
4 chicken breasts, boneless or 6 boneless chicken thighs
Oil
Spread chicken pieces with the mayo. Season the potato flakes with a little salt and pepper. Place potato flakes on a plate or in a shallow dish. Coat the chicken pieces with the potato flakes, pressing a little to cover well. Heat oil in skillet until really hot. Cook chicken pieces in skillet, on both sides, until golden brown. Turn heat down to medium and continue cooking until chicken is cooked. Serves 3-4.
The Green Bowl of Spring

Green Bowl of Spring
We all get cravings. Food cravings. I think most of us think of cravings as a bad thing, like wanting brownies at midnight. But there are other cravings. The ones we should listen to.
It’s been a long winter. Spring, so far, has been unseasonably cold. I found myself have a craving lately, for veggies. More specifically, green veggies.
Don’t get me wrong. I eat veggies all the time. I like them. But this is more than my normal desire for veggies.
So I listened to these cravings, and made a big saute of green veggies for dinner last night. I used what I had on hand. The mixture was so full of flavor, and just what I had been wanting. It reminded me of Spring, all green and full of life, so that is what I called the recipe. I plan on making this again, maybe switching up some of the veggies. I just ate them as is, but I could see serving them over rice or pasta.
The Green Bowl of Spring
3 T. olive oil
2 onions, sliced
2 c. chopped cabbage
1 pound of Brussels spouts, trimmed and cut in half
1 pound sugar snap peas, trimmed
1/2 pound asparagus, trimmed and cut in 2-inch pieces
1 c. stock- veggie or chicken
salt and pepper to taste
parsley
Heat oil in large skillet and cook onions until tender. Add cabbage and cook until cabbage is tender, about 5 -7 minutes. Add Brussels sprouts and cook five minutes longer, reducing heat to medium and stirring often. Add remaining ingredients and cook 3-5 minutes more, until veggies are tender and most of the stock has cooked off. Adjust seasonings. Makes 4-6 servings.
Frozen Mocha Cheesecake

Frozen Mocha Cheesecake
If you want a really tasty dessert that requires no baking, this one just might do it for you. Rather than being baked, this cheesecake is prepared, then frozen. Because it is made ahead of time and frozen, you can keep it on hand for when you need a dessert.
I made one large cheesecake, but could also make smaller, individual serving cheesecakes, in ramekins.
It also pairs chocolate with coffee- a classic combination. The crust is normally made with chocolate cookies- I used chocolate graham crackers for the crust. They worked great.
Great dessert for hot weather. Who am I kidding? I would want this even if there was a blizzard.
I taught a cheesecake class last night and served this cheesecake to the class. Everyone loved it. It has a rich, creamy texture and plenty of flavor.
Frozen Mocha Cheesecake
1 ¼ c. chocolate cookie crumbs
¼ c. sugar
¼ c. butter, softened
8 oz. cream cheese
1 (14oz.) can sweetened condensed milk
2/3 c. chocolate syrup
2 T. instant coffee crystals
1 t. hot water
1 c. whipping cream, whipped
Combine crumbs, sugar and butter and press into 9-inch springform pan. Chill. Beat cheese until fluffy and beat in milk. Stir in syrup and dissolve coffee in water. Add to cheese mixture and fold in whipped cream. Pour into prepared crust and freeze until solid, at least 6 hours. Garnish with additional cookie crumbs if you like or with shaved chocolate. Keep leftovers frozen and use within a few weeks for best flavor.
Lemonade Cheesecake Squares
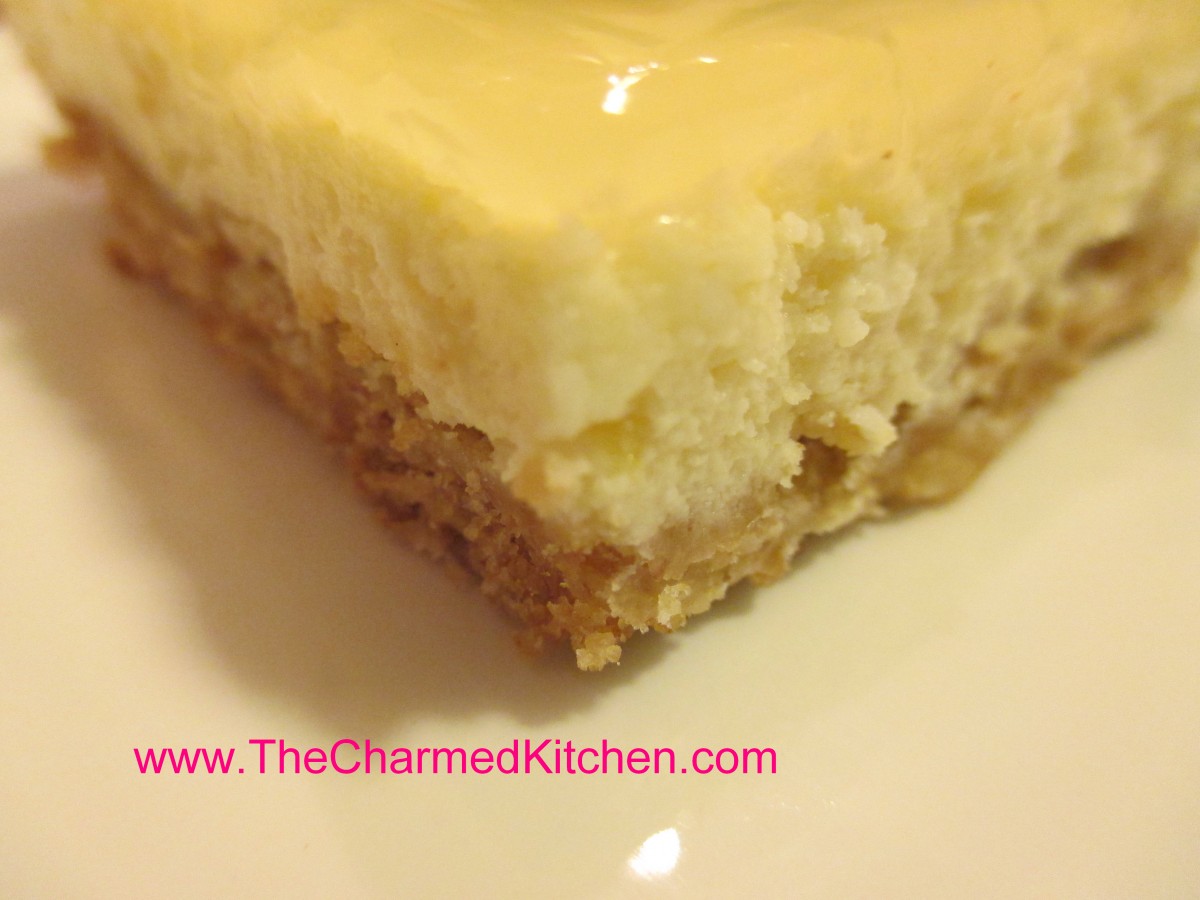
Lemonade Cheesecake Squares
The combination of lemon and cheesecake is a classic combo. I have made lemon cheesecakes in the past and enjoyed them a lot.
I wanted to change things up, and decided to jazz up the flavor with lemonade both in the filling, and as a glaze on top of the cheesecake.
The end result is just what I had hoped for. Creamy, not too sweet, and a pop of lemon flavor from the glaze.
I also wanted texture to the crust, so I added some oats, in addition to the graham crackers, and baked this cheesecake in a 9×13-inch pan. You could serve it with a few berries on top, if you like. This is a great spring or summer dessert.
Here is the recipe.
Lemonade Cheesecake Squares
Crust:
¾ c. butter (1½ sticks)
1 ¼ c. graham cracker crumbs
1 c. oatmeal, old-fashioned or quick cooking
¼ t. salt
Filling:
2 (8oz.) packages cream cheese, softened
¾ c. frozen lemonade concentrate, thawed*
3 T. flour
2 eggs
2 t. grated lemon peel
Glaze:
¾ c. frozen lemonade concentrate, thawed*
2½ T. cornstarch
Heat oven to 350-degrees. Grease a 9×13-inch baking pan. Beat together butter with the rest of crust ingredients. Press into bottom of prepared pan and bake 20 minutes. Beat cream cheese, lemonade and flour until fluffy. Stir in eggs and peel. Pour over crust and bake for 25 minutes, or until set. Cool then add the glaze. To make the glaze: in small saucepan combine the lemonade with the cornstarch. Heat together over medium heat until mixture becomes thickened and bubbly, stirring constantly. Pour over cheesecake. Store covered in fridge. Makes 24 squares.
*You can use store bought frozen lemonade concentrate, or here is the recipe I use to make my own.
Homemade Lemonade Concentrate
1 1/3 c. lemon juice- fresh or bottled
1 c. sugar
lemon zest, optional
Combine ingredients and stir until sugar is dissolved. Freeze until ready to use. Makes a little over 1 1/2 cups. To use: combine three parts water to one part concentrate.
10 Common Plants You Can Eat
 A lot of people don’t realize how many common plants they can eat. I thought it might be fun to share a few of them with you. Some of these are plants we grow as landscape/ornamental plants. Others are more often thought of as “weeds”. All have one thing in common. They are edible.
Some you may already know. I hope I might show you a few edibles you didn’t know about before.
I tried to stick to plants that were easy to identify. If you are not sure what it is – don’t eat it. Don’t eat plants where pesticides have been sprayed, either.
With any luck, you have at least a few of these in your yard.
 Violets: Violet flowers are edible and used to decorate pastries and to make jelly. Did you know you can also eat the leaves? They are mild flavored- especially when young- and are a great addition to salads. Violet leaves are also high in vitamin C.
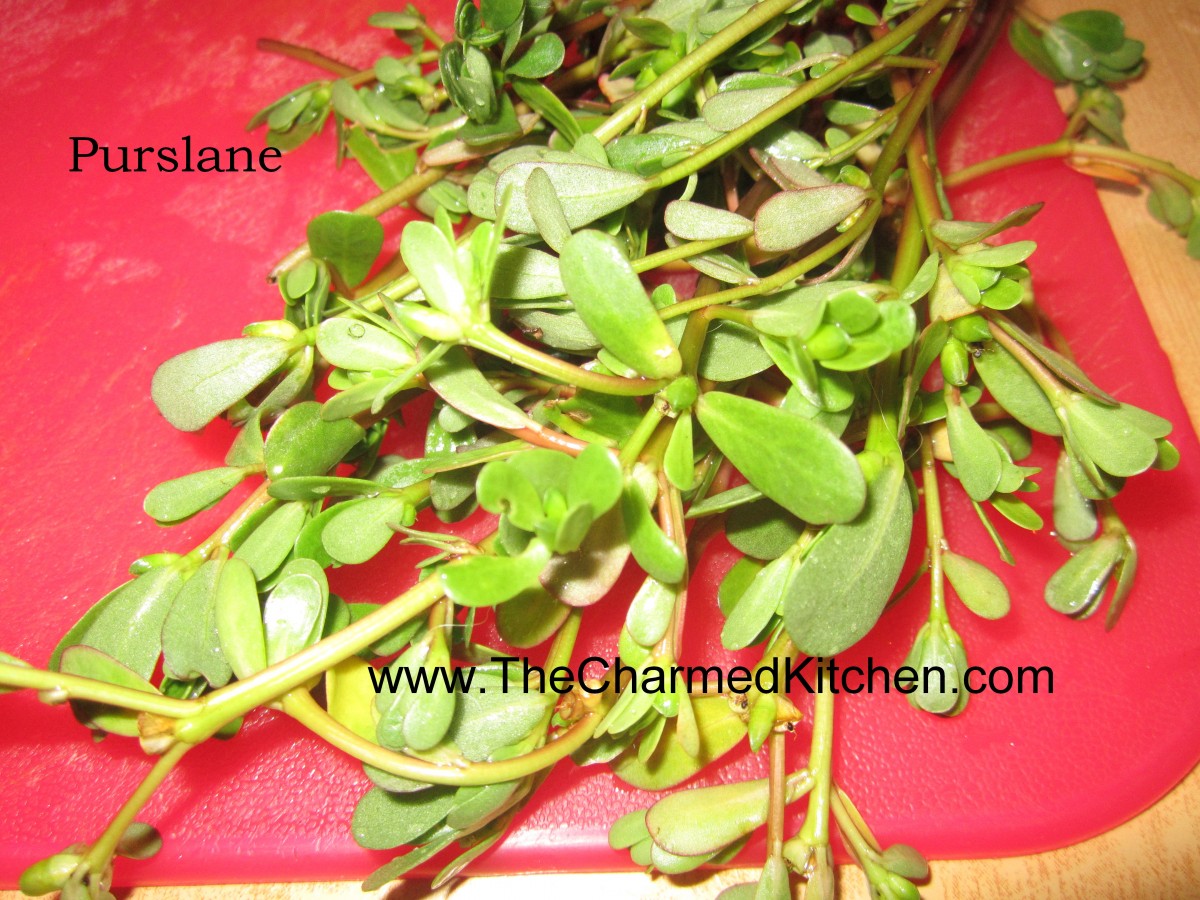 Purslane: The thick, fleshy leaves of purslane are easy to identify. Many vegetable gardeners make every effort to keep them out of their yards. Truth is, purslane is grown as a vegetable in many parts of the world. The leaves can be eaten raw in salads, can be cooked in a stir fry or just steamed as a fresh veggie. They can also be pickled. I make a salsa out of purslane leaves. They are crunchy with a slightly citrus flavor.
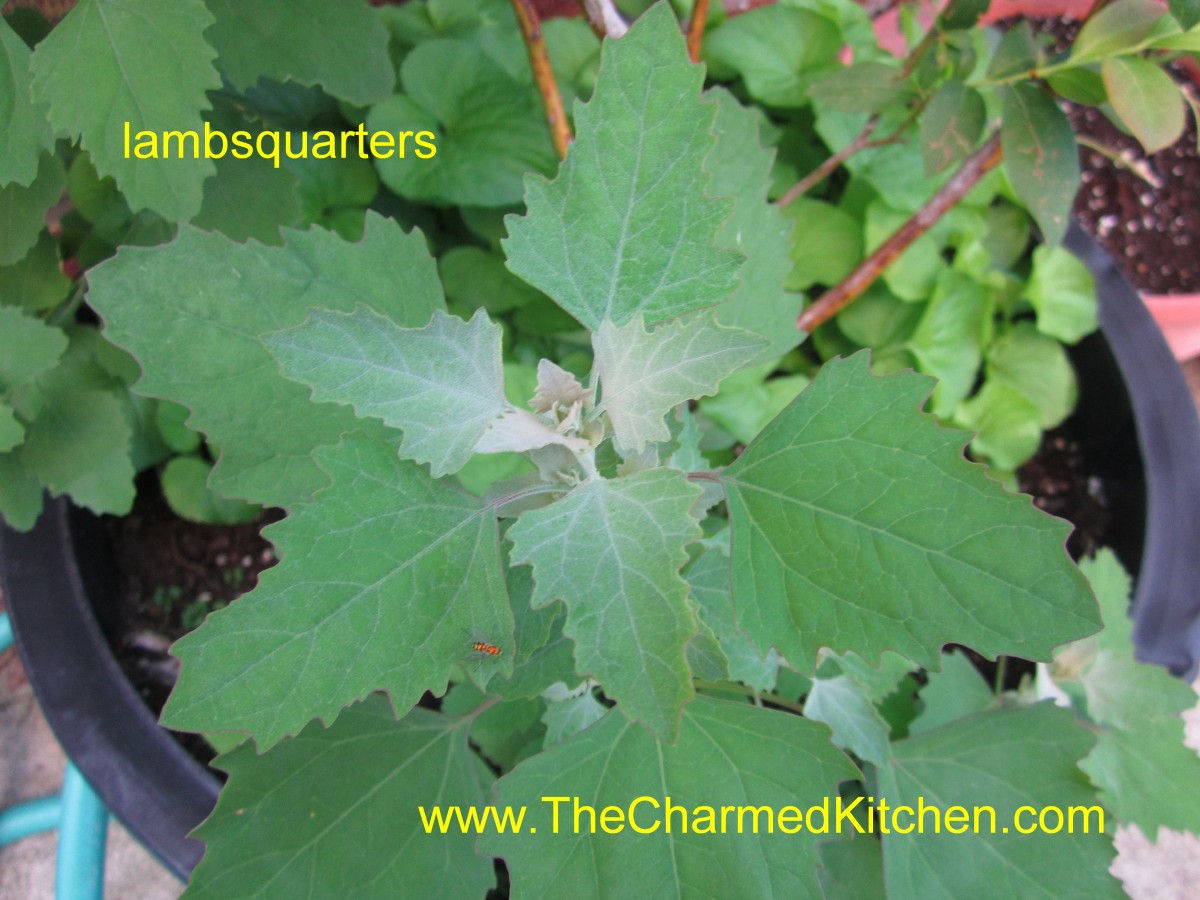 Lambsquarters: Lambsquarters are one of my favorites. They sprout all over my yard and in pots as soon as the weather warms up in the Spring. The leaves can be eaten raw when young or cooked as they mature. They taste just like spinach and are even better for you. Plants can get quite large and provide an easy harvest of nutritious greens.
 Dandelions: We spend so much money trying to kill them. Sad because they are really a tasty green. Dandelions were brought to America by European immigrants as a vegetable. Their bitter greens can be an acquired taste. By combining the greens with certain foods you make them taste less bitter. Starchy foods like breads or potatoes, dairy products, tomatoes and vinegars all seem to tame the bitterness. Dandelion greens can be eaten cooked or raw. Flowers are used to make jelly and wine and can be added to baked goods.
 Hosta: If you can get to them before the deer do, you will be pleasantly surprised. Hosta leaves are quite mild flavored, similar to Bibb lettuce. I add them to salads and even serve them with dips. The older leaves get tough so pick young leaves.
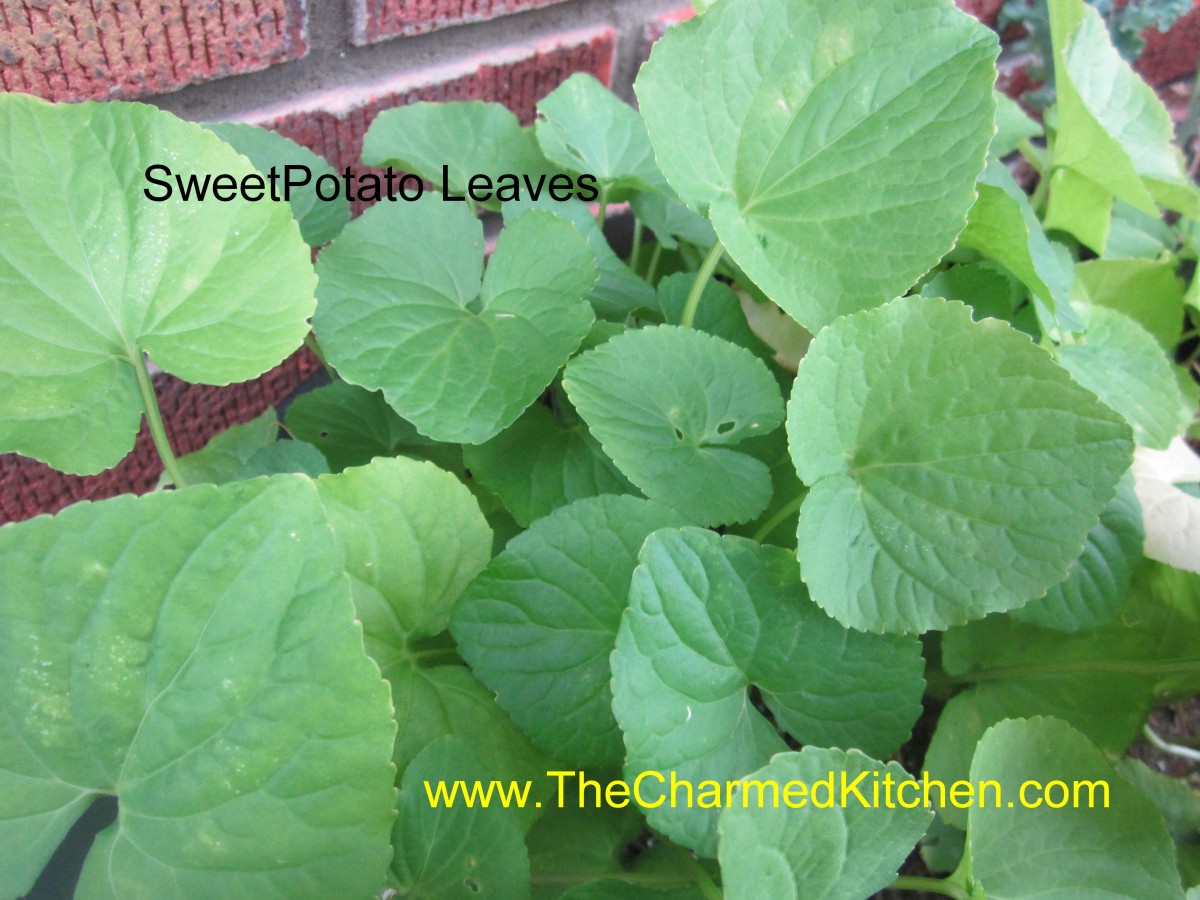 Sweet Potato Leaves: A friend from Hawaii first told me about eating sweet potato leaves. The leaves are pretty mild flavored. I normally eat them cooked although I have friends that eat them raw as well. You can eat the leaves of all sweet potatoes, including ornamental types.
 Lilac: Lilac flowers are fragrant and edible. I use them every year to make lilac infused vinegar. They have a nice spicy taste that works well in the vinegar. Blossoms can be added to salads, too. This year I also made lilac jelly.
 Redroot/Pigweed: This member of the amaranth family is distinguished by a reddish color to its roots. It has a spinach like flavor and can be cooked and used like spinach is any recipe. The plants can get several feet tall and often show up in places where the soil has been tilled.
 Tulips: Tulips are more than pretty, they are also quite tasty. The petals taste like a mild flavored lettuce and can add a beautiful touch to salads. The bulbs are also edible but we rarely eat them because to do so would destroy the plant. The petals, however, can be harvested and eaten year after year without harming the plant.
 Roses: Rose petals have been used to make fragrances for a very long time. The petals are also edible and can be added to salads and used to make jelly, syrup and of course, rose water. The hips are also quite edible. Rose hips are the round balls that are left after the bloom is spent. They are full of vitamin C and can be cooked and used to make tea and jelly.
This is far from a complete list. Just a few things from my yard that I thought you might have, too.
Hummus with Broccoli

Broccoli with Hummus
In a cooking class with kids this week, they learned to make hummus. I think they were surprised at how simple it is to make. A lot of adults are surprised, too. Hummus is so easy to make.
Hummus is made from chickpeas, olive oil, tahini, lemon juice, garlic and a few seasonings. Of course, you can make all sorts of variations, if you prefer. You just combine the ingredients in a food processor or blender until smooth. Doesn’t get much simpler. I prefer to make my own, so I can flavor it the way I want.
The kids had sugar snap peas and carrots with their hummus. We used it like a dip. It was a big hit with them.
But hummus can be used as more than a dip. I love to toss hummus with hot vegetables. It would replace butter or maybe a cheese sauce.
One of my favorite combinations is hummus with broccoli. The flavors work great together. You just toss hummus with freshly cooked broccoli. So yummy.
Since I had some cauliflower, I added some of it to the dish as well.
So try making your own hummus. Even if you use store bought hummus, try tossing it with hot, cooked veggies for a fun side dish.
Steamed Broccoli with Hummus
1 lb. fresh broccoli
1/2 c. hummus, homemade or store bought
Cut broccoli into long spears, peeling and trimming tough stems. Steam until just tender. Warm hummus over low heat or in a microwave and spoon over the cooked broccoli. Serves 4 as a side dish, 2 as a main course.
Hummus
1 can garbanzo beans, drained
1/4 c. olive oil
2 T. lemon juice
2 T. tahini (sesame seed paste)
2 cloves garlic
salt and hot pepper sauce to taste
Combine all ingredients in a blender or food processor until smooth. Adjust seasonings. Chill. Serve with pita bread, crackers or fresh vegetables. Also nice spread in a pita bread with sliced tomatoes, cucumbers and lettuce. Freezes well.
Cranberry Orange Scones

Cranberry Orange Scones
I make scones pretty often. There is nothing quite like the taste of fresh baked scones. Plus, baking them makes the house smell wonderful.
I taught a class last week on scones, and we made these in class. Someone in class asked me what scones are. I told her I think of scones as biscuits for company. The procedure for making both is the same. You just put more fun ingredients in scones. Although scones can be plain, they often contain fruits, nuts and spices.
These scones are shaped by pressing the dough in a round cake pan, then cut into wedges before baking.
They come out looking great and tasting great, too. If you don’t have buttermilk just add a little lemon juice to regular milk. I actually used half and half instead of milk, and added 1 tablespoon of lemon juice to the half and half. It worked great.
Perfect breakfast for this weekend. Serve warm with butter and jam.
Cranberry-Orange Scones
2 c. flour
4 T. sugar
2 t. baking powder
1 t. baking soda
1 t. grated orange peel
½ t. salt
¼ c. butter
1 c. dried cranberries
2/3 c. buttermilk
1 egg
Extra milk and sugar, for topping
Preheat oven to 425 degrees and lightly grease a baking sheet. Combine dry ingredients in medium bowl and cut in butter to resemble coarse crumbs. Stir in cranberries. Beat together milk and egg and add to flour mixture, stirring with fork until just coming together. Turn onto floured surface and knead 5-6 strokes or until ball of dough holds together. Transfer dough to prepared sheet and with floured hands, press dough into an eight-inch circle. I place dough in floured 8-inch cake pan, then invert onto the baking sheet- for a nice, even circle. With a sharp, floured knife cut dough into 8 wedges. Brush top of dough with a little extra milk, then sprinkle tops with a bit of sugar. Bake 14-16 minutes. Makes 8.
Dough can also be patted out on work surface and cut into circles or pressed into a square and cut into smaller squares.
Homemade Mustard Recipes

Homemade Bavarian Mustard
With baseball season here, there has been a lot of talk about hot dogs and mustard lately. I thought I would share these recipes for homemade mustard. Mustard is actually pretty easy to make.
I will admit to not being a big fan of mustard when I was a kid. I am now. I enjoy using all types of mustard in all sorts of dishes. Mustard is great on sandwiches and sausages. It is also a versatile ingredient for salads, salad dressings, marinades and all sorts of sauces.
I lean towards spicy brown mustard myself. I also enjoy making my own mustard. That way I can tweak the seasonings.
So here are a few of my favorite homemade mustard recipes. If you never made mustard before- you might want to try. It is easy and fun.
Horseradish Mustard
1 c. dry mustard
3/4 c. white wine vinegar
1/3 c. dry white wine or dry sherry
1/4 c. brown sugar
1/4 c. granulated sugar
1 T. dried minced onion
2 t. caraway seeds
1 1/2 t. salt
1/4 t. coarse ground mustard
2 eggs, slightly beaten
1 T. prepared horseradish
Combine all ingredients, except eggs and horseradish in top of double boiler and let stand at room temperature for 2 hours. Whisk in eggs and cook over simmering water until mixture has thickened and eggs are cooked, about 10 minutes. Remove from heat and stir in horseradish. Pour into sterilized jar, cool and cover. Store in fridge for up to 3 months. Makes 2 cups.
Bavarian Mustard
3/4 c. beer
2/3 c. dry mustard
2 T. sugar
2 T. cider vinegar
2 t. salt
1-t. celery seeds
1/2 t. fresh grated ginger or 1/4 t. dry
1 egg, beaten
Combine all but the egg in the top of a double boiler and let stand 2 hours at room temperature. Stir in egg and cook over simmering water. stirring constantly until mixture thickens and egg is cooked, about 10 minutes. Pour into sterilized jars and cool before covering. Store in fridge for up to 2 months. Makes 2 cups.
Spicy Mustard
1 c. dry mustard
2/3 c. dry white wine
1/2 c. vinegar, flavored with herbs or garlic
1/2 c. sugar
2 t. salt
1 t. basil
1 t. chili powder
1 t. dried minced garlic
1 t. oregano
1/2 t. cracked pepper
2 eggs, slightly beaten
Mix all ingredients, except eggs, in top of double boiler and let stand 2 hours at room temperature. Add eggs and cook over simmering water, stirring constantly until mixture thickens and eggs are cooked, about 10 minutes. Pour into sterilized jars and cool down before covering and refrigerating. Keeps in fridge for up to 2-3 months. Makes 2 cups.
French Herb Mustard
1/4 c. dry mustard
1/4 c. white wine vinegar
1/4 c. white wine or dry sherry
1/4 c. brown sugar
1/2 t. salt
1/2 t. tarragon
1/4 t. dill seed
1/4 t. celery seed
1/4 t. ground cloves
3 egg yolks or 1 whole egg
Combine all ingredients, except eggs, in top of double boiler and let stand at room temperature 2 hours. Whisk in eggs and cook over simmering water, stirring constantly, until mustard thickens and eggs are cooked, about 5 minutes. Store in crock or jar in fridge for up to 1 month. Makes 1 cup, recipe can be doubled.


