Spiced Bread and Butter Pickles
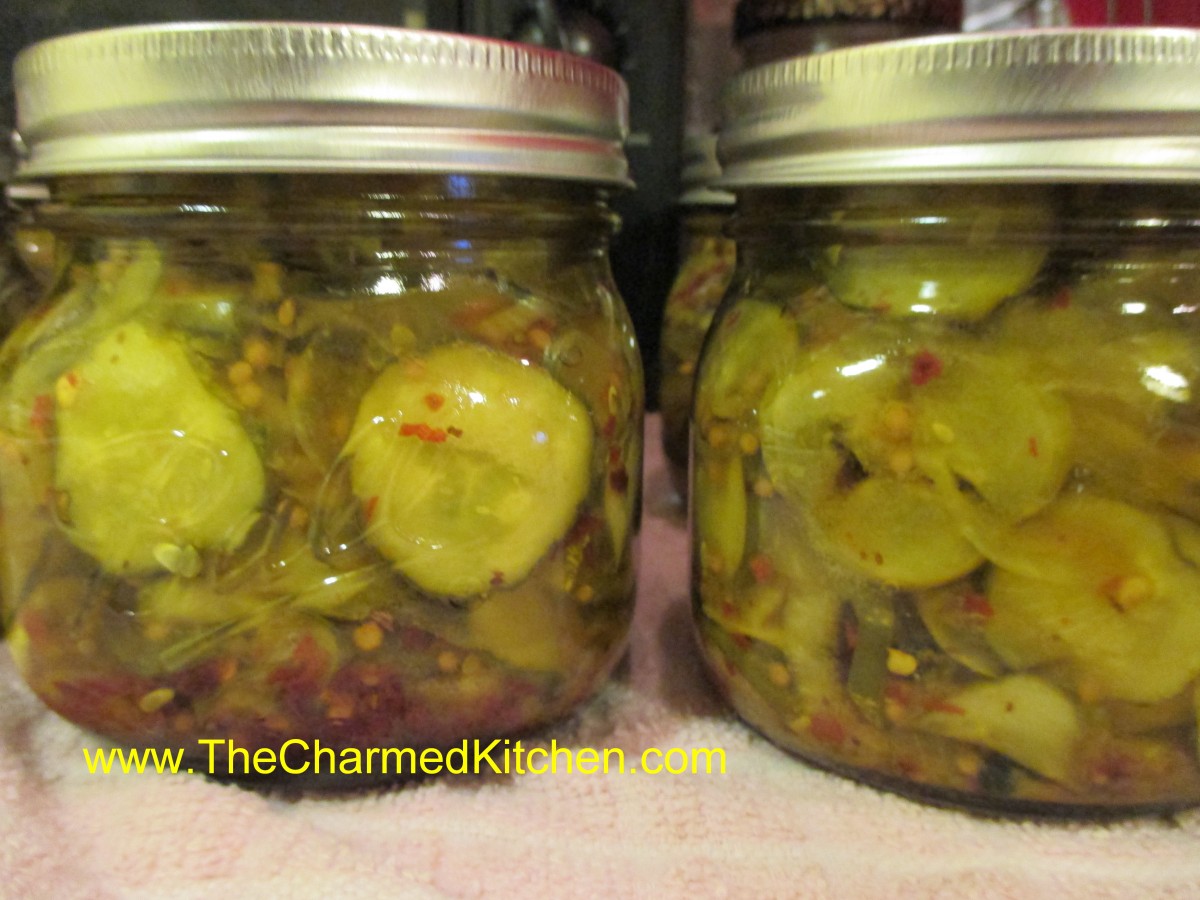
Spiced Bread and Butter Pickles
I am a big fan of homemade bread and butter pickles. I make several batches every year. Friends and family really like them, too. I get requests, every year, for these Spiced Bread and Butter Pickles.
While you should follow recipes for pickles carefully- those amounts of vinegar, salt, sugar etc., all are important for safety and a good end product, you can play around with seasonings a little.
In this case, I just add a teaspoon of red pepper flakes to each pint jar for the spicy version. Just enough of a kick. You might want to add a little more or less, according to your taste.
So here is the recipe for classic Bread and Butter Pickles- with the variation for Spiced included.
Bread and Butter Pickles*
6 quarts thinly sliced pickling cucumbers
6 medium onions, peeled and sliced thin
½ c. pickling salt
1½ quarts vinegar
4½ c. sugar
½ c. whole mustard seed
1 T. Pickling spice
1 T. celery seeds
Wash cucumbers and trim off ends before slicing. Place in non-reactive bowl
(stainless steel, enamel, plastic) add the onions and then salt and stir. Allow cucumbers and onions to sit in the salt for 3 hours. After 3 hours drain well, but do not rinse. Meanwhile combine remaining ingredients and bring to a boil. Add cucumbers and onions and return to the boil. As soon as the mixture is boiling ladle into clean, hot pints jars, leaving a good ½ -inch of headspace. Wipe rims and screw on lids firmly. Place in boiling water bath and process for 10 minutes. Remove to counter and allow to cool naturally. Makes 12 pints.
* For Spiced Bread and Butter Pickles add 1 teaspoon of red pepper flakes to each pint jar just before filling.
Note: These need a couple of weeks for the flavors to develop. They can also be made with firm, small zucchini.
Source: Putting Food By
Plentiful Zucchini Recipes

Creamy Zucchini Soup
I read once, that in August, there are more zucchini than people in America. Seems easy to believe.
If you grow zucchini, or know someone who does, you are probably enjoying a lot of zucchini right now. You might even feel a little overwhelmed. I decided to share a whole bunch of my favorite zucchini recipes.
There are savory and sweet recipes, and a few that are gluten-free. Remember, you can also shred and freeze your extra summer squash or dehydrate them to use later. Hope this helps.
Creamy Zucchini Soup
1 medium onion, chopped
2 T. butter
4-6 medium zucchini, sliced
1 large potato, peeled and diced
1 T. chopped parsley
½ t. each basil, marjoram and thyme
1 t. hot sauce, or to taste
salt and pepper to taste
6 c. chicken or veggie broth
1 c. milk or half and half- I prefer the half and half
In Dutch oven cook onions in butter until tender. Add vegetables and seasonings and cook until hot. Add broth, heat to a simmer and cook 15 minutes. Puree mixture in blender in batches and return to pot. Add milk and heat through. Adjust seasonings. Serve hot or cold. I top with some fresh chopped parsley and a little hot sauce. Serves 6-8.
Zucchini Pancakes
2 c. shredded zucchini
1 medium onion, diced
2 eggs
1/2 c. flour- you made need a little more or less depending on how moist your zucchini is
2 t. hot pepper sauce, or to taste
1 t. baking soda
salt to taste
oil for cooking
Combine all ingredients, except the oil, in a medium bowl. Heat oil in skillet and spoon batter in. I used a little over 1/4 cup for each. Cook over medium heat until lightly browned around the edges. Flip and cook until golden on both sides and pancake springs back when touched lightly. Remove to platter and keep warm. Repeat with remaining batter. Serve with salsa or sour cream. Makes 8.
Zucchini and Cheese Tartlets
Since zucchini are so prolific there never seem to be enough recipes for them. I like this one as an appetizer. You can bake up a big batch, bake and then freeze some for whenever you need them.
1 recipe of pie crust dough, enough for 2 pies, home made or store bought
1 medium zucchini shredded, about 1 1/2 cups
1 T. flour
1 c. shredded cheese- any kind you like. I like cheddar.
2 eggs, beaten
1/2 c. minced onion
1 t. Italian seasoning
salt and pepper to taste
hot pepper sauce to taste
Preheat oven to 375 degrees. Roll out dough to 1/8-inch thick. Use a 2 1/2-inch biscuit cutter to cut out circles of dough. Place dough circles in mini muffin pans. Press them in gently being careful not to tear them. Repeat with remaining dough and re-roll scraps. You’ll end up with about 3 dozen in all. If you don’t have enough pans, keep the extra dough circles under a towel or plastic wrap so they don’t dry out until you are ready to use them. In mixing bowl combine zucchini and toss in the flour. Add remaining ingredients and mix well. Adjust seasonings to your taste. Place a rounded teaspoonful of zucchini mixture into each of the tartlet shells in the prepared pans. Don’t over fill. Bake for 12-15 minutes or until golden brown on top. They will puff up while baking but flatten when cooling. Can be served hot, warm or at room temperature. Makes about 3 dozen.

Can be frozen. To reheat take straight from the freezer and place on a baking sheet. Bake in a preheated 325 degree oven and bake for about 20 minutes, but check after 15 minutes.
Baked Zucchini with Mushrooms
2 T. butter
8 oz. sliced mushrooms
½ t. salt
1 clove minced garlic
Pepper to taste
½ t. Italian seasoning
4 medium zucchini, about a pound, shredded
¼ c. bread crumbs
4 T. fresh grated Parmesan or Romano cheese
4 eggs, slightly beaten
In a skillet heat butter and sauté mushrooms until tender and liquid is evaporated, about 5 minutes. Place mushroom mixture in mixing bowl and add the zucchini, seasonings, bread crumbs and half of the cheese. Combine ingredients and spoon them into a greased 8-inch square baking dish. Pour over the eggs and bake at 325 for 35-40 minutes or until custard is set. Sprinkle with remaining cheese and return to oven for 5 minutes. Serves 4-6.
Zucchini Carrot Cake
2 eggs
1 c. sugar
2/3 c. oil
1¼ c. flour
1 t. baking powder
1 t. baking soda
1 t. cinnamon
½ t. salt
1 c, grated carrot
1 c. grated zucchini, squeezed dry and packed tightly
½ c. chopped nuts
Beat eggs with sugar until frothy. Beat in oil then add dry ingredients. Beat on high for 4 minutes. Stir in veggies and nuts. Pour batter into a greased 9-inch square baking pan. Bake in a 350-degree oven for about 35 minutes or until top springs back when lightly touched. Cool and frost
Frosting
4 oz. cream cheese, softened
3 T. butter, softened
1 t. vanilla
2 c. powdered sugar
Beat together cream cheese and butter until smooth. Beat in vanilla and sugar. Spread over cooled cake.
Zucchini Bread
3 c. flour
3 eggs
2 c. sugar, I use less
2 c. shredded zucchini
1 c. oil
1 c. chopped nuts or raisins, optional
½ c. sour cream or Greek yogurt
1 t. each vanilla, cinnamon, salt and baking soda
Preheat oven to 350 degrees and grease 2 (9×5 inch) loaf pans. Set aside. Place flour in large bowl. Beat eggs and add with remaining ingredients to flour, mixing well and scraping bowl. Pour batter into prepared pans and bake 1 hour , or until browned and toothpick in center emerges clean. Cool in pans on wire rack. Freezes well. Makes 2 .
Summer Squash Strata
2 medium yellow summer squash, sliced thin
2 medium zucchini, sliced thin
3 large tomatoes, sliced
2 medium onions, sliced thin
Salt and pepper
4 T. olive oil
½ c. shredded cheese
½ c. bread crumbs
In a greased 13×9 inch baking dish layer slices of the vegetables adding salt and pepper to taste. Use up all the veggies. Drizzle with the oil and sprinkle the cheese and bread crumbs over the top. Bake in a 350 degree oven for 30 minutes, or until vegetable are tender. Serves 6.
Spicy Chocolate Zucchini Cupcakes
These are wonderfully spicy, moist cupcakes. Instead of frosting them, I decided to top them with melted butter and cinnamon sugar. It’s something I’ve done with muffins, in the past. I just never thought of topping cupcakes that way before. It was a really good idea. The cupcakes were baked for a picnic, and in the heat, frosting would have melted. Besides, not everyone likes frosting. As an added bonus- it is a another recipe using zucchini, and that is never a bad thing.
2 cups all-purpose flour
1 t. baking soda
½ t. salt
1 t. cinnamon
½ t. nutmeg
Pinch of cloves
¼ c. unsweetened cocoa
½ cup butter, softened
½ cup olive oil
1½ c. sugar
2 eggs
½ c. buttermilk
1½ t. vanilla
2½ c. grated zucchini
1 cup chocolate chips
Topping:
½ c. butter, melted
½ c. sugar
2 t. cinnamon
Preheat oven to 325 degrees. Grease and flour 24 muffin cups or use paper liners. Mix together the dry ingredients. Set aside. In a large bowl, cream together the butter, olive oil and sugar until light and fluffy. Beat in the eggs one at a time, then stir in the buttermilk and vanilla. Beat in the flour mixture, just until incorporated. Stir in the grated zucchini and chocolate chips. Pour batter into prepared pans. Bake for 25 to 30 minutes, or until the top of the cupcakes spring back when lightly pressed. Cool in pans over a wire rack for at least 10 minutes or until cool enough to handle. Dip top of cupcakes in melted butter, then dip in the cinnamon sugar. Place on rack to finish cooling off. Makes 24.
Chocolate Zucchini Cupcakes
½ c. butter
½ c. oil
1 ¼ c. sugar
2 eggs
½ c. buttermilk
1 t. vanilla
2 ½ c. flour
1/3 c. cocoa
2 t. cinnamon
1 t. baking soda
1 t. baking powder
2 c. shredded zucchini
Heat oven to 350 degrees. Line 30 muffin pans with paper liners and set aside. In mixing bowl combine butter, oil, sugar and eggs and beat until light and fluffy. Beat in milk and vanilla. Combine dry ingredients and add to egg mixture- beating until smooth. Stir in zucchini. Scoop batter into cupcake paper lined pans, filling about 2/3 full. You will get about 30, I sometimes get more. Bake 15-20 minutes or until toothpick inserted comes out clean. Cool and frost. Makes 30-36.
I used the Classic Vanilla Frosting recipe below, but doubled the recipe.
Zucchini Carrot Cupcakes
2 eggs
1 c. sugar
2/3 c. oil
1¼ c. flour
1 t. baking powder
1 t. baking soda
1 t. cinnamon- I think I would use a little more next time
½ t. salt
1 c. grated carrot
1 c. grated zucchini, squeezed dry and packed tightly
½ c. chopped nuts, optional
Beat eggs with sugar until frothy. Beat in oil then add dry ingredients. Beat on high for 4 minutes. Stir in veggies and nuts. Pour batter into 18- 24 paper lined muffin tins, filling them 2/3 full. Bake in a 350-degree oven for about 15 minutes or until top springs back when lightly touched. Cool and frost. Makes 24.
Note: These cupcakes deflate a little while cooling.
Classic Vanilla Frosting
3/4 cup butter
6 cups confectioners’ sugar
1/3 cup milk
1 1/2 teaspoons vanilla extract
1/4 teaspoon salt
2 tablespoons milk
Beat butter in a large bowl until fluffy. Gradually add 3 cups of the sifted confectioners’ sugar, beating well. Slowly beat in the vanilla, salt, and 1/3 cup of the milk. Gradually beat in the 3 remaining cups of confectioner’s sugar. Beat in additional milk (1 to 2 tablespoons) if needed, to make frosting of spreading consistency. If desired tint the frosting with 6 to 8 drops of food coloring.
Gluten-Free Zucchini Brownies
1½ c. shredded zucchini
1 c. almond butter- but you could use peanut butter instead
1 c. chocolate chips
1/3 c. honey – but you can use 1/2 cup if you want a sweeter brownie
¼ c. unsweetened cocoa powder
1 egg
1 t. vanilla
1 t. baking soda
1 t. cinnamon
½ t. allspice
Preheat oven to 350 degrees. Grease a 9×9 inch pan, set aside. Combine all ingredients in a medium bowl and stir until well blended. Pour batter into pan and spread evenly. Bake 25-30 minutes, or until toothpick inserted comes out clean. Cool before cutting. Makes 16.
Bacon Tomato Mini Quiches with Zucchini Crust
Gluten Free
Crust:
1¾ c. shredded zucchini
1¼ c. cooked rice- white or brown
1 egg
¼ c. grated Parmesan cheese
Mix all ingredients together.
Filling:
8 slices cooked and crumbled bacon
1 c. shredded cheese – I like Swiss, but use what you like
1 tomato, seeded and diced
½ c. chopped sweet onion
Combine ingredients in small bowl. Set aside until ready to use.
Custard:
1 1/3 c. half and half
4 eggs
½ t. each basil, garlic powder, paprika and salt
1/8 t. pepper
Place in medium bowl and whisk together until smooth.
Grease 12 muffin cups. The mixture will fill 12 cups very full- but you can make your quiches a little smaller, if you like and make a few more. Pat 2 tablespoons of the crust mixture into each muffin cup. Bake in a 350 degree oven for 10-12 minutes. Cool before filling. While baking and cooling crusts prepare filling of your choice and custard. Spoon 2 tablespoons of filling over each cooled crust. Spoon about 3-4 tablespoons of the custard over the filling. Bake in a 375 degree oven for 15-20 minutes. Can be served warm or cold.
Other fillings:
Tomato, broccoli, mushroom:
In 1 T. butter, sauté 1¼ c. sliced mushrooms, ¾ c. chopped fresh broccoli and 1/3 c. diced onion. Cook until tender, cool. Stir in 1 C. shredded cheddar cheese and 1 tomato, seeded and diced.
Spinach and onion:
Combine 1 10 oz. package frozen spinach, cooked and drained well, with ½ c. diced onion and 1 c. shredded Swiss cheese and ½ c. diced sweet red pepper.
Zucchini Rice Casserole
1 c. water or broth
½ c. raw rice
Salt and pepper to taste
2 T. oil
1 medium onion, chopped
1 lb. small to medium zucchini, about 3-4, sliced
1 sweet pepper, seeded and diced
8 oz. tomato sauce
1 c. shredded cheese, any type you like
¼ c. freshly shredded Parmesan cheese
Bring water or broth to a simmer and stir in rice. Cover and cook over low heat until rice is tender, about 20 minutes for white rice and 40 minutes for brown. Season with salt and pepper to taste, using less salt if cooking in broth. Meanwhile heat oil in a skillet and cook onion until wilted and tender. Add zucchini and pepper and cook until both are tender. Season with salt and pepper to taste. Combine vegetable mixture with the rice and tomato sauce and pour into 1½ quart casserole. Sprinkle with cheeses and bake in a 350 degree oven until heated through and cheese is bubbly, about 20 minutes. Serves 6.
Quick Corn and Zucchini Sauté
2 sweet peppers, seeded and cut into strips
2 medium zucchini, sliced
Oil
2 c. corn kernels cut from cobs, about 4 ears
1 t. garlic salt
½ t. Italian seasoning
In oil cook peppers and zucchini until crisp tender, about 5 minutes. Add remaining ingredients and cook 4 more minutes, or until heated through. Serves 6-8.
Fresh Summer Squash Relish
2 c. shredded summer squash, any type, peeled if desired
1 c. finely diced sweet onion
¼-½ c. bottled Italian dressing or other vinaigrette, I make my own
Combine all ingredients and chill until ready to use. Nice on cold and hot sandwiches and in tuna salad. Keeps in fridge for a couple of weeks.
Multi-Grain Zucchini Bread
1¼ c. whole wheat pastry flour
1 c. wheat germ
½ c. sunflower seeds or chopped nuts
1 T. baking powder
½ t. salt
¾ c. shredded zucchini
1/3 c. honey
¾ c. milk
1 egg
Grease a 9-inch cake pan and preheat oven to 375-degrees. Combine dry ingredients and set aside. In medium bowl combine remaining ingredients and stir in flour mixture. Pour batter into prepared pan and bake 30 -35 minutes or until toothpick inserted into middle comes out clean. Cool in pan ten minutes then remove from pan and cool on a rack.
Preserving Basil On New Day Cleveland
Here is my latest television appearance. I had so much fun on the show. David Moss is a lot of fun to talk cooking with. Everyone that works on the show make me feel welcome. Always a good time.
http://fox8.com/2017/08/03/how-to-make-your-garden-herbs-last-year-round/
Spicy Pickled Beets

Spicy Pickled Beets
Beets are just one of those foods. People seem to love them, or hate them. I am a beet lover. I enjoy them in all sorts of dishes. The nice thing about making a batch of pickled beets is being able to open up a jar whenever you want.
This recipe is a pretty classic way to preserve beets. The brine is a sweet and sour mixture with pickling spice, salt and red pepper flakes for added flavor. You could play around with the seasonings a little. Maybe adding more heat.
Pickled beets are great served as a side dish with all sorts of foods. I like them served with cheeses, crackers and other pickled foods as an appetizer. If you don’t want to can them- you can store them in the fridge for up to a couple of months.
Spicy Pickled Beets
4 lbs. beets, smaller sizes preferred
3 c. thin sliced onions
2 c. sugar
2 T. Pickling spice
1 T. canning salt
2 t. red pepper flakes
2½ c. cider vinegar- 5% acidity
1½ c. water
Wash and trim beets, leaving a couple inches of stem attached. Cook in boiling water until tender. Cool beets down so you can handle them. Peel beets and cut into 1½- 2-inch diameter pieces, if beets are large. Leave whole if beets are small. Set aside. Combine the rest of the ingredients in a pot and bring to a boil. Reduce to simmer and simmer 5 more minutes. Add beets and cook a few minutes, until beets are warmed through. Ladle hot beets into clean pint jars, leaving ½ inch headspace. Ladle in hot liquid, leaving ½-inch headspace. Remove air bubbles, wipe off rim, screw on lid to finger-tip tightness. Repeat with remaining beets and liquid. You should fill about 5 pint jars. Process in a boiling water bath for 30 minutes. Turn off the heat and leave jars in water bath 5 minutes before removing to counter to cool. Yield: 5 pints.
Adapted from The Ball Blue Book
Canning Yellow and Orange Tomatoes

Crushed Tomatoes
I have been asked several times in canning classes, if it is safe to can yellow or orange tomatoes. We have all heard that yellow and orange tomatoes are lower in acid, so are they still safe to can? The answer is yes, they are safe to can.
Why?
Truth is, that yellow and orange tomatoes have just as much acid as red tomatoes.
Well, for the most part at least. In terms of acidity or Ph, yellow and orange tomatoes are about average. Some cultivars have more, some less. Bottom line is that all tomatoes are safe to can- as long as you acidify them.
Adding salt is optional and is for flavor only. Use canning/pickling salt or non-iodized salt when canning.
Here are some popular canning recipes to get you started. All follow the NCHFP (National Center for Home Food Preservation) recommended procedures.
Crushed Tomatoes
Peel and core tomatoes , trim off any bad spots and quarter. Place about 1/4 of your prepared tomatoes in the kettle and cook, stirring constantly over high heat. Use a potato masher to crush tomatoes and extract juices. Once they are boiling add remaining tomatoes, stirring constantly. You don’t need to crush these tomatoes. Bring to a boil and boil for 5 minutes. In clean, hot jars add needed acidity listed below. You can also add 1 teaspoon of canning salt per quart if desired. Ladle in hot tomatoes, leaving 1/2-inch headspace. Wipe jar rims clean and adjust lids. Process in boiling water bath. Pints 35 minutes, quarts, 45 minutes. 1,000-3000 ft over sea level add 5 minutes. Twenty-two pounds of tomatoes will yield about 7 quarts of tomatoes.
Whole Tomatoes in Juice
Use any extra tomatoes to make juice. I use tomatoes that are too big to can whole, or those that have blemishes that need to be trimmed. Cut up clean, unpeeled tomatoes in a kettle and cook, stirring often until tomatoes are mushy. Strain mixture, pressing on solids or run through a food mill or tomato juice extractor. Set aside,. Place peeled, whole tomatoes in kettle and add enough tomato juice to cover them. Heat to a simmer and simmer gently 5 minutes. Add lemon juice or citric acid to jars, using amounts listed below. Add salt, if desired. Add tomatoes and cover with hot juice, leaving 1/2 -inch headspace. Wipe rims and adjust lids. Process both pints and quarts 85 minutes in a boiling water bath.
Tomato Juice
Wash, stem and trim bruises off tomatoes. Cut into chunks. Add about 1 pound of tomatoes to kettle and bring to a boil while crushing. Continue to add additional cut up tomatoes slowly, keeping mixture boiling. This will keep the juice from separating later. Simmer an additional 5 minutes once the tomatoes have all been added. Press mixture through a strainer , sieve or food mill to remove seeds and skins. Add lemon juice or citric acid to jars according to directions listed below. Add salt if desired. Return juice to boil and add to prepared jars leaving 1/2-inch headspace. Wipe rims and adjust lids. Process n a boiling water bath pints 35 minutes and quarts 40 minutes. Add 5 minutes processing time at elevations between 1,001 and 3,000 ft.
Tomato Sauce
Prepare as for juice. After juice is made return to pot and start cooking down to desired thickness. You’ll lose about 1/3 of the volume for thin sauce and 1/2 of the volume for thick. Add lemon juice or citric acid to prepared jars as described below. Add salt if desired. Add boiling sauce leaving 1/4 -inch headspace. Wipe rims and adjust lids. Process in a boiling water bath 35 minutes for pints and 40 minutes for quarts. Add five minutes at 1,001-3,000 ft. elevation.
Acidity and Tomatoes
Tomatoes must be acidified before canning. When canning either whole, crushed or juiced tomatoes you must add either 2 T. bottled lemon juice per quart or 1/2 t. citric acid . For pint use 1 T. lemon juice or 1/4 t. citric acid. You can also use 4 T. (5%) vinegar per quart, but it will alter the flavor and is not recommended. You can add a little sugar to offset the flavor, if you like.
Caramel Crepes with Honey Ice Cream

Caramel Crepes with Honey Ice Cream
I had made dessert crepes last week and still had some in the freezer. It had been hot around here so I wanted something cold to serve for dessert.
I had made honey ice cream, so that part was covered. I made a simple caramel sauce to top the crepes and finished them with a little whipped cream. It really was an easy dessert, but looked special. Tasted pretty good, too. The thing is, you can get all the components made, then just put them together when you are ready to serve them.
When I make crepes, I often have extra and freeze them for later use. I was happy that I did. Of course, use any ice cream flavor you have. I will say, the honey ice cream is worth the effort. I just spooned some ice cream along one edge of the crepes, and rolled them up. I kept them in the freezer until ready to serve. Then I drizzled with the caramel sauce. Much easier than you might think.
Dessert Crepes
1 c. flour
4 eggs
1 1/2 c. milk
1 T. sugar
2-T. orange-flavored liqueur or orange juice concentrate
1/4 c. butter, melted and cooled
Mix all ingredients in blender (except butter) until smooth, scraping sides often. Add butter and blend well. Let stand for 30 minutes before using, or can be refrigerated, covered, overnight. Beat again, just before using.
Heat 6 or 7 inch skillet. Brush with butter or oil and pour in about 2 teaspoons of batter, tipping pan to cover bottom of pan completely with batter. Cook until edges start to brown, turn over and cook until lightly browned (about 2 minutes per side.)
Crepes can be made day ahead or even frozen between sheets of waxed paper and frozen. Makes 20.
Here is another variation that would be great with chocolate or strawberry ice cream.
Chocolate Crepes
Add 2-3 T. cocoa to flour and mix well before blending. You will probably need to add 1-2 T. extra milk, but mix first.
Honey Ice Cream
1 ½ c. whipping cream
1 ½ c. half and half
2/3 c. honey
6 large egg yolks
Heat together cream and half-and-half to simmer . Whisk honey and yolks in a medium bowl. Gradually whisk in hot cream mixture. Return to pan and heat until mixture thickens (about 170 degrees) but do not boil. Strain into large bowl. Chill until cold. Process in ice cream maker. Makes 4 ½ c.
Easy Caramel Sauce
1 packed cup brown sugar
1/2 cup half-and-half
4 tablespoons butter
Pinch salt
4 t. vanilla extract
Mix the brown sugar, half-and-half, butter and salt in a saucepan over medium-low heat. Cook while whisking gently for 5 to 7 minutes, until it gets thicker. Add the vanilla and cook another minute to thicken further. Turn off the heat, cool slightly and pour the sauce into a jar. Refrigerate until ready to use. You can serve it cold, or warm a little before using.
Four Fresh Tomato Salads

Marinated Tomato Salad
Tomato season is too short around here. I can never get enough of what my mom called “real tomatoes”. The first few tomatoes never make it in the house. Warm from the sun, they are too tempting. I just pick them right off the plant and eat them.
Then, I start to think about preserving some for after the season is over. So I start drying and canning tomatoes.
Sometimes, in the excitement of canning and dehydrating tomatoes, I find I haven’t remembered to eat enough of them. So anxious to get as many as possible put away for winter, I have denied myself the pleasure of fresh, juicy, vine-ripened tomatoes.
Well, not this year. I have been having tomatoes with my eggs for breakfast, creamy tomato soup for lunch and plenty of tomato sandwiches and salads. I thought I would share a few of my favorite tomato salad recipes with you.
They are pretty simple. I think that is how it should be. When you have something as close to perfection as a ripe tomato, little more is needed.
Marinated Tomato Salad
3 large tomatoes, cut in wedges, or 2 pints cherry tomatoes, halved
1 T. olive oil
1 clove garlic, minced
2-3 basil leaves, cut into thin strips
2 T. balsamic vinegar
salt and pepper to taste
Combine ingredients and serve at room temperature. Serves 4-6.
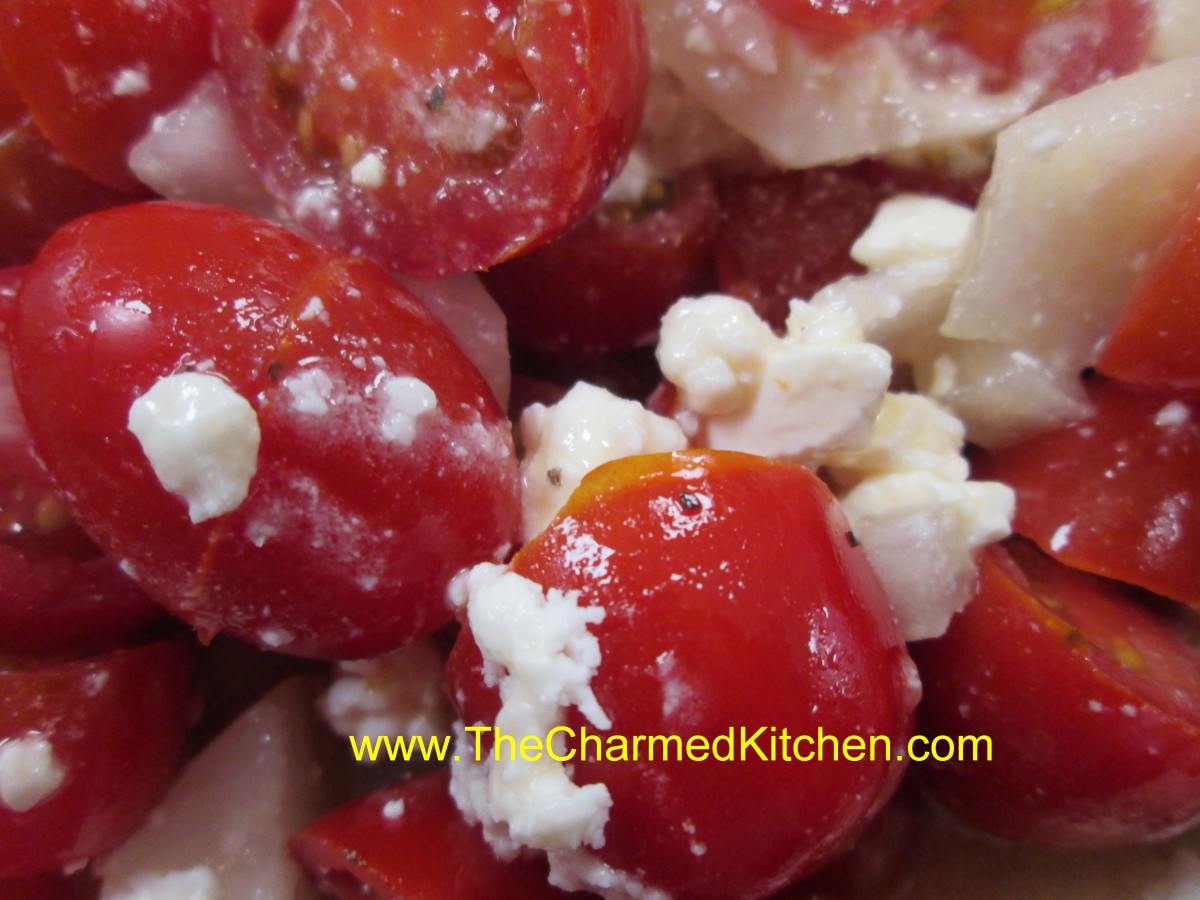
Tomato and Feta Salad
3 tablespoons crumbled feta cheese
12 cherry tomatoes, thinly sliced
1/2 sweet onion, diced
1 tablespoon olive oil -I used a lemon infused olive oil
1 tablespoon lemon juice
Salt and pepper to taste
In a bowl, mix the feta cheese, cherry tomatoes, onion, olive oil, and lemon juice. Add salt and pepper to taste. Serve immediately. Serves 2.
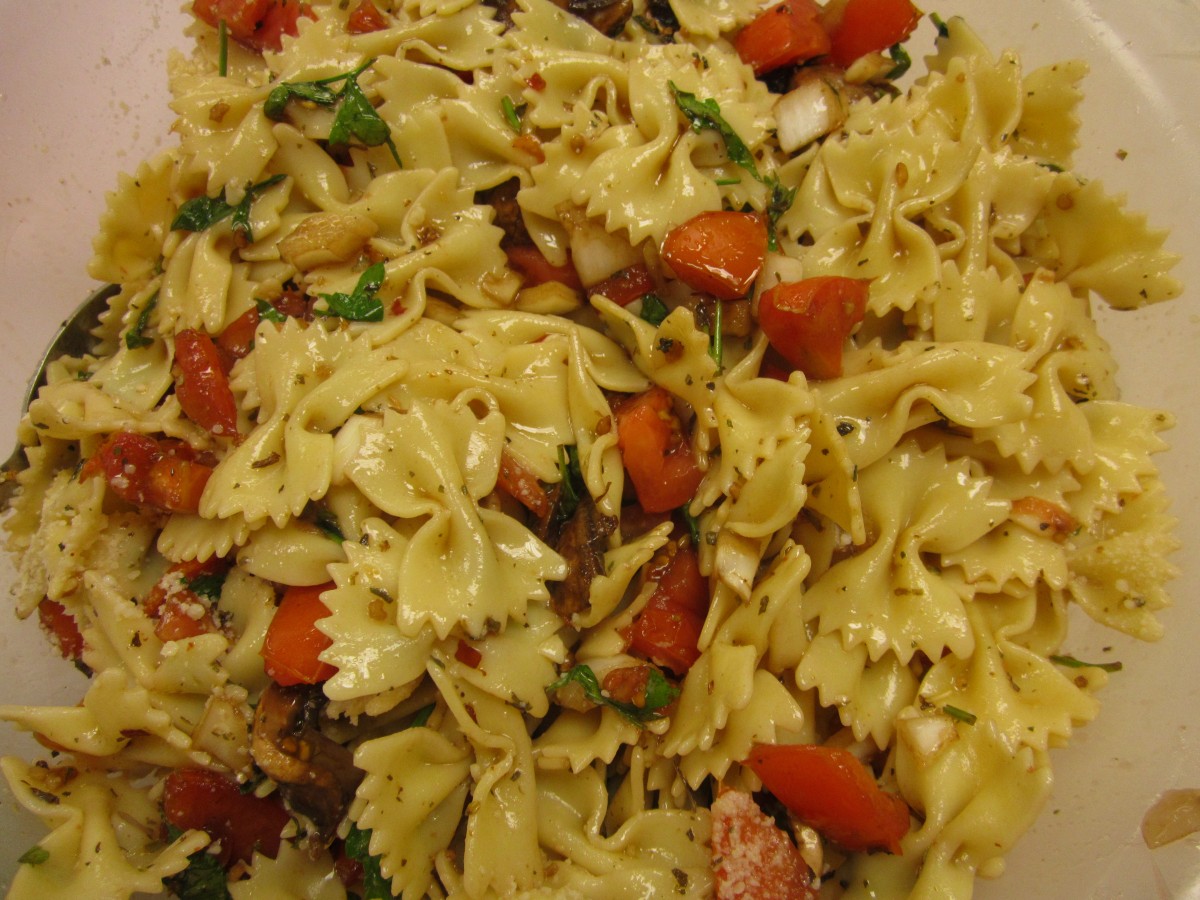
Warm Pasta Salad
1 lb. Plum tomatoes, chopped
1 medium sweet onion, chopped
4 oz. Fresh mushrooms, sliced
2 cloves garlic, minced
¼ c. fresh parsley, chopped
1 T. dried basil or 1/4 c. chopped fresh basil
1 T. capers, optional
1 t. dried oregano
½ c. olive oil
¼ c. red wine vinegar
3 T. balsamic vinegar
Dash of hot red pepper flakes
Salt to taste
1 lb. Uncooked pasta
Combine all ingredients, except pasta and chill overnight. Cook pasta, drain and toss with tomato mixture. Mixture should be served right away . Serves 6.
BLT Salad
6-8 slices bacon
2 slices rye bread
2 slices Swiss cheese
5 c. torn up lettuce or mixed greens
3 T. olive oil
2 T. apple cider vinegar
1 T. balsamic vinegar
Salt and fresh ground pepper
2-3 tomatoes, diced
Cook bacon until crisp. Remove from pan, drain and crumble. Remove most of the bacon grease from the pan. Make a sandwich with the rye bread and the Swiss cheese. Toast in the skillet over medium heat until golden brown and cheese is melted. Set aside. Place lettuce in bowl and toss with the oil to coat the leaves. Toss with the vinegars and season with salt and pepper to taste. Add the tomatoes and the bacon and toss. Cut the sandwich into cubes and place on the top of the salad. Serves 2.
Note: you can make two sandwiches if you want more bread and cheese in the salad.
Tomato Feta Salad
Warm Pasta Salad

BLT Salad
Fresh Cherry Cake

Fresh Cherry Cake
This cherry cake is the perfect summer dessert. It is full of fresh cherries and not too sweet. I love to serve it warm from the oven, but even at room temp, it is a crowd pleaser.
The cake is great, just as it is, but can also be dressed up with a scoop of ice cream, whipped cream or a drizzle of melted chocolate.
While fresh cherries are in season, I try to use them in as many dishes as I can. I also pit and freeze some to enjoy later. I used fresh, pitted cherries, but you could use frozen, if you prefer.
The recipe calls for biscuit mix- like Bisquick. You can use store bought, or even make your own. I included a recipe for homemade biscuit mix at the bottom of this post.
So here is the recipe. Enjoy!!
Fresh Cherry Cake
2 c. biscuit mix*
1/2 c. sugar
1/3 c. milk
2 T. oil
1 egg
1½ c. pitted cherries- sweet or sour
Preheat oven to 350. Grease and flour a 9×9-inch pan. Beat all ingredients together, except cherries, for about 30 seconds. Fold in cherries and pour into prepared pan. Bake for about 35 minutes. Cake should be golden brown on top and test clean with a toothpick. Serve warm, if you can.
*You can use Bisquick or Jiffy Mix, or use homemade. Recipe follows.
Pastry Mix/ Biscuit Mix
8 cups sifted, all-purpose flour
1 c. powdered milk
1 c. powdered buttermilk
¼ c. baking powder
1 T. salt
2 c. shortening**
Sift dry ingredients together 3 times. Cut in shortening to resemble cornmeal. Keep in an airtight container. Store in a cool dry place and use within six months.
**You can use coconut oil, if you prefer. If you do, chill coconut oil before making the mix, and store mix in fridge.
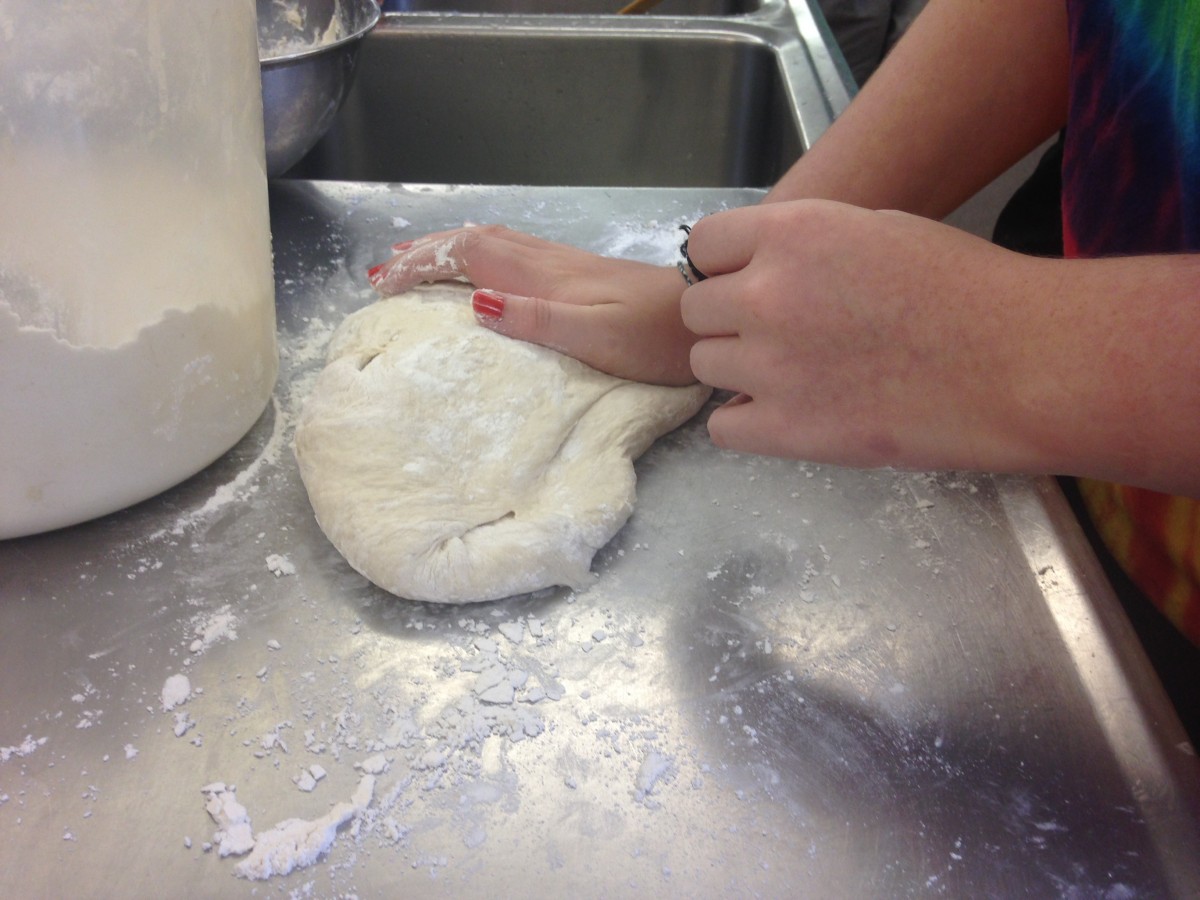
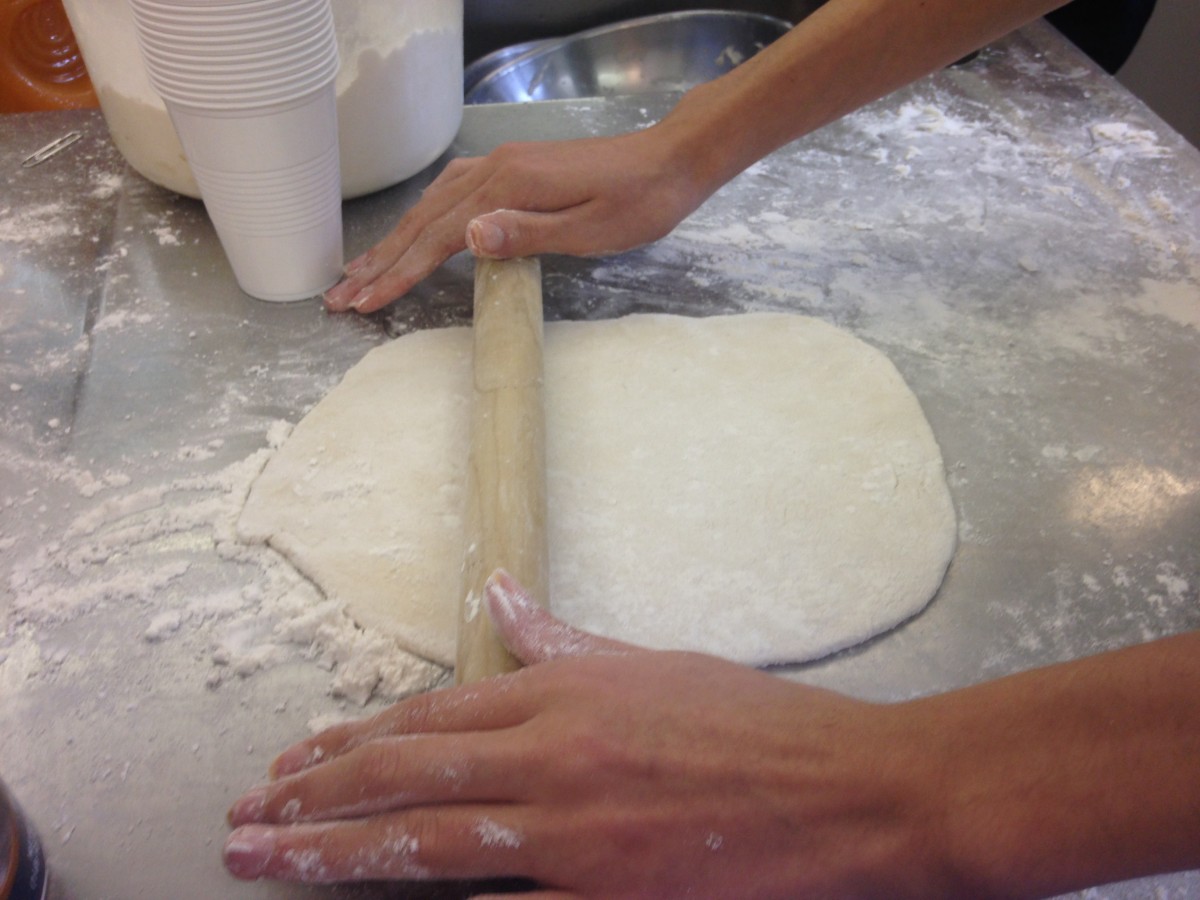
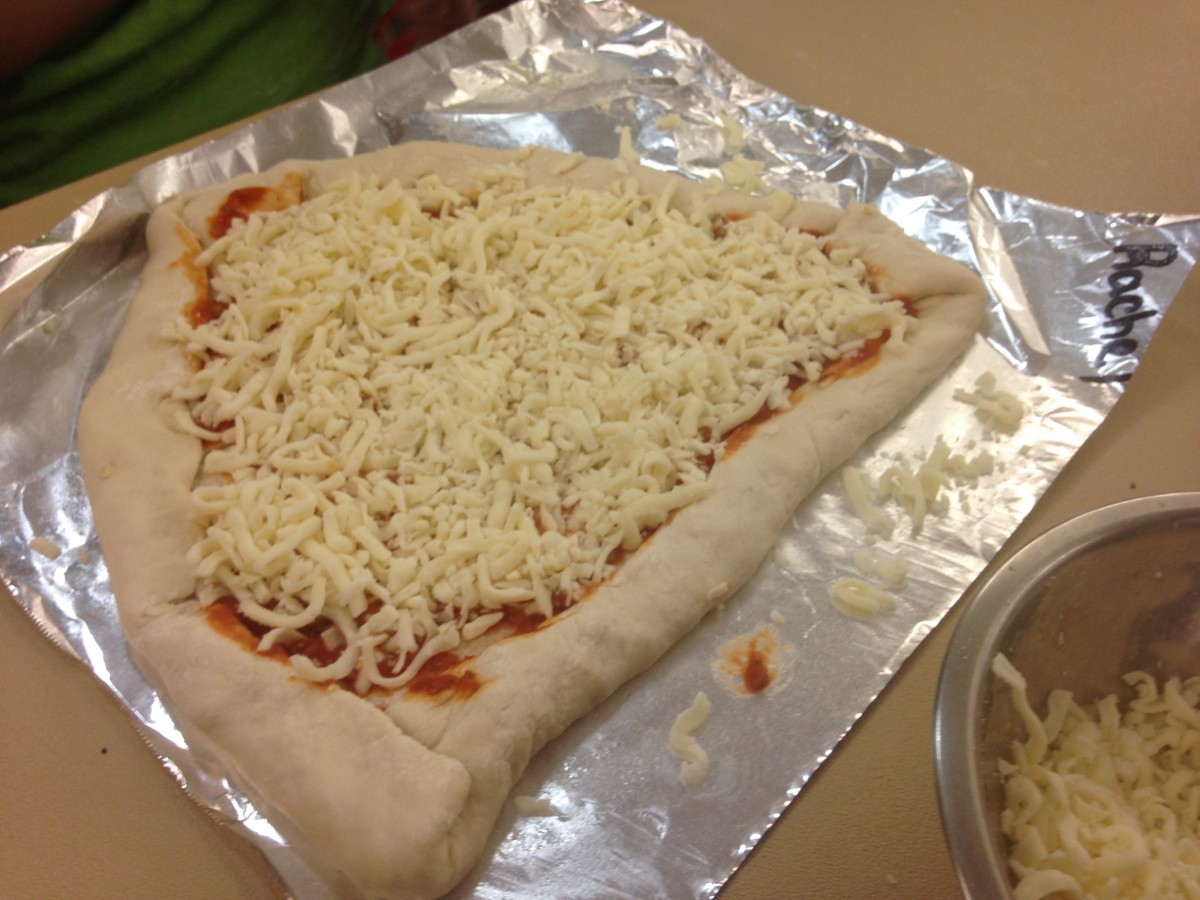
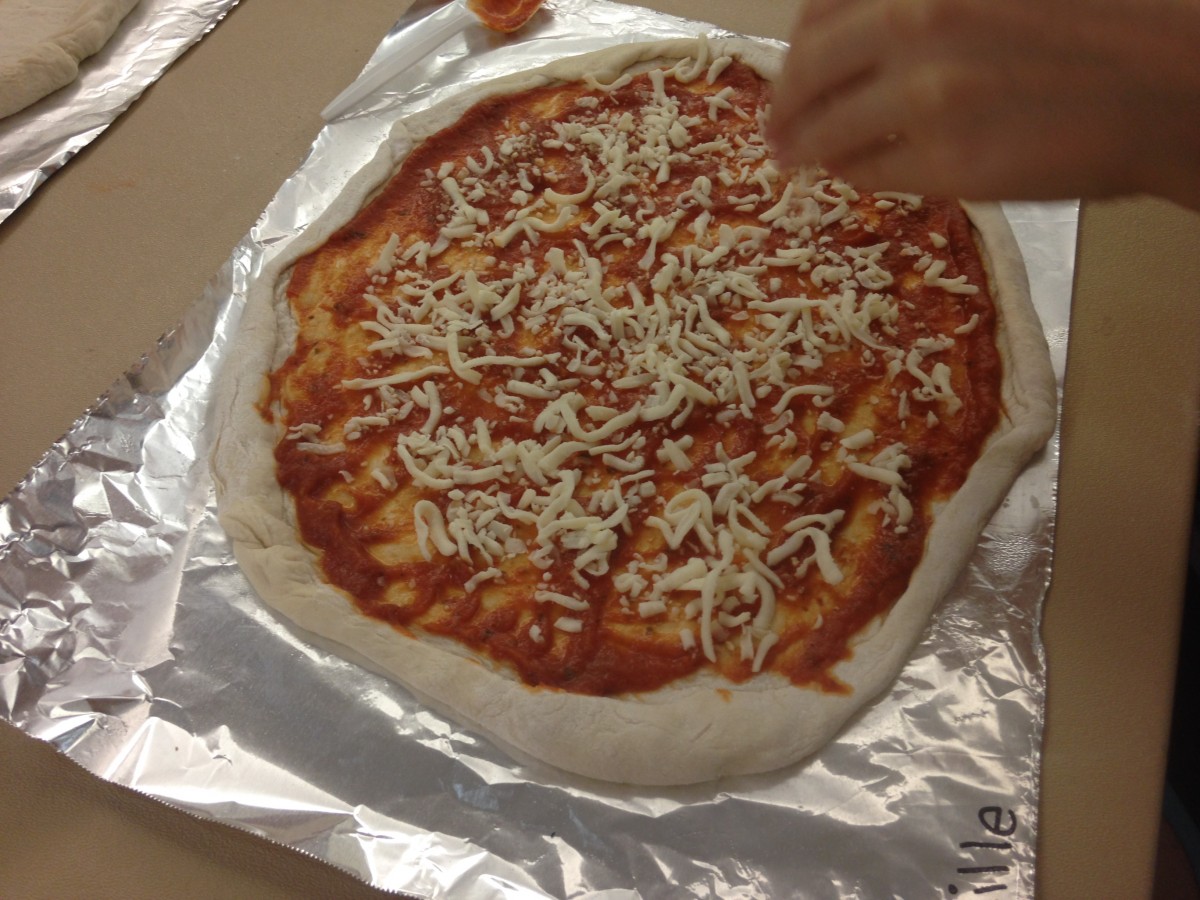
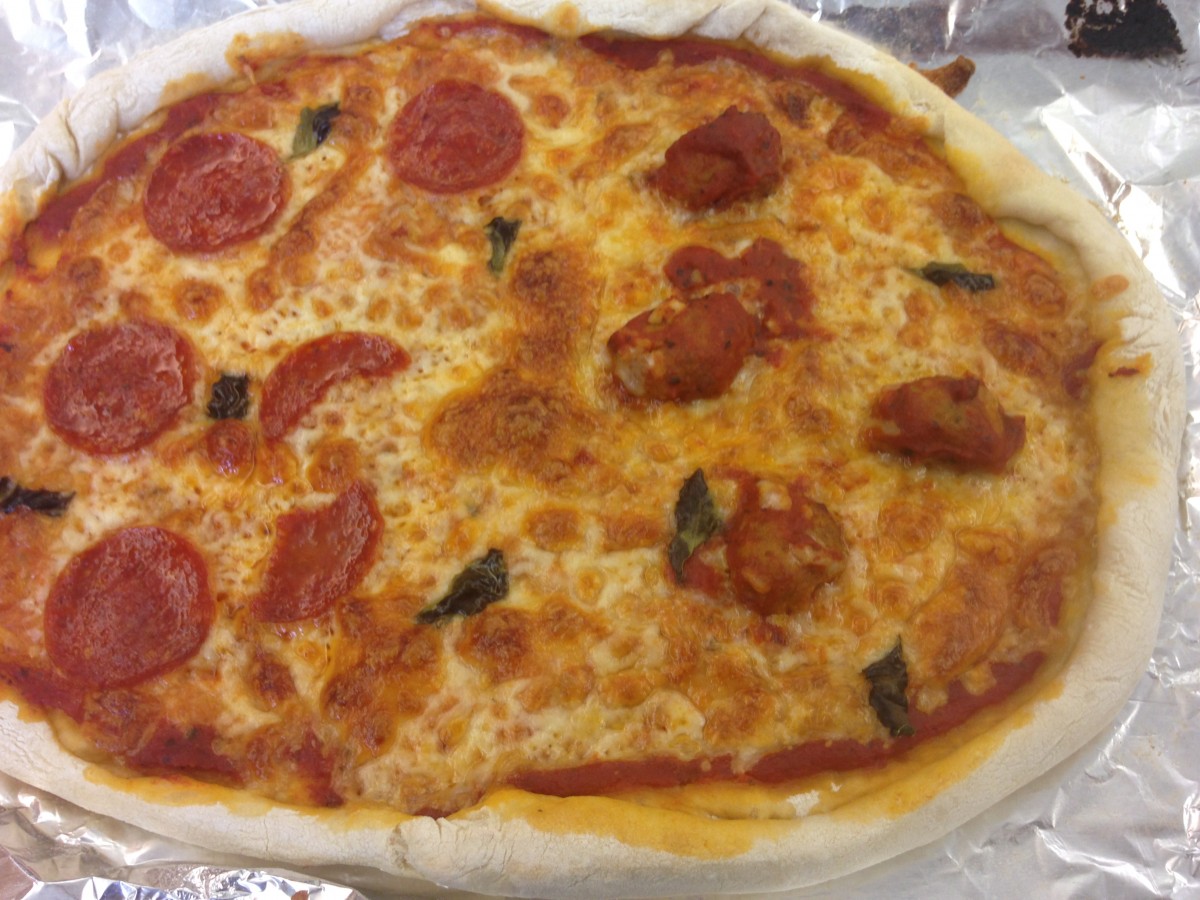
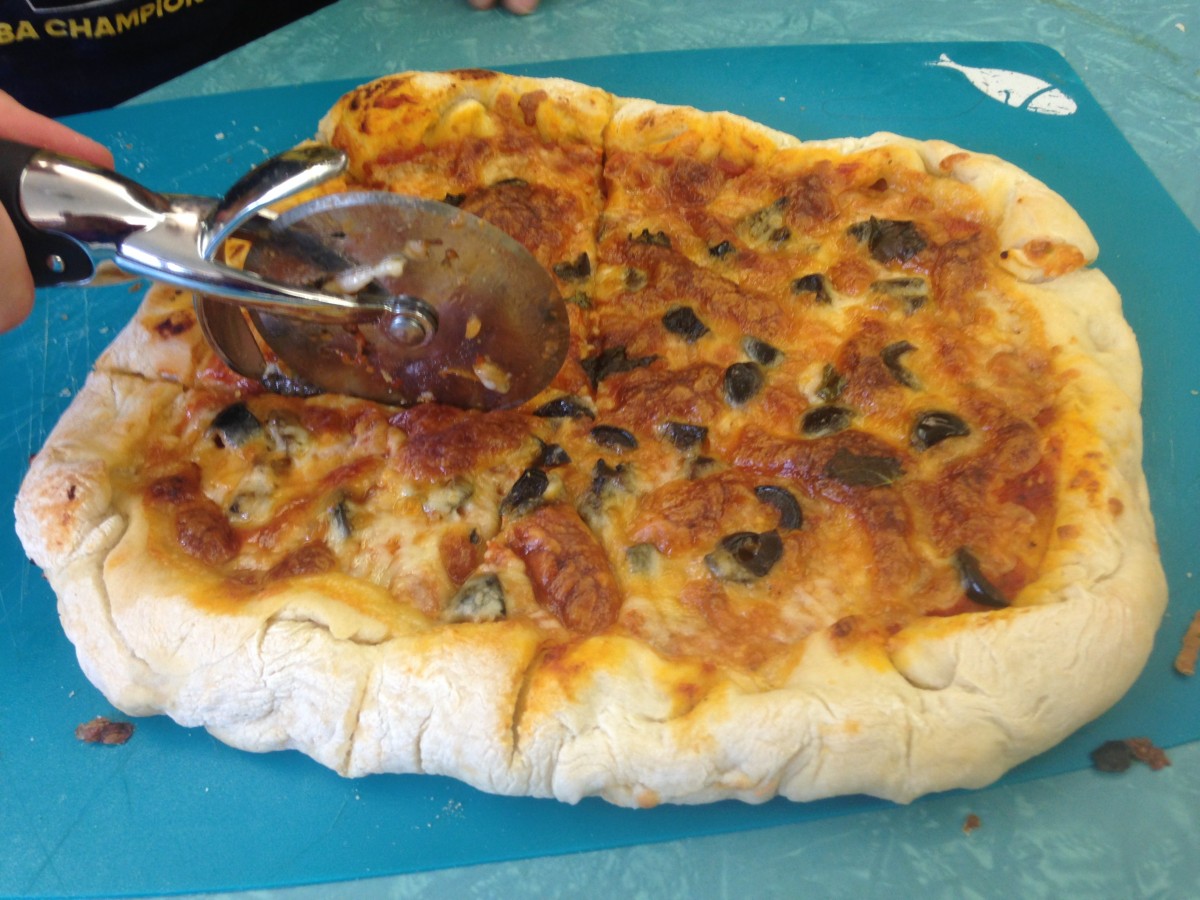
Pizza Day in Teen Cooking Camp
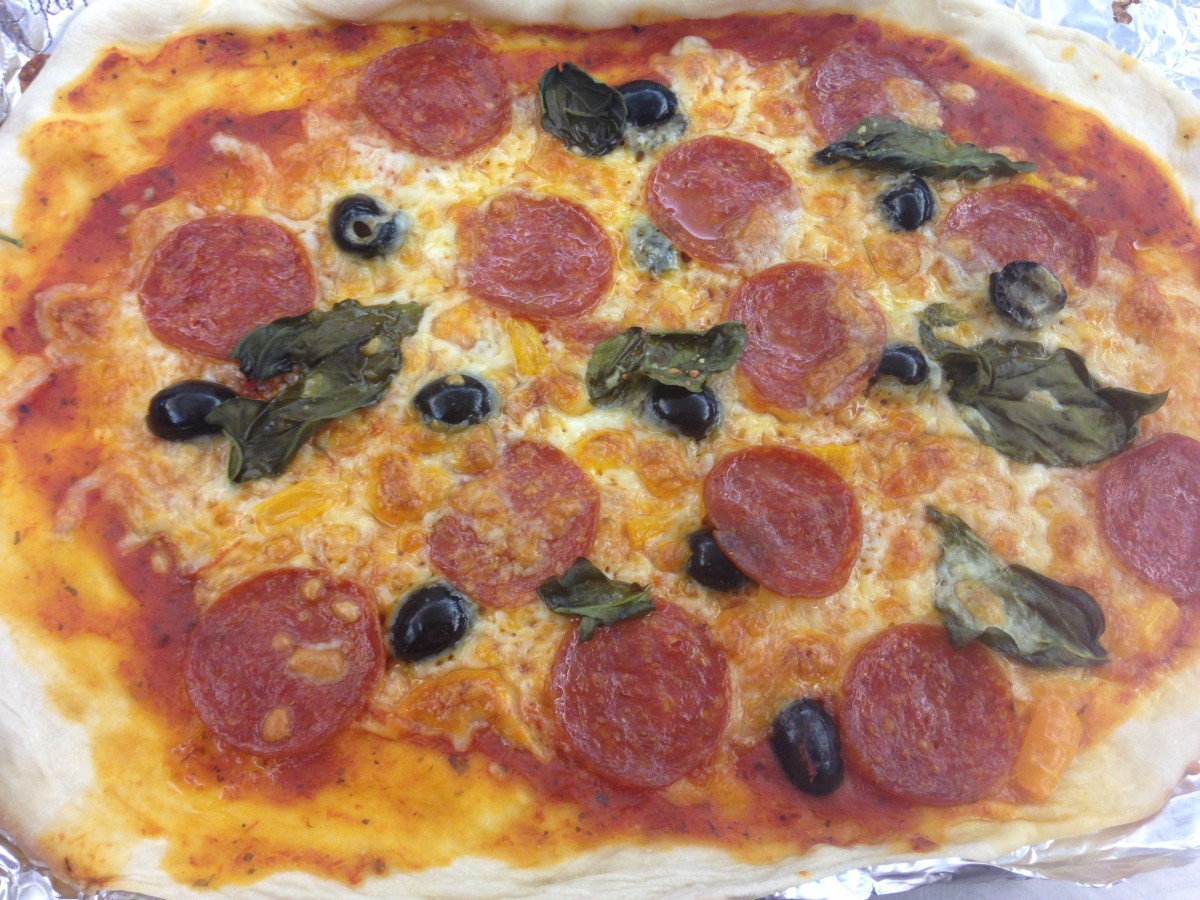 The kids made great pizzas today. We even had enough time to make some tortilla pizzas. They made their own dough, rolled it out, and topped them according to their preferences.
The fresh basil I brought in was a big hit, and a number of the kids opted to add it to their pizzas.
Here are pics of what they did.


Dilly Beans

Dilly Green Beans
In a pickle making cooking class last night, we made dilly green beans. These are one of my favorite pickles. I like pretty much any type of pickle, and I love green beans, so no surprises there. If you have an abundance of green beans, you might consider making a batch of these to enjoy year round.
These are great just eaten like other pickles, as a side. But they are also great added to a Bloody Mary- or so I am told. I also like to serve them as an appetizer with cheeses, crackers and olives.
While the recipe calls for 1/4 teaspoon of red pepper flakes per jar- feel free to add more, for a spicier version.
Dilly Green Beans
4 lbs. table‑perfect whole green beans
1 3/4 t. crushed dried hot red pepper
3 1/2 t. dried dill seed or seven fresh dill heads
7 cloves of fresh garlic, peeled
5 c. vinegar
5 c. water
1/2 c. less 1 T. pickling salt
Wash beans thoroughly. Remove stems and tips, and cut them as much as possible in uniform lengths to allow them to stand upright in canning jar, coming to the shoulder of the jar. have jars clean and very hot, and lids and sealers ready in scalding water. In each jar place one dill head or 1/2 t. dill seed, add one garlic clove, and 1/4 t. crushed hot red pepper. Pack beans upright in jars, leaving 1 inch of head room. Heat together the water, vinegar and salt. When the mixture boils, pour it over the beans, filling each jar to 1/2 inch from the top. Run a plastic knife down and around to remove trapped air. Adjust lids, and process in a boiling water bath for 10 minutes, start timing after the water in the canner returns to a boil. Remove jars. …Wait at least 2 weeks for these beans to develop their flavor. Yield: 7 pints
Source: Putting Food By


