Irish Soda Bread


It’s that time of year. Irish food in on the mind. This soda bread is a classic. Simple and fast to make, it can be served with breakfast, lunch or dinner.
The soda bread is like a big scone or biscuit. It has a crisp, outer crust, with a crumbly, soft center. I like to serve soda bread with butter and jam.
I used raisins, but you can substitute currants, golden raisins, or just leave them out, if you prefer.
I make soda bread all through the year, not just for St. Patrick’s Day. Right from the oven with some butter and jam. Yum.
Irish Soda Bread
2 c. flour
½ t. each baking powder and baking soda
¼ t. salt
2 T. butter
¾ c. raisins, currants or golden raisins, optional
2 t. caraway seeds
1 egg, beaten
1 c. buttermilk
Preheat oven to 400 degrees. Dust a baking sheet with a little flour. Combine dry ingredients in bowl and cut in butter to resemble coarse crumbs. Add raisins and caraway seeds. Combine egg and milk and set 2 tablespoons of this mixture aside. Add remaining milk mixture to flour mixture and combine just until dough forms into a ball. Place on baking sheet, brush with reserved egg mixture and cut a crisscross on top of loaf. Bake about 25 minutes or until bread sounds hollow. Makes 1.
Cheesy Chocolate Hamantaschen


A friend shared this recipe recently, and I was intrigued. I had to try these cookies. The filling for these traditional Jewish cookies is inspired by the filling used in cannoli. I made a few changes from the recipe he shared, and was very happy with how they turned out.
The dough, which contains no sugar, has a wonderful, pastry-like texture. It pairs up well with the filling. The drizzle of chocolate is a perfect finish for them. They aren’t a gooey, overly sweet cookie, which I really like.
They pair up nicely with tea or coffee. I confess, I had a couple for breakfast with my morning tea. I would definitely make these again.
Thanks, Jared, for sharing this recipe.
Cheesy Chocolate Hamantaschen
Filling:
¼ c. ricotta cheese
5 oz. cream cheese
½ c. powdered sugar
1 t. cinnamon
½ c. mini chocolate chips
Dough:
½ c. (1 stick) butter, softened
3 oz. cream cheese
½ c. half and half or milk
1 t. vanilla
½ t. salt
2½ c. flour
Topping:
1 egg white
2 T. water
½ c. chocolate chips
Powdered sugar, optional
Prepare the filling. Beat together the ricotta and cream cheese until smooth. Mix in the milk and cinnamon, then stir in the chips. Chill until ready to use. Make the dough by mixing the cream cheese and butter together. Add the milk, vanilla and salt and mix until smooth. Stir in the flour until a stiff dough forms. Wrap the dough in plastic wrap, or put in a bag and chill at least an hour – or up to a couple of days – before proceeding. On lightly floured surface, roll the dough to a little less than ¼ – inch thickness. Cut dough out into 2-3 inch circles. Place a scant teaspoon of filling in middle of each dough circle. Combine the egg white with water and beat together. Brush a little of the egg white mixture over the edges of the dough circle. Fold the dough up in thirds towards the center, pinching the edges to seal. They should look like little three-corner hats. Repeat with remaining dough, re-rolling the scraps. Brush folded cookies with a little more of the egg white mixture. Place on lightly greased cookie sheets and bake in a 375-degree- oven for 15 minutes, or until golden on the bottom. Remove to cooling rack. Once cooled, melt the chocolate chips and drizzle over the cookies. You can top with some powdered sugar, if you like. Makes 2½-3 dozen.
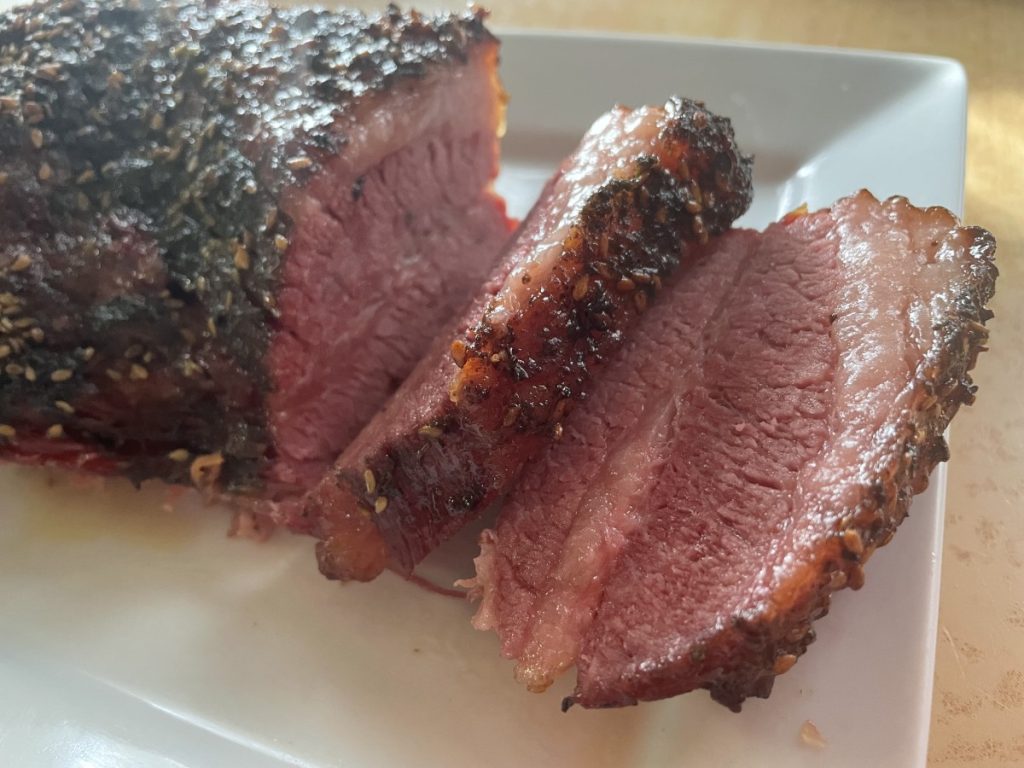
Roasted Corned Beef

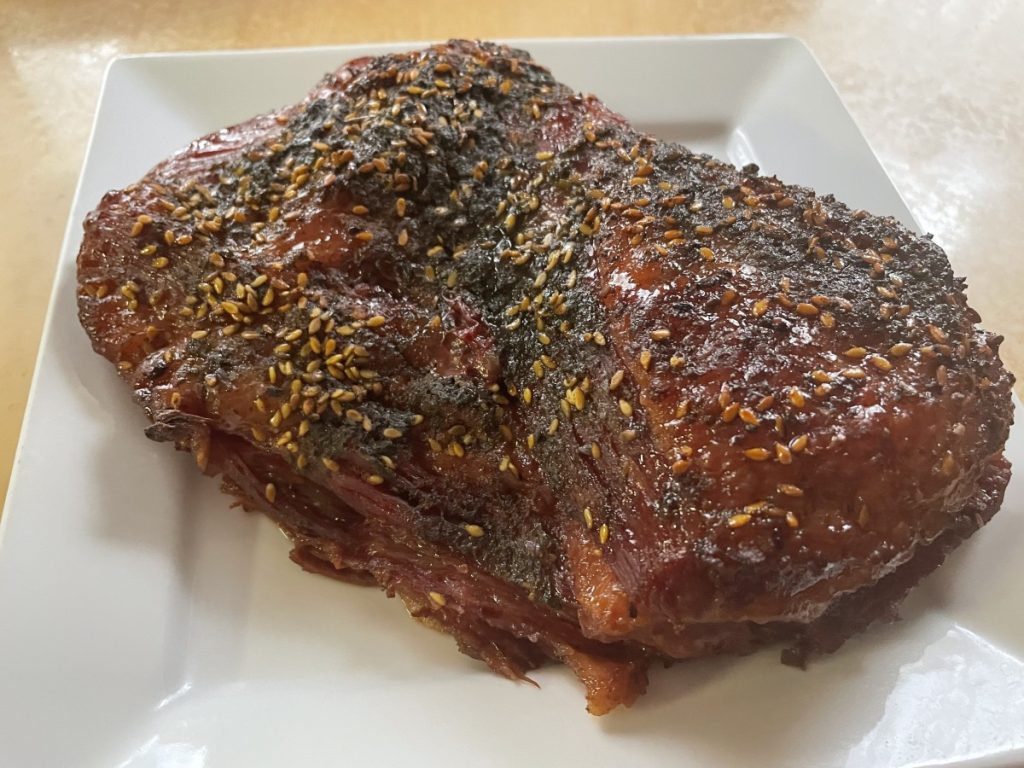
After hearing about roasting corned beef, I finally did it. I can see why those who have raved about the results were so excited. The end result was a roast that was tender, flavorful and kind of pretty, too. I had searched the internet for directions and found a wide assortment of recipes. Most of the roasting temps were in the 300-325 degree range. Cooking times varied from 2-6 hours. All of the recipes I found added water to the roasting pan- but amounts varied widely – from a few tablespoons to several cups of water.
There were also all sorts of options for a spice/sweet rub. I used ingredients I thought would work with the corned beef and I was not disappointed. I used maple syrup, za’atar spice and some brown sugar. Recipe for the za’atar follows after the roasting directions.
I was concerned that the roasted corned beef would be too salty. It was not. A lot of the salt comes out in the water used in the roasting process. I tasted a piece of the roasted onion in the pan and it was super salty. The cooking liquid was, too. The roast was not too salty.
Roasted Corned Beef
4-5 pound corned beef
1/2 c. maple syrup
2-3 tablespoons za’atar
1/2 c. brown sugar
1 onion, peeled and chopped
2-3 cups water*
Remove the meat from packaging. Rinse with cool water and pat dry. Discard the seasoning packet. Place a wire rack in a roasting pan and place the roast on the rack. Brush the roast with about 1/4 cup of the maple syrup. Sprinkle the za’atar over the meat and rub to cover evenly. Sprinkle with 1/4 cup of the brown sugar. Rub the sugar into the roast. Place onions in the roasting pan and add about two cups of water. The meat should be above the water. Seal the roasting pan with foil or cover with a tight fitting lid. Place in a preheated 325 degree oven and roast for 2 1/2- 3 hours. Add more water, if needed. See note below. Pierce roast to make sure it is tender. Brush with the rest of the maple syrup and sprinkle with the rest of the brown sugar. Return to oven, uncovered, and cook until top of roast browns nicely, about an hour. Remove from oven. Let rest 15-20 minutes before slicing.
* The water amount became an issue for me. I thought the pan was sealed tightly, but at 2 hours, I smelled a faint burning smell. The roasting was was just out of water. I added more, replaced the foil and returned the roast to the oven for another hour. I had used a pretty big pan, in relation to the size of the roast- and obviously, the foil was not sealed as tightly as I thought. Check the roast a time or two – to be sure the water does not run out. By the same token, you don’t want the meat sitting in water. If you use a smaller roasting pan, or use a tight fitting lid, you might not need to add more water at all.
There are a number of variations of this recipe. This is the version that I made.
Za-atar Spice Mix
1 T. whole coriander
1 T. whole cumin
2 T. dried marjoram- you could use thyme instead
2 T. sumac- available at some specialty stores
2 T. sesame seeds- I toasted mine.
in small skillet, toast coriander and cumin until you can just start to smell them. Let them cool, then grind them up in a spice mill or coffee grinder. Combine this mixture with the rest of the ingredients and stir to combine well. Store in a cool, dry place.
Fresh Fish and Vegetable Soup


When you think of homemade soup, I am guessing you don’t think of fish. Perhaps a clam chowder, but not fish. Maybe you should. This soup is really quite wonderful. It is full of great flavors and it cooks up in no time. It is both light and satisfying. It sort of reminded me of a Manhattan style chowder, but with fish instead of clams.
You can use any mild fish you happen to like. I have used salmon, catfish, cod, tilapia and flounder in the past, and liked the way all of them tasted in the soup. You can also use a mix of more than one fish.
The recipe calls for canned tomatoes, but fresh tomatoes would work. I have used bottled salsa a few times. It added a nice little bit of extra flavor. You would add a pound of diced fresh tomatoes, if using fresh.
So here is the recipe. Hope you give it a try.
Fresh Fish and Vegetable Soup
1 medium carrot, sliced
2 ribs celery, diced
2 medium potatoes, peeled and sliced
1 large leek, white part only, cleaned and chopped
5 c. chicken, vegetable or fish stock
1 (14 oz.) can of stewed tomatoes, I used a pint of home canned tomatoes
Salt, pepper and cayenne pepper to taste to taste
1 1/2 lb. firm white fish cut into 1/2 inch cubes
1/4 c. flour
2 t. paprika
2 T. oil 1/4 c. fresh parsley
In broth cook the carrot, celery and leeks 10 minutes. Add tomatoes and potatoes and simmer, covered, for 15 minutes longer. Season to taste. Meanwhile mix the flour and paprika together and dredge the fish in it. Heat oil in a skillet over medium high heat and cook the fish until lightly browned on both sides. Drain on paper towels. Before serving add fish pieces and parsley to the soup and simmer 5 minutes. Serve with crusty bread. Serves 6.

Chili Bean Spoon Bread


This is a great dish when you want to go meat free, but still have a hearty meal. It combines the flavors of chili with a cornbread topper. A classic combination, for sure.
The base is a lentil chili that you place in a casserole dish, then top with a cornbread batter. The dish is finished off in the oven until the cornbread is baked.
To serve, spoon some of the cornbread onto your plate and top with the lentil chili. I have made it for friends and it is always a big hit, even for the meat eaters. Perfect to warm you up on a chilly day.
You can serve this as a vegetarian main dish, or as a side dish.
Chili Bean Spoon Bread
1/2 lb. lentils
pinch of ground cloves
2 c. milk
1/2 t. salt
2/3 c. cornmeal
4 T. butter
4 eggs
4 T. oil
2 large onions, chopped
1 clove minced garlic
1 T. chopped parsley or 1 t. parsley flakes
1 T. chili powder
1 t. ground cumin
1 (14 oz.) can diced tomatoes, undrained
salt and pepper to taste
In saucepan cover lentils with about 2 cups water and add cloves. Bring to a boil, turn down to a simmer and cook, covered, until lentils are tender, about 20 minutes. You may need to add a little more water. Meanwhile in another saucepan heat milk and salt almost to boiling. Stir in cornmeal and continue cooking, stirring constantly until thickened. Remove from heat. Stir in butter and eggs and set aside. In oil sauté onions and garlic until tender. Add seasonings, tomatoes and lentils and heat until bubbly. Adjust seasonings. Pour lentil mixture into greased 2-quart casserole dish. Spoon over the cornmeal mixture. Set casserole dish in larger pan and add 1 inch of hot water to larger pan. Bake in a 350-degree oven for 30-40 minutes, or until bread is firm and golden. Serves 4-6.
Classic Gnocchi


I did a class recently on dumplings. Dumplings can include so many different foods. One of the dishes that was requested we make for the class was gnocchi.
Gnocchi are a type of dumpling made with potatoes. They are tender, tasty and so easy to make. Sort of like a spaetzle, but made with potatoes in the dough. They have a unique texture and flavor. They have a unique appearance as well, as uncooked gnocchi are traditionally rolled across the tines of a fork to leave tiny grooves. The grooves help to hold sauce. It also makes them look pretty. There are special grooved boards made just for making gnocchi, but a fork works well, too.
Once cooked, gnocchi can be served with butter or a little olive oil, with a red sauce or browned in butter or oil. I love them with some fresh grated Parmesan cheese.
So here is the recipe I used. If you never made gnocchi before, I hope you will give them a try. so easy and so good!!!
Classic Gnocchi
4 small russet potatoes, 22-24 oz. total, peeled, diced into 1/2-inch cubes
1 egg
2 T. whipping cream or half and half
1 1/4 t. salt
1/8 t. nutmeg
1 1/2 c. (about) flour
Steam potatoes over boiling water until tender, about 12 minutes. I steam mine in the microwave. Place in bowl and mash or put potatoes through a ricer. Place in bowl and cool about 10 minutes. Add egg, cream, salt and nutmeg and mix well. Stir in flour and combine until slightly sticky dough forms. Add more flour a tablespoon at a time if the mixture is too moist. Turn dough onto lightly floured work surface and divide into 6 equal portions. Roll out 1 piece into a rope about 20-inches long by 3/4 inch. Cut dough into 3/4 -inch pieces and roll each piece over the tines of a fork or over a wire whisk to make grooves in them. Arrange finished gnocchi in a single layer on a floured baking sheet and repeat the process with the remaining dough. Boil the gnocchi in well-salted boiling water, about 1/3 at a time. Boil for 4-5 minutes. They will come to the surface and be tender. Check after 4 minutes. Serve with butter and Parmesan cheese or with a favorite pasta sauce.

Basque Soup


Theissoup is hearty and rich flavored. I used oil and almond milk, so the soup was vegan. You could use milk and butter, if you prefer. It tastes great, either way. It also comes together quickly, with ingredients you can keep on hand, so it is a great homemade soup when you don’t have a lot of time. The combination of milk, tomatoes and corn also makes it a pretty dish to serve. I used a jar of my home canned tomatoes and corn I had frozen last summer.
Basque Soup
1 c. chopped onions
1 1/2 c. chopped celery
1/4 c. oil or butter – we used oil in class
1/4 c. flour
3 c. milk*
1 (16 oz.) jar stewed tomatoes, undrained
1 can whole kernel corn, undrained- we used frozen corn
3-4 cans butter beans, drained and rinsed
3-4 cups water and 1T. paste-type vegetable soup base
or 3-4 cups vegetable broth
pepper to taste
hot pepper sauce to taste
shredded mild cheese, optional
Sauté onions and celery in oil until tender. Stir in flour until smooth and add milk, stirring to keep lumps from forming. Stir over medium heat until milk has thickened and begins to boil. Stir constantly as mixture simmers for an additional minute or two. Add remaining ingredients, except cheese and bring up to a simmer. Adjust seasonings. Ladle into bowls and top with cheese, if desired. Serves 8-10.
Note: You can use almond, rice, oat or soy milk in place of the dairy milk, if you like.
Broccoli with Hummus


When you think of hummus, I bet you think of it as a dip. It is a great dip, paired with some pita bread or fresh veggies. But hummus can be more than a dip. I love to toss hot veggies with hummus. I especially like to do this with broccoli. I started doing this years ago for a friend who was vegan. The hummus was a nice substitute for butter or a cheese sauce.
You can use homemade hummus, but store bought is fine, too. Hummus is made from chickpeas, olive oil, tahini, lemon juice, garlic and a few seasonings. Of course, you can make all sorts of variations. You just combine the ingredients in a food processor or blender until smooth. Doesn’t get much simpler. I prefer to make my own, so I can flavor it the way I want.
One of my favorite combinations is hummus with broccoli. The flavors work great together. You just toss hummus with hot, freshly cooked broccoli. So yummy.
Since I had some cauliflower, I added some of it to the dish as well.
So the next time you have some hummus around, try tossing it with hot, cooked veggies for a fun side dish or an easy vegetarian main dish.
Steamed Broccoli with Hummus
1 lb. fresh broccoli, you can also use cauliflower or a combination
1/2 c. hummus, homemade or store bought, recipe follows
Cut broccoli into long spears, peeling and trimming tough stems. Steam until just tender. Warm hummus over low heat or in a microwave and spoon over the cooked broccoli. Toss to coat evenly. Serves 4 as a side dish, 2 as a main course.
Hummus
1 can garbanzo beans, drained- or about 2 cups cooked chick peas
1/4 c. olive oil
2 T. lemon juice
2 T. tahini (sesame seed paste)
2 cloves garlic
salt and hot pepper sauce to taste
Combine all ingredients in a blender or food processor until smooth. Adjust seasonings. Chill. Serve with pita bread, crackers or fresh vegetables. Also nice spread in a pita bread with sliced tomatoes, cucumbers and lettuce. Freezes well.
Orange and Oatmeal Scones


I love fresh scones, still warm from the oven. Since it is citrus season, I decided to make scones with some seasonal orange flavor. These scones have a nice, crunchy outside and crumbly, tender middle.
The orange juice and orange zest gives them a wonderful flavor. The oatmeal gives them a lovely texture and the raisins add just a bit if sweetness. A very nice combination.
These are great served warm, topped with sweet butter and jam. They are perfect for breakfast or brunch.
You can also use these scones as the base for a berry shortcake. Split, topped with sweetened berries and some whipped cream, they turn into a simple and tasty dessert.
Orange and Oatmeal Scones
2 1/2 cups flour
2 cups rolled oats
1 cup sugar
1 teaspoon salt
1 tablespoon baking powder
1/2 teaspoon baking soda
1/2 cup very cold, unsalted butter – cut into chunks
1 egg
1/2 cup orange juice
2 t. grated orange peel
1 cup raisins – plumped and well dried
Glaze
milk, sugar, orange zest
Line a large baking sheet with parchment paper (double two sheets if you have them – one inside the other). Preheat oven to 425 F. In a large bowl, place flour, oatmeal, sugar, salt, baking powder, baking soda and mix together. Cut or rub in butter to make a mealy mixture. Stir in egg and orange juice. Add orange peel and raisins. Mix to make a soft dough. Turn out onto a lightly floured board and knead for a few minutes. Roll or pat out into a thickness of 1/2 inch. Using a serrated cookie cutter cut into disks or rounds. Brush with milk and sprinkle with sugar and orange zest. Bake until nicely browned – about 14 minutes. Makes about 24.
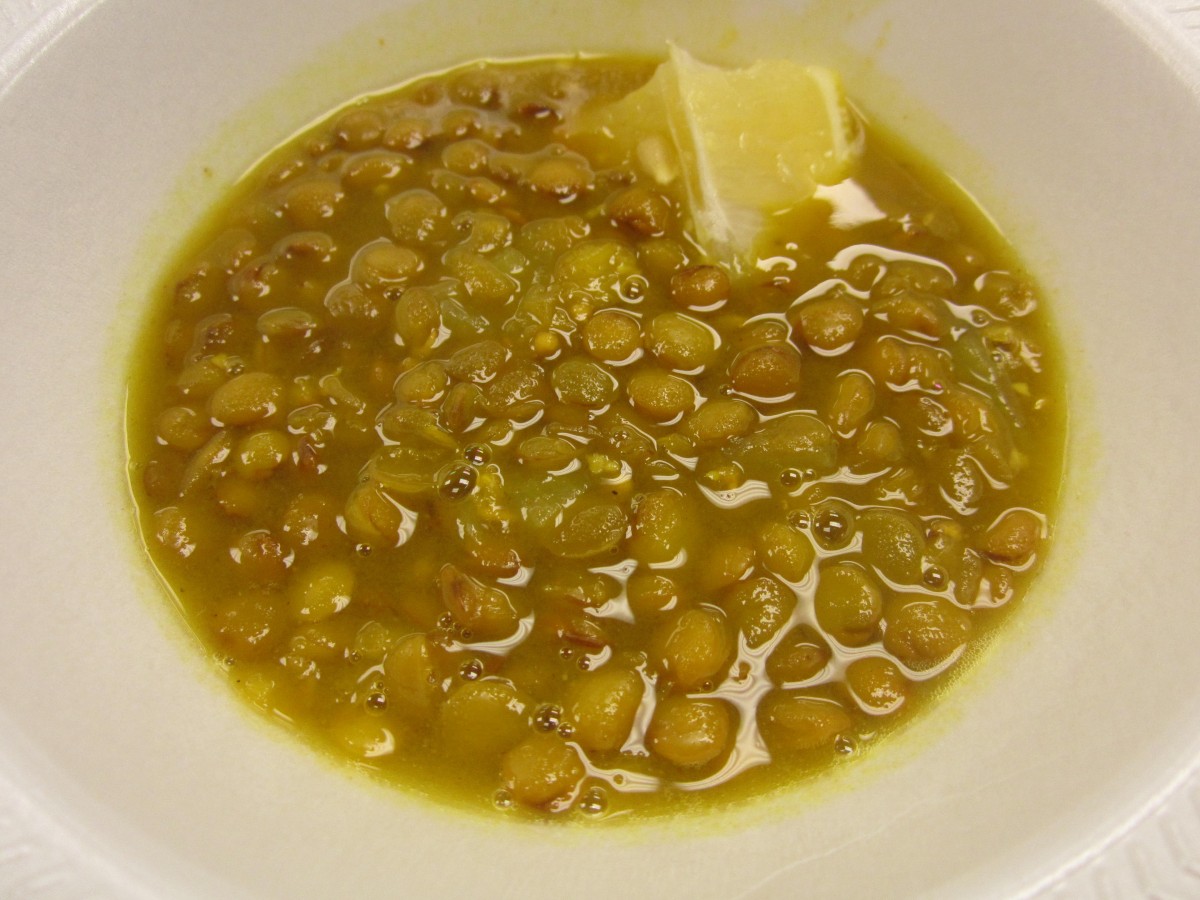
Lentil (Dal) Soup


Also called Dal Soup, this is a recipe I love to make when the weather is chilly. Satisfying and just spicy enough. It is a great dish to serve when vegetarian friends or family are over and still hearty enough for the meat eaters. The mix of spices gives it great flavor.
This recipe came from a local restaurant that is now closed. So the only way for me to enjoy this soup is to make it myself.
I cook it just until the lentils are tender, but not cooked to mush. Serve with a lemon wedge to squeeze on the soup before eating.
Lentil (Dal) Soup
8 c. water
1 ½ T. ground turmeric
1 T. ground coriander
3 bay leaves
2 garlic cloves, minced
½ t. cayenne pepper
2 2/3 c. Lentils, rinsed (about 1 pound)
¼ c. olive oil
1 large onion, chopped
1 t. fresh minced ginger
1 t. cumin seed
½ t. mustard seed
2 T. fresh lemon juice
Salt to taste
Lemon wedges
Bring first 6 ingredients to boil in large pot. Add lentils; reduce to a simmer and cook, covered, until lentils are tender, about 45 minutes. Meanwhile, in skillet over medium heat cook onions and seasonings in oil until onion starts to brown, about 10 minutes. Stir in lemon juice. Add this mixture to lentil mixture and cook until soup reaches desired consistency. Add salt to taste. Serve in bowls and garnish with lemon wedges. Serves 8.


