Zucchini and Cheese Tartlets

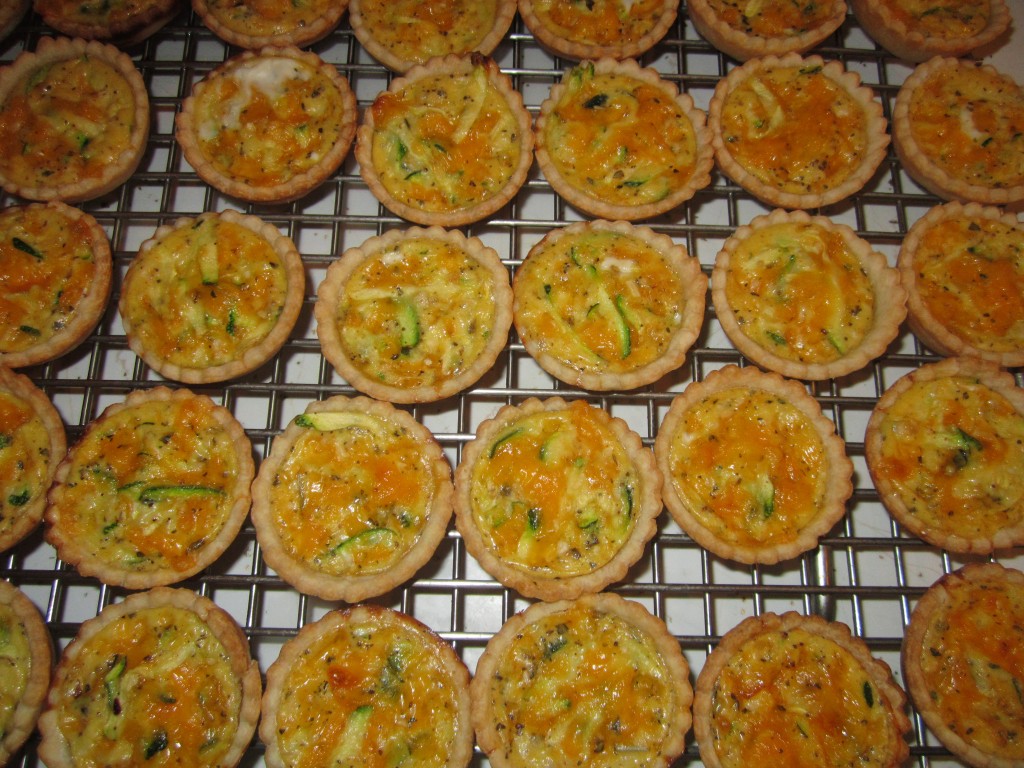
Since zucchini are so prolific, there never seem to be enough recipes for them. I like this one as an appetizer. You can make up a big batch, bake and then freeze some for whenever you need them. Served with a salad they make a nice lunch or light dinner.
Zucchini and Cheese Tartlets
1 recipe of pie crust dough, enough for 2 pies, home made or store bought
1 medium zucchini shredded, about 1 1/2 cups
1 T. flour
1 c. shredded cheese- any kind you like. I like cheddar.
2 eggs, beaten
1/2 c. minced onion
1 t. Italian seasoning
salt and pepper to taste
hot pepper sauce to taste
Preheat oven to 375 degrees. Roll out dough to 1/8-inch thick. Use a 2 1/2-inch biscuit cutter to cut out circles of dough. Place dough circles in mini muffin pans. Press them in gently being careful not to tear them. Repeat with remaining dough and re-roll scraps. You’ll end up with about 3 dozen in all. If you don’t have enough pans, keep the extra dough circles under a towel or plastic wrap so they don’t dry out until you are ready to use them. In mixing bowl combine zucchini and toss in the flour. Add remaining ingredients and mix well. Adjust seasonings to your taste. Place a rounded teaspoonful of zucchini mixture into each of the tartlet shells in the prepared pans. Don’t over fill. Bake for 12-15 minutes or until golden brown on top. They will puff up while baking but flatten when cooling. Can be served hot, warm or at room temperature. Makes about 3 dozen.
Can be frozen. To reheat take straight from the freezer and place on a baking sheet. Bake in a preheated 325 degree oven and bake for about 20 minutes, but check after 15 minutes.
Corn and Bean Wraps


If you are looking for a different filling for your wraps, you should try this recipe. The filling is a combination of cabbage, corn, beans, green onions and Cajun seasoning. The veggies are all mixed together and served warm, wrapped in a tortilla.
Shredded cabbage is wilted down in oil. I just cut up fresh cabbage, but you could use cole slaw mix, if you like. Once the cabbage is tender, the rest of the ingredients are added. It could not be easier.
This also might be a way to get your family to eat more veggies. We do like to eat things that are rolled up, wrapped up or stuffed.
I used fresh sweet corn, but you can use frozen corn. I freeze local sweet corn every year to enjoy throughout the year.
So here is the recipe. The ingredients may seem humble, but put together, they really are something special.
Corn and Bean Wraps
1 lb. shredded cabbage or cole slaw mix
oil
1 c. corn, fresh or frozen
1 c. sliced green onions
1 T. Creole seasoning
1 (15 oz.) can beans, drained – I like black beans or kidney beans
1/3 c. mayonnaise
6 (8 inch) flour tortillas
Sauté cabbage, covered, in oil until wilted. Add remaining ingredients (except mayo) and cook until heated through. Remove from heat and stir in mayo. Spoon mixture down center of tortillas and roll up. Serves 6.
Blueberry Kolachy

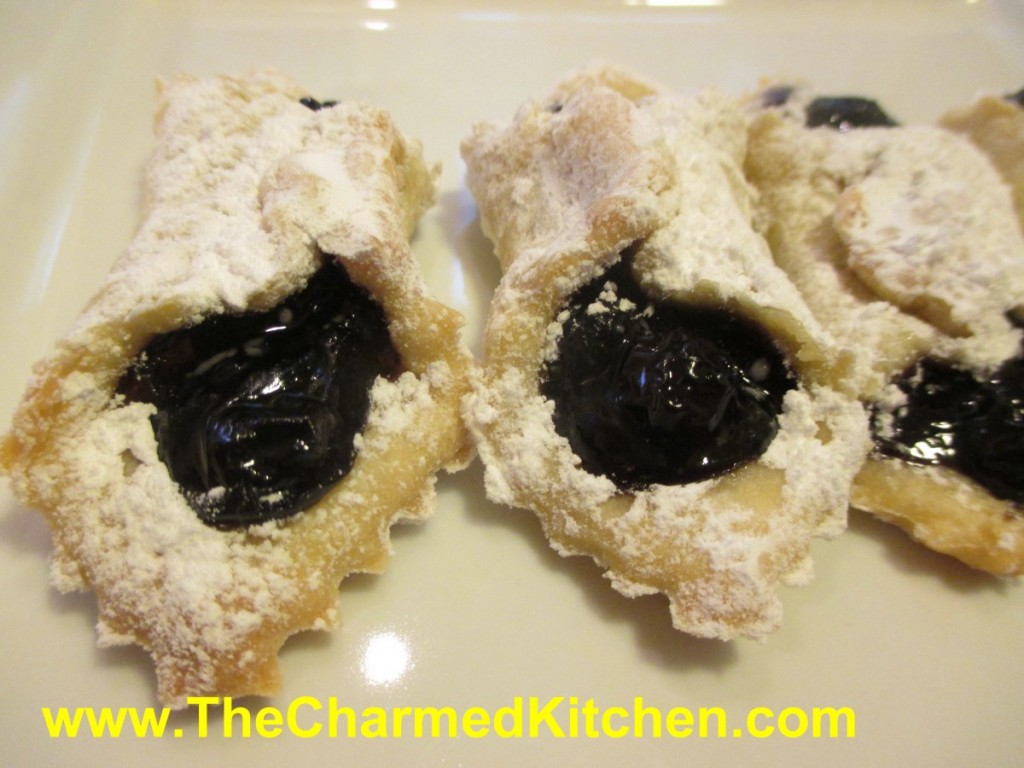
I have fond memories of making these delicate cookies with my Mother. I think of her every time I make them.
I made my own blueberry pie filling, but you could use store-bought, if you prefer. Finish off the cookies with a light dusting of powdered sugar, if you like.
One problem people sometimes have, when making kolachy, is having them open when baking. When you fold the dough over the filling, give it a good pinch. Then fold it over and pinch it again. Also, don’t leave too much flour on the dough. It will prevent the dough from sticking to itself and will cause it to pop open. Some people like to moisten the dough a little, before sealing. That works, too. I just find the double pinch method works fine for me. Important to know- even the ones that pop open will taste amazing!! We were is a very warm kitchen and the cookie dough was on the sticky side. Very few opened up while baking.
Blueberry Kolachy
Dough
3 sticks butter
8 oz. cream cheese, softened
3 cups flour
Blueberry Filling– recipe follows
Powdered sugar, optional
Mix dough ingredients together and chill well before using.
Roll out chilled dough into squares or circles. Spoon a little blueberry filling into the center and pinch 2 ends or corners together. Bake in 350-degree oven for about 12 minutes, or until golden on edges. Cool and dust with powdered sugar. Makes 4-5 dozen.
Blueberry Pie Filling
3 1/2 c. blueberries
3/4 c. sugar, or to taste
1/4 c. cornstarch
1 c. water
1 T. lemon juice
In saucepan, bring blueberries and sugar to a boil, stirring often. Combine cornstarch with water and lemon juice and add to the blueberry mixture. Return to the boil and cook until thickened and bubbly. Makes 4 cups. You might not need the whole batch for the cookies.
Zucchini Bread Pudding

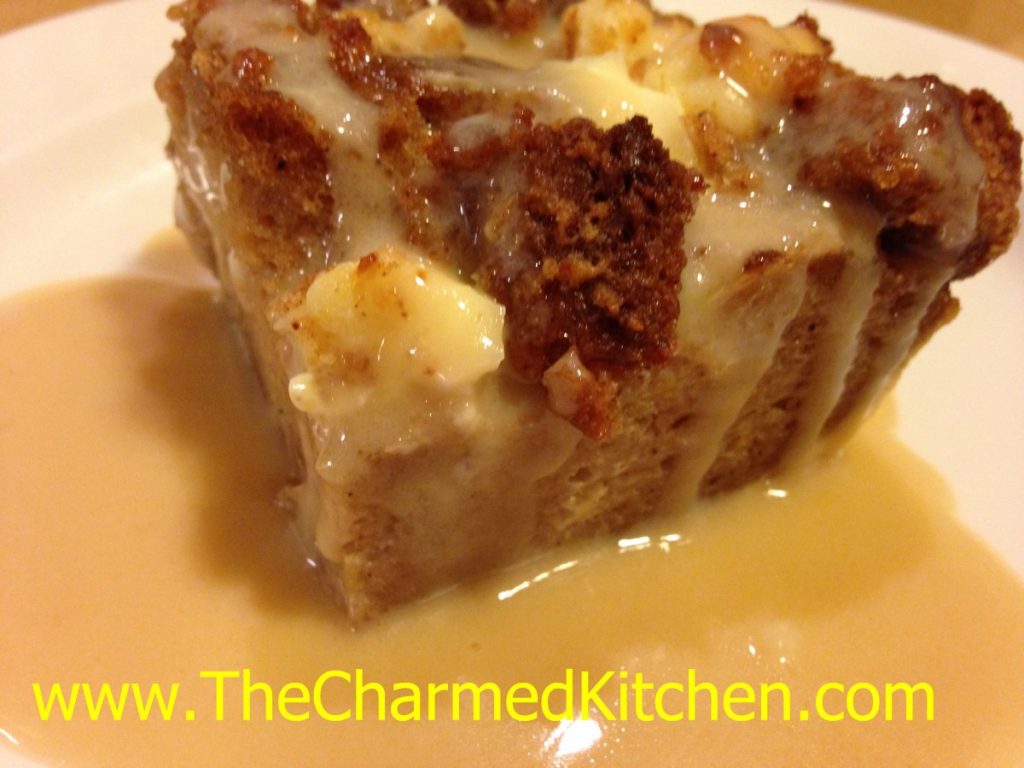
I had some extra zucchini bread and wanted to do something different with it. I ended up making this zucchini bread pudding. It came out even better than I thought it would. Rich, not too sweet. A simple, classic dessert.
I felt it needed some sort of topping or sauce. I made a vanilla caramel sauce to dress it up a little. It worked great. Ice cream or whipped cream would have worked, too.
I guess I should really call it a zucchini bread bread pudding. After all, it is bread pudding made from zucchini bread. My spell check hates it when I type the same word twice, so zucchini bread pudding it is.
I know this would also work with other quick breads, like pumpkin or banana bread.
So here is the recipe- for the bread pudding, the zucchini bread and the caramel sauce.
Zucchini Bread Pudding
6-8 cups cubed zucchini bread- recipe follows
8 oz. cream cheese- cubed
2 c. half and half
3 eggs
1 T. vanilla
1 t. cinnamon
Vanilla Caramel sauce- recipe follows
Butter a 2-quart casserole. Preheat oven to 350 degrees. Place half the cubed zucchini bread in the prepared pan. Add half the cubed cream cheese, scattering over the bread. Repeat with remaining bread and cheese. In bowl, combine the remaining ingredients, beating until well mixed. Pour over the zucchini bread mixture. Place casserole in oven and bake for 30 minutes, or until bread pudding is set. Allow bread pudding to cool a little before serving. Serve with the vanilla caramel sauce or top with ice cream or whipped cream. Serves 8.
While often served warm, this bread pudding is tasty served chilled, too. Heck, I just had some for breakfast.
Zucchini Bread
3 c. flour
3 eggs
2 c. sugar
2 c. shredded zucchini
1 c. oil
1 c. chopped nuts or raisins
½ c. sour cream or strained yogurt
1 t. each vanilla, cinnamon, baking powder, salt and baking soda
Preheat oven to 350 degrees and grease 2 (9×5 inch) loaf pans. Set aside. Place flour in large bowl. Beat eggs and add with remaining ingredients to flour, mixing well and scraping bowl. Pour batter into prepared pans and bake 1 hour and 20 minutes, or until browned and toothpick in center emerges clean. Cool in pans on wire rack. Freezes well. Makes 2.
Vanilla Caramel Sauce
1 c. sugar
¼ c. water
4 T. butter
2 t. vanilla
¼ c. half and half
Pinch of salt
Combine sugar and water in a small saucepan. Bring to a boil and cook for about 3 minutes. Remove from the heat and add the remaining ingredients. Stir until smooth.
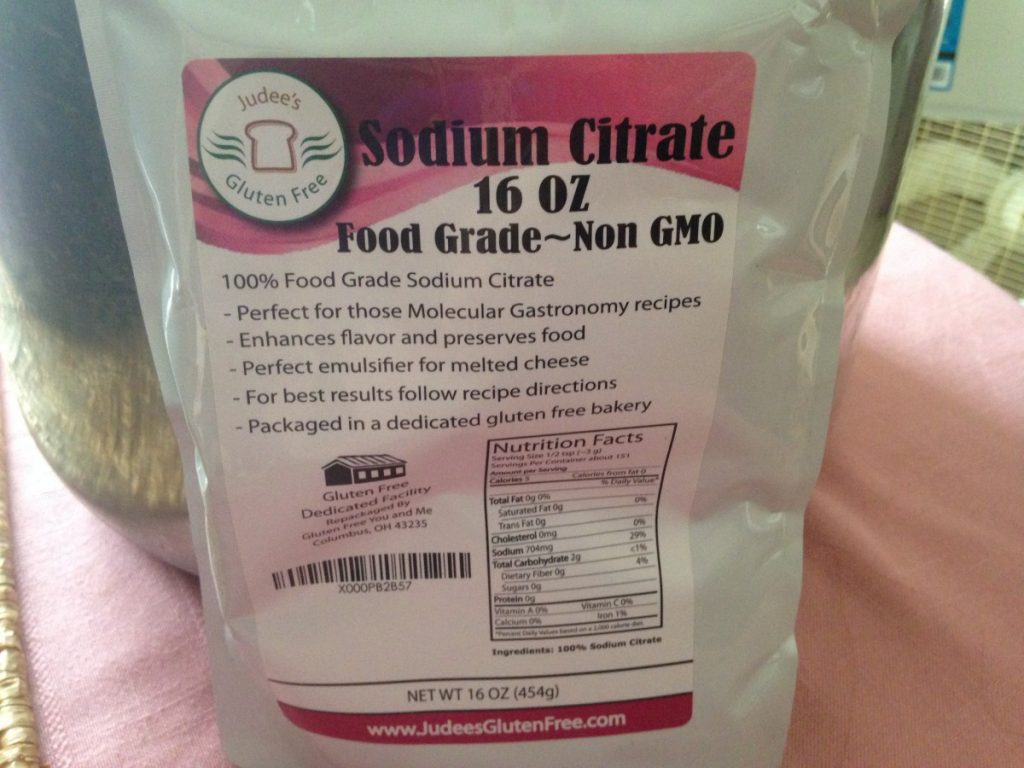
The Science of Creamy Mac and Cheese

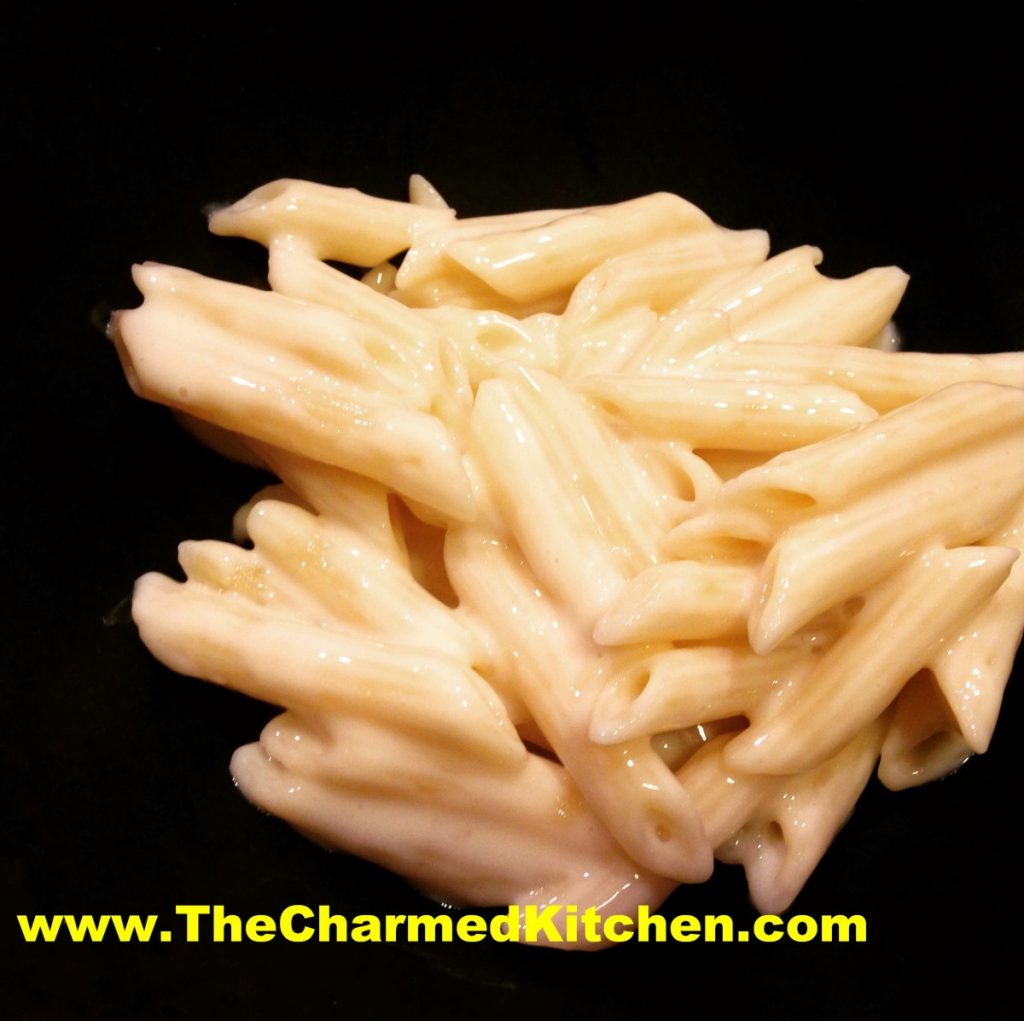
I knew about sodium citrate and its effects on cheese sauces. It took me a while to try it myself. The end result was the creamiest cheese sauce ever. Now I use it all the time when I want a really creamy cheese sauce.
We made two versions of mac and cheese in cooking camp with kids. We made the traditional roux-based recipe and the less traditional sodium citrate version. The kids preferred the sodium citrate version by far. We used a milk cheddar in class. Both versions tasted fine, but the textures were different.
Sodium citrate is the natural salt of citric acid. It has a sour taste, and is used as a preservative and food additive. It is also used in sour candies.
For a lot of us, making a cheese sauce involves making a classic white sauce, or béchamel. Flour and butter are combined in a saucepan, then heated together until the butter melts and the mixture is smooth. Then you add milk, cream or half and half. Once the mixture thickens, you add the cheese and end up with a cheese sauce. Wonderful and classic, but some cheeses don’t melt that well. You end up with a tasty, but somewhat un-creamy end product.
There is a way to make the creamiest cheese sauce ever and it involves a little science. When you make a cheese sauce, the cheese will melt, but sometimes has a grainy texture. That is because of the way the proteins bond with calcium in the cheese. When you combine warmed liquid with a little sodium citrate, then add the cheese, the sodium substitutes for some of the calcium and the cheese breaks down better. The end result is a really creamy sauce.
The liquid you use can be water or milk. I like half and half. I found several recipes on line. I played around, and ended up with the recipe below. Some directions said you have to use an immersion blender to get a creamy result. I did that the first time and the sauce was very creamy. I used a whisk the next time. I found whisking worked just fine.
You want to be sure to use food grade sodium citrate.
Super Creamy Mac and Cheese
12 oz. dry pasta
2 T. butter
1¼ c. half and half – you can also use water, milk, broth
2½ t. sodium citrate
12 oz. finely shredded cheese- I used Gouda, but cheddar, Muenster or any cheese that melts well, will work
Salt and pepper to taste
Cook pasta according to package directions. Drain, place in bowl and toss with the butter. Set aside. Heat half and half in a saucepan, over medium heat. Stir in the sodium citrate and bring to a simmer. Add the cheese slowly, about ¼ cup at a time, whisking well until melted before adding more. Sauce will become thick and creamy. Once all the cheese has been added, stir in the prepared pasta, adjust seasonings and serve. If you like, you can place mac and cheese in a casserole, top with buttered bread crumbs and bake until bread crumbs are toasted, about 20 minutes at 350 degrees. Serves 4.
Cherry Pie “Blintzes”


I think these blintzes are one of my favorites. They make a great dessert. We just dusted them with powdered sugar, but you can also top them with ice cream or whipped cream. They remind me a warm cherry pie. Blintzes also make a great breakfast or brunch dish.
They are easy to make, too. We made these in cooking camp this week and the kids loved them.
These are not traditional blintzes. The secret is that the blintzes are made with flour tortillas instead of traditional crepes. I love the texture flour tortillas take on when softened in milk. They really work well, and with a fraction of the work of making crepes. We used canned pie filling in camp, but since cherries are in season, I have included a recipe for making your own.
So here is the recipe. I think you will love them as much as I do.
Cherry Pie Blintzes
Cherry Pie Filling
4 c. pitted sweet cherries- sour cherries can also be used
1½ c. water
½ c. sugar- use a little more if using tart cherries
Pinch of salt
¼ c. cornstarch
Place cherries in a saucepan with 1 cup of the water, sugar and the salt. Bring to a simmer. Mix cornstarch with the ½ cup of water and add to the cherry mixture, cooking until just thickened. Cool. Makes about 4 cups.
Blintzes
8-10 Flour tortillas
½ c. Milk
Cherry Pie Filling
4 T. Butter
Powdered sugar
Make the pie filling ahead of time, so it is cooled down. Place the tortillas in a shallow pan and pour milk over them. Turn them to make sure they all get covered in the milk. Let the tortillas soften for 5-10 minutes. Place a tortilla on a flat surface and spoon about ½ cup of the pie filling in the middle. Fold sides in until they almost touch in the middle. Roll up from the bottom to form a little bundle. Repeat with remaining tortillas and filling. Heat butter in saucepan over medium heat and brown the blintzes, turning over as needed to brown on both sides. Start them off seam side down, to keep them from popping open. Place on serving dish and dust with powdered sugar. Serve warm. Makes 8-10.

Browning in the skillet
Peach Liqueur


I like to think of making fruit liqueurs as just one more type of food preservation. I make jams and jelly with seasonal fruit, so why not preserve some of summer’s bounty in alcohol?
Peach liqueur is one of my favorites. Pretty simple, really. Just combine peaches with vodka (or brandy) and allow the mixture to steep. After a week or two, strain it. After straining out the fruit, I also filter the liqueur through either coffee filters or cheesecloth to get it nice and clear.
Sweetening is optional. Unsweetened, it is called a Peach Eau de vie, which translates into water of life. Got to love the French!!! Sweetened, it is a liqueur.
Poured into pretty bottles, these liqueurs can make fun gifts, too.
Peach Liqueur
10 medium sized, ripe peaches
3 c. vodka or brandy
1 c. sugar syrup – optional – recipe follows*
Peel and pit peaches reserving only the fruit. You can leave the skins on, if you prefer. Place in jar with the alcohol and steep at least a week, shaking several times. You can leave the fruit in for up to two weeks. Strain, squeezing out as much juice from the fruit as possible. Filter through cheesecloth, fine mesh strainer or coffee filters for a clearer product. Add sugar syrup, if desired, and mature 4-6 weeks. Makes 4 cups.
*Sweetening– Simple syrup is made from 1 cup of sugar and ½ cup of water. Bring to a boil, then cool. You will have 1 cup of syrup. Some recipes call for plain sugar and others for honey. Watch when you substitute honey for sugar, as it is sweeter and stronger flavored.
Peach Streusel Muffins

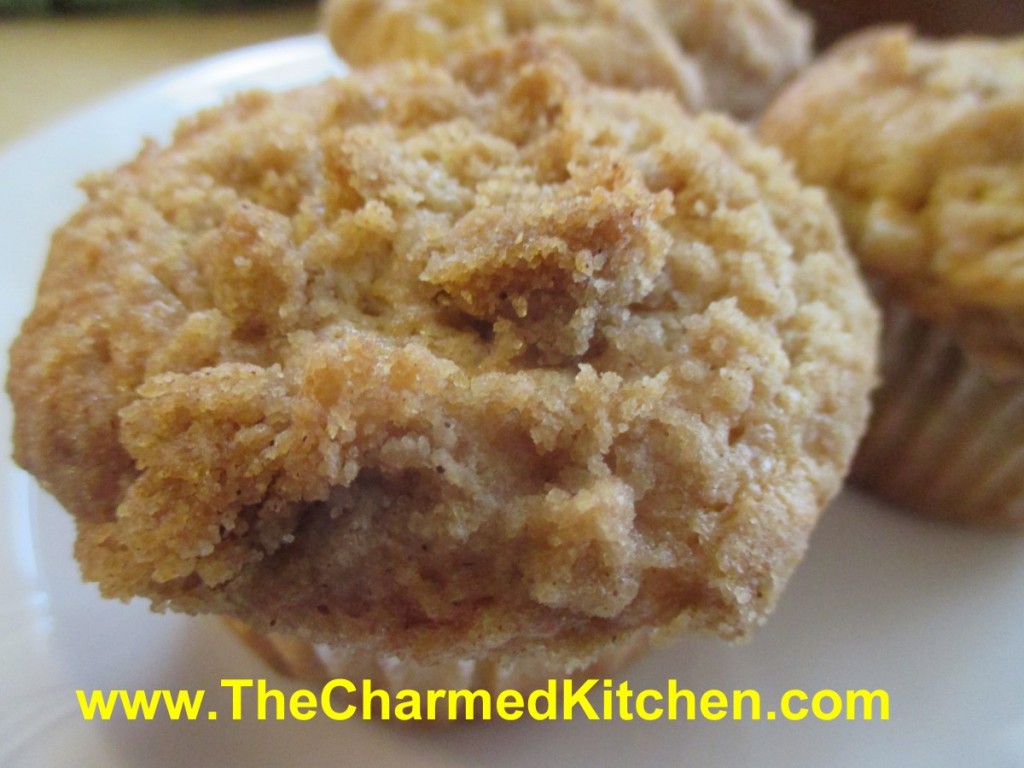
I can’t get enough of peaches these days. I have been eating them fresh, making preserves, freezing peaches and cooking with them. This recipe is one of my favorites.
I hadn’t made them in a long time, so I decided today was the day. Now I remember why I liked them so much. Perfect crumbly texture, not too sweet, and that streusel topping.
They can be for more than breakfast, too. Split, topped with sweetened fruit and ice cream, these muffins make a great “shortcake” dessert.
While they are really great warm from the oven, these muffins are still fine the next day, or even the day after that, assuming they last that long. They freeze, well, too.
Peach Streusel Muffins
Streusel topping:
1/3 c. flour
1/3 c. brown sugar
½ t. nutmeg
4 T. cold butter
Batter:
2 c. flour
½ c. sugar
¼ c. brown sugar
1 T. baking powder
1 t. cinnamon
½ t. nutmeg
½ t. salt
½ c. cold butter- 1 stick
2 eggs
¾ c. half and half or buttermilk
1 t. vanilla
1 c. finely chopped fresh peaches, about 1 large
½ c. finely chopped pecans, optional
Heat oven to 375. Line 15 muffin tins with paper liners or grease them. Set aside. Make streusel by mixing together flour, sugar and nutmeg in a small bowl. Use your fingers, or a pastry blender, to cut the butter into the flour mixture until it resembles coarse crumbs. Set aside. Make batter: In medium bowl combine flour with sugars and other dry ingredients. Mix well. Cut in butter until mixture resembles coarse crumbs. In small bowl beat eggs and add half and half and vanilla. Stir into flour mixture and fold in until just mixed. Mixture will look lumpy. Fold in peaches and nuts, if using. Scoop batter into prepared tins, filling about ¾ full. I get more than 12 from this recipe- normally about15, but it depends on how full you fill them. Sprinkle the tops with streusel. Place muffin tins on a baking sheet and bake for 20 or until golden brown. Cool a little before serving, if you can wait.
Homemade Cherry Liqueur


I make a lot of homemade liqueurs, but cherry is one of my favorites. I enjoy just sipping it, or adding it to other cocktails or mixing it with soda water.
It is easy, and the reward is having this lovely liqueur to enjoy even when cherries aren’t in season. I added a couple of vanilla beans to mine, but you can leave them out, if you prefer. You could also add 1-2 tablespoons of vanilla extract.
If you like a less sweet liqueur, you can add less sugar. You could use sour cherries instead.
Cherry Liqueur
2 c. granulated sugar
4 c. vodka or brandy
1 lb. large, washed, stemmed and pitted sweet cherries
2 (6-7 inch) vanilla beans, broken into several pieces, optional
Place sugar and vodka or brandy in a large jar- I used a half gallon canning jar. Stir until sugar is mostly dissolved. Add cherries and vanilla and cover jar. Do not stir. Place in a cool, dark place for 3 months, without stirring or shaking. Strain and filter. Divine! Makes 4-6 cups.
Fresh Peach Salsa

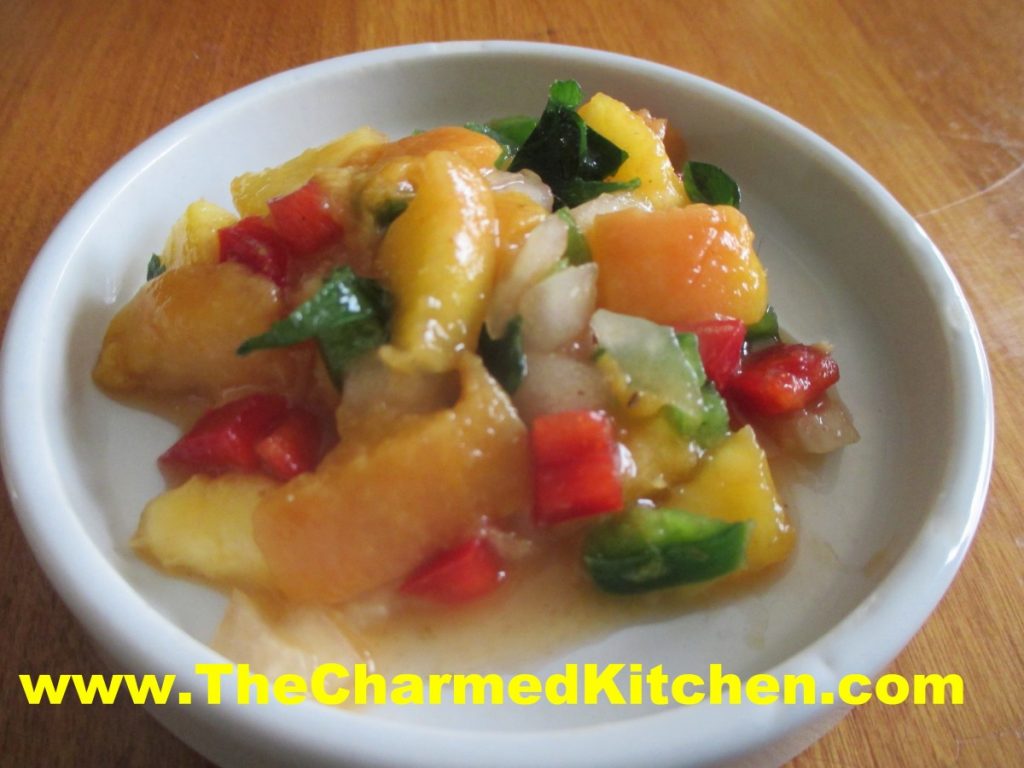
This salsa makes a great topper for grilled meats or fish. It is also fun to serve with chips. While salsa may traditionally be made with tomatoes, there are other options. The peaches give the salsa a great natural sweetness. It is so colorful.
I used really ripe peaches, which are tough to peel. To help peel them, I placed the peaches in boiling water for a minute. Then I put them in cold water. Once they were cool enough to handle, they peeled easily.
I used 5 peaches and ended up with almost 2 cups of prepared fruit. You might need more or less, depending on the size of the fruit.
You can make the salsa as spicy as you like. I added a jalapeno pepper and some hot sauce. I tasted the salsa 30 minutes after I made it and added a little more hot sauce.
Fresh Peach Salsa
4-5 ripe peaches, peeled, pitted and diced
½ c. minced sweet onion
½ c. minced sweet pepper
1 jalapeno, seeded and minced
2-3 T. chopped fresh cilantro
1t. hot sauce, or to taste
zest and juice from 1 lemon, you could use a lime instead
salt and pepper to taste, don’t be afraid to give this dish a good bit of salt
Combine all ingredients in a bowl and stir until mixed. Check seasonings. Chill for at least 30 minutes and taste again- you will likely add more seasoning. Serve over grilled meats or with chips.


