Blueberry Chef Salad

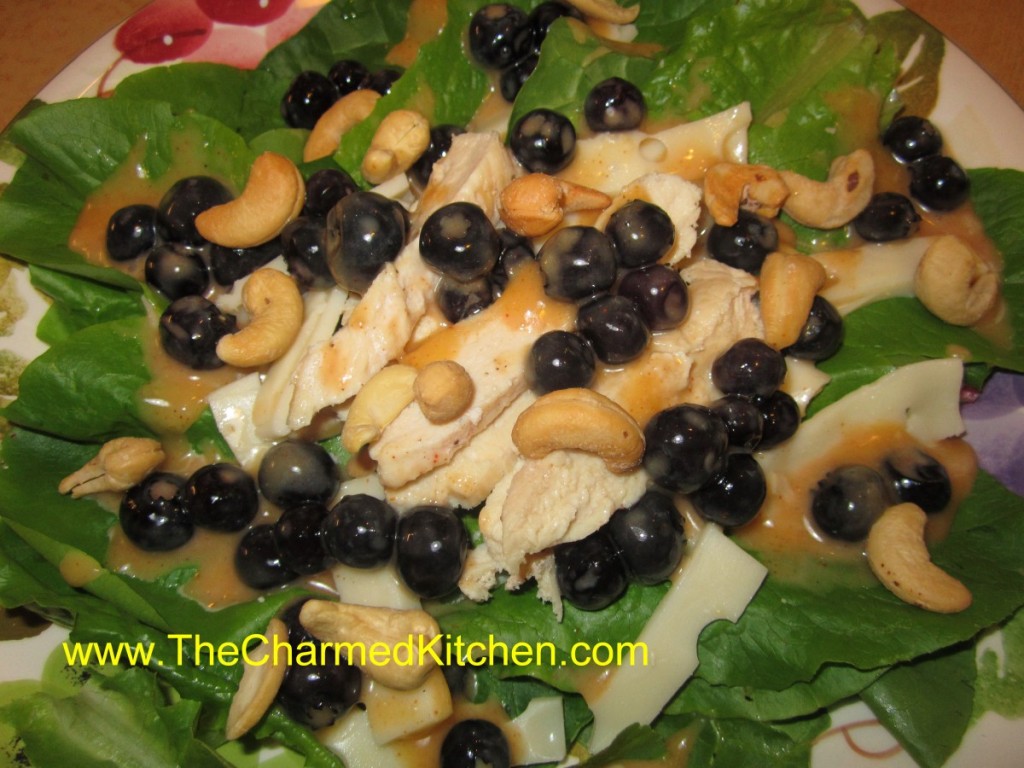
This is one of those salads that is good any time of the year. A local produce market had the most beautiful blueberries this week. I decided to enjoy some of them in this salad.
The dressing is a honey French type dressing. It really makes the whole salad work. You can add the berries to the dressing, or serve them on top of the salad. I topped it with cashews, but you could add croutons, if you prefer.
Blueberry Chef Salad
Dressing:
1/3 c. honey
1/4 c. white wine vinegar or cider vinegar
1 t. paprika
1 t. dry mustard
1/4 t. salt
1/2 c. olive oil
3 cups blueberries
Salad:
6 c. torn salad greens
12 oz. cooked chicken, turkey, ham etc, cut into strips
1 c. cubed cheese
1/2 c. cashews
In blender, combine first five ingredients and start running machine on high. Add oil in a slow stream until mixture becomes thickened. Pour into bowl and stir in berries and chill, several hours if you can. When ready to serve, arrange greens on one large platter or on smaller salad plates. Arrange meat and cheese on platter or plates. Spoon over the dressing and cashews then serve. Serves 4-6.
Crawfish Boil

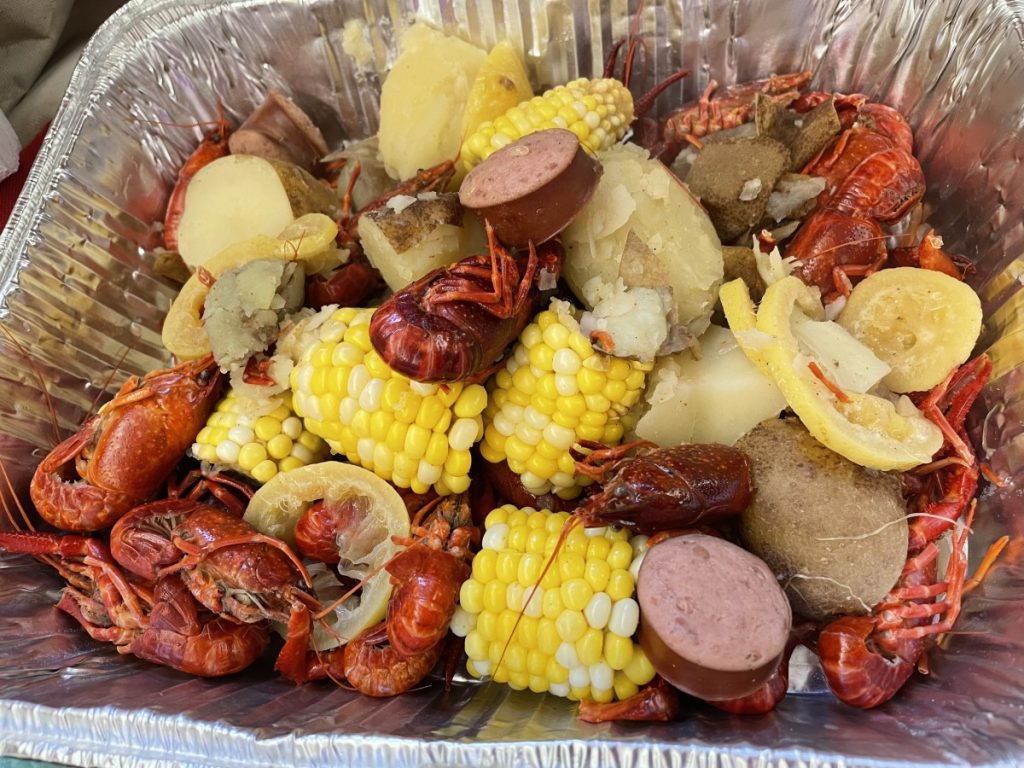
In a recent class on the Foods of New Orleans, we did a crawfish boil. It was a lot of fun. The boil was pretty easy to put together. Water is seasoned in a big pot, then brought to a boil. Corn, potatoes, sausage and garlic are added and simmered until the potatoes are tender then the crawfish are added.
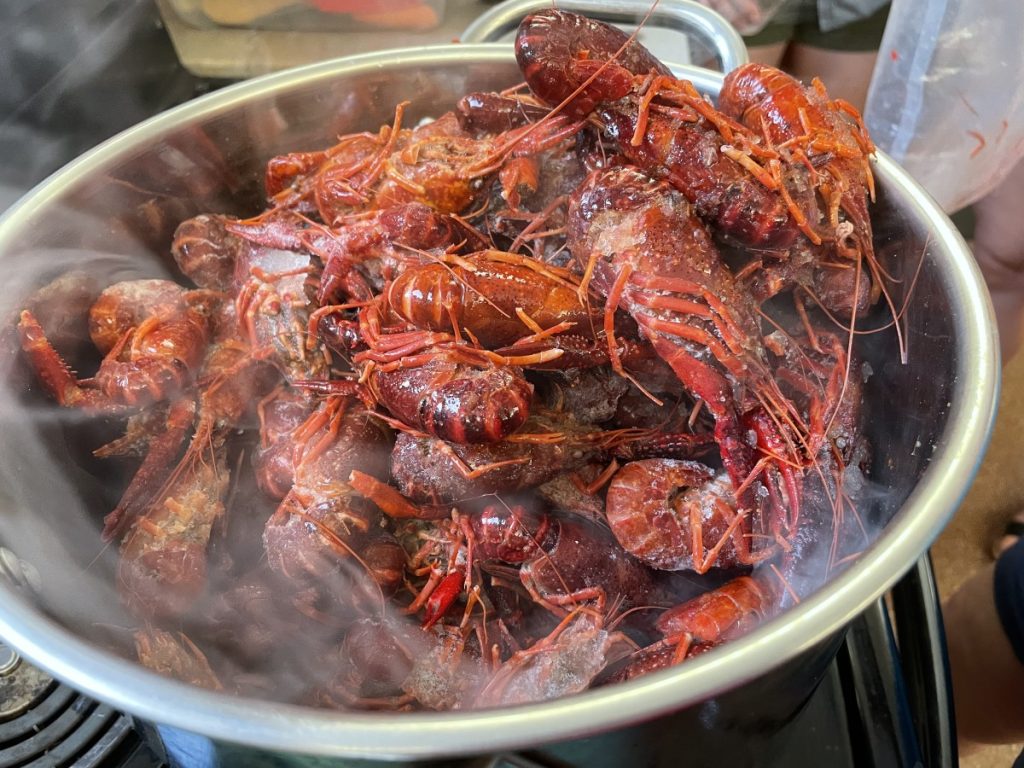
Getting fresh crawfish wasn’t really an option, so I opted to buy a bag of frozen crawfish. Cooking and prep times are a little different when using frozen. I explain in the recipe below. The dish is messy and communal and fun to eat.
Of course, you can play around with adding other seafood and other ingredients as well.
Crawfish Boil
3 lbs. crawfish fresh or frozen
8 -10 cups water or seafood stock – if using water, you will need to add salt
2 tablespoons Cajun seasoning or more to taste
1 tablespoon Lemon Pepper seasoning
1 head garlic, unpeeled but separated
3 ears corn, cut into 2-inch pieces
12 oz. potatoes, halved
14 oz. (400 g) smoked sausage, cut into chunky pieces
1 lemon, sliced into rounds
Fill a large pot with water. Bring the water to a boil. Add the seasonings. Bring to a rolling boil. Add the garlic, corn, potatoes, sausage and lemon slices. Cover the pot with its lid and cook for 10 minutes. Taste the crawfish boil water. If it’s too salty, add more water. If it’s too bland, add more seasonings to taste. Transfer the crawfish into the pot and cook for 3-4 minutes, with the lid covered. Turn off the heat and let the crawfish soak for 10 minutes. The longer the crawfish soaks, the spicier they will be. Remove all the ingredients using a strainer and serve immediately.
Note: When using frozen crawfish, you are really just thawing them out and warming them up. Add to the pot, cover and turn off the heat. Let soak about 10 minutes to pick up some of the flavor from the water, but don’t cook them.
Breakfast with Dad

One of my favorite memories of my Dad, involved a very special breakfast. It was a breakfast only he and I shared.
Every summer, there was a park we would go to for family picnics. It was called Pine Way Trails. It has long ago been sold and the land developed.
The place would get very crowded, so we had to go early to get a prime location by the lake, and enough picnic tables for everyone. My Dad and I would go before anyone else.
Back then, it made me feel so special to go and to help. I am guessing it was because I was the baby, and no one else wanted to get up so early.
Dad and I would get there just as Pine Way Trails opened. The mist would still be rising off the lake. I’d help him unpack the car and place stuff on the tables we were claiming for the day. We would move them together and make sure they were level. Dad didn’t want wobbly tables.
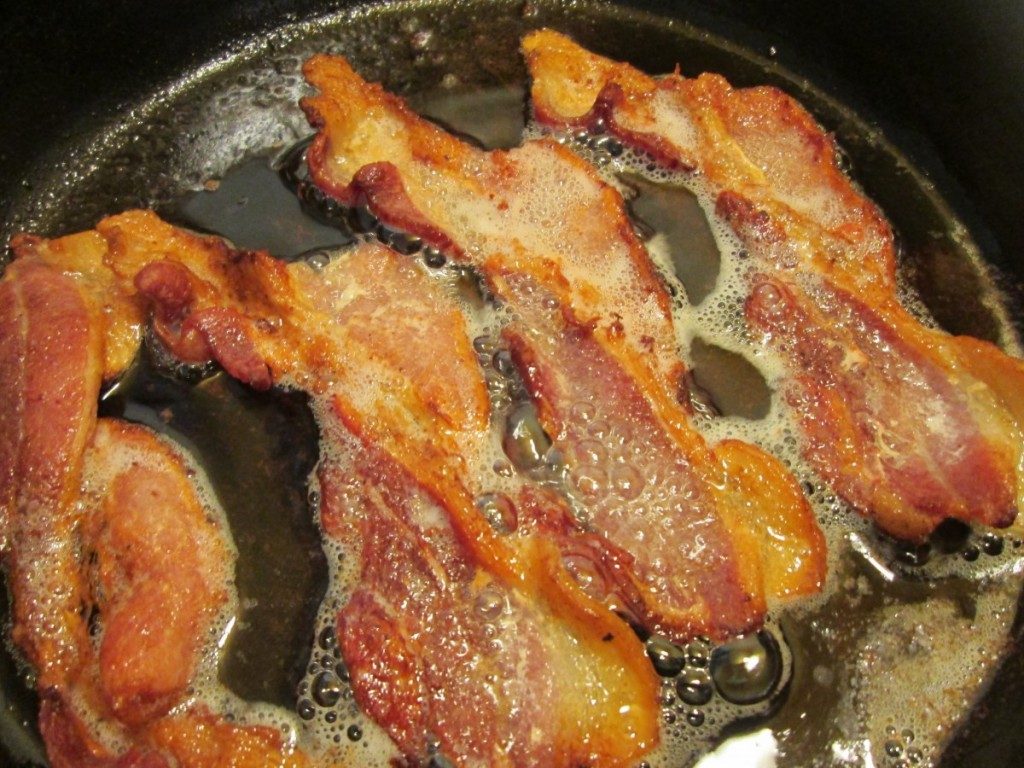
Then, he’d get a fire started in one of the grills. He always brought his cast iron skillet. Over the fire, he’d cook us bacon and then cook a couple of eggs. Dad had his thermos of coffee, and I had orange juice.
On paper plates we’d sit and enjoy our breakfast together. I don’t think, as a kid, I really appreciated the skill it took to get that fire just right. The bacon was crisp, but never burnt and the eggs would be sunny side up- with the yolks warm, yet runny. I’d use my bacon to get the last of the yolk off my plate.
Later in the day, everyone else would arrive. My mom, sister and brother, aunts, uncles, cousins, friends. We’d have a wonderful day together swimming and fishing and eating grilled hot dogs and hamburgers, chicken and salads and fresh melon. It was noisy and so much fun.
That special part of the day for me, was the breakfast my Father and I shared, quietly by the lake.
I got out the cast iron skillet this morning- cooked some bacon and eggs and thought of him.
Whole Wheat Swiss Cheese Bread

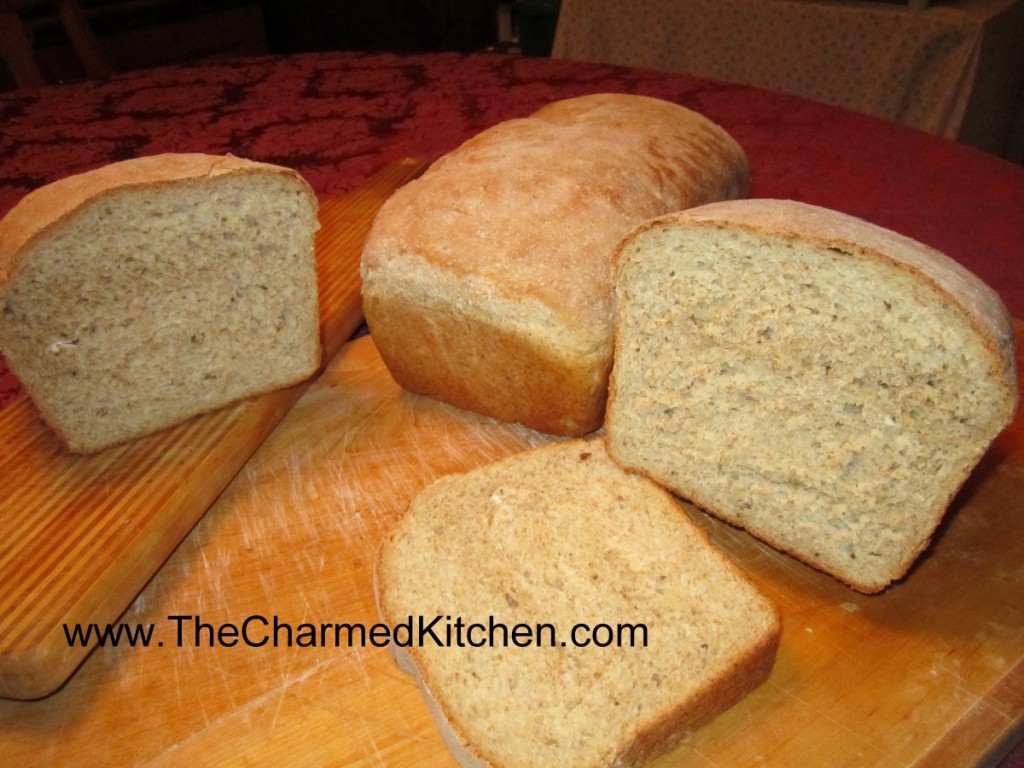
This really is a great bread. The dough has Swiss cheese melted into it- giving you great texture and flavor. It is also a cool- rise recipe. That means the dough is prepared, rested for a bit, shaped and then popped in the fridge to rise. It can be baked several hours later or even the next day. You can prep it in the evening- let it rise in the fridge overnight- and bake it in the morning. Great for when you want homemade bread- but don’t have a long block of time to make it. This was the first bread I ever made on my own. My Dad had been a baker and I think of him when I make it.
Whole Wheat Swiss Cheese Bread
3 c. flour
2 ½ -3 c. whole wheat flour
2 packages active dry yeast
2 T. sugar
2 t. salt
1 c. each milk and water
4 oz. diced Swiss cheese
3 T. butter
Oil
Combine 2 cups of the flour with the yeast, sugar and salt in a mixing bowl. Heat together water and milk with cheese and butter until warm, cheese does not have to melt. Add to flour mixture and beat 3 minutes. Stir in remaining white flour and beat 2 minutes. Stir in enough whole wheat flour to make a soft dough. Knead on floured surface until smooth and elastic. Cover with bowl and let rest 20 minutes. Divide dough in half and shape into loaves by rolling out and then rolling into a loaf and sealing seams. Place in greased 8×4 inch loaf pans and brush with oil. Cover with plastic wrap and place in fridge. Chill 2 –24 hours. Remove from fridge and remove plastic wrap allowing to stand while oven preheats. Bake at 375 for 35-40 minutes. Remove from pans and brush with butter. Cool. Makes 2 loaves.
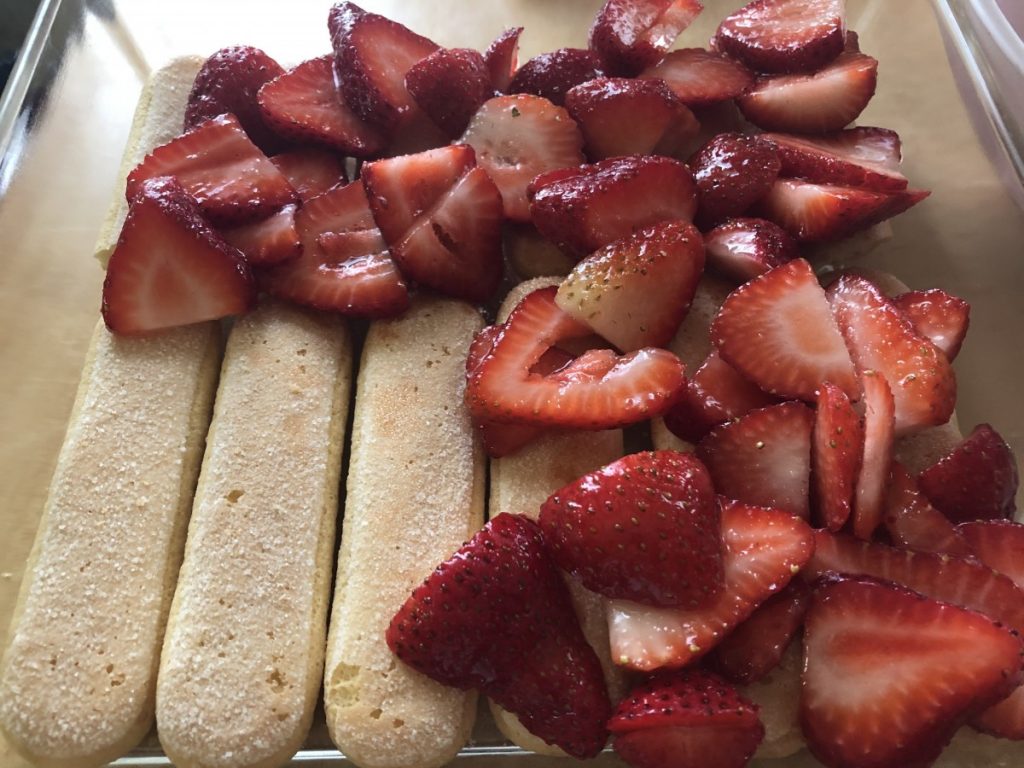
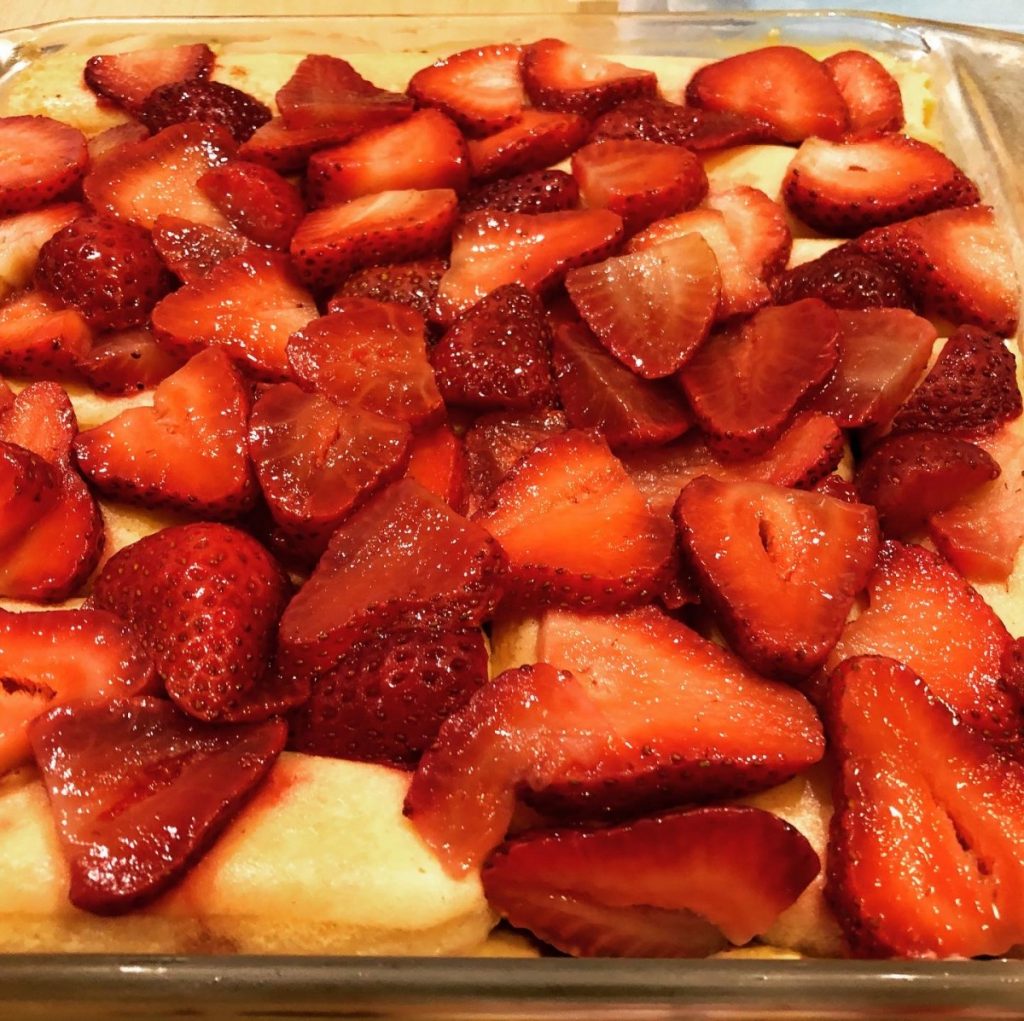
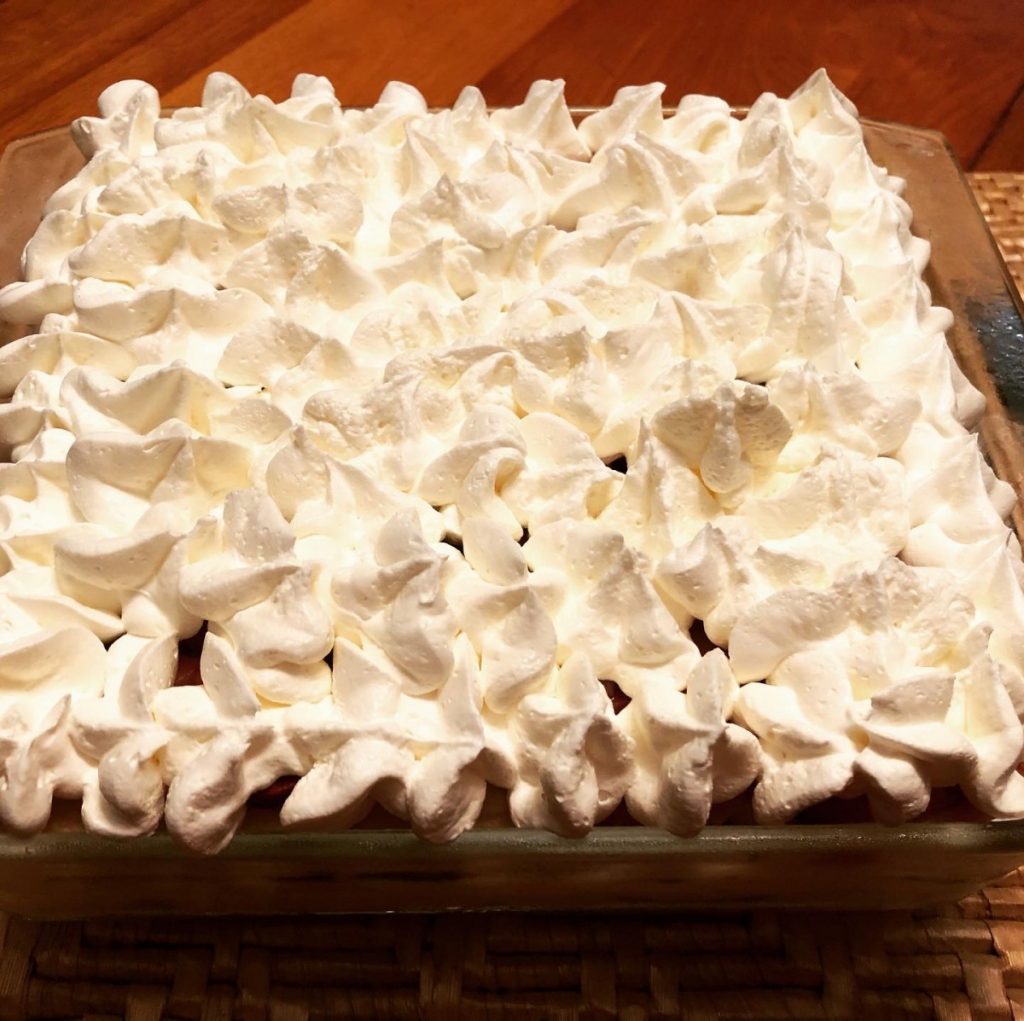
Strawberry Shortcake Trifle


I am not sure why I never combined ladyfingers with strawberries before. Using them together in this dish made a wonderful dessert- that was also very easy. I could see topping it with a few blueberries for the 4th of July.
I want to just say something about ladyfingers. There are two types I see in stores around here, soft or crisp. The soft ones are smaller and cake-like and found in bakeries in grocery stores. Like sponge cake. The other ladyfingers are crisp and larger. I find the crispy type at Italian stores and sometimes at specialty grocery stores. The ladyfingers you want for this recipe are the larger, crisp ladyfingers.
I was happy with how it came out. The ladyfingers were soft, not mushy. They actually were kind of fluffy. The flavors blended so nicely. Great summer dessert. Light and refreshing, but kind of rich, too. I made vanilla pudding, but make life easier and just use store bought- if you prefer.
Here is the recipe. Enjoy!!
Strawberry Shortcake Trifle
1½ – 2 pounds strawberries, washed, stemmed and sliced
½ c. sugar
24 ladyfingers
1 recipe vanilla pudding- recipe follows
¾ c. Hazelnut chocolate spread
Whipped cream or whipped topping
Combine strawberries with the sugar and set aside. Make the pudding, if you haven’t already. You can use premade pudding. You’ll need 2-3 cups of pudding. I had some leftover from the recipe I made. In a 9×9-inch baking dish, place one layer of the cookies. You might have to trim them a little to fit. I had 2 rows of 6 cookies, but I had to break off a little for the second row to fit. Spoon over half of the strawberries, with some of the liquid in the bowl. Spread a layer of pudding over the berries. For the next layer, spread some of the hazelnut spread over each lady finger before putting it in the pan. When you put them in the pan, place them with the spread on the under side. Add another layer of the pudding, then top with the rest of the strawberries. Cover and place in fridge until ready to serve. You can do all this up to 2 days ahead. Before serving, remove cover and top with whipped cream or any whipped topping you like. Serves 6-8.
Vanilla Pudding
1 c. sugar
½ c. cornstarch
½ t. salt
3 ¾ c. half and half
1 T. vanilla- or a little more
2 T. butter
Combine dry ingredients in a medium saucepan. Whisk in half and half and vanilla until well mixed. Heat over medium heat, stirring constantly, until mixture starts to bubble and get thickened. Mixture will get pretty thick. Turn down heat to keep it from scorching. As soon as pudding is thickened, remove from the heat and stir in the butter until melted. Place pudding in a bowl, cover with plastic wrap and chill until ready to use. Makes about 4 cups.
Cooking with Garlic Scapes

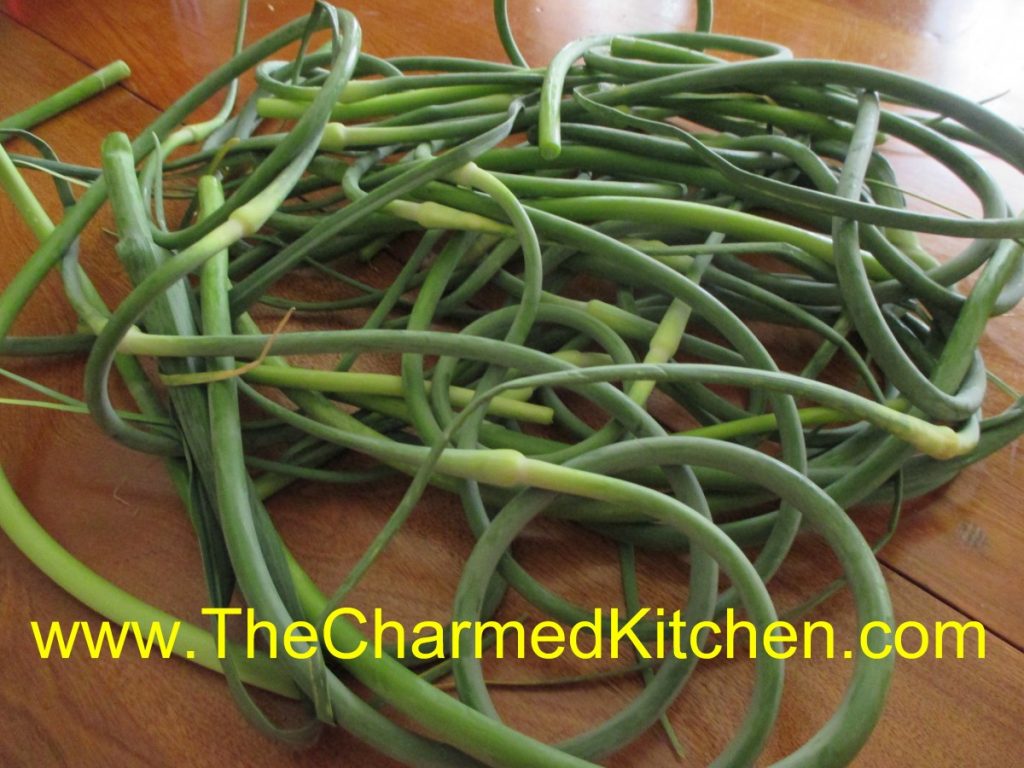
If you have never had garlic scapes, you don’t know what you are missing. Garlic scapes are the green shoots removed from hard-neck varieties of garlic. By removing the shoots, the bulbs will get bigger. So farmers and gardeners remove them. Garlic scapes curl as they grow, so they are easy to identify if you see some at your local farm market. They are showing up at farm markets around here right now.
Garlic scapes are good served raw, or barely cooked. When cooked, the flavor mellows a lot. I love to steam garlic scapes for about 5 minutes, then just eat like fresh green beans, with butter and salt. I steamed a bunch of scapes the other day- then chopped them up and added to potato salad. So tasty!!
They have a rich, garlic flavor that is all the sweeter because of the short time they are around. Enjoy them when you can- they will be gone soon. I sometimes use scapes in place of basil, in my pesto recipe, or combine them with parsley in a garlic scapes-parsley pesto. You can also combine the garlic scapes with cottage cheese in the blender- add a little lemon juice and hot sauce for a tasty dip. Here are some more recipes for cooking with garlic scapes.

Garlic Scapes Potato Salad
4-5 garlic scapes
2 lbs. red skinned potatoes*
½ cup minced sweet pepper
½ c. olive oil
½ c. apple cider vinegar
2 T. sugar
2 T. chopped parsley
2 t. fresh dill weed
Salt and pepper to taste
Hot sauce to taste
Steam the scapes for 5 minutes. Cool a little, and cut into ¾ -inch slices. You should end up with about 1½ of sliced scapes when done. Place in a medium bowl. Cook potatoes until tender. I baked mine in a microwave until tender and then cut into cubes. Baking them is also a nice way to cook the potatoes. You can also opt to cut into cubes first and boil the potatoes. Whatever method to cook the potatoes is fine with me. Take the potatoes, while still warm, and place in the bowl with the scapes. Mix the rest of the ingredients together in a small bowl and stir until sugar dissolves. Pour over warm potato mix, tossing to coat evenly. Adjust seasonings. Chill and serve. Serves 6-8.
* You can really use any potato you like.
Garlic Scapes Pesto Sauce
1 c. chopped scapes – you can also use half scapes, half parsley
1/4 c. olive oil
3-4 cloves garlic
Salt to taste
1/2 c. pine nuts, sunflower seeds, pecans or walnuts
1 c. fresh grated Parmesan cheese
Combine all ingredients, except the cheese, in a blender and mix until smooth. Stir in the cheese and toss over hot, cooked pasta or use as a sauce on meat and poultry. Sauce will keep a few days in the fridge and makes about 1 1/2 cups, enough for 1 lb. of cooked pasta.
Lebanese Garlic Sauce
1/2 c. chopped garlic scapes
1 cup lemon juice
1 teaspoon salt
3 cups olive oil
In the container of a blender, combine the garlic scapes, lemon juice and salt. Blend at medium speed until smooth. Continue blending while pouring olive oil into the blender in a thin stream. The mixture should become thick and white almost like mayo. Store refrigerated in a glass container. Nice on hot pasta, cooked rice or grains or brushed on meats while cooking. It also is a great salad dressing.
Garlic Scapes with Broccoli
1 c. chopped garlic scapes
1 1/2 teaspoons salt
1 bunch broccoli, cut into florets, steamed 5 minutes, cooled
1/3 cup olive oil
1/4 cup red wine vinegar
1 tablespoon Dijon mustard
1/2 cup grated Parmesan cheese, or to taste
Place garlic scapes in a food processor with the salt and blend into a paste. Add olive oil, vinegar, and mustard. Pulse until smooth. Place garlic scapes mixture in a bowl and add the broccoli. Stir to coat. Chill for 3 hours to marinate, stirring occasionally. Sprinkle with Parmesan cheese before serving. Tastes even better the next day!!!
Muffuletta

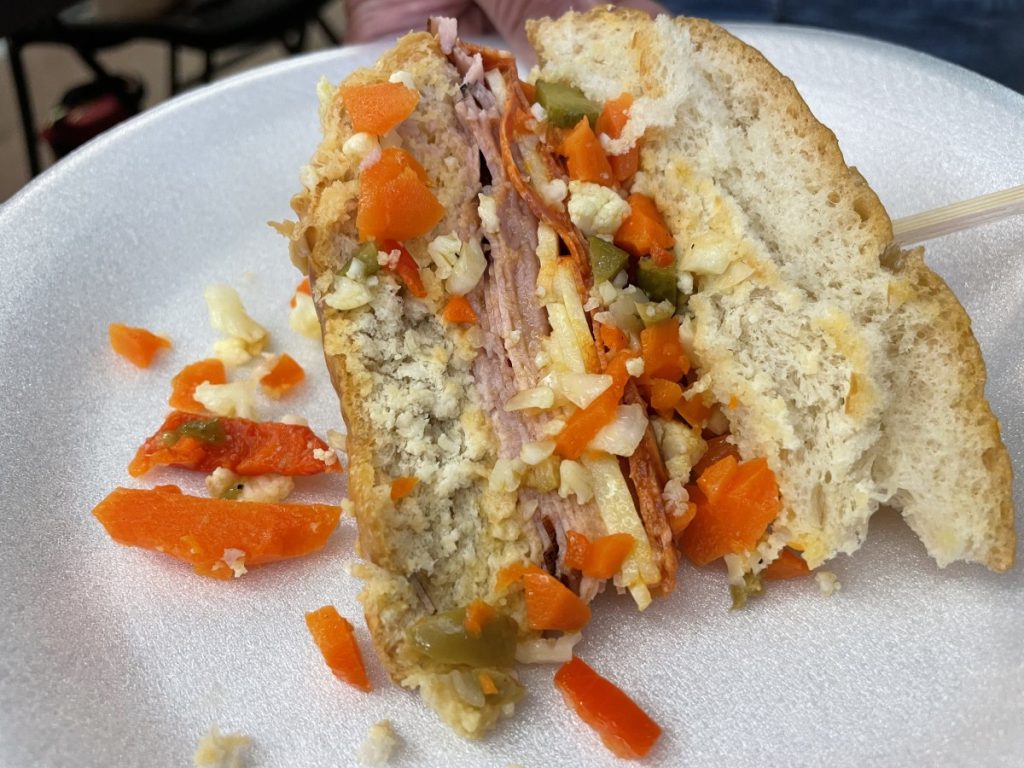
In our class on foods of New Orleans last night we made a Muffuletta. A Muffuletta is a type of large sandwich. It was first invented by Italian immigrants to New Orleans and classically contains olives and assorted meats and cheese. It also can contain pickled veggies. They are fun to make and fun to eat. A great take along for picnics and a nice meal when it is too hot to cook. It can be made a day ahead, wrapped up and kept chilled until you are ready to cut into wedges to serve.
While the recipe calls for a round loaf of Italian bread, unsliced, we used sour dough bread last night, because that was what I found at the store. It was not as classic, but still worked fine. These are great for parties, too.
Muffuletta
16 oz. jar pickled mixed vegetables (1½ cups)
1/4 c. chopped pimento stuffed green olives or ripe olives, drained
1 clove garlic, minced
1 T. olive oil
1 9-inch loaf round Italian bread, unsliced
6 oz. thin sliced ham or turkey ham
4 oz. sliced mild white cheese, like provolone or Monterey Jack
4 oz. thin sliced hard salami
Drain vegetables, reserving two tablespoons of the liquid. Chop them and combine with the olives, garlic and oil. Slice bread in half horizontally. On bottom half layer the ham, cheese and salami. Top with the vegetable mixture and sprinkle with pepper if desired. Cover with the top of the bread and secure with picks. To serve, cut into wedges. Serves 8. Note: Sandwich can be made ahead of time and wrapped tightly in plastic wrap, even a day ahead. Keep chilled.
Bacon Waffles for Dad


If you are looking for a special breakfast for Father’s Day, maybe dad would like some waffles. Even better, make him waffles with bacon inside them. Then serve your bacon waffles with extra bacon on the side!!!
For me, breakfast doesn’t get much better than waffles. Well, unless maybe you add bacon to the waffle batter.
Truth is, I don’t treat myself to waffles all that often, but if I am going to eat waffles, I go all out.
These are truly wonderful waffles. Light, crispy on the outside and studded with bacon. A drizzle of warm maple syrup and you are good to go.
So, if you are looking for a special treat for dad for breakfast, or lunch, or dinner or a snack… try these bacon waffles. You can thank me later.
Bacon Waffles
1 pound sliced bacon
1 3/4 cups all-purpose flour
1 tablespoon sugar
2 teaspoons baking powder
1/2 teaspoon salt
3 eggs, separated
1½ cups milk
¼ cup butter, melted
In a skillet, cook bacon until crisp. Drain; crumble and set aside. In a mixing bowl, combine the flour, sugar, baking powder and salt. Beat egg yolks, milk and butter; stir into dry ingredients until smooth. Beat egg whites until stiff peaks form; fold into batter. Add bacon. Before making each waffle, stir batter. Bake in a preheated waffle iron according to manufacturer’s directions until golden brown.
Peach Ice Cream- Recipe #2

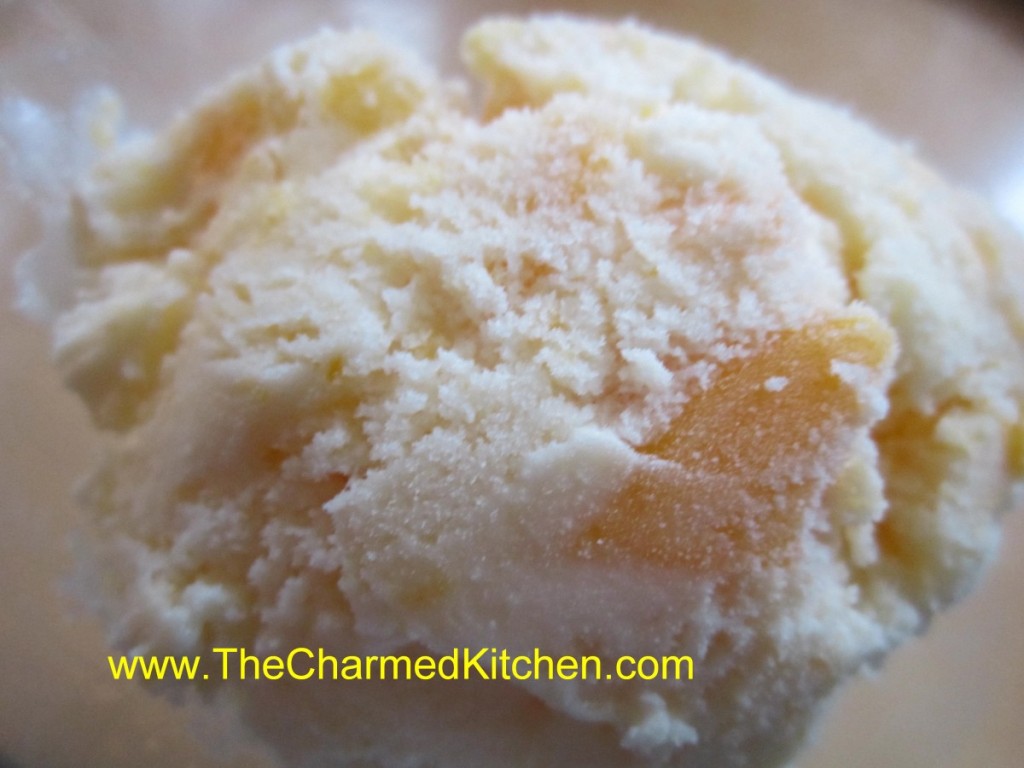
Yesterday I posted my peach ice cream recipe, using a custard ( egg ) base. Today, I thought I would post another recipe for peach ice cream, since I mentioned it in the post. In this recipe, only the peaches are cooked, to soften them up before freezing. The rest of the base is not. This recipe contains no eggs. The texture is lovely, but different from an egg-based ice cream. The color is different, too. I just thought it would be nice to give you a couple of options.
Peaches are one of those fruits that make me think summer. We had a couple of peach trees in the backyard when I was growing up. I remember one year, my dad had to prop up the branches so they wouldn’t break under the weight of all those peaches. Homemade ice cream is all about summer, too. Fruit-studded ice cream seems like the perfect dessert for a warm summer day.
When using peaches in ice cream, you don’t want to just cut up the fruit and drop it in. If you do that, the peaches will form ice crystals and become quite hard, sort of like peachy ice cubes. Nobody want that in their ice cream. Better to cook the peaches first, like I did for the peaches in this recipe. That way, when you put them in the ice cream, they get frozen, but in a softer way. True of other fruits you might add to any ice cream recipe.
Homemade Peach Ice Cream
3-4 ripe peaches
2 c. half and half
1 c. sugar, or to taste
1 T. vanilla
1 T. orange zest
Peel and dice peaches. Cook in a small amount of water and a little sugar until tender. If you don’t precook the peaches they will be icy and hard in the ice cream. Cool and drain. In bowl combine half and half and sugar and stir until sugar is dissolved. Add remaining ingredients and stir well. Place in ice cream machine and process according to manufacturer’s directions. If you don’t have an ice cream maker place mixture in a shallow pan and freeze solid. Remove from freezer and allow to soften a little at room temperature then break up into chunks and place in a mixing bowl. Beat with a mixer until smooth and return to freezer. You can also process in a food processor. Makes 1 quart.
Peach Ice Cream- Custard Style


If there is a favorite summer treat for me- it is ice cream. I love to go to the local ice cream shop for a sundae or cone, and I love to make my own ice cream. When I found myself with a few extra peaches, I knew I wanted to use some of them to make ice cream. Peach ice cream is one of my absolute favorites.
I have made a peach ice cream before. This one is different because I made a custard base for my ice cream this time. A custard base just means that egg yolks, or eggs, are incorporated into the base of the ice cream. The base is heated up, so the eggs get cooked. In the other recipe, there are no eggs.
The custard base gives you a creamier end product. I wouldn’t say you have to make a custard-based ice cream for it to be good. They are just different. The custard base is a bit more work, but still not a difficult recipe at all.
This peach ice cream came out so good. Really creamy. I had perfectly ripe peaches. They were a little small, so I used 5 of them in this batch of ice cream. I used a vegetable peeler to remove the skins. I think that the skins get tough once cooked. Leave them on, if you prefer. I cut them off the pits, being sure to save all the juices, too. Then I just diced the peaches up pretty small.
If I just dumped the raw peaches into the ice cream base and froze it, they would end up as hard peachy cubes. By cooking the peaches first, they stay softer in the ice cream. This is true of any fruit ice cream. Using fruit that had been frozen, then thawed, will also work. I added a little vanilla, too. Not enough to overpower the peaches, but to add another layer of flavor.
So here is the recipe. Enjoy!!
Peach Ice Cream- Custard Style
4-5 peaches- mine were small- I used 5
1½ c. half and half
1 c. heavy whipping cream
3 egg yolks
1 c. sugar or to taste
1 t. vanilla
Peel the peaches. Cut the peaches to remove the pits. Discard pits. Dice up the peaches over a bowl to catch all the juices. In medium saucepan, place the peaches with the peach juice, half and half and cream. Over medium low heat, bring up to a simmer. Stir every few minutes, to prevent scorching. Let the mixture cook a few minutes, to soften the peaches. In a small bowl, beat together the egg yolks, sugar and vanilla. Add ½ cup of the hot cream mixture to the eggs, whisking in well. Add another ½ cup of the cream mixture, whisking again. Add one last ½ cup of the hot cream and again, whisk until smooth. Pour the egg mixture into the saucepan with the cream and while whisking, simmer until mixture starts to thicken and will coat the back of a spoon. This will take about 5 minutes. Don’t use too high a heat, or you will scramble your eggs. Mixture should reach 160 degrees to be sure eggs are cooked. Remove from heat. Pour mixture into a bowl. Allow ice cream base to cool down, then chill in fridge. Chilled mixture can be frozen in an ice cream maker once cold- in a few hours- or even the next day. Once mixture has been frozen in ice cream maker, place in a container and freeze until ready to serve. Makes about 5-6 cups of ice cream. |


