Ingredient Substitutions


Did you ever find yourself in the middle of cooking, only to find you are missing an ingredient? Maybe its a baking ingredient that you don’t use that often, so you don’t keep on hand. That can be so frustrating.
Cake flour is a good example. I don’t have that many recipes that call for cake flour, so I don’t keep it on hand. I don’t need to really. Did you know you can easily make your own cake flour? There are a couple of ways to “make” cake flour when needed.
Cake flour isn’t the only ingredient you can make at home. You might be surprised at some of the substitutes you have around already. There are lots of ways you can make what you need, or find something that will work just as well. Here is a collection of some substitute solutions I have accumulated over time. Helpful for the next time you reach for something only to find you are out of it.
Cake Flour
Rather than keeping cake flour on hand, you can add lib in a pinch. There are 2 ways to substitute.
For each cup of cake flour you can measure 1 cup of regular all purpose flour and then just remove 2 table spoonfuls of the flour.
Some recipes also call to remove the 2 table spoons of regular flour and replace them with 2 tablespoon of cornstarch. I’ve tried both methods in baking and have had fine results either way. It is important that you measure the flour correctly to begin with. Flour should always be spooned into the measuring cup and then leveled off with a knife.
For a larger amount:
7 cups flour
1 c. cornstarch
Sift together and store until ready to use.
Self-Rising Flour
8 c. flour
5 T. Baking powder
2 T. sugar
1 T. salt
Combine all ingredients and store in an airtight container. Keeps for several months.
Cornstarch
To replace 1 tablespoon of cornstarch you could use:
2 tablespoons flour or 1 tablespoon arrowroot or 4 teaspoons quick cooking tapioca or 1 tablespoon potato starch
Light Brown Sugar
Combine 1 cup white sugar with 2 tablespoons of molasses. Note: for dark brown sugar increase molasses to 3 tablespoons.
Sweetened Condensed Milk
1 c. dry non-fat milk
2/3 c. sugar
1/2 c. boiling water
3 T. butter or margarine melted and hot
Combine all ingredients in a blender until smooth. Can be stored in the fridge and used within 3 days. This is the same as 1 14 oz. can.
Baking Powder
To replace 1 teaspoon you could use 1/3 teaspoon baking soda plus 1/2 teaspoon cream of tartar
Pie Crust Mix
5 1/3 c. flour
1 T. salt
2 1/3 c. shortening, butter or lard
Sift together flour and salt, and then cut in shortening to resemble coarse crumbs. Store in an airtight container until ready to use. To use lightly measure 1 1/3 c. mix into a small bowl. Begin adding cold water 1 tablespoon at a time, using about 4-5 table spoons all together. After each addition of water toss mixture with a fork and start to press it together. As soon as dough will hold together without being sticky, wrap in plastic wrap and chill about an hour. This will make 1 crust and an entire batch will make about 6 crusts.
Biscuit Mix (like Bisquick or Jiffy Mix)
8 c. flour
1 c. powdered milk
1 c. powdered buttermilk
1/4 c. baking powder
1 T. salt
1 ½ c. shortening*
In large bowl combine dry ingredients and mix well. Cut in shortening until mixture resembles coarse crumbs. Store in a tightly closed container and use in 1-2 months. Makes 10 cups.
* You can use butter or coconut oil in place of the shortening- but store mix in the fridge. There may be some changes in finished baked foods.
Biscuit Mix 2
10 c. flour
½ c. sugar
1/3 c. baking powder
1 T. salt
2 c. shortening
Mix dry ingredients well. Cut in shortening until it resembles coarse crumbs. Store in an airtight container and use within 3 months. Makes 13 cups.
Aquafaba – Egg Free Meringue
Aquafaba is a meringue substitute, using the liquid from a can of garbanzo beans instead of egg whites. Handy for people allergic to eggs and for vegans, too. Not sure who figured this one out, but it is a fun and tasty substitute.
liquid from a can of garbanzo beans
2-3 t. cream of tartar
sugar to taste- granulated or powdered
1 t. vanilla – or other flavoring- optional
In mixing bowl, place liquid and cream of tartar and beat until mixture looks foamy and thick. Sweeten with sugar, a few tablespoons at a time until desired sweetness is achieved. The longer you whip, the better this works. Whip for at least 10 minutes. Add flavoring, if using. You can also add food coloring, if you like. Makes about 2 cups. Store in fridge. For best results, place finished aquafaba in a strainer and prop over a bowl until you are ready to use it. It seems to hold up better this way. Any liquid that forms, will drip off into the bowl below.
Taco Seasoning
4 t. onion powder
3 t. chili powder
1 t. cornstarch
1 t. garlic powder
1 t. cumin
½ t. oregano
1/8 t. cayenne pepper
Mix and store in a cool, dry place. This is the same as 1 packet of taco seasoning mix.
Homemade “Corn” Syrup
2 cups granulated sugar
3/4 cup Water
1/4 tsp. Cream of Tartar
dash of salt
Combine all in a large, heavy stainless steel pot. Stir and bring to a boil. Reduce heat to a simmer and cover with lid for 3 to 4 minutes to get the sugar crystals off the sides of the pan.
Uncover and cook to softball stage, 238 to 240 degree’s F. or when a small amount is dropped into cold water and does not hold its shape; stir constantly. Cook for another minute.
Cool and store in covered jar at room temperature, will keep well for 2 months at room temperature.
For dark corn syrup add 1/4 cup molasses
Chocolate Substitutions
To substitute cocoa for unsweetened chocolate in a recipe combine 3 tablespoons of cocoa and 1 tablespoon of fat.
Unsweetened chocolate can be turned into semi sweet chocolate by adding 1 tablespoon of sugar to each melted ounce. Three ounces of unsweetened chocolate and 3 tablespoons of sugar will equal 4 ounces of semi sweet chocolate.
Homemade Tortillas


If you never made tortillas because you thought they were too hard to make, I hope I can change your mind. Tortillas are pretty easy to make. They only have a few ingredients- although you can get creative and add more stuff. The dough is simple enough. Once made, you just need to roll it out into circles. Heck, you only need to roll them into something resembling a circle. They will taste the same, even if they aren’t perfectly round.
Cooking involves a hot skillet and 30 seconds per side. The flavor and texture are so much fresher than most of what you can buy. Certainly fresher than what is at the local grocery store.
While it is easier if you have a tortilla press, I roll mine out by hand all the time. You could also use a pasta machine for rolling- although that will limit their width.
There is a little fat in most recipes- traditionally lard- but you have wiggle room here, too. I used coconut oil and was very happy with the taste and texture. So here are three recipes for tortillas- corn, wheat and whole wheat.
Corn Tortillas
1 3/4 cups masa harina ( corn flour) it is finer than cornmeal and will give you a nicer end product
1 1/8 cups hot water
In a medium bowl, mix together masa harina and hot water until thoroughly combined. Turn dough onto a clean surface and knead until pliable and smooth. If dough is too sticky, add more masa harina; if it begins to dry out, sprinkle with water. Cover dough tightly with plastic wrap and allow to stand for 30 minutes.
Preheat a cast iron skillet or griddle to medium-high. Divide dough into 15 equal-size balls. Using a tortilla press, a rolling pin, or your hands, press each ball of dough flat between two sheets of plastic wrap. Immediately place tortilla in preheated pan and allow to cook for approximately 30 seconds, or until browned
and slightly puffy. Turn tortilla over to brown on second side for approximately 30 seconds more, then transfer to a plate. Repeat process with each ball of dough. Keep tortillas covered with a towel to stay warm and moist until ready to serve.
Whole Wheat Flour Tortillas
1 cup all-purpose flour
4 cups whole wheat bread flour
1/2 cup fat, you could use lard, shortening or coconut oil – something solid at room temp- not oil
2 tablespoons salt
1 1/2 cups boiling water
flour for rolling
In a large bowl, stir together 1- cup all-purpose flour, whole wheat flour and salt. Rub in the fat by hand until the mixture is the texture of oatmeal. Make a well in the center, and pour in the boiling water. Mix with a fork until all of the water is evenly incorporated. Sprinkle with a bit of additional flour, and knead until the dough does not stick to your fingers. The dough should be smooth. Make balls the size of golf balls, about 2 oz. each. Place them on a tray, and cover with a cloth. Let stand for at least 1 hour, or up to 8 hours. Heat a griddle or large frying pan over high heat. On a lightly floured surface, roll out a tortilla to preferred thinness. Fry one at a time. Place on the griddle for 10 seconds, as soon as you see a bubble on the top, flip the tortilla over. Let it cook for about 30 seconds, then flip and cook the other side for another 30 seconds. Roll out the next tortilla while you wait for that one to cook. Tortillas can be refrigerated or frozen. Makes 18.
Flour Tortillas
2 c. flour
1/4 c. fat, you could use lard, shortening or coconut oil – something solid at room temp- not oil
1 t. salt
2/3 c. warm water
Combine flour and fat by cutting in to resemble coarse crumbs. Dissolve salt in water and stir into flour mixture. Form into a ball and knead on a lightly floured surface 2-3 minutes or until it is smooth. Divide dough into 12 equal pieces and wrap each in plastic wrap. Allow dough to rest 30 – 60 minutes. On lightly floured surface roll out a piece of dough into a 7-inch circle. Cook dough on griddle or in a skillet over medium high heat until puffy and golden on both sides, 1-2 minutes. Wrap in a kitchen towel and repeat process with remaining dough, stacking and wrapping as you go. Makes 12.
How to Clean Leeks

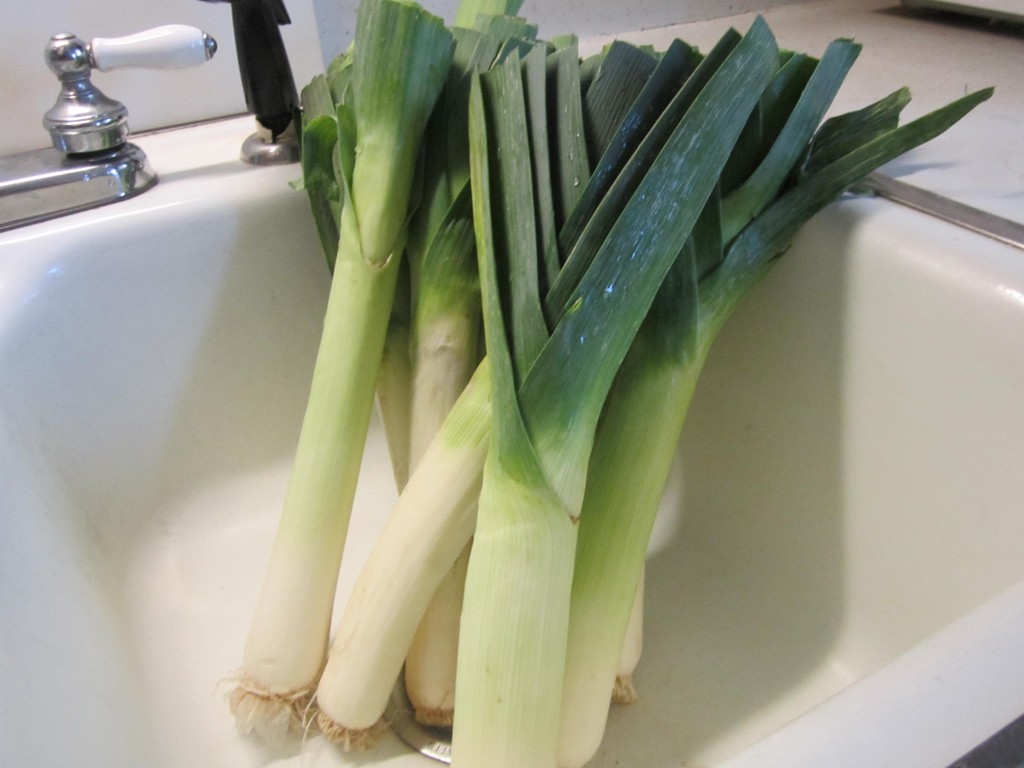
I love to cook with leeks. They have an onion flavor, but with lovely sweetness. Leeks are a wonderful addition to soups, chowders and stews. They also can be fried for a crunchy garnish.
I get asked all the time about how to prep them. Leeks are full of sand and have to be prepped properly, so you don’t get any grit in your food. The edible part is the white and light green parts. The dark green leaves are tasty, but tough. They can be used for making stock.
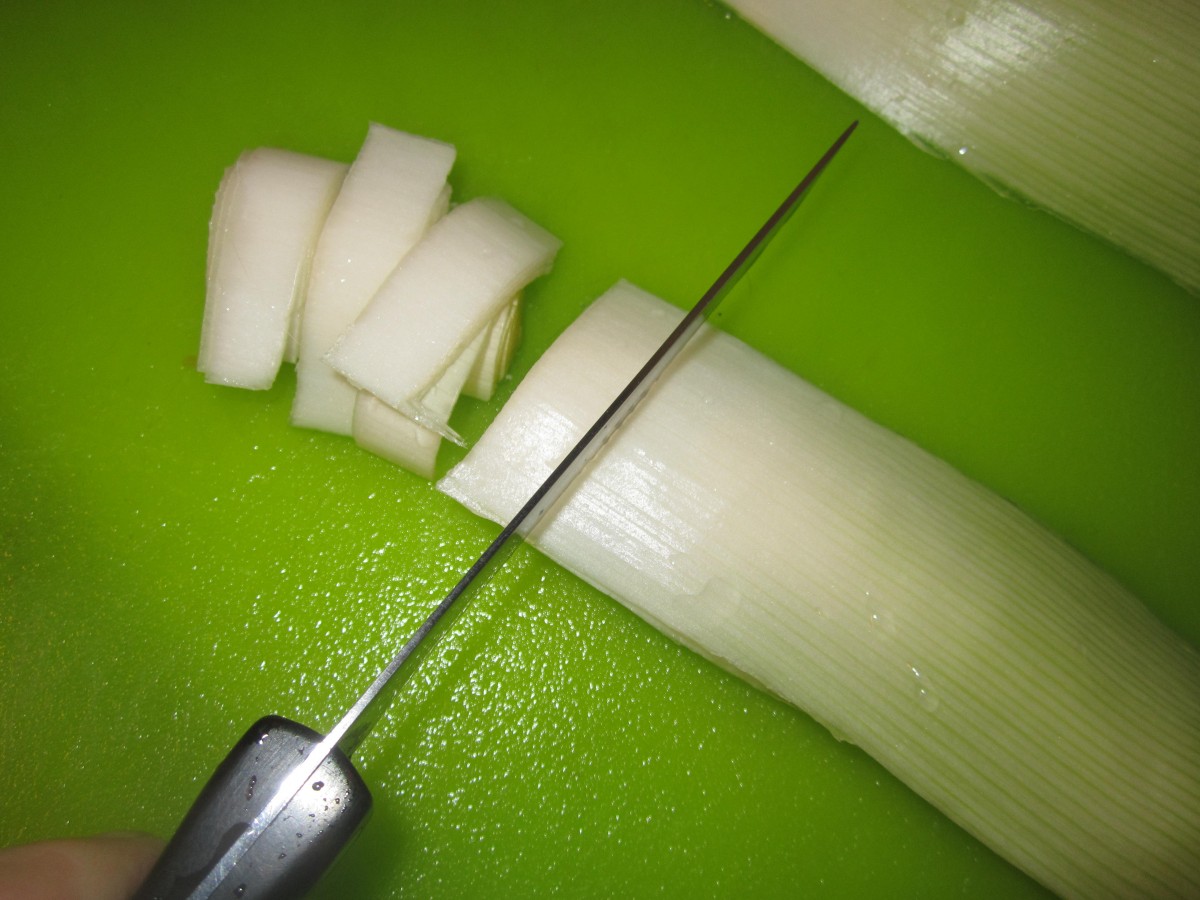
To get started, peel off the first layer of leaves. There is often a lot of sand there. Cut off the bottom about 1/2 -inch from the root. You should be able to see the rings, or layers, of the leek when you do this. Trim off any dark green parts at the top. You’ll have a trimmed leek at this point.
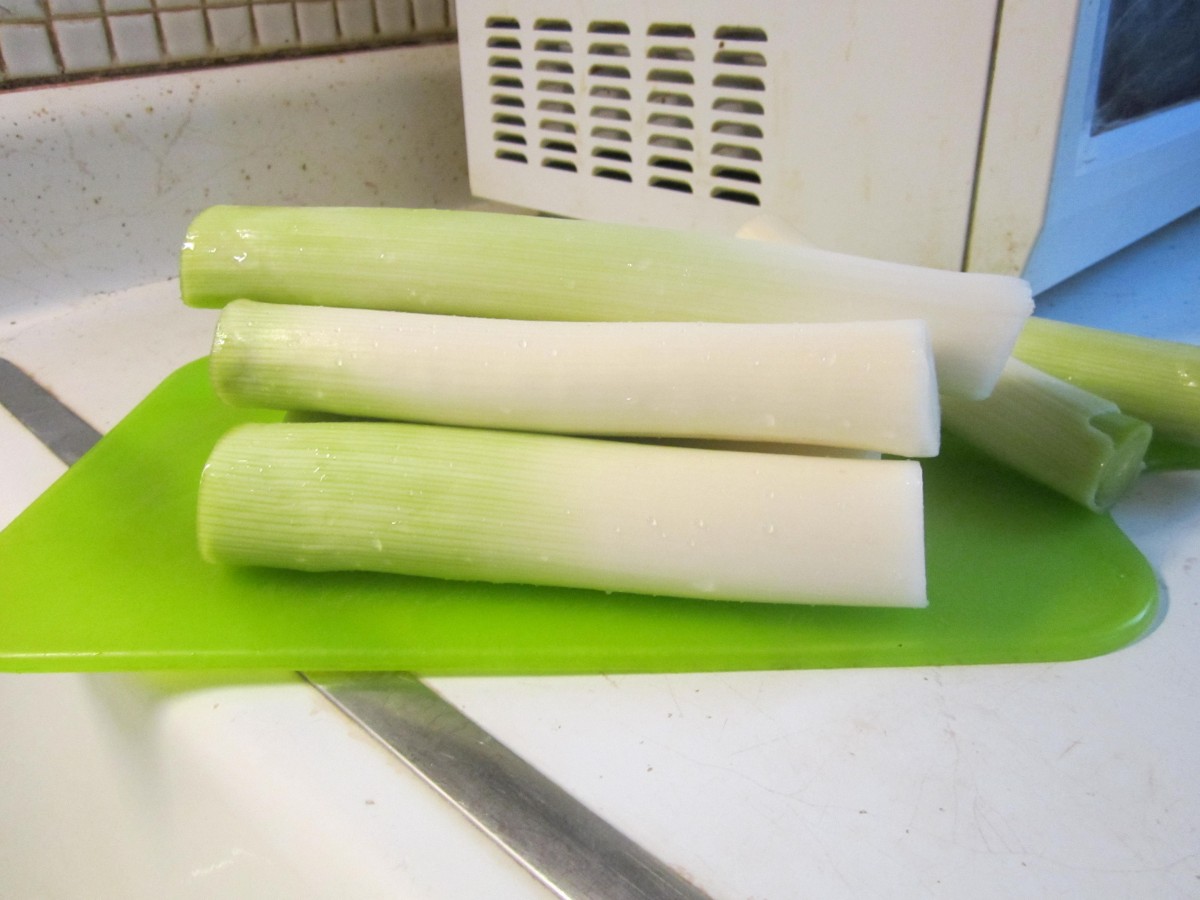
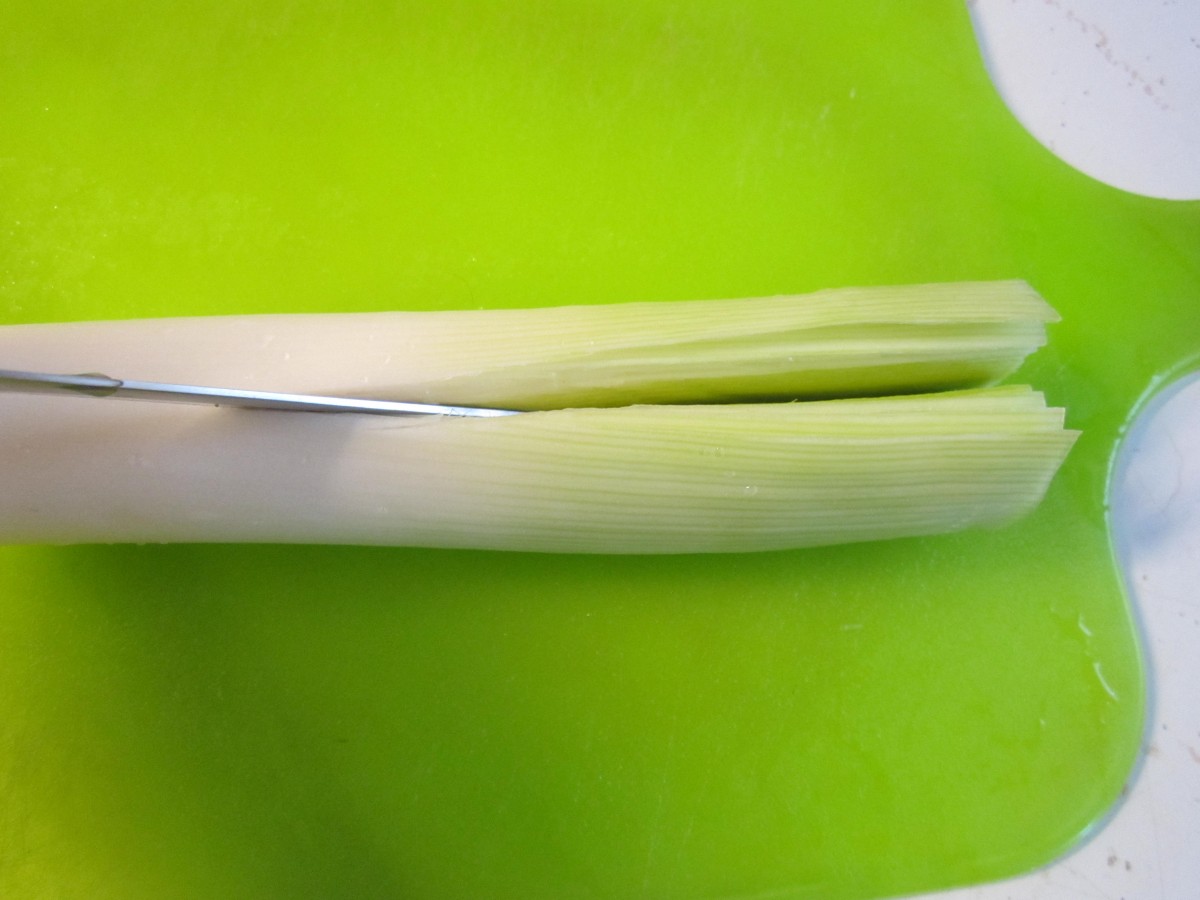
Now you have to clean it. Cut the leek lengthwise in half. Hold one half at a time under running water while fanning the leaves to dislodge any dirt. Take the rinsed halves and cut them into 1/2-inch slices. You could also cut them into thin strips, if you like.
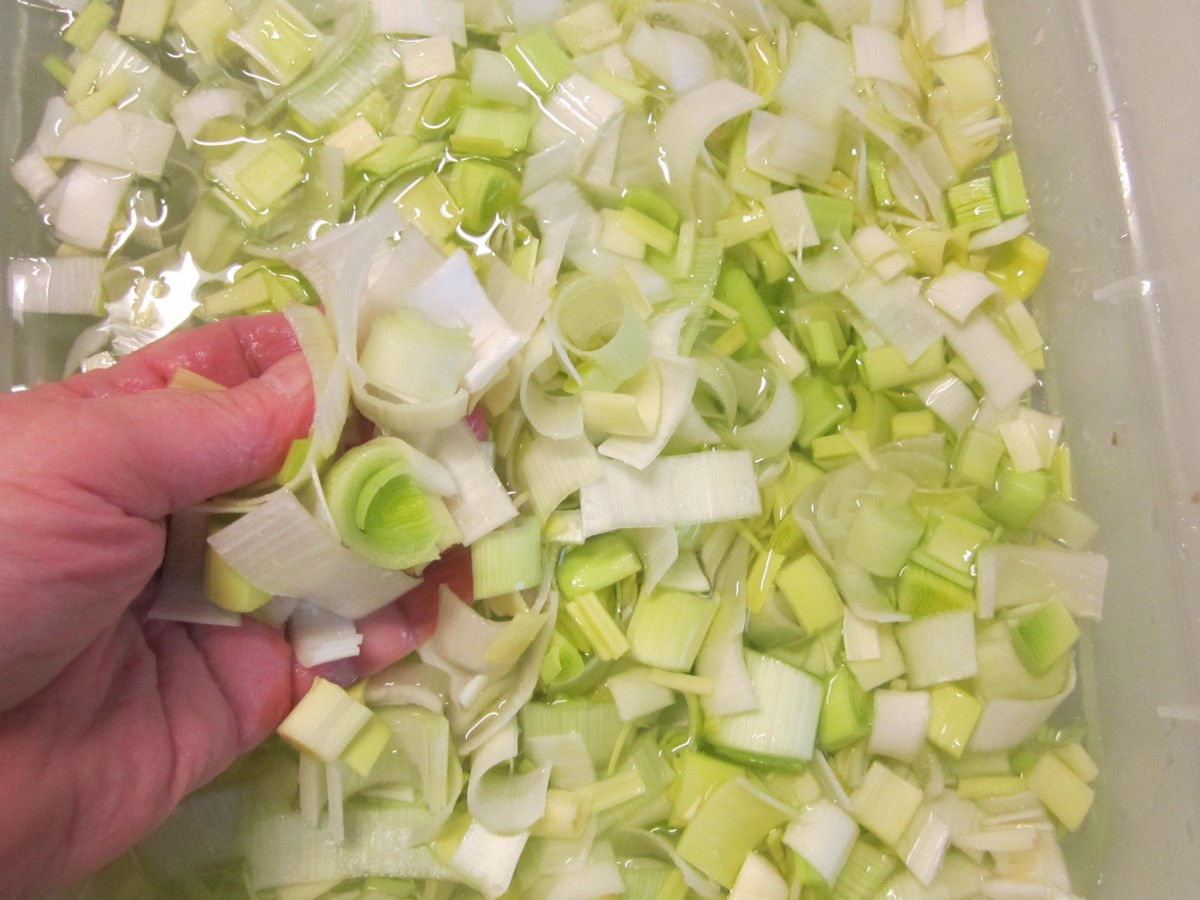
Place the slices in a large pan or bowl, filled with cold water, and agitate them to loosen any remaining sand. Use your fingers to separate the layers. Make sure the bowl is deep enough for the leeks to float, several inches from the bottom. The leeks will float and the sand and dirt will sink. Let them stand a few minutes and then lift them out of the water to drain. Any grit will be at the bottom of the bowl.
If there is a lot of grit in the bottom of the bowl, you might want to repeat the rinsing process one more time. It might sound like a lot of work, but it really doesn’t take that much time and the leeks will be completely clean. I often buy a lot of leeks when they are on sale, and clean them all at once.Then I saute the cleaned leeks in oil, and freeze for later use.
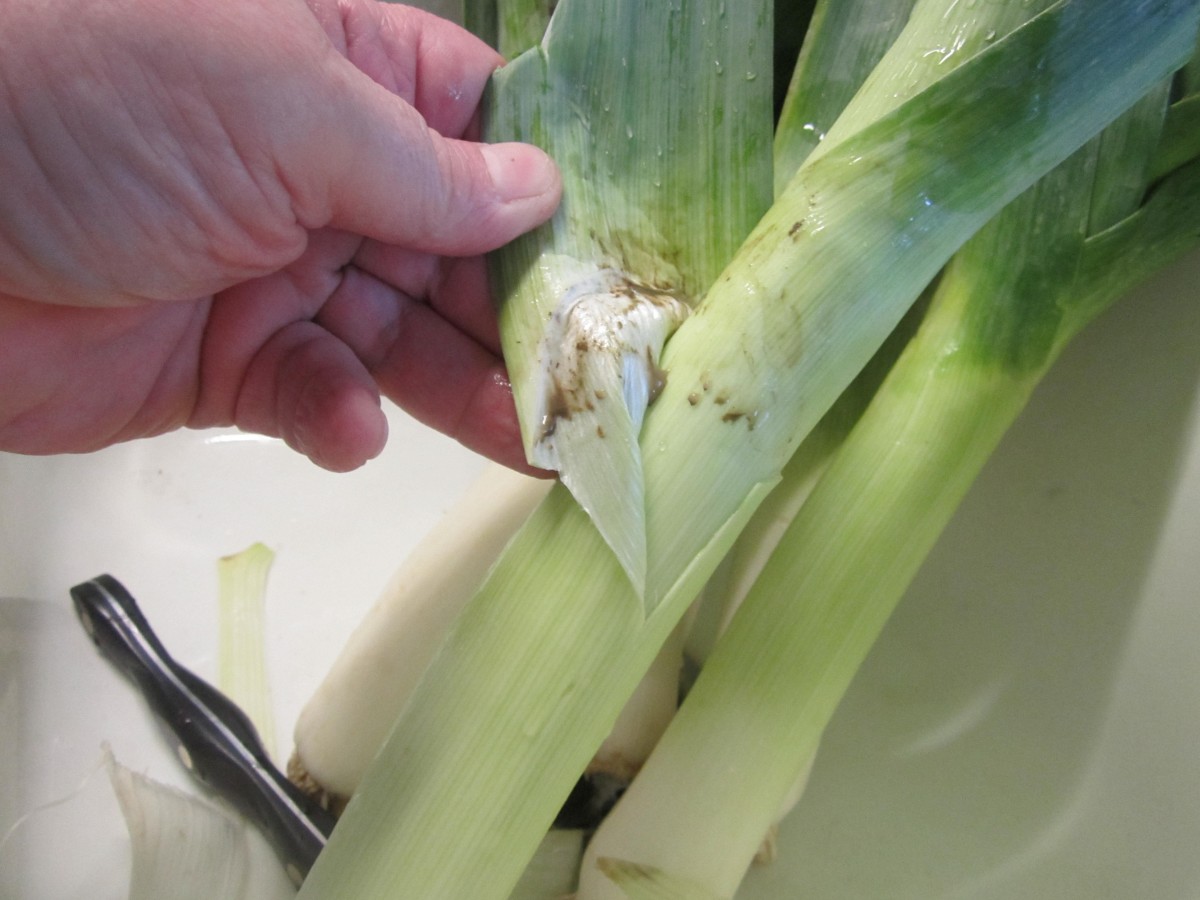
Remove one or 2 outer layer of leaves

Trim off bottom 1/2-inch above the root

Layers should be visible
Properly trimmed leeks
Split leek lengthwise

Rinse under running water while fanning layers
Cut into 1/2-inch slices
Place in large container of cold water and separate the layers
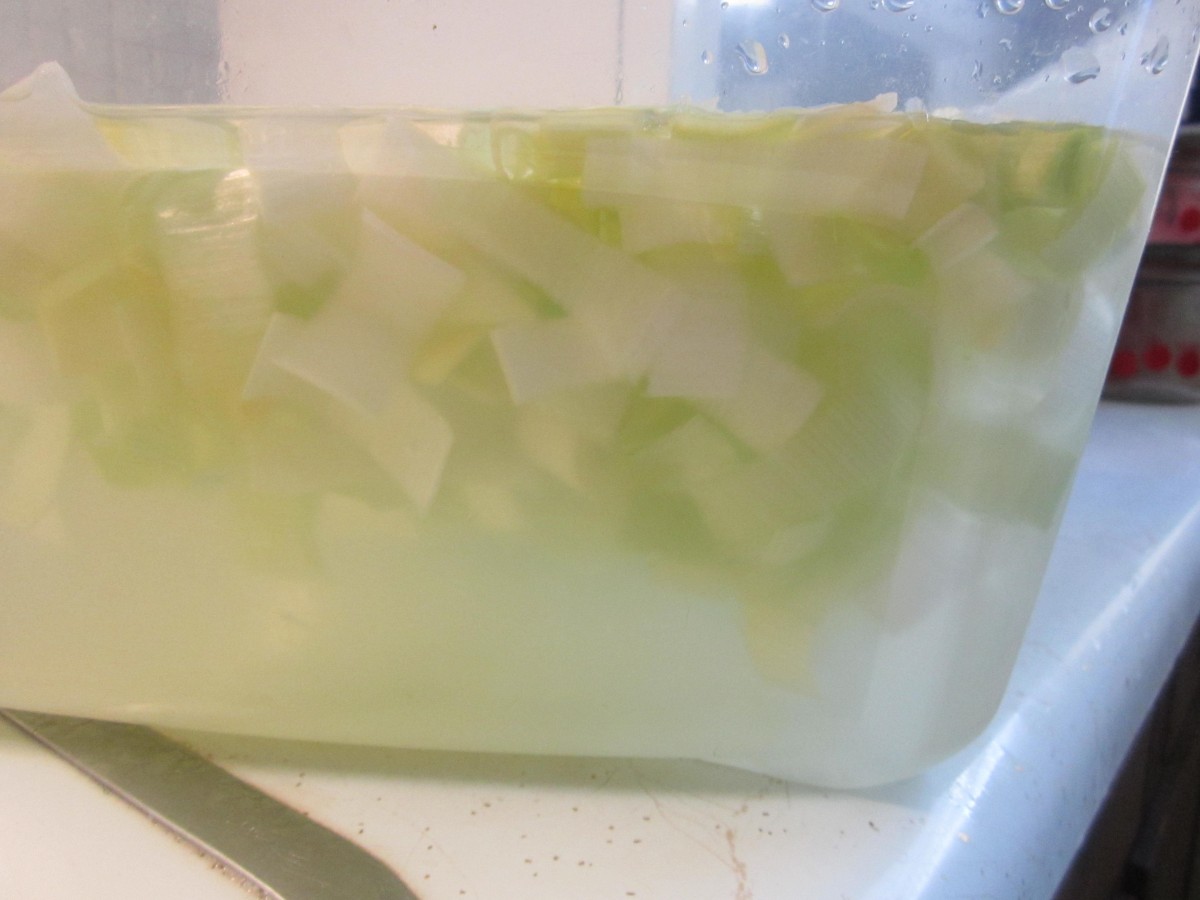
Leeks float- dirt sinks
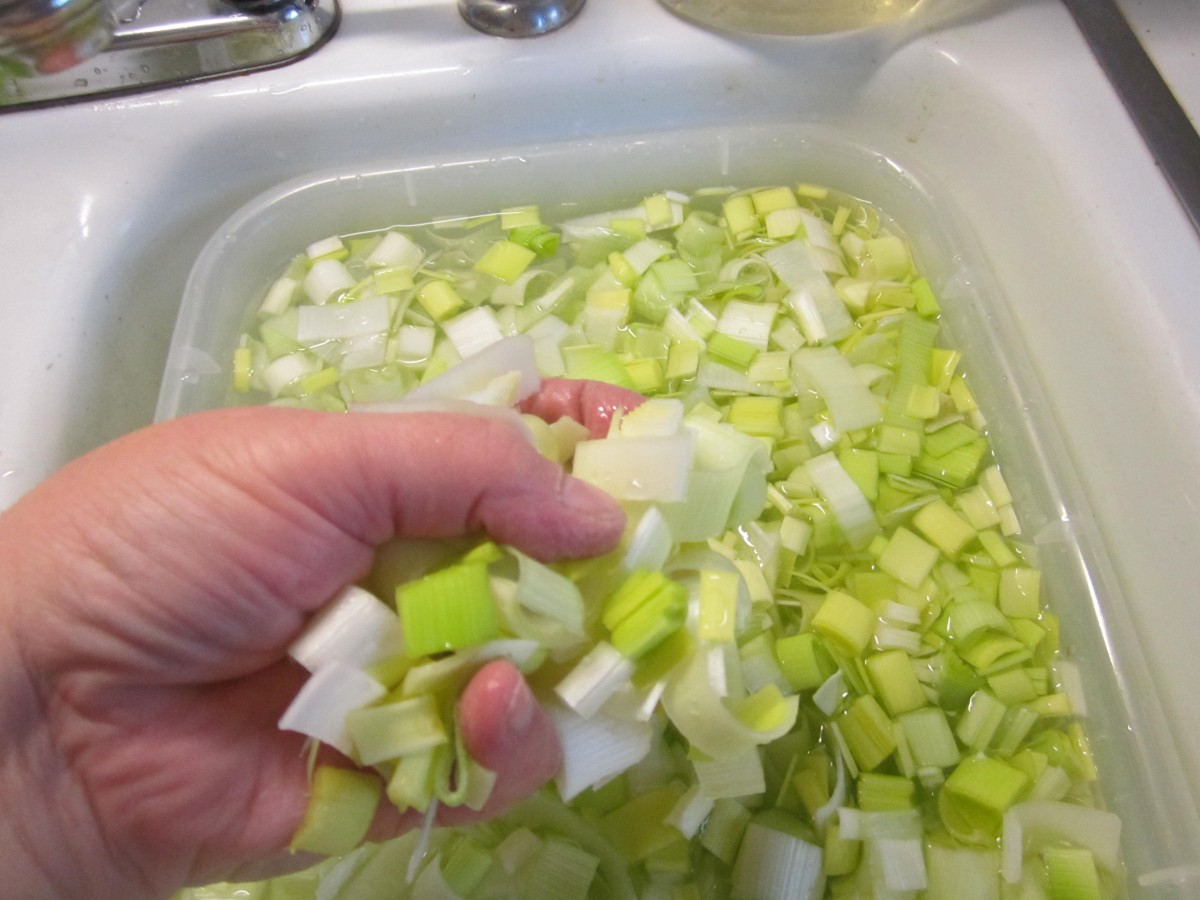
Lift clean leeks out of the water

Clean and ready for cooking
Coconut Almond Sorbet


Inspired by a friend who can’t have dairy, I made this coconut sorbet. I started with a can of coconut milk, added some almond milk, sweetened it, and added vanilla for a little added flavor. So simple and really tasty.
It has a lot of the creaminess of a dairy based dessert. In fact, if you didn’t know, you would probably think there is some milk or cream in this sorbet, even though there isn’t.
Looking forward to making some for my vegan niece the next time she comes to town.
Coconut Almond Sorbet
1 can (13.5 oz.) coconut milk
1 c. almond milk
¼ c. sugar- or to taste
2 t. vanilla
Combine all ingredients in bowl and stir until sugar is dissolved. Place in an ice cream maker and freeze according to manufacturer’s instructions. Makes 1 quart.
Note: If you don’t have an ice cream machine, you can freeze the sorbet in a shallow tray. Once frozen, remove from freezer and let it soften a few minutes. Break into chunks and process in a food processor to soften. Return to freezer until ready to eat.
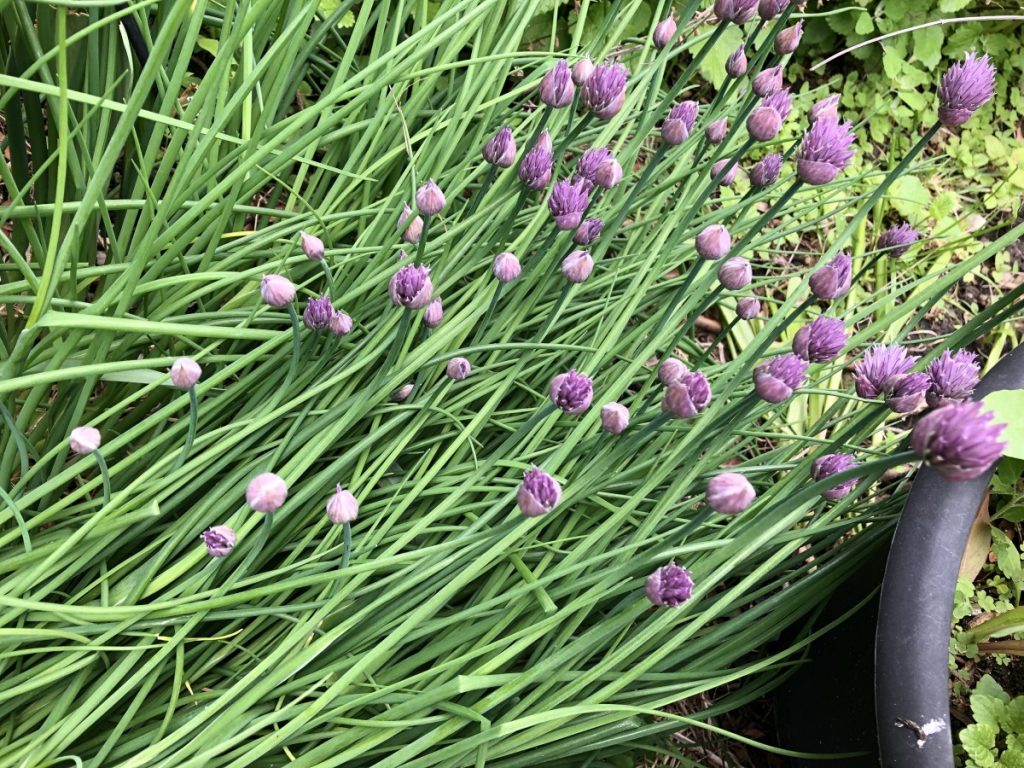
Chives- How to Use- How to Grow


What’s not to love about chives? This allium family herb is an easy to grow perennial. With little effort, you will be rewarded with onion-flavored leaves and blossoms year after year.
When the chives are first up in my garden I want to use them in everything. They will be around all season, but that first Spring harvest is always my favorite.
Their delicate onion flavor goes well with so many dishes. I enjoy cooking with the blossoms, too. Anyplace you might use green onions, you can use chives. I add them to dips, salad dressings, soups, veggie dishes. You get the idea. Same thing with the flowers. Toss them in any dish where you want a mellow, onion flavor. I have a friend who likes to dip the blossoms in batter and deep fry them. Yum!!
Chive Crepes with Crab Filling
Chives add a pretty color and wonderful flavor when used in crepes. I made a crab filling, but you could fill them with any number of savory ingredients. This is a great dish for brunch, lunch or breakfast.
3/4 c. flour
1/8 t. salt
3 eggs, beaten
2 T. melted butter
3/4 c. milk, approximately
1/3 c. fresh chives*
Butter or oil for pan
In blender mix together flour, salt and eggs until smooth. Add butter, milk and chives and blend until batter consistency is that of cream. Let stand for 30 minutes before using, or can be refrigerated, covered, overnight. Mix well, just before using.
Heat 6 or 7 inch skillet. Brush with butter or oil and pour in about 2 teaspoons of batter, tipping pan to cover bottom of pan completely with batter. Cook until edges start to brown, turn over and cook until lightly browned (about 1-2 minutes per side.)
Crepes can be made day ahead or even frozen between sheets of waxed paper and frozen. Makes 12.
When ready to serve: Crepes can be filled ahead or guests can fill their own
* You can use other combinations of fresh herbs like parsley, thyme, cilantro.
Crab Filling – enough for 6-8 crepes
2 T. butter
1/2 c. minced onion
3 T. flour
1 c. milk
Salt and pepper to taste
1 (6-oz.) can crab meat, drained, or 1 c. cooked shrimp
1 c. shredded mild cheese, I used Fontina
Chopped chives
Heat butter in skillet and cook onions until tender. Add flour and mix well. Stir in milk and seasonings and cook until sauce is thickened and bubbly. Stir in seafood and heat through. Spoon some of this mixture onto a crepe. Add some cheese and roll up. Garnish with chopped chives. Makes 6-8.
Chive Butter
I also like to make Chive butter. The recipe is pretty simple.
3 T. snipped chives
½ t. lemon zest
1/2 c. (1 stick) softened butter
Mix all ingredients until well combined. Chive butter can be stored in a jar, or wrapped in plastic wrap and chilled or frozen until ready to use. Good with fish, poultry, carrots, and potatoes.
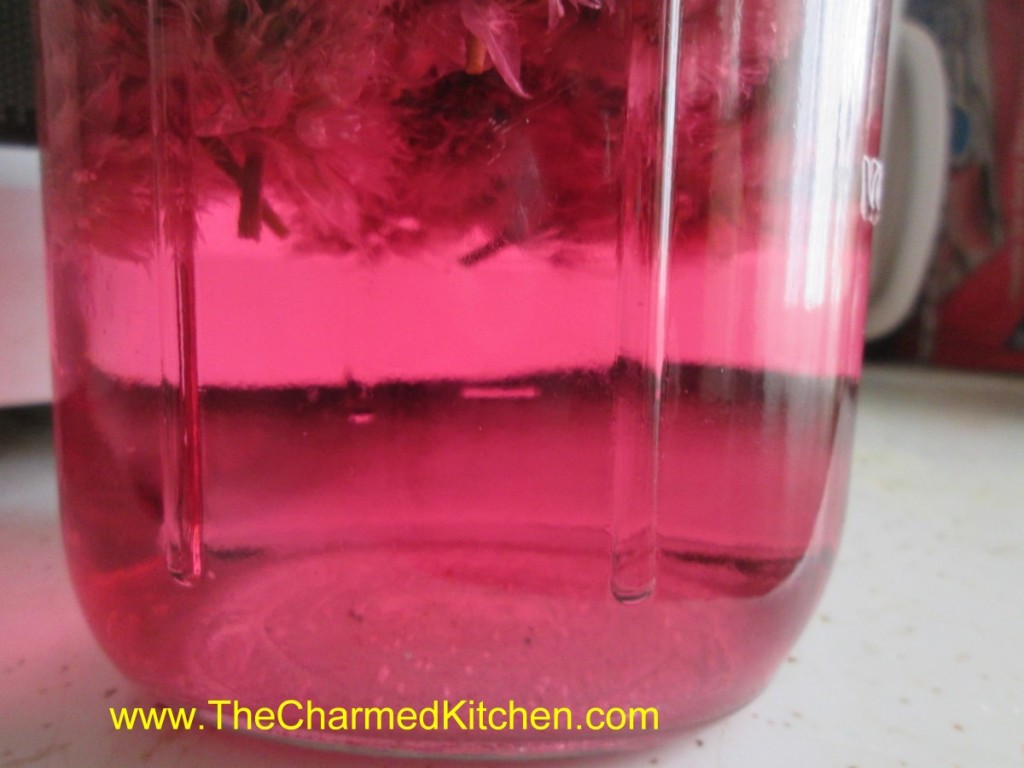
Chive Blossom Vinegar
One of the ways I preserve my herbs every year, is by using them to flavor vinegar. It is easy to do and you’ll have great flavored vinegar to use all year round. You can use the vinegar in salad dressings or in marinades and sauces. Chive blossom vinegar is one of my favorites. I often use white wine vinegar but you can use red wine vinegar, apple cider vinegar or even white vinegar. The blossoms give the vinegar a beautiful color, too.
All you need is a clean jar, chive blossoms and vinegar (5% acidity). The acidity is listed on the label. For every cup of blossoms add 2 cups of vinegar to the jar. Close the jar and put it in a cupboard for a couple of weeks, or longer. When ready to use, strain out the blossoms. Pour the strained vinegar through coffee filters or layers of cheesecloth to get out any sediment. The end result is clear and quite pretty. Store in a cool, dark place for best color and flavor.
Freezing Chives
An easy way to preserve your chives is just to freeze them. Take freshly washed and dried chives and chop them up. You can use a knife, scissors or food processor. Place the chopped chives on a tray or baking sheet and place in the freezer to harden a bit, before transferring to a freezer container or freezer bag. By pre-freezing them before packaging, you keep them from clumping up and freezing into a green lump.
Growing Chives
When growing chives, a sunny, well drained spot is preferred, but chives will tolerate some shade. They prefer to be in the ground, but I have chives that are in pots and thriving. I even have chives that popped up in one of my hanging baskets. They return every year.
Chives require little maintenance, but there is one annual clean-up job: stem removal. At first glance, chives looks like just leaves, but there are stems in there. Each purple chive blossom that appears in Spring is on a stem. While the stems are edible, they are also tough and woody, compared to the leaves. I like to remove the stems once the chives are finished blooming. Even in a large clump of chives, this job only takes about 5 minutes.
First, identify the stems. They either have a chive blossom on them- or they will have a brown tip from where the blossom was removed. When you touch a stem, you’ll be able to tell right away that it is tougher than the leaves. Pinch the stem between your fingers and run your fingers down to the base of the stem. Give a little tug and the stem pops right out. Repeat this with the rest of the stems. Kind of boring, but only take a few minutes. Once done, your plant will be all tender leaves.
English Muffins


If you haven’t made them before, English muffins are pretty simple to make. They are not baked in the oven, like most other breads. Rather, they are “baked” in a skillet over medium heat. It is the same way crumpets are cooked. I really like the flavor of a freshly made English muffin.
I decided to make a multi-grain version this time. I used spelt flour, but you could use whole wheat flour instead. Here is the recipe. If you only have white flour, you could use it for all the flour in this recipe.
Multi-Grain English Muffins
2 packages yeast
2 ½ -3 cups bread flour
1 ½ c. spelt flour, or whole wheat flour
½ c. oat bran
¼ c. wheat germ
2 T. sugar
2 t. salt
2 c. milk
¼ c. oil
Cornmeal
In large bowl combine yeast, 1 cup of the bread flour and remaining dry ingredients. Warm milk and oil and add to flour mixture and beat 3-4 minutes. By hand, stir in enough flour to make a moderately stiff dough. Turn onto floured surface and knead until dough is smooth and elastic, about 8-10 minutes.
Place dough in greased bowl and turn to grease top. Cover and allow to rise until doubled, about 1 ¼ hour. Punch dough down and allow to rest 10 minutes. On lightly floured surface roll dough to just under ½ inch thick. With 4 inch biscuit cutter cut out rounds of dough, re-rolling and cutting scraps. Dip both sides in cornmeal and cover, allowing to rise about 30 minutes. In ungreased griddle pan or skillet cook muffins over medium heat, turning frequently, until they are golden on both sides and cooked through. This will take about 20-25 minutes. To serve, split and toast. Makes 12-15.
Note: I used a 3-inch biscuit cutter and ended up with over 20 muffins.

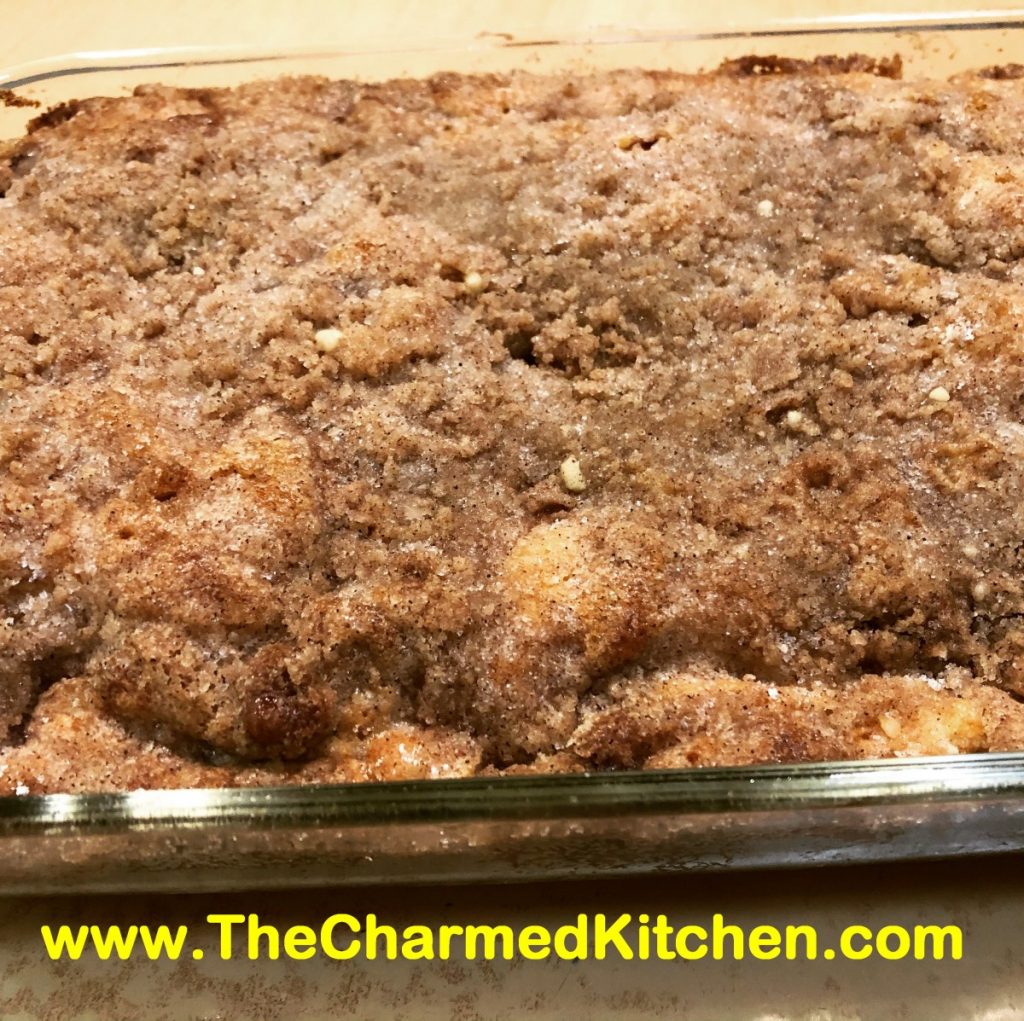
Apple Crumb Cake


Tender cake and a crunchy topping seem like the perfect combination. Most days I would rather have a crumb topping on a cake than frosting.
This recipe hits all the right notes. Sweet with apple chunks throughout, a nice touch of cinnamon and that crumb topping. An added bonus, it is easy to make.
This time I baked it in a 7×11 inch glass pan. I have also baked this cake in 8×8 and 9×9 pans. The 8×8 pan may take a few more minutes to bake.
Apple Crumb Cake
For cake batter:
2 c. flour
2 t. baking powder
½ t. salt
½ stick (¼ cup) butter, softened
¾ c. sugar
1 egg
½ c. milk
2 c. chopped peeled, cored apples
For topping:
½ c. sugar
¼ c. flour
2 t. cinnamon
½ stick (¼ c. butter, chilled and cut into bits)
Combine dry ingredients and set aside. In mixing bowl with electric mixer, beat butter and sugar until light and fluffy. Beat in egg and milk. Add flour mixture gradually until just mixed in. Fold in apples. Grease and flour an 8 or 9-inch pan and add prepared batter. Combine topping ingredients until they resemble coarse crumbs. Sprinkle over the batter in pan and bake in a preheated 375-degree oven for 35-45 minutes. Use toothpick to test.
Note: I used a 7×11 inch pan and it worked fine.
Orange and Oatmeal Scones


I love fresh scones, still warm from the oven. Since it is citrus season, I decided to make scones with some seasonal orange flavor. These scones have a nice, crunchy outside and crumbly, tender middle.
The orange juice and orange zest gives them a wonderful flavor. The oatmeal gives them a lovely texture and the raisins add just a bit if sweetness. A very nice combination.
These are great served warm, topped with sweet butter and jam. They are perfect for breakfast or brunch.
You can also use these scones as the base for a berry shortcake. Split, topped with sweetened berries and some whipped cream, they turn into a simple and tasty dessert.
Orange and Oatmeal Scones
2 1/2 cups flour
2 cups rolled oats
1 cup sugar
1 teaspoon salt
1 tablespoon baking powder
1/2 teaspoon baking soda
1/2 cup very cold, unsalted butter – cut into chunks
1 egg
1/2 cup orange juice
2 t. grated orange peel
1 cup raisins – plumped and well dried
Glaze
milk, sugar, orange zest
Line a large baking sheet with parchment paper (double two sheets if you have them – one inside the other). Preheat oven to 425 F. In a large bowl, place flour, oatmeal, sugar, salt, baking powder, baking soda and mix together. Cut or rub in butter to make a mealy mixture. Stir in egg and orange juice. Add orange peel and raisins. Mix to make a soft dough. Turn out onto a lightly floured board and knead for a few minutes. Roll or pat out into a thickness of 1/2 inch. Using a serrated cookie cutter cut into disks or rounds. Brush with milk and sprinkle with sugar and orange zest. Bake until nicely browned – about 14 minutes. Makes about 24.
Lilac Vinegar


Since the lilacs are in bloom, I decided to preserve some of them and make lilac vinegar. As long as they are grown where chemicals haven’t been sprayed, lilacs blossoms are edible. The flavor is floral, with a touch of spice.
I use the lilac vinegar in salad dressings, marinades and in pickling. I like to add a splash to soups or chili, to brighten them up. I also use lilac vinegar as a base for lilac jelly.
To make lilac vinegar, just place clean lilac blossoms in a jar and cover with red wine vinegar.* Put a lid on the jar and store in a cupboard for 10 days or longer. Ideally, you want at least one cup of blossoms for every 2 cups of vinegar- to get enough lilac flavor into the vinegar. A one to one ratio- one cup blossoms, one cup vinegar, will give you an even more flavorful vinegar in the end.
When ready to use, strain out the blossoms and discard them. Pour the vinegar through a coffee filter to get out any remaining plant material. You can transfer the lilac vinegar to a decorative bottle. It can be stored at room temperature but will hold its color longer if kept cool, even refrigerated.
* always use vinegar that is 5% acidity. You can use white wine vinegar, cider vinegar or whatever vinegar you like.
Lilac Salad
4-6 cups mixed salad greens, washed and spun dry
Olive oil
Lilac vinegar
Salt and pepper to taste
Edible flowers, optional
Place greens in a salad bowl. Drizzle with a little olive oil and toss until leaves look glossy. Drizzle with a little lilac vinegar and toss. Season with salt and pepper and toss again. Add flowers, if desired and place in serving bowls.
Cheesy Onion Garlic Bread


This is not your typical garlic bread. In this recipe, slices of bread are topped with a garlic and onion mixture, then a cheesy mixture is added. They are so good. Made these in class last night. I couldn’t find baguettes, so we used a nice Italian bread. They came out great. Substantial enough to make a meal if served with a salad.
Cheesy Onion Garlic Bread
2 French baguettes, cut into 3/4 inch diagonal slices
1 large minced onion
8 cloves minced garlic
1/4 cup butter
2 cups shredded mozzarella cheese
1/2 cup grated Parmesan cheese
1 cup mayonnaise
Preheat the broiler. Slice the French baguettes diagonally into 3/4 inch slices.
In a medium skillet over medium heat, melt the butter. Combine the onions and garlic in the skillet. Cook and stir until tender. Set aside to cool. In a mixing bowl, combine the mozzarella cheese, Parmesan cheese and mayonnaise. On a cookie sheet, arrange the French bread slices in a single layer. Spread the onion and garlic mixture on the bread slices. Spread the cheese and mayonnaise mixture over the onion and garlic mixture on the bread slices. Broil about 5 minutes, until the cheese is bubbly and slightly browned. Serve immediately.
Note: You can also bake at 450 degrees until the cheese is melted and toasted. That will take a little longer than the broiler, about 10 minutes.


